ZONKO K118 User manual

Tablet K118
Operation Manual
Please read the instructions first
Please read this Operation Manual carefully before using the equipment, so as to ensure safe
and correct use.
The instructions herein are premised on the default values of the equipment.
The images and screen shots used herein may differ from the appearance of the actual
product.
Available features and additional services may vary by equipment, software or service
provider.
Our company shall not be responsible for problems resulting from third-party applications.
All Right Reserved (2021)

Contents
Introduction.....................................................................................................................................4
Acknowledgement ............................................................................................................................................4
Introduction to the Product: ..............................................................................................................................4
Market positioning:...........................................................................................................................................4
Design principles: .............................................................................................................................................5
Detailed parameters ..........................................................................................................................................6
Getting Started ................................................................................................................................1
Introduction to Accessories...............................................................................................................................1
Install SD memory card ....................................................................................................................................1
Battery charging ...............................................................................................................................................1
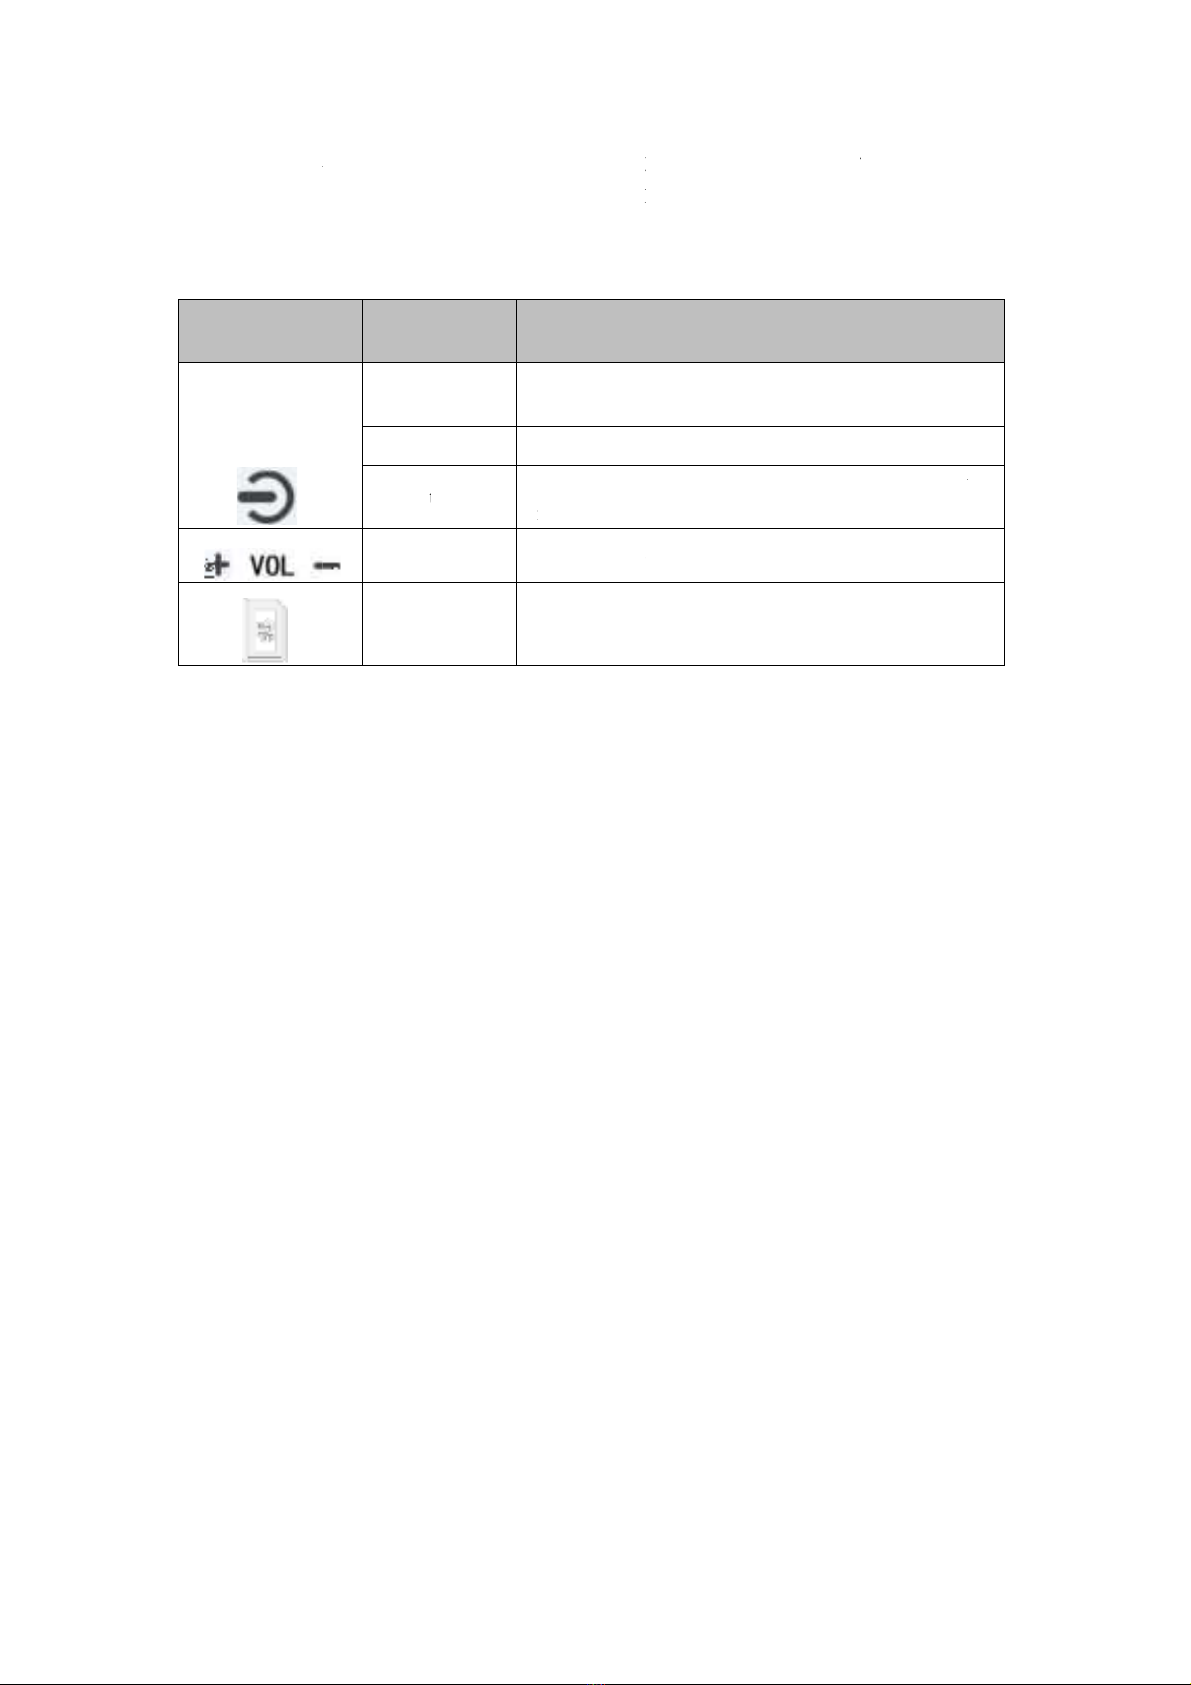
Description of buttons and interfaces................................................................................................................2
Boot wizard......................................................................................................................................3
Setting the language..........................................................................................................................................3
Setting the WIFI ...............................................................................................................................................3
Setting the date and time...................................................................................................................................4
Setting Google Services.................................................................................................................................... 4
Setting MID password ......................................................................................................................................5
Gesture operation............................................................................................................................6
Basic operation ................................................................................................................................7
Main screen ...................................................................................................................................................... 7
Status notification panel ................................................................................................................................... 8
Lock screen interface........................................................................................................................................ 8
Locking and unlocking the screen ....................................................................................................................9
Setting the screen lock mode ............................................................................................................................ 9
Setting the sleep time........................................................................................................................................9
Rotating the touch screen................................................................................................................................ 10
Entering the text.............................................................................................................................................. 10
Managing the applications.............................................................................................................................. 10
Resetting the tablet computer ......................................................................................................................... 10
Communication function.............................................................................................................. 11
E-mail ............................................................................................................................................................. 11
Network..........................................................................................................................................12
Browser .......................................................................................................................................................... 12
Play store ........................................................................................................................................................ 13
Entertainment ...............................................................................................................................13
Camera.......................................................................................................................................................13-15
File manager ..............................................................................................................................................14-16
Browsing pictures ........................................................................................................................................... 15
Playing video .................................................................................................................................................. 16
Music .............................................................................................................................................................. 16
Tools................................................................................................................................................16
Calendar.....................................................................................................................................................16-17

Clock .............................................................................................................................................................. 17
Tape recorder .................................................................................................................................................. 17
Calculator ....................................................................................................................................................... 17
Safety instructions.........................................................................................................................18
Precautions .............................................................................................................................. 18-19
Answers to frequently asked questions ................................................................................. 19-20
Warranty content ..........................................................................................................................20

1. Introduction
Acknowledgement
Thank you very much for choosing this product. K116 is a 10.1-inch tablet computer. The
main chip used is SC9863A based on AndroidTM 10.0-11.0 operating system, which is novel and
can easily expand the latest third-party applications in the market.
The product is provided with built-in functions such as, WIFI, BT, GPS, FM,which can easily
realize wireless communication and wireless network functions, and render it possible to surf the
Internet anytime and anywhere; with built-in high-precision GPS module, it can navigate by
loading map software. Multiple built-in sensors allow users to enjoy a whole new experience of
control and entertainment; built-in camera shooting and photographing, etc., lead electronic
consumption into a brand-new era of handheld Internet entertainment.
This Operation Manual systematically gives a brief introduction to the product MID, provides
detailed parameters, function description, operation method, precautions, comparative advantages
with similar products in the market, answers to frequently asked questions, warranty contents,
after-sales contact information, etc. Please read this Operation Manual carefully before using the
product MID.
Introduction to the Product:
K101 is a 10.1-inch high-definition MID tablet, which uses SpreadtrumSC9863Eight-core
main chip and core ARM Cortex-A55 MP8 1.6GHz frequency, integrates Bluetooth, WIFI,
FM and GPS modules, adopts 2GBDDR, 32GBFLASH, supports front and rear dual cameras
and dual speaker channels.
Market positioning:
Students
Employees
The elderly
After market research, to give back to the users better, the K116 MID tablet computer with
high cost performance has been researched and launched by technicians, which can be used
for online education and learning, remote office communication, and the smooth browsing
speed can be used for browsing websites, books and TV movies, so that users can experience
the visual feast of the big screen anytime and anywhere.

Design principles:
The SpreadtrumSC9863 main chip of MediaTek is a highly integrated baseband platform,
which integrates modulator and application processing subsystem and integrates Bluetooth,
WIFI, FM and GPS modules. Integrated RF solutions furnish excellent radio performance
under strict environmental conditions. The chip integrates Eight-core ARM Cortex-A55
MPCoreTM, and supports all types of startup interfaces, including parallel NAND flash
memory or EMMC, and 64-bit LPDDR2 or LPDDR3, to achieve the best performance in
operation, so that customers can have a better experience.
For a better experience, we use a 10.1-inch FHD high-definition full-view display with a
resolution of 1920*1200, so that users can experience the visual effect better.
Capacitive touch screen is used, which is made of super-A HD 300L materials, and
dust-proof cotton is added on four sides, which can support up to 10 touch points.
Ultra-large battery life of 6000MAH, protection boards made with clever workmanship and
double MOS tubes make the effective capacity of the battery more durable and international
warranty services are covered globally.
Bluetooth 4.2 is used
Supporting GPS module to navigate and locate
Supporting FM

Detailed parameters
Type Name Parameter
Product parameter
Model K116
CPU type spreadtrum SC9863A CortexTM A55 MP8 1.6Ghz
CPU speed 1.6GHz
GPU speed IMG GE8322
Memory 2GB
Hard disk 32GB
System 10.0
Display 10.1-cunFHD 1920*1200/800*1280
Camera Front200/500/ back 500/1300 with flash
Click screen 5-point touch/G+G
WIFI 802.11b/g/n
Bluetooth 4.2
GPS Support
Android system 10.0/11.0
USB interface Supporting type-C/OTG
Battery 6000 mA /3.7V
Specifications of
charger
Input:AC 100V-240V, output:DC 5V2A
Specifications of
headphones
3.5mm headphones LRGM version I (interface
L-R-G-M)
Memory card Supporting 128GB (max.)
Size 240MM*167.5MM*9.3MM
Weight 480g-500g
Other parameters
Interface style Google
Language Supporting multiple languages
Audio MP3,MP2,AMR,AWB,APE,M4A,MIDI,
OGG,WAV,FLAC,3GP (Need Licence:AAC, WMA)
Video MPEG4-SP,
H.264/AVC,H.263,3GP,3G2,MP4,MKV,AVI,
Input method Standard Andriod soft keyboard (supporting third-party
input method)
Google,Android,Google Play and other marks are trademarks of Google LLC.

1
Getting Started
Introduction to Accessories
Check whether there are the following items in the packaging box of the product:
MID equipment
Operation Manual
Power adapter
type-CUSB cable
Or other accessories
For other accessories, please contact the dealer for purchase
Install SD memory card
This equipment comes with built-in storage. If it is necessary to store more files, such as music,
ringtones, wallpapers, videos, and short messages, the memory space can be expanded by
inserting a memory card. MicroSD memory card is used for this equipment. The steps for
installing the memory card are specifically as below:
1. Make the gold contact of the memory card face down;
2. Push the memory card into the card slot until it locks into place
Our company follows recognized standards for memory cards, but some brands may not be fully
compatible with the equipment.
Battery charging
Before using the equipment for the first time, confirm that the equipment has enough power:
1. Plug the type-CUSB plug at one end of the charger into the type-CUSB interface of the
equipment, and plug the other end of the charger into a standard power socket for charging.
2. When the equipment is shut down and charged, charging animation will appear, and when the
equipment is fully charged, a picture of fully-charged battery will be displayed.
3. If charging is not displayed when the charger is plugged in, please check whether the charger
can be used normally.
Note:
If the equipment is not used for a long time, the battery power will be exhausted. At this
time, the battery needs to be charged for a period of time before being powered on.

De
Ic
o
It is o
n
cause
b
scriptio
n
o
n
n
ly allowed t
o
b
attery dama
g
n
of butt
o
Fun
c
Startu
p
shutd
o
Lock
s
Restar
t
Vo l u
m
Memo
o
use charger
s
g
e or damage
o
ns and i
c
tion
R
p
&
o
wn
P
s
creen
T
t
L
a
n
m
e button
A
ry card I
n
2
s
approved b
y
to your equi
p
nterface
s
R
emarks
P
ress and hol
T
he screen c
a
L
ong press f
o
n
d restart th
e
A
djust the v
o
n
sert the me
m
y
our compa
n
p
ment.
s
d for 3-5 se
c
a
n be locked
o
r 8-10 seco
n
e
equipment
o
lume
m
ory card a
s
n
y. Unautho
r
c
onds to po
w
with a short
n
ds can forc
s
shown in t
h
r
ized charger
s
w
er on
press
ibly shut do
w
h
e icon
s
will
w
n

3
Boot wizard
Setting the language
Click ENGLISH(UNITED STATES), then select the required national language, and then click
START to proceed to the next step.
Setting the WIFI
Please don't link WIFI here, don't enter your password, and please select Set Up offline to operate.

4
Setting the date and time
Choose to adjust the local time zone, date and time, and then click Next to proceed to the next
step.
Setting Google Services
Select the Google Service users want to open or close, and then click More to proceed to the
next step.

5
Setting MID password
Set the PIN password. If users don't need to set the PIN password, click Skip and select Skip
anyway to enter the main interface.

6
Gesture operation
Users can directly operate icons, buttons, keyboards and interfaces on the touch screen with your
fingers
Including the following operations:
Click:
Click the screen slightly once with your fingers
For example, click an application icon to open the application.
Long press:
Click the target for more than 2 seconds
For example, press and hold in the blank area of the desktop to enter the editing
interface.
Slide:
Slide on the screen with fingers
For example, sliding left and right on the main screen can switch screens.
Drag:
Press and hold the target, and then drag it to another position on the screen
For example, press and hold an icon on the main screen to drag it to other
positions.
Other locations.
Zoom:
Close the two fingers to reduce the display size of the target and separate the two
fingers to enlarge the target
For example, when viewing a picture, this operation can enlarge and reduce the
picture.

7
Basic operation
Main screen
After booting and unlocking, users can see the main screen, which contains the following
contents:
At the top of the screen is the status notification bar, which displays battery power, network
signal, time and other icons. Pull down from the top to open the status notification bar panel;
Indication icons, widgets, application shortcuts and other items can be seen in the
main-screen display area;
At the bottom of the screen is an operation bar with three operation keys: [Back Key], [Home
Key] and [Last Run]
Execute the corresponding function after touching;
The main screen extends beyond the screen width, and you can switch to different pages by
sliding left and right on the desktop with your fingers;
Users can enter the APP application interface by sliding from bottom to top in the main
screen.
1 Return key Go back to the previous interface, and if the on-screen keyboard is
open, this operation will close the keyboard.
2 Home key Back to the main screen

8
3 Last run Display a list of recently opened applications, which can be
accessed quickly after being touched
4 Main screen Pull up in the main screen to enter the APP application interface
5 Status
notification
bar
Display prompt information and equipment status icons, and pull
down to expand the status notification panel
Status notification panel
Click the top of the screen and pull down to open the panel of the status notification bar, as
displayed in the following figure.
Users can view the system notification daily, and view the specific notification content
by pulling it down
Pull down to click the icon to quickly adjust some settings, such as screen brightness,
opening/closing flight mode, etc.
Lock screen interface
After booting and entering the system, the first thing the user sees is the lock screen interface
Slide up to unlock the screen and enter the main interface

9
Locking and unlocking the screen
Locking the screen:
Automatic screen lock: when the equipment is not used for the set sleep time, the
equipment will automatically lock the screen;
Manual screen lock: lock the screen manually by pressing the power button briefly.
Unlocking the screen:
When the screen is locked, slide the screen up to unlock it
Setting the screen lock mode
Users can choose different ways to lock the screen in the settings, so as to enhance the security of
the equipment.
Select SettingsSecurityScreen Lock in the application list to select:
None: never lock the screen;
Sliding: users can unlock the screen without a pattern, PIN or password;
PIN code: a digital PIN code is required to unlock the screen. After setting, when the
equipment prompts users to enter the PIN code, enter the PIN code to unlock the screen;
Pattern: users need to unlock the pattern before unlocking the screen. Draw the pattern
based on the screen prompts. After successful drawing, when the equipment reminds
users to draw the unlocking pattern, draw the previously set pattern to unlock the screen;
Password: password is required to unlock the screen. When the equipment prompts
users for a password, enter the password to unlock the screen.
Setting the sleep time
Enter the SettingsDisplaySleep, and users can set the delay time before the screen is

10
automatically locked. If users don't perform any operation on the equipment within the set time,
the screen of the equipment will be automatically locked.
Rotating the touch screen
This equipment is provided with a built-in gravity sensor. When rotating the equipment, the
interface will automatically rotate in the direction of the equipment.
If users want the interface direction to remain unchanged, pull down the status notification bar of
the system and set the automatic rotation screen to close.
Entering the text
Users can use the on-screen keyboard to input text, click the text input area to open the on-screen
keyboard, and click in the action bar to close the on-screen keyboard; if it is necessary to
switch the input method, users can change the input method in SettingsLanguage and Input
Method; they can use the copy and paste function to input text quickly.
Managing the applications
Select SettingsApplication in the application list to enter application management
1. To uninstall a downloaded application, click Downloaded, select the desired program, and then
click Uninstall.
2. To pause an application, change settings, or manage other options, select All or Running.
Resetting the tablet computer
Select SettingsSystemResetting OptionRestoring Factory Settings in the application list,
and users can restore the tablet computer to the factory settings and erase all data stored in the
equipment.
Warning: this operation will delete all personal information saved in the tablet computer and all
downloaded applications and files. Once these files are deleted, they cannot be recovered.

11
Communication function
E-mail
Gmail
Click the Gmail icon in the application list to enter.
This function supports mail accounts of Google, Outlook, Hotmail, Live, Yahoo and Exchange
protocols
Users can receive and send mails through Gmail account, and it is necessary to add or create an
account when users log in to Gmail for the first time.
Creating a Gmail account
If users don't have a Gmail account, it is necessary to click "Create" to apply for a Gmail account,
just follow the on-screen prompts.
Setting a Gmail account
If users already have a Gmail account, enter the corresponding information on the pop-up
setup wizard page, click "Login", and then select "Next" until users enter the mailbox.
Viewing mails
1. After entering the main interface of mails, the number of unread mails will be displayed in the
title bar, and in bold format.
2. Click the mail to read it.
3. Click the star sign under the mail receiving date to set the mail as a star mail, and click again
to cancel the star sign.
Sending emails
1. Click the button of the title bar ;
2. In the address bar of the recipient, enter the email address, and separate multiple addresses by
commas in English mode;
3. Click the CC person and enter the email address of CC person/confidential person, and
separate multiple addresses by commas in English mode;
4. Enter the subject;
5. Enter the email body;
6. Click the send button in the title bar.

12
Network
Browser
Click the Browser icon in the application list to enter.
Accessing web pages
1. Enter the browser function and access the main page by default;
2. If it is necessary to visit other web pages, click the "URL Input Field", enter the URL,
and click the "Go" button in the keyboard;
3. When browsing the web page, users can click on the screen with two fingers and then
separate fingers to enlarge the web page; slowly close two fingers to narrow the web
page;
Opening multiple web pages
Users can open multiple web pages and switch between different web pages.
1. Click the button of title bar to open a new tab;
2. Click the title of the window to switch to browse different web pages;
3. Click the button behind the title to close the current web page.
Setting the home page
1. Click the button in the upper right corner after entering the browser;
2. Select "Settings";
3. Select "Home Page";
4. Click "Open This Page";
5. Select or enter the required URL and confirm.
Setting bookmarks
When browsing a web page, select the button to bookmark the web page for future browsing.
View bookmarks and history
Click the button of title bar to select bookmarks to view the set bookmarks, and click
to quickly open the corresponding web page; select "History" to view the recently visited
web pages, and click to open the corresponding web pages.

13
Play store
Click the Play Store icon in the application list to enter.
By using the Play Store, users can quickly and easily download a massive number of applications
to the equipment (it is necessary to set a Google account when users log in to the Play Store for
the first time)
Enter the main interface of the Play Store after setting successfully:
1. Find the required application and click to enter it;
2. Click "Install";
3. Read the permission instructions carefully;
4. After confirmation, select "Accept and Download" to start downloading. After
downloading successfully, the program will be installed automatically.
Note:
All support for the "Play Store" software is furnished by the third-party developer, and
the developer information can be acquired from the details page of each software.
Our company shall not be responsible for problems resulting from third-party
applications.
Entertainment
Camera
Before taking an image, it is necessary to know the relevant settings: click Camera
to enter in the application list

Fil
Clic
Use
r
cop
y
equ
i
Not
e
1.
No.
1
2
3
4
5
6
7
e manag
k the icon o
f
r
s can store
a
y
, rename, a
n
i
pment, dow
n
e
:
Some file f
o
Name
Camera
b
Photo m
o
Video
r
mode
Picture
p
Switch
k
Flash m
o
Standar
d
er
Fil
e
a
nd manage
a
n
d find files
a
n
load files w
h
o
rmats are
n
D
b
utton
C
o
de
C
r
ecording
C
p
review
C
k
ey
C
o
de
C
d
mode
T
a
e
Manager i
n
a
ll sorts of fil
a
nd folders.
U
h
ile browsin
g
n
ot supporte
d
D
efinition
lick to take ph
o
lick Select to e
n
lick Select to e
n
lick Enter to p
r
lick to switch t
h
lick to select t
h
a
ke pictures in
14
n
the applica
t
es and folde
r
U
sers can tra
n
g
the network
,
d
, specifical
l
o
tos
n
ter photo mo
d
n
ter the video
r
r
eview the pict
u
h
e front/rear c
a
h
e flash
default standar
d
t
ion list to en
r
s in the equi
p
n
sfer files fr
o
,
or receive f
i
l
y dependin
g
d
e
r
ecording mod
e
u
res
a
mera
d
mode
ter.
p
ment. User
s
o
m a compat
i
i
les via emai
l
g
on the so
ft
e
s
can open, c
r
i
ble compute
r
l
annexes.
ft
ware in th
e
r
eate,
r
to a
e
This manual suits for next models
1
Table of contents