10ZiG Technology Limited ZiGnature Pad 1410 User manual

-i -

-ii -
Contents
Zignature Pad Overview .....................................................................................................................................3
Related Publications......................................................................................................................................3
Key Features..................................................................................................................................................3
Requirements................................................................................................................................................4
Software Components...................................................................................................................................4
Box Contents .................................................................................................................................................5
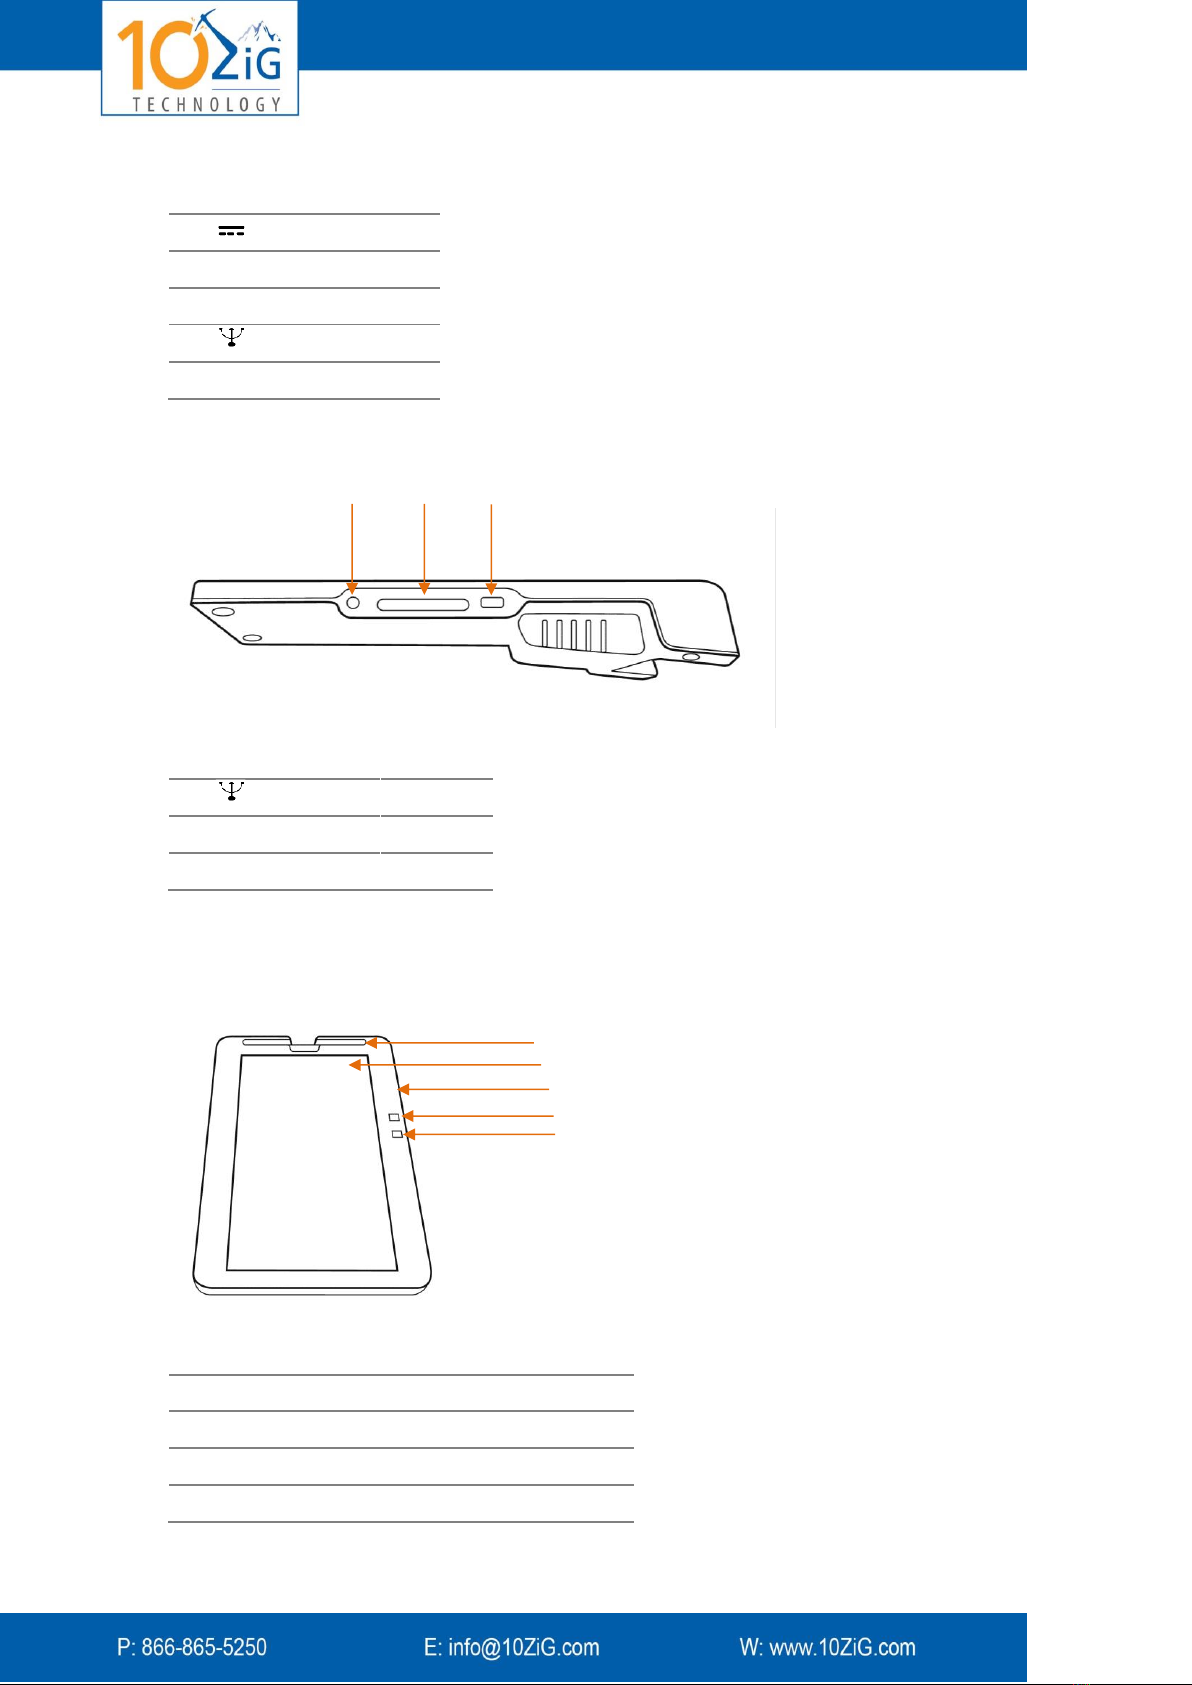
Physical Attributes.........................................................................................................................................5
Document Monitor........................................................................................................................................7
Installation..........................................................................................................................................................9
1. Installing the Software ..............................................................................................................................9
2. Installing the Hardware ...........................................................................................................................12
3. Opening the Document Monitor.............................................................................................................13
4. Connecting to Your ERP System ..............................................................................................................13
Use of VPort and Zignature Pad .......................................................................................................................14
1. Sending a Document to the Zignature Pad .............................................................................................14
2. Controlling the View: Document Monitor...............................................................................................14
3. Signing a Document.................................................................................................................................14
4. Storing the Document .............................................................................................................................15
System Configuration .......................................................................................................................................17
Storage and Backup Options .......................................................................................................................17
Display Options ...........................................................................................................................................20
Signature Options........................................................................................................................................23
Print Options ...............................................................................................................................................25
Advertising Campaign Creation........................................................................................................................29
Preparing a New Commercial......................................................................................................................29
Preparing a List of Commercials..................................................................................................................29
Preparing a Slide Show................................................................................................................................30
Zignature Pad Maintenance .............................................................................................................................31
System Errors and Events............................................................................................................................31
Cleaning Instructions...................................................................................................................................31
Replacing Pen Batteries...............................................................................................................................32
Updating Software ......................................................................................................................................32
Upgrading Firmware....................................................................................................................................32
Upgrading Hardware ...................................................................................................................................33
Maintaining the Storage Areas....................................................................................................................33
Uninstalling the Software Suite...................................................................................................................33
Troubleshooting ...............................................................................................................................................34

-3 -
Zignature Pad Overview
Congratulations on your purchase of the 10ZiG Zignature Pad-1400 or 1410. 10ZiG combines
leading edge technology with electronic signature and printing solutions for the business
sector.
The 10ZiG Zignature Pad™-1400/1410 is a front-end, customer-facing paperless printer
deployed at the employee's work station where customers are engaged, when the employee
presents a paper contract and pen to the customer for signing. In the past, a document
would be printed and then signed by a customer; now, it can be printed to the Zignature Pad
as an electronic document that captures electronic signatures.
The device uses advanced security and encryption techniques to store all modifications to
the document as PDFs or TIFFs, with time-stamps, in a tamper-evident environment.
Related Publications
Refer to the following documentation for more information about 10ZiG Zignature Pad-
1400/1410.
10ZiG Setups (PDF document)
Signature Wizard Designer User Guide
LUA Scripting for 10ZiG Zignature Pad-1400/1410
Key Features
Full size, high resolution LCD with 1366x768 pixels (Zignature Pad-1400) and
1280x800 pixels (Zignature Pad-1410)
Electromagnetic digitizer collects 2048 pressure levels for biometric data analysis
High speed USB 2.0 interface
TCP/IP Ethernet interface
Allows reviewing and signing even long documents
Complies with PDF/A standards
Implements RSA 2048-bit encryption
Supports promotional advertising
Functions as a local printer for fast integration
Saves time
Eco-friendly: saves electricity, paper, and ink

-4 -
Requirements
PC hardware:
Intel® Pentium® dual core, Atom™, or Core 2 Duo processors, Via and AMD
processors, or better
At least 1 (preferably 2) GB RAM
At least 100MB free disk space for installation
Onboard USB 2.0 high speed port or network connection
Single setup software:
Windows 8, XP SP3, Vista with SP1 or Windows 7 32-bit or 64-bit operating system
.NET Framework v.2.0 (pre-installed in Windows 7)
Administrative privileges for installation
Citrix server software:
Windows 2003 server or Windows 2008 server (32-bit or 64-bit) with Citrix
presentation server v.4.0 or above or XenApp v.5.0 or above
Citrix client software:
A PC or thin client with Windows XP 3 or Windows 7 32- or 64-bit running Citrix
online plug-in or Citrix Receiver
Terminal Services:
Other client-server software
NOTE: Please read the Safety Precautions.
Software Components
The single user software includes these components
VPort, including Document Monitor, VPort Agent, VPortal client, VPort configuration
Virtual printer driver, named 10ZiG Zignature Pad
USB driver (optional when using network link)
VPortal software includes
VPortal Server –Includes PCUPCFTOOL.EXE, which is an administrator tool for
updating client software and configurations, including automatic distribution of
Zignature Pad firmware.
WebVPortal server
NOTE: For a thorough examination of the different installation options, refer to 10ZiG Setups
(PDF document).

-5 -
Box Contents
Power adapter
USB cable
Product CD (optional)
Digital pen
This guide
Zignature Pad-1400/1410
Figure 1: Items in box
Before setting up your Zignature Pad, carefully remove the items from the box:
If any items are missing from your package, contact your reseller.
Use only the included AC adapter or an adapter approved for this Zignature Pad.
Physical Attributes
Rear View
Figure 2: Rear view
1
2
3
4
5
USB-B
USB-A
6

-6 -
#r
1
Not in use
2
DC In port
12VDC
3
RJ-45
Port 2
4
RJ-45
Port 1
5
USB B port
6
Not in use
Right View
Figure 3: Right view
1
USB A port
Not in use
2
Smartcard reader
Not in use
3
On/Off button
Top View
Figure 4: Top view
1
Pen holder
2
LCD display
3
Zignature Pad frame
4
White LED activity indicator
Wireless pen
1
2
3
4
5
1
2
3

-7 -
5
Blue LED activity indicator
USB connection
Document Monitor
The Document Monitor on your computer allows you to manipulate the document in a
number of ways: saving, printing, changing the display, setting areas to sign, etc.
Below is a description of each of the buttons.
Action
Document
Monitor
Toolbar
Description
Effect on
Zignature
Pad
Archive document
Close the document and store it (see
Closing the Document)
Closes the
document
Print last un/signed
document
Print the currently displayed unsigned
document or the most recent signed
document to the printer defined in
the Quick Print Document tab
Displays a
document
Set
portrait/landscape
mode
Change the page orientation
None
Previous/Next page
Move to previous or next page
(Page Up and Page Down keys on
your keyboard also work when the
Document Manager is in focus)
Moves
[X] of 1
Jump to a particular page
Jumps
Zoom out
Zoom in
%
%
Change the zoom level out or in, or
type an exact zoom percentage
None
Fit page/width
Adjust the display so the page fits
exactly in the Document Monitor
window, or so the width of the page
fits the width of the Document
Monitor window (without regard to
the length of the page)
None
Signature wizard on-
the-fly
Define the exact spot requiring a
signature (active when a document is
displayed on the Zignature Pad) and
press Play (see Defining a Signature
Area)
A red box
appears when
Play is pressed
Index of
commercials/slide
shows
Open lists of commercials and slide
shows (active when no document is
displayed on the Zignature Pad)
None
Custom Actions
button
Can call an external application upon
request to 10ZiG
None

-9 -
Installation
For a thorough examination of the different installation options, refer to 10ZiG Setups (PDF
document).
1. Installing the Software
The Zignature Pad software includes these installations:
VPort installation:
oSingle user
oCitrix server for different Citrix versions
oCitrix client
oTerminal Services (for the server)
WebVPortal installation
VPortal server installation (required for integration with Terminal Services)
Firmware update utility (supplied separately)
NOTE: For a thorough examination of the different installation options, refer to 10ZiG Setups
(PDF document).
If you are still not sure what software to install, contact your authorized Zignature Pad
service representative.
To update your software, see Updating Software on page 32.
VPort Single User Setup
The VPort setup described here is applicable for single user installations.
1. Run the setup wizard:
If you have an installation CD, insert it into your computer’s CD-ROM drive. (If
the setup program does not start automatically, run it by double-clicking
setup.exe from the CD.) Select the single user installation type from the list of
options.
If you have an installation ZIP file, unzip it and run setup.exe. The wizard for
VPort single user starts.
2. If the current user has no administrative privileges, the setup prompts for the
administrator’s user name and password.
These are the installation steps:
1. Installing software
2. Installing hardware
3. Opening the Document Monitor
4. Connecting to ERP (optional)

-10 -
3. Follow the steps in the wizard (reading and agreeing to the EULA agreement,
defining the path, etc.).
4. Define VPortal Server IP address dialog prompts you to enter the IP address and
port of your VPortal server (see VPortal installation). If you don't need or know the
IP address at this stage, you can define it later (click the Define later button). The
VPortal Server is not normally used for small installations.
5. The Define data folders dialog prompts you to define folders for documents:
input –for documents you bring in to the Zignature Pad
output –for signed documents
backup folders –for additional copies of the input and output documents
the Advertisement Box folder –for commercials
A default location for these folders is suggested. The folders must have read/write
file access enabled for all users.
6. When prompted, choose between the USB and network connections (see below).
7. Click Save. If you selected USB in the previous step, you will be prompted to connect
the Zignature Pad to the computer (see 2. Installing the Hardware).
8. If Start 10ZiG VPort is selected, when you exit the installation, the Zignature Pad
software tries to establish a connection with the Zignature Pad.
9. The VPort Agent icon in the Windows notification area shows the current
connection status. Right click the Zignature Pad Agent icon and select Configure.
Click the Quick Print Document tab and select the printer installed in Windows
where you want documents printed out (for example, via auto-print or last
un/signed document).
If you are setting up Zignature Pad for a network:
1. Define an IP address for the Zignature Pad. It is highly recommended that this be a
static address.
2. Connect the Zignature Pad via USB to any computer on the network, such as an
administrator computer.
3. In the Windows notification area, right click the VPort Agent tab and select
Configure. In the Network Connection tab, ensure that Use Network connection to
10ZiG Zignature Pad is not selected. If you made a change, click Apply.
4. In the Windows notification area, right click the VPort Agent tab and select Network
Discovery. The VPort Device Manager opens. In the Auto Discovery tab, view the
Zignature Pad settings. Click Settings:

-11 -
a. Set DHCP to False.
b. Configure Device IP, Subnet Mask, and Gateway.
c. Click OK and Refresh, then view the updated settings.
5. In the Zignature Pad configuration, in the Network Connection tab, select Use
Network connection to 10ZiG Zignature Pad. Type the IP address you used earlier.
Click Apply.
6. Disconnect the USB cable. Turn the Zignature Pad off and on. Connect the Zignature
Pad to the network using the port closer to the USB port (see Figure 2).
7. Install VPort for single user as described above. When prompted, select network
connection.
8. In the Zignature Pad configuration, in the Network Connection tab, select Use
Network connection to 10ZiG Zignature Pad. Type in the IP address you used
earlier.
9. If there are many disturbances in the communication, causing the Zignature Pad to
restart frequently:
oIn the Zignature Pad configuration, in the Network Connection tab, raise the
Network tolerance index. (Maximum allowed: 20.)
oTo ensure that documents are not lost during processing, in the VPort Agent
tab, select Keep last document in case of failure.
WebVPortal Installation
WebVPortal is a web service that you must install on the network. It allows you to track the
number of documents and pages printed via Zignature Pad for the pay-as-you-use option.
To enable, in the VPort configuration under the VPortal connection tab, select Report page
counter and type in the URL. You can change the URL at any stage via the VPortal
connection tab in the configuration, by changing the details in the VPortal Web Service URL
field.
VPortal Installation
VPortal collects published templates and scripts from the workstation where Signature
Wizard Designer is installed and distributes the templates and scripts to all other
workstations.
VPortal is required for Terminal Services and is optional for Citrix.
The installation is the same as for VPort, except for these differences:
VPortal handles saved files, taking them from the OutBox and storing them on the
server where VPortal is installed.
VPortal sends printed files to the workstation InBox.
VPortal includes VPortal Server.
VPortal will not work until you have defined the IP address. You can always configure the
VPortal parameters later:
1. Right click the VPort Agent icon in the Windows notification area and select
Configure.

-12 -
2. In the VPortal Server connection tab, type the relevant data in the VPortal IP
address.
3. If you want an alternative IP address, add it.
4. Click Apply.
2. Installing the Hardware
Warning
Do not connect the USB adapter to the computer until the software
prompts you to do so.
Figure 5 10ZiG Zignature Pad: USB option with wireless pen –for illustration purposes only
1. Place the Zignature Pad on a stable surface where there is adequate room to
operate it.
2. Connections:
oIf you have a USB cable:
Connect USB-B (shown in Figure 1) to the rear of the Zignature Pad.
Connect USB-A to a USB port on the host computer (it is
recommended to use a USB port that is close to the motherboard).
oIf you have a network cable:
Connect one end to Port 1 on the rear of the Zignature Pad (shown
inFigure 2: , close to the USB port) and the other end to the network
outlet.
(Optional) The Zignature Pad acts as a network switch. Connect one
end to Port 2 on the Zignature Pad and the other end to your host
computer.
3. Wireless pen:
oIf necessary, remove the battery compartment cover and install one AAA
battery with the positive “+” facing up. Replace the battery compartment
cover.
240V
60Hz

-13 -
4. Plug the cable attached to the AC adapter in to the DC In port on the rear (shown in
Figure 2Figure 2: ). Plug the other end of the power adaptor in to an AC outlet.
The hardware is ready. Turn on the Zignature Pad by pressing the button on the right (shown
in Figure 3). If you have a USB connection, you should now see a blue flashing light on the
Zignature Pad. After a few seconds, you should see the default screen (the 10ZiG logo). If
necessary, see the Troubleshooting section.
Warning
Do not attempt to open the digital pen. This may cause the pen to
malfunction and is not covered by the warranty.
Safety Precautions
Use the power cord supplied with your Zignature Pad.
Plug the power cord directly into a properly grounded electrical outlet. If you do not
know whether an outlet is grounded, ask an electrician to check the outlet.
Do not use an extension cord.
Do not place the Zignature Pad where people may step on the power line or USB
cable.
Do not place objects on the Zignature Pad or the power adaptor.
Looking after your Zignature Pad
Do not place the Zignature Pad near a heat source or in direct sunlight.
Do place the Zignature Pad on a level, solid surface with adequate strength for the
weight of the device.
Do not place any liquids on or near the Zignature Pad. For cleaning instructions, see
Cleaning the Pen and Zignature Pad Frame.
There are no user serviceable parts inside the Zignature Pad. Do not disassemble the
device.
3. Opening the Document Monitor
The Document Monitor is software located on your computer that provides you with an
interface to the documents. To open the Document Monitor, right click the VPort Agent icon
in the Windows notification area and select Run Document Monitor.
At the moment, no document is displayed. All you can see is a toolbar at the top of the
screen. We will explore the options available to you later, in Using the Document Monitor.
4. Connecting to Your ERP System
Usually the company’s ERP system takes control of the created documents. If there is no ERP
interface and VPortal is installed, VPortal handles the documents and stores them on the
VPortal server.

-14 -
At this stage, you must establish contact between VPort and your ERP system (refer to your
system administrator).

-15 -
Use of VPort and Zignature Pad
These steps are explained in more detail in the following sections.
1. Sending a Document to the Zignature Pad
To send a document to the Zignature Pad:
1. Open the document in a Windows application (e.g., a DOC file in Microsoft Word or
PDF in Adobe Reader).
2. Select Print and choose the 10ZiG Zignature Pad printer from the list of available
printers.
3. (Optional) Click the Properties button and review the document properties. Note
that the paper size is defined as 10ZiG VPort and the resolution is 100x100 dots per
inch.
4. Click Print (or OK, depending on your software).
After a few seconds the document appears on the Zignature Pad.
If you are using Citrix, VPort makes use of the Citrix virtual channel.
2. Controlling the View: Document Monitor
The Document Monitor on your computer allows you to change the view of your document
on the host side, to send the document to a printer, to close it, and more. To open the
Document Monitor, click the icon on your taskbar. See a detailed description of the
capabilities of the Document Monitor.
3. Signing a Document
Defining a Signature Area
To define an area where the customer must sign:
These are the typical steps to perform, in brief:
1. Send your document from your computer to the VPad.
VPort opens the document simultaneously in the Document Monitor.
2. Help your customer review the entire document by manipulating the document
in the Document Monitor to change the view on the VPad. Alternatively, the
customer can press the Up and Down arrows in the VPad.
3. The customer signs the document using the VPad.
4. Close the document.
5. VPort saves and stores the document.

-16 -
1. In the Document Monitor, click the Signature Wizard On-The-Fly button .
2. A red box appears on the Document Monitor:
Drag the red box to the desired location using your mouse.
Resize the red box by dragging a corner.
3. Click the Play button .
4. The red box is now visible to the customer, who must write inside the box using the
wireless pen.
5. When the customer has finished, click the Stop button . The red box disappears
from the Zignature Pad and the signature appears on the document.
6. If you want an additional signature, simply move the red box (repeating the above
steps 2-4).
The customer can click any of these buttons on the Zignature Pad with the digital pen:
Previous Page , Next Page , green check mark , and Cancel button (if enabled in
the VPort Agent tab).
To delete the most recent signature, right click the Document Monitor and select Undo
signature.
To cancel all work with the current document, right click the Document Monitor and select
Cancel document (or click the Cancel button ). The document closes and the Zignature
Pad returns to displaying the logo or commercials.
There is also a signature method for experts.
Writing with the Digital Pen
Instructions for your customer:
Hold the pen comfortably.
Do not press the buttons on the pen.
Apply sufficient pressure to activate the pen head.
4. Storing the Document
Closing the Document
When you have finished working with the document:
Ask the customer to use the digital pen to press the green check mark at the
bottom of the Zignature Pad, OR
Close the document yourself by clicking the Archive document button in the
Document Monitor.

-17 -
VPort understands that you have finished working with the signed document and stores it
automatically. For more information on how the documents are stored, see Storage
Configuration Options.
Printing the Document
If you defined auto-print, the document prints. If auto-print is not defined, it is still possible
for you to print the document: In the Document Monitor, click the Print last unsigned
document button or the Print last signed document button .
If you get an error message, you can resolve it.
Viewing the Log
After Zignature Pad has successfully handled at least one document, you can see information
about the number of pages and documents processed (since the Zignature Pad started to be
used) by right clicking About VPort Agent…in the Windows notification area.
Exiting
(Optional) Exit the Document Monitor by clicking the Exit program button .

-18 -
System Configuration
NOTE: You can change most of the
configuration settings Storage and Backup
Options
The dialog below is the source for many of the storage options you may configure. Access
this dialog by right clicking the VPort Agent icon in the Windows notification area and
selecting Configure and then the VPort Agent tab on the left.
This section describes configuration options, grouped as follows:
Storage and Backup
Display
Signature
Printing
These are the storage and backup options:
Save as TIFF instead of PDF
Automatically show last document if network fails
Change storage location
Back up documents in additional location
Change names of stored files
See all stored documents

-19 -
Changing the Output Format
VPort saves the file in the output format (default: PDF).
To change the default output format to TIFF:
1. In the VPort Agent tab, change the Document type to TIFF.
2. Click Apply.
Remembering the Last Document Accessed
To make sure you can always retrieve the most recent document in case of network glitches:
1. In the VPort Agent tab, select Keep last document in case of failure (selected by
default).
2. Click Apply.
Once communication is re-established, the document will reappear on the Zignature Pad.
Changing the Storage Location
VPort automatically stores the documents in the OutBox location you specified during
installation.
NOTE: If you have a VPortal connection, after a file is saved, VPortal takes the file, stores it
on the server where VPortal is installed, and empties the OutBox. (If you do not have a
VPortal connection, the file is retained in the OutBox folder.)
You can see the OutBox path (and change it):
1. Select the Document folders tab.
2. See/change the path specified in Folder for documents after signing (OutBox).
3. Click Apply.

-20 -
Defining Additional Backup
In addition to the Outbox, you can save another copy of your documents:
1. In the Document folders tab, select back up OutBox.
2. Define a path and click Apply.
For added document security, you can use the StorageBox feature so that your files are
copied to an additional location, such as on the company network:
3. In the Document folders tab, in Optional storage folder (StorageBox), define a path.
4. Click Apply.
NOTE: You may wish to free space on the computer disk from time to time. See Maintaining
the Storage Areas.
Determining the Output File Name
By default, the name of the output file is the document’s original name.
To use a name composed of the name of the computer, the user name (taken from the
Windows login) and the timestamp when the document was saved:
1. In the VPort Agent tab, deselect Keep document name.
WARNING: If you save more than one copy of the same document, each new copy
will overwrite the previous version as they have identical file names.
2. Click Apply.
Viewing All Stored Documents on the Computer
You can examine documents processed as input to the system, documents saved as output
documents, and BMP files used for ad campaigns.
To view documents on your computer:
1. Select the Document folders tab.
2. Click Explore InBox/OutBox/AdvBox.
The path to the relevant documents opens.
3. You can identify a particular document by its original name (or, if Keep document
name is not selected, the name of the computer plus the Windows login user name
plus the timestamp when the document was saved).
4. To examine a document, double-click it.
If PDF, Adobe Reader opens. Click the Signature Panel button on the top right to
open a list of signatures. Note that you cannot make any changes to this document.
NOTE: You may wish to free space on the computer disk from time to time. See Maintaining
the Storage Areas.
To open a TIFF file from the inbox backup folder for further signing in the Zignature Pad:
1. In the VPort configuration, in the Document Folders tab, click Explore InBox,
Backup.
2. Navigate to the relevant folder and highlight the document.
3. Right click and highlight Open with.
This manual suits for next models
1
Table of contents
Other 10ZiG Technology Limited Tablet manuals