5five F26 User manual

USER’S MANUAL
T R U S T T H E S O U N D T R U S T T H E S O U N D T R U S T T H E S O U N D
T R U S T T H E S O U N D
C A R A U X / U S B / m i c r o S D R E C E I V E R W I T H B T F U N C T I O N
50Wx4
M A X P O W E R
B T M U S I C U S B I N P U T F M R A D I OM P 3 P L A Y E RA U X I N P U T
A P P C O N T R O L
S D S L O T
G/R/W


С O N T E N T
Precautions
Read Before Using
How to install and remove the player
Wired connections
Front Panel Description
Basic operations and receiver operation modes
Radio mode
Media player mode
Bluetooth mode
Troubleshooting guide
Specifications
4
5
6
9
10
11
12
12
14
15
16

P R E C A U T I O N S
4
A T T E N T I O N !
If you encounter any difficulties in using the device, contact an authorized
service center. The device has a built-in LCD monitor, so be careful when
transporting and installing.
It is not recommended to wipe the surface of the device with abrasive
detergents.
The operating voltage of the player is 12V (+/- 2V), direct current. At lower or
higher voltage it is not recommended to use the device, since it can be
easily damaged.
Before turning on the device, make sure that the temperature in the car is in
the range from 0 to +45 degrees.
Use fuses rated for the current indicated on the fuse holder for
replacement. If the fuse blows several times in a row, carefully check the
electrical connections for a short circuit. Also check the voltage on the
vehicle electrical system.
To prevent damage, do not expose the apparatus to direct sunlight, heat
radiation or hot air. If the temperature in the passenger compartment is too
high, do not turn on the unit until the temperature in the passenger
compartment drops. Do not expose the device to sudden changes in
temperature.

R E A D B E F O R E U S I N G
5
· Carefully read through this manual to familiarize yourself with this high-
quality sound system.
· The moment of unit installation is considered the start of its operation.
When using the device in winter it is recommended to heat the car interior
for 15 minutes or up to operating temperatures.
· Use the unit with the temperature that goes beyond the operation
temperature greatly decreases the operation resource of device.
· Disconnect the vehicle's negative battery terminal while mounting and
connecting the unit.
· When replacing the fuse, be sure to use one with an identical amperage
rating.
· Do not use the unit in places where it can be exposed to water, moisture
and dust.
· Do not open covers and do not repair yourself. Consult the dealer or an
experienced technician for help.
· Make sure you disconnect the power supply and aerial if you will not be
using the system for a long period or during a thunderstorm.
· Make sure you disconnect the power supply if the system appears to be
working incorrectly, is making an unusual sound, has a strange smell, has
smoke emitting from it or liquids have got inside it. Have a qualified
technician check the system.
· The unit is designed for negative terminal of the battery, which is
connected to the vehicle metal. Please confirm it before installation.
· Do not allow the speaker wires to be shorted together when the unit is
switched on. Otherwise it may overload or burn out the power amplifier.

P L A Y E R I N S T A L L A T I O N
A N D R E M O V A L
6
· Before final installation, connect the wiring according to the time diagram
and make sure that it all works correctly.
· To ensure proper installation, use only the parts supplied with the device.
Using foreign parts may cause malfunction.
· In order to maintain warranty, this product must be installed at an
authorized dealer.
· Install the device in such a way that it does not interfere with the driver
and does not injure the passenger in case of a sudden stop, for example,
during emergency braking.
· Avoid installing the unit in places where it may be exposed to high
temperatures, such as direct sunlight or hot air from the heater, and where
it will be exposed to dust, dirt, or excessive vibration.
· Be sure to remove the front panel before installing the device.
For proper installation of the device, the compartment for installing radio
equipment in the dashboard must correspond to the following dimensions
In addition, you should check if the depth of the compartment is sufficient
to accommodate the receiver. Before starting work, make sure that the
vehicle’s ignition is off. It is recommended, if possible, to disconnect the wire
from the “-” terminal of the car battery.
53мм
182мм

7
Frame
Metal mantle
Key
Key
Frame
Instrument board
1) Insert the keys all the way into the grooves on the sides of the device.
Remove the player from the mounting frame.
2) Insert the mounting frame (without the player case) into the dashboard
compartment and bend the “tabs” with a screwdriver. Not all “tabs” fit the
design of the dashboard of a particular car, select the most suitable.
3) Connect the power and speaker connectors, the antenna connector to
the player. Make sure the wires are not pinched anywhere. Carefully insert
the player into the mounting frame until the latches click, while observing
the position of the connected wires so as not to accidentally damage
them.

8
Metal mantle
Key
Key
Removing the receiver
Make sure the ignition is off. Disconnect a wire from "-" plugs of the car
battery.
Remove the metal bracket from the back of the device (if installed
previously).
Insert the keys all the way into the slots on the sides of the front panel.
Pull the receiver out of the frame by pulling it towards you.

W I R E D C O N N E C T I O N S
To replace a fuse, remove the blown fuse from the socket and insert a new
one of the same rating.
F U S E R E P L A C E M E N T
9
1
2
3
4
ANTENNA
FUSE
15А
SPEAKERS
· Make sure your vehicle's on-board voltage is +12 volts with a negative
value on the chassis.
· Before starting installation, turn off the on-board power by removing the
fuse from the receiver. After connecting all the wires, install it in place.
· Connect the wires as shown.
· If your vehicle does not have an ISO connector, you can purchase it at an
auto accessories store.
Notes: Improper connection may damage the receiver and void the
warranty on this unit.
Front RCA Output(R)/Red
Front RCA Output(L)/White
Rear RCA Output (R)Red
Rear RCA Output(L)White
1.
2.
3.
4.
Rear Right SP.
Front Right SP.
Front Le SP.
Rear Le SP.
Purple
Purple Black
Grey
Grey Black
White
White Black
Green
Green Black
Red
Black
Blue
Yellow
ACC
GND
Auto ANT
+12V
1
B
2
3
4
5
6
7
8
1
A
2
3
4
5
6
7
8
B A

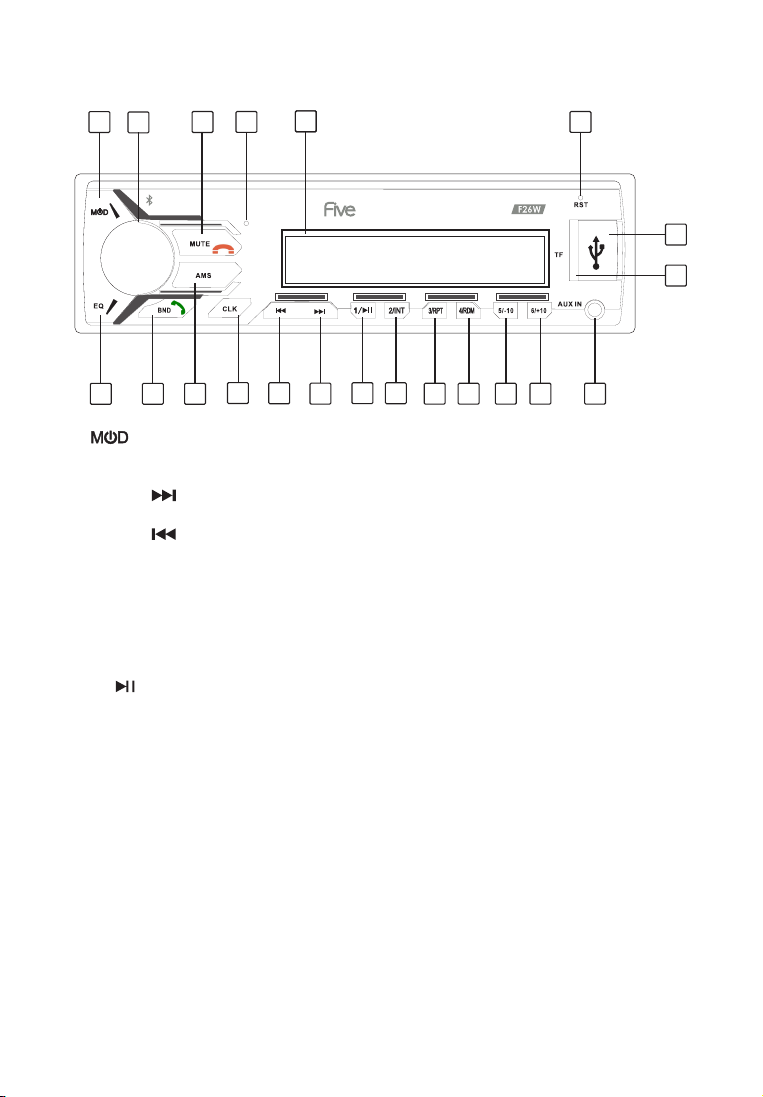
1. button ON/OFF the device, select the receiver modes
2. MUTE mute ON/OFF button, in Bluetooth mode, interrupts the call
3. VOL / SEL volume control / multi-select button sound modes
4. Button: switching to the next track in media player mode, search
next radio station in radio mode
5. Button: switching to the previous track in media player mode,
search previous radio station in radio mode
6. AMS button for automatic tuning of the radio, scanning stored stations
7. EQ (equalizer) button for selecting sound settings
8. CLK button to display and set the current time
9. BND button to select the frequency range of the receiver, answering a
mobile phone call in Bluetooth mode
10. LCD Display
11. 1 / button to turn on the installed radio station in radio mode,
in media player enable Play / Pause
12. 2 / INT button to turn on the installed radio station in radio mode,
in media player modeenabe demo mode
13. 3 / RPT button to turn on the installed radio station in radio mode,
in media player modeenable track repeat / repeat of all tracks
14. 4 / RDM button to turn on the installed radio station in radio mode,
in media player modeenable random playback.
15. 5 / -10 button to turn on the installed radio station in radio mode,
in media player modeenable transition of playback 10 tracks back
16. 6 / + 10 power button of the installed radio station in radio mode,
in media player modeenable playback transition 10 tracks forward
17. AUX IN - audio input for an additional device
18. RST device reboot button
19. MicroSD card reader
20. USB port for an additional device
21. Microphone
F R O N T P A N E L D E S C R I P T I O N
4
9 6 11 12 13 14 15 16 17
1
5
8
18
310
21
19
2
20
7

11
B A S I C O P E R A T I O N S A N D
R E C E I V E R O P E R A T I O N M O D E S
Turn on / off the player
Press the power button on the front panel to turn on the head unit. To turn
off the receiver, in any mode, press and hold the button for 3 seconds.
To select a mode, you can sequentially press the button on the front
panel. The modes are displayed in the following sequence: RADIO / USB / SD
/ AUX / BT. USB and SD memory card modes are available only if the
appropriate drive is inserted in the slot of this unit
Volume control
The desired volume level is set by rotating the encoder on the front panel of
the receiver.
Mute
To block the sound instantly, press the MUTE button on the front panel. To
return to the previous sound level, press the MUTE button again.
Sound setting
Press on the encoder to select a custom parameter:
VOL / BAS / TRE / BAL / FAD / LOUD OFF / EQ OFF / STEREO / DX.
· BASS * Adjusts the bass tone.
· TREBLE * Adjusts the treble tone.
· BALANCE Adjusts the balance between the right and left speakers.
· FADER Adjusts the balance between the front and rear speakers.
· LOUD Off/On Turns the loudness mode on / off.
· EQ Off/On Turns the equalizer on / off.
Rotate the encoder to select one of the five settings:
POP / ROCK / JAZZ / CLASSIC / COUNT
equalizer settings.
· STEREO / MONO, switch between modes.
· DX / LOC switch between receive all radio stations / receive radio stations
with the strongest signal.
When setting, the selection of parameters is carried out by rotating the
encoder. After this, do not take any action for 3 seconds to save your
settings.
Note: * Bass and treble adjustments are available only when the equalizer is
off (EQ OFF mode)
EQ settings
Press the volume control repeatedly to select the equalizer setting mode
EQ. By turning the encoder, you can select one of four modes for adjusting
the equalizer: POP / ROCK / JAZZ / CLASSIC / COUNT. Or you can just use
button EQ.

D A T E A N D T I M E S E T T I N G S
To display the clock on the screen press CLK button. To set the current time,
press and hold CLK. The hour numbers will blink. The digital value is set by
rotating the volume control. Press the parameter select button to go to the
minute setting; numbers meaning minutes will blink. Rotate the VOLUME
knob to adjust the minutes. Click on CLK button to confirm the clock setting.
M E D I A P L A Y E R
There is a USB interface on the front side of the device. To the USB connector
a USB flash drive can be connected. When connecting a USB flash drive to
the USB interface, the receiver switches to USB mode by default regardless
of current mode and starts searching for supported audio files on the flash
drive. When files are found, playback will start. When USB flash drive
connected to activate the USB mode, press the button repeatedly,
until “USB” appears on the display of the unit.
F R E Q U E N C Y R A N G E S E L E C T I O N
R A D I O M O D E
In radio mode, press the BND button repeatedly to select required range.
Switching occurs in the following order: FM1> FM2> FM3
Auto Radio Tuning
Press and hold the AMS button for several seconds. The automatic scanning
of the radio range and storing of the found stations in the device memory
will begin. After scanning, listening to the first radio station found will begin.
Introductory listening
Briefly press the AMS button. Sequential playback starts for 6 seconds. each
of the 18 preset radio stations.
Manual tuning of the radio
To search and tune in radio stations manually, press the button to
scan the band backward or forward, respectively. The found radio station
can be entered into the memory cell by pressing and holding one of the
digital buttons 1 - 6. This default setting is made in AUTO mode. Press and
hold the button until MANUAL appears. Manual tuning mode
allows you to change the frequency in 0.1 MHz steps.
Switch to saved radio stations
Briefly press one of the number buttons 1 - 6 to switch to the radio station
stored under this number in the current frequency range.
12

Track selection
Briefly press the or button to switch to the previous file or the next.
The display will show the file number. Press the or button while
holding to scroll backward / forward. Playback starts when the button is
released.
Pause playback
Press the 1/ button to pause playback. Press the 1/ button again to
resume playback.
Preview all files
Press the 2 / INT button on the front panel. The INT ON indicator will appear
on the display, after which overview playback of each file will begin for 10
seconds. After the scan of the last file has finished, playback of the file from
which the scan started will begin. To interrupt the scan operation, press the
2 / INT button again.
Repeat file playback
To enable the file repeat mode, press the 3 / RPT button. When the 3 / RPT
button is pressed again, all files will be played back.
Play all files in random order
Press the 4 / RDM button to play all files in random order. Press the button
again to cancel the function.
Note:
The INT, RPT, RDM modes are switched on the first time the corresponding
buttons are pressed, and a brief indication appears on the screen to turn
on the mode (INT ON, RPT ON, RDM ON). Pressing the corresponding buttons
again disables the modes with a brief indication on the screen that the
mode is turned off (INT OFF, RPT OFF, RDM OFF). At the same time, INT, RPT,
RDM cannot work. Only the last selected mode remains active with the
corresponding indication on the screen.
Skip 10 tracks back
To go back 10 tracks, press the 5 / -10 button with hold
Skip 10 tracks forward
To go forward 10 tracks, press the 6 / + 10 button with hold
SD card management
On the front panel of the receiver there is a slot for connecting SD-memory
cards (card reader). When you connect an SD memory card to a
compatible interface, the system will search for audio files on the memory
card. When files are detected, playback will start. Management of the SD
interface is similar to the management of the USB interface, which was
described above. SD mode selection is initiated using the button
Note:
1. The device only supports standard USB flash drives that are approved by
Microsoft.
2. USB-MP3-players are not standardized, which means that different
brands and different models may have their own standards. The system
may not support all MP3 players.
13

A U X M O D E
R E S E T F U N C T I O N
The AUX jack is for connecting an external audio device to enhance sound.
To do this, connect an external source to the AUX line-in input on the front
panel. After connecting the equipment by successive pressing the button
on the front panel, select the AUX mode. If connected correctly, the audio
signal from an external source will be transmitted through the acoustics of
the head unit. This makes it possible to adjust the volume and sound
quality. For example, you can connect an MP3 player to listen to audio
through the car speakers.
The RESET button can be activated using a ballpoint pen or a thin metal
tool. This option may be required in the following cases:
First installation, after connecting all wires.
None of the control buttons work.
The message ERROR on the display.
Turn on the receiver and use your BT-enabled mobile device to search for
CAR-BT. If necessary, enter “0000” after detection.
After pairing, the device will display
The device supports A2DP exchange protocol.
To start playing / pausing music, press the button 1/
Press the button to answer the call. The display will show
To end the conversation, press the button
To switch between BT and mobile device during a call, press the button 1/
To call the last person in the call list, press and hold the button
After disconnecting, the device will display
B T M O D E
14

T R O U B L E S H O O T I N G G U I D E
If problems persist using the methods listed above, contact your nearest authorized
service center.
Symptom Cause Solution
Wiring is connected
incorrectly.
Make correct wiring
connection.
The car ignition is not on. If the power supply is
properly connected to the
car accessory, switch the
ignition on.
The fuse is blown Replace the fuse.
Failure in the software. Initialize the system by
pressing the RESET button
with a thin pointed object.
Volume is in minimum. Adjust volume to the desired
level.
Wiring is not properly
connected.
Check wiring connection.
Unbalanced audio output. Adjust the balance in the
sound settings menu.
The radio does not work The antenna cable is not
connected
Insert the antenna cable
properly.
The radio station
automatic tuning does
not work
The signals are too weak. Try to select stations
manually.
No power
No sound or the sound is very
quiet.
Below is a table describing simple measures that can help you eliminate
most problems likely to emerge when this unit is in use. If below measures
do not help, turn to a service center or to the nearest dealer.
Cleaning the device case
Wipe the surface of the device with a soft cloth. Do not wet the case! If the
case is very dirty use a cloth slightly moistened with soapy water and then
wipe the case with a dry cloth.
ATTENTION:
15

S P E C I F I C A T I O N S
R A D I O
M E D I A P L A Y E R
A U X
Operating frequency: FM 87.5 - 108 MHz
The number of memory cells for storing tuned radio stations 18
Intermediate frequency: 10.7 MHz
Sensitivity (30 dB): 15 dB
Reflection Ratio: 40 dB
Signal to Noise Ratio: 65dB
Frequency response: 30 Hz-15 kHz
File System: FAT16 / FAT32
Flash cards SD, USB: no more than 32 GB
Types of playable files: MP3/WMA/WAVE/FLAC
Support ID3 tags encoded in ISO-8859-1.
Signal to Noise Ratio: 85dB
Stereo Channel Separation: 80dB
Frequency response: 20Hz-20kHz
Maximum input voltage: 1.0 V
Input Impedance: 30 kOhm
Frequency response: 20 Hz-20 kHz
Connector: Mini Jack 3.5 mm
Bluetooth mode, support for profiles A2DP, HFP (ver. 4.2)
Maximum output power (10% distortion coefficient): 4 * 50 W
Tone Control: ± 8dB (low frequencies 100Hz, high frequencies 10kHz)
Speaker impedance: 4-8 ohm / channel
RCA stereo audio output
Supply voltage: direct current +10.8 - 14.7 V, on the case "-"
Maximum current consumption: 5 A
Overall dimensions: 178x90x50 mm
Weight: 0.4 kg
16

Dear customers!
Please note that the specifications, design and algorithms of the device are subject
to change without notice! All illustrations in this manual are schematic images of
objects and may differ from their actual appearance.
The manufacturer sets the product life to 3 years.
Safe disposal.
Your device is designed and made of high quality materials and components that
can be recycled and reused. If the product has a crossed-out wheeled bin symbol,
this means that the product complies with European Directive 2002/96 / EC. Check
out the local separate collection system for electrical and electronic products.
Observe local regulations. Dispose of old devices separately from household waste.
Proper disposal of your product will help prevent potential negative consequences
for the environment and human health.


T R U S T T H E S O U N D T R U S T T H E S O U N D T R U S T T H E S O U N D
“AUTOTEK INDUSTRIAL LIMITED”
1318-19,13/F, HOLLYWOOD PLAZA, 610 NATHAN ROAD, MONGKOK, KOWLOON,
HONG-KONG, CHINA
MADE IN P.R.C.
This manual suits for next models
3
Table of contents
Popular Car Receiver manuals by other brands

Dual
Dual iplug XDM6820 Installation & owner's manual

Denver
Denver cat-120 instruction manual

Panasonic
Panasonic CQ-C1113NW operating instructions

Kenwood
Kenwood KDC-8080R instruction manual

Sony
Sony CDX-F5000 - Fm/am Compact Disc Player Installation/connections

Pioneer
Pioneer Premier DEH-P360 Operation manual