manuals.online logo
Brands
  1. Home
  2. •
  3. Brands
  4. •
  5. ABBREE
  6. •
  7. Radio
  8. •
  9. ABBREE AR-M6 User manual

ABBREE AR-M6 User manual

1.FUNCTIONS & FEATURES
2.PRECAUTIOMS
3.KNOW ABOUT THIS RADIO 4.HOW TO USE THIS RADIO
2.1 You are adviced to check radio version first before connect power cable:
◆12V version radio: Your radio must be supplied with a continued current
of 12 volts.
2.2 Please install the antenna (connect to the location“B”on the back panel
of the radio) and set the SWR (Standing Wave Ratio) before transmitting.
Failure to do so may result in destruction of the power amplifier, which is
not covered by the guarantee.
◆AM and FM mode
◆ VOX
◆ CTCSS/DCS
◆ VOX
◆ SQ and ASQ Control
◆ Full Channel SCAN
◆ EMG Channel CH9/19
1 2 3
4.1 Power On/Off the Radio ....................................................................
(1) Turn VOL knob clockwise to power on the radio, the LCD displays
channel number.
(2) Turn VOL knob anti-clockwise, until hear "Ka Ta", the radio is
powered off.
4.2 Volume Control ...................................................................................
Turn VOL knob clockwise to increase volume, anti-clockwise to decrease
volume.
4.3 ASQ / SQ Control ...............................................................................
※ASQ (Automatic Squelch Control)
Turn SQ knob anti-clockwise into ASQ position. LCD displays " ". No
repetitive manual adjustment and a permanent improvement between the
sensitivity and the listening comfort when ASQ is active. This function can
be disconnected by turning the switch clockwise. In this case the squelch
adjustment becomes manual again. " " disappears from LCD.
※SQ (Manual squelch)
Turn the SQ knob clockwise to the exact point where all background
noises disappear. This adjustment should be done with precision as, if set
to maximum (fully clockwise), only the strongest signals will be received.
4.4 ▼CH/▲CH ...........................................................................................
※Channel Selector (short press)
(1) These keys allow increasing or decreasing a channel. A beep sounds
each time the channel changes.
(2) Hold or can fast change working channel.
※Scan (very long press)
(1) Press and hold the or key for 7 seconds or until a beep sounds
to start scan function, LCD displays " ".
(2) Short press or key to change scan direction during scan.
(3) Short press or [PTT] key to exit scan function.
3.1 Function location
CB RADIO
Instruction Manual
145
3 7 6 8 10 9
C
B
D
A
2
1 POWER ON/OFF ~ VOLUME CONTROL
2 SQUELCH~ASQ (Automatic Squelch Control)
3 MICROPHONE JACK
4 LCD
5 MODE ~ KEYPAD LOCK
6 CTCSS/DCS ~ CTCSS/DCS SET
7 EMERGENCY CHANNEL ~ RESET
8 CHANNEL SELECTOR
9 CHANNEL SELECTOR
10 VOX ~ VOX SET
A ANTENNA JACK
B EXTERNAL SPEAKER JACK
C POWER CONNECTION
D PTT SWITCH
R
AR-M6
5.SPECIFICATION4.HOW TO USE THIS RADIO 4.HOW TO USE THIS RADIO
»In lock Mode all keys except PTT is valid.
»This function is only enabled in FM mode.
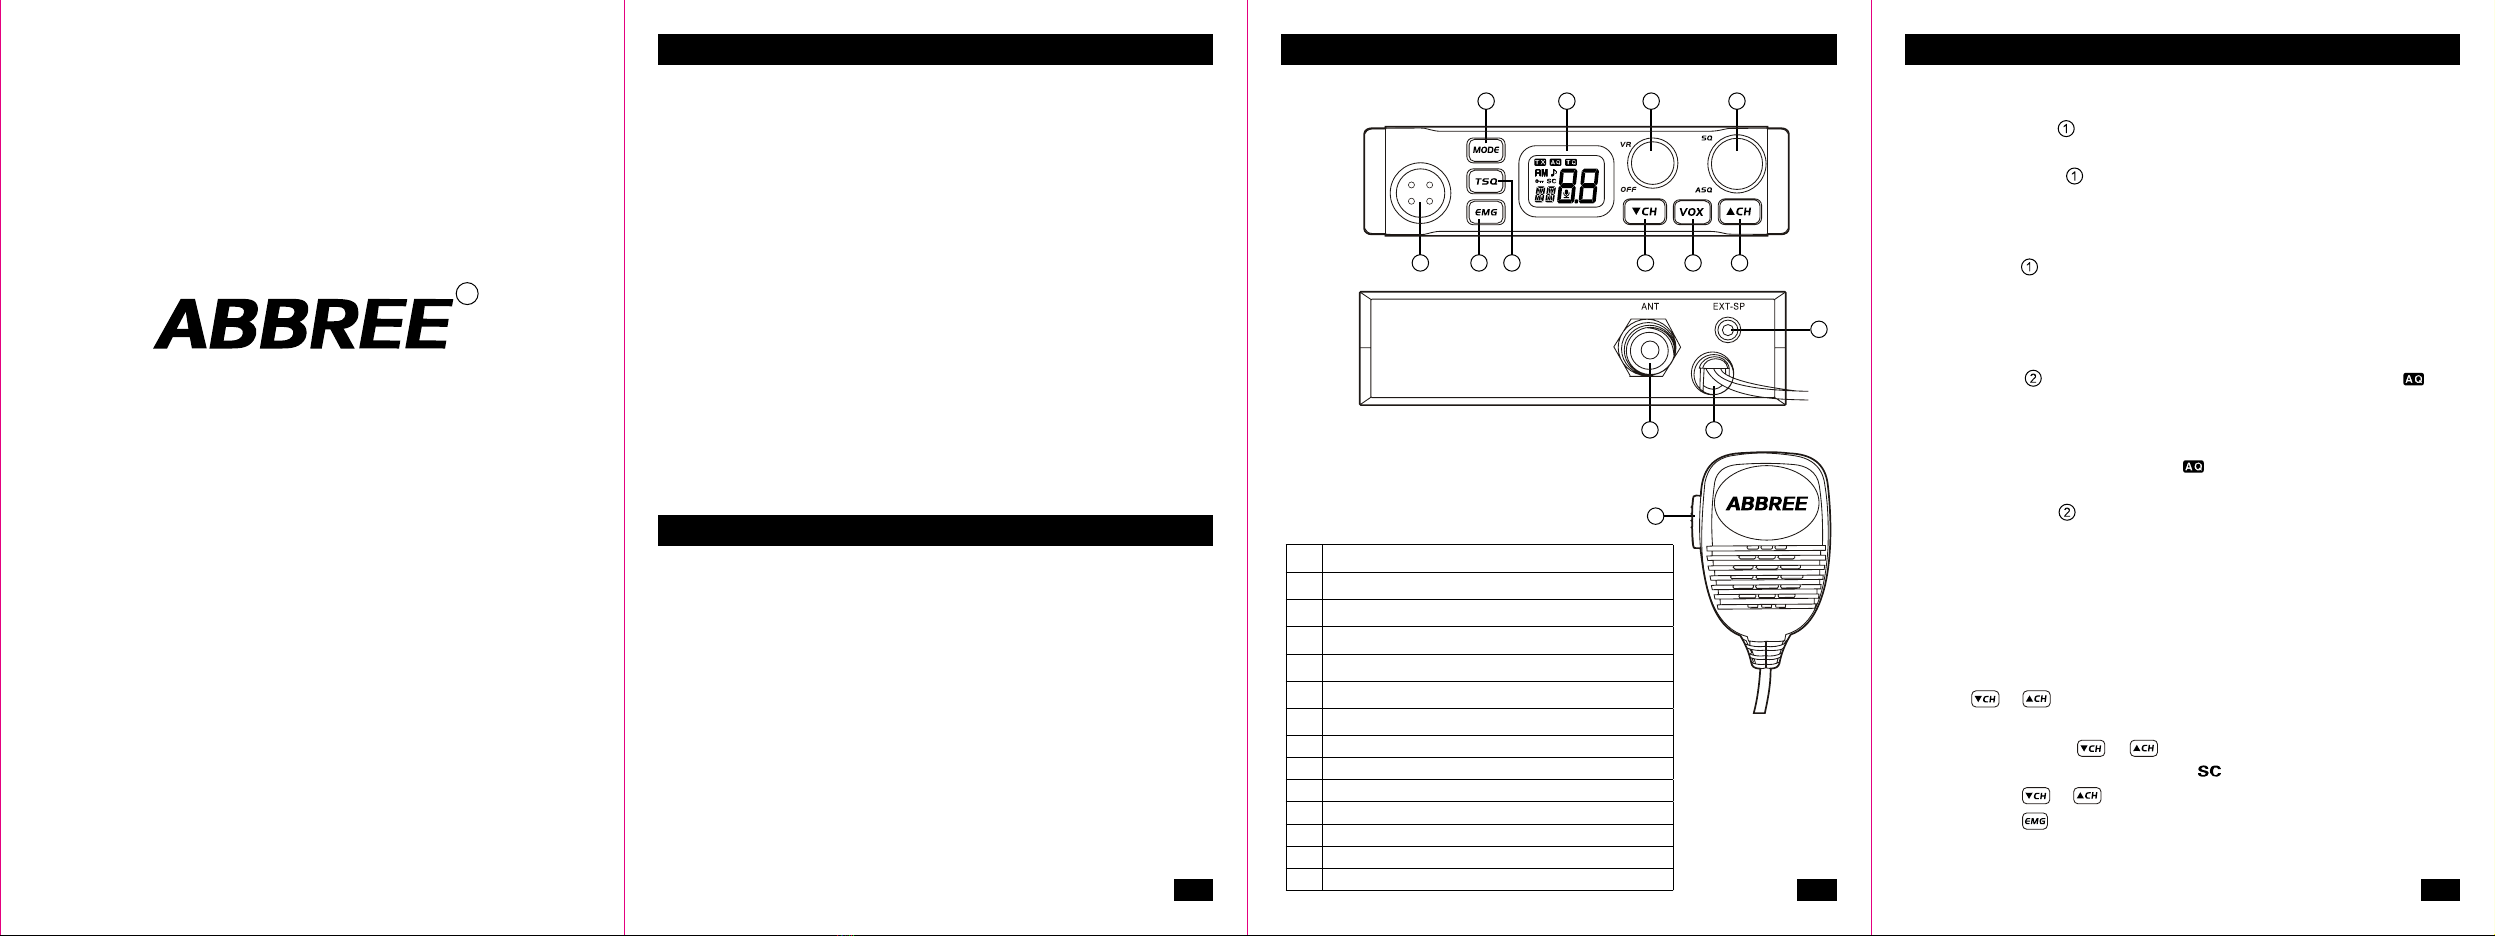
4 5 6
GENERAL
Modulation Mode AM/FM
Frequency Range 26.965-27.405MHz
Frequency Tolerance ±5.0ppm
Input Voltage 13.8V
Dimensions 140x161.5x41mm
Weight 608g
Operating Temperature Range -20℃ to +50℃
Current Drain
Transmit 3A MAX
Receive Squelched 0.3A
VOL Max 0.7A
Antenna Connector UHF, SO-239
TRANSMITTER
Power Output 4 Watts FM/AM
Transmission interference inferior to 4nW
Frequency Response 300-3000Hz
Modulated signal distortion inferior to 5%
Output Impedance 50 ohms
RECEIVER
Sensitivity Less than 1uV for 10dB(S+N)/N
Image Rejection 70dB
Adjacent Channel Rejection 60dB
IF Frequencies 1st 10.695MHz
2nd 455KHz
Automatic Gain Control(AGC) Less than 10dB change in audio
Output for inputs from 10 to 50000uV
Squelch less than 1uV
Audio Output Power 1Watts at 8Ω less than 10% distortion
Frequency Response 300-3000Hz
4.5 MODE ...................................................................................................
※Mode Control (short press)
(1) Short press , key to switch between / mode.
(2) The LCD displays the selected mode.
4.6 TSQ ......................................................................................................
※CTCSS/DCS (short press)
4.7 EMG ......................................................................................................
※Emergency Channel (short press)
4.9
4.10
Install external speaker ....................................................................
Resume Factory Default ..................................................................
4.8 VOX ......................................................................................................
※VOX (short press)
※Keypad Lock (long press) ※VOX Setting (long press)
※CTCSS/DCS Setting (long press)
(1) Long press key for over 2 seconds to lock the keys, LCD displays
"".
(2) Long press key for over 2 seconds again to unlock the keys " "
disappears form LCD.
(1) Short press key to enable/disable CTCSS tone or DCS code,
LCD displays " " when the TSQ function is enabled.
(1) Long press key enter the CTCSS/DCS function setting, " " falshes
in the LCD.
(2) Short press key to select CTCSS tone or DCS code.
C: stands for CTCSS tone.
D: stands for DCS code.
(3) Short press or key to set desired CTCSS tone or DCS code.
There are 38 CTCSS tones from 001 to 038 and 104 DCS codes from
001 to 104.
(4) Long press key to store and exit setting.
(1) Short press key to choose CH9, the channel number flashes.
(2) Short press key again to choose CH19, the channel number flashes.
(3) Short press key third time to return to last normal channel.
Short press key to enable/disable the VOX function. The LCD displays
"" when the VOX function is enabled.
(1) Long press key enter the VOX function setting, " " falshes in the
LCD.
(2) Short press key to choose wanted setting.
LE: stands for sensitivity level.allows the adjustment of the microphone
for an optimum transmission quality. Adjustable level from 1 (high
sensibility) to 9 (low sensibility)
TI: stands for delay time.allows avoiding the sudden cut of the
transmission by
adding a delay at the end of speaking. The level is adjustable from 1 (short
time delay) to 9 (long time delay)
(3) Short press or key to set desired level.
(4) Long press key to store and exit setting.
Choose a 8Ω external speaker with 3.5mm mono connector.
(1) Hold press key to power on radio, until the LCD displays " ", the
resume work finish.
(2) All channel and function setting will resume factory default after above
operation.
Xiamen Aorui Electronics Co.,Ltd
FCC Compliance Statements:
This device complies with part 15 of the FCC Rules. Operation is subject to the
following two conditions:
(1) This device may not cause harmful interference, and
(2) this device must accept any interference received, including interference that
may cause undesired operation.
This equipment has been tested and found to comply with the limits for a Class B
digital device, pursuant to part 15 of the FCC Rules. These limits are designed to
provide reasonable protection against harmful interference in a residential
installation. This equipment generates, uses and can radiate radio frequency
energy and, if not installed and used in accordance with the instructions, may
cause harmful interference to radio communications. However, there is no
guarantee that interference will not occur in a particular installation. If this
equipment does cause harmful interference to radio or television reception, which
can be determined by turning the equipment off and on, the user is encouraged to
try to correct the interference by one or more of the following measures:
-Reorient or relocate the receiving antenna.
-Increase the separation between the equipment and receiver.
-Connect the equipment into an outlet on a circuit different from that to which the
receiver is connected.
-Consult the dealer or an experienced radio/TV technician for help.
WARNING:
MODIFICATION OF THIS DEVICE TO RECEIVE CELLULAR RADIOTELEPHONE
SERVICE SIGNALS IS PROHIBITED UNDER FCC RULES AND FEDERAL LAW.
RF Exposure and Separation Distance:
For safe operation, the minimum separation distance should be 35.8cm.

Popular Radio manuals by other brands

AEG KRC 4376 CD instruction manual

AEG

AEG KRC 4376 CD instruction manual

Noxon NOXON datasheet

Noxon

Noxon NOXON datasheet

S&C SpeedNet SDR instruction sheet

S&C

S&C SpeedNet SDR instruction sheet

Sangean DT-210 Specifications

Sangean

Sangean DT-210 Specifications

POLMAR ZX-40 PRO user manual

POLMAR

POLMAR ZX-40 PRO user manual

Sony XDR-S3HD - HD / AM operating instructions

Sony

Sony XDR-S3HD - HD / AM operating instructions

Clint F4 user manual

Clint

Clint F4 user manual

Albrecht Audio DR 452 manual

Albrecht Audio

Albrecht Audio DR 452 manual

Raymarine Apelco 510 user guide

Raymarine

Raymarine Apelco 510 user guide

Clatronic DR 572 Instruction manual & guarantee

Clatronic

Clatronic DR 572 Instruction manual & guarantee

DeWalt DCR019-QW Original instructions

DeWalt

DeWalt DCR019-QW Original instructions

PURE Evoke C-D4 manual

PURE

PURE Evoke C-D4 manual

kchibo KK-P01 user manual

kchibo

kchibo KK-P01 user manual

Philips PSA110/00 Specifications

Philips

Philips PSA110/00 Specifications

Uniden BCD325P2 owner's manual

Uniden

Uniden BCD325P2 owner's manual

Tangent Dab2go junior user manual

Tangent

Tangent Dab2go junior user manual

Wouxun KG-XS20G owner's manual

Wouxun

Wouxun KG-XS20G owner's manual

Kenwood TK-7180(H) specification

Kenwood

Kenwood TK-7180(H) specification

manuals.online logo
manuals.online logoBrands
  • About & Mission
  • Contact us
  • Privacy Policy
  • Terms and Conditions

Copyright 2025 Manuals.Online. All Rights Reserved.