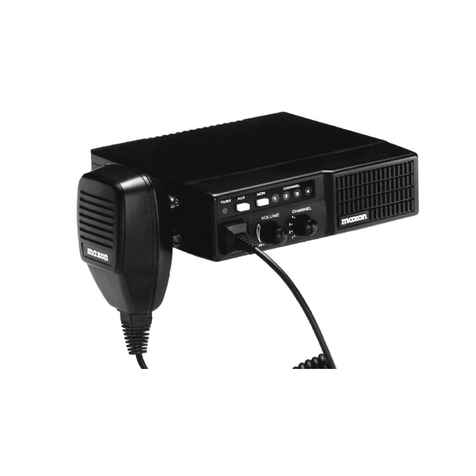
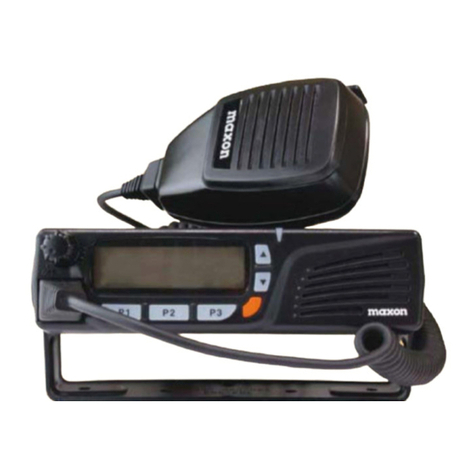
Maxon SM-2402 User manual

SM-2402

Operating
Instructions
Table of Contents
About Your SM-2402 Series Radio .........................................………………………………........….1
About maxon ...........................................………………………………...........1
Safety Information ..................................................………………………….......... 1
Unpacking Information ..............................................................………………............. 4
SM-2402 Series Features ...............................................................…...............................4
Installation Safeguards ………...................................................................................... 5
Description of Radio Components ..................………................................………......................... 6
Display Icons and Indications ..................................................................………………......... 8
SM-2402 Series Operations ..........................................................................…....................8
Power On / Off Volume ...................................………………….................................... 8
Trunked Mode Operation ........................................................………………..................................... 8
Channel Monitoring .......................................................................................…………………........... 8
System "Handshaking" .........................................................................………………….................... 9
Transmitting ......................................................................................................…………………........ 9
Receiving .............................................................................................................…………………..... 9
Transpond Mode ...................................................................................................…………………..10
Conventional Mode Operation ............................................................................………………....... 10
Transmitting ..........................................................................................................………………... 10
Receiving .............................................................................................................………………….. 11
Busy System Queuing ...........................................................................................……………….... 11
Multiple-Function Keypad Description ...................................................................……………….... 12
Option Button Function Descriptions ....................................................................………………..... 13
Talk Around .......................................................................................................………………….... 13
Monitor ..............................................................................................................………………….... 13
Horn and Lights .................................................................................................………………….... 13
Auxiliary ...............................................................................................................………………….. 14
Public Address .......................................................................................................………………… 14
Status Indicators and Audible Alert Tones ................................................................…………….... 15
Scan Modes ..............................................................................................................…………….... 16
LTR Manual Group Scan ...................................................................................………………….... 16
LTR Auto Group Scan ......................................................................................………………......... 16
System Scan ...................................................................................................…..…………............ 17
Conventional Group Scan ............................................................................. …..…………............. 17
Editing Scan List ............................................................................................…..……….................. 18
Conventional Scanning ..................................................................................……........................... 18
Talk Back Scan ................................................................................................…………………....... 18
RX only / TX disable .........................................................................................…………………...... 18
Priority TX Scan ..............................................................................................…………………........ 19
Priority only TX .................................................................................................…………………...... 19
Priority Look Back Scan ...................................................................................…………………...... 19

Vacant Channel Scan .......................................................................................………………......... 20
Nuisance Delete ................................................................................................…………………..... 20
DTMF Microphone Operation .............................................................……………………………...... 20
Table of Contents
Auto Dial Operation ............................................................................………….…….................... 20
Manual Dial Operation ..............................................................................…………………........... 21
Clearing a Dialed Number ................................................………………….................................... 21
To Store a Number in Memory ................................................................…………………............. 21
To Recall a Stored number from Memory .................................................…………………........... 21
Clearing a Stored Number .......................................................................…………………............. 22
FCC Licensing ............................................................................................……………................. 22
Service .......................................................................................................………………................22
Software Copyrights ..................................................................................………………................ 23
Maintenance ...................................................................................................………………........... 23
Product Warranty ..............................................................................................………………......... 23

About Your SM-2402 Series Radio
Maxon's SM-2402 series mobile radio are Compatible.Conventional radio system operation.
the SM-2402 is capable of up to 208 channels 13 Groups per system in conventional operation.
The operation and functions for the SM-2402 Series radios are described in this manual.
We urge you to thoroughly read this manual before operating the radio.
Application of some functions described in this manual is determined by the system you use.
Your Maxon Dealer will program your radio so that you have the greatest number of functions
possible relative to your needs.
Should you have questions regarding the operation of the radio, please consult your Maxon Dealer.
About Maxon
Maxon is a world-respected name in professional FM two-way radio equipment operating in the
UHF, VHF and 800 MHz frequencies; personal two-way communication devices, including the
popular FRS (Family Radio Service) and GMRS radios; and a variety of wireless communication
products (two-way voice messaging handsets, Wireless Local Loop terminals, etc.).
Safety Information
The Federal Communications Commission (FCC), with its action in General Docket 93-62,
November 7, 1997, has adopted a safety standard for human exposure to Radio Frequency (RF)
electromagnetic energy emitted by FCC regulated equipment. Maxon subscribes to the same safety
standard for the use of its products. Proper operation of this radio will result in user exposure far
below the Occupational Safety and Health Act and Federal Communications Commission limits.
WARNING - The antenna(s) used for this transmitter must be installed to provide a separation
distance of at least 60 cm from all persons and must not be co-located or operation in
conjunction with any other antenna or transmitter.

Safety Information, Continued
WARNING - This radio has been tested and complies with the FCC RF exposure limits for
“Occupational Use Only.” In addition, your FM radio complies with the following
standards and guidelines with regard to RF energy and electromagnetic energy levels
and evaluation of such levels for exposure to humans :
-FCC OET Bulletin 65 Edition 97-01 supplement C, Evaluating compliance with FCC
guidelines for Human Exposure to Radio Frequency Electromagnetic Fields.
-American National Standards Institute (C95.1-1992), IEEE standard for Safety levels
with respect to human exposure to radio frequency electromagnetic fields, 3 kHz to
300 GHz.
-American National Standards Institute (C95.3-1992), IEEE recommended practice for
the measurement of potentially hazardous electromagnetic fields – RF and Microwave.
-DO not operate the radio without a proper antenna attached, as this may damage the
radio and may also cause you to exceed FCC RF exposure limits.Aproper antenna is
the antenna supplied with this radio by the manufacturer or an antenna specifically
authorized by the manufacturer for use with this radio.
-ALWAYS use Maxon authorized accessories. Use of unauthorized accessories can
cause the FCC RF exposure compliance requirements to be exceeded.
-DO not transmit for more than 50% of total radio use time (50% duty cycle).
Transmitting more than 50% of the time can cause FCC RF exposure compliance
requirements to be exceeded.
The information listed above provides the user with the information needed to make him or her
aware of RF exposure, and what to do to assure that this radio operates within the FCC RF
exposure limits.
During transmissions, your Radio generates RF energy that can possibly cause interference with
other devices or systems. To avoid such interference,turn off the radio in areas where signs are
posted to do so.
WARNING - It is mandatory that radio installations in vehicles fueled by liquefied petroleum gas
conform to the following standard: National Fire Protection Association standard
NFPA 58 applies to radio installations in vehicles fueled by liquefied petroleum (LP)
gas with LP gas container in the trunk or other sealed-off space within the interior of
the vehicle. This standard requires that:
1Any space containing radio equipment shall be isolated by a seal from the space
in which the LP gas container and its fittings are located.
2Remote (outside) filling connections shall be vented to the outside.
WARNING - DO not operate the transmitter of a mobile radio when someone outside the vehicle is
within two feet (0.6 meter) of the antenna.

WARNING - DO not allow children to operate transmitter - equipped radio equipment.
CAUTION - DO not operate the radio near electrical blasting caps or in an explosive
atmosphere.
CAUTION - DO not operate the transmitter of any radio unless all RF connectors are secure and
any open connectors are properly terminated.
All equipment must be properly grounded for safe operation.
All equipment should be serviced by a qualified technician.
NOTE: This radio operates in FCC regulated frequency bands. All radios must be licensed by
the FCC before use. Because this radio contains a transmitter, Federal law prohibits
unauthorized use or adjustments of this radio.

Unpacking Information
Remove and carefully inspect the contents of your package(s) for the following items:
Radio
Microphone
DC Power Supply Cord
Radio Mounting Bracket and Hardware
Microphone Bracket and Hardware
Operating Instructions
SM-2402 Series Features
zConventional radio operation
z9 character display with icons
zWideband frequency separation
zProgrammable output power
zProgrammable 12.5 / 25 kHz channel spacing
zMultiple-function five button keypad
zProgrammable On / Off hook function
zTalk Around
zScanning
zPriority Scanning
zLook Back
zScan list editing
zCTCSS / CDDCS (Conventional operation)
zBusy channel lockout
zTime-out timer

Installation Safeguards
WARNING -DO NOT install the radio unit where it would interfere with the
proper operation of automatic collision protection devices
(air bags).
WARNING - DO NOT install the radio unit where it would likely cause injury in case of accident.
NOTE: The radio is not intended for operation in a positive ground vehicle.
1. Select a location for the radio where you can easily see and reach all controls,
A. including the microphone.
2. Using the radio mounting bracket as a template, mark with a pencil the locations
A. where the bracket securing screws will be placed.
NOTE -Before drilling holes in the vehicle, verify that there is nothing that could be
damaged or get in the way by drilling and putting screws in this location. It is better to
use existing passages in the dashboard,trunk, and sfloor for the routing cable, thus
avoiding excessive drilling.
After drilling holes for the mounting bracket, attach bracket to the surface by using the
two large Phillips head screws provided.
3. Install the radio unit to the bracket using the black screw knobs (located on each side
of the radio) along with the two spring lock washers, and two large flatwashers
provided.
NOTE -Depending on the radio mounting location, it may be more convenient to install the
microphone bracket before installing the entire radio unit.
4. Mount the microphone bracket to the most convenient side of the radio unit, using the
two small Phillips head screws provided. There are two options for installing the
microphone bracket, allowing the on-hook placement of the microphone from either
the top or the front of the bracket.
5. Connect the DC power supply cord to the radio. If necessary, the power supply cord
may be connected before mounting the radio unitto the radio bracket.
6. Push the modular microphone connector into the microphone jack (located in the front
of the radio unit) until a click is heard.

Installation Safeguards, Continued
CAUTION -Some electronic fuel injection, anti-skid braking systems, cruise controls, and vehicle
alarms may be prone to interference from radio frequency energy or may malfunction due to a lack
of protection from RF energy. If the vehicle contains such equipment, consult your Dealer to get
help determining whether the electronic equipment in the vehicle will operate properly when the
radio is transmitting.
You must purchase an antenna for proper operation of the radio. Consult your Dealer to determine
which antennas are suitable.
Description of Radio Components
1) On / Off - Volume Knob - Turns the radio on and / or off, and controls the
audio level
2) Display – Back lighted display with icons and up to 9 alphanumeric
characters
3) Up / Down Selection Buttons – Selects Systems, Groups, option functions
4) Mode Select Button - Toggles among Systems, Groups, Call missed (CALL)
and display brightness (BRIGHT). Also returns radio to your Home
system / Home Group
5) Option Select Button – Enables / disables optional radio functions, also
enables scrolling when using the Up / Down Selection Buttons.
6) Scan Select Button – Enables / disables Scan functions; also toggles
between Scan and Priority Scan modes
7) LED Indicator - Tri-colored light indicates status of radio
8) Speaker - 8 Ohm (please use symbol for OHM) internal speaker allows
received messages to be heard
9) Microphone Connector - 8-pin, RJ-5 jack accepts microphone plug and is
used for radio programming
10) External Auxiliary Connector - 3.5 mm jack is used for connecting an external speaker
11) High density DB-15 Connector - Option connector which supplies or receives audio levels.
Can also be used with an external or internal radio modem to make the radio capable of
sending or receiving mobile data information
12) Antenna Receptacle – Requires a 50 Ohm (please use symbol for OHM) load, PL-259 type
(sold separately)

13) DC Power Cord – 13.8 VDC Polarized plug (for use in negative ground vehicles only)
14) Ignition Sense – (located on high-density DB-15 connector) Allows vehicle ignition to power
radio on and off
15) Mounting Bracket with Hardware - Used to support the radio during installation
16) Microphone Hanger- Used to hang the microphone; also used to enable / disable CTCSS /
CDDCS squelch functions

Display Icons and Indications
zS - Indicates scan mode is active
zP-Indicates Priority scan mode and assigned priority channel
zL -Low RF Power is active.
SM-2402 Series Operations
Power On / Off - Volume:
Turn the radio on by rotating the On / Off - volume control clockwise until you hear a click and, if
enabled via Dealer programming, the self test “alert”tone will be heard. SM-2402 will briefly
appear in the display. Turn the radio off by rotating the control counter clockwise.
Trunked Mode Operation
Your Maxon SM-2402 series may be programmed to operate with both Trunked and Conventional
modes. There are only a few differences in their operation and these are detailed as follows.
Channel Monitoring:
While on a Trunked System, channel monitoring is performed automatically by the radio transceiver.
In accordance with the FCC rules, while operating on a Conventional System the channel must be
monitored prior to transmit-ting. In both Trunked and Conventional Systems,operation may vary
from System to System. Your Maxon Dealer will be able to assist with particular operational
parameters and procedures for the various Systems and functions.

Trunked Mode Operation, Continued
System “Handshaking”
In a Trunked System, when the P-T-T is pressed on the microphone, a “Handshaking”
routine occurs which establishes communications between the radio and Trunked System. When
the LED indicator glows steadily red, voice transmission may begin. If your Maxon Dealer has
enabled the “Clear to Talk”tone option, the radio will emit a short tone signaling voice
transmission may occur. In Conventional Systems, there is no System “handshaking”and
voice transmission may start immediately.
Transmitting
1. Rotate the On / Off - Volume control clockwise to turn the power on.
2. Adjust On / Off - Volume control further clockwise to increase the volume level.
Rotate counter clockwise to decrease volume level.
3.Select the desired System and Group using the Up/Down but tons located on the front of the
unit.
4.Insure the microphone is secure in the Microphone jack located on the front of the unit,
press and hold the P-T-T lever on the side of the microphone.
5.Listen for the “Clear to Talk”tone (or wait for the LED indicator to glow steady red)
and begin talking. Hold the microphone 1 or 2 inches from you mouth, speak clearly
and distinctly into the microphone area of the front grille.
6.Release the P-T-T lever as soon as the message is complete and listen for a response.
The P-T-T lever must be pressed continuously while talking and released to listen.
Receiving
1.Turn power on and set the volume level as previously described.
2.Select the desired System and System Group.
3.When a message is received, the LED indicator will glow green.
4.Respond to message by removing the microphone from hook,thenpress the P-T-T lever on
the side of the microphone. Press the P-T-Tcontinuously while talking and release to listen.
If scanning modes are enabled be sure to respond before scanning resumes, if you do not,
another call may be received and the selected System and Group may have to be changed.
Scanning is indicated by scan mode icons. Refer to “Scan Modes”for more descriptive
information.

Trunked Mode Operation, Continued
Transpond Mode
If Transpond has been enabled by your Dealer, your radio will automatically send (transpond)
an acknowledgment to the System indicating that your radio has received a transmission.
Transpond is a Dealer programmable feature.
Conventional Mode Operation
Your Maxon SM-2402 series may be programmed to operate in Conventional modes.
Conventional mode may or may not require a Conventional repeater System. Radio to
radio communications can also be accomplished in Conventional operation.How the
Conventional mode is programmed is determined by your Dealer.
Transmitting
1. Rotate the On / Off - Volume control clockwise to turn the power on.
2. Adjust On / Off - Volume control further clockwise to increase thevolume level.
Rotate counter clockwise to decrease volume level.
3. Select the desired Conventional System and Group channel using the Up / Down buttons
located on the front panel of the radio.
4. In a Conventional System it is necessary to monitor the channel for activity before a
transmission. Monitor the channel by pressing the OPT (option) button located on the front
panel and selecting monitor, once selected pressing OPT button once will begin monitor
function, pressing OPT a second time will turn off monitor function.Monitoring of the channel
can also be accomplished by observing the LED indicator for a solid yellow color. If solid yellow
is observed, you must wait for the indication to leave before a transmission can be made.
5. Press and hold the microphone P-T-T lever on the side of the micro-phone, LED indication will
glow red, hold the microphone 1 or 2 inches from you mouth, speak clearly and distinctly into
the microphone area of the front grille.
6. Release the P-T-T lever as soon as the message is complete and listen for a response. The
P-T-T lever must be pressed continuously while talking and released to listen.
Receiving
1. Turn power on and set the volume level as previously described.
2. Select the desired System and System Group channel.

Conventional Mode Operation, Continued
1. When a message is received, the LED indicator will glow solid yellow or green depending
if CTCSS tone or DCS has been programmed.
2. Respond to message by pressing the P-T-T lever on the side of the microphone. Press the
P-T-T continuously while talking and release to listen.
If scanning modes are enabled be sure to respond before scanning resumes, if you do not,
another call may be received and the selected channel may have to be changed. Scanning is
indicated by the scan mode icons. Refer to “Conventional Scanning”for more descriptive
information.
Busy System Queuing
If enabled by your Dealer, Busy System Queuing will monitor the System for activity. Once the
System becomes available the System will automatically be accessed and held for a period of time,
determined by your Dealer, allowing you to transmit on the System. An audible indication will sound
along with a flashing yellow LED indication when queuing has begun and again will sound when the
System has been acquired. Busy System Queuing is available for both Trunked and Conventional
System operation. The word QUEUING will also be shown in the display when busy system queuing
has become active.
Multiple-Function Keypad Description
Your SM-2402 series has five multiple function keypad buttons located on the front panel. An
audible beep, if enabled by your Dealer, is heard each time an option button is depressed.
* Up / Down Arrow Keys -These buttons will allow you to scroll Up or Down your preprogrammed
Systems, Groups or option functions depending upon which button is pressed. A press and
release will step once, a press and hold will scroll until button is released. All System and Group
names will be shown in the display and are preprogrammed by your Dealer.
* Mode Button -This button will allow you to return to your Home System / Home Group, or toggle
between System, Group, Call Missed (CALL) and Display Brightness (BRIGHT).
Press-and-release will toggle between System, Group, call and bright selection modes. A press
and hold will tune to the Home System / Group. System and Group names will be displayed.

Multiple-Function Keypad Description, Continued
Call Missed
Call Missed mode, allows you to check for calls which you may have missed while away
from your radio. Call Missed is a dealer program-mable function. A continuous flashing
Phone Handset icon indicates a call or calls have been missed and are stored in the
missed call list. To check for missed calls press and release the MODE button until the
word CALL is shown in the display. Press the up or down buttons to view and selecta
call you desire to answer. Once selected pressing the P-T-T of the microphone will allow
the missed call to be answered. Once answered that call will be removed from your call
list. Up to 8 unanswered calls will be stored. Any new calls beyond 8 will be removed
from the list beginning with the oldest call. Pressing the mode button a second time will
remove any unanswered calls and exit the call missed list.
NOTE: Scanning will be disabled when your call list is being accessed.
Display Brightness
Display Brightness mode, allows you to change the brightness ofthe display. To change
the display brightness press and release the MODE button until the word BRIGHT is
shown in the display. Press and release the up or down buttons to change the display
brightness. There are 4 levels of brightness, continuously pressing up or down buttons will
go back through your display brightness levels. Once selectedthe radio will return to the
previously selected System or Group.
OPT (Option) -This button will allow you to enable or disable a selected optional function. A press
and release, unless specified otherwise, will enable or disable the currently selected function
Monitor (MONITOR), Auxiliary (AUXILIARY), Public Address (P/A), no option (NONE). A press and
release followed immediately by a press and hold will allow selection of option functions using the
up or down arrow buttons. Once option is shown in display a second key press of OPT will select
option to be used under the OPT button indicated by the SCAN icon.If no button press is detected
option will not be enabled and radio will resume previous operation. All option indications will be
displayed by either an icon or in the LCD.
Scan Button - This button will allow selection between Scan and Priority scan modes. A press and
release will enable normal scanning functions

Multiple-Function Keypad Description, Continued
a press and hold will enable Priority Scan functions. A press and release will disable the
selected Scan function. All indications will be displayed as icons, if normal scan is selected the
SCAN icon will be shown. If priority scan has been selected both the SCAN and Picons will be
shown.
Option Button Function Descriptions
Monitor
Monitor mode is only available for Conventional operation, if previously selected as the OPT
button function, allows you to open the radios squelch to listen for activity before attempting
transmission on a conventional Systems channel Group.Monitor also defeats CTCSS and
CDDCS squelch functions. Monitor can be activated by a press and release of the OPT button
opening the radios squelch. A second press and release of OPT button will close the radios
squelch. When monitor is active the word MONITOR will show in the display.

Option Button Function Descriptions, Continued
second press and release of OPT will deactivate horn and light function. The horn and light
function can be used in conjunction with the Dealer programmable Call Missed feature. The
call missed feature will store up to 8 unanswered calls.
Auxiliary
Auxiliary mode, if previously selected as the OPT button function, will enable or disable an
external speaker option which may have been added to your radio. When activated by a press
and release of OPT button the internal speaker to the radio will be disconnected and the
externally attached speaker will become active. A second press and release will return to radios
internal speaker. The auxiliary option can be activated with all other options with the exception of
NONE. When other options are selected the attached external speaker will always be active until
the other selected option is disabled.
Public Address
Public address mode, if previously selected as the OPT button function, allows the microphone
to be used as a public address or intercom feature. When activated by a press and release ofthe
OPT button the internal speaker to the radio will be disconnected and the externally connected
Public address speaker will become active allowing only your voice transmission over the
externally connected speaker. The radios transmitter and receiver will also be deactivated. A
second press and release will return radio to normal operation. The word P/A will be show in the
display when option is active.

Status Indicators and Audible Alert Tones
Your series has a sophisticated microprocessor control which
provides a series of audible alert tones.
Upon initial power up, a quick beep indicates that the self-test of the micropro-cessor functions has
been completed satisfactorily.A series of tones may be sounded with any of the following
conditions:
zAttempt to transmit on a System / channel that is already in use when busy channel lockout
has been programmed into the radio.*
zCall Received.*
zClear-To-Talk / Transmit, indicates you may now begin speaking. *
zTransmit not available, indicates you are denied transmit on that System /channel.*
zBusy System Queuing, indicates your radio has been placed in the queuing mode and is
attempting to access the System.
zOut of Range, indicates you are out of range of the System.
zTime-Out-Timer, indicates you have exceeded the maximum transmission time.*
zBusy Channel Lockout, indicates transmission cannot occur while channel is active.*
* Indicates a function that is initially programmed into the radio by your Dealer. The majority of
LED indications and audible alerts can be enabled or disabled by your Dealer via programming.
STATUS
DESCRIPTION LED COLOR/ICON AUDIBLE TONE DISPLAY
Normal Power On - Ready Red, Yellow, Green
-Flashing Single Beep
Call Received Yellow Single Beep
Correct Call Green Single Beep
Transmit Red
Busy Channel Yellow
Transmit not
Allowed Yellow -Flashing Busy Tone -
Repeated
Priority Icon P
Auxiliary Icon - Flashing (musical note)
System Trunked or
Conventional Icon SYS
Clear to Talk Red Single Beep

Status Indicatiors and Audible Alert Tones, Continued
STATUS DESCRIPTION LED COLOR/ICON AUDIBLE TONE DISPLAY
Trunked Out of Range Red, Yellow -
Flashing Two Beeps-
Repeated RANGE
Warning Busy System
Queuing Yellow -Flashing Single Beeps-
every 10 seconds QUEUING
Busy System
Accessed Yellow -Flashing Single Beeps
-Repeated
Queue Time-out Single Tone -2
seconds
Time- Out -Timer Single Tone TIME OUT
Horn and Lights Green, Yellow -
Flashing HORN-LT
Call Missed Icon - Flashing CALL / Flashing
Phone handset
Busy Channel
Lock Out Yellow Busy Tone -
Repeated BUSY
Scanning
In Normal Scan
Mode Icon SCAN
In Priority Scan
Mode Icon SCAN with P
Scan List Editing EDIT GRP,
EDIT PRI or
EDIT SYS
In Scan List Icon Two Beeps S or P
Not in Scan List No Icon Two Beeps
Scan Modes
Your SM-2402 series radio may be programmed for one or more scan modes
depending upon your Dealer programming.
LTR Manual Group Scan
To enable LTR manual Group scan, enter normal scan by a press and release of the scan button
on the radios front panel. The scan icon will show in the display. In this scan mode the radio will
scan all LTR receive Group IDs. Upon receiving the correct ID the radio will allow transmission
on that Group ID until scanning resumes.

LTR Auto Group Scan
Operation is the same as for LTRManual Group Scan with the exception you do not need to
press the scan button. This function is pre-programmed by your Dealer.
Scan Modes, Continued
Conventional Group Scan
To enable Conventional Group Scan, press and release the scan button on the front panel. The
scan icon will show in the display. A press and hold of the scan button will activate priority scan.
A second press and release will turn scan off. Conventional Group Scan performs in the same
manner as LTRmanual group scan with the exception, ID codes are not required. Only those
groups enabled in the group scan list will be scanned.
Editing Scan List
You as a user can edit your Priority your Group scan list and your System scan list. To activate
Scan list editing, first determine if you will be editing your System scan list or your Group scan list.
Select either System mode or Group mode using the mode button located on the front panel.
Once System or Group mode has been entered turn the radio off using the control knob. Press
and hold the scan button and at the same time turn the radio power back on while continuing to
hold the scan button. Your display will show one of the following: EDIT GRP
EDIT SYS
EDIT PRI
Continue holding the scan button until the desired edit function is shown in the display. Once
desired edit function is shown release the scan button. Use the up or down buttons to select the
desired System or Group to add or delete from the scan list. Once selected press and release the
mode button to add or remove from your list. The scan icon indicates if your selected System or
Group has been added. When list is completed press and release the scan button to exit mode and
resume normal radio operation.
Table of contents
Other Maxon Radio manuals

Maxon
Maxon MCB-100 WXD User manual

Maxon
Maxon MDP-6000 Series User manual

Maxon
Maxon MCB-45W User manual

Maxon
Maxon SP210U2 User manual

Maxon
Maxon MBR-400 User manual

Maxon
Maxon SM2102 User manual

Maxon
Maxon PM200 User manual

Maxon
Maxon SP-0402 User manual

Maxon
Maxon SL100K User manual

Maxon
Maxon MCB-30 User manual

Maxon
Maxon SD-160 Series User manual

Maxon
Maxon SP-310 User manual

Maxon
Maxon MCB-10A User manual

Maxon
Maxon SP-6102 User manual

Maxon
Maxon CM10 User manual

Maxon
Maxon HCB-40WX User manual

Maxon
Maxon SP-200 Series User manual

Maxon
Maxon SL7000 User manual

Maxon
Maxon HCB-30C User manual

Maxon
Maxon SM-2000E Series User manual