Abus TVVR30000 User manual

ABUS 4-Channel Compact Digital Recorder
TVVR30000
User manual
Version 1.1

Notes on the operating instructions
English
These user manual contains important information for in-
stallation and operation.
This should be also noted when this product is passed on
to a third party.
Therefore look after these operating instructions for future
reference!
A list of contents with the corresponding page number can
be found in the index.
Pay attention to the accompanying documents on “Control via the web interface”
and “Software”. These can also be found on the Internet under www.abus-sc.com
2

Device overview
Device overview
Front
Rear
See System operation on page 12.
1 2 3 4 5 6
7 8 9 10 11 12 13 14 15
3

Device overview
Remote control
4

Contents
Device overview...............................................................................................................................................................3
Quick guide ......................................................................................................................................................................7
Before you start................................................................................................................................................................7
Installing the HDD ............................................................................................................................................................7
Establishing the connections ...........................................................................................................................................7
Important safety information..........................................................................................................................................8
Explanation of symbols....................................................................................................................................................8
Proper use .......................................................................................................................................................................8
General ............................................................................................................................................................................8
Power supply ...................................................................................................................................................................8
Overloading/Overvoltage .................................................................................................................................................9
Cables..............................................................................................................................................................................9
Installation location/Operating environment ....................................................................................................................9
Remote control.................................................................................................................................................................9
Care and maintenance...................................................................................................................................................10
Accessories....................................................................................................................................................................10
Putting into operation .....................................................................................................................................................10
Children and the device .................................................................................................................................................10
Introduction....................................................................................................................................................................11
General information .......................................................................................................................................................11
Unpacking the device.....................................................................................................................................................11
Scope of delivery ...........................................................................................................................................................11
System operation...........................................................................................................................................................12
General information .......................................................................................................................................................12
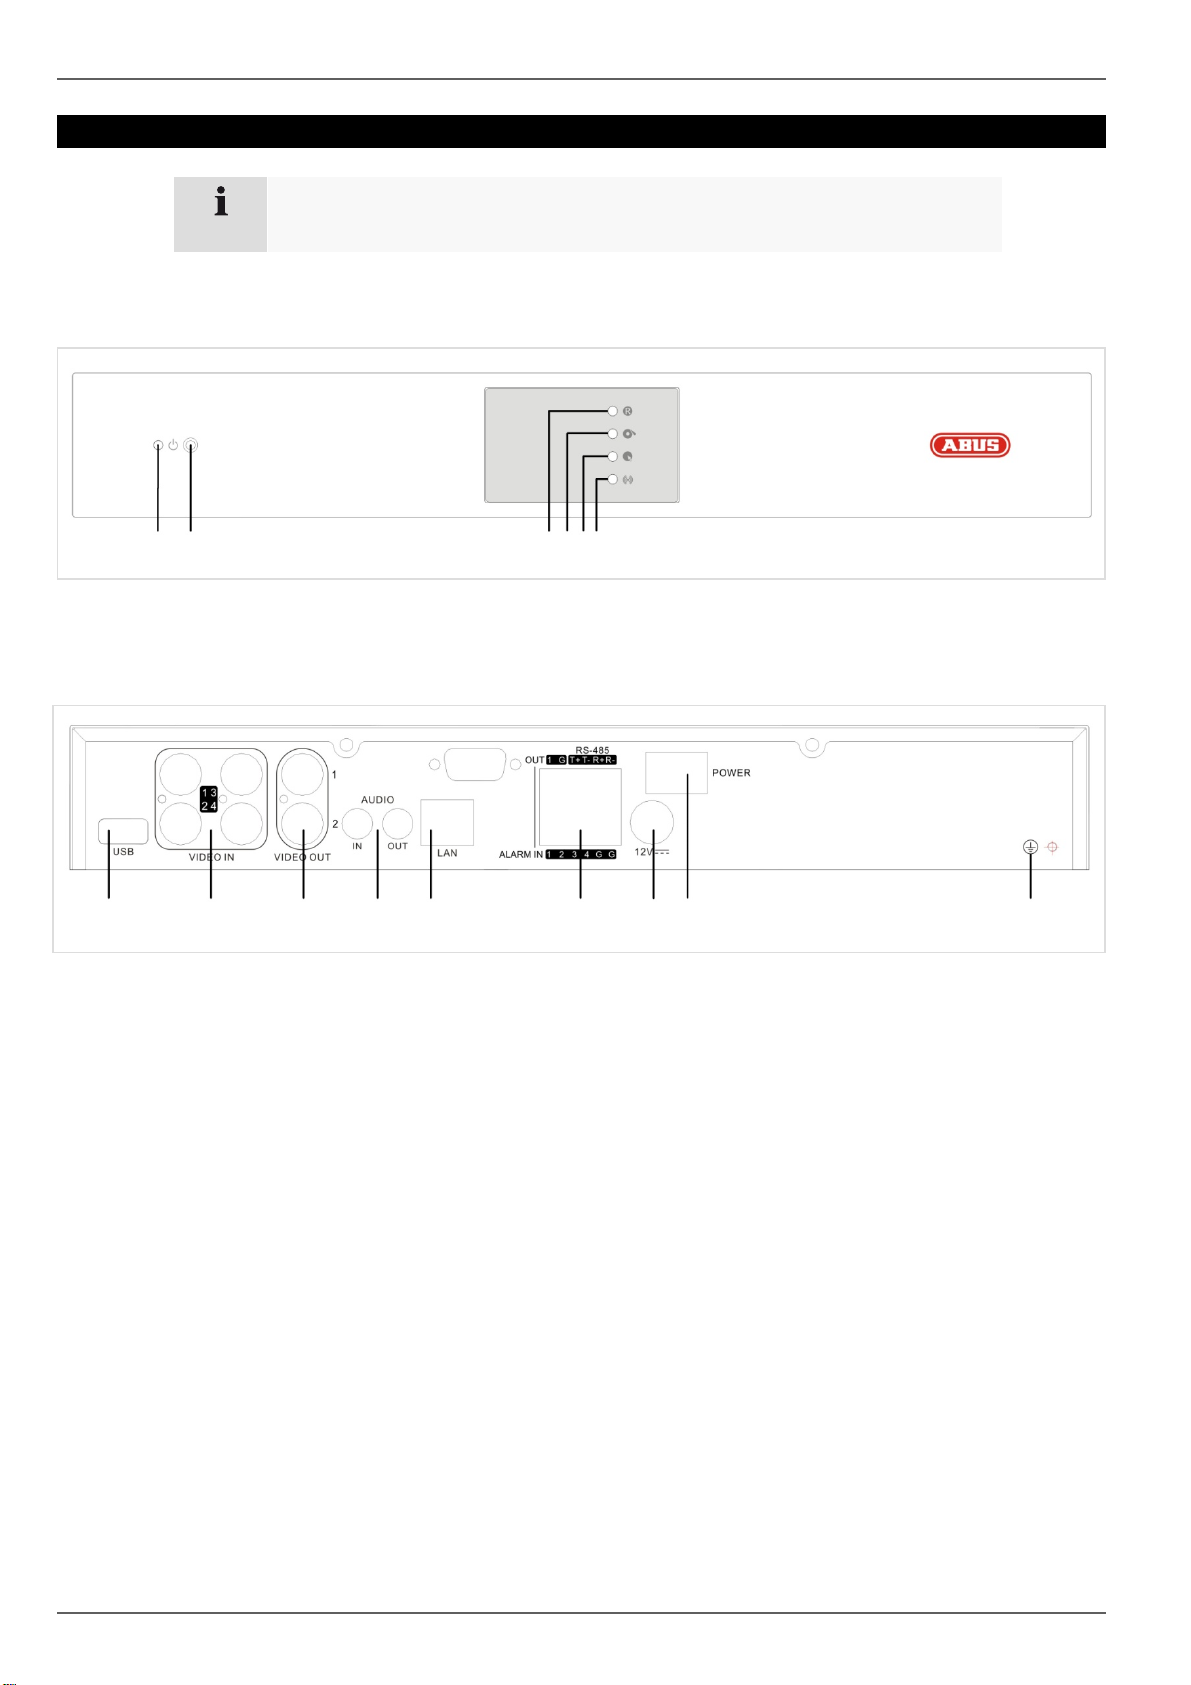
Operating elements on the device .................................................................................................................................12
Connections on the rear of the device ...........................................................................................................................12
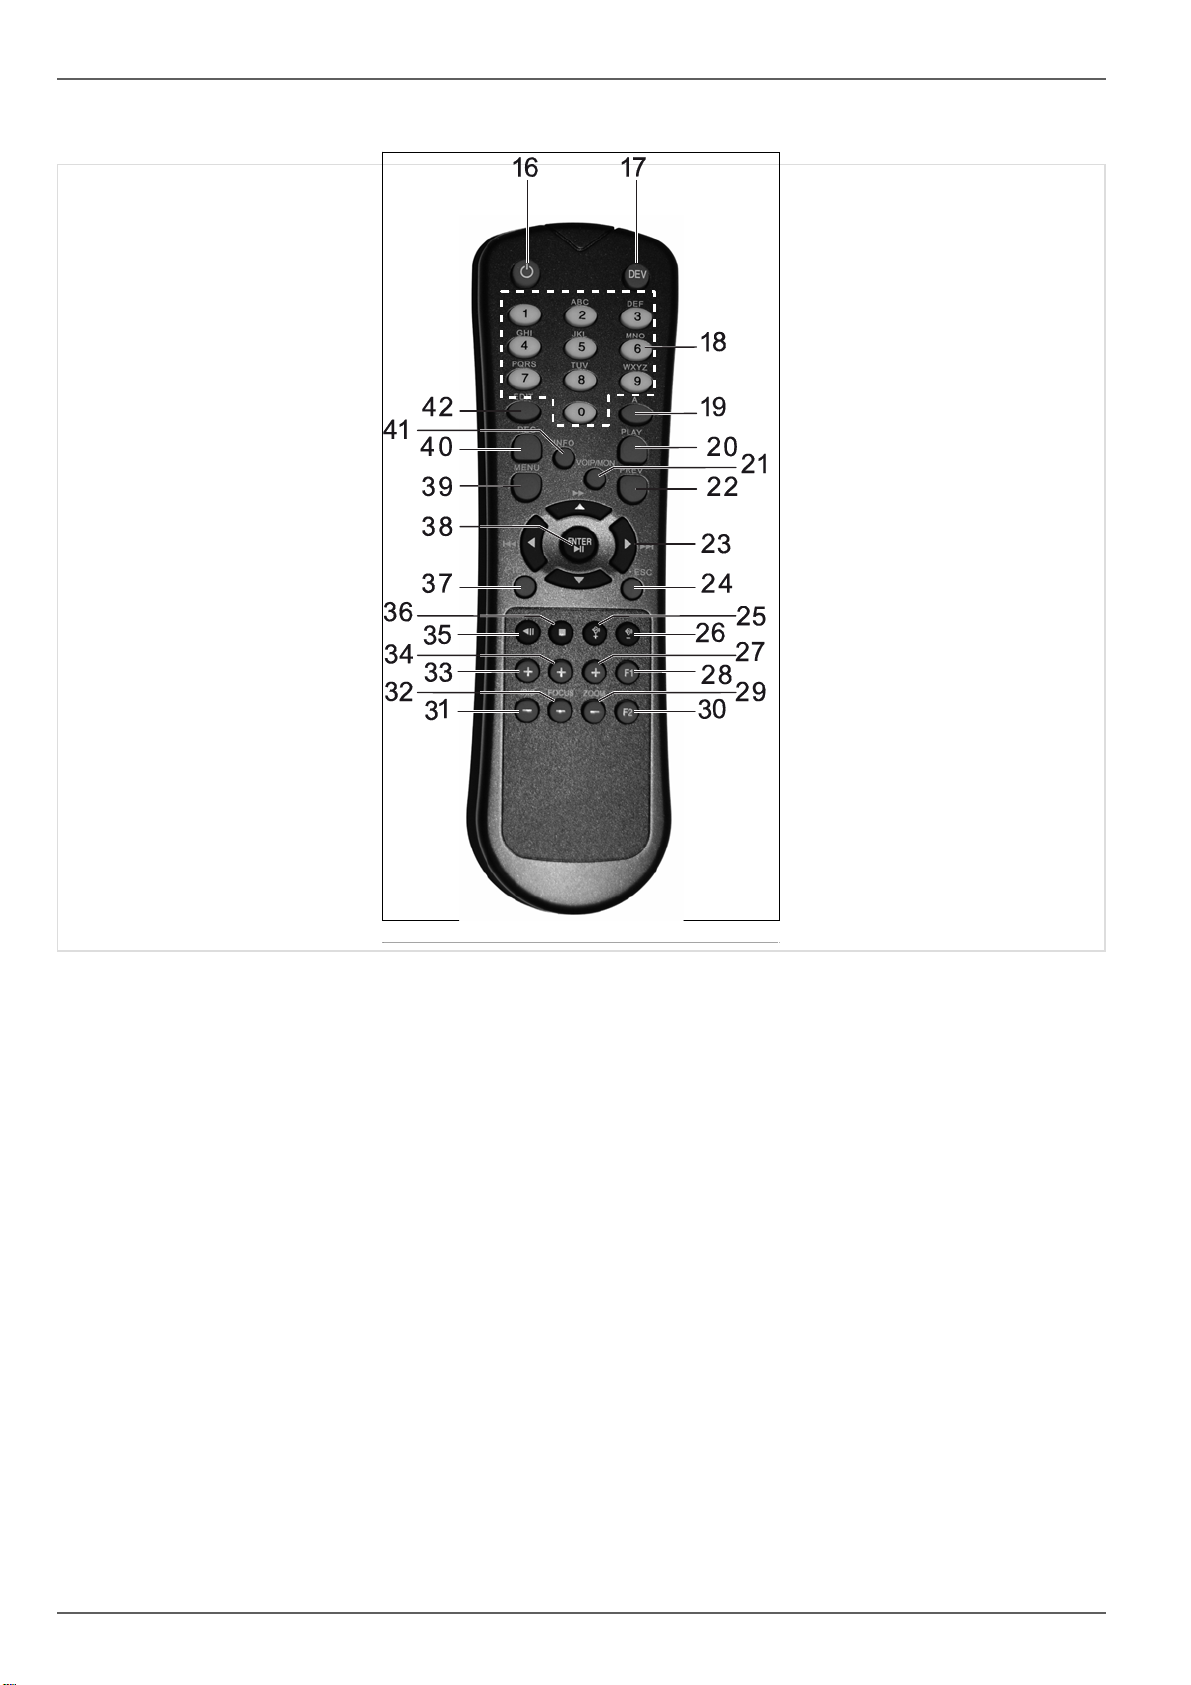
Operating elements on the remote control ....................................................................................................................13
Mouse operation ............................................................................................................................................................13
Starting the device .........................................................................................................................................................14
On-screen keyboard ......................................................................................................................................................14
Displays on the monitor .................................................................................................................................................14
Live view.........................................................................................................................................................................15
Overview ........................................................................................................................................................................15
Pop-up menu for mouse operation ................................................................................................................................15
Settings ..........................................................................................................................................................................15
Setting the date/time.................................................................................................................................................16
Setting the preview ...................................................................................................................................................16
Record.............................................................................................................................................................................17
Set-up.............................................................................................................................................................................17
Schedule...................................................................................................................................................................18
Manual record ................................................................................................................................................................18
Playback..........................................................................................................................................................................19
General information .......................................................................................................................................................19
Using the control panel.............................................................................................................................................19
PTZ control.....................................................................................................................................................................20
General information .......................................................................................................................................................20
Using the PTZ control panel .....................................................................................................................................20
Pop-up menu for mouse operation ...........................................................................................................................20
PTZ settings..............................................................................................................................................................20
Preset settings ...............................................................................................................................................................21
5

Contents
6
Patrol settings ................................................................................................................................................................21
Pattern settings ..............................................................................................................................................................22
Device menu...................................................................................................................................................................23
Menu overview...............................................................................................................................................................23
Menu description ......................................................................................................................................................23
Live view .................................................................................................................. Fehler! Textmarke nicht definiert.
Camera ..........................................................................................................................................................................24
Motion detection: Setting an area.............................................................................................................................24
Motion detection: Settings ........................................................................................................................................24
Advanced settings ....................................................................................................................................................25
Recording.......................................................................................................................................................................25
Network..........................................................................................................................................................................25
General .....................................................................................................................................................................25
Terms and definitions ...............................................................................................................................................25
Network layout ..........................................................................................................................................................26
Network configuration ...............................................................................................................................................26
Alarms............................................................................................................................................................................29
PTZ ................................................................................................................................................................................30
Users..............................................................................................................................................................................30
Utilities............................................................................................................................................................................31
Troubleshooting.............................................................................................................................................................32
Index................................................................................................................................................................................33
Technical data................................................................................................................................................................34
HDD storage capacity...............................................................................................................................................35
Disposal..........................................................................................................................................................................36
Information on the EU directive on waste electrical and electronic equipment .............................................................36
Information on handling batteries ..................................................................................................................................36
Important information on disposing of batteries.............................................................................................................36
Information on the European RoHS directive ................................................................................................................36
Glossary..........................................................................................................................................................................37
Overview of specialist terms ..........................................................................................................................................37
Internal HDD ...................................................................................................................................................................39

Quick guide
Quick guide
Before you start
The following preparatory steps must be made:
1. Pay attention to the general information, safety in-
formation and notes on setting up and connecting
the device (see page 8).
2. Check the contents of the package for completeness
and damage.
3. Insert the batteries into the remote control.
Installing the HDD
Warning
Switch off the device and disconnect it from the
mains power supply.
Pay attention to the required earthing of the de-
vice to avoid static discharge.
1. Install the HDD. Use the data and power cable sup-
plied.
2. Firstly, establish the connection to the motherboard
using the red data cable (small connector).
3. Connect the power supply cable
(large 5-pin connector).
4. Check that the connections are secure.
5. Close the housing.
Establishing the connections
1. Connect the analogue cameras with BNC connec-
tions 1 to 4.
2. Connect the audio connections.
3. Connect the LAN connection on the device to the
network.
4. Connect the sensors to the alarm inputs.
5. Connect the monitor to the BNC connection.
6. Connect the mouse to the USB port.
7. Establish a connection to the mains power supply.
8. Switch on the device using the POWER switch on
the rear. The DVR status display on the front of the
device lights up.
Note
To connect a monitor with a VGA connection, use
the BNC-VGA converter (TVAC20000).
7

Important safety information
Explanation of symbols
The following symbols are used in this manual and on the
device:
Symbol Signal
word Meaning
Warning Indicates a risk of injury or health
hazards.
Warning Indicates a risk of injury or health
hazards caused by electrical
voltage.
Important Indicates possible damage to the
device/accessories.
Note Indicates important information.
The following labels are used in the text:
Meaning
1. …
2. …
Set of tasks or instructions with a defined
sequence in the text
•…
•…
Set of points or warnings without a defined
sequence in the text
Proper use
Only use the device for the purpose which it was de-
signed and built for. Any other use is considered inap-
propriate.
This device may only be used for the following purpose(s):
•This digital recorder is used in combination with con-
nected video signal sources (B/W and colour cam-
eras) and video output devices (CRT or TFT moni-
tors) for object surveillance.
Note
Data storage is subject to national data-protection
guidelines.
During installation, inform your customers regard-
ing the existence of these guidelines.
General
Before using the device for the first time, read the following
instructions carefully and pay attention to all warnings,
even if you are already familiar with electronic devices.
Warning
All guarantee claims become invalid for damage
caused by non-compliance with these operating
instructions.
We cannot be held liable for resulting damage.
Warning
We cannot be held liable in the event of material
or personal damage caused by improper opera-
tion or non-compliance with the safety information.
All guarantee claims are invalid in such cases.
Keep this manual in a safe place for future reference.
If you pass on or sell the device, you must also include
this user manual.
This device has been manufactured in accordance with
international safety standards.
Power supply
•Only operate this device through a power source
which supplies the mains power specified on the type
plate.
•If you are unsure of the power supply at the installa-
tion location, contact your power supply company.
Warning
Avoid data loss!
Always use an uninterruptible power supply (UPS)
with overvoltage protection.
•Disconnect the device from the mains power supply
before carrying out maintenance or installation work.
•The on/off switch does not completely disconnect the
device from the mains power supply.
•To disconnect the device completely from the mains
power supply, the plug must be disconnected from
the mains socket. Therefore, the device should be
positioned so that direct and unobstructed access to
the mains socket is guaranteed at all times and the
plug can be disconnected immediately in an emer-
gency.
•To avoid the possibility of fires, the plug should al-
ways be disconnected from the network socket if the
device is not used for long periods. Disconnect the
device from the mains power supply before impend-
ing electrical storms, or use an uninterruptible power
supply.
8

Important safety information
9
Warning
Never open the device on your own! There is a
risk of electric shocks!
If it is necessary to open the device, consult trained
personnel or your local maintenance specialist.
•The installation or modification of a HDD should only
be made by trained personnel or your local mainte-
nance specialist.
Warning
The installation of additional equipment or modifi-
cation of the device invalidates your guarantee if
not carried out by trained personnel.
We recommend having the HDD installed by a
maintenance specialist.
Your guarantee is invalidated in the event of im-
proper installation of the HDD.
Overloading/Overvoltage
•Avoid overloading of mains sockets, extension cables
and adapters as this can result in fires or electric
shocks.
•Use overvoltage protection to prevent damage
caused by overvoltage (e.g. electrical storms).
Cables
•Always hold cables by the connector, and do not pull
the cable itself.
•Never touch the mains cable with wet hands, as this
can lead to a short circuit or electric shock.
•Never position the device, furniture or other heavy
items on the cable. Ensure that the cable does not
become kinked, especially on the connector and
sockets.
•Never knot the cable, and do not tie it to other cables.
•All cables should be laid so that they cannot be
stepped on or cause an obstruction.
•A damaged mains cable can cause a fire or electric
shock. Check the mains cable from time to time.
•Never modify or manipulate the mains cable or plug.
•Do not use plug adapters or extension cables that do
not conform to the applicable safety standards, and do
not make alterations to power supply cables or mains
cables.
Installation location/Operating environment
•Position the device on a firm, level surface and do not
place any heavy objects on the device.
•The device is not designed for operation in rooms
subject to high temperatures or moisture (e.g. bath-
rooms), or in excessively dusty rooms.
•Operating temperature and ambient humidity:
-10 °C to 55 °C, maximum 85 % relative humidity.
The device may only be operated in moderate climate
conditions.
Ensure the following:
•Sufficient ventilation must be present at all times (do
not place the device in a storage rack, on thick car-
pets, on a bed or anywhere where the ventilation
slots are covered. Make sure that a gap of at least
10 cm is present on all sides).
•The device must not be exposed to direct heat
sources (e.g. heaters).
•The device must not be exposed to direct sunlight or
strong artificial light.
•The device must not be placed in close proximity to
magnetic fields (e.g. loudspeakers).
•Naked flames (e.g. candles) must not be placed on or
near the device.
•Contact with spraying or dripping water and aggres-
sive liquids must be avoided.
•The device must not be operated in close proximity to
water, and must not be submerged under any cir-
cumstances (do not place objects containing water on
or near the device, such as vases or drinks).
•Foreign objects must not penetrate the device.
•The device must not be exposed to strong variations
in temperature, as this can lead to condensation and
electrical short circuits.
•The device must not be exposed to excessive jolts or
vibrations.
Remote control
•Remove all batteries if the device will not be used for
a sustained period, as these can leak and damage
the device.

Important safety information
10
Care and maintenance Putting into operation
Maintenance is necessary if the device has been dam-
aged. This includes damage to the plug, mains cable and
housing, penetration of the interior by liquids or foreign
objects, exposure to rain or moisture or when the device
does not work properly or has fallen.
•Observe all safety and operating instructions before
putting the device into operation for the first time.
•Only open the housing to install the HDD.
Warning
When installing the device in an existing video
surveillance system, ensure that all devices are
disconnected from the mains power supply and
low-voltage circuit.
•Disconnect the device from the mains power supply
before maintenance (e.g. cleaning).
•If smoke develops or unusual noises or odours are
detected, then switch off the device immediately and
pull the mains plug from the socket. In such cases,
the device should not be used until it has been in-
spected by a qualified technician.
•Maintenance work should only be carried out by
qualified specialists.
•Never open the housing on the device or accesso-
ries. There is a risk of fatal injury due to an electric
shock when the housing is opened.
•Clean the device housing and remote control with a
damp cloth.
•Do not use solvents, white spirit or thinners as these
can damage the surface of the device.
•Do not use any of the following substances:
•Salt water, insecticides, solvents containing chlorine
or acids (ammonium chloride) or scouring powder.
•Gently rub the surface with a cotton cloth until it is
completely dry.
Warning
The device works under dangerous voltages. The
device must only be opened by authorised spe-
cialists. All maintenance and service work must be
carried out by authorised firms. Improper repairs
can expose device users to the risk of fatal injury.
Accessories
•Only connect devices that are suitable for the in-
tended purpose. Otherwise, hazardous situations or
damage to the device can occur.
Warning
If in doubt, have a specialist technician carry
out assembly, installation and connection of the
device.
Improper or unprofessional work on the mains
power supply or domestic installation puts both
you and other persons at risk.
Connect the installations so that the mains power
circuit and low-voltage circuit always run sepa-
rately from each other. They should not be con-
nected at any point or become connected as a re-
sult of a malfunction.
Children and the device
•Do not allow children access to electrical devices.
Never allow children to use electrical devices without
supervision. Children may not be able to accurately
detect possible risks. Small parts can be life-
threatening if swallowed.
•Keep batteries away from small children. Call for
medical assistance immediately if a battery is swal-
lowed.
•Keep packaging materials away from children (dan-
ger of suffocation).
•This device should not be used by children. If used
improperly, spring-loaded parts can be ejected and
cause injuries to children (e.g. eye injuries).

Introduction
Introduction
Dear customer,
Thank you for purchasing this product.
This product complies with current domestic and Euro-
pean regulations. Conformity has been proven, and all
related certifications are available from the manufacturer
on request (www.abus-sc.com).
To maintain this status and to guarantee safe operation,
it is your obligation to observe these operating instruc-
tions!
Read the entire operating manual carefully before putting
the product into operation and pay attention to all operat-
ing and safety information!
All company names and product descriptions are trade-
marks of the corresponding owner. All rights reserved.
In the event of questions, please contact your local main-
tenance specialist or dealer.
Disclaimer
These operating instructions have been produced
with the greatest care. Should you discover any
missing information or inaccuracies, please con-
tact us under the address shown on the back of
the manual. ABUS Security-Center GmbH does
not accept any liability for technical and typo-
graphical errors, and reserves the right to make
changes to the product and operating instructions
at any time and without prior warning. ABUS Se-
curity-Center GmbH is not liable or responsible for
direct or indirect damage resulting from the
equipment, performance and use of this product.
No forms of guarantee are accepted for the con-
tents of this document.
General information
In order to use the device correctly, read this user man-
ual carefully and keep it in a safe place for later use.
This manual contains instructions on recorder operation
and maintenance. Consult an authorised specialist if the
device needs to be repaired.
Unpacking the device
Handle the device with extreme care when unpacking it.
The packaging is made of reusable materials, and
should always be passed on for recycling.
We recommend the following:
Paper, plastic packaging, cardboard and corrugated
cardboard should be disposed of in the appropriate recy-
cling containers.
If recycling containers are not available in your local area,
then you can dispose of these materials as domestic
waste.
If the original packaging has been damaged, inspect the
device. If the device shows signs of damage, then return
it in the original packaging and contact the manufacturer.
Scope of delivery
•ABUS Digital Recorder
•Power supply unit and mains cable
•Remote control (without batteries)
•Connection cable for HDD
•Software CD
•User manual
11

System operation
System operation
12
General information
The device can be controlled as follows:
•By remote control
•Using the USB mouse
Operating elements on the device
Note
Pay attention to the overview on page 3.
No. Name
Function
1 Power LED
Lights up blue when the system is switched on
2 IR receiver
For the remote control
3 REC LED
Lights up red during recording
4 HDD LED
Flashes blue when the HDD is accessed
5 Network LED
Lights up red when the network is accessed
6 Alarm LED
Lights up red in the event of an alarm
Connections on the rear of the device
Note
Pay attention to the overview on page 3.
No. Name
Function
7 USB port
•To connect a USB mouse
•To connect a USB stick for data backups
8 VIDEO IN: BNC inputs
9 VIDEO OUT 1: BNC monitor output
VIDEO OUT 2: BNC spot monitor output
10 AUDIO IN: Cinch audio input
AUDIO OUT: Cinch audio output
11 LAN:
10/100 MBit Ethernet LAN connection
12 ALARM IN:
•Alarm input 1–4
•G = Ground
ALARM OUT:
•Relay output and ground
RS-485:
•Connection for PTZ cameras
13 12 V DC power socket
14 Power switch
15 Connection for earthing line

System operation
Operating elements on the remote control
Note
Pay attention to the remote control diagram on
page 4.
No. Name
Function
16 POWER
On/Off switch
17 DEV
Assigns the remote control with the device ID
18 Alphanumeric keys
•For selecting the camera (channel) in the live
view
•For entering letters and digits in system fields
19 A
•Changes the entry format (upper/lower case,
symbols, digits)
•Further symbols can be displayed by pressing
the “0” button in symbol mode.
20 PLAY
Starts playback
21 VOIP
Not used
22 PREV
Changes the screen display in the live view
23 Navigation keys
During playback:
•S, TSets the speed
•W, XPrevious/next day
In PTZ:
•Camera control
In menus:
•Navigation
24 ESC
•Exits menu
25 Not used
26 Not used
27 Zoom +:
Enlarges the image section in PTZ mode
28 F1:
Not used
29 Zoom -:
Reduces the image section in PTZ mode
30 F2:
Not used
31 IRIS-: In PTZ mode:
•Closes the iris
32 Focus-: In PTZ mode:
•Reduces the image section in PTZ mode
33 IRIS+: In PTZ mode:
•Opens the iris
34 Focus+: In PTZ mode:
•Enlarges the image section in PTZ mode
No. Name
Function
35 Not used
36 Not used
37 PTZ
Switches on PTZ control
38 Enter key fII
•Confirms the selection
•Ticks/unticks the boxes
During playback:
•PLAY/PAUSE
39 MENU
•Calls up the main menu
•Switches the key tones on and off (press and
hold down for 5 seconds)
40 REC
Opens/starts manual recording
41 Not used
42 Deletes character during entry
Mouse operation
Note
Further descriptions in these operating instruc-
tions can be accessed with the mouse.
The device is suitable for use with a USB mouse.
Connect the mouse to the USB port.
Button Function
Left Single-click
•Selection in menu, activation of an entry
field or tab
Double-click
•Switches between the screen display of
single and multiple images in the live view
and during playback
Click and drag
•In PTZ mode: Camera control
•Set-up of alarm areas or zones
Right Single-click
•Calls up the pop-up menu
Scroll
wheel
In full-screen live view
•Shows previous/next camera
In menus:
•Selects/changes settings
13

System operation
Starting the device
Important
The device must only be operated with the mains
power specified on the type plate.
14
For safety reasons, use an uninterruptible power
supply (UPS).
After the device has been connected to the power supply
and the main switch on the rear of the device is switched
on, the power LED lights up.
The device carries out a self-test during the start-up pro-
cedure.
On-screen keyboard
The on-screen keyboard appears after clicking on a text
entry field with the mouse:
The keys have a similar function as on a mobile phone.
•Each key has more than one character.
•Pressing the “A” key scrolls through the following
modes:
- Numbers
- Uppercase
- Lowercase
- Special characters
(press the “0” key to display further
symbols)
•Press the same key repeatedly to get the character
you require.
•To delete the character in front of the cursor, click on
“EDIT”.
Displays on the monitor
The device shows the date and time, camera name and
whether a recording is in progress.
•Continuous recording: Blue “R”
•Event recording: Red “R”

Live view
Live view
Overview
The live view starts automatically after the device is
switched on.
The signals of the connected cameras are displayed on
the main screen.
•By double-clicking the left mouse key, you can dis-
play the camera image as a full-screen view or switch
back to the original view.
Pop-up menu for mouse operation
Note
Press the right mouse button when the cursor is
positioned on a live image.
The following settings can be made. The arrow pointing
to the right indicates that a sub-menu is opened for selec-
tion:
Single Full-screen view for selected camera
Mult Preview 4x camera view
Next Preview Displays the next camera in full-
screen view
PTZ Control Activates PTZ mode
Play Switches to playback mode
Manual Record Starts/finishes recording
Close Status Opens/closes the recording status
symbol
Aux Chan Displays camera on the Aux chan
Main menu Opens the main menu
Settings
Note
The live view can be set as follows.
Open the main menu and click on Display:
Language User interface language
Device ID Used for unique identification when
using remote control
Require
Password
Activates/deactivates password
prompt (when accessing via the
network, the password is still
needed despite deactivation)
Video Standard PAL/NTSC
Menu
Transparency
Transparency of the main menu
Date/Time Time, date and DST
Preview Stop Auto-switch, camera identifica-
tion
15

Live view
Setting the date/time
Date Display
Mode
DD/MM/YY, MM/DD/YY,
YY/MM/DD
Date To enter the day, month and year
Time To enter the hour, minute and
second
Enable DST Daylight Saving Time Bias: Correc-
tion of the DST to the reference
time
From DST starts
To DST ends
Setting the preview
Preview Default setting in the preview:
Full-screen, 4x view
Switch Time Switch time between the cameras in
the full-screen view:
Never, 5 seconds .. 30 minutes
Audio Preview Audio output during the full-screen
view
Display Delay Time the triggering camera is dis-
played as a full-screen image if an
event occurs
Layout Changes the camera layout in the
preview
16

Record
Record
Set-up
Open the main menu and click on Record:
If HDD Full Overwrites or finishes recording
Select Camera Camera to be set
Enable Event-
Para
Select this item to record events
(motion detection or alarm)
Stream 1/
Stream 2
Stream 1 = Parameter for continuous
recording
Stream 2 = Parameter for event
recording
Stream Type Video, video and audio
Resolution QCIF, CIF
Frame Rate Number of images saved per second.
The maximum number is dependent
on the set resolution.
Bit Rate Data volumes per second. The rec-
ommended bit rate is set for each
resolution. A bit rate lower than that
recommended reduces the recording
quality but extends the recording time.
Enable Rec Activates/deactivates camera
recording
PostRec Time Recording period after an alarm
(in seconds)
PreRec Time Recording period before an alarm
(in seconds)
Copy to
Camera
Copies the selected settings to other
cameras (all or selected)
Note
In addition to these settings, the schedule must be
configured to start a recording.
Note
The maximum PreRec/PostRec time is dependent
on the set bit rate. The lower the bit rate, the more
memory is available for PreRec/PostRec.
17

Record
Schedule
The schedule is used to specify the recording times and
triggers (recording type) for the cameras.
Click on Schedule:
I
1. Select the day.
2. Tick or untick the “All Day” box. When “All Day” is se-
lected, defined times cannot be entered. The re-
cording type then applies to the entire day.
3. Specify the recording type in the drop-down menu:
•All Day
•Motion detection
•Alarm
•Motion detection or alarm
•Motion detection and alarm
4. To make specific time settings, untick the “All Day”
box.
5. When making a specific time setting, you can define
up to 4 time periods (each from 00:00 to 00:00). The
times in the individual periods must not overlap.
6. Select the camera under “Copy to” or select “All”,
then confirm by pressing “Copy”.
Note
With All Day, you define time windows where
there is continuous recording.
The other events (e.g. motion detection and/or
alarm) only trigger the recording after the specific
event has occurred.
Manual record
1. Select “Manual Record” in the live view:
2. Select the camera to start manual recording. Click on
“Start/Stop” to do so.
Note
Click on “Start All” or “Stop All” to start or finish re-
cording from all the connected cameras.
18

Playback
Playback
General information
1. Select “Play” in the live view.
2. To search for existing recordings, select the camera,
recording type and time period.
3. Click on “Search” to search for relevant recordings. If
there are more than 8 search results, they are listed
on additional pages. Scroll through the pages by
pointing the mouse on the front page number and
turning the scroll wheel.
4. Select one or more entries and click on “Play” to play
them back.
5. Click on “Copy” to back up the selected entries on
USB or “Backup Today” to back up the entire day.
Note
Data backup:
After you start copying, the message “Waiting for
USB medium...” appears. Now remove the USB
mouse and connect a USB medium to back up the
data. Copying starts automatically. You can also
use the remote control supplied for the recorder at
any time.
Using the control panel
The control panel is used for controlling the running play-
back. The symbols have the following meaning:
No. Meaning/function
1 Reverses 30 seconds
2 Reduces the playback speed
3 Playback/Pause
4 Increases the playback speed
5 Advances 30 seconds
6 Switches audio playback on/off
7 Saves the recording
8 Hides the control panel
9 Digital zoom
10 Previous camera
11 Next camera
Note
Data backup:
If you press the “Save recording” button, the video
currently being shown is saved temporarily until
the button is pressed again. You can repeat this
procedure as many times as you wish. After exiting
Playback, you are prompted to back up on a USB
medium the videos saved temporarily. If the videos
are not backed up immediately after exiting Play-
back, they are deleted.
12345 6 78 911
10
19

PTZ control
PTZ control
General information
PTZ control is used to access individual PTZ cameras
and control them manually.
Using the PTZ control panel
No. Meaning/function
1 Iris
2 Focus
3 Zoom
4 Controls camera and starts patrol 1
Pop-up menu for mouse operation
Note
Press the right mouse button when the cursor is
positioned on a live image.
The following settings can be made. The arrow pointing
to the right indicates that a sub-menu is opened for
selection:
Channel PTZ camera selection
Preset Selects the set preset
Exit Exits PTZ mode
PTZ settings
The following settings are necessary on the PTZ
cameras:
1. Select the installed camera.
2. Enter the data of the connected camera. Ensure that
the data matches that of the PTZ camera.
3. The PTZ ID is used to clearly identify and control the
PTZ camera.
4. If several cameras of the same type are connected,
then you can copy the settings to the other connec-
tions.
5. Exit the settings by pressing Apply and OK.
Note
Check the settings of the PTZ cameras.
If a connected camera does not work correctly,
then check the entered parameters (ID, baud rate,
data bit etc.).
1
2
3
4
20
Table of contents
Other Abus Digital Recorder manuals