manuals.online logo
Brands
  1. Home
  2. •
  3. Brands
  4. •
  5. Accuro
  6. •
  7. Fitness Electronic
  8. •
  9. Accuro AccuroFit User guide

Accuro AccuroFit User guide

FIT
2 0 1 9 S E T U P M A N U A L
AC C U R O F I T.C O M
W E L C O M E
T O A C C U R O. TA B L E O F C O N T E N T S
Congratulations on your decision to purchase the Accuro

it Dynamic
Heart Rate Display System! We believe you made the right choice to not
only help your club become more pro

itable and retain more of your
members, but also to help your members get the most out of their

itness journey with your club.
Wirelessly display individual and group performance results on multiple
screens throughout your club. Members can easily track workout data in
real-time, track their heart rate zone, calories burned and intensity. This
monitoring will allow your members to train in their optimal heart rate
zone, helping them to achieve their

itness goals and improve outcomes.
We are excited you have chosen to partner with us to help your
members achieve more. Our team is here to help you along the way!
2.
3.
3.
4.
6.
9.
12.
14.
16.
17.
18.
Introduction
What’s in the Box
System Requirements
Simple Start Up Guide
Connections
Getting Started
Use of Extended Display
How to Start a Class
Maintenance
Marketing Material
Support
2
I N T H E B OX .
SY S T E M R E Q U I R E M E N T S .
R O U T E R
L A P T O P
Having trouble? Contact support at 877

409

0937
Locate the laptop computer that was sent to you.
R E C E I V E R
Hard drive capacity Wi

i technology
500 gigabytes 802.11n
SATA N300 (300mpbs)
Windows 10 Small to medium
homes
Intel 2.4GHz
1.6 gigahertz Not applicable
Intel Celeron
4 gigabytes
Five (5) 10/100 (1 WAN and 4
LAN) Fast Ethernet ports with
auto-sensing technology
5.21 x 4.28 x 1.88in
(132.46 x 108.7 x 48mm)
Weight: 0.36lb (0.163kg)
Wireless A

CDouble

irewall
Not applicable
4 hours IEEE
15.6 inches
Hard drive type Wi

i performance
Operating system Wi

i range
Processor brand Wi

i brand
Processor Speed Beamforming
Processor model Number of
ethernet ports
System memory (RAM) Number of
USB ports
Wireless networking Security
Battery life Standards
Screen size Physical
3
S I M P L E S TA R T U P G U I D E .
S T E P 1 21
Remove the router from the box.
Plug the router into a power source.
Take the colored cable from the router box and plug
it into the yellow port on the back of the router.
Plug the other end of the colored cable into an open
numbered port on the back of your in-club router
that you utilize for internet access.
After a few seconds, you should see all solid green
lights on the front of the router.
PLEASE NOTE:
For best performance, make sure the receivers are less than 100 feet from the router.
Locate the receivers that we sent to you. They are small, have a white button and two little
lights on the front of them. Note that the receivers are already setup with the routers.
Having trouble? Contact support at 877

409

0937
•
•
•
•
•
S T E P 2
Locate the area/room you are looking to cover with the
heart rate projection. (Remember: each receiver covers
about 1,000 square feet.)
Once in the space, locate an outlet on one side of the
room. The higher the outlet is, the better. If the outlet is
high up on the wall, this will work best.
Plug one receiver into the outlet. The receiver should
automatically turn on.
On the opposite side of the room, locate a second outlet.
Again, the higher up the wall, the better. Plug in the
second receiver into the outlet. The receiver should
automatically turn on.
If you have more than 2 receivers and are looking to cover
more space, the same process can be repeated as above.
•
•
•
•
•
•
4
S I M P L E S TA R T U P G U I D E .
S T E P 3 43
Locate the space you want to keep your laptop. If it is in
the same room that is being covered, that typically works
best. If it is another area, please make sure you have
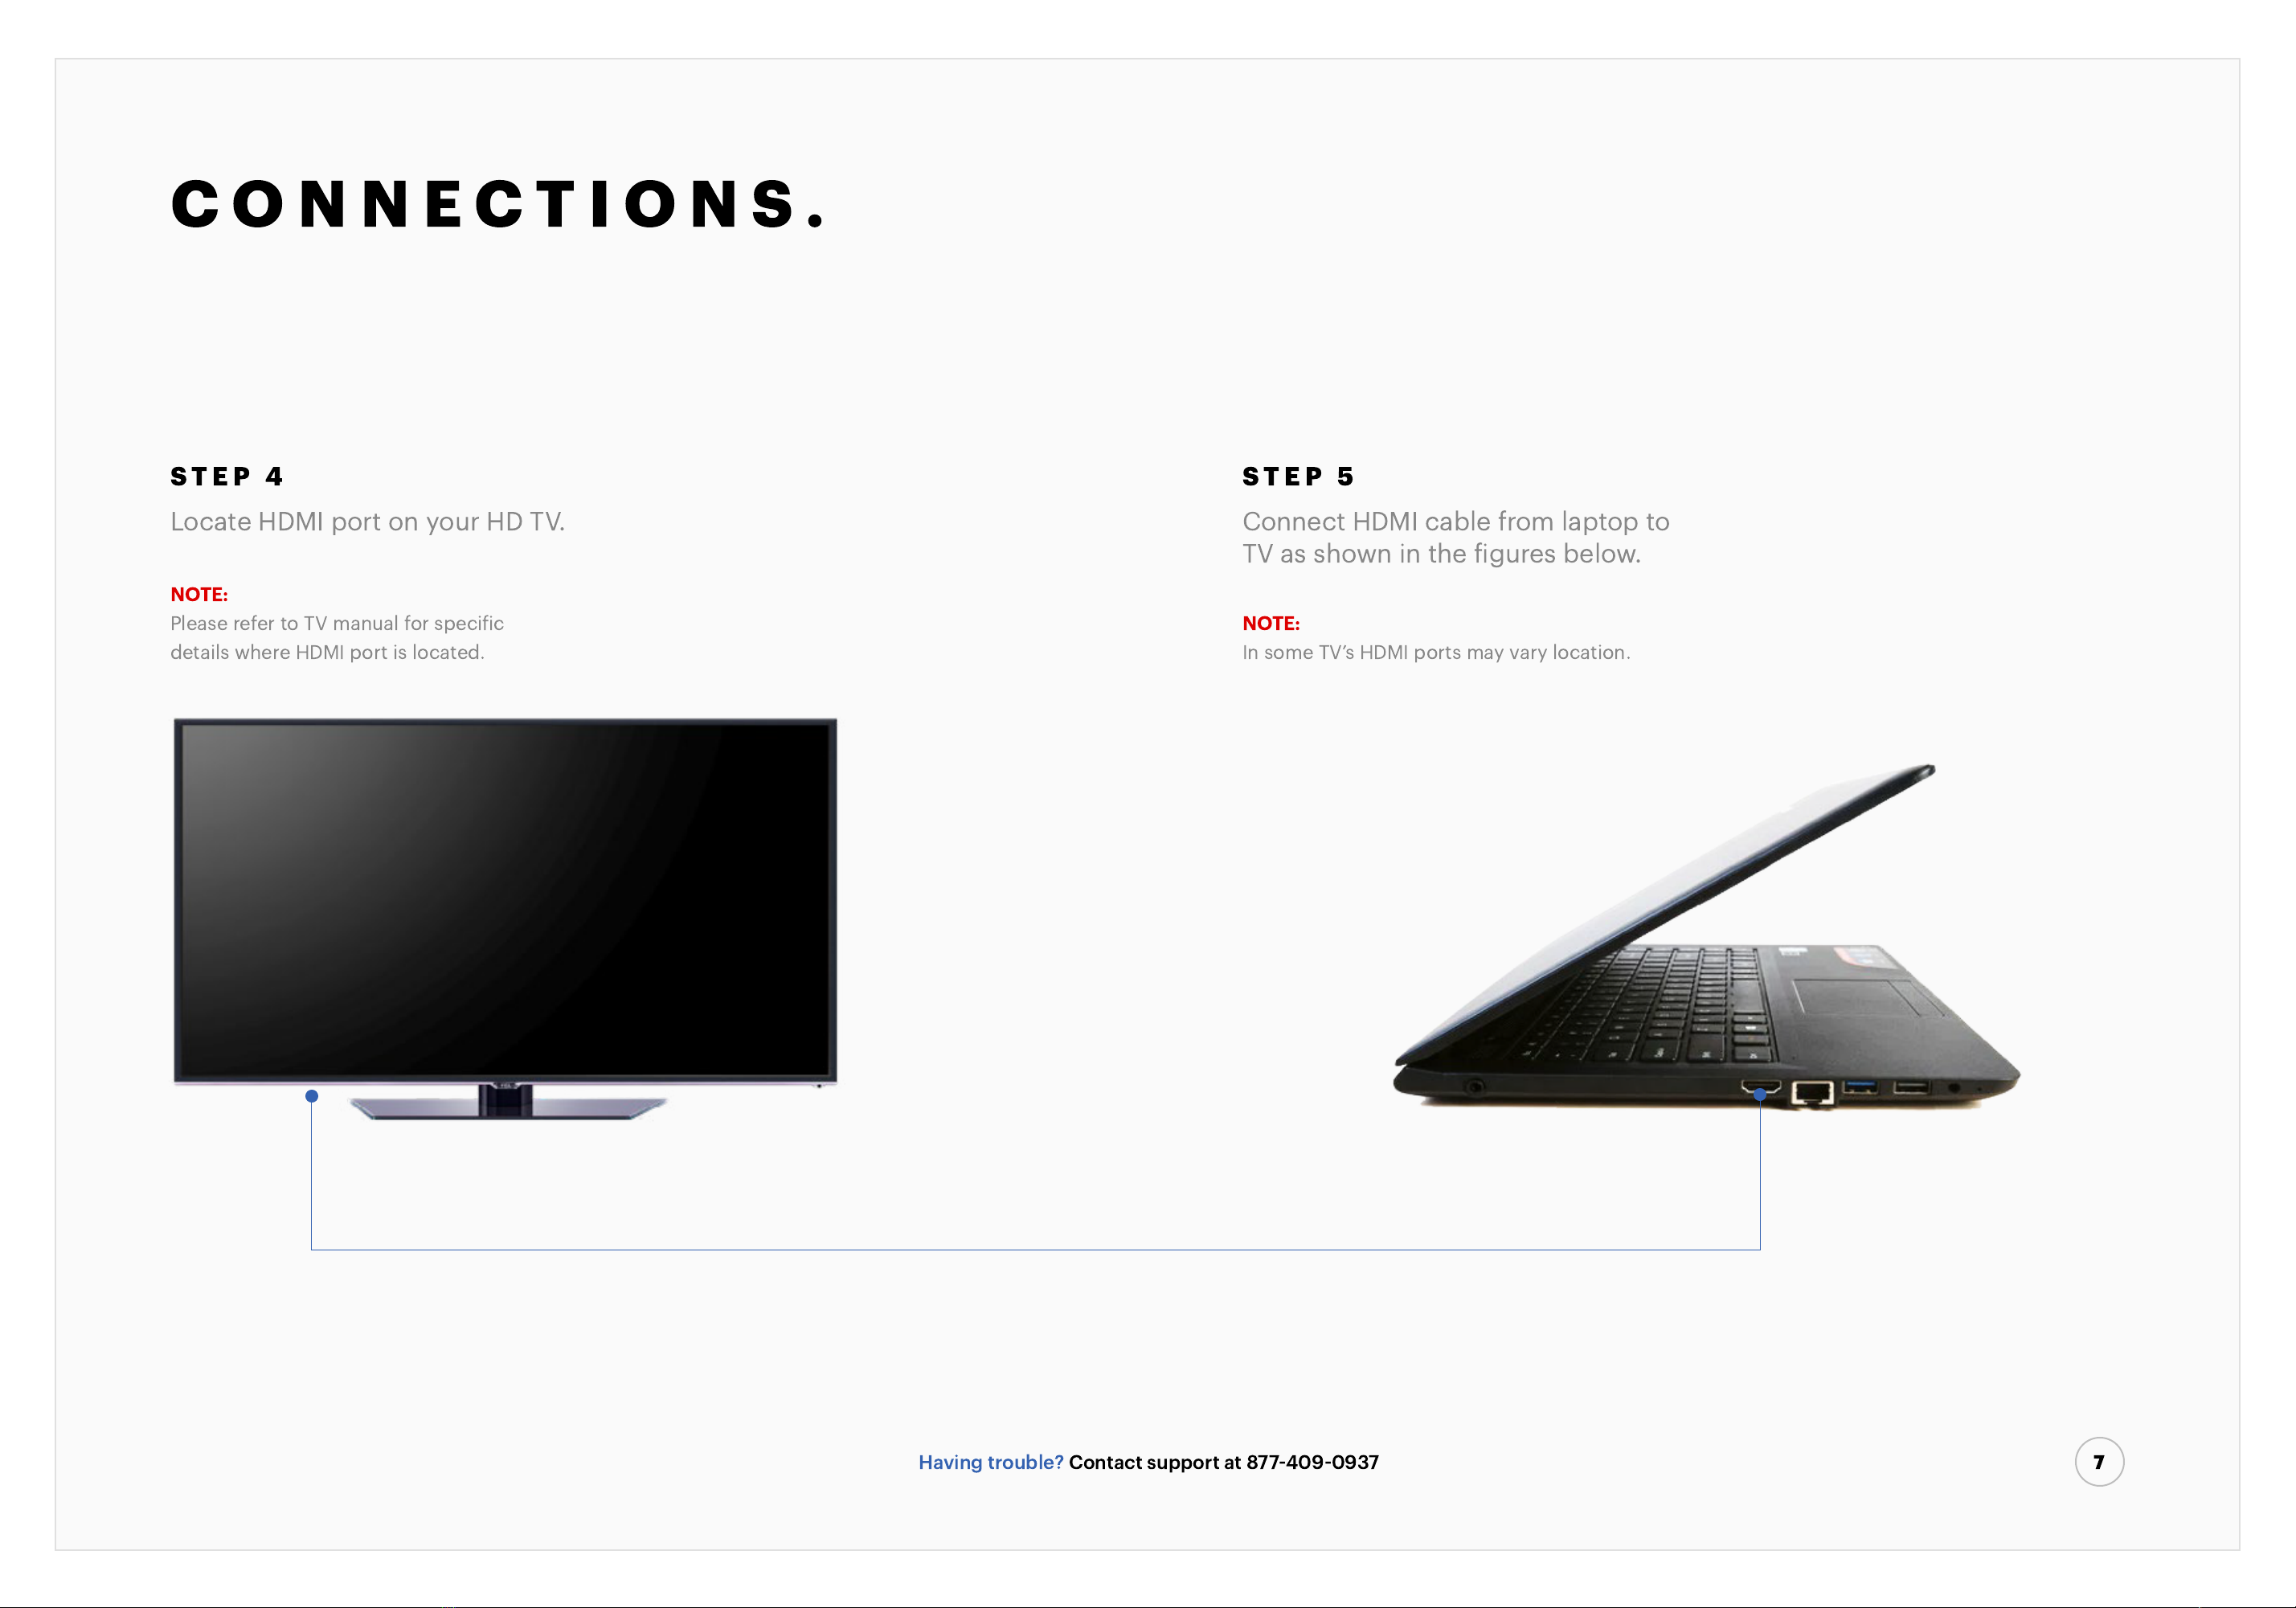
access to HDMI and the TV you are looking to connect to.
Plug the laptop into an outlet.
Connect the laptop to your TV via an HDMI cable.
Turn the laptop on. Once the laptop powers on, it should
automatically connect to the router we provided
and that you have already set up.
Open the AccuroFit software.
On the left-hand side, select “Admin Panel”
Select “Wireless Receivers”
Make sure you see your receivers listed there. If you do
not, please contact our support team.
Having trouble? Contact support at 877

409

0937
•
•
•
•
•
•
•
•
S T E P 4
Close the Accuro

it Software.
Right click on the desktop.
Select “Display Settings”.
On the right-hand side, scroll down until you see “Multiple Displays”.
The drop-down will be defaulted to “Duplicate This Display”.
Change the drop-down to “Extend This Display”.
Select Save/Keep these changes.
Re-open the AccuroFit Software • Select “Class Section”.
Click “Show Display”.
The heart rate display should now be on your TV display. The laptop
display will remain on the software controls. This allows you to
continue to add or modify pro

iles, etc. without interrupting a class
session that might be taking place on the TV screen.
•
•
•
•
•
•
•
•
•
•
Locate the laptop computer that was sent to you.
5
C O N N E C T I O N S .
Having trouble? Contact support at 877

409

0937
6
S T E P 1
S T E P 2
S T E P 3
Locate your port (1) in the back of your router.
Locate ethernet port in laptop.
Connect ethernet cable from laptop to router,
make sure that it connects to part (1) on router.
NOTE:
There should be 5 ports total.
I N S T E A D O F S T E P S 1

3
You may just connect your computer
to the Wi

i network.
C O N N E C T I O N S .
Having trouble? Contact support at 877

409

0937
7
S T E P 4 S T E P 5
Locate HDMI port on your HD TV. Connect HDMI cable from laptop to
TV as shown in the

igures below.
NOTE:
Please refer to TV manual for speci

ic
details where HDMI port is located.
NOTE:
In some TV’s HDMI ports may vary location.
C O N N E C T I O N S .
Having trouble? Contact support at 877

409

0937
8
S T E P 6
S T E P 7
S T E P 8
Locate yellow port on the Accuro

it Router.
Connect Ethernet Cable from Accuro

it
Router to your club router.
Make sure receivers are connected
to the Accuro

it Router.
Accuro

it Router Club Wi

i Router
G E T T I N G S TA R T E D.
Having trouble? Contact support at 877

409

0937
9
1. Power your computer.
Homescreen
2. Input username & password.
3. Click on accuro icon on desktop.
Username: accuro
Password: “press enter/spacebar”
To add members to the system,
click the
Member Pro

iles
button.
This is the screen that appears once you
click on the Accuro icon on your desktop
with following selections:
• Class session
• Member pro

iles
• Loaner pods
• Admin panel
• Exit
G E T T I N G S TA R T E D.
Having trouble? Contact support at 877

409

0937
10
Enter the following information:
Max HR will appear automatically.
Then click save member.
• Email address of member
• Username / name
• Loaner pod (if needed)
• HR pod ID serial number
• Year of birth
• Weight
• Gender
Max HR can be manually changed.
Located behind the HRM
G E T T I N G S TA R T E D.
Having trouble? Contact support at 877

409

0937
11
To use a loaner pod, click here. Click Add or Remove Pod.
N A M E :
Loaner Pod 1 be sure to identify the HRM
with this name for future reference.
U S E O F E X T E N D E D D I S P L AY.
Having trouble? Contact support at 877

409

0937
12
1 .
2 .
Make sure you have HDMI connected from external
TV source to computer.
Right Click on desktop and go to display settings.
3 .
Go to multiple displays.
U S E O F E X T E N D E D D I S P L AY.
Having trouble? Contact support at 877

409

0937
13
4 .
Click on extend these displays.
5 .
Make sure that the top of the screen (1&2) line up as shown below.
H O W T O S TA R T A C L A S S .
Having trouble? Contact support at 877

409

0937
14
1 .
Press
SHOW DISPLAY.
2 .
Press
(Start Class)
clock will start.
59:49
H O W T O S TA R T A C L A S S .
Having trouble? Contact support at 877

409

0937
15
3 . 4 . 5 .
After you click on the clock this
message will appear on your screen. The message below will display after
you select (Yes) in the previous step. Leaderboard will display at the end
of the class session.
(Yes) - End class and show class summary
(No) - Continue with class session
(Yes) - To end and a leaderboard will display.
M A I N T E N A N C E .
Having trouble? Contact support at 877

409

0937
16
Pod maintenance How to wear it
Battery Life
1. Detach the pod from the strap after each use.
2. Clean the pod with a slightly damp
washcloth or gym wipe.
3. Make sure to clean any sweat residue o
ff
of
the metal electrodes on the back of the pod.
4. Allow the pod to dry completely before
using again Strap Maintenance.
• Strap must be in direct contact with skin.
• Pod must be placed on the sternum and
ACCURO logo should be right
‑
side up.
• Remove pod from strap after every training
workout / routine.
• If using pod to connect to a

itness app on iOS
or Android to track real
‑
time updates, please be
sure to end session on the app to disconnect the
communication between the pod and the app.
Strap maintenance
How not to break it
1. Hand wash the strap gently, using cold to
lukewarm water and antibacterial soap.
2. Rinse the strap completely and hang to dry.
• Do not submerge pod in water.
• Do not use any unapproved cleaner on
pod and/or strap.
• Do not leave strap to “soak” in water for
longer than one minute.
Do not wash the strap in the washing machine or
dishwasher.
Do not leave a strap submerged in water for more
than one minute.
I N

C L U B M A R K E T I N G .
1617
Now that you have invested in the AccuroFit Dynamic Heart Rate Display, it is
time to educate your members on the value of heart rate training and

ind
ways to motivate them into utilizing the new system and purchasing the
accompanying equipment, speci

ically the heart rate monitors.
Accuro has a growing library of material that is designed to help you promote
your new AccuroFit system to your members. The material featured comes in
many di
ff
erent formats and allows you to either utilize the material as it is in
it’s current state, or allows you to fully download the material and manipulate
it how you see

it. You can add your own logos, change colors, change
graphics, etc. The advantage for you is that everything is already done, but
you have the

lexibility to make your own upgrades, which will save you time
and allow you to start promoting today!
We will be continuously adding more material for your use. Please check back
often to

ind the latest material that you can use to promote the AccuroFit
Dynamic Heart Rate Display and heart rate monitors within your club.
accuro

it.com/club-marketing
F I N D T H E M A T E R I A L S O N :
T E C H N I C A L S U P P O R T.
16
1 (877) 409

0937 support@accuro

it.com1 Trans Am Plaza, Unit 545
Oakbrook Terrace, IL 60181
Support available from 7:00AM to 3:00PM CST or by appointment.
For technical support on your AccuroFit system, contact us at:
18

Popular Fitness Electronic manuals by other brands

Misfit flare NDJ3k quick start guide

Misfit

Misfit flare NDJ3k quick start guide

Epson Runsense SF-810 user manual

Epson

Epson Runsense SF-810 user manual

Solos 33-00016-00 quick start guide

Solos

Solos 33-00016-00 quick start guide

Copper Fit STEP FX quick start guide

Copper Fit

Copper Fit STEP FX quick start guide

Spivi Studio installation manual

Spivi

Spivi Studio installation manual

Polar Electro FT60 Getting started guide

Polar Electro

Polar Electro FT60 Getting started guide

Polar Electro RCX3 user manual

Polar Electro

Polar Electro RCX3 user manual

Energetics PR 3200p Computer Manual

Energetics

Energetics PR 3200p Computer Manual

JLL JF150 Instruction guide

JLL

JLL JF150 Instruction guide

BH FITNESS Tecnovita YF910 manual

BH FITNESS

BH FITNESS Tecnovita YF910 manual

Energetics E-102 user manual

Energetics

Energetics E-102 user manual

Vibro Shape MC0138 user guide

Vibro Shape

Vibro Shape MC0138 user guide

Technogym ISOCONTROL Service maintenance manual

Technogym

Technogym ISOCONTROL Service maintenance manual

MySwing Professional Quick start guides

MySwing

MySwing Professional Quick start guides

Energetics PR 990 HRC Computer Manual

Energetics

Energetics PR 990 HRC Computer Manual

Medion MD 15200 user manual

Medion

Medion MD 15200 user manual

Kettler ELYX 5 Training and operating instructions

Kettler

Kettler ELYX 5 Training and operating instructions

BH FITNESS H698 manual

BH FITNESS

BH FITNESS H698 manual

manuals.online logo
manuals.online logoBrands
  • About & Mission
  • Contact us
  • Privacy Policy
  • Terms and Conditions

Copyright 2025 Manuals.Online. All Rights Reserved.