manuals.online logo
Brands
  1. Home
  2. •
  3. Brands
  4. •
  5. Acer
  6. •
  7. Projector
  8. •
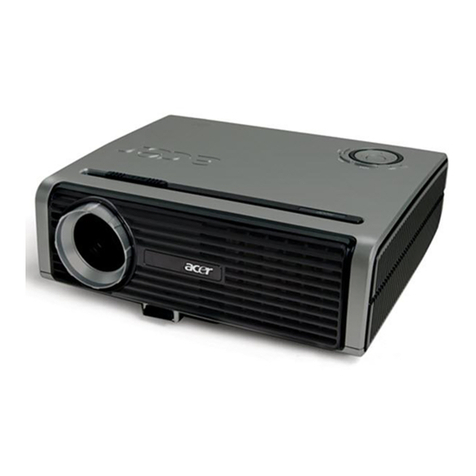
  9. Acer PD720 User manual

Acer PD720 User manual

Other manuals for PD720

1

Other Acer Projector manuals

Acer TravelMate C200 Series User manual

Acer

Acer TravelMate C200 Series User manual

Acer C112 Series User manual

Acer

Acer C112 Series User manual

Acer SL 700X User manual

Acer

Acer SL 700X User manual

Acer H7530 Series User manual

Acer

Acer H7530 Series User manual

Acer K11 Series User manual

Acer

Acer K11 Series User manual

Acer P1165 Series User manual

Acer

Acer P1165 Series User manual

Acer X1160P User manual

Acer

Acer X1160P User manual

Acer U5200 Series User manual

Acer

Acer U5200 Series User manual

Acer XD1170 Series User manual

Acer

Acer XD1170 Series User manual

Acer XD1150 Series User manual

Acer

Acer XD1150 Series User manual

Acer PD525D User manual

Acer

Acer PD525D User manual

Acer H6522BD User manual

Acer

Acer H6522BD User manual

Acer P1223 User manual

Acer

Acer P1223 User manual

Acer Projector User manual

Acer

Acer Projector User manual

Acer PL1620n User manual

Acer

Acer PL1620n User manual

Acer X1161 Series User manual

Acer

Acer X1161 Series User manual

Acer PD311 series User manual

Acer

Acer PD311 series User manual

Acer P7203B Series User manual

Acer

Acer P7203B Series User manual

Acer PD321 User manual

Acer

Acer PD321 User manual

Acer PD1330W Series User manual

Acer

Acer PD1330W Series User manual

Acer K11 Series User manual

Acer

Acer K11 Series User manual

Acer TravelMate C110 Series Operator's manual

Acer

Acer TravelMate C110 Series Operator's manual

Acer H7530D Series User manual

Acer

Acer H7530D Series User manual

Acer P7215 User manual

Acer

Acer P7215 User manual

Popular Projector manuals by other brands

Eiki LC-X985 Specification sheet

Eiki

Eiki LC-X985 Specification sheet

InFocus LitePro 610 quick start

InFocus

InFocus LitePro 610 quick start

Epson EH-TW5900 datasheet

Epson

Epson EH-TW5900 datasheet

FOREVER MLP-100 manual

FOREVER

FOREVER MLP-100 manual

Toshiba TDP-MT8U Specifications

Toshiba

Toshiba TDP-MT8U Specifications

Mitsubishi XD500U specification

Mitsubishi

Mitsubishi XD500U specification

Kodak Ektapro 3020 Illustrated parts list

Kodak

Kodak Ektapro 3020 Illustrated parts list

Toshiba TDP-EW25U Specifications

Toshiba

Toshiba TDP-EW25U Specifications

Barco iQ PRO G500 supplementary guide

Barco

Barco iQ PRO G500 supplementary guide

NEC Showcase Series HT1100 user manual

NEC

NEC Showcase Series HT1100 user manual

Philips LC1341 user guide

Philips

Philips LC1341 user guide

Epson PowerLite 1266 user guide

Epson

Epson PowerLite 1266 user guide

MAGINON DLP 1400S user manual

MAGINON

MAGINON DLP 1400S user manual

Toshiba TLP-380 owner's manual

Toshiba

Toshiba TLP-380 owner's manual

Philips PicoPix PPX2480/EU user manual

Philips

Philips PicoPix PPX2480/EU user manual

Hitachi CP-X605 Series Specifications

Hitachi

Hitachi CP-X605 Series Specifications

Optoma TW1692 user manual

Optoma

Optoma TW1692 user manual

Kodak EKTAPRO instruction manual

Kodak

Kodak EKTAPRO instruction manual

manuals.online logo
manuals.online logoBrands
  • About & Mission
  • Contact us
  • Privacy Policy
  • Terms and Conditions

Copyright 2025 Manuals.Online. All Rights Reserved.

English
Usage Notice
Precautions ............................................................................................ 2
Introduction
Product Features .................................................................................... 3
Package Overview.................................................................................. 4
Product Overview ................................................................................... 5
Main Unit ......................................................................................... 5
Panel Control .................................................................................... 6
Connection Ports ............................................................................... 6
Remote Control wit Mouse Function and Laser Pointer ..................... 7
Laser Pointer Caution ........................................................................ 7
Installation
Connecting t e Projector ........................................................................ 8
Powering On/Off t e Projector ................................................................ 9
Power On t e Projector ..................................................................... 9
Power Off t e Projector ..................................................................... 10
Adjusting t e Projected Image ................................................................ 11
Adjusting t e Projector Heig t ........................................................... 11
Adjusting t e Projector Zoom/Focus ................................................... 12
Adjusting Projection Image Size ......................................................... 12
User Controls
Panel Control & Remote Control ............................................................. 13
On-Screen Display Menus ...................................................................... 15
How to Operate ................................................................................ 15
Image-I (Computer mode) ................................................................. 16
Image-I (Video mode) ........................................................................ 17
Image-II (Computer mode) ................................................................ 18
Image-II (Video mode) ....................................................................... 19
Audio ............................................................................................... 20
Language.......................................................................................... 20
Management .................................................................................... 21
Appendices
Troubles ooting...................................................................................... 22
C anging t e Lamp ................................................................................ 24
Specifications ......................................................................................... 25
Compatibility Modes .............................................................................. 26
Table of Contents
English
Usage Notice
Warning-Do not look into the lens. The bright light may hurt your eyes.
Warning- To reduce the risk of fire or electric shock, do not expose this product to
rain or moisture.
Warning- Please do not open or disassemble the product as this may cause
electric shock.
Warning- When changing the lamp, please allow unit to cool down, and follow
all changing instructions.
Warning- This product will detect the life of the lamp itself. Please be sure to
change the lamp when it shows warning messages.
Warning- After changing a new lamp, please reset the lamp life from O D menu.
Warning- Before switching off the product, please keep the cooling fan running
for a few minutes.
Warning- When connecting the projector to computer, please turn on the
projector first.
Warning- To reduce the risk of injury to the eyes, do not look directly into the
laser light on the remote control and do not point the laser light into
anyones eyes. This remote control is equipped with a Class II laser that
emits radiation.
Warning- When the lamp reaches the end of its life, it will burn out and may make
a loud popping sound. If this happens, the projector will not turn back
on until the lamp module has been replaced. To replace the lamp,
follow the procedures listed under Changing the Lamp.
Precautions
Follow all warnings, precautions and maintenance as recommended in
this users guide to maximize the life of your unit.
Do:
vTurn off the product before cleaning.
vUse a soft cloth moistened with mild detergent to clean the display
housing.
vDisconnect the power plug from AC outlet if the product is not being
used for a long period of time.
Dont:
vBlock the slots and openings on the unit provided for ventilation.
vUse abrasive cleaners, waxes or solvents to clean the unit.
vUse under the following conditions:
- Extremely hot, cold or humid environment.
- In areas susceptible to excessive dust and dirt.
- Near any appliance generating a strong magnetic field.
- Place in direct sunlight.
English
Product Features
This product is an XGA single chip 0.  DLPTM projector. The
outstanding features of it are listed as follows:
vTrue XGA, 1024 x 768 addressable pixels
v6.4 lbs (2.9 kgs) ompa t design
vSingle hip DLPTM te hnology
vSXGA ompression and VGA, SVGA re-sizing
v200 Watts user repla eable UHP lamp
vMa ompatible
vNTSC/NTSC4.43/PAL/PAL-M/PAL-N/SECAM and HDTV ompat-
ible
vFull fun tion remote with mouse ontrol and laser pointer
vHigh-te h DVI Conne tion for digital and analog video onne tiv-
ity
vHigh definition TV ompatibility
vUser friendly Multilingual on-s reen display menu
vAdvan ed ele troni keystone orre tion
vUser friendly ontrol panel
vLuxurious arrying ase in luded
Introduction
English
Package Overview
This projector comes with all the items shown below. Check to make
sure your unit is complete. Contact your dealer immediately if any-
thing is missing.
Power Cord
S-Video Cable
VGA Cable
Remote Control with Mouse
Function and Laser Pointer
Carrying Case
Audio Cable
Quic Start Card
DVI to D-Sub Cable
Battery x 2
Users Guide
Introduction
Composite Video Cable
12
34 5
6
Projector with lens cap
Remote Mouse Y Cable
7
English
Main Unit
Product Overview
Introduction
1. Panel Control
2. Power Connector & Power Switch
3. Connection Ports
4. Focus Ring
5. Zoom Lens
6. Zoom Ring
. Speaker
8. Remote Control Receiver
9. Elevator Button
10. Elevator Foot
1
2
3
45
8
6
7
910
English
Introduction
Panel Control
Connection Ports
1 RS232 Input Connector (RS232 is for after service purpose only)
2. Audio Input for Video
3. Composite Video Input Connector
4. S-Video Input Connector
5. Audio Input for DVI
6. DVI Input Connecter
. Audio Input for Computer
8. PC Analog Signal/HDTV/Component Video Connector
9. Audio Output Connector
10. Monitor Loop-through Connector
11. Remote Mouse Input Connector
12. Power Switch
13. Power Connector
2
3
4
5
6
9
7
810 11
12
13
1. Lamp Warning LED
2. Temperature Warning LED
3. Volume
4. Mute
5. Menu (On/Off)
6. Four Directional Select Keys
. Enter
8. Zoom
9. Re-sync
10. Source
11. Power /Standby
1
2
3
4
5
8
6
7
9
10
11
1
English
Remote Control with Mouse Function & Laser Pointer
Source
Re-sync
Freeze
Keystone Correction
Power / Standby
Volume ( + / - )
Mute
Multi-Directional Selector
Enter Key
Menu
Laser Pointer
Zoom In / Zoom Out
Page Up
Page Down
LED
Laser Pointer Caution
Introduction
Caution : To reduce the ris
of injury to the eyes, do not loo
directly into the laser light on the
remote control and do not point
the laser light into anyones eyes.
This remote control is equipped
with a Class II laser that emits
radiation.
vClose the cover of the remote
control when you want to use the
remote mouse.
Cover
English
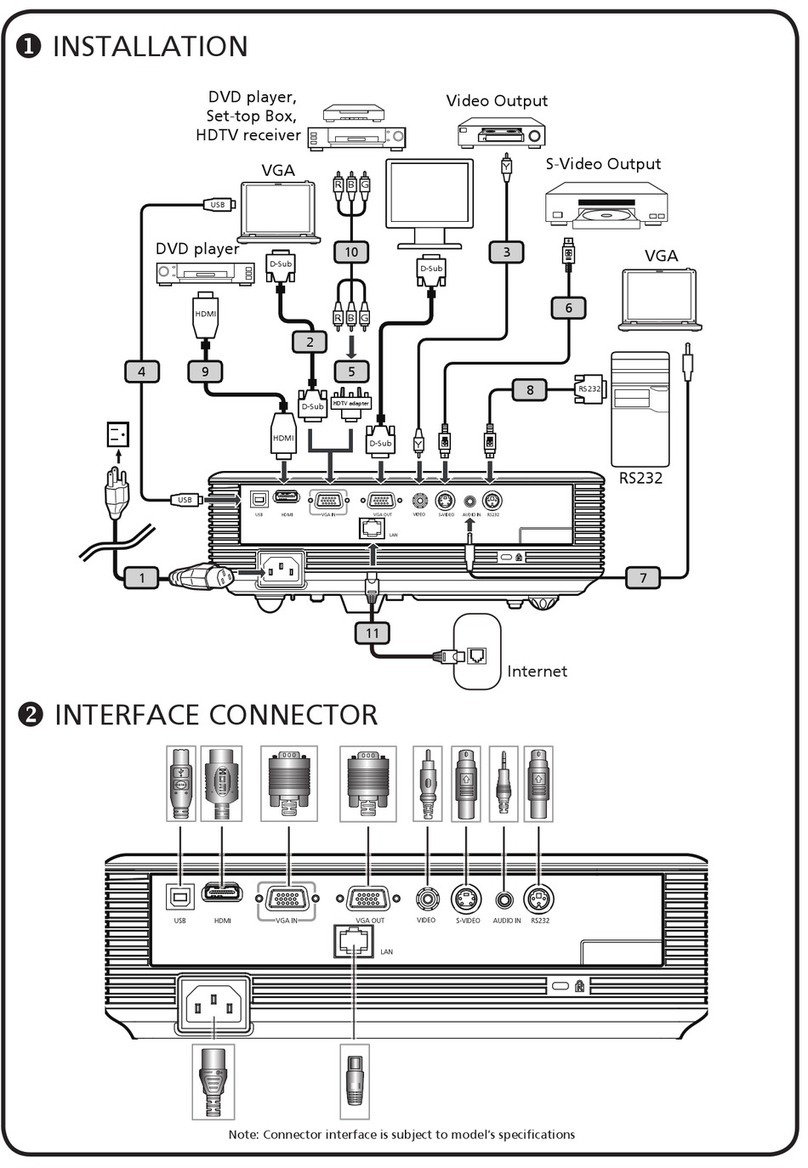
1. Power Cord
2. VGA Cable
3. S-Video Cable
4. Audio Cable Jac /RCA
5. Composite Video Cable
6. DVI to D-Sub Cable
7. Remote Mouse Y Cable
8. D-Sub to RCA Cable for HDTV/
Component (optional)
Connecting the Projector
Installation
vTo ensure t e projector works well wit your computer, please configure t e
display mode of your grap ic card to make it less t an or equal to 1024 X
768 resolution. Make sure timing of t e display mode is compatible wit t e
projector. Refer to t e Compatibility Modes section on page 26.
S-Video Output
Video Output
1
2
3
4
8
67
Digital Tuner Output
Antenna
RS232
AUDIO
VIDEO
S-VIDEO
AUDIO AUDIO AUDIO
DVI
COMPUTER
MONITOR
MOUSE
INPUT OUTPUT
RGB
RS232
USB
5
English
Lens cap
Power / Standby
Installation
Powering On the Projector
1. Remove the lens cap.
2. Ensure that the power cord and signal cable are securely connected.
3. Turn on the main power switch on the side of the projector and allow the
projector to warm up for 1-2 minutes. 
4. Turn on the lamp by pressing Power/Standby button on the control
panel.  The startup screen will display and count down for 20 seconds and
the Power/Standby indicator will light solid amber. The LAMP LED indica-
tor will light solid green.
5. Turn on your source (computer, notebook, or video player ,etc.). The projec-
tor will detect your source automatically.
vIf t e screen displays No Signal , please make sure t e signal cables are
securely connected.
vIf you connect multiple sources at t e same time, use t e Source button
on t e Remote Control or Panel Control to switc .
Power On/Off the Projector
vTurn on the projector first and
then the computer.
Power Switch
1
2
3
English
Installation
Powering Off the Projector
1. Press the Power/Standby button to turn off the projector lamp.
2. After pressing the Power/Standby button, you will see a message Power
off the lamp? on the on-screen display. Press the Power/ Standby button
again to confirm. Otherwise the message will disappear after 5 seconds.
3. Power/Standby LED indicator will light solid amber for about 30 seconds.
After the Power/Standby indicator starts flashing, you can turn off the
main power switch on the side of the projector.
If you want to turn on the projector again, you must press the Power/
Standby button within 90 seconds of the indicator flashing.
4. Do not turn on the projector immediately following a power off procedure.
vW en t e LAMP indicator flas s green for about 10 seconds, you will see
a message Fan Fail on t e on-screen display. Please contact your local
dealer or our service center.
vW en t e TEMP indicator lig ts solid orange, it indicates t e projector as
been over eated. You will see a message Over Temperature on t e on-
screen display. T e projector will automatically s ut itself down. Under
normal conditions, t e projector can be switc ed on again for your
presentation. If t e problem persists, you s ould contact your local dealer or
our service center.