Acorn MASTER-TROL User manual

CPT Handheld Programmer
User Manual
®
P/N 0715-116-000 Rev. A

i
Table of Contents
Introduction
Features
Keypad Definitions
Handheld Programmer Setup
How to Program Controllers
How to change the ON-TIME
How to change the LOCKOUT TIME
How to GLOBAL ENABLE valves
How to GLOBAL DISABLE valves
How to enable a valve using STATION ENABLE
How to disable a valve using STATION DISABLE
How to change the ACTUATOR MODE
How to change the VALVE MODE
How to program Variable Lockout Mode
How to view valve STATUS
1
1
2
4
7
7
8
9
9
10
10
11
12
13
14
ACORN ENGINEERING COMPANY
3URFWRU$YHQXHƔ32%R[Ɣ&LW\RI,QGXVWU\&$
3ƔƔ)
ZZZDFRUQHQJFRP
CPT Handheld Programmer
User Manual
®

INTRODUCTION
Master-Trol Handheld Programmer (CPT) can be used to program a single
Master-Trol Controller, or all controllers connected to a Versa-Link. The Handheld
Programmer is portable which allows you to connect to any controller directly. It is small and
light weight but capable of programming a majority of the system’s features.
FEATURES
Overall Dimensions: 6.75” x 4.75” x 1.5” (172mm x 121mm x 38mm)
Weight: 14.4oz (408g)
20 Character x 2 line LCD display
Auto Shutoff feature will automatically power down the programmer if it remains idle
for 5 minutes to conserve battery life.
Included with Handheld Programmer: 9V Battery, Versa-Link Interface Cable, and User
Manual.
Technical Support: (800) 743-8259
www.acorneng.com 1

ON
TIME
GLOBAL
ENABLE
GLOBAL
DISABLE
STATION
ENABLE
LOCKOUT
TIME
STATION
DISABLE
ACTUATOR
MODE
KEYPAD DEFINITIONS
The “ON TIME” button is used to program the valve’s runtime. The runtime can be
set up to one hour using minute, second, and “tenths of a second” increments.
The “LOCKOUT TIME” button is used to program Lockouts. A Lockout is a specified
amount of time a fixture user must wait between actuations. A Lockout can be
programmed up to one hour using minute and second increments.
The “GLOBAL ENABLE” button is used to enable all valves that are disabled on a
controller. If the programmer is connected to multiple controllers on a Versa-Link,
then the “GLOBAL ENABLE” button will enable all valves that are disabled on all
connected controllers. Any valves that are already enabled will remain enabled.
The “GLOBAL DISABLE” button is used to disable all valves that are enabled on a
controller. If the programmer is connected to multiple controllers on a Versa-Link,
then the “GLOBAL DISABLE” button will disable all valves that are enabled on all
connected controllers. Any valves that are already disabled will remain disabled.
The “STATION ENABLE” button is used to enable a single valve that is disabled on
a controller.
The “STATION DISABLE” button is used to disable a single valve that is enabled on
a controller.
The “ACTUATOR MODE” button is used to configure the fixture’s pushbutton to one
of the following modes:
(SC) Single Cycle -
Mode
The valve runs for the programmed “ON TIME.” If a lockout is
programmed, then the valve will disable until the lockout
has elapsed. Once the lockout has elapsed, the valve will
automatically return to standby mode and wait for the next
activation.
(CI) Cycle Interrupt -
Mode
When the valve is cycled, the cycle can be interrupted by
actuating the fixture button a second time to turn the water off.
If the cycle is not interrupted, then the valve will run until the
“ON TIME” has elapsed. If a lockout is programmed, then the
valve will disable until the lockout has elapsed. Once the
lockout has elapsed, the valve will automatically return to
standby mode and wait for the next activation.
(AM) Accumulator -
Mode
This mode is used for accumulators on an AcornVac vacuum
plumbing system. When an input signal from the accumulator is
present, the valve will open. The “ON TIME” will not begin until
the input signal is no longer present. Once the input signal is no
longer present, the valve will continue to operate until the “ON
TIME” has elapsed. Then the valve will return to standby mode.
Technical Support: (800) 743-8259
www.acorneng.com 2

VALVE
MODE
STATUS
(TM) Terminate -
Cycle Mode
When the valve is cycled, the cycle can be interrupted by
actuating the fixture button a second time to turn the water off.
Even though the water is turned off, the “ON TIME” will
continue to count down. The valve cannot be actuated again
until the “ON TIME” has elapsed.
The “VALVE MODE” button is used to configure the fixture’s valve to one of the
following modes. (WARNING - These modes will remain active until they are turned
off using the handheld programmer):
(SS) Simultaneous -
Shutoff Mode
When this feature is on, the valve will be paired with the valve
numerically before it on the controller. When the valve is
actuated, it will run until the “ON TIME” has elapsed. When the
valve cycle ends, the valve numerically before it will also end
its cycle if it is running, regardless of its “ON TIME”.
WARNING: This feature can only be turned off with the hand-
held programmer.
(PO) Paired -
Operation Mode
When this feature is on, the valve will be paired with the valve
numerically before it on the controller. When that valve is
actuated, both valves will turn on at the same time. The “ON
TIME” for the valve that is set for “Paired Operation Mode” will
not begin until the “ON TIME” for the valve numerically before
it has elapsed and shut off. This valve will then continue to run
until its “ON TIME” has elapsed, then shutoff.
(RO) Remote On -
Mode
When this feature is on, it will turn the valve on and override
the “ON TIME”. WARNING: This feature will turn the valve on
and it will remain on until the feature is turned off, regardless
of the “ON TIME”.
(RS) Remote -
Shutoff Mode
When this feature is on, it will disable the valve. This feature
overrides the “STATION ENABLE” feature of the handheld
programmer and the Master-Trol System Computer.
WARNING: The valve can only be enabled by turning this
feature off with the handheld programmer.
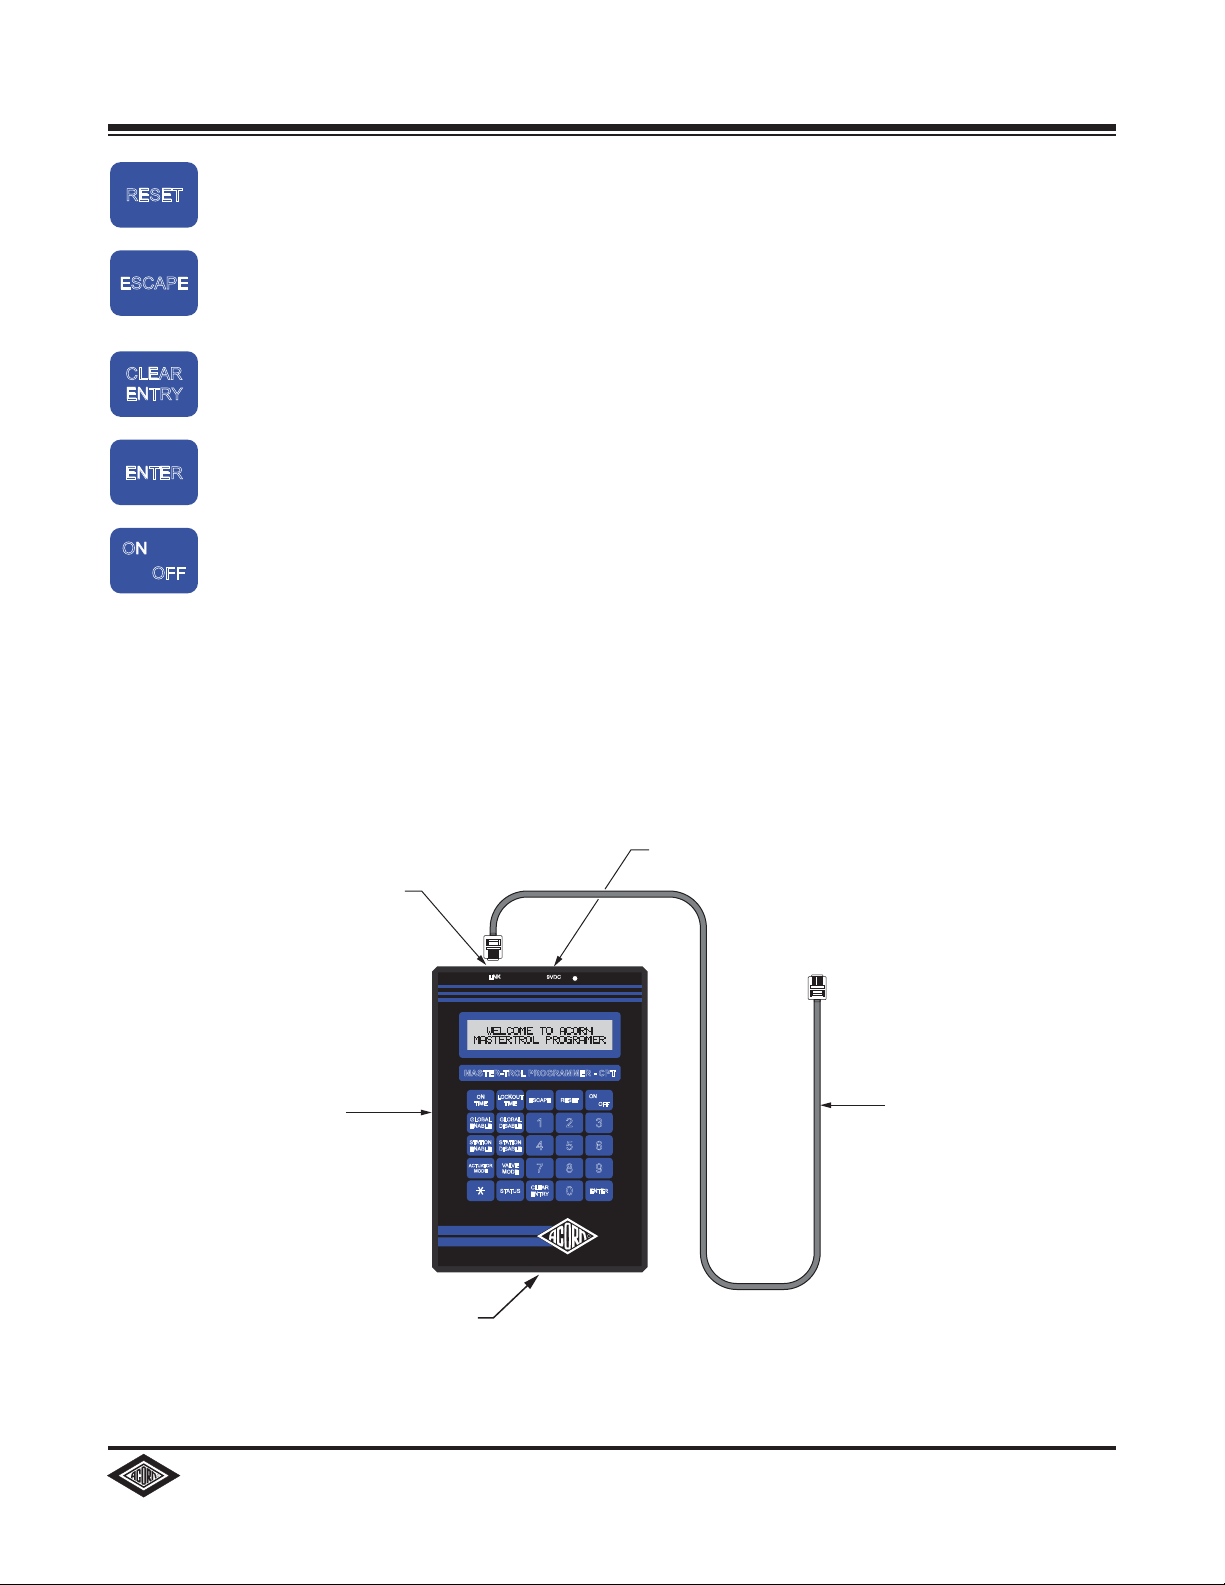
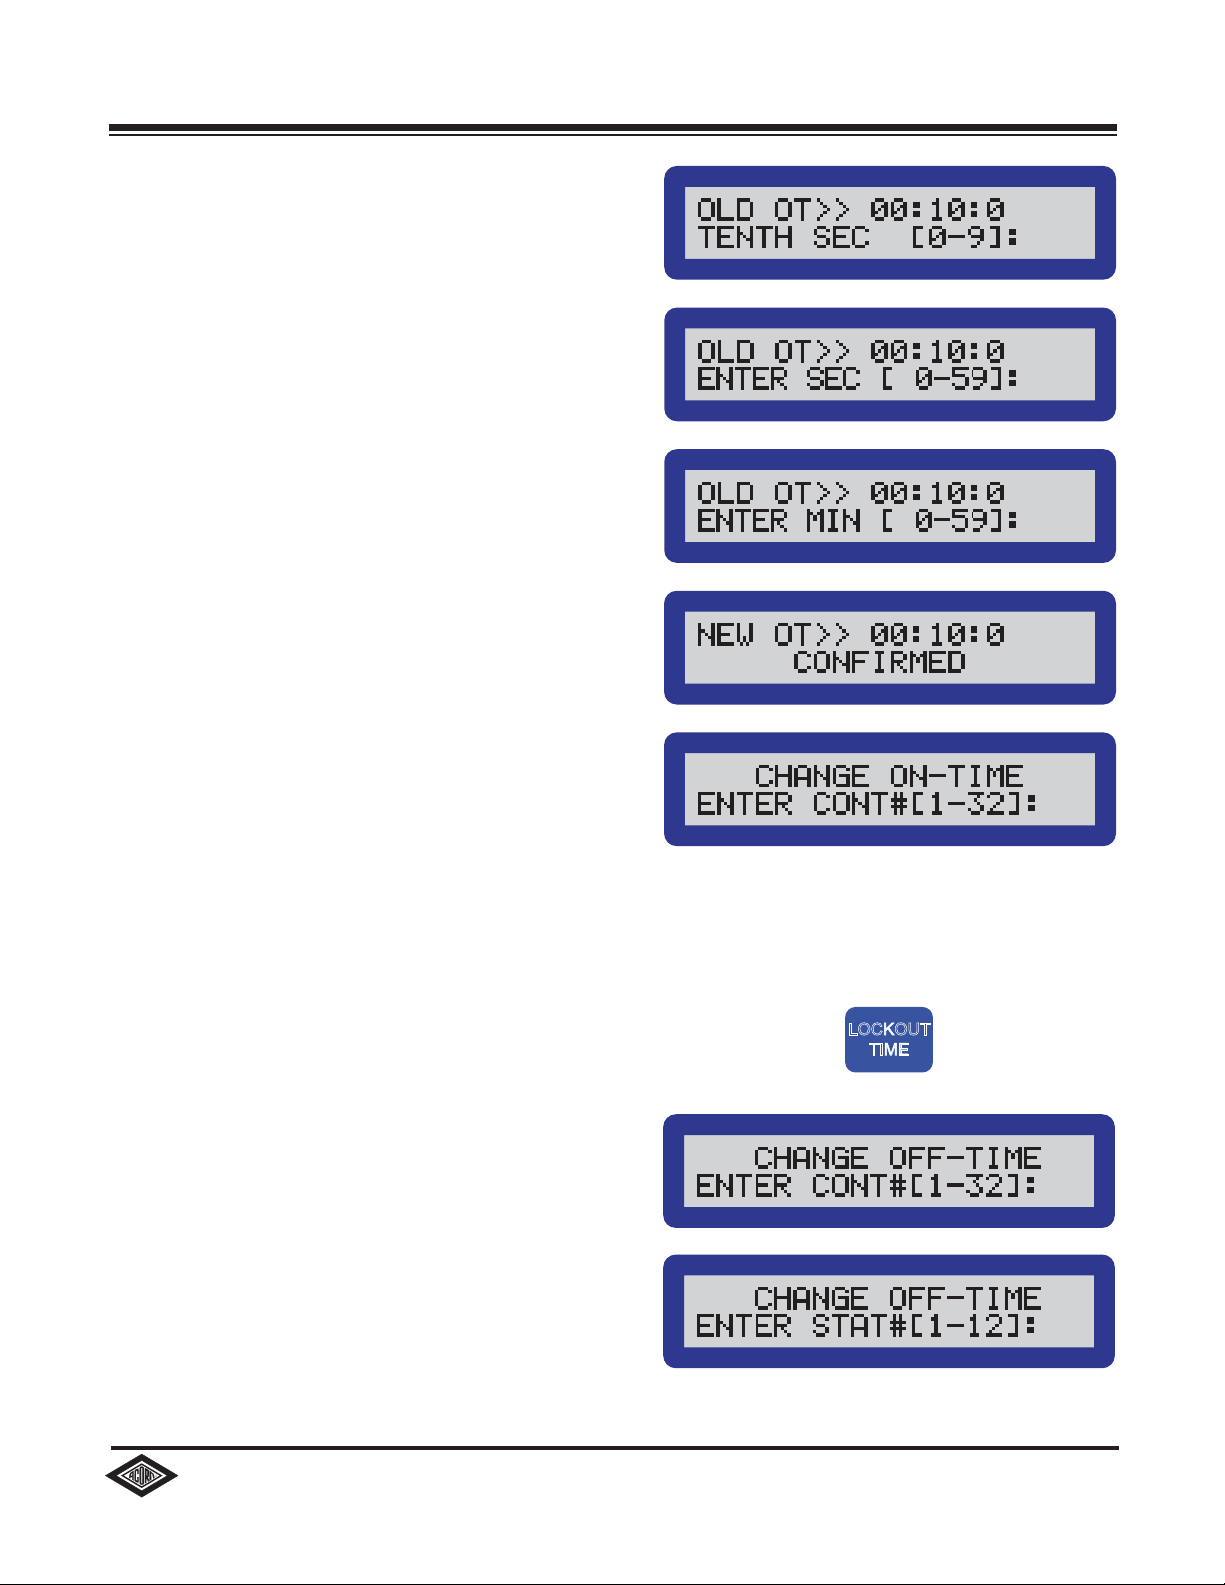
After the “ON TIME” and ”LOCKOUT TIME” have been programmed, this button is
used to set the valve to Variable Lockout Mode. The Variable Lockout will disable the
valve until the “LOCKOUT TIME” has elapsed if the valve is actuated a specified
number of times within a specified window of time. This feature is typically used on
fixtures with multiple users.
The “STATUS” button allows you to view the current settings of any selected valve
on a controller. You can advance to the next valve by pressing the “ENTER” button.
Technical Support: (800) 743-8259
www.acorneng.com 3

Link Port
(Top)
Plug-in Transformer
Connection (Top)
Battery
Compartment
(Bottom Rear)
CPT
Handheld
Programmer
Versa-Link
Interface
Cable
RESET
ESCAPE
CLEAR
ENTRY
ENTER
ON
OFF
ON
TIME
LOCKOUT
TIME ESCAPE RESET ON
OFF
GLOBAL
ENABLE
STATION
ENABLE
ACTUATOR
MODE
GLOBAL
DISABLE
STATION
DISABLE
VALVE
MODE
STATUS CLEAR
ENTRY ENTER
1 2 3
4 5 6
7 8 9
0
LINK 9VDC
MASTER-TROL PROGRAMMER - CPT
R
Manufacturers of Stainless Steel Plumbing Fixtures
CITY OF INDUSTRY, CALIFORNIA
The “RESET” button will restart the Handheld Programmer without shutting off the
power. You will be required to enter the password again.
The “ESCAPE” button will remove you from your current function and return you to
the “PRESS YOUR DESIRED FUNCTION KEY” screen. You can then select a new
function without restarting the Handheld Programmer.
The “CLEAR ENTRY” button allows you to clear information if you make a mistake
while entering data.
The “ENTER” button confirms the data you have entered and applies the changes.
The “ON/OFF” button is used to power the Handheld Programmer on and off.
HANDHELD PROGRAMMER SETUP
1. Install the 9V battery or connect the plug-in transformer to the Handheld Programmer.
2. Plug the interface cable into the link port on the Handheld Programmer.
Technical Support: (800) 743-8259
www.acorneng.com 4

Versa-Link
Connections
ON
TIME
LOCKOUT
TIME ESCAPE RESET ON
OFF
GLOBAL
ENABLE
STATION
ENABLE
ACTUATOR
MODE
GLOBAL
DISABLE
STATION
DISABLE
VALVE
MODE
STATUS CLEAR
ENTRY ENTER
1 2 3
4 5 6
7 8 9
0
LINK 9VDC
MASTER-TROL PROGRAMMER - CPT
R
Manufacturers of Stainless Steel Plumbing Fixtures
CITY OF INDUSTRY, CALIFORNIA
Facility Name:
Facility Location:
Station Location
1
2
3
4
5
6
7
8
9
10
11
12
Station Location
Link #: Controller Address #:
Date Shipped: Acorn SO #:
For assistance in installation or maintenance, call:
Acorn Technical Assistance 1-800-743-8259
MASTER-TROL CONTROLLER
DAUGHTERBOARD VER.
PT. NO. 0715-002-001
MASTER-TROL
ELECTRONIC
VALVE
CONTROLLER
ACORN ENGINEERING COMPANY
15125 PROCTOR AVE PO BOX 3527
INDUSTRY, CA. 91744
24 VAC POWER STATIONS
ADDRESS
FLASHING
IN USE
VERSA-LINK
IN OUTADD VALUES
OPEN
CLOSE RED INDICATES PUSHBUTTON ACTUATION - GREEN INDICATES VALVE IS OPEN - YELLOW INDICATES BOTH
1 2 3 4 5 1 2 3 4 5 6 7 8 9 10 11 12
Facility Name:
Facility Location:
Station Location
1
2
3
4
5
6
7
8
9
10
11
12
Station Location
Link #: Controller Address #:
Date Shipped: Acorn SO #:
For assistance in installation or maintenance, call:
Acorn Technical Assistance 1-800-743-8259
MASTER-TROL CONTROLLER
DAUGHTERBOARD VER.
PT. NO. 0715-002-001
MASTER-TROL
ELECTRONIC
VALVE
CONTROLLER
ACORN ENGINEERING COMPANY
15125 PROCTOR AVE PO BOX 3527
INDUSTRY, CA. 91744
24 VAC POWER STATIONS
ADDRESS
FL A S HING
IN U S E
VE R S A - L I N K
IN OU TAD D VA L U ES
OPEN
CLOSE RED INDICATES PUSHBUTTON ACTUATION - GREEN INDICATES VALVE IS OPEN - YELLOW INDICATES BOTH
1 2 3 4 5 1 2 3 4 5 6 7 8 9 10 11 12
3. Locate the two Versa-Link connections.
4. Unplug all cables from the Versa-Link Connections. Then use one of the empty ports to
connect the Versa-Link Interface Cable of the Handheld rogrammer.
Technical Support: (800) 743-8259
www.acorneng.com 5

ON
TIME
LOCKOUT
TIME ESCAPE RESET ON
OFF
GLOBAL
ENABLE
STATION
ENABLE
ACTUATOR
MODE
GLOBAL
DISABLE
STATION
DISABLE
VALVE
MODE
STATUS CLEAR
ENTRY ENTER
1 2 3
4 5 6
7 8 9
0
LINK 9VDC
MASTER-TROL PROGRAMMER - CPT
R
Manufacturers of Stainless Steel Plumbing Fixtures
CITY OF INDUSTRY, CALIFORNIA
Facility Name:
Facility Location:
Station Location
1
2
3
4
5
6
7
8
9
10
11
12
Station Location
Link #: Controller Address #:
Date Shipped: Acorn SO #:
For assistance in installation or maintenance, call:
Acorn Technical Assistance 1-800-743-8259
MASTER-TROL CONTROLLER
DAUGHTERBOARD VER.
PT. NO. 0715-002-001
MASTER-TROL
ELECTRONIC
VALVE
CONTROLLER
ACORN ENGINEERING COMPANY
15125 PROCTOR AVE PO BOX 3527
INDUSTRY, CA. 91744
24 VAC POWER STATIONS
ADDRESS
FL A S HING
IN U S E
VE R S A - L I N K
IN OU TAD D VA L U ES
OPEN
CLOSE RED INDICATES PUSHBUTTON ACTUATION - GREEN INDICATES VALVE IS OPEN - YELLOW INDICATES BOTH
1 2 3 4 5 1 2 3 4 5 6 7 8 9 10 11 12
5. Make sure the controller is powered before turning on the Handheld Programmer.
6. Press the “ON/OFF” button to turn on the Handheld Programmer.
Once the Handheld Programmer is powered, the
Welcome screen will be displayed briefly.
Using the number pad, you will then need to
enter the 5-Digit Password, then press “ENTER”.
The Polling screen will be displayed briefly.
While polling the Handheld Programmer will
display the addresses of all the connected
controllers.
Power LED
Technical Support: (800) 743-8259
www.acorneng.com 6

ON
TIME
After polling, the handheld programmer will
briefly display the total number of controllers that
were found.
When the “PRESS YOUR DESIRED FUNCTION
KEY” screen appears, you are now ready to
select the feature you want to program.
HOW TO PROGRAM CONTROLLERS
2. If you are connected to multiple controllers,
enter the controller address with the valve
you want to program and press “ENTER”.
If not, proceed to step #3.
3. Enter the station number of the valve you
want to program and press “ENTER”.
1. From the “PRESS YOUR DESIRED
FUNCTION KEY” screen, press the “ON-
TIME” button.
The following will provide step-by-step instructions on how to program each feature of the
Master-Trol Controller. Each set of instructions will begin from the “PRESS YOUR
DESIRED FUNCTION KEY” screen. Please see the “Keypad Definitions” section for
descriptions of each feature and mode.
NOTE: If the Handheld Programmer is connected to multiple controllers, then you will
be required to enter the controller address and station number when specifying the valve
you want to program. If you are connected to one controller, then the Handheld Programmer
will only ask for the station number. Controller address numbers should be written on the front
of the controller.
How to change the ON-TIME:
Technical Support: (800) 743-8259
www.acorneng.com 7

LOCKOUT
TIME
4. The old “ON TIME” will be displayed at the
top. Enter the “tenths of a second” (0-9) you
require, then press “ENTER”.
5. Enter the number of seconds (0-59) you
require, then press “ENTER”.
6. Enter the number of minutes (0-59) you
require, then press “ENTER”.
7. The Handheld Programmer will breifly
confirm the new “ON TIME”.
8. After confirmation, the Handheld
Programmer will return to the controller/
station screen. You can change the “ON
TIME” for a new valve, or press the
“ESCAPE” button to change a different
feature.
2. If you are connected to multiple controllers,
enter the controller address that contains
the valve you want to program and press
“ENTER”. If not, proceed to step #3.
3. Enter the station number of the valve you
want to program and press “ENTER”.
1. From the “PRESS YOUR DESIRED
FUNCTION KEY” screen, press the
“LOCKOUT TIME” button.
How to change the LOCKOUT TIME:
Technical Support: (800) 743-8259
www.acorneng.com 8

GLOBAL
DISABLE
GLOBAL
ENABLE
4. The old “LOCKOUT TIME” will be displayed
at the top. Enter the number of seconds
(0-59) you require, then press the “ENTER”
button.
5. Enter the number of minutes (0-59) you
require, then press the “ENTER” button.
6. The Handheld Programmer will briefly
confirm the new “LOCKOUT TIME”.
8. After confirmation, the Handheld
Programmer will return to the controller/
station screen. You can change the
“LOCKOUT TIME” for a new valve, or
press the “ESCAPE” button to change
a different feature.
2. The Handheld Programmer will briefly
display a confirmation that all valves
are enabled. Then it will return to the
“PRESS YOUR DESIRED FUNCTION
KEY” screen.
How to GLOBAL ENABLE valves:
1. From the “PRESS YOUR DESIRED
FUNCTION KEY” screen, press the
“GLOBAL ENABLE” button.
2. The Handheld Programmer will briefly
display a confirmation that all valves
are disabled. Then it will return to the
“PRESS YOUR DESIRED FUNCTION
KEY” screen.
How to GLOBAL DISABLE valves:
1. From the “PRESS YOUR DESIRED
FUNCTION KEY” screen, press the
“GLOBAL DISABLE” button.
Technical Support: (800) 743-8259
www.acorneng.com 9

STATION
ENABLE
STATION
DISABLE
How to enable a valve using STATION ENABLE:
1. From the “PRESS YOUR DESIRED
FUNCTION KEY” screen, press the
“STATION ENABLE” button.
How to disable a valve using STATION DISABLE:
2. If you are connected to multiple controllers,
enter the controller address with the valve
you want to program and press “ENTER”.
If not, proceed to step #3.
3. Enter the station number of the valve you
want to program and press “ENTER”.
4. After confirmation, the Handheld
Programmer will return to the controller/
station screen. You can either disable a
new valve, or press the “ESCAPE” button
to change a different feature.
1. From the “PRESS YOUR DESIRED
FUNCTION KEY” screen, press the
“STATION DISABLE” button.
2. If you are connected to multiple controllers,
enter the controller address with the valve
you want to program and press “ENTER”.
If not, proceed to step #3.
3. Enter the station number of the valve you
want to program and press “ENTER”.
4. After confirmation, the Handheld
Programmer will return to the controller/
station screen. You can either enable a
new valve, or press the “ESCAPE” button
to change a different feature.
Technical Support: (800) 743-8259
www.acorneng.com 10

ACTUATOR
MODE
7. The Handheld Programmer will briefly
confirm the new “ACTUATOR MODE”.
8. After confirmation, the Handheld
Programmer will return to the controller/
station screen. You can change the
“ACTUATOR MODE” for a new valve,
or press the “ESCAPE” button to change
a different feature.
How to change the Actuator Mode:
1. From the “PRESS YOUR DESIRED
FUNCTION KEY” screen, press the
“ACTUATOR MODE” button.
2. If you are connected to multiple controllers,
enter the controller address with the valve
you want to program and press “ENTER”.
If not, proceed to step #3.
3. Enter the station number of the valve you
want to program and press “ENTER”.
4. The Handheld Programmer will briefly
display the old mode.
5. Press the numerical value on the keypad
for the mode you require. See “Keypad
Definitions” for descriptions of each mode.
SC = Single Cycle Mode
CI = Cycle Interrupt Mode
AM = Accumulator Mode
TM = Terminate Cycle Mode
Technical Support: (800) 743-8259
www.acorneng.com 11

VALVE
MODE
7. The Handheld Programmer will briefly
confirm the new “VALVE MODE”.
8. After confirmation, the Handheld
Programmer will return to the controller/
station screen. You can change the
“VALVE MODE” for a new valve, or press
the “ESCAPE” button to change a different
feature.
How to change the Valve Mode:
1. From the “PRESS YOUR DESIRED
FUNCTION KEY” screen, press the
“VALVE MODE” button.
2. If you are connected to multiple controllers,
enter the controller address with the valve
you want to program and press “ENTER”.
If not, proceed to step #3.
3. Enter the station number of the valve you
want to program and press “ENTER”.
4. The Handheld Programmer will briefly
display the old mode.
5. Press the numerical value on the keypad
for the mode you require. See “Keypad
Definitions” for descriptions of each mode.
SS = Simultaneous Shutoff Mode
PO = Paired Operation Mode
RO = Remote On Mode (See Warning and Keypad Definition)
RS = Remote Shutoff Mode
WARNING - These modes will remain active until they are turned off using the handheld
programmer. To turn off the mode, repeat steps 1 through 7 and choose the same mode again.
This will turn off the mode.
Technical Support: (800) 743-8259
www.acorneng.com 12

ON
TIME
LOCKOUT
TIME
How to program Variable Lockout Mode:
1. Program the valve for the required “ON
TIME”. (See “How to change On-Time”)
2. Program the valve for the required
“LOCKOUT TIME”. (See “How to
change Lockout Time”)
4. If you are connected to multiple controllers,
enter the controller address with the valve
you want to program and press “ENTER”.
If not, proceed to step #4.
5. Enter the station number of the valve you
want to program and press “ENTER”.
6. Enter the number of Actuations you
require. (When confirmed, “A” will
represent “Actuations”)
7. Enter the amount of seconds (0-59) you
require for the “Window of Time”, then press
“ENTER”.
8. Enter the amount of minutes (0-59) you
require for the “Window of Time”, then press
“ENTER”. (When confirmed, “W” will
represent “Window of Time”)
3. From the “PRESS YOUR DESIRED
FUNCTION KEY” screen, press the
“ ” button.
9. After confirmation, the Handheld
Programmer will return to the controller/
station screen. You can change the
“Variable Lockout” for a new valve, or press
the “ESCAPE” button to change a different
feature. See “Keypad Definitions” for a
description of “ ” (Variable Lockout).
Technical Support: (800) 743-8259
www.acorneng.com 13

STATUS
Controller
Address
Station
Number
Enabled/
Disabled
Status
Actuator
Mode
Programmed
“ON TIME”
Programmed
“LOCKOUT TIME”
How to view valve Status:
2. If you are connected to multiple controllers,
enter the controller address with the valve
you want to view and press “ENTER”. If
not, proceed to step #3.
3. Enter the station number of the valve you
want to view and press “ENTER”.
1. From the “PRESS YOUR DESIRED
FUNCTION KEY” screen, press the
“STATUS” button.
4. The following screen will display multiple parameters for the chosen valve.
5. Press the “ENTER” button to cycle to the
next valve, or press the “ESCAPE” button
to change a different feature.
Technical Support: (800) 743-8259
www.acorneng.com 14
Table of contents