acropaq APS26K User manual

1 | Page
Bedienungsanleitung
Automatischer Aktenvernichter
APS26K
DE

2 | Page
1. BEDIENELEMENTE
1. Schneidwerkaufsatz
2. Schiebeschalter
-- OFF: deaktiviert
-- Auto: Sobald eine Papier eingesetzt ist, startet der Aktenvernichter
-- REV: Gestautes Papier zurückrollen
3. Kreditkarteneinzug
4. Papiereinzug mit Schneidwerk (max. 220 mm breit →A4-Format)
5. Auszug (zum Platzieren des Aktenvernichters auf größeren Auffangbehältern)
6. Auffangbehälter mit Volumen 7 L
2. TECHNISCHE DATEN
APS26K
Nicht für die gewerbliche Nutzung
Schnittleistung: max. 4 Blätter DIN A4 (80 g/m²) oder eine Kreditkarte
Schnittmethode, Schnittbreite: Streifenschnitt, 6 mm
Schnittgeschwindigkeit: 2.2 m/min
Breite Papiereinzug: 220 mm
Kontinuierlicher Betrieb: 2 min - Abkühlzeit 25 min
Geräuschpegel: 72 dB(A)
Bedienumfang: Autostart/Autostopp - Rückwärtslauf - Aus
Abmessungen (B x T x H): 310 - 380 x 145 x 296 mm
Gewicht: 1,35 kg
Spannungsversorgung: 220 - 240V / 50Hz, 0.9A
Aufnahmeleistung: 210W

3 | Page
3. SICHERHEITSVORSCHRIFTEN
Lesen Sie bitte diese Anleitung vor Gebrauch des Geräts sorgfältig durch.
Erklärung der Symbole
Um alle Funktionen Ihres Aktenvernichters nutzen zu können, lesen Sie bitte diese
Anleitung vor Gebrauch des Geräts sorgfältig durch.
Achtung: Die falsche Anwendung des Halten Sie Krawatten vom Bereich
Geräts kann zu schweren Verletzungen des Papiereinzugs fern!
führen!
Halten Sie Schals, Schmuck und lose Halten Sie Ihr Haar vom Bereich des
Kleidung vom Bereich des Papiereinzugs Papiereinzugs fern!
fern!
Das Gerät darf nicht von Kindern Sprühen Sie keine entzündlichen
bedient werden! Halten Sie Kinder Gase oder Öl auf das Gerät.
von dem Gerät fern. Feuergefahr!
Fassen Sie nicht mit den Händen in Führen Sie keine Büroklammern
den Papiereinzug! oder Heftklammern in den
Papiereinzug ein!
Warnung! Verletzungsgefahr durch Einzugsmechanismus. Lose Gegenstände können sich
im Einzug verfangen und Verletzungen hervorrufen. Halten Sie Finger, Haare, Schals,
Krawatten, Schmuck etc. vom Einzug fern.
Achtung! Die Nichtbeachtung dieser Sicherheitszeichen kann ernste körperliche Verletzungen
verursachen! Falls doch ein Gegenstand (Ärmel, Krawatte etc.) unbeabsichtigt in den Einzug gelangt,
ziehen Sie sofort den Netzstecker aus der Steckdose!

4 | Page
Sicherheitsrichtlinien
•Das Gerät ausschließlich für den vorgesehenen Zweck verwenden.
•Das Gerät an eine Stromquelle anschließen, die den Spezifikationen auf dem Typenschild
des Geräts entspricht.
•Das Gerät an eine einfach zugängliche Steckdose in Gerätenähe anschließen.
•Kein(e) Verlängerungskabel oder Mehrfachsteckdose verwenden.
•Die Nichtbeachtung dieser Anweisungen birgt das Risiko der Beschädigung und von
Verletzungen und führt zum Erlöschen der Garantie.
•Wartungs- oder Instandsetzungsmaßnahmen am Gerät nicht selbst vornehmen.
•Dafür sorgen, dass Kreditkartenreste nicht in das Altpapier geraten.
•Das Gerät nicht mit beschädigtem Netzkabel oder Netzstecker verwenden.
•Beim Transport des Geräts Bodenunebenheiten und auf dem Boden liegende
Gegenstände vermeiden.
•Bitte lesen Sie alle Sicherheitshinweise und Anweisungen. Der Hersteller haftet nicht fr
Fälle materieller Schäden oder Verletzungen, die durch falsche Handhabung oder
Nichteinhaltung der Sicherheitshinweise entstanden sind. In solchen Fällen wird die
Garantie ungltig.
•Das Gerät ist fr den Einsatz im Innenbereich bestimmt. Verwenden Sie es niemals im
Freien.
•Setzen Sie das Gerät keiner Feuchtigkeit aus.
•Seien Sie stets aufmerksam und achten Sie darauf, was Sie tun. Verwenden Sie keine
elektrischen Geräte, wenn es Ihnen an Konzentration oder Aufmerksamkeit mangelt
oder Sie unter dem Einfluss von Drogen, Alkohol oder Medikamenten stehen. Auch ein
kurzer Moment der Unachtsamkeit kann bei der Verwendung elektrischer Geräte zu
schweren Unfällen und Verletzungen fhren.
•Versuchen Sie nicht, das Gerät zu öffnen, zu modifizieren oder zu reparieren. Lassen Sie
das Gerät nicht fallen, zerstechen oder zerbrechen Sie es nicht und setzen Sie es keinem
hohen Druck aus.
•Veränderungen am Gerät und technische Modifizierungen sind nicht zulässig.
•Überprfen Sie das Gerät und das Kabel (und, falls zutreffend, den Adapter) vor der
Verwendung auf Schäden. Sollten sichtbare Schäden, ein starker Geruch oder eine
bermäßige Überhitzung von Komponenten auftreten, ziehen Sie sofort alle Stecker und
verwenden Sie das Gerät nicht mehr.
•Keine Sprühreiniger oder Sprühfette verwenden, da diese zu einer spontanen
Entzündung führen können.
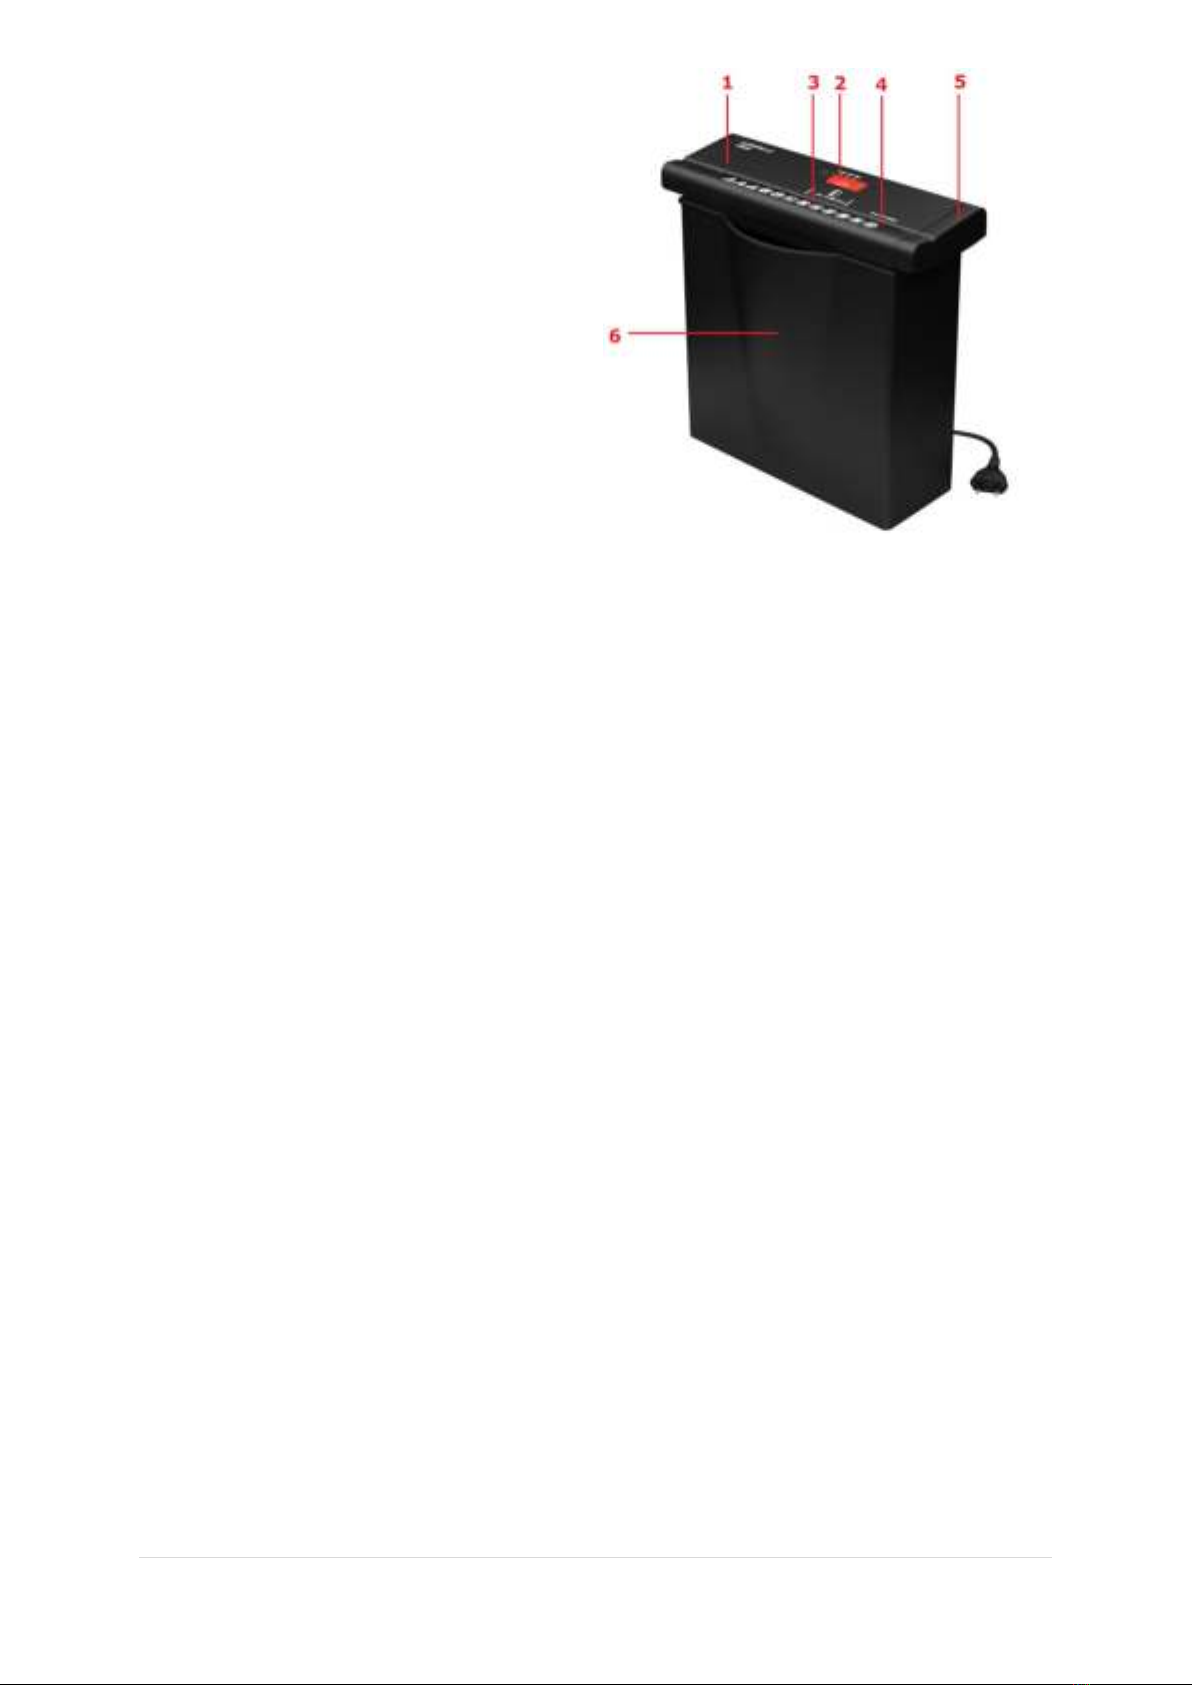
4. BESTIMMUNGSGEMÄSSER GEBRAUCH
-Verwenden Sie den Aktenvernichter APS26K nur zur Zerkleinerung von Papier und Kreditkarten!
Das zu zerkleinernde Papier muss trocken sein und den im Kapitel „Technische Daten“
aufgeführten Anforderungen entsprechen! Die Zerkleinerung anderer Materialien kann dazu
führen, dass Sie sich verletzen (durch Splittern fester Materialien etc.) oder Schäden am Gerät
entstehen (z.B. Zerstörung des Schneidwerks).
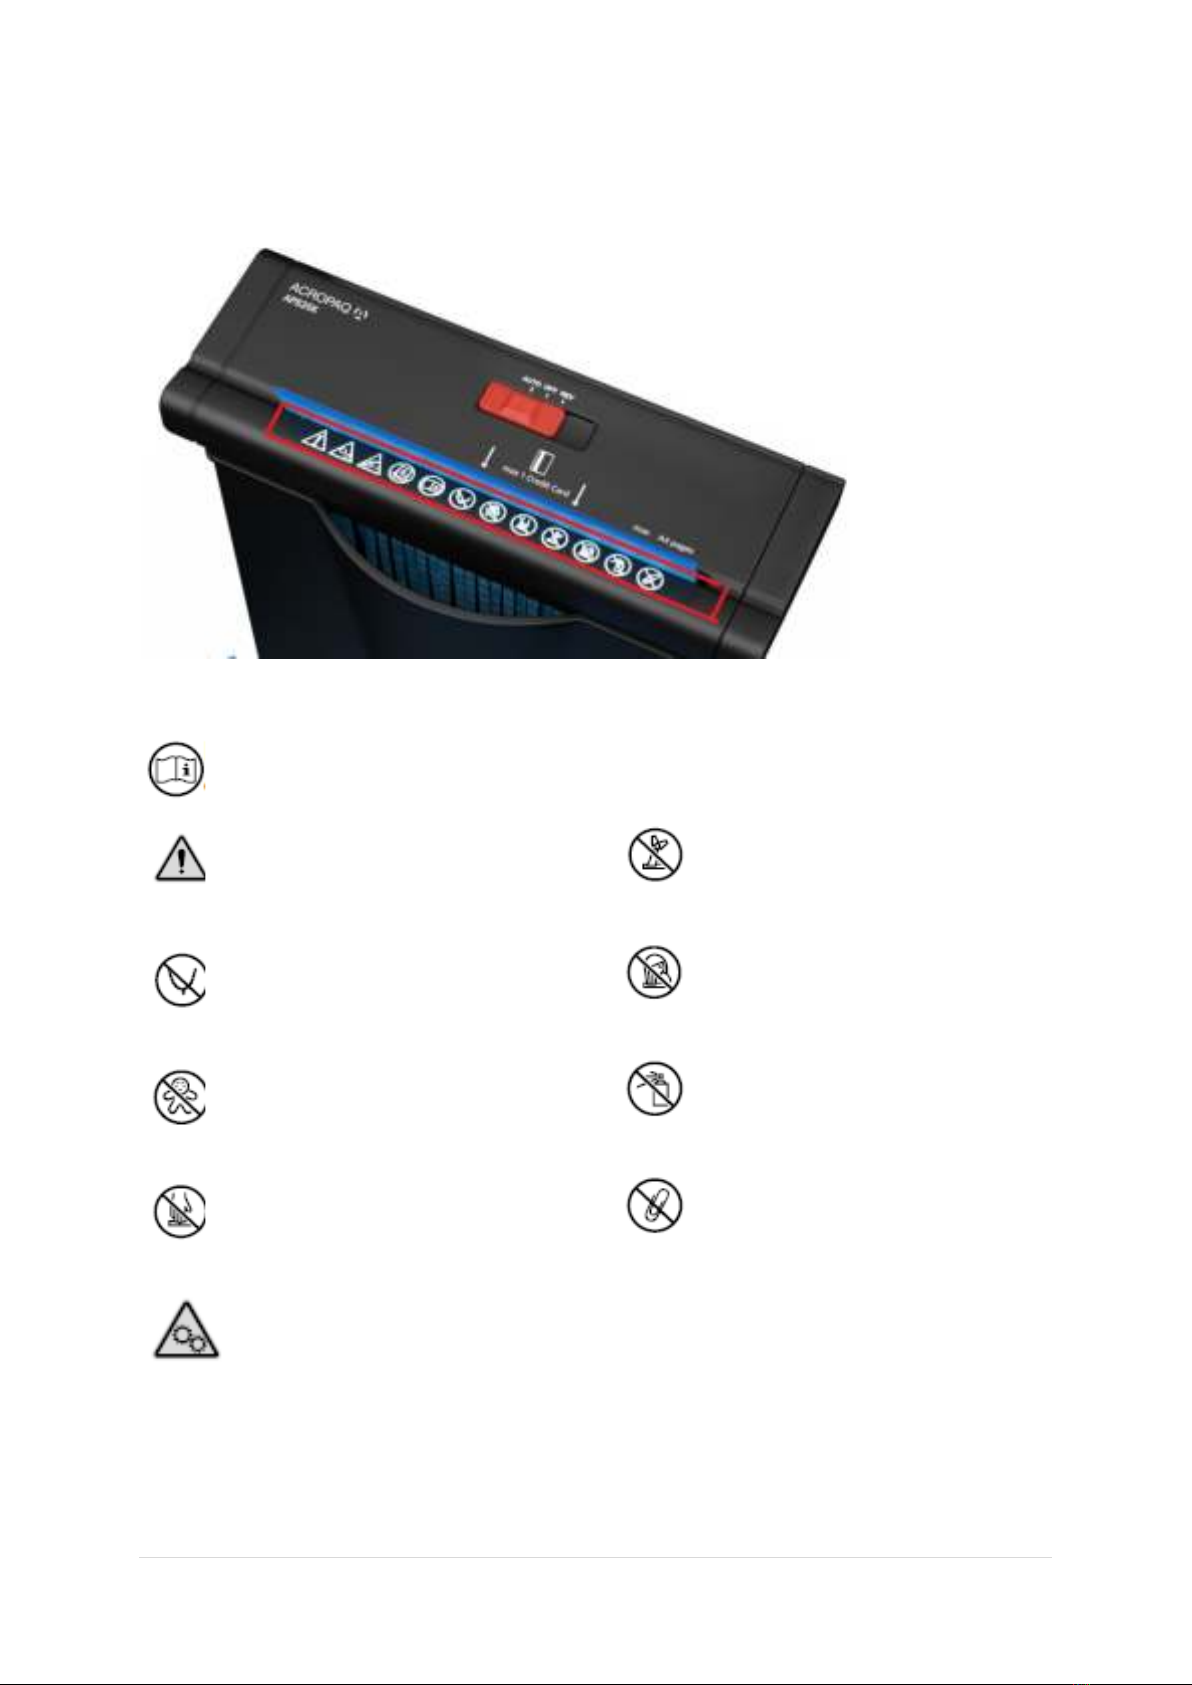
-Entfernen Sie alle Büro- und Heftklammern, bevor Sie dem Gerät das Papier zuführen!
-Vernichten Sie mit diesem Gerät keine Endlosformulare!
-Das Gerät darf nur in trockenen geschlossenen Räumen benutzt werden.

5 | Page
5. INBETRIEBNAHME
1) Das Gerät auspacken und die Schneideinheit auf den Behälter setzen.
Achtung! Die Unterseite des Schneidwerkaufsatzes enthält scharfe Ecken.
Verletzungsgefahr!
2) Stellen Sie Auffangbehälter und Schneidwerkaufsatz auf einer ebenen Fläche auf
3) Platzieren Sie das Gerät in der Nähe einer Steckdose. Stellen Sie Auffangbehälter und
Schneidwerkaufsatz jedoch nicht in der Nähe einer Wärmequelle oder in der Nähe von Wasser
auf.
4) Stecken Sie den Netzstecker in die Steckdose.
5) Zum Starten des Geräts den Schiebeschalter nach links schieben, in Position „Auto“;
In der Position Auto wird der Zerkleinerungsbetrieb des Schneidwerks automatisch gestartet,
sobald Papier oder eine Kreditkarte durch den Papiereinzug eingeführt wird. Das Gerät schaltet
auf Vorwärtslauf und zieht das Papier oder die Kreditkarte ein. Nach dem Zerkleinerungsvorgang
läuft das Gerät noch ca. 2 bis 4 Sekunden weiter, dann schaltet das Gerät automatisch ab.
6) Das zu vernichtende Papier in den Einzugsschlitz (4) einführen.
Hinweis: Darauf achten, dass das Papier sauber gestapelt ist.
Liegt die Stapeldicke im zulässigen Bereich, wird der Motor gestartet, und das Papier wird
zerkleinert. Der Schneidwerkbetrieb wird automatisch eingestellt, sobald der Vorgang
abgeschlossen ist.
7) Ist der Papierstapel zu dick, hält das Gerät automatisch an. Den Schalter auf Rückwärtsbetrieb (R)
schieben, um das gestaute Papier rückwärts ausgeben zu lassen. Kann das Papier so nicht
freigegeben werden, mehrfach langsam zwischen den Positionen „Auto“ and „REV“ umschalten.
Nicht schnell umschalten, da das Gerät dadurch beschädigt werden kann
8) Einige Blätter aus dem Papierstapel entnehmen und erneut versuchen. Der erkleinerungsvorgang
beginnt automatisch.
9) Gerät ausschalten, Ziehen Sie den Netzstecker aus der Steckdose.

6 | Page
6. MOTORSCHUTZ
Der Motor schaltet bei Überlastung automatisch ab. Ziehen Sie den Netzstecker aus der Steckdose
und lassen Sie den Motor auf Raumtemperatur abkühlen. Stecken Sie den Netzstecker wieder in die
Steckdose und setzen Sie den Betrieb fort.
Hinweis! Beachten Sie den im Kapitel „Technische Daten“ angegebenen kontinuierlichen Betrieb.
7. PAPIERSTAU BESEITIGEN
Wenn dem Schneidwerk zu viel Papier zugeführt wurde, entsteht ein Papierstau. Bei einem
Papierstau schaltet das Gerät automatisch ab.
Gehen Sie wie folgt vor:
-Geben Sie das Papier über den Rückwärtslauf (Rev) aus.
-Befreien Sie den Einzug von Papierresten über den Vorwärtslauf (Auto).
Hinweis! Wenn durch den Rückwärts-/Vorwärtslauf die Blockade nicht beseitigt wurde, ziehen Sie
den Netzstecker und entfernen Sie danach die Papierreste manuell aus dem Schneidwerk.
-Stellen Sie den Schiebeschalter in die Position Auto.
-Reduzieren Sie die zu zerkleinernde Papiermenge und setzen Sie den Zerkleinerungsvorgang fort.
Rückwärtslauf (Position Rev)
Stellen Sie den Schiebeschalter in die Position Rev, damit das Schneidwerk rückwärts läuft und das
Papier wieder freigibt.
Vorwärtslauf (Position Auto)
Stellen Sie den Schiebeschalter in die Position Auto, um einen gegebenenfalls verbliebenen
Papierrest zu zerkleinern und aus dem Schneidwerk zu entfernen.

7 | Page
8. WARTUNG UND PFLEGE
Achtung! Wartungsarbeiten dürfen nur bei gezogenem Netzstecker vorgenommen werden!
Auffangbehälter leeren
1) Ziehen Sie den Netzstecker aus der Steckdose.
2) Nehmen Sie den Schneidwerkaufsatz vom Auffangbehälter ab.
3) Entleeren Sie den Inhalt des Auffangbeghälters an geeigneter Stelle.
4) Platzieren Sie den Schneidwerkaufsatz wieder auf dem Auffangbehälter.
Hinweis! Es wird empfohlen, den Auffangbehälter nicht bis ans Schneidwerkheran zu füllen. Hierdurch
vermeiden Sie einen Rückstau des Schnittguts in das Schneidwerk. Leeren Sie den Auffangbehälter
regelmäßig.
Schneidwerk ölen
Damit Sie lange Freude an Ihrem Aktenvernichter haben, empfehlen wir Ihnen, das Schneidwerk
regelmäßig von Rückständen zu befreien und etwas Spezialöl für Aktenvernichter auf das
Schneidewerkzeug aufzutragen.
-Nach jedem Leeren des Auffangbehälters Spezialöl in mehreren Querlinien auf ein passendes
Blatt Papier auftragen und dieses Blatt in der Schiebeschalterposition Auto durch das
Schneidwerk laufen lassen.
-Alternativ ist Ölpapier. Das Öl auf pflanzlicher Basis ist im Papier eingeschlossen und tritt erst
beim Zerkleinerungsprozess aus. Damit ist eine einfache und saubere Handhabung gewährleistet.
Einfach das Ölpapier-Blatt im Aktenvernichter zerkleinern lassen und anschließend das Gerät im
Rückwärtslauf ca.10 Sekunden laufen lassen. Danach ist der Aktenvernichter wieder
einsatzbereit.
Achtung! Die Verwendung von FCKW-haltigem Sprühflaschen öl ist verboten!
Gerät reinigen
-Reinigen Sie das Gerät von außen mit einem leicht angefeuchteten Tuch.
Hinweis! Keine scharfen Reinigungsmittel benutzen. Keine Chemikalien (z.B. Benzin, Alkohol) zur
Reinigung des Gehäuses verwenden.

8 | Page
9. STÖRUNGSBESEITIGUNG
Gerät funktioniert nicht?
1. Ist das Gerät richtig an einer Steckdose angeschlossen?
2. Steht der Schiebeschalter auf der Position „Auto“?
3. Liegt ein Papierstau vor?
4. Ist der Motor überhitzt?
5. Ist die Gerätetür geschlossen?
Papierstau?
-Haben Sie mehr als die zulässige Anzahl von Blättern zugeführt (siehe Kapitel "Technische
Daten")? Wurde das Papier nicht gerade in den Einzugsschlitz eingezogen?
Ja? Entfernen Sie den Papierstau, siehe Kapitel " INBETRIEBNAHME ”.
10. ELEKTRO- UND ELEKTRONIK-ALTGERÄTE
Nach Ablauf der Nutzungsdauer Ihres Produkts gilt dieses als Elektro- und Elektronik-Altgerät. Für
solche Geräte gilt:
Elektro- und Elektronik-Altgeräte dürfen nicht als unsortierter Siedlungsabfall entsorgt werden. Sie
sind getrennt zu sammeln, sodass sie demontiert und die Komponenten und Materialien recycelt,
wiederverwendet oder verwertet (d. h. zur Energierückgewinnung als Kraftstoff bei der
Stromerzeugung verwendet) werden können.
Elektro- und Elektronik-Altgeräte können kostenlos bei öffentlichen Rücknahmestellen abgegeben
werden.
Geben Sie Ihr Elektro- und Elektronik-Altgerät bei der nächstgelegenen öffentlichen Rücknahmestelle
ab.
Das Recycling von Elektro- und Elektronik-Altgeräten dient dem Umwelt- und Gesundheitsschutz,
dem Erhalt von Rohstoffen, einer besseren nachhaltigen Entwicklung und einer besseren
Versorgung mit Rohstoffen in der Europäischen Union. Dies wird durch Rückgewinnung wertvoller
Sekundärrohstoffe und Abfallvermeidung erreicht. Sie können durch die Rückgabe des Altgeräts bei
einer Rücknahmestelle Ihren Beitrag zu diesen Zielen leisten.
Das Produkt ist mit dem Symbol für Elektro- und Elektronik-Altgeräte (durchgestrichene Abfalltonne)
gekennzeichnet. Das Symbol bedeutet, dass das Altgerät nicht als unsortierter Siedlungsabfall
entsorgt werden darf.

Kundendienst:
Service-Hotline:
Service website:
Serviceadresse:
e-mail:
GARANTIEKARTE
Aktenvernichter APS26K
Bitte den Kaufbeleg und diese
Garantiekarte ausgefüllt dem Gerät beilegen!
Kundendaten:
Straße, Hausnummer:
PLZ, Ort: Land:
Telefonnummer mit Landesvorwahl:
E-mail :
Fehlerbeschreibung:
Kaufdatum:
Datum/Unterschrift:
Hinweis:
Bei Inanspruchnahme der Garantieleistung müssen dem defekten Gerät die Garantiekarte und der
Kaufbeleg unbedingt beigelegt werden sowie nach Möglichkeit eine detaillierte Fehlerbeschreibung.
Eine nachträglich eingereichte Garantiekarte wird nicht akzeptiert.
+32 2 531 00 00
http://rma.acropaq.com
ACROPAQ NV/SA, Preflexbaan 403, 1740 TERNAT, BELGIUM
DE Bedienungsanleitung APS26K
Name, Vorname:

1 | Page
User Manual
Automatic Shredder
APS26K
EN

2 | Page
1. CONTROLS
1. Shredder unit
2. Switch
- OFF: disabled
- Auto: As soon as a paper is inserted, the shredder starts
- REV: Roll back jammed paper
3. Credit card entry
4. Paper entry with cutting mechanism (max 220mm width →A4 format)
5. Extension (to fit the shredder on larger waste bins)
6. Waste bin, capacity 7 L
2. TECHNICAL SPECIFICATIONS
APS26K
Not intended for commercial use
Cutting capacity: Max. 4 sheets of A4 (80 g/m2) or 1 credit card
Cutting method, cut width: Strip-cut, 6 mm
Shredding speed: 2.2 m/min
Width of paper infeed: 220 mm
Continuous operation time: 2 min - Cooling down time 25 min
Noise level: 72 dB(A)
Range of operations: Auto start/Auto stop - Reverse Running - Off
Dimensions (W x D x H) : 310 - 380 x 145 x 296 mm
Weight: 1,35 kg
Power supply: 220 - 240V / 50Hz, 0.9A
Rated input power: 210W

3 | Page
3. SAFETY INSTRUCTIONS
please read this manual carefully to be able to use all functions of the device.
Explanation of the safety symbols
In order to be able to exploit all the functions provided by the shredder, please
read this operating manual thoroughly before starting to use the device.
Attention: Improper use of the device keep ties away from the area of the
can result in severe injuries! Paper entry!
Keep scarves, jewellery and loose- Keep your hair away from the area
fitting clothing away from the area of the the paper entry!
paper entry!
The device must not be operated by Never spray any flammable gases or
children! Keep children away from the oil on the device. Risk of fire!
device.
Never insert your hands in the paper Never insert paper clips or staples
entry! In the paper entry!
Warning! Risk of injury through the insertion mechanism. Loose objects could be
caught in the insertion slot and cause injuries. Keep fingers, hair, scarves, ties,
jewellery etc. away from the insertion slot.
Attention! Failure to observe the safety labels can result in severe personal injury! If an object
(sleeve, tie, etc.) does enter the entry accidentally, disconnect the power plug from the power socket
immediately!

4 | Page
Safety guidelines
•Only use the device for its intended purpose.
•The device must only be connected to a supply voltage corresponding to the electrical
rating shown on the unit.
•The device should be connected to a socket outlet near the equipment that is easily
accessible.
•Do not connect multiple adaptors or use an extension cable.
•Failure to follow these instructions could result in damages/injuries and will invalidate
your guarantee.
•Do not attempt to service or repair the unit yourself.
•If recycling, separate paper and credit card shreds.
•Do not use this unit if the cable or plug have been damaged.
•Care should be taken when moving equipment to avoid any uneven surfaces.
•Please read all the safety information and the instructions. The manufacturer is not liable
for cases of material damage or personal injury caused by incorrect handling or non
compliance with the safety instructions. In such cases, the warranty will be voided.
•The device is intended for use indoors. Never use it outdoors.
•Keep the device away from moisture.
•Be vigilant at all times, and always be careful what you are doing. Do not use electrical
equipment if you are lacking in concentration or awareness, or are under the influence of
drugs, alcohol or medication. Even a moment of inattentiveness can lead to serious injuries
when using electrical equipment.
•Do not attempt to open, modify or repair the device. Do not drop, puncture, break or
expose to high pressure.
•Alterations to the device and technical modifications are not permitted.
•Check the device and cable (and if applicable, the adapter) for any damage before use. If
there is any visible damage, a strong odour, or excessive overheating of components,
unplug all the components immediately and stop using the device.
•Shredder must be disconnected from power source, if not used for an extended period of
time.
•Do not use spray cleaners or spray lubricants as these may present a risk of fire.
4. PRESCRIBED USE
-Only use the APS26K shredder to shred paper and credit cards! For the paper to be shredded, it
must be dry and comply with the requirements stipulated in Chapter "Technical Specifications"!
Attempting to shred other material can lead to personal injuries (e.g. through splinters from hard
material, etc.) and damage to the equipment (e.g. damage to the cutting mechanism etc.).
-Remove all paper clips and staples from paper before feeding it in the device!
-Do not shred continuous forms in this device!
-The device may only be used in dry, indoor rooms.

5 | Page
5. STARTING UP
1) Remove the shredder from the packaging and place the shredder head on top of the bin.
Attention! The underside of the cutting mechanism attachment has sharp
edges. Risk of injury!
2) Set the waste bin and shredder attachment on an even surface.
3) Position the device near a power socket. However, do not position the waste bin and
shredder attachment near a source of heat or in the vicinity of water.
4) Connect the power plug to a power socket.
5) To commence shredding move the slider to the left, in the position “Auto”;
In the Auto setting, the cutting mechanism starts automatically as soon as you feed paper or a
credit card into the infeed slot. The shredder switches to forward running and draws in the paper
or credit card. At the end of the shredding operation, the device continues running for approx. 2
to 4 seconds and then switches off automatically.
6) Insert paper to be shredded into the entry ‘4’.
Note: Make sure the paper to be inserted is neatly stacked.
If the paper thickness is within the shredder’s capacity, the motor will start and your documents
will be shredded. The cutters will stop once the shredding process is complete.
Note! A maximum of 4 sheets of A4 paper with a weight of maximally 80 g/m² may be inserted in
the paper infeed at a time. Feed credit cards in between the two arrows.
7) If the paper thickness is greater than the shredder’s capacity, the shredder will stop. Slide the
switch to the ‘R’ position and reverse the jammed paper. If the paper is jammed to such an
extent that it will not come out using the reverse function, slowly move the slider between the
“REV” and “Auto” position.
Do not do this quickly as it can damage the shredder.
8) Remove some of the sheets from the paper stack and re-try. The shredder will automatically
start and allow the paper to be shredded.
9) Finished ? then you can switch the device “OFF” and disconnect the power plug from the power
socket.

6 | Page
6. MOTOR PROTECTION
The motor switches off automatically in the event of an overload. First of all, disconnect the power
plug from the power socket and allow the motor to cool down to room temperature. Then connect
the power plug to the power socket again and continue operation.
Note! Observe the continuous operation time stipulated in Chapter "Technical Data".
7. CLEARING PAPER JAMS
If too much paper is fed into the cutting mechanism, a paper jam occurs. The shredder switches off
automatically in the event of a paper jam.
Proceed as follows:
-Press the Rev button to activate reverse operation and feed the paper back out.
-Remove any residual paper from the entry using the forward feed (Auto).
Note! If the jam is not cleared by the reverse/forward running process, disconnect the power plug
and remove the residual paper from the cutting mechanism manually.
-Set the sliding switch to Auto.
-Reduce the quantity of paper being shred and continue with the shredding process.
Rev setting (reverse operation)
Set the sliding switch to Rev so that the cutting mechanism runs in reverse and releases the paper.
Forward feed (Auto)
Set the sliding switch to Auto in order to ensure any residual paper is shredded and removed from
the cutting mechanism.

7 | Page
8. MAINTENANCE AND SERVICE
Attention! Maintenance work may only be completed when the power plug has been disconnected
from the power socket!
Emptying the Waste Bin
1) Disconnect the power plug from the power socket.
2) Remove the shredder attachment from the waste bin.
3) Empty the contents of the collection container in a suitable place.
4) Replace the shredder attachment back on the waste bin.
Note! It is recommended not to allow the waste bin to fill up against the cutting mechanism. This
prevents the shredded paper congesting and jamming in the cutting mechanism. Empty the waste bin
regularly.
Oiling the Cutting Mechanism
To ensure a long service life for your paper shredder, we recommend clearing any residue from the
cutting mechanism regularly and applying a little special oil for paper shredders on the cutting tool.
-Each time the waste bin is emptied, apply several lines of the special oil in a lateral direction on a
suitable sheet of paper and feed this sheet through the shredder by setting the sliding switch to
Auto.
-As an alternative you can also use lubricant sheets. The oil, which is on a vegetable basis, is
impregnated in the paper and only escapes during the shredding process. This ensures simple,
clean use. Simply insert the lubricant sheet in the paper shredder infeed, shred it and then switch
the device to reverse running for approx. 10 seconds. The shredder is then ready for operation
again.
Attention! It is forbidden to use oil spray from aerosol cans containing CFC!
Cleaning the Device
-Clean the outside of the device with a slightly damp cloth.
Note! Do not use any aggressive cleaning agents. Never use any chemicals (e.g. cleaning solvent,
alcohol) to clean the housing.

8 | Page
9. TROUBLESHOOTING
Device does not work?
If the paper shredder will not start, please check the following:
1. Is the machine plugged in correctly?
2. Is the switch pushed to the position ‘Auto’?
3. Is the machine jammed with paper?
4. Has the motor overheated?
Paper jam?
In the unlikely event of the shredder jamming, use the manual reverse function as per step 7 of the
‘Starting up’ section. Reduce the number of sheets in the paper stack and re-try.
10. Waste Electrical and Electronic
Equipment (WEEE)
At the end of its useful life, your product is considered to be WEEE. As such it is important to note
that WEEE is not to be disposed of as an unsorted municipal waste. It is to be collected separately
such that it can be disassembled so its components and materials can be recycled, re-used, and
recovered (burned for energy content in the production of electricity)
Public collection points have been set up by municipalities for the collection of WEEE, free of charge
to you.
Please return your WEEE to the collection facility nearest your home or office.
Recycling of WEEE is geared toward protecting the environment, protecting human health,
preserving raw materials. Improving sustainable development, and ensuring a better supply of
commodities within the European Union. This will be achieved by retrieving valuable secondary raw
materials and reducing the disposal of waste. You can contribute to the success of these goals by
returning your WEEE to a collection facility.
Your product is marked with the WEEE symbol (wheelie bin with an X through it). This symbol is to
inform you that the WEEE is not to be disposed off as unsorted municipal waste.

Customer Service:
Service hotline:
Service website:
SAV address:
e-mail:
WARRANTY CARD
Shredder APS26K
Please complete this warranty card and
enclose it with the machine, together
with your proof of purchase.
Customer data:
Street, number:
Postcode, Town: Country:
Telephone number with international dialing code:
E-mail :
Description of fault:
Date of purchase:
Date/signature:
Note:
When claiming on the warranty, the warranty card and the proof of purchase must be included
with the machine as well as a detailed description of the fault wherever possible. Warranty
cards sent separately afterwards will not be accepted
+32 2 531 00 00
http://rma.acropaq.com
ACROPAQ NV/SA, Preflexbaan 403, 1740 TERNAT, BELGIUM
EN User Manual APS26K
Surname, first name:

1 | Page
Notice d’utilisation
Destructeur automatique de documents
APS26K
FR

2 | Page
ÉLÉMENTS DE CONTRÔLES
1. Cache du bloc de coupe
2. Interrupteur à glissière
-- OFF: désactivé
-- Auto: dès qu'une lame est insérée, la déchiqueteuse démarre
-- REV: rouleau de papier coincé
3. Fente pour carte de crédit
4. Fente pour papier (largeur max 220 mm →format A4)
5. Rallonge (pour placer le destructeur sur de plus grandes corbeilles)
6. Corbeille, volume est 7 L
1. DONNÉES TECHNIQUES
APS26K
Non destiné à un emploi industriel
Capacité de coupe: max. 4 feuilles DIN A4 (80 g/m²)
Méthode de coupe, largeur de coupe : Coupe en bandes, 6 mm
Vitesse de coupe : 2.2 m/min
Largeur de l’introducteur de papier : 220 mm
Fonctionnement continu : 2 min - Temps de refroidissement 25 min
Niveau sonore : 72 dB(A)
Étendue de la manipulation : Démarrage automatique/arrêt automatique - Marche arrière - Arrêt
Dimensions (l x p x h) : 310 - 380 x 145 x 296 mm
Poids : 1,35 kg
Alimentation en courant : 220 - 240V / 50Hz, 0.9A
Puissance électrique : 210W
Table of contents
Languages:
Other acropaq Paper Shredder manuals
Popular Paper Shredder manuals by other brands

UNITED OFFICE
UNITED OFFICE UAV 190 A1 operating instructions

Fellowes
Fellowes POWERSHRED C-325CI instructions

Champion Power Equipment
Champion Power Equipment RT10010 owner's manual

Fellowes
Fellowes POWERSHRED 90S instructions

UNITED OFFICE
UNITED OFFICE UAVS 300 A1 Operating instructions and safety instructions

Retsch
Retsch BB200 operating instructions