Acroprint ES1000 User manual

0213 IH-3974VND
H-3974
PAGE 1 OF 37
ES1000
USER’S MANUAL

0213 IH-3974VND
H-3974
PAGE 2 OF 37
WARNING
This equipment has been tested and found to comply with the limits for a Class A digital
device, pursuant to Part 15 of FCC Rules. These limits are designed to provide reasonable
protection against harmful interference when the equipment is operated in a commercial
environment. This equipment generates, uses and can radiate radio frequency energy and, if
not installed and used in accordance with the instruction manual, may cause harmful
interference to radio communications. Operation of this equipment in a residential area is
likely to cause harmful interference in which case the user will be required to correct the
interference at his or her own expense.
Caution: Changes or modifications not expressly approved by the party responsible for
compliance could void the user’s authority to operate the equipment.
THIS DIGITAL APPARATUS DOES NOT EXCEED THE CLASS A LIMITS FOR RADIO
NOISE EMISSIONS FROM DIGITAL APPARATUS AS SET OUT IN THE RADIO
INTERFERENCE REGULATIONS OF THE CANADIAN DEPARTMENT OF
COMMUNICATIONS.
LE PRÉSENT APPAREIL NUMÉRIQUE NÉMET PAS DE BRUITS
RADIOÉLECTRIQUES DÉPASSANT LES LIMITES APPLICABLES AUX APPAREILS
NUMÉRIQUES DE CLASSE A PRESCRITES DANS LE RÈGLEMENT SUR LE
BROUILLAGE RADIOÉLECTRIQUE ÉDICTÉ PAR LE MINISTÈRE DES
COMMUNICATIONS DU CANADA.
Information contained in this manual is company private to Acroprint Time Recorder Co., and shall
not be modified, used, copied, reproduced or disclosed in whole or in part without the written
consent of Acroprint.
Contents herein are current as of the date of publication. Acroprint reserves the right to change the
contents without prior notice.
This manual has been carefully prepared to cover all aspects of this unit. However, if any
explanations are inadequate, unclear, or difficult to understand, please contact Acroprint.
We recommend that you carefully read this manual to maximize the use of this unit.
© 2008 Acroprint Time Recorder Co. All Rights Reserved.

0213 IH-3974VND
H-3974
PAGE 3 OF 37
ES1000 User’s Manual i
Table of Contents
Alert Definitions ........................................................................................ iii
Precautions ............................................................................................... iii
GETTING STARTED .............................................................................. 1
Introduction ............................................................................................... 1
Features ................................................................................................... 1
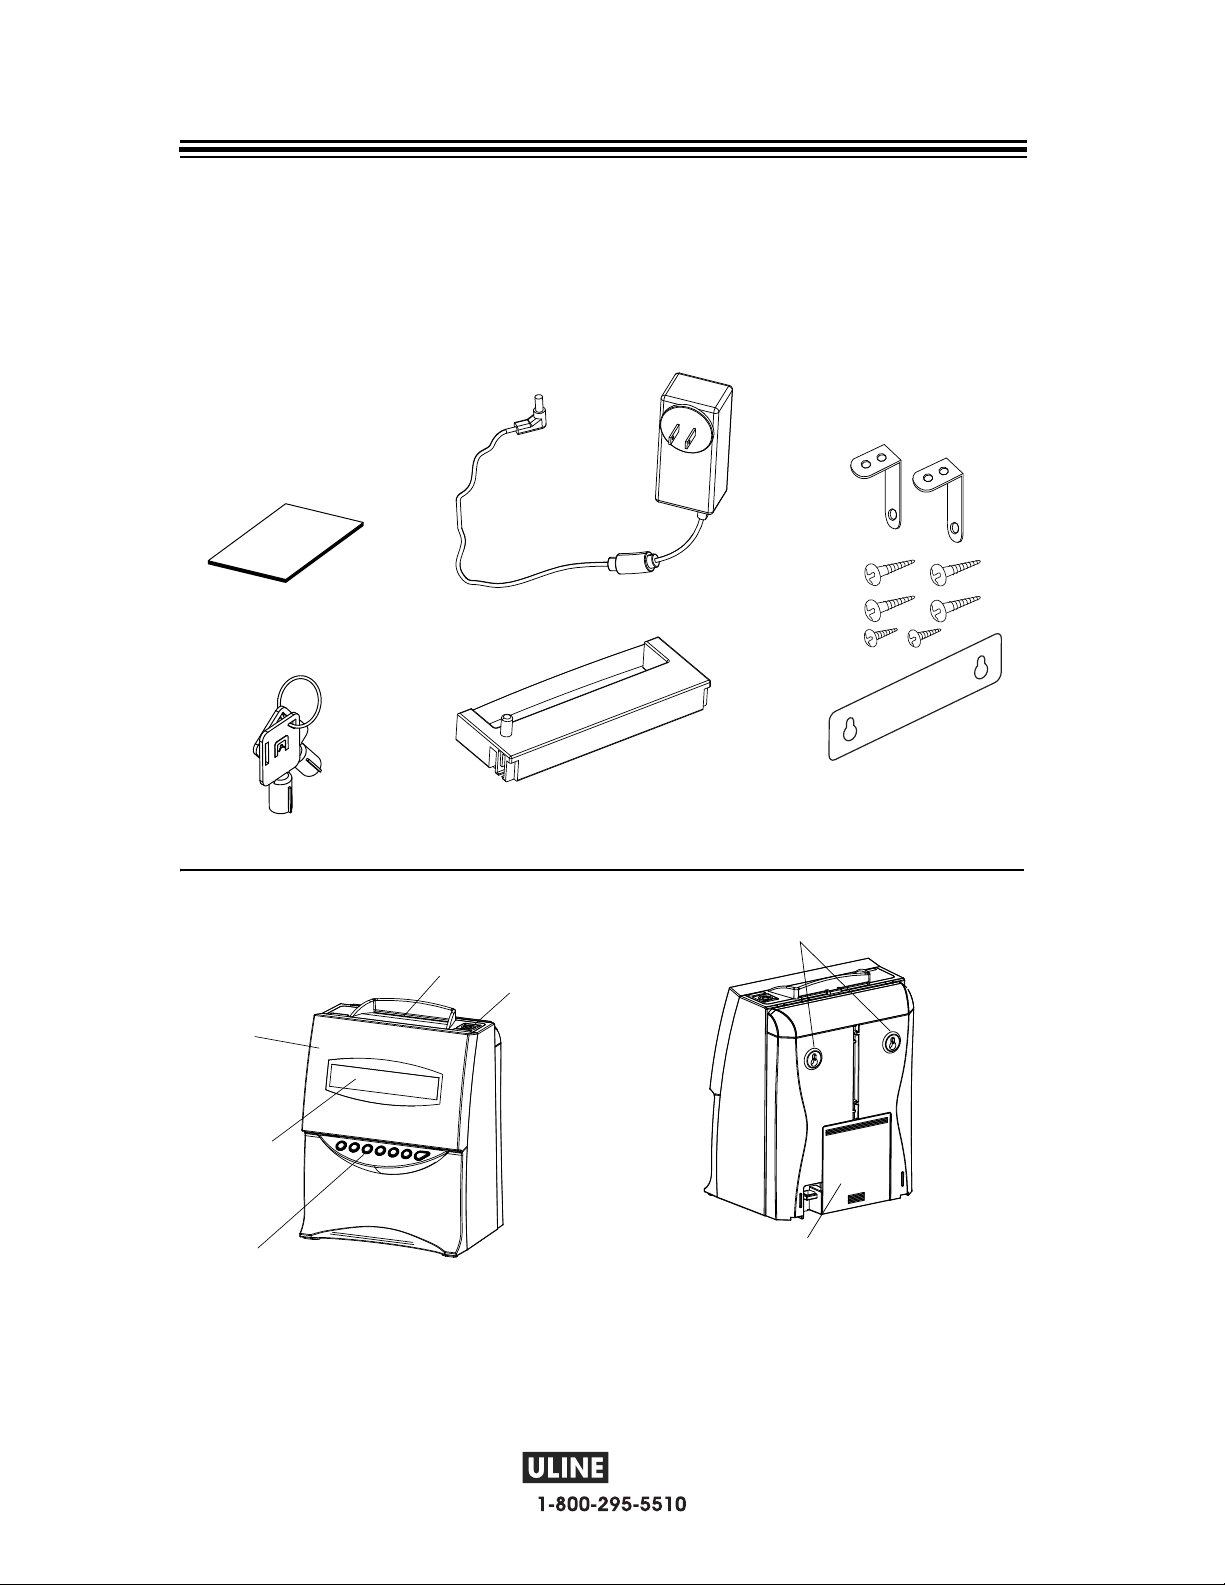
Package Contents .................................................................................... 2
Ribbon Installation .................................................................................... 3
Power the ES1000 .................................................................................... 6
Atomic Synchronization ............................................................................ 7
PROGRAM THE ES1000 ...................................................................... 8
Front Cover Removal ............................................................................... 8
Programming Method ............................................................................... 8
Front Cover Installation ............................................................................ 9
PROGRAM SETTINGS ........................................................................... 10
Reports ..................................................................................................... 10
Timecard Maintenance (Transferring and Resetting) ............................... 10
Time Zone ................................................................................................. 10
Daylight Saving Time ................................................................................ 11
Hour Display Format ................................................................................. 11
Hour Print Format ..................................................................................... 11
Day Print Format ...................................................................................... 11
Language .................................................................................................. 11
Date and Time .......................................................................................... 12
Signals (Bells and Horns) ......................................................................... 12
Enable Override Switch ............................................................................ 16
Enable Transfer Switch ............................................................................ 16
Pay Period Rules ...................................................................................... 16
Pay Period Type/Start ........................................................................... 16
Overtime ................................................................................................ 17
Day Advance Time ................................................................................ 17
Minute Print Format ............................................................................... 17
Ribbon Color Change ............................................................................ 18
Maximum Time on the Clock ................................................................. 20
Rounding ............................................................................................... 20
Auto Break Length ................................................................................ 21
Reset To Factory Defaults ..................................................................... 21
5
6
7
7
7
8
9
12
14
14
14
15
16
16
16
16
24
13
17
17
17
17
17
27
27
18
18
22
22
22
22
23
23
23
26
26

0213 IH-3974VND
H-3974
PAGE 4 OF 37
ii
RESTART BUTTON .............................................................................. 21
EMPLOYEE OPERATIONS ..................................................................... 22
Clocking In and Out .................................................................................. 22
Working Across the Day ........................................................................... 22
Transfer a Timecard ................................................................................. 22
Symbols on a Timecard ............................................................................ 22
HARDWARE ........................................................................................ 23
Wall Mounting ........................................................................................... 23
Battery Installation .................................................................................... 24
Signal Wiring ............................................................................................ 26
APPENDIX ........................................................................................... 29
Job Costing and Alternate Length Pay Periods ....................................... 29
Troubleshooting ........................................................................................ 29
Specifications ............................................................................................ 30
PRODUCT REGISTRATION
27
28
28
28
28
28
29
29
30
32
35
35
35
36

0213 IH-3974VND
H-3974
PAGE 5 OF 37
ES1000 User’s Manual iii
Alert Definitions
For your safety and the protection of the ES1000, the following alerts are used throughout this
manual.
Precautions
READER ALERT MEANING
Alerts you to supplementary information and helpful tips.
Alerts you to possible data loss or that failure to take or avoid a specific
action might result in physical harm to you or to the hardware.
Alerts you “do not” perform an action.
ALERT DESCRIPTION
• Insert the power plug as far as it will go. Improper insertion of the plug
may result in fire or electric shock.
• If any anomaly occurs, for example, heat or smoke is generated or an
odor is emitted, unplug the unit immediately and contact your dealer
for servicing. There is a danger that further use may cause a fire or
electric shock.
• If foreign matter should get in the unit (including a piece of metal,
water, or liquid), disconnect the plug from the outlet immediately and
contact your dealer for servicing. There is a danger that further use may
cause a fire or electric shock.
• Remove the line cord plug from the outlet before transferring the unit,
or it may damage the cord. This may lead to a fire or electric shock.
• If the unit should be dropped or the case is broken, unplug the unit and
contact your dealer for servicing. Further use may lead to a fire or
electric shock.

0213 IH-3974VND
H-3974
PAGE 6 OF 37
iv
• Do not disassemble or modify the unit. High voltage is present inside
that may lead to an electric shock.
• Do not use any voltage of the power source other than designated.
• Do not share a single outlet with another plug. This may lead to a fire or
electric shock.
• Do not damage, break, or modify the power cord.
• Do not put heavy objects on, pull, or forcefully bend the cord. These
may damage the cord, possibly resulting in a fire or electric shock.
• Do not plug or unplug the unit with a wet hand. This may lead to an
electric shock.
• Do not place the unit on an uneven or tilted surface. This may result in
injuries due to the unit dropping or falling off.
• Do not put a water-filled container or a metal object on top of the unit. If
water is spilled or the metallic object slips inside, a fire or electric shock
may occur.
• Do not install the unit in a humid or dusty environment. This may result
in damage or malfunction.
• Do not place the unit near a kitchen counter or humidifier. Oil, smoke,
or steam generating from them may cause fire or electric shock.
• Do not yank the power cord to disconnect from the outlet. Hold the plug
with your hand to do so, or the cord may be damaged. This may lead to
a fire or electric shock.
• Do not insert or drop any other timecard than specified into the slot.
Such misuse may result in damage or malfunction.
• Do not come in contact with the print head. This may result in personal
injury.
ALERT DESCRIPTION

0213 IH-3974VND
H-3974
PAGE 7 OF 37
ES1000 User’s Manual 1
GETTING STARTED
Introduction
Thank you for purchasing an Acroprint Model ES1000 Totalizing Payroll Recorder. We are
confident this unit will give you full satisfaction. Items such as the time and date are preset at the
factory. Acroprint recommends reading this manual before you start using this unit.
Features
• Atomic Synchronization Sets Time and Date Automatically
• Automatic Daylight Saving Time (DST)
• Automatic Date, Month Year Change to 2099
• Durable Snap-in Ribbon Cartridge
• Prints in three languages
• Two-color printing, showing early and late punches
• Prints in standard AM/PM hours or 24-hour format with date or day of week
• Totals are formatted to minutes or 1/100 hours
• Calculates actual/rounded time
• Automatically calculates time between punches and totals time
• Calculates weekly and daily overtime
• Handles up to 100 employees on weekly, bi-weekly, semi-weekly or monthly pay periods
• Automatically deducts break time from totals
• Signal control for external bells or horns
• Available reports from payroll recorder:
o Hours Summary
o Clock Rules
o Timecards in Use
• Desktop or Wall Mount
• Optional battery backup for printing during power outages
• Requires ES1010 timecard
Refer to the Product Registration Card in the back of this manual to register your ES1000.

0213 IH-3974VND
H-3974
PAGE 8 OF 37
2
Package Contents
Unpack the ES1000 and check its contents to ensure the time recorder and all accessories shown
below are included. If equipment has been damaged in transit, immediately report the extent of
damage to the transportation company and to Acroprint. Order replacement equipment, if necessary.
Equipment
ES1000
ES1000 Manual (1) Power Supply (1)
Wall-Mount Screws,
Brackets and
TemplateKeys (2)
Ribbon Cassette (1)
(may be installed)
Front View Back View
'SPOUDPWFS
%JTQMBZ
'VODUJPOCVUUPOT
,FZIPMF
$BSETMPU
8BMMNPVOUJOHIPMFT
&YUFSOBMTJHOBMBOEGVMMPQFSBUJPO
CBUUFSZPQUJPOBMDPNQBSUNFOU

0213 IH-3974VND
H-3974
PAGE 9 OF 37
ES1000 User’s Manual 3
Ribbon Installation
1. Insert key and turn counter-clockwise to unlock. Pull top of card slot up and towards you.
Open Unit
2. Turn the knob on the cassette as indicated and tighten.
Make Ribbon Taut
The ribbon may be pre-installed in the ES1000.
Only turn the knob counter-clockwise or the ribbon may be damaged.
'SPOUDPWFS

0213 IH-3974VND
H-3974
PAGE 10 OF 37
4
3. Install the ribbon cassette by threading the ribbon between the print head and ribbon mask.
Insure the ribbon is fully seated by pressing and snapping into place.
Install Ribbon Cassette
If it is difficult to insert the ribbon cassette, insert it while turning the knob.
,OPC
$MBTQ $MBTQ
1SJOUIFBE
1SJOUIFBE
3JCCPONBTL
3JCCPO
1SJOUIFBE
3JCCPONBTL
3JCCPO
$PSSFDU *ODPSSFDU

0213 IH-3974VND
H-3974
PAGE 11 OF 37
ES1000 User’s Manual 5
4. Turn the knob of the ribbon cassette counter-clockwise to tighten.
Tighten the Ribbon
5. Close the cover letting it snap into place.
Close Unit

0213 IH-3974VND
H-3974
PAGE 12 OF 37
6
Power the ES1000
Remove cover to insert jack into the ES1000 and route the wire as shown. Replace cover and plug
the transformer into the AC outlet.
Insert Jack Route Cable
Power the ES1000
$&DGDSWHU
$&RXWOHW

0213 IH-3974VND
H-3974
PAGE 13 OF 37
ES1000 User’s Manual 7
Atomic Synchronization
The ES1000 receives the NIST WWVB Signal which will automatically set the time and date.
When the ES1000 is searching for the Atomic Signal, the following characters will alternate on
the display:
When the ES1000 has found the Atomic Signal and set the time and date, the Atomic Symbol will
remain on:
For more information about the WWVB Radio Signal (Atomic Signal), visit NIST’s
website at: www.boulder.nist.gov.
If the Atomic Symbol is not on and steady, try repositioning the ES1000 for better signal
reception. If no symbol is on, you will need to set the time and date manually.
Set your time zone (refer to “Time Zone” on page 10) for the Atomic Synchronization to
perform properly.
The Atomic Synchronization will automatically adjust for the Daylight Saving Time
(DST).

0213 IH-3974VND
H-3974
PAGE 14 OF 37
8
PROGRAM THE ES1000
Front Cover Removal
You must remove the front cover to change settings.
1. Insert key and turn counter-clockwise to unlock.
2. Remove Front Cover as shown.
Remove Front Cover
Programming Method
The three buttons used to program the ES1000 are:
The and buttons change the value of the setting. The button scrolls to the next setting.
Reinstall the cover at anytime to return to normal operation.
,FZ
'SPOU$PWFS
3URJUDPPLQJ
%XWWRQV
+
–
NEXT

0213 IH-3974VND
H-3974
PAGE 15 OF 37
ES1000 User’s Manual 9
Front Cover Installation
Fit the tabs on the bottom of the cover into the holes on the ES1000. Press the top of the cover
closed as shown.
Replace Front Cover
5BCT )PMFT
)PMFT

0213 IH-3974VND
H-3974
PAGE 16 OF 37
10
PROGRAM SETTINGS
The ES1000 provides on-screen guidance for programming. We have summarized the settings and
how they can be useful to your business. When needed, additional details are provided.
Reports
Press so the display shows YES. Press to scroll through the options.
The following reports are available:
•Current Hours Summary: Prints a summary of active timecards.
•Previous Hours Summary: Prints a summary of timecards that have been closed out.
•Timecards in Use Report: Provides a list of the timecard numbers that are active.
•Clock Setup Report: Provides a summary of the current settings in the ES1000.
Timecard Maintenance (Transferring and Resetting)
Press so the display shows YES. Press to scroll through the following options:
•Transfer a Timecard: Allows you to move data from a full, lost or damaged card to a new card.
•Reset a Timecard: Allows you to manually reset the timecard so that it can be reused.
•Reset All Timecards: Can be used with alternate length pay periods or job costing.
Time Zone
Select your time zone for the Atomic Clock Synchronization.
Example Time Zones
In the Previous Report, all timecards are marked with a “P” except an individual timecard
that was reset during the current pay period.
DISPLAY
TIME ZONE DESCRIPTION
-04 Atlantic Standard Time
ES-05
(Default)
Eastern Standard Time
CS-06 Central Standard Time
-07 Mountain Standard Time
PS-08 Pacific Standard Time
AS-09 Alaska Standard Time
HS-10 Hawaiian Standard Time
+
NEXT
+
NEXT

0213 IH-3974VND
H-3974
PAGE 17 OF 37
ES1000 User’s Manual 11
Daylight Saving Time
The following Daylight Saving Time options are available:
•Automatic: The Atomic Feature of the ES1000 will automatically adjust for Daylight Saving
Time.
•Manual: If you are not receiving the Atomic Signal, this option allows you to manually set
Daylight Saving Time. The ES1000 uses a perpetual calendar and will not need to
be reset each year. Press to enter the start/end date for DST.
•Off: If you do not observe Daylight Saving Time, this option turns DST off.
Hour Display Format
The hour can be displayed as:
• AM/PM
• 24 Hour Format
Hour Print Format
The hour can be printed as:
• AM/PM
• 24 Hour Format
Day Print Format
The day can be printed as:
• Day (of week)
• Date
Language
The Display and Timecard Print will show the selected language.
Choose from the following languages:
• English
• Spanish
• French
An “*” is printed after the daily total when Daylight Saving Time affects this total.
NEXT

0213 IH-3974VND
H-3974
PAGE 18 OF 37
12
Date and Time
If the ES1000 is unable to receive the “Atomic Synchronization” signal, you will need to set the
time and date manually.
Signals (Bells and Horns)
The signal menu schedules the ringing of bells or sounding of horns. Up to 48 signals can be set
with different times, durations and days of the week.
• Press to select YES.
• Press .
• Press .
• Press or to select the number of seconds (1-9).
• Press .
• Press to turn the day on and to turn the day off. As you press or , you will scroll
through each day.
• Press .
Plug in the ES1000 and set the Time Zone (refer to “Time Zone” on page 10). Leave the
ES1000 plugged in overnight. If the Atomic Symbol is showing steady in the morning,
the time and date are set correctly.
SIGNAL MENU
= NO
SIGNAL #01
OFF
At this point, if you press or , you will scroll through each of the Signals and view
their current settings.
SIGNAL #01 DURATION
= OFF
SIGNAL #01 DAYS
= _MTWTF_
+
NEXT
+
–
NEXT
+
–
NEXT
+
–
+
–
NEXT

0213 IH-3974VND
H-3974
PAGE 19 OF 37
ES1000 User’s Manual 13
• Press or to select the hour of the signal.
• Press .
• Press or to select the minute of the signal.
• Press .
• Press or to select YES or NO. Select YES to continue to add signals or NO to exit and
continue with other settings.
SIGNAL #01 TIME
HOUR = 12AM
SIGNAL #01 TIME
MINUTE = 00
NEXT SIGNAL
= YES
You can scroll through the signals with or and press to edit the settings.
+
–
NEXT
+
–
NEXT
+
–
+
–
NEXT

0213 IH-3974VND
H-3974
PAGE 20 OF 37
14
The following table may be helpful in laying out your Signal Schedule:
Signal Schedule
SIGNAL #TIME DURATION DAYS OF WEEK
1
2
3
4
5
6
7
8
9
10
11
12
13
14
15
16
17
18
19
20
21
22
23
24
Other manuals for ES1000
1
Table of contents