Adeneo Embedded i.MX53 User manual

Adeneo i.MX53 Quick Start Board BSP
for Android Gingerbread v4.2
User Guide and Release Notes
01/29/2012 Adeneo i.MX53 QSB BSP for Android Gingerbread 4.2 Page 1/20
Table of contents
Table of contents
Release Contents
Supported hardware
Supported operating systems for development
Changelog
Additional documentation
Tested Features
Untested features
Known issues
Installing and Building Android
Software prerequisites
Unpacking and patching the sources
Building Android for the i.MX53 Quick Start Board
Flashing the images on an SD Card
Booting the board
Calibrating the touchscreen
Configuring the display
4.3” SEIKO 24bpp LCD (MCIMX28LCD)
7” CHUNGWA 16bpp LCD
VGA
HDMI
720P@60
1080P@60
Dual display
SEIKO LCD + VGA
HDMI + VGA
MCIMX-LVDS1 + Multitouch
Using USB peripherals on the QSB
USB camera
USB mouse
USB Keyboard
Other USB peripherals
Configuring your host for the adb
USB mass-storage device
01/29/2012 Adeneo i.MX53 QSB BSP for Android Gingerbread 4.2 Page 2/20
Using the Atheros Wifi
AR6003 Wifi
AR6102 Wifi
Using Ethernet
Voltage fix
Support
Release Contents
This release contains the Android Gingerbread BSP for the i.MX53 Quick Start Board (QSB).
This includes:
●This document: release notes and user documentation.
●Source code and board specific-patches:
○Bootloader (U-Boot)
○Kernel (2.6.35 with Android patches)
○Android open-source project
●Android installation and download scripts. A complete build can be made from
scratch using five scripts.
●Freescale release r10.3: provides support for the i.MX53 architecture. Also includes the
original documentation.
●Adeneo patches for the QSB: provide board-specific support for the QSB.
●Prebuilt binaries: see the Flashing section for instructions on how to flash them.
○Standard Android image.
○Standard Android image + Inflexion UI for i.MX Processors by Mentor
Embedded demo. More information here: http://www.freescale.com/webapp/sps/
site/prod_summary.jsp?code=IMX_MEIUI
Supported hardware
●This release supports the i.MX53 Quick Start Board. This includes the boards featuring
the DA905x PMIC and the “Ripley” MC34708 PMIC.
Supported operating systems for development
●This release has been built and tested with Ubuntu 10.04, 10.10 and 11.04.
●Building Gingerbread officially requires a 64bit machine and operating system. A
workaround is provided to build Android 2.3 on a 32bit machine (instructions are
provided in this document).
01/29/2012 Adeneo i.MX53 QSB BSP for Android Gingerbread 4.2 Page 3/20
Changelog
Version Features
4.2 ●Support Ripley PMIC.
●Merged kernel and U-Boot with Linux release 11.09.
4.1 ●Rebased BSP on Freescale r10.3 release.
●Added support for UVC cameras.
●Fixed backlight flickering on SEIKO LCD.
●Added documentation for the LVDS 10.1” touchscreen.
●Added partial support for the Ripley QSB.
●Fixed missing repository issue.
4.0 ●Supports Android 2.3 (Gingerbread).
●Rebased BSP on Freescale r10.2 release.
●Dual-display support.
3.3 ●Rebased BSP on Freescale r9.4 release. Improves performance,
DVFS support...
●User Keys added as Back/Home.
●HDMI support.
3.2 ●Added helper scripts.
3.1 ●Added support for the SEIKO 4.3” LCD.
●Touchscreen and sensor drivers cleanup.
3.0 ●Fixed touchscreen calibration
●VGA support
●USB OTG and adb support
●Preliminary accelerometer orientation support.
2.0 ●Rebased BSP on Freescale r9.3 release.
1.0 ●Initial drop for Android 2.2 (Froyo).
01/29/2012 Adeneo i.MX53 QSB BSP for Android Gingerbread 4.2 Page 4/20
Additional documentation
●Additional documentation about the i.MX53 platform is available after downloading
the BSP (i.e. after running the download_android.sh script from this release). You will
find the user guide and release notes for the i.MX53 SABRE BSP under install/imx-
android-r10.3/doc. These documents provide useful information about the manual build
procedure.
●General information on how to build the Android open-source project (NOTE: this
information is not specific to i.MX53 platforms. Please follow the instructions provided in
this document to build Android for the QSB): http://source.android.com/source/index.html
●Application development on Android: http://developer.android.com/sdk/index.html
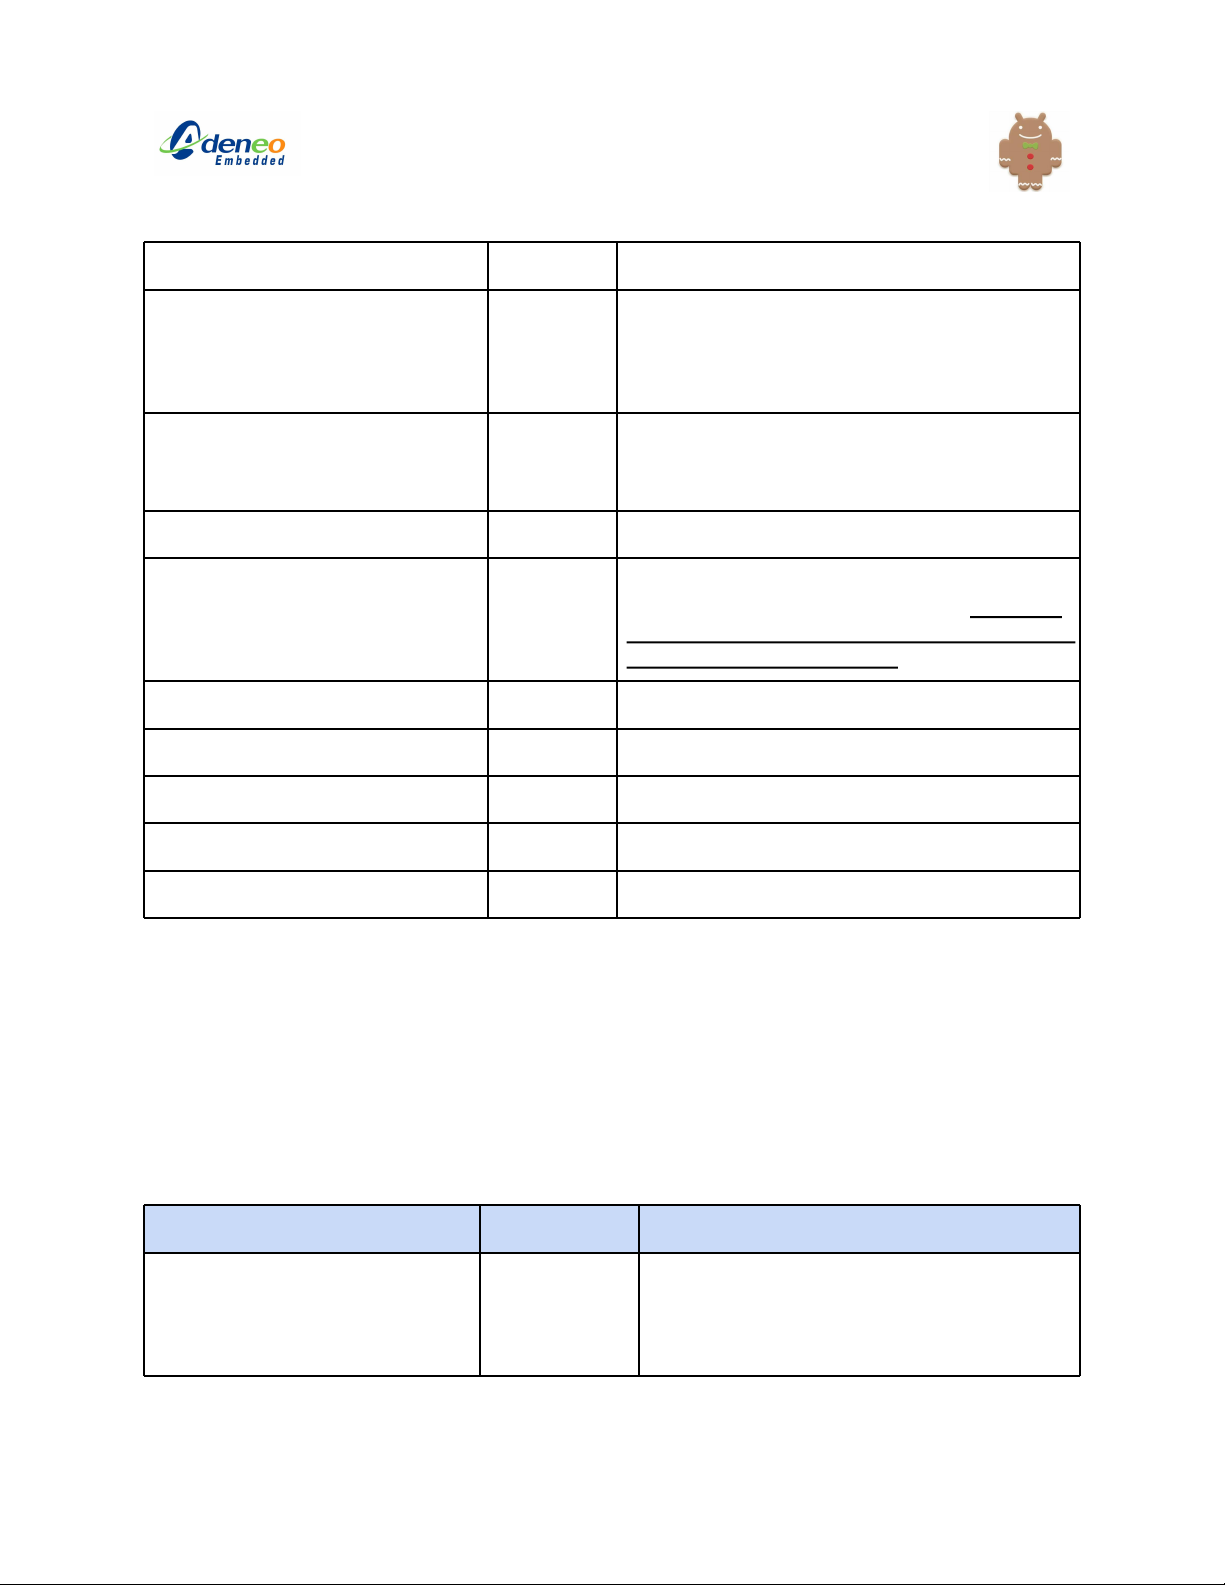
Tested Features
Item Working Notes
Android gallery (video and
pictures)
Yes
Application deployment and
debugging
Yes Using the Gingerbread SDK and Android
Tools r15.
Booting from SD Card Yes
Booting using TFTP and NFS Yes
UART debugging Yes
Ethernet Yes Please see corresponding section for
configuration.
Wifi Yes Supports Atheros AR6003.
VGA display Yes
LCD display Yes
LVDS display Yes
01/29/2012 Adeneo i.MX53 QSB BSP for Android Gingerbread 4.2 Page 5/20
HDMI display Yes Supports HDMI 1080p and 720p.
Backlight Yes In Android, navigate to Settings->Display-
>Brightness and adjust the slider. Automatic
setting is not supported as there no light
sensor on the board.
Touchscreen Yes Resistive support on the SEIKO 4.3” LCD.
Capacitive support using the 10.1” LVDS
screen.
Audio playback and recording Yes
USB device (micro USB) Yes The micro-B USB port is device only.
Due to hardware design limitations DO NOT
use the micro USB device and the lower USB
host ports at the same time!
USB mass storage device Yes
USB HID (keyboard and mouse) Yes Supports Dell keyboard.
USB webcam Yes Supports UVC USB webcams.
Accelerometer Yes Correctly reads the orientation.
User Keys Yes Mapped to Home and Back buttons.
Untested features
The following features have not been tested on this release. Please refer to the Freescale r10.3
documentation for additional information:
●SATA
●Fastboot and recovery modes
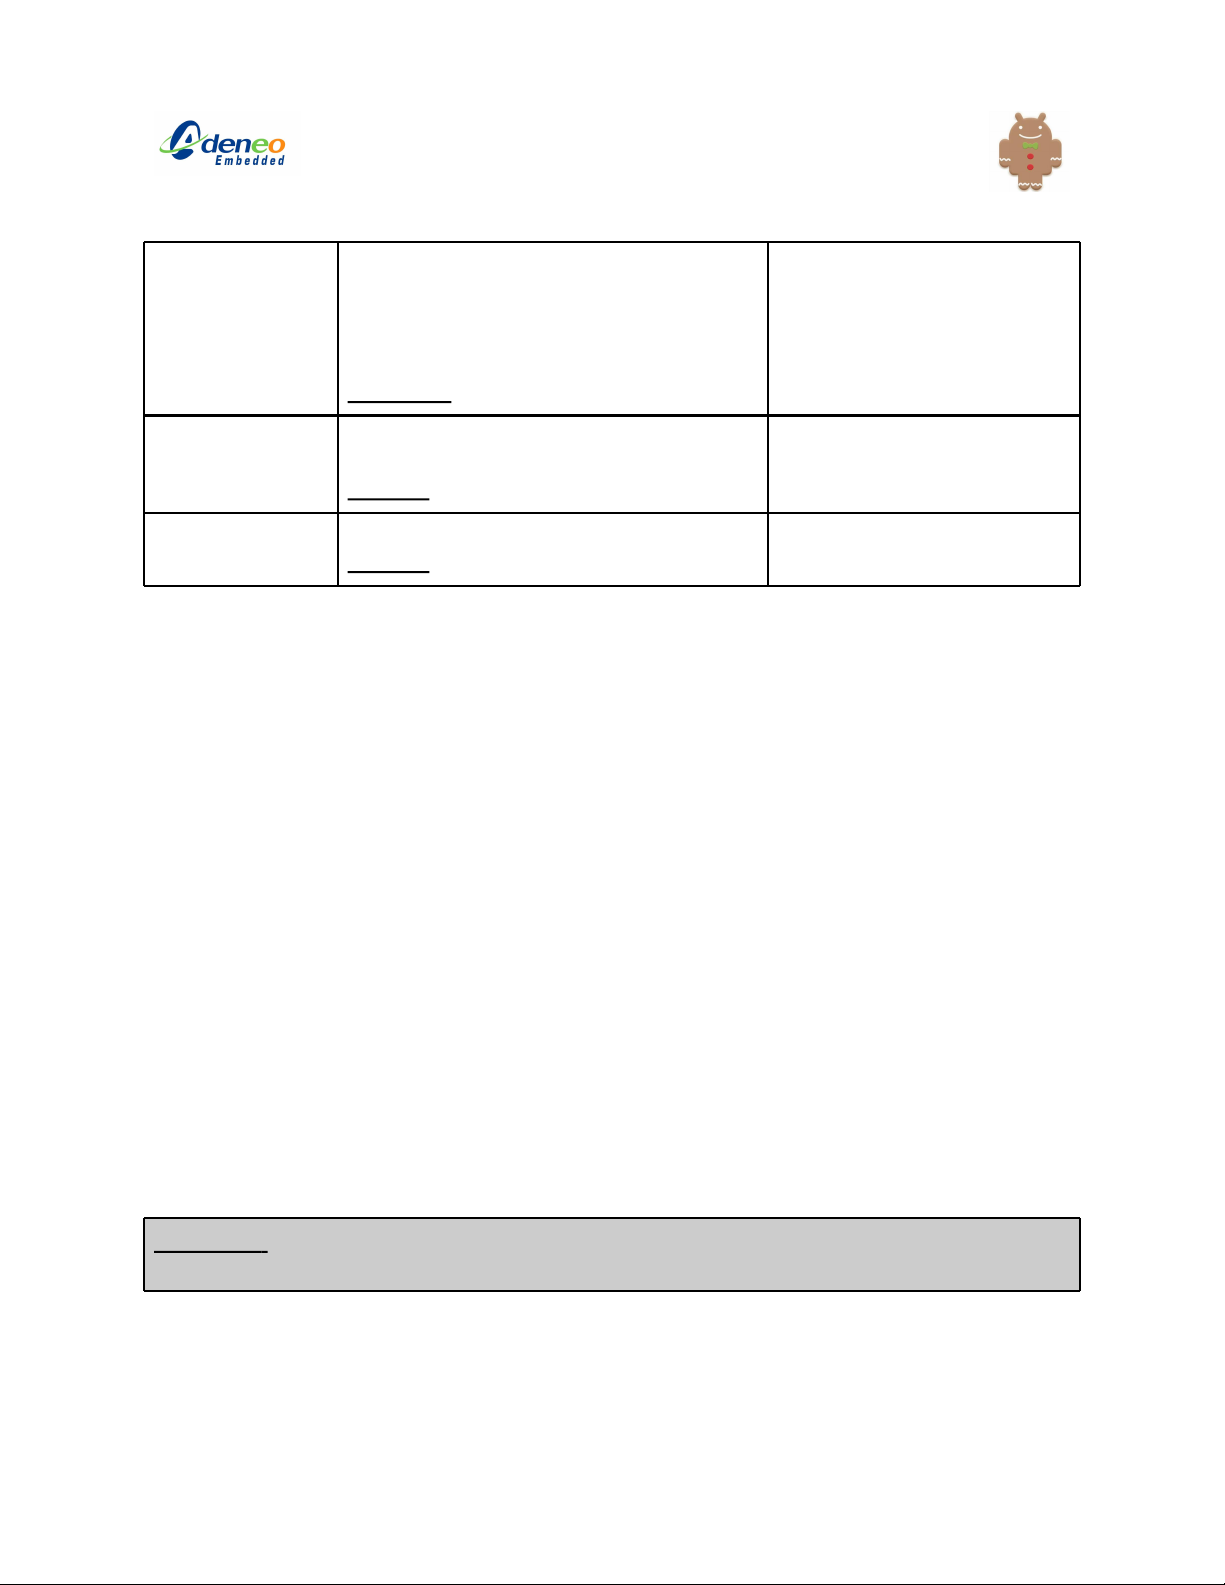
Known issues
Issue Workaround Notes
VPU issue causes multicolored
mosaic when playing back
video.
Yes There is an issue with the VPU on rev 2.0
silicon that requires a voltage increase as
a temporary workaround.
See Voltage Fix.
01/29/2012 Adeneo i.MX53 QSB BSP for Android Gingerbread 4.2 Page 6/20

Touchscreen filtering causes
selections to ‘bounce around’
when dragging icons, selecting
items.
No Values read by the ADC are very noisy.
This is less visible when disabling the
display part of the LCD (not a workaround).
Android Browser cannot access
Internet using the Ethernet
connection.
Yes See Android Browser Fix.
Suspend/Resume issues No ●Resume fails when trying to
wake up the device while it is
suspending.
●Suspend fails in all cases on
the Ripley board. Workaround:
use “Stay awake” in Settings |
Applications | Development.
Constant CPU load created by
the Ripley PMIC driver
No The Ripley PMIC driver creates a kernel
thread (pmic-event-thre) that generates a
constant CPU load of 10%. This issue is
currently under investigation.
Video playback crashes
when the display is set to
high-resolution (e.g. 1080p,
1680x1050)
No
01/29/2012 Adeneo i.MX53 QSB BSP for Android Gingerbread 4.2 Page 7/20

Installing and Building Android
Installing and building Android is made simple through a set of scripts that are provided with this
release. Please refer to the source of these scripts or the Freescale documentation if you need
to customize the build process.
Software prerequisites
Some packages need to be installed on your host in order to build Android. Please refer to the
AOSP documentation: http://source.android.com/source/initializing.html
Note: Gingerbread requires the Java JDK6 to be installed on your host. It will not work with
other Java environments (including JDK5, which is required for Froyo).
Some of the instructions of the AOSP documentation might not apply to your Ubuntu
version. If you have problems installing JDK6, please use the following command:
$ sudo add-apt-repository "deb http://archive.canonical.com/
ubuntu lucid partner"
instead of the one listed on the website:
$ sudo add-apt-repository "deb-src http://archive.canonical.com/
ubuntu lucid partner"
If any of the installation of packages does not work properly, you can use the following websites
to assist you with the installation:
●http://askubuntu.com/questions/25727/how-do-i-install-the-build-dependencies-for-
android
●http://www.wildartist.org/archives/1178
●http://www.crashcourse.ca/wiki/index.php/
Android_on_Ubuntu_10.04#Building_Android_in_its_entirety
Unpacking and patching the sources
●Unpack the release archive:
$ tar xjvf i.MX53-QSB-Android-Release4.2.tar.bz2
●Download the Android sources:
01/29/2012 Adeneo i.MX53 QSB BSP for Android Gingerbread 4.2 Page 8/20

$ cd i.MX53-QSB-Android-Release4.2/scripts
$ ./download_android.sh
The Android sources will be downloaded from the public repositories. This takes a while.
Note: The script has been updated to use the Linaro repositories instead of kernel.org.
●Add i.MX53 platform support:
$ ./patch_android.sh
●Add support for the Quick Start Board:
$ ./apply_qsb_patch.sh
●By default, the Gingerbread build-system now requires a 64-bit machine. The sources
can be patched to build Android on 32-bit machines. Only run this command if this is the
case for you:
$ ./fix_android_32bit.sh
Building Android for the i.MX53 Quick Start Board
The build_android.sh script will build the bootloader, kernel and Android images in a single step.
The syntax to use it is the following:
$ ./build_android.sh --board=[board name] --build-choice=[build type]
[ --lunch-type=[lunch type] --cpus-android=[number of CPUs to build
android] --cpus-kernel=[number of CPUs to build kernel + U-Boot] ]
Parameter Role Supported values
--board= Specifies which board is to be used.
Mandatory
imx53_qsb
--build-
choice=
Specifies what will be built (build
everything, bootloader only, kernel only,
Android only).
Mandatory
all, uboot, kernel, android
--build Android lunch combo: eng, user
01/29/2012 Adeneo i.MX53 QSB BSP for Android Gingerbread 4.2 Page 9/20
choice= ●eng: contains debugging features
and additional programs (e.g.
busybox).
●user: debugging features and
additional programs are disabled.
Mandatory
--cpus-kernel Number of CPUs used to build the kernel
and the bootloader.
Optional
1..N
--cpus-android Number of CPUs used to build Android.
Optional
1..N
●To build the whole system (bootloader + kernel + Android):
$ ./build_android.sh --board=imx53_qsb --build-choice=all --lunch-
type=eng
●To build just the bootloader:
$ ./build_android.sh --board=imx53_qsb --build-choice=uboot --lunch-
type=eng
●To build just the kernel:
$ ./build_android.sh --board=imx53_qsb --build-choice=kernel --lunch-
type=eng
●To build just the Android root-filesystem:
$ ./build_android.sh --board=imx53_qsb --build-choice=android --lunch-
type=eng
Flashing the images on an SD Card
WARNING: The flashing script will reformat and repartition the specified block device, thus
erasing all the data it contains! Make sure you are using the right device-node!
Notes:
●In this document, we will assume that /dev/sdX is the device-node for your SD Card
device. To find the right device-node, insert the SD Card in a reader and use the dmesg
01/29/2012 Adeneo i.MX53 QSB BSP for Android Gingerbread 4.2 Page 10/20

command from a console on your development machine. The kernel logs will show you
the correct letter.
01/29/2012 Adeneo i.MX53 QSB BSP for Android Gingerbread 4.2 Page 11/20

●If you are using an external monitor (VGA, HDMI), make sure to configure the display
when you boot or the board will appear to be stuck at the touchscreen calibration screen.
●Flashing standard binaries built using the above build scripts:
$ ./flash_android.sh /dev/sdX
Notes:
●When using the provided build scripts all binaries are copied automatically to the “out”
directory. This is the location that flash_android.sh uses for binaries.
●This script will erase the existing U-Boot environment and restore the default boot
configuration. Please edit the script and remove the corresponding section if you do not
want this feature (the section is highlight in the script).
●You need to build Android once in order to flash these images.
●Flashing prebuilt binaries (prebuilt binaries are provided with this release - they can be
found in the prebuilt directory):
$ ./flash_prebuilt_android.sh /dev/sdX
●Flashing prebuilt + Inflexion UI demo binaries built using the above build scripts:
$ ./flash_prebuilt_android.sh /dev/sdX --inflexion
These binaries add the Inflexion UI demo, which can replace the Android standard
Launcher (hence the prompt when the board is booted or when the HOME button is
used).
Note: The Inflexion UI demo will not work for all resolutions.
Booting the board
●The Quick Start Board will boot from the Micro SD slot of your board. Insert the SD Card
in that slot and turn on the board (the LEDs should turn blue and green).
●If this is the first time you boot Android on your SD Card, the process will take more time
than usual and prepare the user data files. The calibration will also appear the first time
before launching Android.
●If you need to interact with the console (bootloader, kernel or Android), you will need to
connect a serial cable to the DB9 port of your Quick Start Board.
Serial parameters: 115200bps, 8n1, no flow control.
●To access the bootloader, hit a key in the serial console when you see the following
message: “Hit any key to stop autoboot”.
01/29/2012 Adeneo i.MX53 QSB BSP for Android Gingerbread 4.2 Page 12/20

Calibrating the touchscreen
The calibration only appears the first time you boot Android. The settings are stored on your SD
Card under /data/system/calibration.
●If you want to recalibrate the touchscreen you will need to remove the existing calibration
file. To remove the calibration info insert your SD card into the PC and run the following
commands from a terminal (the actual path might depend on your system):
$ cd /media/data/system
$ sudo rm calibration
●Alternatively, you can use the adb to connect to the board and remove the file from the
debug shell.
adb# rm /data/system/calibration
then reboot.
Configuring the display
The display is configured from the bootloader prompt (to access it, use the serial console
and press “spacebar” when the board starts booting).
4.3” SEIKO 24bpp LCD (MCIMX28LCD)
●This LCD screen is supported by default. If you have changed the settings and need to
set it again, use the following commands:
U-Boot> setenv set_display run lcd
U-Boot> save
●This will save the environment variables to the SD card. Restart the board and Android
will load.
7” CHUNGWA 16bpp LCD
●Use the following commands in U-Boot:
U-Boot> setenv set_display run claa_lcd
U-Boot> save
01/29/2012 Adeneo i.MX53 QSB BSP for Android Gingerbread 4.2 Page 13/20

●This will save the environment variables to the SD card. Restart the board and Android
will load.
●Note: The backlight settings have been adjusted to support the SEIKO 4.3” LCD screen.
They might not be suitable for the 7” screen. If you want to use the 7” display:
○Edit and find the following structure:
static struct platform_pwm_backlight_data mxc_pwm_backlight_data = {
.pwm_id = 1,
.max_brightness = 255,
.dft_brightness = 128,
/* NOTE - ADENEO: this value is suitable for the SEIKO LCD.
It needs to be adapted for different panels */
.pwm_period_ns = 5000000,
};
○Set the PWM period: .pwm_period_ns = 50000,
○Rebuild and flash the kernel.
VGA
●Use the following commands in U-Boot:
U-Boot> setenv set_display run vga
U-Boot> save
●This will save the environment variables to the SD card. Restart the board and Android
will load.
Note: If you need to customize the mode, you will need to edit the “vga” environment variable
and replace “video=mxcdi1fb:GBR24,VGA-XGA” with the desired mode, e.g.
U-Boot> setenv vga 'setenv bootargs ${bootargs} di1_primary
video=mxcdi1fb:GBR24,1680x1050@60 vga'
The following modes are supported:
○1680x1050@60
○1280x1024@60
○1024x768@60
○800x600p@60
HDMI
01/29/2012 Adeneo i.MX53 QSB BSP for Android Gingerbread 4.2 Page 14/20

720P@60
●Use the following commands in U-Boot:
U-Boot> setenv set_display run hdmi_720p
U-Boot> save
●This will save the environment variables to the SD card. Restart the board and Android
will load.
1080P@60
●Use the following commands in U-Boot:
U-Boot> setenv set_display run hdmi_1080p
U-Boot> save
●This will save the environment variables to the SD card. Restart the board and Android
will load.
Dual display
●UI will be output to both the displays if the secondary is connected to the QSB. The
image in secondary display is resized from the image in the primary display.
●The video will only be rendered on one of the displays. This behavior is specified by
different variables in Android (ro.DUAL_VIDEO_*).
●From Freescale r10.3 documentation (install/imx-android-r10.3/doc/
i.MX_Android_R10.3_User_Guide.html):
There are two ways to play video for dual display case.
●The one is to play video on the secondary display device only and UI is displayed on
both display devices, which is called single video case.
●The other one is to play video on both display devices and UI is shown on the primary
display only, which is called dual video case.
Note that user need to decide which case he or she wants to use before system boots up. It
cannot be changed at run time.
To use single video case, edit init.freescale.rc to this:
setprop ro.SIN_VIDEO_DUAL_UI 1
setprop ro.DUAL_VIDEO_SIN_UI 0
To use dual video case, edit init.freescale.rc to this:
01/29/2012 Adeneo i.MX53 QSB BSP for Android Gingerbread 4.2 Page 15/20

setprop ro.SIN_VIDEO_DUAL_UI 0
setprop ro.DUAL_VIDEO_SIN_UI 1
To modify this at build-time, you need to edit src/device/fsl/imx53_loco/init.rc.
SEIKO LCD + VGA
●Use the following commands in U-Boot:
U-Boot> setenv set_display 'run lcd; setenv bootargs ${bootargs}
video=mxcdi1fb:GBR24,VGA-XGA vga'
U-Boot> save
●This will save the environment variables to the SD card. Restart the board and Android
will load.
●From the Android shell (using the serial port console or adb shell), issue the following
command:
# setprop rw.SECOND_DISPLAY_CONNECTED 1
This command might take several seconds before it is applied.
HDMI + VGA
●Use the following commands in U-Boot:
U-Boot> setenv set_display 'run hdmi_720p; setenv bootargs
${bootargs} video=mxcdi1fb:GBR24,VGA-XGA vga'
U-Boot> save
●Note: For HDMI 1080p, replace “hdmi_720p” with “hdmi_1080p”.
●This will save the environment variables to the SD card. Restart the board and Android
will load.
●From the Android shell (using the serial port console or adb shell), issue the following
command:
# setprop rw.SECOND_DISPLAY_CONNECTED 1
This command might take several seconds before it is applied.
MCIMX-LVDS1 + Multitouch
●Use the following commands in U-Boot:
01/29/2012 Adeneo i.MX53 QSB BSP for Android Gingerbread 4.2 Page 16/20

U-Boot> setenv lvds 'setenv bootargs ${bootargs}
video=mxcdi0fb:RGB666,XGA ldb=di0 di0_primary'
U-Boot> setenv set_display ‘run lvds’
U-Boot> save
●This will save the environment variables to the SD card. Restart the board and Android
will load.
Using USB peripherals on the QSB
USB camera
●Insert a UVC USB camera in the top USB host port. The camera should be automatically
detected.
●Run the Camera application from the Launcher.
Note: Only UVC cameras are supported for the QSB. If you need to use the CSI interface of the
i.MX53, please look at the SABRE Tablet files (referenced under the name i.MX53 SMD) for
more information.
USB mouse
●Insert a USB mouse camera in the top USB host port.
USB Keyboard
●Insert a USB keyboard in the top USB host port.
●The keyboard layout is defined in the sources, under src/device/fsl/imx5x/
Dell_Dell_USB_Keyboard*.
Please look at install/imx-android-r10.3/doc/i.MX_Android_R10.3_User_Guide.html for
more information.
Other USB peripherals
Other USB peripherals might require additional work and are not supported in this release.
Please contact Adeneo’s support if you need more information.
Configuring your host for the adb
01/29/2012 Adeneo i.MX53 QSB BSP for Android Gingerbread 4.2 Page 17/20

The adb configuration has changed since Adeneo r4.1. Please look at install/imx-android-
r10.3/doc/i.MX_Android_R10.3_User_Guide.html , section “5.9 How to setup PC (Windows)
to support ADB/RNDIS” for more information.
Following that document, you will need to:
●Update udev rules.
●Create/modify ~/.android/adb_usb.ini.
Please refer to the following page for more information about the adb: http://
developer.android.com/guide/developing/tools/adb.html
USB mass-storage device
The QSB can be seen as a mass-storage device from a compliant USB host. To achieve this,
you need to:
●Connect the micro-B USB cable of your board to a USB host (e.g. your desktop PC). On
the top left corner, you should see a USB logo.
●Drag the top bar down to the bottom of the screen.
●Click on “USB connected”.
●Choose “Turn on USB storage”.
●Your host should now detect your QSB device. The contents of the QSB SD Card will be
exported as the mass-storage space.
Using the Atheros Wifi
AR6003 Wifi
●This release supports the Atheros AR6003 Wifi chip by default. To use it, insert the
AR6003 SDIO module into the standard-size SD Card slot of your board. The module
will be detected automatically and you can configure and use the Wifi (Launcher |
Settings | Wireless & Network | Turn on Wifi).
●To disable the Wifi driver, edit src/device/fsl/imx53_loco/BoardConfig.mk:
○BOARD_WLAN_CHIP_AR6003 :=false
01/29/2012 Adeneo i.MX53 QSB BSP for Android Gingerbread 4.2 Page 18/20

Using Ethernet
●Using the Android debug console, get an IP address from a DHCP server:
# setprop net.dns1 [IP address of your DNS server]
●You should then see a 'Link is up' indication. Enter 'netcfg' again to verify that there are
now IP address and subnet assignments.
●For ethernet, the Android does not set up DNS automatically. Issue the following
command:
# setprop net.dns1 [IP address of your DNS server]
●You should be able to use the browser with an ethernet connection.
Voltage fix
There is a temporary workaround to fix the mosaic effect observed when playing videos. This
increase in VCC voltage is only required with the MX53 T2.0 silicon. Boards that are labeled
SCH-26565 REV D or later (e.g. START-R) DO NOT require this workaround.
From the Freescale release notes:
“MX53 TO2.0 silicon has issue that causes video quality poor with
yellow blocks on the screen when playback some Videos. And we have a
Software Workaround which is little dangerous to the silicon. This
workaround increases the VPU voltage by increasing the VCC to 1.35V.
We did not include this workaround code in the release, and suggest
that you wait for TO2.1. Because It will shorten your silicon's life
cycle, so please pay attention to this before you decided to do so”
To apply this fix, issue the following commands from U-Boot (using the serial console):
U-Boot> setenv fix_voltage 'i2c mw 0x48 0x2f 0x62; i2c mw 0x48 0x3c
0x62'
U-Boot> setenv bootcmd 'run fix_voltage bootcmd_SD1 bootcmd_SD2'
01/29/2012 Adeneo i.MX53 QSB BSP for Android Gingerbread 4.2 Page 19/20

U-Boot> saveenv (if you want to save this setting)
Support
●For support questions, please email [email protected]
●Additional support (non-official) can also be found on http://imxcommunity.org
●More information is available in the SABRE Tablet documentation: install/imx-android-
r10.3/doc/i.MX_Android_R10.3_User_Guide.html
01/29/2012 Adeneo i.MX53 QSB BSP for Android Gingerbread 4.2 Page 20/20
Table of contents


