ADJ J-BOOK 14.1" User manual

MANUALE UTENTE
J-BOOK 14.1”
cod. 280-NB002

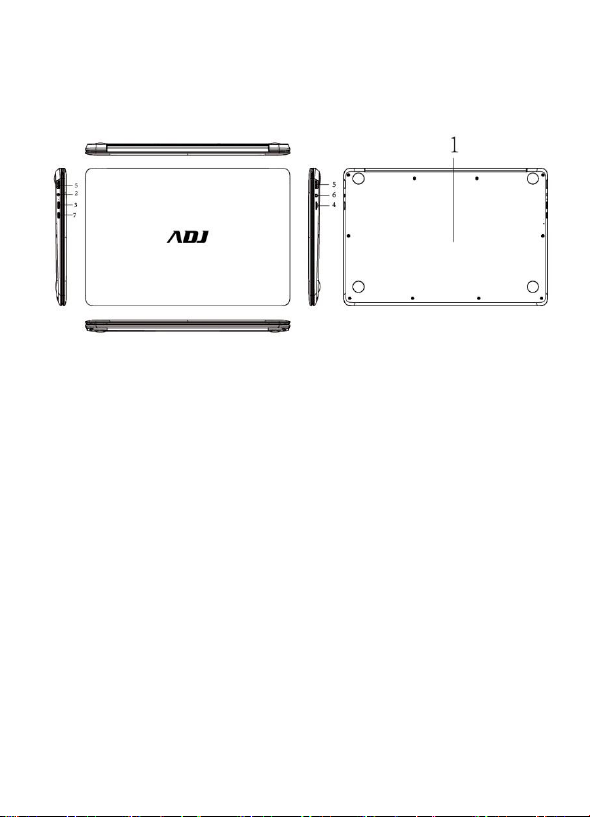
1. Avvertenze per la sicurezza
- Evita di far cadere il dispositivo a terra o di farlo sbattere con forza in altro
modo.
- Non usarlo in ambienti caratterizzati da estreme temperature fredde o calde,
eccessiva umidità, eccessiva presenza di polveri; non lasciarlo per lungo
tempo a contatto diretto con il sole.
- Evita di utilizzarlo in ambienti con forti energie elettromagnetiche o
elettrostatiche.
- Se acqua o altri liquidi dovessero cadere sul dispositivo, questo deve essere
spento immediatamente e asciugato prima del riutilizzo.
- Non usare prodotti di pulizia o altri liquidi che contengano ingredienti chimici
per pulire il dispositivo per evitare danni da corrosione o umidità. Se dovesse
essere necessario pulirlo, usare un morbido panno asciutto o un tovagliolo
di carta.
- In caso di utilizzo improprio dell’hardware e del software, riparazioni del
dispositivo o altra perdita di dati prodotta da circostanze impreviste, l’azienda
produttrice non si assume la responsabilità delle perdite o dei danni causati.
- Durante l’utilizzo di schede di memoria T-Flash o Secure Digital (SD), non
rimuovere improvvisamente la scheda per evitare danni a questa e/o al
dispositivo.
- Per favore fai spesso una copia di backup dei tuoi dati importanti per evitarne
la perdita.
- Non smontare o aprire il dispositivo, altrimenti sarà invalidato il diritto alla
garanzia
- Questo prodotto supporta la maggior parte dei principali produttori di schede
di rete 3G (richiede driver di Windows 10), ma potrebbero esserci differenze
con schede di rete USB (dongle). Si raccomanda di testarle estensivamente
in tutte le loro funzioni prima dell’acquisto.
- Il Manuale ed i relativi aggiornamenti possono variare in qualsiasi momento
senza preavviso; in caso di discrepanze tra il dispositivo e le informazioni
nella Guida Rapida all’Uso si richiede gentilmente che ne venga fatta notifica
al produttore.

2. Descrizione del prodotto
1) Slot SSD: supporta SSD di tipo M.2 (2280)
2) Presa DC: può essere connessa ad un alimentatore DC
3) Uscita video Micro HDMI: High-Definition Multimedia Interface
4) Slot schede di memoria TF: supporta schede Micro SD
5) Interfaccia USB: l’interfaccia USB permette di leggere e scrivere
su pen drive / dischi removibili e altri dispositivi di dati
6) Jack cuffie: utilizzare per connettere cuffie con jack 3.5mm in stereo
7) Porta USB Type-C: permette di leggere e scrivere su dischi esterni
e altri dispositivi di dati
3.1. Boot
Per entrare nel boot premi e tieni premuto il tasto ON/OFF per 3-5 secondi e
rilascialo.
(Nota: Se il dispositivo non risponde alla pressione del tasto, potrebbe aver
bisogno della ricarica della batteria).
3.2. Spegnimento
Per forzare lo spegnimento del dispositivo premi e tieni premuto il tasto
ON/OFF per 4 secondi.
Per spegnerlo dal desktop apri il menu "Start in basso a sinistra, clicca sul
bottone “Arresta”, poi clicca su “Arresta il sistema.”

3.3. Sospensione
Durante il funzionamento premi brevemente il bottone di accensione per
entrare nella modalità sospesa oppure per riattivarlo dalla modalità sospesa.
3.4. Riavvio
Apri il menu Start in basso a sinistra, clicca sul bottone “Arresta”, poi clicca su
“Riavvia il sistema”.
3.5. Connettersi a Internet
Per connettersi ad una rete Wi-Fi in Windows, seleziona l’icona Rete ( o)
sulla barra delle applicazioni.
Seleziona la rete Wi-Fi a cui vuoi connetterti e clicca “Connetti”, poi scrivi la
password e segui le istruzioni. Fatto –ora sei connesso!
Questa icona apparirà nella barra delle applicazioni.
Dopo che ti sei connesso, puoi impostare la tua e-mail, navigare il web e fare
molto altro ancora online.
Se il Wi-Fi non è disponibile, o vuoi la garanzia di una rete cablata, utilizza un
adattatore da USB a Ethernet RJ45 - come l’hub ADJ 143-00020 per il codice
280-NB002 - ti basta connetterlo al notebook ed attaccare un cavo di rete tra
la porta Ethernet dell’hub al tuo router o modem.
3.6. Connettersi a dispositivi Bluetooth®
Grazie al Bluetooth®puoi utilizzare molti dispositivi wireless con il tuo notebook
Windows™ - cuffie, stereo, telefoni, tracciatori per il fitness - solo per citarne
alcuni. Inizia accoppiando il tuo dispositivo Bluetooth®con il tuo notebook. La
procedura per farlo dipende dal tipo di dispositivo Bluetooth®che stai usando.

Connettere una cuffia, stereo o altri dispositivi audio Bluetooth®
1.Accendi il tuo dispositivo Bluetooth®e rendilo visibile. La procedura per
renderlo visibile dipende dal tuo dispositivo. Esamina il dispositivo o vai sul
sito del produttore per scoprire come.
2.Accendi il Bluetooth®sul tuo notebook se non è già accesso. Per farlo, nella
barra delle applicazioni, seleziona Centro Notifiche e Azioni > Bluetooth®.
3.Nel Centro Notifiche e Azioni, seleziona Connetti > il nome del dispositivo.
4.Segui tutte le altre istruzioni che potrebbero comparire. Altrimenti, hai finito
e sei connesso. Il tuo dispositivo Bluetooth®ed il notebook si connetteranno
generalmente ogni volta che i due dispositivi sono a portata l’uno dall’altro
con il Bluetooth®acceso.
Connettere un mouse Bluetooth®,o altri dispositivi
1.Accendi il tuo dispositivo Bluetooth®e rendilo visibile.
2.Seleziona il bottone Start, poi seleziona Impostazioni > Dispositivi >
Bluetooth®.
3.Accendi il Bluetooth®> seleziona il dispositivo > Accoppia.
4.Segui tutte le altre istruzioni che potrebbero comparire.
3.7. Accesso con un account Microsoft™
Seleziona il bottone Start, poi seleziona Impostazioni >Account >Posta
elettronica e account.
Sotto Account usati da altre app, seleziona Aggiungi un account Microsoft™.
Segui la procedura per aggiungere il tuo account Microsoft™. Potresti dover
verificare la tua identità inserendo un codice di conferma.

3.8. Menu Start
App, impostazioni, file –possono essere tutti trovati nel menu Start. Ti basta
cliccare sul bottone Start sulla barra delle applicazioni. Puoi personalizzala
fissando le app ed i programmi, o muovendo e raggruppando le piastrelle. Se
hai bisogno di più spazio, ridimensiona il menu Start.
3.8.1. Le tue app ed i programmi - proprio a portata di mano
Puoi aprire Esplora file, Impostazioni, e altre app che usi spesso nella parte
sinistra del menu Start. Scorri la lista delle app per vedere tutte le app ed i
programmi in ordine alfabetico, dalla A alla Z.

1. Menu (espandi per mostrare i nomi di tutte le voci del menu)
2. Account
3. Esplora file
4. Impostazioni
5. Arresta
3.8.2 Organizzare le tue app
Fissa le app sul menu start per vedere aggiornamenti in diretta su ciò che sta
succedendo nel tuo mondo –come nuove e-mail, il tuo prossimo
appuntamento, il meteo per questo weekend. Quando fissi una app, questa è
aggiunta al menu Start come una nuova piastrella.
Fissa app a Start
1. Seleziona il bottone Start, poi premi e tieni premuto (o clicca col destro) le
app che vuoi fissare.
2. Seleziona Fissa su Start
Quando fissi una nuova app, ridimensionala. Premi e tieni premuto (o clicca
col tasto destro) la piastrella della app, seleziona Ridimensiona, e poi scegli
la grandezza che vuoi per la piastrella.
Consiglio
Trascina e rilascia le app dalla lista delle app per fissarle sul menu start come
piastrelle.

3.8.3 Raggruppa le tue app
Dopo che hai fissato una app, spostala dentro un gruppo.
Per creare un nuovo gruppo di piastrelle, muovi la piastrella di una app su o
giù fino a che non appare il divisore del gruppo, e poi rilascia la piastrella. Muovi
le app dentro o fuori dal gruppo per organizzare le tue piastrelle per la massima
produttività.
Per dare un nome al tuo nuovo gruppo, seleziona lo spazio vuoto sopra il tuo
gruppo e digita un nome.
3.9 Centro Notifiche e Azioni
Clicca nell’angolo in basso a destra della barra delle applicazioni per aprire il
“Centro Notifiche e Azioni”, puoi aprire e chiudere velocemente la modalità
tablet, modalità rotazione, modalità aereo, VPN, modalità risparmio energetico,
Bluetooth®, posizione, proietta e aggiustare la luminosità.

Non hai più bisogno di aprire il centro notifiche per vedere quante ne hai
ricevute - il numero sull’icona del centro notifiche mostra già quante notifiche ti
stanno aspettando. Anche altre applicazioni aggiunte sulla barra delle
applicazioni potrebbero mostrarti il numero di notifiche ancora da leggere.

Garanzia
Questo prodotto è garantito da ogni difetto di fabbricazione, in base a quanto definito dal
D.Lgs. 2 Febbraio 2002, N. 24. In caso di guasto, si prega di rivolgersi al punto vendita dove
è stato effettuato l’acquisto. Per le norme di garanzia consultare il sito www.adj.it.
Il prodotto deve essere utilizzato esclusivamente per le finalità secondo cui è stato
progettato. É vietato ogni altro utilizzo o modifica.
Ulteriori informazioni sulla conformità:
Per ulteriori informazioni sulla conformità, visitare il sito ADJ all’indirizzo:
www.adj.it/certification o contattare il Servizio Assistenza Clienti ADJ al seguente indirizzo
e-mail: [email protected]
Prodotto in Cina - Importato e distribuito da IoT Tecnologie s.r.l.
Via della Faeta, 1 - 00030 San Cesareo (RM) –ITALY
Questo prodotto rispetta le seguenti Direttive:
• DIRETTIVA 2014/53/UE concernente l'armonizzazione delle
legislazioni degli Stati membri relative alla messa a disposizione sul
mercato di apparecchiature radio;
• DIRETTIVA 2014/35/UE concernente l'armonizzazione delle
legislazioni degli Stati membri relative alla messa a disposizione sul
mercato del materiale elettrico destinato ad essere operato entro taluni
limiti di tensione;
• DIRETTIVA 2011/65/UE sulla restrizione dell’uso di determinate
sostanze pericolose nelle apparecchiature elettriche ed elettroniche.
La dichiarazione di conformità del prodotto è visibile sul sito www.adj.it,
nella pagina del prodotto.
Il simbolo del cestino barrato riportato sull’apparecchio indica che il
prodotto, alla fine della propria vita utile, dovendo essere trattato
separatamente dai rifiuti domestici, deve essere conferito in un centro di
raccolta differenziata per apparecchiature elettriche ed elettroniche
oppure riconsegnato al rivenditore al momento dell’acquisto di una nuova
apparecchiatura equivalente. L’adeguata raccolta differenziata per
l’avvio successivo dell’apparecchio al riciclaggio, al trattamento e allo
smaltimento ambientalmente compatibile contribuisce adevitare possibili
effetti negativi sull’ambiente e sulla salute e favorisce il recupero dei
materiali di cui è composto. L’utente è responsabile del conferimento
dell’apparecchio a fine vita alle appropriate strutture di raccolta. Per
informazioni più dettagliate inerenti i sistemi di raccolta disponibili,
rivolgersi al servizio locale di smaltimento rifiuti, o al negozio dove è stato
effettuato l’acquisto. Chiunque abbandona o cestina questo apparecchio
e non lo riporta in un centro di raccolta differenziata per rifiuti elettrici-
elettronici è punito con la sanzione amministrativa pecuniaria prevista
dalla normativa vigente in materia di smaltimento abusivo di rifiuti.

USER MANUAL
J-BOOK 14.1”
cod. 280-NB002

1. Safety Notices
- Avoid dropping the unit on the ground or by other strong impact.
- Do not use in extreme cold, heat (<35 ℃), excessively humid, dusty
environment, long-term use, do not let the machine in the sun.
- Try to avoid using in magnetic, strong electrostatic environment.
- Once water or other liquids to spill on the unit, should be immediately shut
down, the unit wipe dry before use.
- Do not use any cleaner or other liquid containing chemical ingredients to
clean the machine to avoid corrosion and moisture damage, if necessary
cleaning, use a soft, dry cloth or paper towel.
- The company's hardware and software were non-normal operation, the
machine repair or other data loss resulting from unforeseen circumstances
or delete is not responsible for, nor bear the losses caused.
- When using the file card of T-Flash, do not remove the card to avoid damage
to the memory card or device.
- Please feel free to back up your important data to avoid loss.
- Do not disassemble the unit, otherwise it will lose warranty rights.
- This product supports most of the major brands of 3G network card (requires
win10 drivers), there may be differences in 3G Dongle, we recommend that
you test OK before you buy.
- Manual and related software updates at any time without notice, and Quick
Start Guide found discrepancies, please prevail in kind.

2. Device overview
1) Slot SSD: supports M.S SSD (2280)
2) DC interface: can be connected to DC power supply
3) Micro HDMI interface: High-Definition Multimedia Interface
4) TF slot: supports Micro SD
5) USB interface: USB interface can read and write U disk / removable
hard disk and other equipment data
6) Headphone jack: 3.5mm stereo headphones can be connected
7) USB Type-C port: allows you to read and write to external drives and
other data devices
3.1. Boot
Press the On / Off button 3-5 seconds and release the seed.
(Note: There is no response when you press the power button, the device may
need to recharge).
3.2. Shutdown
Press ON/OFF for 4 seconds to force shutdown or hit the Start menu, click on
the “Power” button, select “OFF” button.

3.3. Standby
In the power-on state, short press the power button to enter standby or wakes
up from standby.
3.4. Restart
Open the Start menu, click on the “Power” button, select “Restart” button.
3.5. Get online
To connect to a Wi-Fi network in Windows, select the Network icon ( or )
on the task bar.
Select the Wi-Fi network you want > Connect, then type the password and follow
the instructions. That's it - you're connected! This icon will appear in the task
bar.
After you're connected, you're ready to set up email, browse the web, and do
a whole lot more online.
If Wi-Fi isn't available, or you want the assurance of a wired network, use a
USB to Ethernet RJ45 adapter - like the ADJ 143-00020 - you simply connect
it to your notebook and attach a network cable between the hub's Ethernet port
to your router or modem.
3.6. Connect to Bluetooth®devices
Thanks to Bluetooth®, you can use all sorts of wireless devices with your
Windows PC - Bluetooth®headphones, speakers, phones, fitness trackers -
just to name a few. Start by pairing your Bluetooth®device with your PC. The
way you do this depends on the kind of Bluetooth®device you're using.

To connect a Bluetooth®headset, speaker, or other audio device
1.Turn on your Bluetooth®audio device and make it discover-able. The way
you make it discover-able depends on the device. Check the device or visit
the manufacturer's website to learn how.
2.Turn on Bluetooth®on your PC if it's not on already. To do this, on the task-
bar, select action Center >Bluetooth®.
3.In action center, select Connect > The device name.
4.Follow any more instructions that might appear. Otherwise, you're done and
connected. Your Bluetooth®device and PC will usually automatically connect
anytime the two devices are in range of each other with Bluetooth®turned
on
To connect a Bluetooth®mouse, or other device
1.Turn on your device and make it discover-able.
2.Select the Start button, then select Settings >Devices >Bluetooth®.
3.Turn on Bluetooth®> Select the device >Pair.
4.Follow any more instructions if they appear.
3.7. Sign in with a Microsoft™ account
Select the Start button, then select Settings >Accounts > Email & app
accounts.
Under Accounts used by other apps, select Add a Microsoft account.
Follow the prompts to add your Microsoft account. You may need to verify your
identity by entering a confirmation code.

3.8. Start menu
Apps, settings, files—they can all be found on the Start menu. Just select the
Start button on the task-bar. Next, make it yours by pinning apps and
programs, or moving and regrouping tiles. If you need more space, resize the
Start menu.
3.8.1. Your apps and programs - right at your fingertips
Open File Explorer, Settings, and other apps you use often from the left side of
the Start menu. Scroll down the app list to see all apps and programs
alphabetically, from A to X box.

1. Menu (expands to show names for all menu items)
2. Account
3. File Explorer
4. Settings
5. Power
3.8.2 Organize your apps
Pin apps to the Start menu to see live updates on what’s happening in your
world - such as new email, your next appointment, or the weekend weather.
When you pin an app, it's added to the Start menu as a new tile.
Pin apps to Start
1. Select the Start button, then press and hold (or right-click) the app you want
to pin.
2. Select Pin to Start.
Once you pin a new app, resize it. Press and hold (or right-click) the app tile,
select Resize, and then choose the tile size you want.
Tip
Drag and drop apps from the apps list to pin them to the Start menu as tiles.

3.8.3 Group your apps
After you've pinned an app, move it into a group.
To create a new group of tiles, move an app's tile up or down until a group
divider appears, and then release the tile. Move apps in or out of the group to
organize your tiles for perfect productivity.
To give your new group a name, select the open space above your new group
and type a name.
3.9 Action Center
Click in the lower right corner of the task-bar to open the “Action Center”, you
can quickly open or close the tablet mode, rotation mode, flight mode, VPN,
power-saving mode, the networking, Bluetooth®, location, project and adjust
brightness.

You no longer need to open action center to see how many notifications you
have - the number on the action center icon shows you how many notifications
are waiting for you. Other apps pinned to the task-bar can also show the
number of notifications you've missed.

Warranty
This product is guaranteed against any manufacturing defect, as defined on the D.Lgs.
February 2, 2002, No 24. In case of failure, please contact the retailer where you purchased
it. You can be found at www.adj.it for standards guarantee.
Please use the product only for the purpose for which it was designed. It is forbidden any
other use or modification.
Additional compliance information:
To obtain additional information about the compliance, go to ADJ website:
www.adj.it/certification or contact the ADJ Customer Support to the following e-mail
address: [email protected]
Made in China - Imported and distributed by IoT Tecnologie s.r.l.
Via della Faeta, 1 - 00030 San Cesareo (RM) –ITALY
This product complies with the following directives:
• DIRECTIVE 2014/53/EU on the harmonisation of the laws of the
Member States relating to the making available on the market of radio
equipment;
• DIRECTIVE 2014/35/EU on the harmonisation of the laws of the
Member States relating to the making available on the market of
electrical equipment designed for use within certain voltage;
• DIRECTIVE 2011/65/EU on the restriction of the use of certain
hazardous substances in electrical and electronic equipment.
The declaration of conformity for this product is visible on www.adj.it
site, on the product page.
The symbol of the crossed out trash indicates that the product, at the end
of its useful life, must be treated separately from domestic waste and
must be taken to a recycling center for electrical and electronic
equipment or delivered to the seller when buying a replacement. The
separate waste collection contributes in preventing possible adverse
effects on the environment and health and promote the recovery of
materials it is made. You are responsible for assigning the equipment in
question at the appropriate waste disposal center. For more detailed
information contact your local waste disposal service or the shop where
it was purchased. Anyone who does not carry the product in a recycling
center for electrical and electronic waste shall be punished with
administrative penalty provided by law on the illegal disposal of waste.
This manual suits for next models
1
Table of contents
Languages: