Advanced Kiosks Outdoor Monolith User manual

AK-OM-OM-12/16/2020
Owner’s Manual for the Outdoor Monolith Kiosk
With Speakers, Options
Read This Entire Manual Before Use!

Table of Contents
INTRODUCTION .......................................................................................................................................................1
PRODUCT DESCRIPTION.............................................................................................................................................1
PRECAUTIONS............................................................................................................................................................1
OUR SUPPORT............................................................................................................................................................2
Taxes....................................................................................................................................................................2
SETUP AND OPERATION........................................................................................................................................3
BASIC SETUP .............................................................................................................................................................3
Before Powering on The Kiosk ............................................................................................................................3
Back Up Your Information...................................................................................................................................3
Earthquake Zones ................................................................................................................................................3
SPECIFICATIONS.....................................................................................................................................................4
COMPUTER ................................................................................................................................................................4
MONITOR SPECIFICATIONS ........................................................................................................................................4
55” Monitor .........................................................................................................................................................4
Computer Power and Location ............................................................................................................................5
Computer..............................................................................................................................................................5
Wi-Fi....................................................................................................................................................................6
Network Connection.............................................................................................................................................6
INSTALLATION.........................................................................................................................................................7
INSTALLING THE KIOSK ENCLOSURE.........................................................................................................................7
Location ...............................................................................................................................................................7
General Dimensions.............................................................................................................................................7
Surface Grade ......................................................................................................................................................7
Power and Ethernet for the Kiosk........................................................................................................................8
Power Requirements ............................................................................................................................................9
Mounting the Kiosk..............................................................................................................................................9
MAINTENANCE OF KIOSK..................................................................................................................................14
CLEANING AND MAINTENANCE...............................................................................................................................14
Monitor Glass ....................................................................................................................................................14
Painted Enclosure Cleaning and Maintenance..................................................................................................14
Other Cleaning Practices...................................................................................................................................14
Equipment Manuals ...........................................................................................................................................15
Support...............................................................................................................................................................16
WARRANTY.............................................................................................................................................................17
LIMITED WARRANTY.............................................................................................................................................17
Returned Item....................................................................................................................................................17
Shipping.............................................................................................................................................................17
TERMS AND CONDITIONS.......................................................................................................................................17

1 12/16/2020
Outdoor Monolith Kiosk Assembly and Operation Instructions
www.advancedkiosks.com
Introduction
Product Description
The Double-Sided Outdoor Monolith Kiosk features a 55” Multi touch touchscreen mounted on
an attractive powder coated base. Made out of sturdy 14-gauge metal, it is water-resistant which
is a standard feature of this kiosk.
The Kiosk is powered by an AMD Processor and comes standard with 8GB of RAM, a 256GB
SSD, and Windows 10.
Precautions
•Do not install the kiosk until all the directions
have been read and understood.
•Do not plug in the power until all the directions have been read and
the kiosk is fully assembled.
•Do not use kiosk with an extension cord that does not have grounding.
•Permanent mounting must only be done by a licensed electrician.
•Do not place the kiosk in a location where water is pouring on it, such as below the
edge of an overhang. Despite being water-resistant, water can potentially get inside
and damage components.
•If you have any questions on how to install this kiosk please call us at 603-865- 1000 or
to 5:00 pm EST.

2 12/16/2020
Outdoor Monolith Kiosk Assembly and Operation Instructions
www.advancedkiosks.com
Our Support
The Monolith Kiosk is an elegant, high quality kiosk designed for a wide variety of applications
where space is limited. We are happy to help you with any problems after you have read the
manuals to learn about this product. Advanced Kiosks will support you in ownership as long as
you own your kiosk, within reason. Unless you or your company is an authorized reseller, selling
or giving it to another company or person will void any and all support and warranty. There are a
few prerequisites:
•The person installing the kiosk should be familiar with setting up computers, printers,
monitors and must be able to read and follow directions.
•Read and follow the directions in this document as well as the directions for the touch
screen monitor and the computer. These documents are included with your equipment,
physically and/or via our webpage (see below). We strongly suggest you read these
documents so that you can get the full value of this kiosk. They can also be found at our
website at: https://advancedkiosks.com/support/product-documentation/
•The following are questions we can not answer:
oNetwork questions. This is not part of our equipment and we donot know your
network, so we can not help you here.
oAnti-Virus questions -this is also partof yournetwork/software, and is not
included with our standard kiosk.
oElectrical wiring of your building or location.
For other questions, visit the knowledge base, or the support tab on our website:
https://advancedkiosks.com/knowledgebase/
https://advancedkiosks.com/about-advanced-kiosks/kiosk-support/
Taxes
All products from Advanced Kiosks are made and shipped from New Hampshire. New Hampshire
has no sales tax. If it is required for anyone who is purchasing one of our products to pay taxes to
another state, this is the responsibility of the person or organization purchasing from Advanced
Kiosks, and should notify us at the time of purchase.
For full Terms & Conditions, Please refer to: https://advancedkiosks.com/about-

3 12/16/2020
Outdoor Monolith Kiosk Assembly and Operation Instructions
www.advancedkiosks.com
Setup and Operation
Basic Setup
The kiosk is shipped with a full, standard installation of Windows 10 Professional. See our Quick
Start Guide for software setup located at https://advancedkiosks.com/about- advanced-
kiosks/product-documentation/
Before Powering on The Kiosk
Ensure the Monolith Kiosk has been installed on an even surface and sturdy structure.
Ensure that all connections are secure, and that nothing has come loose.
Check that all gasketing and waterproofing is sufficient.
Back Up Your Information
Superheroes need it, police depend on it and everyone that uses a computer should use some
form of it. Computers aren't perfect. Files become corrupt, motherboards malfunction, electrical
storms strike, and CPUs call it quits taking our precious data with them.
Advanced Kiosks cannot recover your data. If a replacement or repaired kiosk is required, it will
be shipped with our standard installation.
Earthquake Zones
If the Monolith Kiosk is located in an area prone to earthquakes a professional engineer should
consulted to recommend installation requirements to adhere with the building codes in your
region.

4 12/16/2020
Outdoor Monolith Kiosk Assembly and Operation Instructions
www.advancedkiosks.com
Specifications
Computer
Your kiosk comes with 2 small form-factor computers (one for each monitor). See the
manufactures manual for any questions on the computer. Below is the standard specification. See
your disk for additional information and drivers.
OS
Windows 10 Professional
Processor
AMD Ryzen 3
System Memory
8GB DDR4
Storage Device
256GB SSD
LAN Controller
Realtek RTL8111EPH GbE
USB
6xUSB 3.1
Video Ports
1xHDMI, 1xDisplayport
Monitor Specifications
55” Monitor
There are two 55” sunlight readable monitors, each controlled by a separate computer. Below are
the in-depth specifications for the monitors.
55.0" Sunlight Readable Touch Screen
Aspect Ratio
Aspect 16:9
Display Technology
120Hz D-LED Local Dim. BLU
Native (Optimal) Resolution
1920 x 1080
Backlight Adjustment
Automatic (Ambient Light Sensor)
Brightness
2500 nits
Response Time
6msec
Viewing Angle
Horizontal: 178° total
Viewing Angle
Contrast ratio (Typical)
Vertical: 178° total
Contrast 5000:1
Power Input
100 VAC to 240 VAC, 50 to 60 Hz
Power Consumption (Typical)
510W
Temperature
Operating: -30°C ~ 50°C (-22°F - 122°F)
Humidity
Operating: 10%-80%
MTBF
50,000 hours
Regulatory & Safety
FCC (USA) Part 15, Subpart B Class A
Computer Specifications

5 12/16/2020
Outdoor Monolith Kiosk Assembly and Operation Instructions
www.advancedkiosks.com
Computer Power and Location
The power required to operate the Monolith Kiosk is standard US wall plug 120v with grounding.
The kiosk itself runs off of one 12v power brick per computer, which all connects to the surge
protector, as well as the monitor. The kiosk is set to automatically turn on when plugged into a
power source. If this setting changes, oryou need to manually power off the device, then the power
button to turn the kiosk on and off is located on the front of the PC.
Inside of Enclosure with Components
A certified electrician needs to be used if the power box is going to be hard wired into a power
source.
The cable should be concealed using appropriate conduit or similar material from the power box
to the kiosk so no one can trip or tamper with the cord.
The power cable (as well as Ethernet cable) needs to be run up from the bottom of the kiosk, so
no wires are exposed.
Computer
The 2 computers will be secured in the kiosk, located in the Water-Resistant Enclosure. There
are normally around six cables that will be plugged into the computer. Ensure all are plugged in
completely and shipping has not vibrated any loose.
Internal
Computer
Kiosk Power
Box

6 12/16/2020
Outdoor Monolith Kiosk Assembly and Operation Instructions
www.advancedkiosks.com
Wi-Fi
The Monolith kiosk does not come with Wi-Fi. While there are available USB ports that a USB
Wi-Fi adapter may be plugged into, Advanced Kiosks does not recommend the option. We
recommend an insulated category 5 or 6 cable.
Network Connection
A network connection requires a shielded category 5 or 6 cable be installed in conjunction with
the power cable.

7 12/16/2020
Outdoor Monolith Kiosk Assembly and Operation Instructions
www.advancedkiosks.com
Installation
Installing the Kiosk Enclosure
The Monolith Kiosk should be mounted to a solid surface using appropriate anchors for adhering
objects to that surface. A specific anchor may work well for concrete but may not be appropriate
for a wooden surface. It is advised to consult a local professional and reference your local
building codes and regulations to determine the most appropriate or required anchor.
Location
The location for the kiosk should be on a flat level area. The kiosk needs to be fastened to a solid
surface for maximum security and safety. Failure to appropriately secure the kiosk to a floor, or
pad presents a danger of the kiosk tipping over.
General Dimensions
Surface Grade
The surface should slope away from the kiosk to prevent the possibility of water accumulating in
the bottom of the kiosk. Standing water inside the kiosk will elevate humidity levels beyond
acceptable operating conditions.

8 12/16/2020
Outdoor Monolith Kiosk Assembly and Operation Instructions
www.advancedkiosks.com
Power and Ethernet for the Kiosk
Three Rectangular Holes for Cables, and Mounting Holes
The Monolith Kiosk has been shipped with all power connections and plugs attached within the
power box, so that the kiosk can be tested and configured BEFORE permanently installing.
Power leaving the conduit can be secured in the junction box located in the bottom section of the
kiosk. This is a sealed box for protection and should be done by a professional electrician.
A certified electrician needs to be used if the power supply box is going to be hard wired into a
power source.
The cable should be concealed using appropriate conduit or similar material from the power box
to the kiosk so no one can trip or tamper with the cord. The power and ethernet will go through
one of the 3 holes in the bottom of the enclosure.
The power cable (as well as Ethernet cable) needs to be run up from the bottom of the kiosk, so
no wires are exposed. Connect the end of the cable into the plug on the bottom section of the
kiosk.
8 Mounting
Holes

9 12/16/2020
Outdoor Monolith Kiosk Assembly and Operation Instructions
www.advancedkiosks.com
Power Requirements
The following matrix is the power requirements for the kiosk’s components. Over time
manufactures may change these setting please review the manual that comes with each of the
following components for the most recent power information.
Mounting the Kiosk
When mounting to the floor you should use no less than six, 3/4” diameter sleeve anchor bolts to
secure the kiosk to your selected location’s surface. Advanced Kiosks recommends at least this
specification, but please follow your local building codes, and have a professional help with
mounting. We recommend the following setup procedure:
1. Unwrap the base, and line it up on the area you intend to drill into. Use the 6 ¾” holes in
the bottom as a guide. (The bolts with nuts on them are for mounting the enclosure to the
base)
Kiosk Base with Mounting Holes
2. Using ANSI standard drill bits, carefully drill ¾” holes in the floor material using the
base of the kiosk as a guide for hole location. Hole size = Bit size when installing sleeve
Voltage
Power Consumption
Kiosk Side 1
(Monitor + PC)
100-240 Vac
50 / 60 Hz
Monitor 1 + Computer
600W - 644W
Kiosk Side 2
(Monitor + PC)
100-240Vac
50 / 60Hz
Monitor 2 + Computer
600W - 644W
Six Floor
Mounting Holes
(3/4”)
Nuts and Bolts to
Mount the
Enclosure to the
Base

10 12/16/2020
Outdoor Monolith Kiosk Assembly and Operation Instructions
www.advancedkiosks.com
anchors. Make sure the hole is always drilled 1/2" deeper than the depth the sleeve
anchor will penetrate into the base material.
3. Also drill 2 holes for the drainage hoses. These should go into the ground in a way that
allows the water that accumulates to drain, either through soil, or through channels. The
holes should be about ¾” and sealed with silicone or gasketing.
4. Clean the hole of all debris made during drilling, using a brush, vacuum, or compressed
air. Debris can prevent secure mounting. Center kiosk over drill holes.
5. Sleeve anchors come fully assembled with a nut and washer. It is important that the nut is
on the end of the threads to protect the threads during hammering. For the ¾” sleeve
anchors mounted to the base of the kiosk, the minimum embedment depth is 2 and 1/4”
deep into concrete. We recommend at least 1-2 inches deeper, just in case. See the
specifications on the next page for reference. These general specs may differ based on
your location, as these are for concrete.
Sleeve Anchor General Specs from https://www.concretefasteners.com/technical-
specifications-for-sleeve-anchors/
6. Insert the sleeve anchor through the 6 mounting holes and into the hole you drilled in the
floor material. A hammer will be required to pound the sleeve anchor into the material
until the washer and nut are tight against the base.
7. Tighten the nut until finger tight, always turning clockwise. Using a wrench or socket,
use 60-90 ft/lbs. of torque as specified above.
8. Now after the base has been firmly and securely affixed to the ground, lift the kiosk
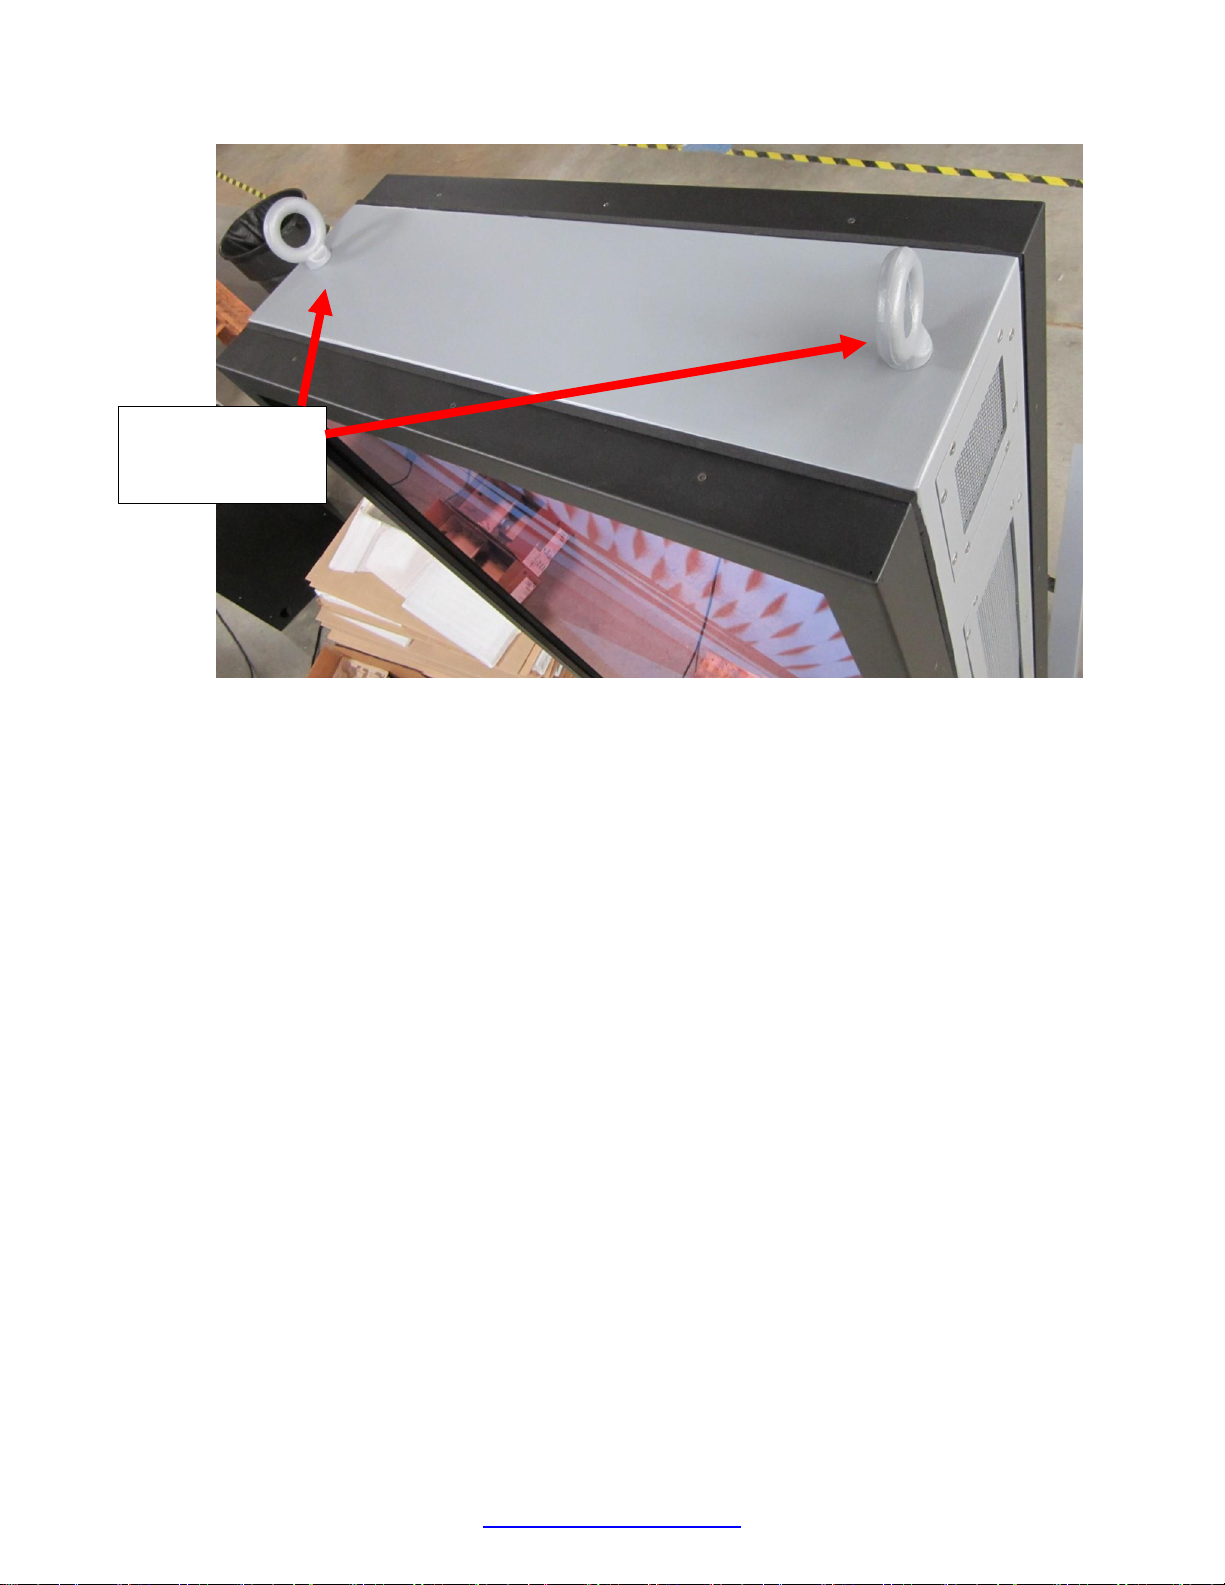
enclosure on top of the base, and precisely line up the holes with the base bolts. Use the
lifting rings on the top of the kiosk with a lifting system. Do not try and lift by hand.
Use extreme caution to prevent injury.
11 12/16/2020
Outdoor Monolith Kiosk Assembly and Operation Instructions
www.advancedkiosks.com
Lifting Rings on Top of Enclosure
9. Use the nuts and bolts mounted to the base and secure the base to the enclosure. Make
sure all bolts are tight and secure.
10. As shown below, there are wires for power, and rubber hoses for drainage. Wire the
power through the bottom rectangles of the base and kiosk, and make sure that the rubber
hoses are secured into the ground. The hoses should be sealed into the ground with
silicone or sealing agent to prevent flooding. Disclaimer: Water can get into the side
vents in the kiosk, so the hoses are meant to drain the water through holes on the inside of
the kiosk. The components inside the kiosk are designed to be water resistant.
Included Lifting
Rings

12 12/16/2020
Outdoor Monolith Kiosk Assembly and Operation Instructions
www.advancedkiosks.com
Drainage Hoses and Electrical Outlets
11. Next, remove the lifting rings by unscrewing the ring counterclockwise. You can then
open up the side of the kiosk through the square vent area on the side of the top of the
kiosk using the provided 1/8” allen wrench on the 8 screws. Repeat on other side.
Unopened Side Vent Opened Side Vent Showing Lifting Ring
Drainage Hoses
Electrical Outlets

13 12/16/2020
Outdoor Monolith Kiosk Assembly and Operation Instructions
www.advancedkiosks.com
12. Use the provided hole cover and lock it into place on both sides of the kiosk. It is a
waterproof foam padded cover that secures with a washer and a wing nut. Tighten the
wing nut so that the foam is fully compressed. Resecure both vents, and make sure that
the everything is mounted correctly.
Wing Nut, Washer, and Cover Hole Sealed by the Hole Cover
13. Finally, make sure that everything is connected correctly, and that the kiosk is secure.
After everything has been wired and secured, plug the power in. The kiosk is
programmed to turn on when plugged in to a power source.

14 12/16/2020
Outdoor Monolith Kiosk Assembly and Operation Instructions
www.advancedkiosks.com
Maintenance of Kiosk
Cleaning and Maintenance
Monitor Glass
Any standard glass cleaner can be used to clean the Monitor, but avoid products containing
ammonia.
Always spray the glass cleaner on the cloth or towel and then clean the touchscreen. Glass
cleaner sprayed directly on the monitor could possibly leak inside the unit and cause damage.
Painted Enclosure Cleaning and Maintenance
Use a mixture of warm water and dish soap to gently clean the outside of the enclosure. Use a
soft cloth and avoid excess scrubbing. DO NOT wipe down any electronics (keyboard, credit
card reader, etc.) with a wet solution.
Other Cleaning Practices
•DO NOT use pressure washers to clean kiosk. Water could potentially get through the
seals.
•DO NOT use leaf blowers near or on kiosk.
For other questions, visit our knowledge base at https://advancedkiosks.com/knowledgebase/

15 12/16/2020
Outdoor Monolith Kiosk Assembly and Operation Instructions
www.advancedkiosks.com
Equipment Manuals
With your Monolith Kiosks, all the documentation for all your components has been included.
Please keep these in a safe place. It is recommended that all serial numbers are also written down.
Serial Numbers –Write all your equipment Serial Numbers here and keep this document in a
safe place.
Serial # ____________________
Notes:


17 12/16/2020
Outdoor Monolith Kiosk Assembly and Operation Instructions
www.advancedkiosks.com
Warranty
Limited Warranty
Your Advanced Kiosks Enviro Kiosk is warrantied for 3 years from the date of purchase. The
electronics in the kiosk are warrantied for 3 years including the monitor. Should any component
fail, you must call Advanced Kiosks Technical Support to obtain RMA # before shipping back
the component. All items must be well packaged for return shipment and insured for their
full value. All items shipped to us must have a tracking number and the RMA # on the outside of
the box. Advanced Kiosks is not responsible for lost packages. Items that are damaged due to
poor packaging will void the warranty. Please note that your warranty only covers usual and
ordinary use of the kiosk and the electronics. It does not cover damage due to misuse, vandalism,
water damage, etc. Any modification of the kiosk will void the warranty
Reformatting the HDD and/or reinstalling the operating system due to file corruption, or any
reason not related to defective hardware, is not included under this warranty and would be
subject to additional costs.
Returned Item
All items that are returned will be subjected to a 35% inspection and restock fee. There is no
refund available for custom work. This includes: custom paint job, custom graphics, custom
paint colors, custom software, or any design modification of the kiosk.
Shipping
When shipping the Enviro Kiosk, it must be well packaged, secured to a pallet, and insured. We
highly recommend taking pictures of the packaged kiosk before shipping.
Terms and Conditions
Please visit our Terms and Conditions page for more detailed information:
http://www.advancedkiosks.com/company-policies/terms-and-conditions.php

Table of contents
Other Advanced Kiosks Digital Signage manuals


