Aeroqual AQY 1 User manual
AQY 1
User Guide

User Guide Revision History
Date
Revision
Description of change
Jun 2018
1.0
First release.

Contents
User Guide Revision History....................................................................2
In the Box...............................................................................................4
External Features....................................................................................4
How your AQY 1 Works...........................................................................5
Powering up your AQY 1.........................................................................6
Power requirements .............................................................................................. 6
Modem Installation ................................................................................7
SIM Card Installation ..............................................................................8
Mounting your AQY 1 .............................................................................9
Connecting to your AQY 1.....................................................................10
Data Security........................................................................................................10
Aeroqual Connect (via Direct WIFI)...................................................................... 11
Aeroqual Cloud (via Network WIFI / Modem) ..................................................... 12
Your AQY 1 Data...................................................................................15
Manage Data........................................................................................................15
Commissioning your AQY 1...................................................................16
Looking after your AQY 1 ......................................................................16
Calibration............................................................................................................ 16
Sensor Replacement ............................................................................................ 17
Specifications .......................................................................................24
Dimensions ..........................................................................................25
Troubleshooting ...................................................................................26
Resetting your AQY 1 ........................................................................................... 26
The Legal Stuff......................................................................................27
Copyright..............................................................................................................27
Terms and Conditions .......................................................................................... 27
Statements of Compliance...................................................................................28
For your notes......................................................................................29
Page | 4
In the Box
The AQY comes with:
12VDC plug pack (90 to 260 VAC input) 24W with 5 m cable
AQY 1 mounting bracket and screws
Cable ties for securing power cable/modem
USB stick with reset files and user guide
User Guide
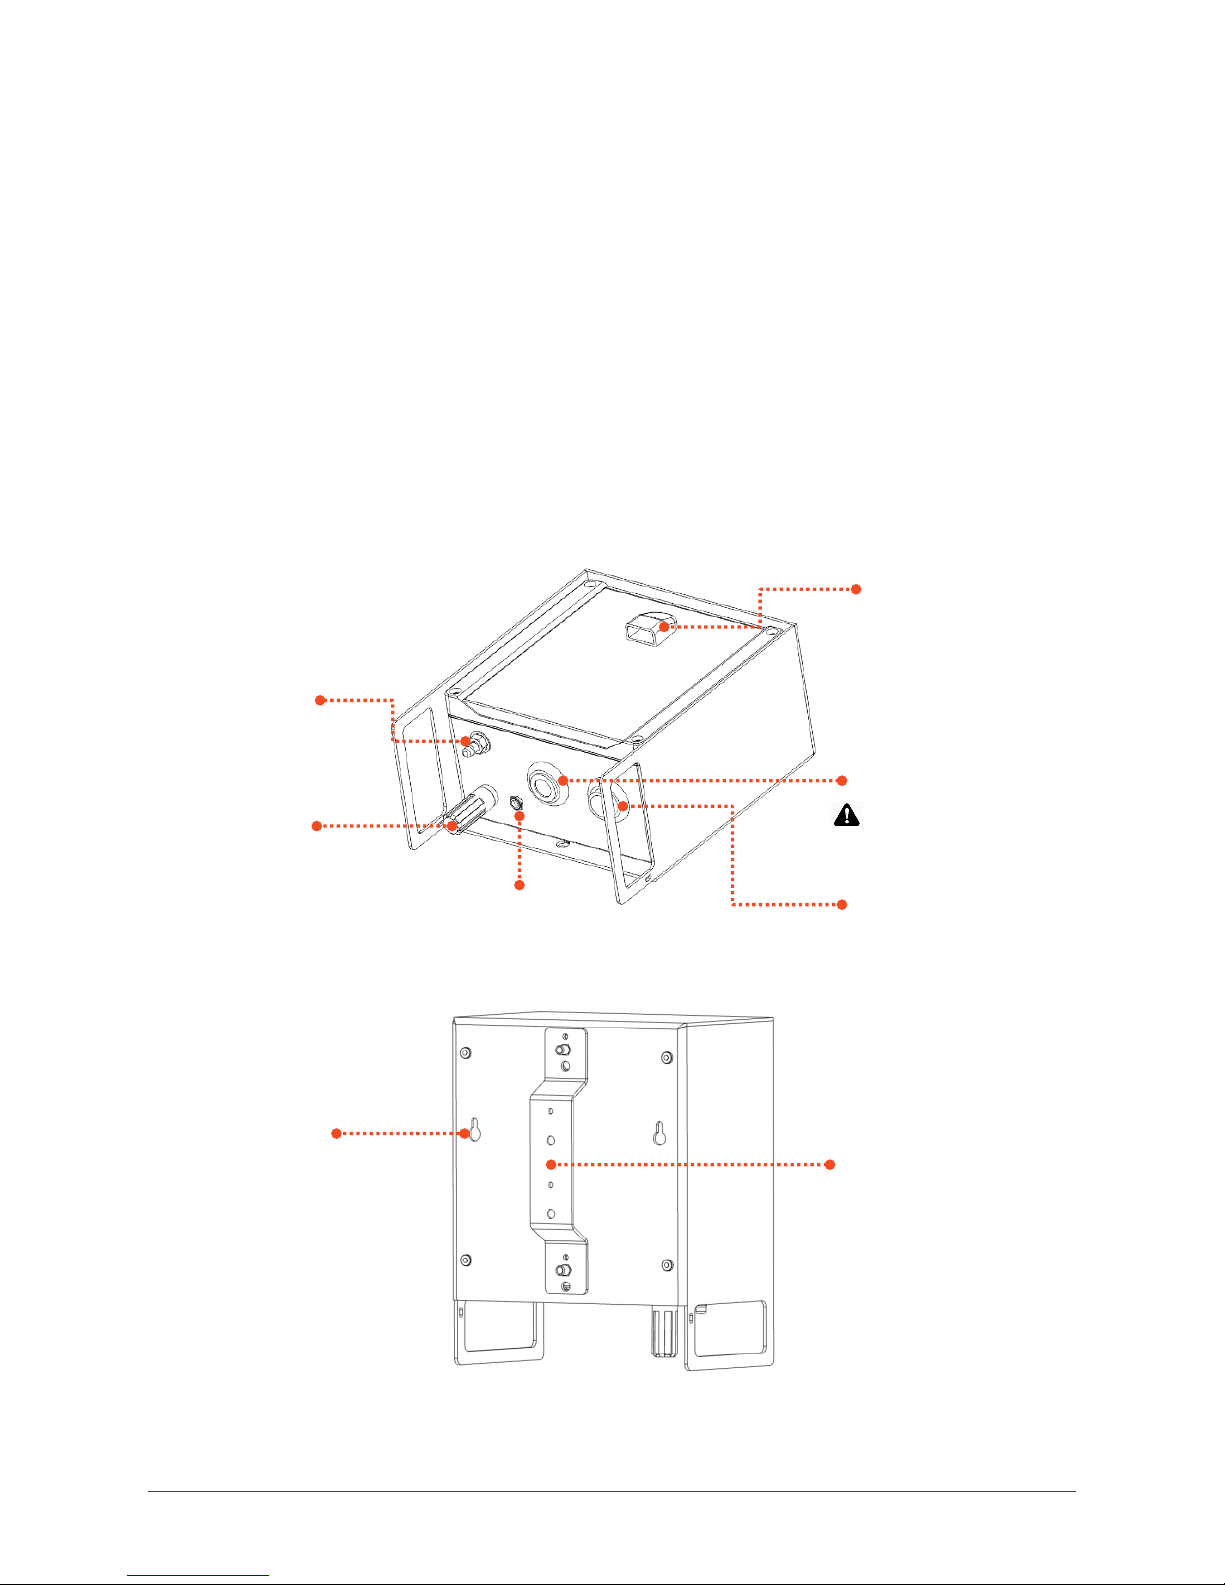
External Features
Electrical
connection
PM2.5/PM10
sample inlet
Temperature and
Relative humidity
sensor
NO2sensor
Do not touch
sensor membrane
O3sensor
sample inlet
Exhaust vent
Mounting bracket
keyholes (x4)
Mounting
bracket

Page | 5
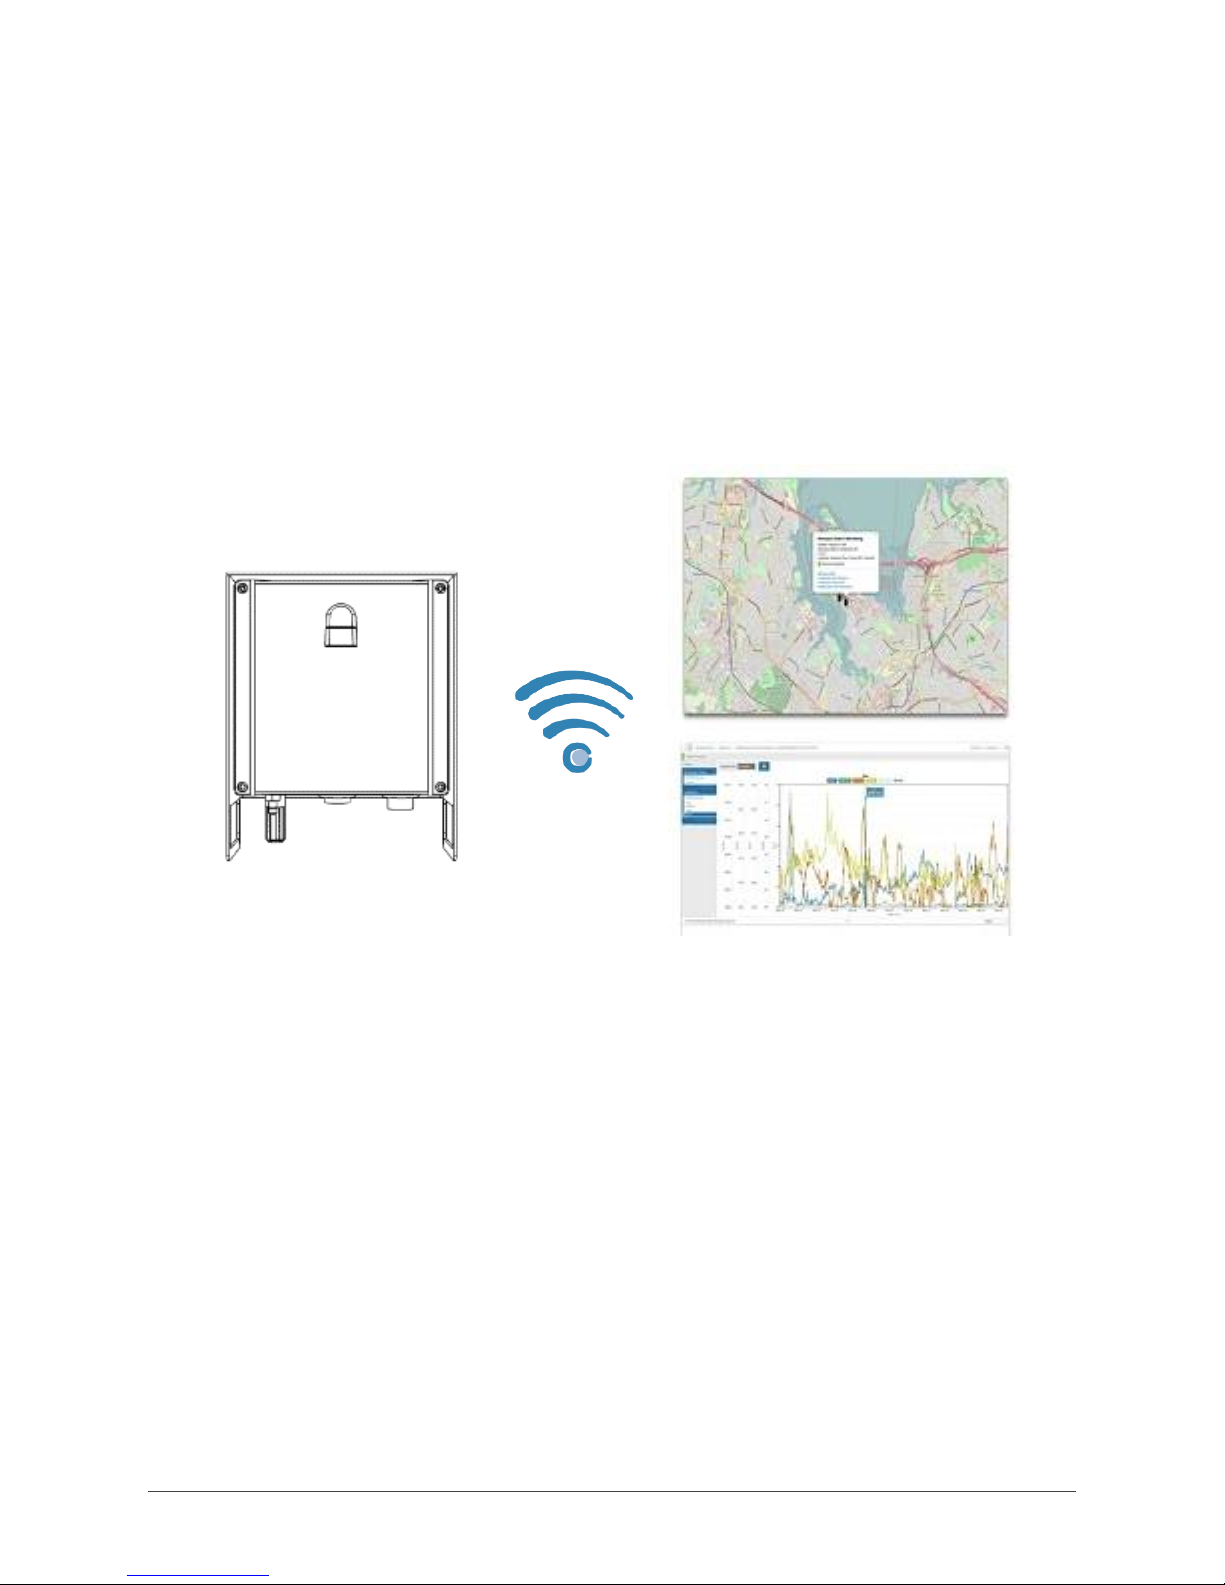
How your AQY 1 Works
The AQY 1 does all measurement on the instrument; there is no correction of
the data on the cloud. We believe this ensures the integrity of the data and
helps to maintain confidence in the measurement. It is also in keeping with the
IoT trend for increased ‘processing at the edge’.
Fans of our ozone sensors will be pleased to know
that we’re still using our patented world class GSS
ozone sensor. Outside of the AQM and AQS
products, the GSS ozone sensor still performs
extremely well in the AQY 1 as various independent
evaluations have shown.
The NO2measurement is also unique. We’re using our selective ozone sensor
to correct for ozone interference on the electrochemical NO2sensor (a
technique patented by Aeroqual). What this means is that the AQY 1 delivers a
real NO2measurement rather than an approximation of NO2as delivered by all
other devices that use an electrochemical NO2sensor. This is because all
electrochemical NO2sensors are cross sensitive to ozone, and all
electrochemical ozone sensors are cross sensitive to NO2. Because we use a
GSS ozone sensor which is highly selective to ozone, it allows us to use this
technique to provide a highly accurate NO2measurement. The algorithm is
embedded in the device itself and occurs in real-time.
The PM2.5 and PM10 measurements are delivered by an
optical particle counter which uses a well-known light
scattering method to size and count particles and then
convert them to a mass fraction. In humid conditions light
scattering is susceptible to humidity artefacts which over-
report particulate levels due to ‘fogging’ where the
particles are encapsulated by moisture and appear larger
to the sensor than they actually are. We correct for this
effect by way of a humidity correction algorithm.
Find out more about Aeroqual’s technology:
https://www.aeroqual.com/company/our-technology
Page | 6
Powering up your AQY 1
Before powering up your AQY 1
-If you have a modem fitted, please insert the SIM card before first
powering up. This will ensure the AQY 1 automatically connects to
Aeroqual Cloud at start up. See SIM Card Installation on page 8.
-If you do not have a modem and/or SIM card, when the unit powers up
you can connect to the AQY 1 using WIFI. See Aeroqual Connect (via
Direct WIFI) on page 11.
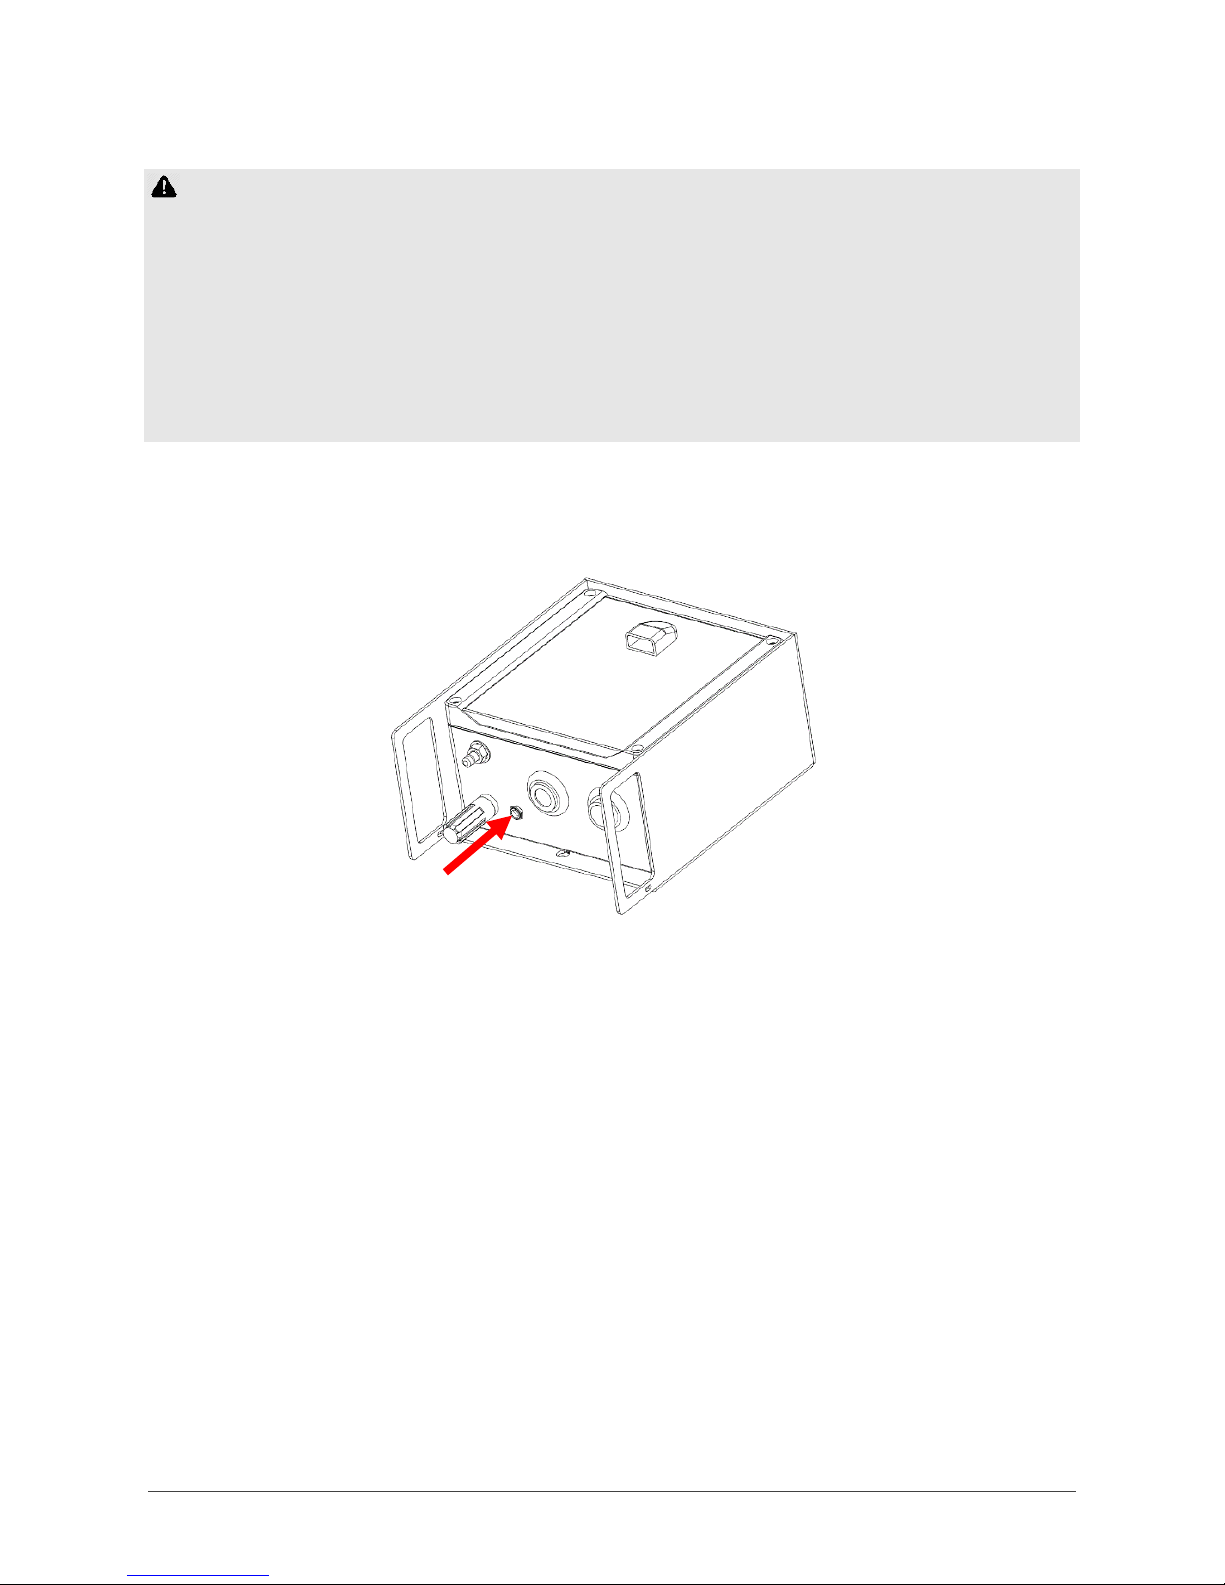
Plug the power adaptor into your mains power socket. Plug the supplied
power jack into the power socket on the bottom of the AQY 1.
A green light should flash for 60 seconds then will stay on. After 60 seconds
you should hear the internal fan switching on, then on and off every seconds.
This indicates successful power on.
Power requirements
The AQY 1 requires 12VDC / 24W to operate and is supplied with a power pack
with mains power plug.
The AQY 1 can be powered by solar electricity as long as the supply output is
compatible with the factory supplied power pack or delivers 12VDC / 24W /
2A.
Power plug
socket
Page | 7
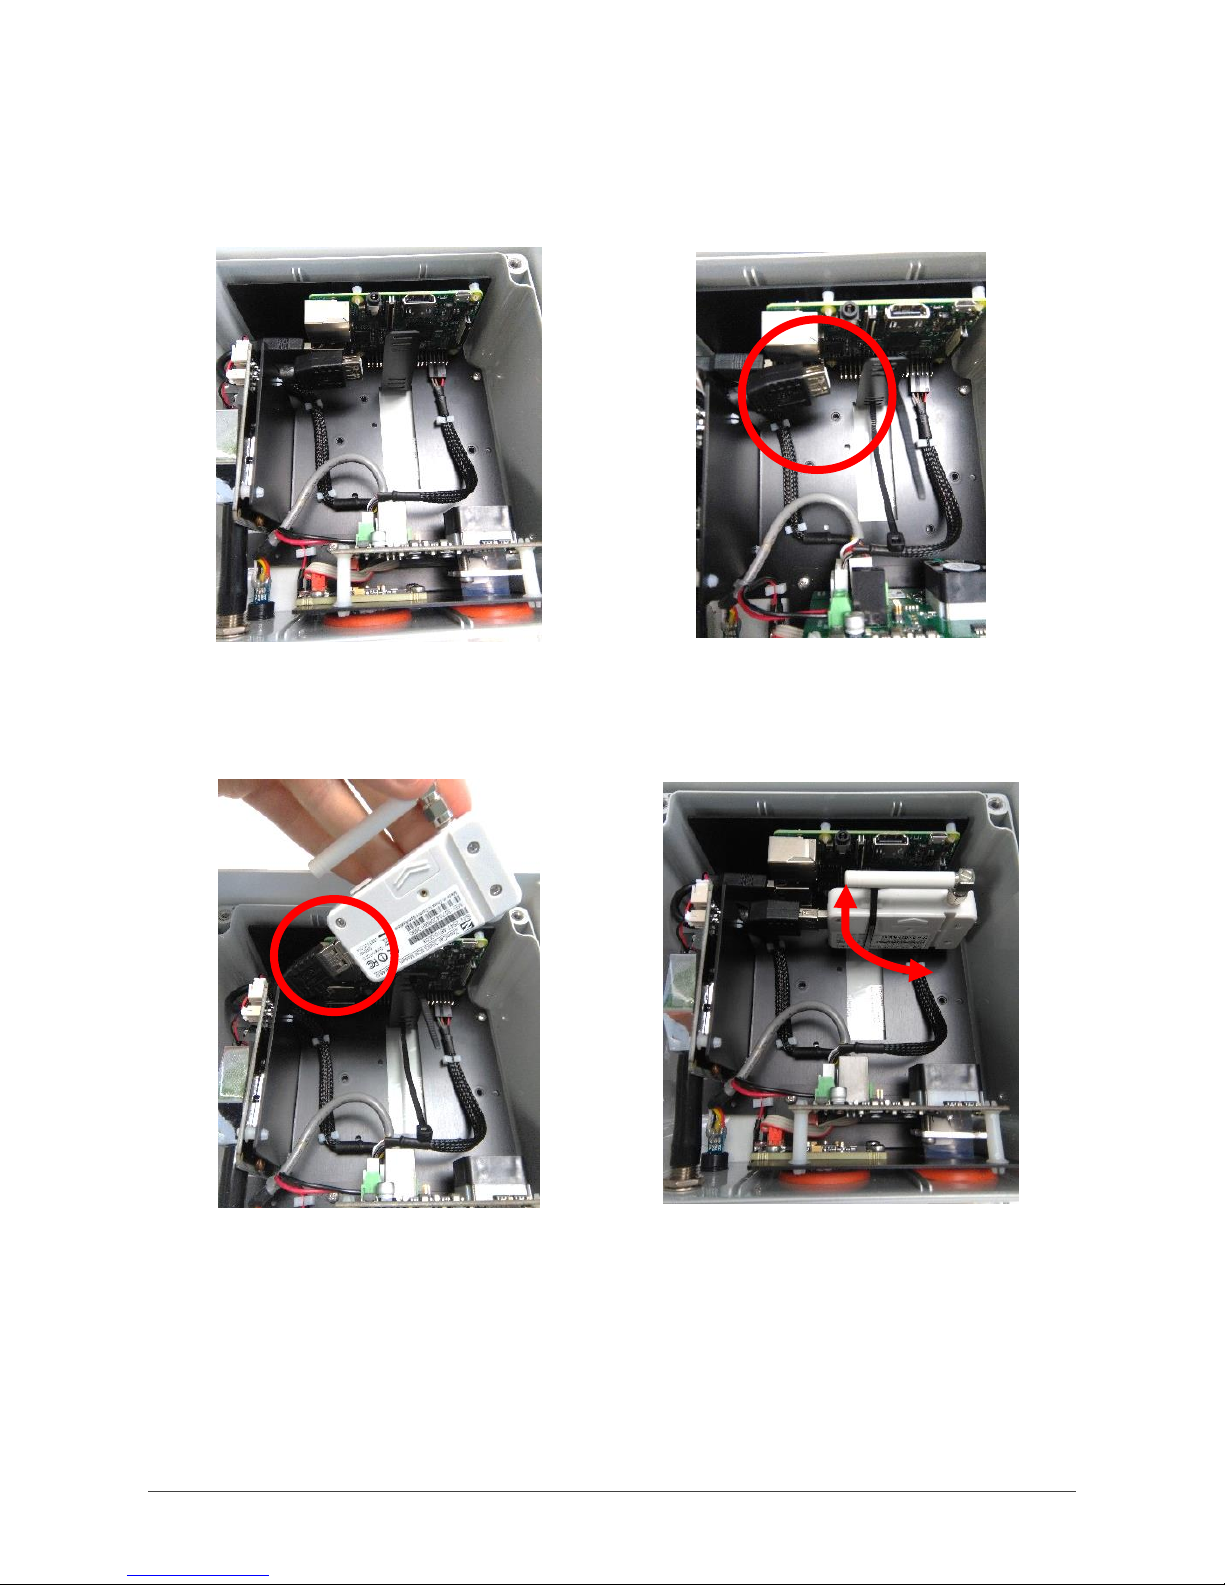
Modem Installation
If a modem is supplied separately or removed during sensor replacement,
follow the steps below to install it.
❶ Remove the front cover.
❷ Feed one of the supplied cable ties
(connector head facing down) into the lowest
slot of the vertical upright, leave ~ 2 in (50
mm) remaining.
❸ Connect the modem to the AQY 1 using
the USB connection as shown above. Position
the modem against the vertical upright with
the pointed end of the cable tie extending
out on the top side.
❹ Rotate the modem aerial down, bend the
pointed end of the cable tie over the modem
and feed through its connector, pull tight and
trim excess. Rotate the aerial back to the
horizontal. When replacing the front cover
ensure the vent is at the top with the opening
facing down.

Page | 8
SIM Card Installation
Insert the SIM card before first powering up. This will ensure the AQY 1
automatically connects to Aeroqual Cloud at start up. If the AQY 1 does not
appear in Aeroqual Cloud after powering up, see Connect your AQY 1 to
Aeroqual Cloud via Modem on page 13.
The standard modem takes a Micro SIM (12 x 15mm).
❶ Remove the front cover.
❷ Rotate modem aerial up to access the SIM
card cover (the retaining screw is removed in
the factory). Slide the cover up to remove it.
❸ Orientate and push in the Micro SIM with
the connector face facing up and bevelled
corner on the right as shown above.
❹ Rotate the aerial back to the horizontal.
When replacing the front cover ensure the
vent is at the top with the opening facing
down.
Micro SIM
installation
orientation

Page | 9
Mounting your AQY 1
The AQY 1 is weatherproof (IP33), no further shelter is required. It comes with a
mounting bracket for mounting to a wall or pole. The back plate of the AQY 1
has “key-holes” to allow the bracket to be used vertically or horizontally, or you
can fix the bracket using the M3 screw mount points. The DC side of the power
adaptor has a 5 m cable to allow connection to an indoor mains power socket.
Cable tie points to secure power cable
M3 screw bracket mount points
Installation Clearances
Choose a location with good airflow.
Secure the power cable using cable ties.
Install away from specific point sources e.g. kitchen vents, A/C units.
Installation examples
> 5 m
Each side
> 2.4 m Top
and bottom
Page | 10
Connecting to your AQY 1
There are two ways to connect to your AQY 1:
Aeroqual Connect for initial set up and when access to the internet is
limited;
Aeroqual Cloud for remote access, visibility of all your AQY 1 stations,
and remote technical support from Aeroqual Care.
Aeroqual highly recommends every AQY 1 is connected to Aeroqual Cloud for
the best user experience, additional data features, and Aeroqual Care.
Data Security
The data belongs to you. We look after it in the same way that a bank looks
after your money. Who you let access your data is entirely up to you –our job
is to carry out your instructions.
If you do choose to store data with us, then here are some of the security
assurances we provide:
We use only ISO 27001 approved data centres
Infrastructure is monitored and protected 24/7
Data is accessed via a secure website with 256-bit SSL encryption
User defined passwords

Page | 11
Aeroqual Connect (via Direct WIFI)
No internet connection is required for Aeroqual Connect. Aeroqual Connect is
always running on the AQY 1 and can be accessed via an internet browser on
any device, there is no software to install.
1. Connect your AQY 1 to Aeroqual Connect via Direct WIFI
After a few minutes of power on, you should see a new Wi-Fi network in your
device’s list of Wi-Fi networks. The Wi-Fi name (SSID) will match your AQY 1
serial number, connect to this network using the password below.
Wi-Fi SSID: AQY-AA000
Password: Aeroqual
2. Access your AQY 1 on Aeroqual Connect
After connecting your AQY 1 to your device, open an internet browser window
and enter 10.10.0.1 in the address bar. You should see the Aeroqual Connect
login screen. Log in with the default user name and password provided.
Username: administrator
Password: aqmadmin
After logging in to Aeroqual Connect, you will be presented with a screen with
three ‘apps’; Manage Data, Configure Instrument and Administration. You are
now accessing your AQY 1 in “Access point” mode.
After logging in go to the
Administration app and create a
new user and secure password,
then delete the default
username and password.
Click on the Manage Data app to immediately see your data. In access point
mode you can view and download data and make changes to the AQY 1
settings. The Wi-Fi range is approximately 10 meters. Data is automatically
saved on-board the AQY 1 and can be accessed and downloaded over the
direct Wi-Fi connection.

Page | 12
Aeroqual Cloud (via Network WIFI / Modem)
Data from your AQY 1 can be viewed or downloaded by you or your
authorised users, remotely from anywhere in the world using Aeroqual Cloud.
1. Connect your AQY 1 to Aeroqual Cloud via a WIFI Network
NOTE: If you haven’t already done so you will need to first connect to your
AQY 1 via Aeroqual Connect.
To use Aeroqual Cloud you need to connect to it through either an internet
connected WIFI network, or by using the AQY 1 modem.
Open Aeroqual Connect as per step 2 in the previous section. Click on the
Configure Instrument app to modify the connection settings.
In the next step the access point will be disabled, take extra care entering
the SSID and password, or you may need to reset the AQY 1 –see Resetting
your AQY 1 on page 26.
Change the WIFI mode from “Access Point” to “Client”, type in the name of
your internet connected WIFI network SSID, then type in your internet
connected WIFI network password and click save. Your device will lose contact
with the AQY 1 and the AQY 1 will connect to the internet.
Client
Page | 13
2. Connect your AQY 1 to Aeroqual Cloud via Modem
The AQY 1 modem supplied is configured to work with most cellular networks.
When the network SIM card is installed in the modem prior to powering on it
should detect the correct access point name (APN).
If your AQY 1 does not become available in your Aeroqual Cloud after inserting
your SIM card and powering on, then you may need to change the Access
Point Name (APN)which may be unique to your chosen cellular provider.
1. To change the APN you will need to access you AQY 1 through Aeroqual
Connect. To do this refer to Aeroqual Connect (via Direct WIFI) on page
11.
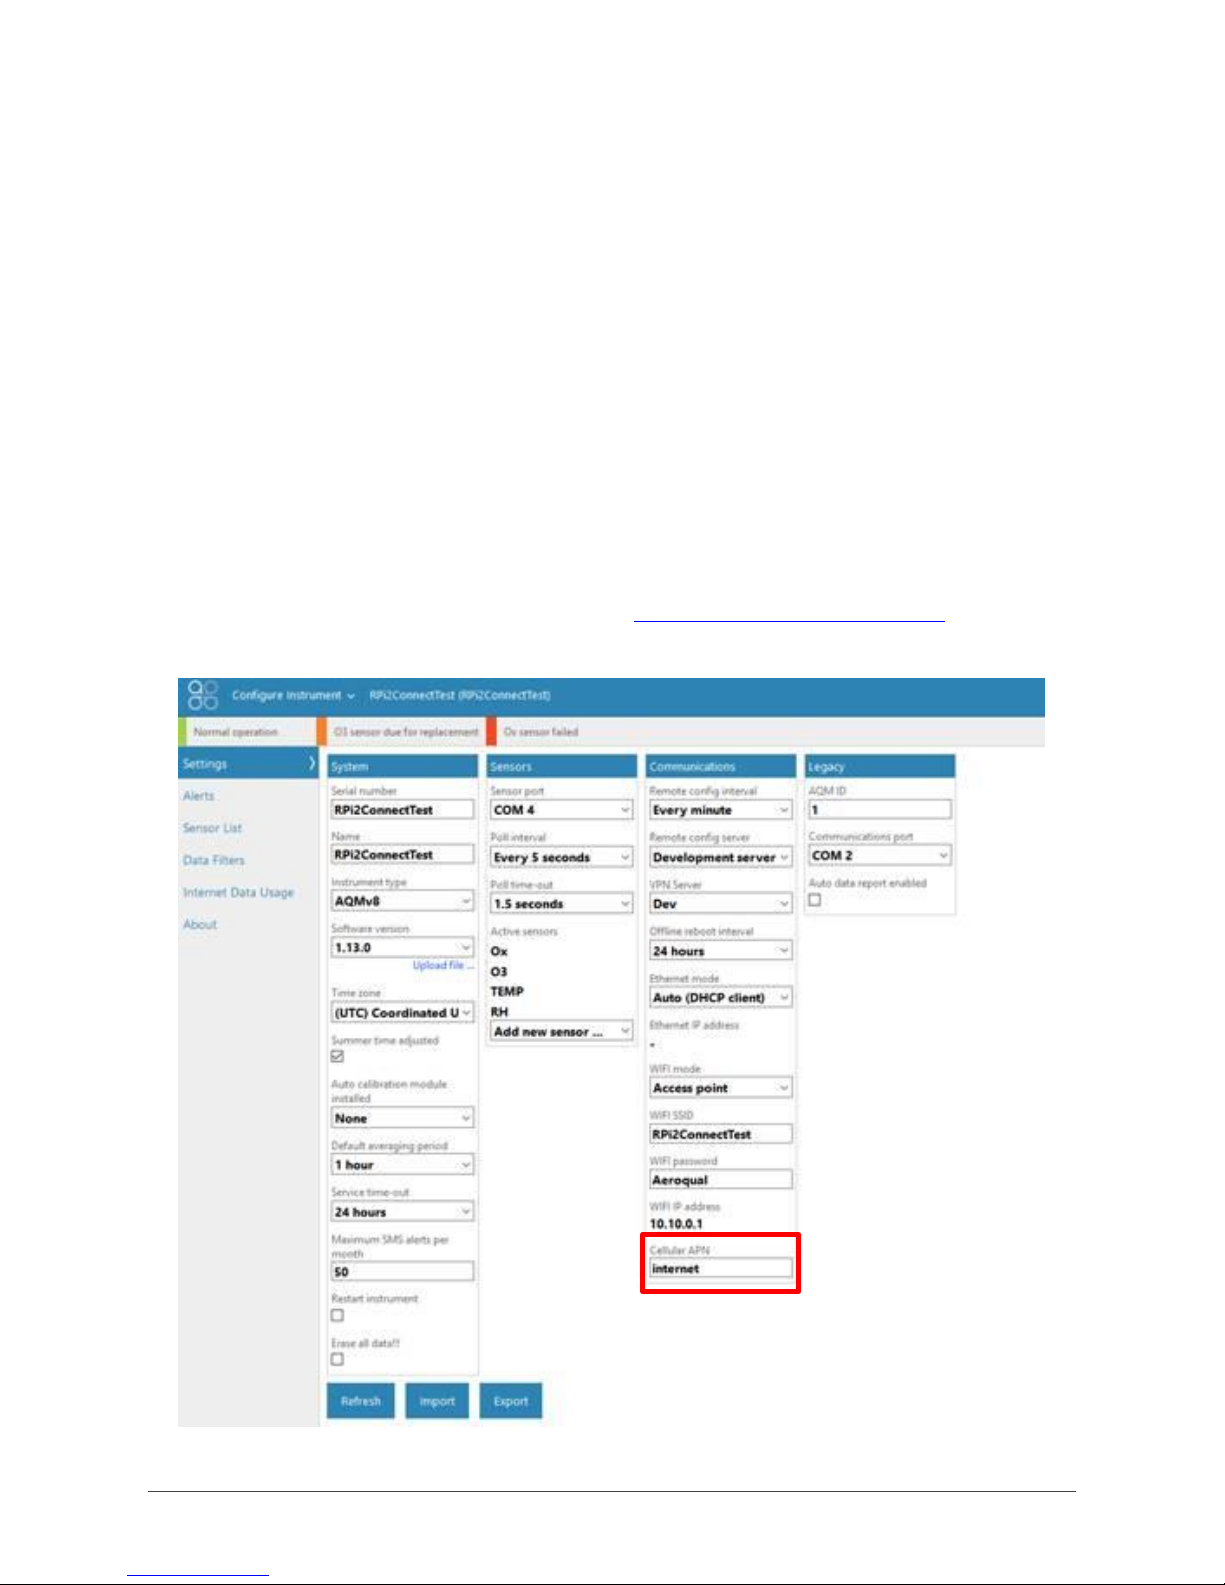
2. Once logged in open Configure Instrument. Under the “Communications”
column you will need to change the “Cellular APN” to match that of your
cellular provider. The default is “internet”. A list of cellular providers APNs
is available at the following website: http://wiki.apnchanger.org.

Page | 14
3. Access your AQY 1 on Aeroqual Cloud
Go to https://cloud.aeroqual.com. Enter the username and password
provided by Aeroqual. For assistance email technical@aeroqual.com.
After logging in to Aeroqual Cloud, you will be presented with a screen with
three “apps”; Manage Data, Configure Instrument and Administration. You can
now access your AQY 1 through Aeroqual Cloud from anywhere in the world.
Click on Select Instrument. If your AQY 1 has successfully connected, you’ll
see “Normal Operation” reported in the banner at the top of the screen. If
there is a connection error then check your APN as per the steps under
Aeroqual Cloud (via Network WIFI / Modem) on page 12.
NOTE: If you have more than one instrument connected to Aeroqual Cloud,
enter the Serial Number (AQY-AA000) of the AQY 1 you want to access.
If you have Administrator privileges then you can create other users (in the
Administrator App) and these users can log on and download data from the
AQY 1 also. You can view and download data using the Cloud Manage Data
app.

Page | 15
Your AQY 1 Data
Once you are connected to your AQY 1 you can start viewing your data!
Data can be viewed and managed in either Aeroqual Connect or Aeroqual
Cloud under “Manage Data”.
Manage Data
Under “Manage Data”, you can view your data in Charts, Advanced Charts,
Table format, or use Download Data to see your data in a .csv file. For other
features such as Auto Export and Manual Sync, please contact
technical@aeroqual.com.
All data captured on the instrument is retained from the first measurement.
Under Charts, adjust the From and To date range and Averaging period as
required.

Page | 16
Commissioning your AQY 1
For most users, simply turning on the AQY 1 is enough. Data will start flowing.
The AQY 1 comes factory calibrated and will report measured air quality
parameters accurately.
For some users, with high data quality objectives, calibration against a ‘reference’
station is the best way to ensure highest correlation between AQY 1 and
reference. To do this install the AQY 1 at the reference station (within 10m of the
reference station inlet) allow it to run for minimum 72 hours then contact us for
Looking after your AQY 1
The sensors supplied with your AQY 1 are intended to provide trouble free
operation during the useful life of its sensors subject to geographical location.
WHO annual
average PM10
(ug/m3)
Example Cities
Useful AQY 1 life
(months)*
0 - 50
Sydney, Los Angeles, London, Hong
Kong, Berlin, Singapore, Sao Paulo,
Tokyo, Moscow
10 - 14
51 - 100
Seoul, Bangkok, Istanbul, Shanghai,
Johannesburg
8 –12
101 –150
Beijing, Medina, Kuwait, Lagos
6 –10
151 - 200
Delhi, Mumbai,
4 –8
*Useful life means the time from installation until the point when the sensor can no longer be
remotely calibrated.
Calibration
Calibration parameters for the NO2, O3and PM2.5/PM10 sensors are stored on
the associated sensor board so the sensors and connected board need to be
replaced with factory calibrated sensors for either calibration or in the case of
sensor failure.
To replace the sensors refer to the next section.

Page | 17
Sensor Replacement
1. Replacing the PM2.5/PM10 Sensor
❶ Disconnect the power supply at the
bottom of the AQY 1 unit.
❷ Loosen all 4 screws (they will not come
out of the casing)
❸ Disconnect white connector at the top of
the PM sensor.
❹ Separate the PM sensor from the metal
bracket by disconnecting the white spacers.
Pull the sensor out of the sample tube
(wiggling or rotating may be required).

Page | 18
❺Insert the new PM sensor into the sample tube.
Connect using the white spacers back to the metal bracket.
Connect the white connector at the top of the new sensor.
NOTE: If you are only changing the PM sensor then you still need to
program the calibration parameters for this sensor, refer to section 3 Setting
the PM2.5/PM10 sensor calibration parameters.
Page | 19
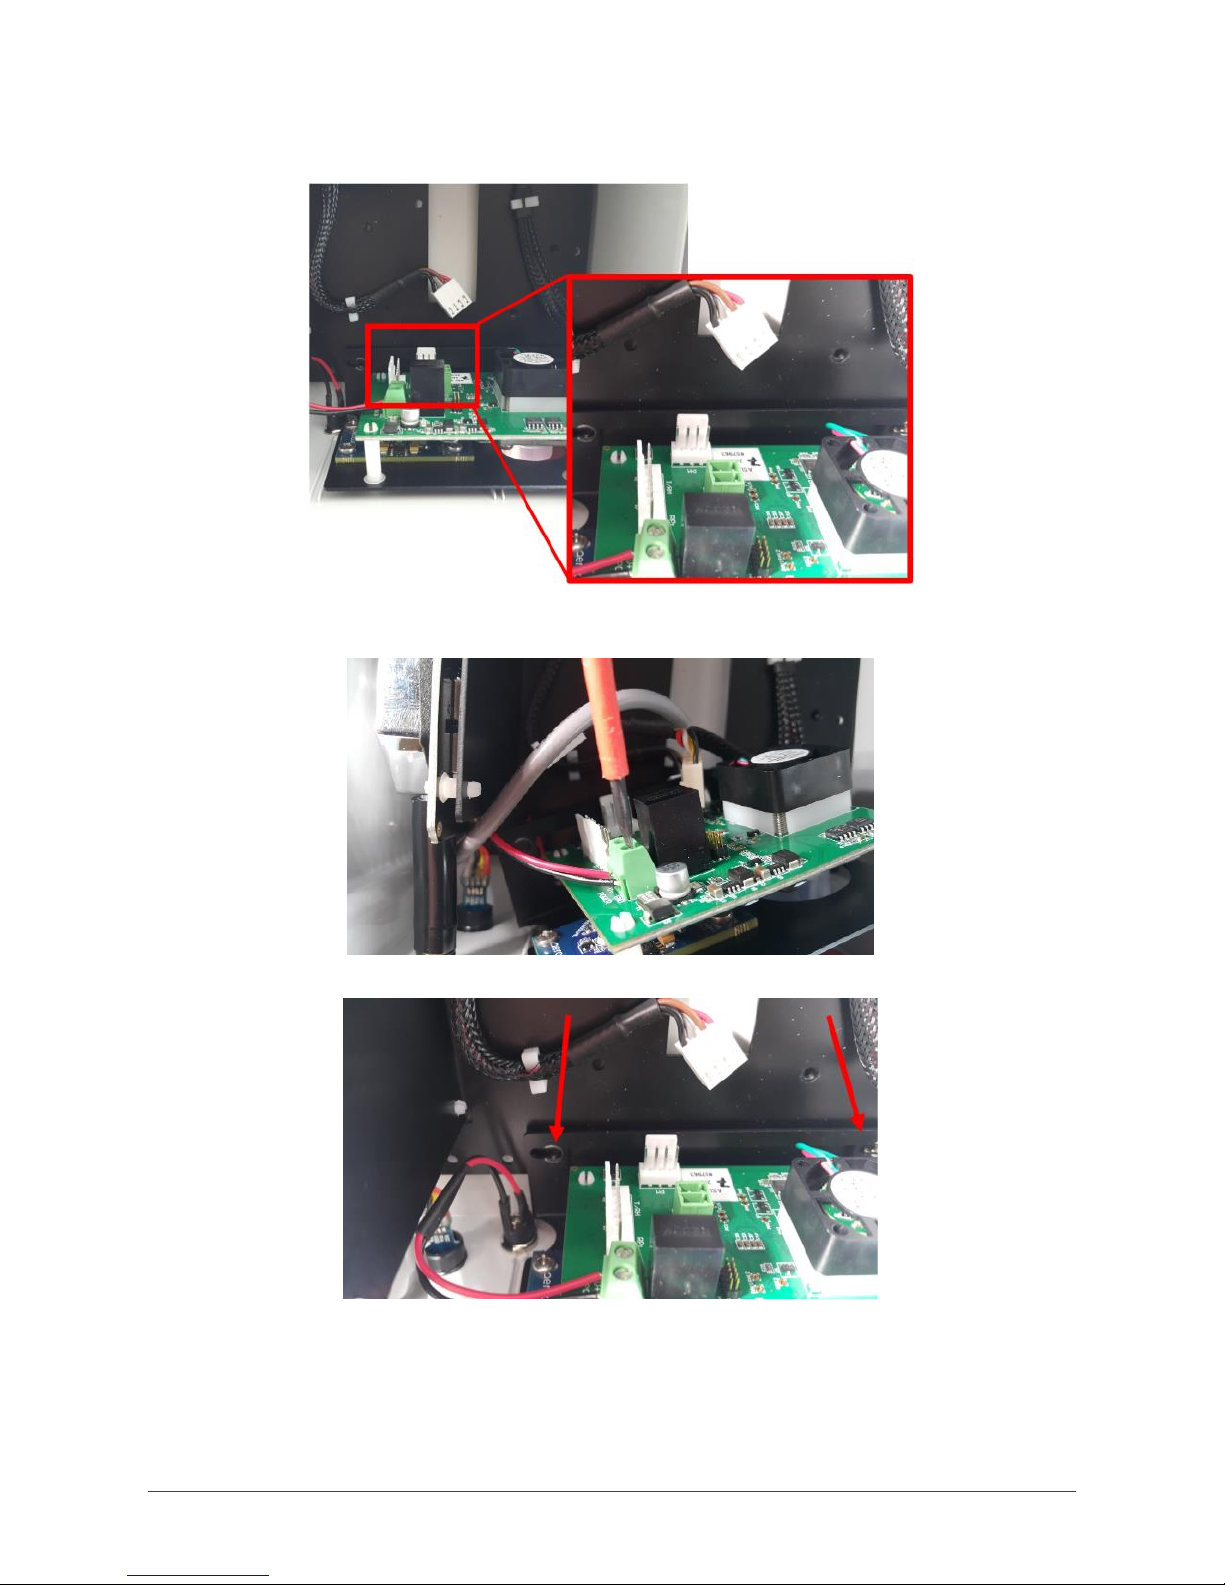
2. Replacing NO2and O3combined sensor cartridge
❶Disconnect the 3 white data connections from the O3/NO2sensor module. The connections
are labelled PM, T/RH and RPi.
❷Unscrew the positive and negative power supply cables from the O3/NO2sensor module.
❸ Unscrew the entire sensor module from the AQY 1 back plate. The sensor module can now
be removed by pulling vertically, gently pull the sensors free from their grommets.
Page | 20
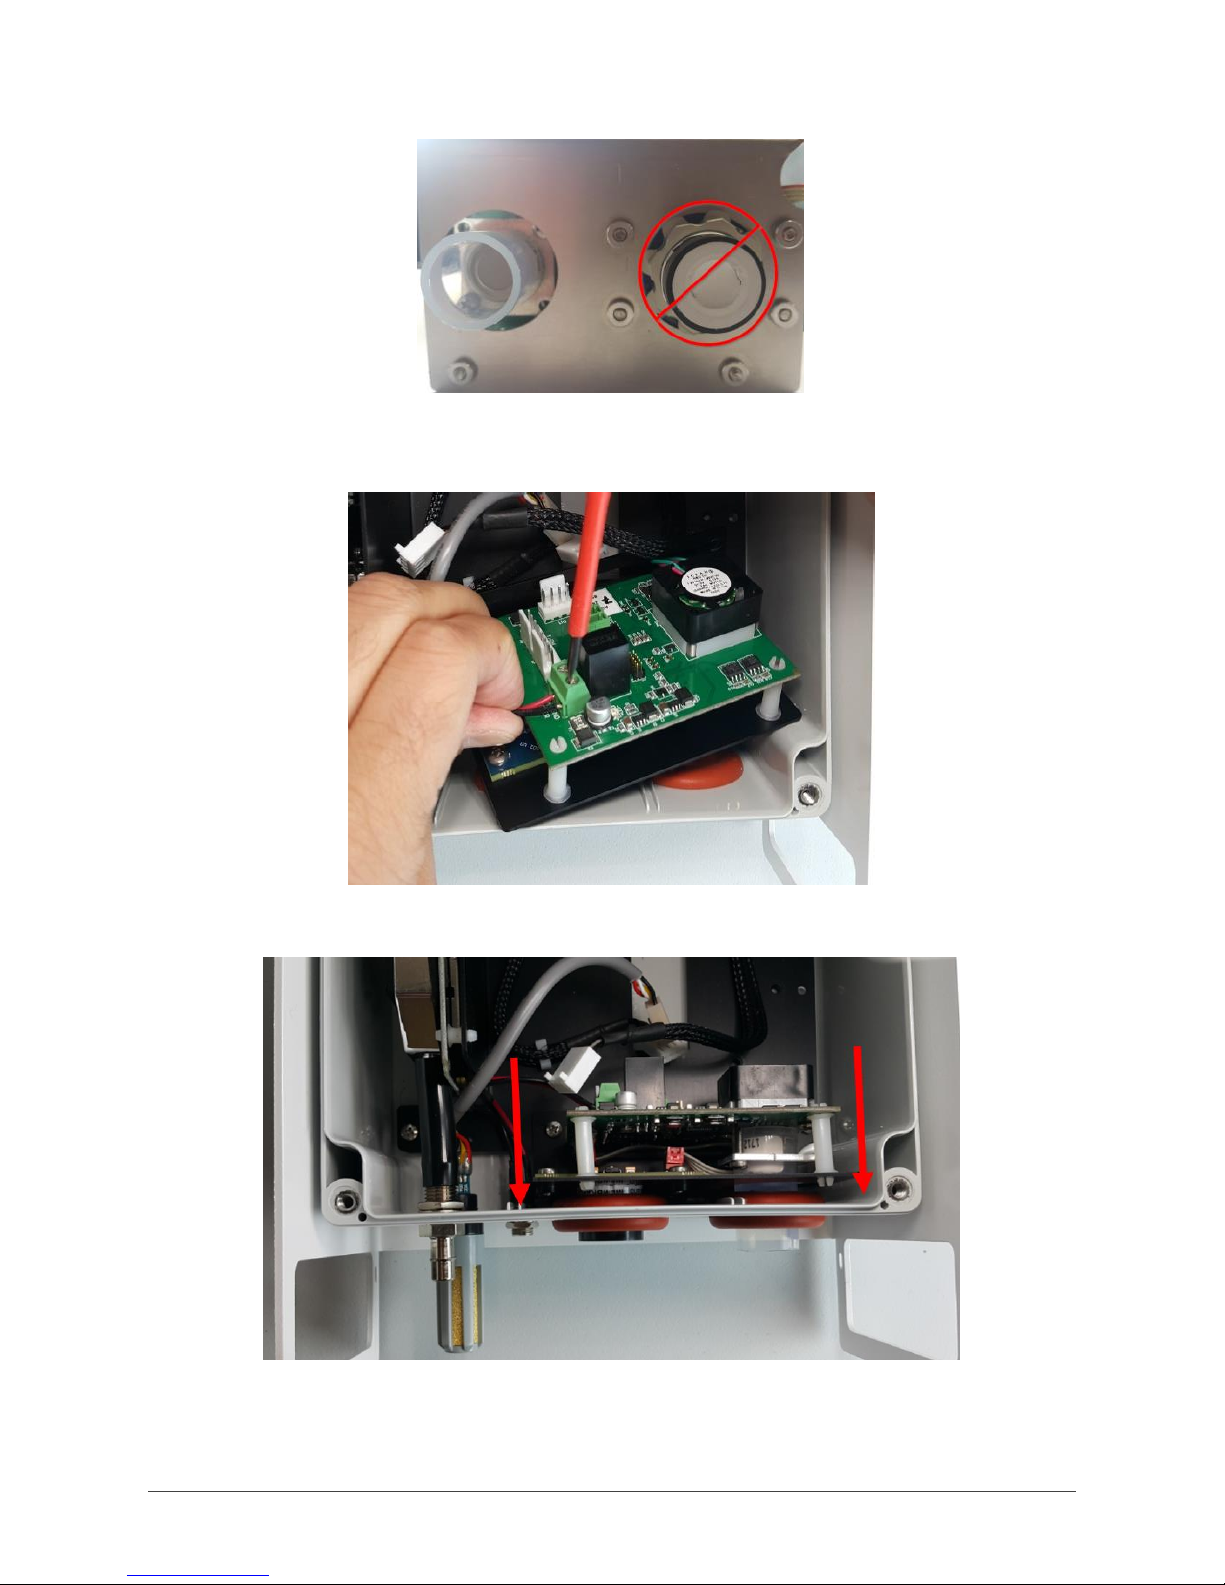
❹Never directly touch the exposed NO2sensor at the bottom. If for any reason the sensor
becomes disconnected from your replacement sensor assembly only grip the sides of the
sensor when reconnecting.
❺Connect the positive and negative power supply cables to the replacement O3/NO2sensor
module. Ensure you double check the polarity
❻Align the NO2and O3sensors with the appropriate holes in the base and place the sensor
module in position.
Table of contents
Popular Other manuals by other brands


Psion Teklogix
Psion Teklogix Workabout PRO G2 user manual

Kasco
Kasco CertiSafe 8400C61 Operation & maintenance manual

Mannington commercial
Mannington commercial ColorFields Installation

Honeywell
Honeywell LonWorks quick start guide

Fender
Fender MALIBU manual

Synergy
Synergy 4018 Installation instructions manual