Air OPUS OFC195B-195 User manual

AIR TENT & AWNING HANDBOOK
Tent Model No. OFC195B-195
Awning Model No. OFC195B-102
OFC195C-AO-UM-0717-Rev.B


AIR TENT
1. Parts List
2. Assembly
3. Pack Down
4. Weathering/Fabric
5. Inflation
6. Deflation
7. Safety
AIR TENT - BUNGEE SECURING POINTS
AIR AWNING
1. Parts List
2. Assembly
3. Pack Down
TROUBLESHOOTING
1. Pump
2. Other
WARRANTY
WOOD MAINTENANCE (IF FITTED WITH BAMBOO)
CONTENTS.
1
5
7
10
11
13

AIR TENT.
1
IMPORTANT! CHECK SETUP AND PREPARATION FOR USE OF YOUR AIR TENT
BEFORE GOING AWAY. ENSURE YOU ARE FAMILIAR WITH ALL ASPECTS OF THE
PRODUCT AND HAVE READ THE INSTRUCTIONS FULLY.
PARTS LIST FOR AIR TENT
1. AIR Tent Canvas x 1 (fitted to your OPUS®Camper)
2. Inner Tents x 2
3. Peg and ladder bands x 16
4. Repair kit x 1
5. Roof Cover
ASSEMBLY
Try to choose a site that is relatively flat. Avoid sites where the land may flood or where water will
run down. DO NOT pitch directly under trees. Pitching near a hedge or wall may provide shelter
against wind. AVOID areas with heavy pollution and where crop spraying may be in progress.
1. Refer to Owner’s Handbook for all prior steps to tent inflation. Page 9.
2. Open the AIR OPUS®trailer door and locate the pump switch within the electrics panel.
3. Remove inflation valve screw cap and fit the hose into the inflation valve.
4. Ensure the 12v system is turned on.
5. Ensure all the external AIR valves are closed to allow for inflation and ensure all internal valves are open.
6. Press the pump switch to begin inflation.
7. Secure the tent canvas over the bed ends as the AIR tent inflates.
8. Once fully inflated to the correct pressure the pump will automatically cut out.
9. Disconnect pump hose from inflation valve and fit inflation valve screw cap to prevent any loss of
tent pressure.
10. Close all internal valves (keep valves closed whilst product is in use).
11. Attach roof lining to internal fixings if required. The roof lining is clipped into place along the
roof of the tent, it attaches in a similar way to the inner bed tents. It provides a lining that is
designed to keep the warmth in during the winter, and the heat out in the summer. It is an optional
installation and blocks out the ceiling windows.
12. Attach inner bed tents to internal fixings at both bed ends.
13. (If applicable) Install LED lighting into zipped PVC pockets on AIR tent roof beam, route cabling
through AIR pole sleeving down to socket and connect. Once installed the LED lighting can stay
fitted permanently, but it must be disconnected from the socket before pack down.
14. Continue from Page 13 of the Owner’s Handbook for all remaining setup steps.
PACK DOWN
Please ensure canvas is dry before packing down.
1. Refer to Owner’s Handbook for all prior pack down steps. Page 24.
2. Ensure the inflation hose has been disconnected from the inflation valve, this will prevent the
valve from getting damaged during pack down.
3. Ensure all inner bed tents are fully unzipped, this will prevent damage during pack down.
4. Open all internal valves.

2
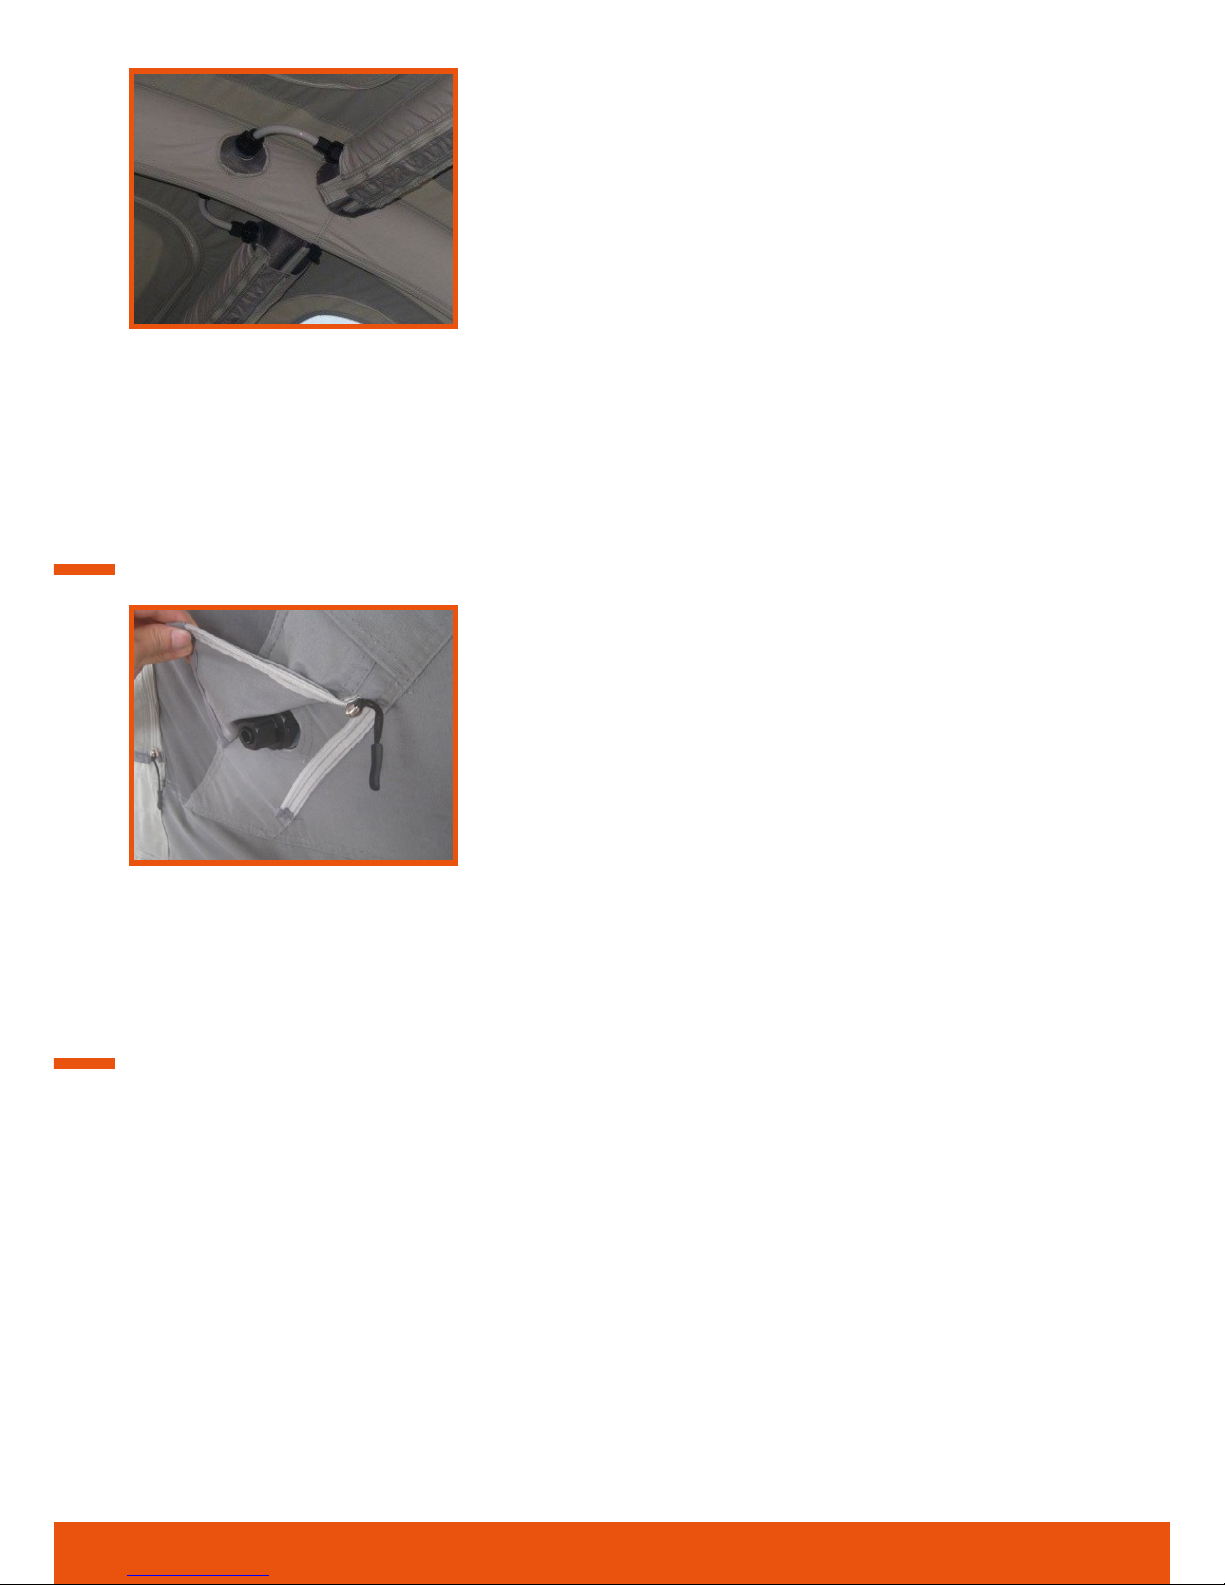
5. Open all external valves.
6. Carefully fold canvas into body of trailer as deflation takes place.
7. Ensure all canvas is inside the body of the trailer and folded neatly with no obstructions.
8. Ensure 12V system is turned off.
9. (If applicable) Disconnect all LED lights from the sockets, this will prevent the sockets and/or AIR
OPUS®from getting damaged during the pack down process.
10. Refer to Owner’s Handbook for all following steps. Page 26.
WEATHERING/FABRIC
Your AIR OPUS®Tent has been manufactured using a polyester/cotton fabric. Before a polyester/
cotton canvas is used for the first time, it is important that the tent is weathered. Inflate the AIR
tent following the inflation instructions when rain is expected. When the cotton becomes wet for
the first time, the weave of the cotton will close. There is no predetermined time for weathering so
please do not be surprised/concerned if there is a small amount of leakage through the canvas and
seams the first few times it rains.
Your AIR OPUS®Tent is made from the best available materials. On first examination, you may find
some slight variances in colour, thick threads, pigment stains and changes due to the weather and
then environment. These are all normal and will not affect the performance of the product and are
not faults or errors.
When your AIR OPUS®is not inflated, the window material may pick up some impressions from zips,
tape, seams etc. This is quite normal and some of these impressions will disappear over time but
some may remain. This is not a fault.
Please ensure your AIR tent is only packed away when completely dry. A wet/damp canvas will
develop mildew/mould very quickly and damage your canvas permanently.
The inside and outside of your AIR tent can be cleaned but only with fresh clean water and a damp
cloth. UNDER NO CIRCUMSTANCES MUST DETERGENTS OR CHEMICAL CLEANERS be used as these
will damage your tent.
You may also experience, depending on the weather and use, condensation. This should not be
confused with leakage. To reduce the risks of condensation, please ensure your AIR OPUS®is
adequately ventilated. Please note that under certain conditions, all tents will suffer from internal
condensation depending on atmospheric conditions, the weather, the amount of moisture in the air/
ground, evening and night time temperatures etc. Condensation can be quite severe causing a film
of water on the inside of your tent (roof and sides) which may drip onto items in your AIR OPUS®
and in severe conditions can leave puddles of water.
Zips should be treated with care, use two hands when closing and opening and do not step on them
during set up or take down. Never force a zip. If a zip opening is tight it is more than likely due to
the fact that your awning is not pitched correctly. Candle wax may be used to help a zip run more
smoothly.
Please remember that your AIR tent is a temporary structure made from natural fibres. Please note
that in fibre products used in outdoor applications, product life may be low because of attack from
UV or acid rain. Discolouration of the fabric may be an early indication that your tent has been
attacked. To limit damage by UV, where ever possible, please site your AIR OPUS®in a shaded area
avoiding direct sunlight. Please be aware that continuous exposure is a more serious problem than
intermittent exposure, since UV attack is dependent on the extent and degree of exposure. Fabrics

can be weakened by prolonged exposure to sunlight and use for extended periods in strong
sunlight will soon cause deterioration. UV degradation is not covered under the AIR OPUS®
warranty. The warranty does not cover air tents used permanently or for display purposes.
WEATHERING OF SPECIAL THREAD USED FOR SEWING
Your AIR OPUS®tent has been manufactured using a special thread which expands and swells to
close the holes made when stitching the product. The thread swells and expands when wet.
It may take a few times for the holes to completely close.
INFLATABLE TECHNOLOGY
The technology used in your AIR OPUS®comprises of inflatable bladders, retained within a
specially constructed grey tube which is held in position with a retaining sleeve within the tent/
flysheet. The zips on the grey sleeves are fastened with a fabric tie and should only be untied if
you need to replace or repair a bladder. If you remove the ties fastening the zips, please ensure
you secure the zips with the ties, in a closed position before re-inflation.
IMPORTANT! UNDER NO CIRCUMSTANCES REMOVE FASTENING TIES AND
UNFASTEN ZIPS WHILE BLADDERS ARE INFLATED. FAILURE TO FOLLOW THIS
INSTRUCTION WILL RESULT IN BLADDER FAILURE.
Please note that it may be necessary to monitor the AIR pressure in your AIR tubes from time to
time, especially if the weather is fluctuating or the temperature is higher than average or colder
than average.
Hot Weather - when the outside temperature rises it is probable that the pressure in the AIR
tubes may increase and it will therefore be necessary to monitor the AIR tubes and release AIR
using the external valves as required.
Cold Weather - a drop of pressure should not be considered a leak or puncture until further
investigated. When the outside temperature drops it is probable that the pressure in the AIR tubes
may decrease and it may therefore be necessary to monitor the AIR tubes and top up the AIR
pressure as necessary.
A repair kit is enclosed with your AIR tent and includes an emergency repair patch for repair of
small holes in your bladder.
INFLATION
The white valve in your AIR OPUS®Tent is your master valve. This
valve is located on the centre AIR beam, positioned behind the
fridge.
Ensure all external AIR valves are closed to allow for inflation and
ensure all internal valves are open.
AIR OPUS®inflatable tubes need 7psi of pressure to give a rigid
support. Your AIR OPUS®tent is supplied with a built in electric
pump which is attached to the Master Valve and pre-set to inflate
to 7psi.
3

Your pump is set to inflate only. Do not tamper with the
pump and do not attempt to use the pump to deflate your
AIR OPUS®.
To inflate switch the pump ‘ON’ - using the button
provided in the electrics panel.
The pump will automatically cut out once the required
pressure has been achieved.
The internal AIR valves on the tubes are open to enable inflation.
Once inflated, these should be closed and only opened again when you are deflating/taking down
your AIR OPUS®(or replacing a faulty bladder).
Continue setting up your AIR OPUS®using the Owner’s Handbook P9
DEFLATION
Ensure interior pack-down is completed first - refer to P24
of the Owner’s Handbook.
Please ensure your AIR tent is dry before taking down. If it
is necessary to pack away your tent while it is wet, please
dry it as soon as possible to avoid damage to the fabric
and components.
Open all internal AIR valves. Then open all external AIR
valves found in the external valve pockets. There are 5
external valves all located on the rear of the AIR OPUS®. As the canvas deflates carefully fold the
canvas into the trailer. Ensure all canvas is housed inside the trailer body.
Continue pack-down procedure in the Owner’s Handbook.
SAFETY - PLEASE BE AWARE
Remember your AIR OPUS®tent can burn - follow these rules to ensure maximum safety.
• Do not smoke near or in your AIR OPUS®.
•Always observe the safety instructions for the appliances used within your AIR OPUS®.
•Keep exits clear.
•Never allow children to play near lighted appliances.
•Please ensure you are fully aware of the dangers of carbon monoxide poisoning and take
precautions at all times.
ALTERATIONS
Alterations made to the AIR tent are made at the owner’s risk and will invalidate your warranty.
4

AIR TENT BUNGEE SECURING POINTS.
IMPORTANT!
IT IS NORMAL FOR THE BUNGEE CORDS ON YOUR NEW OPUS®
TO BE TIGHT, IT IS THEREFORE RECOMMENDED THAT NOT ALL TIE DOWN
POINTS ARE USED INITIALLY. WE RECOMMEND ONLY USING THE LOCATIONS
SHOWN BELOW TO START WITH, AND AS THE BUNGEES LOOSEN WITH TIME
THE OTHERS CAN BE USED IF REQUIRED.
PLEASE ENSURE THAT BUNGEES ARE PULLED SIDEWAYS, RATHER THAN
DIRECTLY DOWN TO EXTEND THEM INITIALLY BEFORE PULLING THEM OVER
THE CLEATS. THIS WILL PREVENT THE EYELETS FROM CATCHING ON THE
BUNGEES AND CAUSING DAMAGE TO THE TENT
FRONT
5 Locations to be used as shown in green and numbered below.
SIDES
NOTE: Side bungees may only be required under heavy wind conditions.
On the 4 outer roof supports (2 on each side of the OPUS®) use the tie down point as shown in the
image OUTER ROOF SUPPORT overleaf, also indicated by number 1.
1 2 3 4 5
5

Use both tie down points on the centre roof supports. Securing 4 points in total - 2 on each bed
end. As shown below titled CENTRE ROOF SUPPORTS.
REAR
6 Locations to be used as shown in green and numbered below.
OUTER ROOF SUPPORTS CENTRE ROOF SUPPORTS
1
1 2 3 4 5 6
6

AIR AWNING.
7
PARTS LIST FOR AIR AWNING
1. AIR Awning with sewn in side pods
2. Inner Tents x 2
3. Pegs and ladder bands x 32
4. Webbing Straps x 10
5. PE Groundsheet x 1
6. Repair Kit x 1
ASSEMBLY
Try to choose a site that is relatively flat. Avoid sites where the land may flood or where water will
run down. DO NOT pitch directly under trees. Pitching near a hedge or wall may provide shelter
against wind. AVOID areas with heavy pollution and where crop spraying may be in progress.
1. Remove AIR Awning from the carry/storage bag.
2. Ensure the ground is free of stones and other sharp objects. Unpack and spread the AIR awning
on the ground.
3. Attach front skirt to the AIR OPUS®.
4. Slide the zip on the back of the AIR awning onto the zip on the front of the AIR tent. The zip is
located under the flap above the front door.
5. Temporarily peg the 4 corners of the flysheet in line with your AIR OPUS®tent. You may need to
re-peg these at a later stage.
6. Join the Velcro patches on the AIR awning and AIR tent (top and both sides).
7. Ensure the AIR tent and AIR awning are totally connected.
8. Ensure all external AIR valves are closed to allow for inflation and ensure all internal valves are open.
9. Locate the main inflation valve which is located at the front of the middle AIR beam.
10. Attach the pump extension to the pump and connect the pump nozzle into the main inflation
valve and press the button to activate the pump.
11. The AIR awning will inflate, the pump will automatically switch off when the pressure has
reached 7psi.
12. Close all internal valves. We recommend you keep all valves closed whilst product is in use.
4. 6.

8
13. Close all zip entrances on the awning’s flysheet and peg out the storm straps and guy lines.
Start with rear corners then peg the front corners, ensuring that there is no slack material between
the four corners. Peg the remaining pegging points, cross pegging the doorways and entrances.
Adjust the guy lines and storm straps as necessary.
14. Your AIR awning includes a groundsheet which may be used by carefully matching its Velcro to
the relevant Velcro on the awning flysheet and the AIR tent skirt.
15. If required attach inner tents to internal fixings at both ends of the awning. The fixings are
colour coded.
16. There are zipped PVC pockets for the use of LED light strips (optional extra) within some of
your AIR awning roof beams.
13.
15.
16.

9
PACK DOWN
IMPORTANT! PLEASE ENSURE BOTH AIR TENT AND AIR AWNING ARE
COMPLETELY DRY BEFORE TAKING THEM DOWN AND PACKING THE UNIT
AWAY.
1. Open all internal valves.
2. Open all external valves.
3. Undo the Velcro patches attaching the AIR tent and the AIR awning. Then unzip the AIR awning
from the front zip located on the AIR tent.
4. Carefully fold the AIR awning canvas and place it back into carry/storage bags.
IMPORTANT! PLEASE READ P2-4 WITH INFORMATION ON WEATHERING,
TECHNOLOGY, INFLATION, DEFLATION, SAFETY, ALTERATIONS AND
WARRANTY. ALL TEXT APPLIES TO THE AIR AWNING AS WELL AS THE
AIR OPUS®TENT.

10
TROUBLE SHOOTING.
PUMP
•Pump not working
> Check that the 12v system of your AIR OPUS®is turned on.
> Check 20A fuse (yellow) on the fuse panel in the unit under the fridge,
replace if needed.
•Pump seems to cut out before tent is fully inflated
> Check that the pump pressure dial is set to the correct setting on 7PSI.
> Ensure that AIR poles are not folded, which would restrict AIR flow, on occasion they
may need gentle assistance in popping up.
•The main tent is taking a longer time than usual to inflate
> Ensure that all external AIR release valves are in the closed position.
> Ensure that your AIR OPUS®leisure battery is fully charged.
•The awning is taking a longer time than usual to inflate.
> Ensure that all AIR release valves are in the closed position.
> Ensure that your AIR OPUS®leisure battery is fully charged.
> Ensure that the pump extension hose is fastened properly, as any AIR leaks will prevent
the pump from reaching its correct pressure.
OTHER
For any other troubleshooting issues please contact your place of purchase for further assistance.
Spare parts are available if required. Please refer to the warranty section on Page 9 for further
information on warranty inclusions and exclusions.

11
WARRANTY.
YOUR AIR OPUS®TENT AND/OR AWNING ARE COVERED BY A WARRANTY
FOR A 12 MONTH PERIOD FROM THE DATE OF COLLECTION. THE AIR TUBE
TECHNOLOGY IS COVERED FOR A PERIOD OF 24 MONTHS FROM THIS DATE.
FOR WARRANTY AND AFTERSALES, PLEASE CONTACT YOUR SUPPLYING
DEALER IN THE FIRST INSTANCE.
OPUS®will bear the costs of labour and parts (transportation excluded) on goods
repaired under this warranty provided that:
• Faults are attributable to flaws or defects in materials or workmanship only.
•The directions in the owners manual have been thoroughly observed at all times.
•Unauthorised repairs have not been carried out.
Items or Repairs not covered under this warranty include:
• Defects resulting from wear and tear through normal use.
• Defects resulting from misuse, accidental, storm or wilful damage.
• Damage resulting from improper storage or maintenance.
• Negligence or damage resulting from unauthorised repairs.
• Bladder damage including, but not limited to, over inflation, unnecessary release of
the sealed zips on the black holding tubes etc. Please note that the inflatable bladders
are subject to wear and tear and are a replaceable item.
• General wear and tear to flysheet and all components including but not limited to guy
lines, storm straps, ladder pegging bands etc.
• Slubs within the fabric which are a natural characteristic.
• Damage caused by packing your tent/awning away wet including but not limited to
colour transfer/dark coloured fabric transferring to lighter coloured fabric, mould etc.
• Damage caused by or as a result of extremes of weather including but not limited to
storms, wind, cold etc.
• Moisture appearing on the inside of the flysheet caused by condensation including but
not limited to weather conditions, insufficient ventilation etc.
• Leakage through seams due to excessive abrasion.

• Damage caused from misuse of the pump, including but not limited to tampering
with the pump system, adjusting the pre set pressure of the pump etc.
• Leakage through seams including main seams where it has not been possible to apply
seam sealant during the manufacturing process or where tape has peeled away, or
where taping is broken during the manufacturing process because of the necessity to
incorporate tie points, suspension points etc.
• Damage due to over-tensioning including but not limited to, damaged seams, zips,
pegging points etc.
• Broken or damaged zips caused by undue force, jamming, incorrect pegging etc.
• Broken buckles/pegging points subjected to over tensioning/undue force etc.
• Damage sustained due to cooking inside or near the awning/tent.
• Damage caused by UV degradation or acid rain to the tent/awning and its
components.
• Damage caused by jumping, bouncing, launching yourself onto or off any AIR tube or
twisting, bending, wrenching or handling any AIR tube in any such manner which will
inevitably cause damage.
• Products used on permanent sites, displays or commercial use by rental companies.
• Transportation or shipment costs to and from the manufacturer or their recognised
agents/dealers for repair or assessment against a warranty claim.
THIS DOES NOT AFFECT YOUR STATUTORY RIGHTS.
The manufacturer and/or their recognised agents/dealers, directors, employees or insurers will not
be liable for consequential or other damages, losses or expenses in connection with or by reason
of the inability to use the product for any purpose.
NOTE: Any claim(s) arising due to missing parts or faulty goods MUST be made before
use. The manufacturer will not be responsible for any claims regarding missing parts or
faulty items where the product has not been checked by the user prior to use.
Once you have received authorisation, please return the OPUS®to your place of purchase for
inspection. The cost of transportation is not covered under this warranty. In the event of the
product being returned for assessment, it must be sent in a completely dry and clean condition.
Please ensure all personal possessions are removed. Failure to do this will also deem the product
unfit for inspection.
This warranty is not transferable.
Register your OPUS®warranty online within 14 days of collection at:
www.purpleline.co.uk/product-registration
12

13
WOOD MAINTENANCE (OPTIONAL UPGRADE BAMBOO)
ROUTINE CARE
• Always mop up spills of water and other liquids straight away. Do not allow liquids to stand on
wooden work surfaces for any period of time (the finishing oil is water resistant, not water proof).
• Always use pan stands and trivets to protect the timber from hot, rough, wet, dirty pots and
pans, direct contact from iron, steel or copper vessels can also stain the bamboo surfaces.
• Always use cutting boards to chop and slice food. Do not cut directly onto the work surface.
• Clean the tops with a sparing amount of warm water, a drop of washing up liquid and a well
wrung out cloth. We do not recommend using multi-purpose cleaning products which contain
chemicals as this may damage the worktops. Please also avoid the use of scouring pads. If a
scouring pad is used, the worktop may need to be re-oiled afterwards.
• It is important that the bamboo surfaces are re-oiled at regular intervals to remain in
the same condition as when installed. The time span between oiling is dependent on the
degree of use and wear they receive. We recommend that in the first year of ownership the
bamboo is re-oiled every 3 months to build up a protective layer and then yearly thereafter to
maintain this.
• Ensure that the OPUS®remains open after oiling for the full drying time specified by the oil
manufacturer.
SURFACE CARE
The surfaces of the timber worktops have been finished with specifically formulated oil. The oil
is formulated to be safe for the preparation of food and to enhance the wood colour and grain
pattern; to provide a durable, protective surface over the natural bamboo structure, whilst being
easy to look after and restore when the surface becomes worn.
When the top is newly oiled and the surface is in good condition, it will have a sheen to it.
Splashes of water will form into properly defined droplets that stand up clearly. After a period of
use the finish will become worn; the sheen will diminish and the surface become dull. Water will
not form into droplets as readily but tend to spread out and wet the surfaces. This is a clear sign
that the worktop needs re-oiling. In fact it is better to re-oil before the surfaces reach this
condition.
The time taken for wear to occur depends on the amount of use the surfaces have had. In any one
kitchen there will be both high and low wear and tear zones, the former needing more attention
than the latter.
NOTE: It is not uncommon for different levels of porosity in the natural wood, this may mean that
certain areas of your OPUS®bamboo do not take fully to the original coats of oil. If you find that
water droplets do not form in areas when in contact with liquids, dry and re-oil immediately.
DAMAGE REPAIR
One of the many advantages to a natural wood is its repair-ability. In the unlikely event that the
bamboo gets damaged or stained, it can be sanded and re-oiled to bring it back to an as new
condition.

General Enquiries: enquiries@opuscamper.co.uk
Marketing Enquiries: marketing@opuscamper.co.uk
Warranty Enquiries: warranty@opuscamper.co.uk
www.opuscamper.com
01473 601200
OPUS®Terms & Conditions and Warranty information can be found online at:
www.opuscamper.co.uk/terms-conditions.html
Photographs and diagrams are for illustration purposes only.
Actual product may vary and any specifications are subject to change without prior notice.
All information correct at time of print. Purple Line Ltd 2017.
UK Patent No. 2500946A
REVISION NUMBER: OFC195C-AO-UM-0717-Rev.B
This manual suits for next models
1
Table of contents