air sniper DCU-300 User manual

Air Sniper DCU-300
USER MANUAL

Tel: 1-866-466-2592 Email: info@airsniper.ca Web: www.airsniper.ca
EPA Facility Registration Number 100516-CAN-1
2
A WORD TO AIR SNIPER OWNERS
At Air Sniper, we design and build air sanitization systems with complete customer
satisfaction in mind. To assure trouble-free operation of your air sanitization
system, please read this manual and follow installation recommendations.
An authorized Air Sniper representative will know the system best, and if service or
maintenance is needed, the Air Sniper team is here to help. Our team is dedicated
to providing you with the best possible service and assuring your satisfaction with
our product.
For inquiries, questions or concerns regarding the unit, or any other Air Sniper
products contact:
1.866.472.1059
Air Sniper Bay 11
6565 40th Street S.E.
Calgary, AB Canada T2C 2J9
Call, email or fill out the online form and one of our customer
service specialists will get in touch with you.
© AIR ALPINE INNOVATIVE RESEARCH INC. All rights reserved. This document is subject to change without notice.
All Air Sniper trademarks and logos are owned by Air Sniper or one of its affiliates. Unless expressly noted, names and brands of third parties that may be used in this
document are not used to indicate an affiliation or endorsement between the owners of these names and brands and AIR ALPINE INNOVATIVE RESEARCH INC.
Those names and brands may be the trademarks or registered trademarks of those third parties. Because we are continuously improving our products and
services, Air Sniper reserves the right to change specifications without prior notice. Air Sniper is an equal opportunity employer.

Tel: 1-866-466-2592 Email: info@airsniper.ca Web: www.airsniper.ca
EPA Facility Registration Number 100516-CAN-1
3
TABLE OF CONTENTS
HOME PAGE ............................................................................................... 1
AWORD TO AIR SNIPER OWNERS............................................................. 2
TABLE OF CONTENTS ................................................................................. 3
IMPORTANT SAFETY INSTRUCTIONS..................................... 4
ABOUT YOUR UNIT ...................................................................................... 5
DESIGN......................................................................................................... 5
FEATURES ................................................................................................... 6
SPECIFICATIONS......................................................................................... 6
INCLUDED PARTS ....................................................................................... 7
INSTALLATION ......................................................................................... 8
INSTALLATION CONCLUSION................................................................... 12
BULB STATUS ............................................................................................ 12
CONTROLLER DIAGRAM........................................................................... 13
TROUBLESHOOTING........................................................................ 14
ADDITIONAL FACTORS ............................................................................. 14
REPLACING YOUR UNIT............................................................................ 15
WARRANTY.............................................................................................. 16

Tel: 1-866-466-2592 Email: info@airsniper.ca Web: www.airsniper.ca
EPA Facility Registration Number 100516-CAN-1
4
IMPORTANT SAFETY INSTRUCTIONS
WARNING: NEVER EXPOSE SKIN OR EYES TO UV LAMP WHEN OPERATING
Read and follow all instructions prior to installation. Read the directions and all safety
labels prior to operation. Failure to follow any instructions or labels may result in
injury of the user or damage to the unit. Save this manual for future reference.
1.
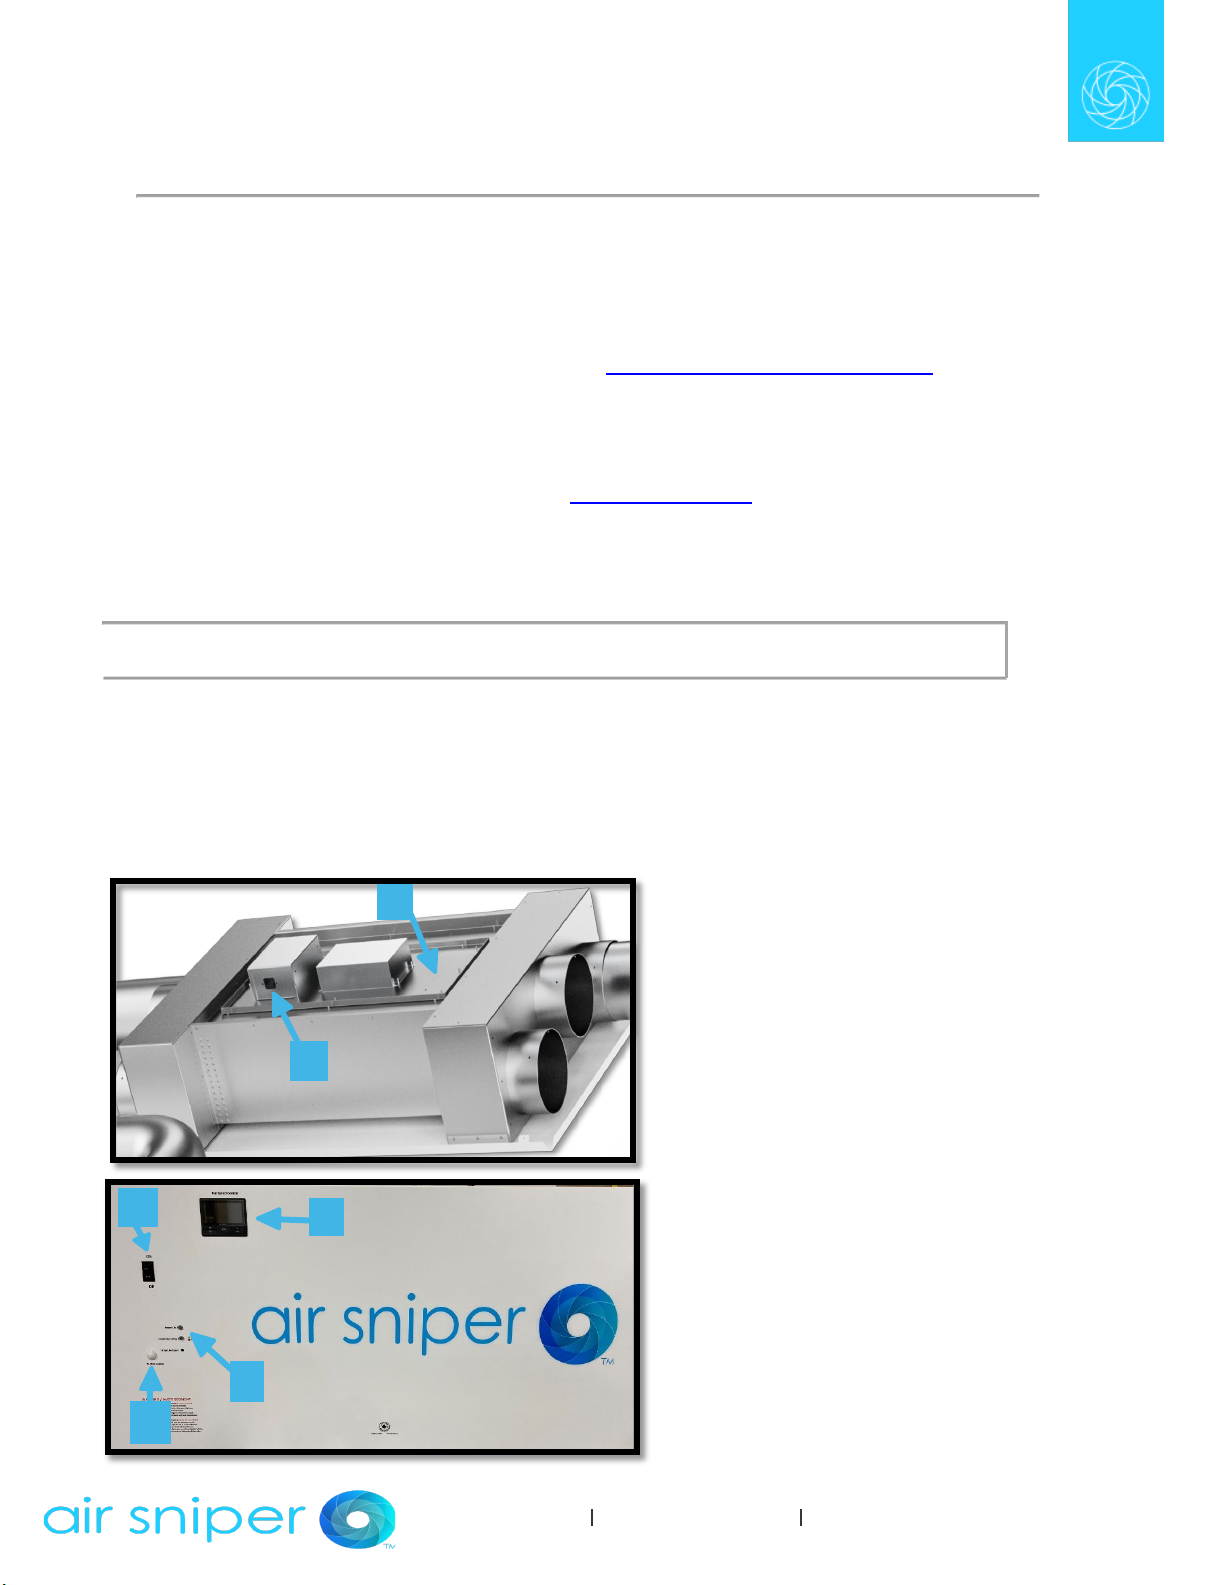
The DCU-300 unit is intended to be used for
air sanitization inside of a sealed air chamber.
Do not attempt to operate the UV-C lamps
outside of the sealed housing.
2.
Electrical shock may cause Injury or possible
death. Ensure that the unit is turned off and
disconnected from the power source prior to
installation or replacement.
3.
Untrained personnel can perform installation
and replacement of the unit as per the
instructions within this manual. Do not
attempt to perform any maintenance on your
unit. Improper maintenance can result in
damage to the unit and injury of the user. If
your unit requires maintenance, please
contact Air Sniper. Replacement of the UV-C
lamp by the user is not allowed.
4.
Do not attempt to modify your unit.
Modification of this unit may result in injuries
to the user or damage to the unit.
5.
Inspect your unit for any abnormalities or
damage prior to installation and use.
Damaged units can result in harmful UV-C
leaks. Do not operate units that are damaged.
6.
If the supply cord is damaged, it must be
replaced by the manufacturer, a service agent
or similarly qualified persons in order to avoid
a hazard.
7.
This appliance contains a UV-C emitter. UV-C
lamps contain small amounts of mercury. If the
lamp is broken or damaged, clean and
dispose of it properly as per your local safety
regulations.
8.
The DCU-300 unit is not to be used by
persons (including children) with reduced
physical, sensory or mental capabilities, or a
lack of experience and knowledge, unless
properly supervised. Children shall be
supervised so that they do not to play with the
unit.
9.
It is recommended a minimum of 2 people are
present when installing the unit. Units can be
heavy and require care and precision when
installing.
10.
Air Sniper products are not waterproof. Do not
attempt to use your unit in a wet environment.
11.
Air Sniper products are designed for indoor
use only. Do not attempt to install your unit
outdoors.
12.
The use of this device is a supplement to and
not a substitute for standard infection control
practices; users must continue to follow all
current infection control practices related to
cleaning and disinfection of environmental
surfaces.
13.
The DCU-300 unit does not require cleaning to
continue to operate effectively.
14.
FIRST AID INSTRUCTIONS: If Injury occurs,
contact your doctor or appropriate emergency
services.
15.
WARNING: UV RADIATION EMITTED
FROM THIS DEVICE. Unintended use of the
appliance or damage to the housing may
result in the escape of dangerous UV-C
radiation. UV-C radiation may, even in small
doses, cause harm to the skin and eyes

Tel: 1-866-466-2592 Email: info@airsniper.ca Web: www.airsniper.ca
EPA Facility Registration Number 100516-CAN-1
5
ABOUT YOUR UNIT
Thank you for purchasing the Air Sniper DCU-300 air sanitizing unit. Following installation,
you will be able to enjoy air sanitization that is proven to kill 99.97% of airborne
contaminants passing through the unit while producing no ozone. All Air Sniper products
are tested and verified in independent laboratories and are manufactured in North
America. Find the test results here: https://airsniper.ca/test-results/
For more information on the DCU-300 unit and all other Air Sniper products and services,
call (Toll Free) 1-888-338-9549, visit www.airsniper.ca or email Air Sniper at
info@airsniper.ca with any questions, comments or concerns.
DESIGN
The DCU-300 unit is made up of several key components listed below.
The DCU-300 unit is designed to be installed to allow for continuous sanitization of airflow up
to 1,200 CFM. For greater airflow environments, multiple units may be necessary.
1.
300w UV-C Lamp (Enclosed)
2.
Power Cord Port
3.
On/Off Switch
4.
Control Monitor
5.
LED Indicators
6.
Motion Sensor (Optional)
3
4
1
2
6
5

Tel: 1-866-466-2592 Email: info@airsniper.ca Web: www.airsniper.ca
EPA Facility Registration Number 100516-CAN-1
6
FEATURES
- 300 Watt UV-C Induction Lamp
- 6+ Year Lamp Life (55,200 Hours)
- 3x Centrifugal In-Line Fan
- Easy-Fit Ceiling Tile Mount
- Plug & Play
- Control Monitor
- Bluetooth Enabled
- Optional Motion Sensor
SPECIFICATIONS
Power Supply
Single Phase, 100v - 240v - A/C 50/60 Hz
Energy Consumption
5.5 Amp Max @100-120v - A/C
Or
2.8 Amp Max @220-240v – A/C
Operating Temperature Range
-25°C / 100°C
Power Control Systems
On/Off Switch, Control Monitor, Optional
Motion Sensor, Airflow Pressure Sensor
Bulb Life
55,200 hours (6+ years) of high intensity
UV-C.
Electrical Safety Certification
Field Certified
Ozone Certification
Field Certified
Weight
Lamp Assembly: 15 lbs (7 kg)
Fan Assembly: 15 lbs (7 kg)
Dimensions
Lamp Assembly: 11” (H) x 24” (W) x 48” (D)
Fan Assembly: 8.6” (H) x 24” (W) x 48” (D)
Housing Material
Aluminum
CFM
400-1,200 CFM

Tel: 1-866-466-2592 Email: info@airsniper.ca Web: www.airsniper.ca
EPA Facility Registration Number 100516-CAN-1
8
INSTALLING YOUR UNIT
CAUTION: Use care when unboxing and handling your unit. Ensure adequate space is
available for unboxing, installation, and operation prior to attempting to handle your unit.
Ensure that the intended placement of your unit allows access to the necessary power
requirements and does not create a hazard once connected.
REQUIRED TOOLS
Ladder for ceiling access
Safety cables
Drill/screwdriver
Aluminum air duct tubing
INSTALLATION
To Install the DCU-300 unit:
1. Remove from packaging
a. Carefully remove your DCU-300 unit, 10’ power cable and AC Infinity
Fan Manual from the packaging.
b. Inspect the unit and all components, make note of any damage or
defects that may have occurred during shipment.
If after opening your unit you notice any missing or
damaged components, please contact your Air Sniper
representative for immediate assistance.
(Toll Free) 1.888.338.9549
www.airsniper.ca

Tel: 1-866-466-2592 Email: info@airsniper.ca Web: www.airsniper.ca
EPA Facility Registration Number 100516-CAN-1
9
2. Prepare location for installation
a. Prior to installation of either the lamp or fan assembly, be sure to note where the
units will be mounted and where the air intakes and outputs are intended to be.
This will determine the amount of aluminum air duct tubing necessary to
complete installation. If using the motion sensor add-on, consider the placement
to ensure there will be a consistent detection of motion.
b. The lamp assembly is designed to drop into a 24” x 48” space in a metal T-Bar
ceiling, with at least 24” clearance above the T-Frame.
c. The fan assembly is designed to drop into a 24” x 24” space in a metal T-Bar
ceiling, with at least 17” clearance above the unit.
d. Turn off all HVAC equipment prior to installation.
To Return
Air Grill
To Supply
Air Grill
Standard Flexible Dryer
Ducting Tube
Typical In 3 Places

Tel: 1-866-466-2592 Email: info@airsniper.ca Web: www.airsniper.ca
EPA Facility Registration Number 100516-CAN-1
10
3. Installing the unit - Lamp Assembly
a. Once a 24” x 48” opening in the ceiling has been prepared, drop the lamp assembly
into the space.
b. Secure the lamp assembly into the ceiling mount opening by connecting the support
cables to the 4 connection points as detailed below.
Fan
Assembly
Lamp
Assembly
Safety Cable
Mounting Point

Tel: 1-866-466-2592 Email: info@airsniper.ca Web: www.airsniper.ca
EPA Facility Registration Number 100516-CAN-1
11
4. Installing the unit – Fan Assembly
a. Once a 24” x 24” opening in the ceiling has been prepared, drop the fan assembly
into place.
b. The fan assembly is supplied with a power cord designed to connect with the lamp
assembly. Ensure the mounting location allows for this connection.
c. Secure the fan assembly into the ceiling mount by connecting the support cables to
the 4 connection points same as the lamp assembly diagram. (See page.10)
d. Once the fan assembly is secured, using the aluminum air duct tubing, connect the
fan assembly to the installed lamp assembly. (See page.9)
e. Attach the plug from the fan assembly to the lamp assembly and tidy up the length
of the cord.
5. Installation Continued
a. After the DCU-300 is secured, using aluminum air duct tubing connect the lamp
assembly to the installed fan assembly. (Ensure that the number of ducts
corresponds to the installed number of fans, block off all unused ducts on the unit.)
Verify that the desired intake and output aluminum duct tubing is also installed.
b. The DCU-300 is supplied with a 10’ power cord with a standard male plug for
connecting to a standard electrical outlet. The installer is responsible for
connecting the 110 – 120v or 220 – 240v power correctly in the form of hard wiring
a plug or utilizing an extension cord if needed.
c. The DCU-300 is ready for operation. Turn on the unit by flipping the black On/Off
switch and the “Power On” LED will illuminate green. The DCU-300 will activate as
soon as adequate airflow is detected or the motion sensor is activated.

Tel: 1-866-466-2592 Email: info@airsniper.ca Web: www.airsniper.ca
EPA Facility Registration Number 100516-CAN-1
12
INSTALLATION CONCLUSION
1. The “Power On” LED should illuminate, if not turn the unit back off and inspect
the cable connections to verify the unit is properly connected.
a. If all the connections are correct and the outlet is tested to verify the
unit is receiving power but the “Power On” LED still isn’t illuminated,
turn your unit off and contact an Air Sniper representative.
2. Once airflow is detected, the “Lamp Operating” LED will illuminate, indicating
the UV-C Lamp is on. If using optional motion sensor, the unit will turn on after
detecting motion and remain on for 45 minutes to an hour if no further activation
occurs.
BULB STATUS
The “Lamp Operating” LED can illuminate three different colours, indicating differing bulb
status.
The variations are as follows:
Green: Lamp operating, the lamp is operating as intended.
Yellow: Lamp life warning, the lamp is nearing the end of its
lifespan, requires replacement in near future.
Red: Lamp life exceeded, lamp has reached the end of its lifespan,
requires immediate replacement.
When the “Lamp Operating” LED color is yellow indicating “Lamp Life Warning”, please
contact your local distributor or an Air Sniper representative directly for a replacement.

Tel: 1-866-466-2592 Email: info@airsniper.ca Web: www.airsniper.ca
EPA Facility Registration Number 100516-CAN-1
13
CONTROLLER DIAGRAM
1. Mode Button – Cycles through all of the controller’s modes.
2. Up/Down Buttons – Adjusts the parameters of the mode or settings you are viewing.
3. Setting Button – Cycles through all of the controller’s settings.
PROGRAMMING MODES
•OFF Mode – Set the device to turn off.
•ON Mode – Set the device to run continuously at a level from 0 to 10.
•AUTO Mode – Set temperature and humidity triggers that will turn the device on or off.
•TIMER TO ON Mode – Set a one-time countdown that will turn the device on once it ends.
•TIMER TO OFF Mode – Set a one-time countdown that will turn the device off once it ends.
•CYCLE Mode – Set an on and off duration that your device will repeat continuously.
•SCHEDULE Mode – Set an on and off clock time that your device will repeat daily.
SETTINGS THAT AFFECT PROGRAMMING
•Max and Min Level Setting – Set the maximum and minimum level a device can run at,
which affects all modes.
•Transition Setting – Set the device to ramp up in levels gradually as the temperature and
humidity gets further away from your set target. Only affects AUTO Mode.
•Other Settings – Other controller settings including switching between F° and C°, display
brightness, sensor calibrations, and more.

Tel: 1-866-466-2592 Email: info@airsniper.ca Web: www.airsniper.ca
EPA Facility Registration Number 100516-CAN-1
14
TROUBLESHOOTING
If your unit is not operating as expected, there are several steps you can take to attempt to
correct the problem.
If the “Lamp Operating” LED is not illuminating after powering on:
- Inspect the unit and the power cable to verify nothing appears damaged.
- Check that the selected power source is in fact providing power to the unit.
- Check that the On/Off switch is flipped to the on position.
- Once airflow is established, the lamp indicator light will be lit.
- Check that both ends of the 10’ power cable are securely connected to the
unit and the power source.
WARNING: Do not attempt to operate the UV-C lamp outside of the unit
enclosure. UV-C radiation is extremely harmful to unprotected skin and eyes.
ADDITIONAL FACTORS
Given that air pressure can change at differing elevations and differing humidity levels, for
safety reasons the lamp requires a minimum value of airflow to ensure safety.
If the “Lamp Operating” LED is not illuminated and you’ve verified
a correct setup and proper installation. Try increasing the airflow
and/or fan speeds until it turns on.
If the “Lamp Operating” LED is not able to illuminate at any airflow
and/or fan speed please contact your Air Sniper representative at
1.888.338.9549 or email us at service@airsniper.ca.
REPLACING YOUR UNIT

Tel: 1-866-466-2592 Email: info@airsniper.ca Web: www.airsniper.ca
EPA Facility Registration Number 100516-CAN-1
15
The DCU-300 unit uses a built in 300w UV-C lamp with a lifetime of 6+ years (55,200
hours, based on 24/7 operation).
To track the life of the lamp on your unit, check the “Lamp Operating” LED colour when
the unit is powered on to determine the state of your unit. It is strongly recommended that
the unit be replaced when the “Lamp Life Warning” yellow LED is illuminated.
When the lamp life has been exceeded, the LED will glow red. Contact your local
distributor or Air Sniper representative to order replacements.
REPLACEMENT
WARNING: UV-C Lamps generate heat during operation, allow 20-30
minutes after unplugging the unit for the lamp to cool down.
1. Disconnect the expired unit from the power source. The 10’ power cable can also be
disconnected from the unit
2. Locate and remove the safety cables used to install the unit and carefully remove the
aluminum air duct tubing before removing the unit from the ceiling.
3. Insert a new DCU-300 unit into the ceiling. (Refer to Installation on page 8).
4. Place and tighten the safety cables back into place, securing the unit onto the ceiling
mount. Re-attach the aluminum air duct tubing.
5. Connect the 10’ power cable to the newly installed unit.
6. Using the On/Off switch, turn the unit on, verify “Lamp Operating” LED is illuminated.
7. Once the new unit is installed, carefully package the old unit with all included
equipment to ship to your local distributor or directly to Air Sniper for store credit.
WARRANTY
We take pride in the quality of our products. In the case of a defective piece of equipment,

Tel: 1-866-466-2592 Email: info@airsniper.ca Web: www.airsniper.ca
EPA Facility Registration Number 100516-CAN-1
16
AIR Alpine Innovative Research Inc. offers a limited five-year warranty on all our products
(excluding bulbs). In case of a discovered defect, we will replace or repair the unit.
Extended Warranty is available.
Limited Warranty Five Year Warranty
Alpine Innovative Research Inc. (AIR) warrants the Air Sniper™ unit to be free from defects in
the workmanship or materials under normal use and service (the “Warranty”) for a period of three
(5) years (the “Warranty Period”) from the date of purchase through an AIR-authorized
dealer/distributor. During the Warranty Period, should an Air Sniper™ unit be determined to be
defective, AIR shall repair or replace the defective Air Sniper™ unit(s) (at AIR or dealer’s option)
within a reasonable period.
Remedy Procedures
If the Air Sniper™ unit proves defective within the Warranty Period, the purchaser may choose
one of the following remedies, after contacting AIR for a Return Authorization Number:
1. Return the defective Air Sniper™ unit to the dealer/distributor from whom it was purchased
together with a copy of the bill of sale, or dated proof of purchase thereof and the Return
Authorization Number; or 2. Ship the defective Air Sniper™ unit directly to Air Alpine Innovative
Research Customer Warranty Department along with the Return Authorization Number.
Limitations
This Warranty is the only representation regarding the Air Sniper™ unit, by Alpine Innovative
Research Inc. of merchantability and fitness for use and shall extend to five (5) years from the
date of purchase. The warranty excludes replaceable UV-C bulbs. If it is determined by either
Alpine Innovative Research Inc. or an authorized dealer/distributor that the defect is the result of
damage caused by the purchaser, the Warranty is null and void.
Contact us with any questions, comments or concerns pertaining to this warranty at Air Sniper by
e-mail, telephone, or in-person at AIR, Alpine Innovative Research.
Customer Warranty Department
(Toll Free): 1.888.338.9549
Air Sniper Bay 11
6565 40th Street S.E.
Calgary, AB Canada T2C 2J9
Table of contents
Popular Fan manuals by other brands

Eberg
Eberg FLY instruction manual

Ventair
Ventair SPYDA SPY903NWH instruction manual

HeroCamper
HeroCamper HEAT 1500+ Installation guide and user's manual

Titus
Titus THH Series installation manual

Airflow
Airflow Duplexvent DV65 Entro-V User, maintenance and installation manual

Vents
Vents VENTS TT Series user manual