cds-fx cds-fx
cds-fx
18
english
WARNINGS
CAUTION
RISK OF ELECTRIC SHOCK
DO NOT OPEN
CAUTION:Toreduce the riskof electricshock, donotremoveany cover.
No user-serviceable parts inside. Refer servicing to qualified service
personnelonly.
The lightning flash with arrowhead symbol within the
equilateral triangle is intended to alert the use to the
presence of un-insulated “dangerous voltage” within the
product's enclosure that may be of sufficient magnitude to
constituteariskofelectricshock.
The exclamation point within the equilateral triangle is
intended to alert the user to the presence of important
operation and maintenance (servicing) instructions in the
literatureaccompanyingthisappliance.
To prevent electric shock, do not use this polarized plug with an extension cord,
receptacle or other outlet unless the blades can be fully inserted to prevent blade
exposure.
1. Read Instructions All the safety and operating instructions all exposed metallic parts. The resistance should be more than
shouldbereadbeforethisproductisoperated. 100,000ohms.
2. Retain Instructions. The safety and operating instructions 14. Non-use Periods. The power cord of the appliance should be
shouldberetainedforfuturereference. unplugged from the outlet when left unused for a long period of
3. Heed Warnings. All warnings on the appliance and in the time.
operatinginstructionsshouldbeadheredto. 15. Object and Liquid Entry. Care should be taken so that objects do
4. Follow Instructions. All operating and use instructions should not fall and liquids are not spilled into the enclosure through
befollowed. openings.
5. Water and Moisture. The appliance should not be used near 16. DamageRequiring Service.Theappliance should beserviced by
water - for example, near a bathtub, washbowl, kitchen sink, qualifiedservicepersonnelwhen:
laundrytub,in awetbasement,ornear aswimmingpool, andthe !Thepower-supplycordortheplughasbeendamaged;or
like. !Objectshavefallen,orliquidhasbeenspilledintotheappliance;or
6. CartsandStands. Theapplianceshouldbeusedonlywithacart !Theappliancehasbeenexposedtorain;or
orstandthatisrecommendedbythemanufacturer. !The appliance does not appear to operate normally or exhibits a
An appliance and cart combination should be moved with care. markedchangeinperformance;or
Quick stops, excessive force, and uneven surfaces may cause the !Theappliancehasbeendropped,ortheenclosuredamaged.
appliance and cart combination to overturn 17. Servicing. The user should not attempt any service to the
appliance beyond that described in the operating instructions.
All other servicing should be referred to qualified service
personnel.
18. Ventilation Slots and openings in the cabinet are provided for
7. Wall or Ceiling Mounting. The product should be mounted to ventilation and to ensure reliableoperation of the product andto
a wall or ceiling only as recommended by the manufacturer. protect it from overheating, and these openings must not be
8. Heat. The appliance should be situated away from heat sources blocked or covered. The openings should never be blocked by
such as radiators, heat registers, stoves, or other appliances placing the product on a bed, sofa, rug, or other similar surface.
(includingamplifiers)thatproduceheat. This product should not be placed in a built-in installation such
9. Power Sources This product should be operated only from as a bookcase or rack unless proper ventilation is the
the type of power source indicated on the rating label. If you manufacturer'sinstructionshavebeenadheredto.
are not sure of the type of power supply to your home, 19. Attachments do not use attachments not recommended by the
consult your product dealer or local power company. For productmanufacturerastheymaycausehazards.
products intended to operate from battery power, or other 20. Accessories Do notplacethisproductonanunstable cart,stand,
sources, refer the operating instructions. tripod, bracket, or table. The product may fall, causing serious
10. Grounding or Polarization This product maybe equipped witha injury to a child or adult, and serious damage to the product. Use
polarized alternation-current line plug (a plug having one blade onlywitha cart,stand,tripod, bracket,ortable recommendedby
widerthan theother).This plugwillfit intothepoweroutlet only the manufacturer, or sold with the product.Any mounting of the
one way. This is a safety feature. If you are unable to insert the product should follow the manufacturer's instructions, and
plug fully into the outlet, try reversing the plug. If the plug should use a mounting accessory recommended by the
should still fail to fit, contact your electrician to replace your manufacturer.
obsoleteoutlet. Do not defeat the safety purposeofthe polarized 20. Lightning For added protection for this product during a
plug. lightningstorm, orwhen itis leftunattended andunused forlong
11. Power-CordProtection. Power-supplycordsshouldbe routedso periodsof time,unplugit fromthewall outlet anddisconnect the
that they are not likely to be walked on or pinched by items antennaorcablesystem.Thiswillprevent damagetotheproduct
placed upon or against them, paying particular attention to the duetolightningandpower-linesurges.
cord in correspondence of plugs, convenience receptacles, and 22. Replacement Parts When replacement parts are required, be
thepointwheretheyexitfromtheappliance. sure the service technician has used replacement parts specified
12. Cleaning - The appliance should be cleaned only as by the manufacturer or have the same characteristics as the
recommendedbythemanufacturer. original part. Unauthorized substitutions may result in fire,
electricshock,orotherhazards.
Clean by wiping with a cloth slightly damp with water.Avoid getting 23. Safety Check Upon completion of any service or repairs to this
product, ask the service technician to perform safety checks to
waterinsidetheappliance. determinethattheproductisinproperoperatingcondition.
13. For AC line powered units - Before returning repaired unit to
user, use an ohm-meter to measure from bothAC plug blades to
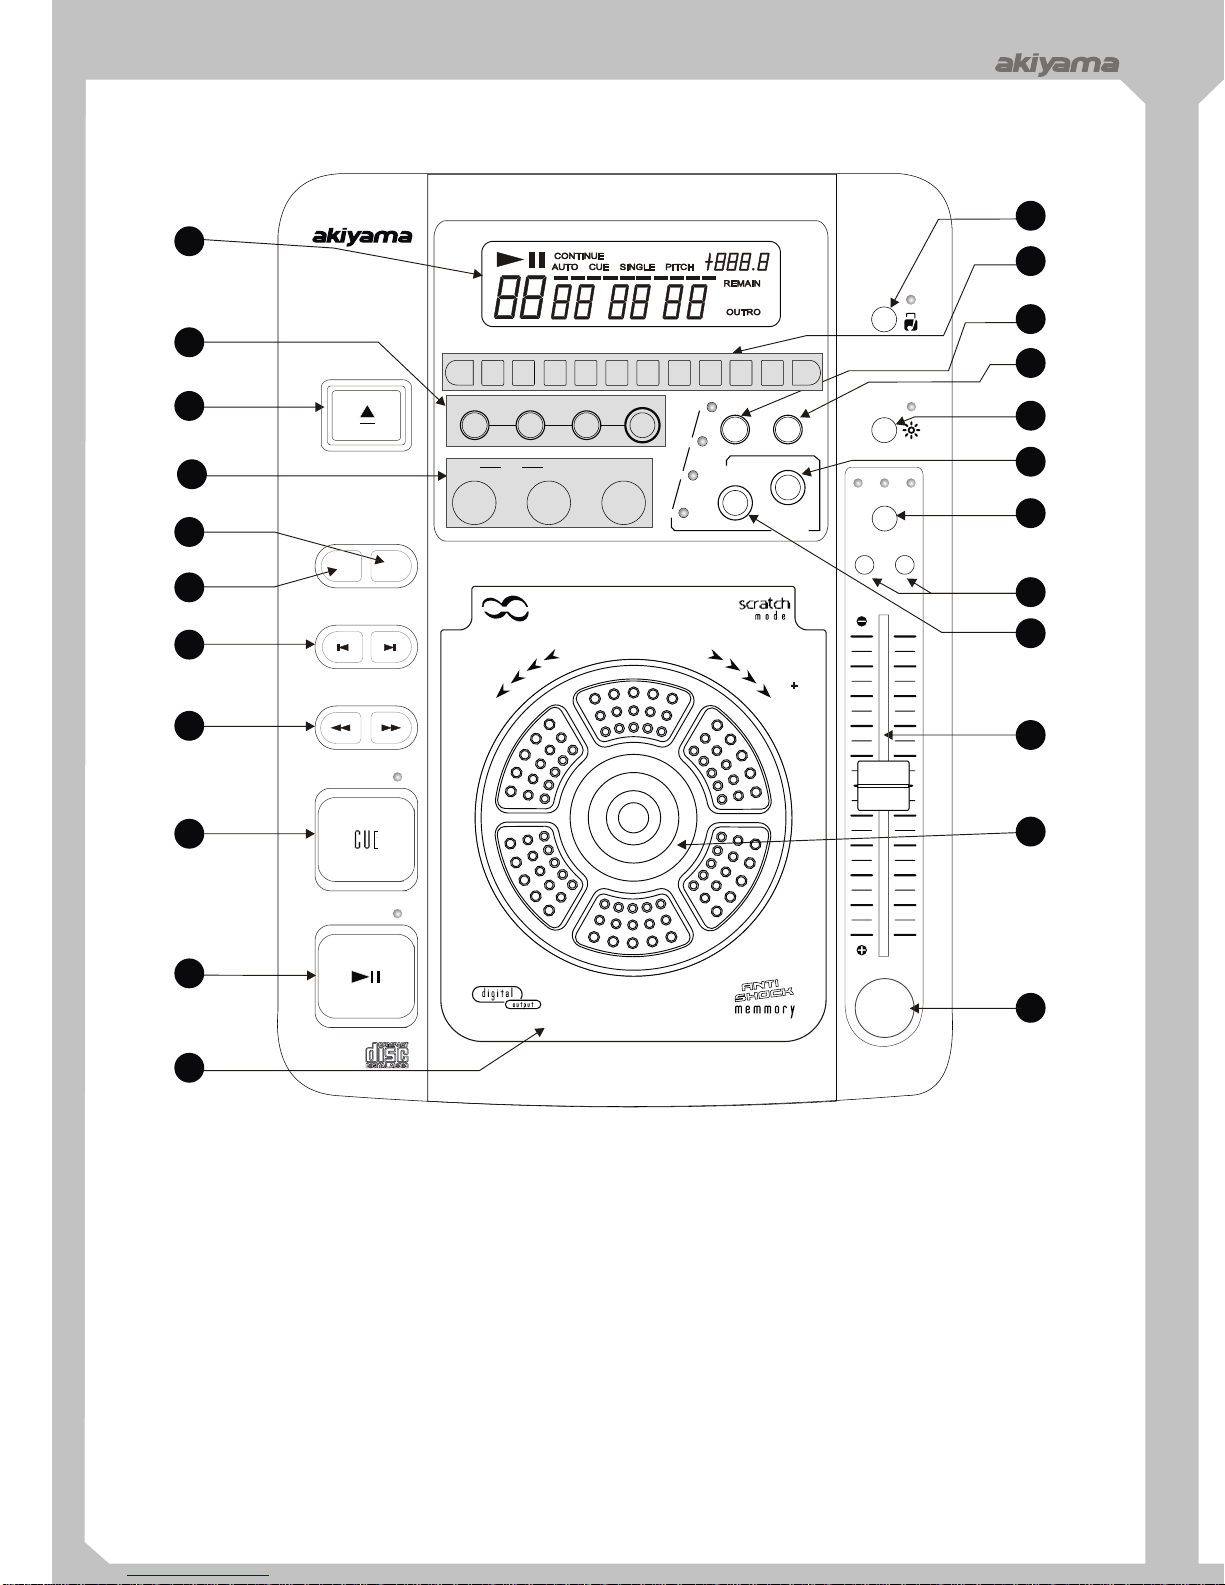
DESCRIPCION DE MANDOS Y FUNCIONES
AC 230V~50Hz 12WAC 230V~50Hz 12W
COMPACT DISC PLAYERCOMPACT DISC PLAYER
SERIAL NO.:SERIAL NO.:
MADE IN CHINAMADE IN CHINA
LL
line out
RR
relay
digital
out offon power
remote
CDS-FX
AKIYAMA. 08191 BARCELONA (SPAIN)
CAUTION
RISK OF ELECTRIC SHOCK
CAUTION, RISK OF ELECTRIC
SHOCK, DO NOT OPEN.
ATENTION: TO REDUCE RISK
1.DIGITALOUT(salidadigital) 4.ACPOWERCORD(conexionared)
SalidadigitalmedianteconectorJackparaconversorD/A. Conectaralatomadecorriente.
2.LINEOUT(salidanivellínea) 5.POWERSWITCH(conmutadordepuestaenmarcha/parada)
Salidadeniveldeseñal“Línea”,conectaralmezclador,amplificador, Presioneuna vezparaponer el equipo enmarcha y vuelva apresionar
etapadepotencia. paraapagarlo.
3.REMOTE(conexiónremota) 6.RELAYJACK(conexiónparalafunciónRELAY)
Conectar a un mezclador con la función “Fader Start” para poder Conectar a un mezclador con función Fader Start o a un
controlar la puesta en marcha del reproductor mediante el fader del
mezclador.
controlador
externo.
1
2
3
4
5
6
PANEL DE CONEXIONES
OPERACIONES BÁSICAS
1.Cargayextraccióndediscos laquesemanipulalarueda.
*Presione"OPEN"paraabrirelcompartimentodeldisco. *SEARCHKNOB(búsqueda)
*Coloqueeldisco:posicionelo enel centrodel compartimentoconla PresioneelcontrolSEARCH ( o )enmodoPausaparaavanzar
etiquetahaciaarriba. o retroceder un “frame” (trozito) por cada pulsación; si mantiene
*Presionelatapaparacerrarelcompartimentodeldisco. presionadoelcontrolreproduciremoslos“frames”consonido.
*PresionePLAY/PAUSEparacomenzarlareproducción. 4.PITCHCONTROL KNOB(controldelPitch)
2.Saltoaotrapistadeldisco *JOGDIAL (rueda)
Utilicelos botonesTRACK SKIPparaavanzar( )oretroceder ( )a En modo PLAY podemos variar la velocidad de reproducción hacia
lapistadeseada. adelanteohaciaatrássegúnelsentidoenelquegiremoslarueda.
3.FRAMESEARCH(búsquedapor“frames”) *PITCHCONTROLKNOB(faderdecontroldePitch)
*JOGDIAL(rueda) Muévalohacia+16, lareproducciónseacelerará.Muévalohacia-16,
En modo Pausa, utilice la rueda, la reproducción avanzará o lareproducciónsedesacelerará.
retrocederá “trocito a trocito” (frame) en función de la velocidad con