Sony DVP-FX850 User manual

SERVICE MANUAL
AEP Model
UK Model
Russian Model
PORTABLE CD/DVD PLAYER
DVP-FX850
RMT-D183
SPECIFICATIONS
System
Laser: Semiconductor laser
Signal format system: PAL (NTSC)
Audio characteristics
Frequency response: DVD VIDEO (PCM
48 kHz): 20 Hz to 22 kHz/
CD: 20 Hz to 20 kHz
Harmonic distortion: 0.01 %
Dynamic range: DVD VIDEO: 90 dB/
CD: 90 dB
Wow and flutter: Less than detected value
(±0.001% W PEAK)
Inputs/Outputs
VIDEO (video input/output):
Minijack (1)
Output 1.0 Vp-p/75 ohms
AUDIO (audio input/output)/OPTICAL
OUT (optical output):
Stereo minijack/optical minijack
combined (1)
Output 2.0 Vrms/47 kilohms
Recommended load impedance over
47 kilohms
PHONES (headphones) A/B:
Stereo minijack (2)
Liquid Crystal Display
Panel size: 8 inches wide (diagonal)
Driving system: TFT active matrix
Resolution: 800 ×480 (effective pixel rate:
more than 99.99%)
General
Power requirements:
DC 9.5 V (AC Adaptor/Car battery
adaptor)
DC 7.4 V (Battery pack)
Power consumption (DVD VIDEO
Playback):
23 W (when used with a battery pack)
8.5 W(whenusedwithoutabatterypack,
with a headphone)
Dimensions (approx.):
226.2 ×32.3 ×165.3 mm (width/height/
depth) incl. projecting parts
Mass (approx.): 1.045 kg
Operating temperature: 5°C to 35 °C
Operating humidity: 25 % to 80 %
AC Adaptor: 100-240 V AC, 50/60 Hz
Car Battery Adaptor: 12 V DC
Supplied accessories
• Audio/video cord (mini plug ×2 yphono
plug ×3) (1)
• Mains lead (1)
• AC adaptor (AC-FX150) (1)
• Car battery adaptor (DCC-FX150) (1)
• Battery pack (NP-FX110) (1)
• Remote (with battery) (1)
• Carry case (1)
Desing and specifications are subject to
change without notice.
w
w
w
.
x
i
a
o
y
u
1
6
3
.
c
o
m
Q
Q
3
7
6
3
1
5
1
5
0
9
9
2
8
9
4
2
9
8
T
E
L
1
3
9
4
2
2
9
6
5
1
3
9
9
2
8
9
4
2
9
8
0
5
1
5
1
3
6
7
3
Q
Q
TEL 13942296513 QQ 376315150 892498299
http://www.xiaoyu163.com

– 2 –
WARNING!!
WHEN SERVICING, DO NOT APPROACH THE LASER
EXIT WITH THE EYE TOO CLOSELY. IN CASE IT IS
NECESSARY TO CONFIRM LASER BEAM EMISSION,
BE SURE TO OBSERVE FROM A DISTANCE OF
MORE THAN 25 cm FROM THE SURFACE OF THE
OBJECTIVE LENS ON THE OPTICAL PICK-UP BLOCK.
CAUTION
Use of controls or adjustments or performance of procedures
other than those specified herein may result in hazardous ra-
diation exposure.
SAFETY-RELATED COMPONENT WARNING!!
COMPONENTS IDENTIFIED BY MARK 0OR DOTTED LINE
WITH MARK 0ON THE SCHEMATIC DIAGRAMS AND IN
THE PARTS LIST ARE CRITICAL TO SAFE OPERATION.
REPLACE THESE COMPONENTS WITH SONY PARTS WHOSE
PART NUMBERS APPEAR AS SHOWN IN THIS MANUAL
OR IN SUPPLEMENTS PUBLISHED BY SONY.
1. Check the area of your repair for unsoldered or poorly-sol-
dered connections. Check the entire board surface for solder
splashes and bridges.
2. Check the interboard wiring to ensure that no wires are
“pinched” or contact high-wattage resistors.
3. Look for unauthorized replacement parts, particularly transis-
tors, that were installed during a previous repair. Point them
out to the customer and recommend their replacement.
SAFETY CHECK-OUT
After correcting the original service problem, perform the following
safety checks before releasing the set to the customer:
CAUTION:
The use of optical instrument with this product will increase eye
hazard.
Unleaded solder
Boards requiring use of unleaded solder are printed with the lead-
free mark (LF) indicating the solder contains no lead.
(Caution: Some printed circuit boards may not come printed with
the lead free mark due to their particular size.)
: LEAD FREE MARK
Unleaded solder has the following characteristics.
•Unleaded solder melts at a temperature about 40°C higher than
ordinary solder.
Ordinary soldering irons can be used but the iron tip has to be
applied to the solder joint for a slightly longer time.
Soldering irons using a temperature regulator should be set to
about 350°C.
Caution: The printed pattern (copper foil) may peel away if the
heated tip is applied for too long, so be careful!
•Strong viscosity
Unleaded solder is more viscous (sticky, less prone to flow) than
ordinary solder so use caution not to let solder bridges occur
such as on IC pins, etc.
•Usable with ordinary solder
It is best to use only unleaded solder but unleaded solder may
also be added to ordinary solder.
4. Look for parts which, though functioning, show obvious signs
of deterioration. Point them out to the customer and recom-
mend their replacement.
5. Check the B+ voltage to see it is at the values specified.
MARKING is located on the bottom of the unit.
This CD/DVD player is a CLASS 1 LASER PRODUCT.
This label is located on the bottom of the unit.
CAUTION : CLASS 1M VISIBLE AND INVISIBLE LASER RADIATION WHEN OPEN AND
INTERLOCKS DEFEATED. DO NOT VIEW DIRECTLY WITH OPTICAL INSTRUMENTS.
VORSICHT : KLASSE 1M SICHTBARE UN D UNSICHTBARE LA SERST R AHLUNG WENN GEÖFFNET
UND SPERREN AUSSER FUNKTION. NICHT DIREKT MIT OPTISCHEN INSTRUMENTEN ANSEHEN.
ADVARSEL : SYNLIG OG USYNLIG LASERSTRÅLING AF KL ASSE 1M VED ÅB NING OG OM GÅELSE
AF LÅSEANORDNINGER MÅ IKKE BETRAGTES DIREKTE GENNEM OPTISKE INSTRUMENTER.
ADVARSEL : SYNLIG OG USYNLIG LASERSTRÅLING I KLASSE 1M NÅR ÅPEN OG
LÅSEANORDNINGER FJERNET. IKKE SE DIREKTE MED OPTISKE INSTRUMENTER.
VARNING : KLASS 1M SYNLIG OCH OSYNLIG LASERSTRÅLNING NÄR DENNA DEL ÄR ÖPPEN
OCH MED SPÄRRARNA AVS TÄNGDA. BETRAKTA EJ STRÅLEN DIREKT MED OPTISKA INSTRUMENT.
VARO! : AVATTUNA JA LUKITUS OHITETTUNA LUOKAN 1M NÄKYVÄÄ JA NÄKYMÄTÖNTÄ
LASERSÄTEILYÄ. ÄLÄ KATSO SÄTEESEEN SUORAAN OPTISILLA LAITTEILLA.
w
w
w
.
x
i
a
o
y
u
1
6
3
.
c
o
m
Q
Q
3
7
6
3
1
5
1
5
0
9
9
2
8
9
4
2
9
8
T
E
L
1
3
9
4
2
2
9
6
5
1
3
9
9
2
8
9
4
2
9
8
0
5
1
5
1
3
6
7
3
Q
Q
TEL 13942296513 QQ 376315150 892498299
http://www.xiaoyu163.com

– 3 –
TABLE OF CONTENTS
Section Title Page Section Title Page
1. GENERAL
Precautions ................................................................... 1-1
About This Manual ........................................................ 1-1
This Player Can Play the Following Discs .................... 1-1
Preparations .................................................................. 1-2
Playing Discs ................................................................. 1-3
Enjoying DivX Videos .................................................... 1-7
Settings and Adjustments ............................................. 1-8
Hookups ........................................................................ 1-9
Additional Information ................................................... 1-10
2. DISASSEMBLY
2-1. MAIN Board, USB Board............................................... 2-1
2-2. Traverse ......................................................................... 2-2
2-3. Upper Block ................................................................... 2-3
2-4. LCD Panel Assy/DRIVER Board................................... 2-4
3. BLOCK DIAGRAMS
3-1. Oveall Block Diagram.................................................... 3-1
4. SCHEMATIC DIAGRAMS
4-1. Frame (1/2) .................................................................... 4-1
Frame (2/2) .................................................................... 4-3
4-2. MCU & DC-DC POWER................................................ 4-5
4-3. DVD SERVO & DSP MT1389HD .................................. 4-7
4-4. SDRAM & FLASH ROM ................................................ 4-9
4-5. VIDEO OUT & PANEL CONNECT................................ 4-11
4-6. AUDIO OUT................................................................... 4-13
4-7. IR-KB ............................................................................. 4-15
4-8. T-CON ............................................................................ 4-17
4-9. USB ............................................................................... 4-19
5. PRINTED WIRING BOARDS
5-1. Circuit Boards Location ................................................. 5-1
5-2. MAIN Board ................................................................... 5-3
5-3. DRIVER Board .............................................................. 5-7
5-4. USB Board..................................................................... 5-9
6. WAVEFORMS AND CIRCUIT VOLTAGE
6-1. Waveforms..................................................................... 6-1
6-2. Circuit Voltage Chart ..................................................... 6-5
7. IC PIN FUNCTION DESCRIPTION
7-1. MPEG/DSP/RF Pin Function
(MAIN Board U7: MT1389HD) ...................................... 7-1
7-2. FRONT MICOM Pin Function
(MAIN Board U3: Z8F0822) .......................................... 7-7
8. ELECTRICAL ADJUSTMENT
8-1. Standard Video Level .................................................... 8-1
8-2. VCOM DC Level ............................................................ 8-1
9. TROUBLESHOOTING
9-1. Electrical Trouble Shooting Guide................................. 9-1
1. Power (DC-DC Converter) Circuit ................................. 9-1
2. MPEG Circuit................................................................. 9-3
3. Front Circuit (Dogotrpm & Key)..................................... 9-4
4. RF/Servo Circuit ............................................................ 9-5
9-2. LCD Trouble Shooting Guide ........................................ 9-6
10. REPAIR PARTS LIST
10-1. Exploded Views ............................................................. 10-1
10-1-1. Main Block ................................................................ 10-1
10-1-2. Upper Block .............................................................. 10-2
10-1-3. LCD Block................................................................. 10-3
10-2. Electrical Parts List ....................................................... 10-4
w
w
w
.
x
i
a
o
y
u
1
6
3
.
c
o
m
Q
Q
3
7
6
3
1
5
1
5
0
9
9
2
8
9
4
2
9
8
T
E
L
1
3
9
4
2
2
9
6
5
1
3
9
9
2
8
9
4
2
9
8
0
5
1
5
1
3
6
7
3
Q
Q
TEL 13942296513 QQ 376315150 892498299
http://www.xiaoyu163.com

1-1
SECTION 1
GENERAL Thissectionisextracted from instruc-
tion manual (3-100-247-11).
DVP-FX850
3
Precautions
Road safety
Do not use the monitor unit and headphones
while driving, cycling, or operating any
motorized vehicle. Doing so may create a
traffic hazard and is illegal in some areas. It
can also be potentially dangerous to play your
headsets at high volume while walking,
especially at pedestrian crossings. You
should exercise extreme caution or
discontinue use in potentially hazardous
situations.
On safety
Should any solid object or liquid fall into the
cabinet, unplug the player and have it
checked by qualified personnel before
operating it any further.
On power sources
•The player is not disconnected from the AC
power source (mains) as long as it is
connected to the wall outlet, even if the
player itself has been turned off.
•If you are not going to use the player for a
long time, be sure to disconnect the player
from the wall outlet. To disconnect the AC
power cord (mains lead), grasp the plug
itself; never pull the cord.
•Do not touch the mains lead or the AC
adaptor with wet hands. Doing so may
cause shock hazard.
On temperature increases
Heat may build up inside the player during
charging or if it is being used for a long time.
This is not a malfunction.
On placement
•Place the player in a location with adequate
ventilation to prevent heat build-up in the
player.
•Do not place the player on a soft surface
such as a rug that might block the
ventilation holes.
•Do not place the player in a confined space
such as a bookshelf or similar unit.
•To reduce the risk of fire, do not cover the
ventilation of the apparatus with
newspapers, tablecloths, curtains, etc.
•Do not place the player in a location near
heat sources, or in a place subject to direct
sunlight, excessive dust, sand, moisture,
rain, or mechanical shock, or in a car with
its windows closed.
On operation
•If the player is brought directly from a cold
to a warm location, or is placed in a very
damp room, moisture may condense on the
lenses inside the player. Should this occur,
the player may not operate properly. In this
case, remove the disc and leave the player
turned on for about half an hour until the
moisture evaporates.
•When you move the player, take out any
discs. If you don’t, the disc may be
damaged.
•Keep the lens on the player clean and do not
touch it. Touching the lens may damage the
lens and cause the player to malfunction.
Leave the disc lid closed except when you
insert or remove discs.
On Liquid Crystal Display
•Although manufactured with high precision
technology, the LCD may occasionally
display dots of various colours. That is not a
malfunction.
•Do not wipe the LCD surface with wet
cloth. If water enters, a malfunction may
result.
•Do not place or drop any object onto the
LCD surface. Also, do not apply pressure
from hands or elbows.
•If the player is brought directly from a cold
to a warm location, moisture may condense
over the LCD surface. In which case, wipe
out the moisture with tissue paper, etc.,
before use.
However, moisture condensation will
continue if the LCD surface is cold. Wait
until the surface warms to room
temperature.
On AC adaptor
•Use the supplied AC adaptor for this player,
as other adaptors may cause a malfunction.
Install this system so that the mains lead can
be unplugged from the wall socket
immediately in the event of trouble.
,continued 4
•Do not confine the AC adaptor in a closed
place such as a bookshelf or an AV cabinet.
•Do not connect the AC adaptor to a
traveler’s electric transformer, which may
generate heat and cause a malfunction.
On battery pack
•Certain countries may regulate disposal of
the battery used to power this product.
Please consult with your local authority.
•Because of the battery’s limited life, its
capacity gradually deteriorates over time
and repeated use. Purchase a new one when
the battery holds about only half the normal
period.
•The battery may not be charged to its fullest
capacity when charged for the first time, or
when it has not been used for a long time.
The capacity recovers after being charged
and discharged several times.
•Do not leave the battery pack in a car or
direct sunlight, where temperature goes up
above 60 ºC.
•Do not expose to water.
•Avoid short-circuiting the battery
connecting jacks (A) located on the bottom
of the player and the connecting jacks (C)
on the battery pack with metal objects such
as a necklace.
•Make sure dust or sand does not enter the
battery connecting jacks (A) and the guide
holes (B) located on the bottom of the
player, and the connecting jacks (C) and the
guide holes (D) on the battery pack.
On car adapter
•Use the supplied car adaptor for this player,
as other adaptors may cause a malfunction.
•Do not dissemble or reverse-engineer.
•Do not drop or apply shock.
•Do not touch the metal parts, as it may
cause a short and damage the car adaptor,
especially if touched by other metal objects.
•Do not place the car adaptor in a location
near heat sources, or in a place subject to
direct sunlight or mechanical shock, or in a
car with its windows closed.
On adjusting volume
Do not turn up the volume while listening to
a section with very low level inputs or no
audio signals. If you do, the speakers may be
damaged when a peak level section is played.
On headphones
•Preventing hearing damage
Avoid using headphones at high volumes.
Hearing experts advice against continuous,
loud, and extended play. If you experience a
ringing in your ears, reduce the volume or
discontinue use.
•Showing consideration for others
Keep the volume at a moderate level. This
will allow you to hear outside sounds and still
be considerate to the people around you.
On cleaning
Clean the cabinet, panel, and controls with a
soft cloth slightly moistened with a mild
detergent solution. Do not use any type of
abrasive pad, scouring powder or solvent
such as alcohol or benzine.
On cleaning discs, disc/lens cleaners
Do not use cleaning discs or disc/lens
cleaners (including wet or spray types).
These may cause the apparatus to
malfunction.
If you have any questions or problems
concerning your player, please consult your
nearest Sony dealer.
B
A
Bottom of
the player
D
C
Battery
pack
IMPORTANT NOTICE
Caution: This player is capable of holding a
still video image or on-screen display image
on your television screen indefinitely. If
you leave the still video image or on-screen
display image displayed on your TV for an
extended period of time you risk permanent
damage to your television screen. Plasma
display panel televisions and projection
televisions are susceptible to this.
6
About This Manual
• Instructions in this manual describe the controls on the remote. You can also use the
controls on the player if they have the same or similar names as those on the remote.
• “DVD” may be used as a general term for DVD VIDEOs, DVD+RWs/DVD+Rs (+VR
mode) and DVD-RWs/DVD-Rs (VR mode, video mode).
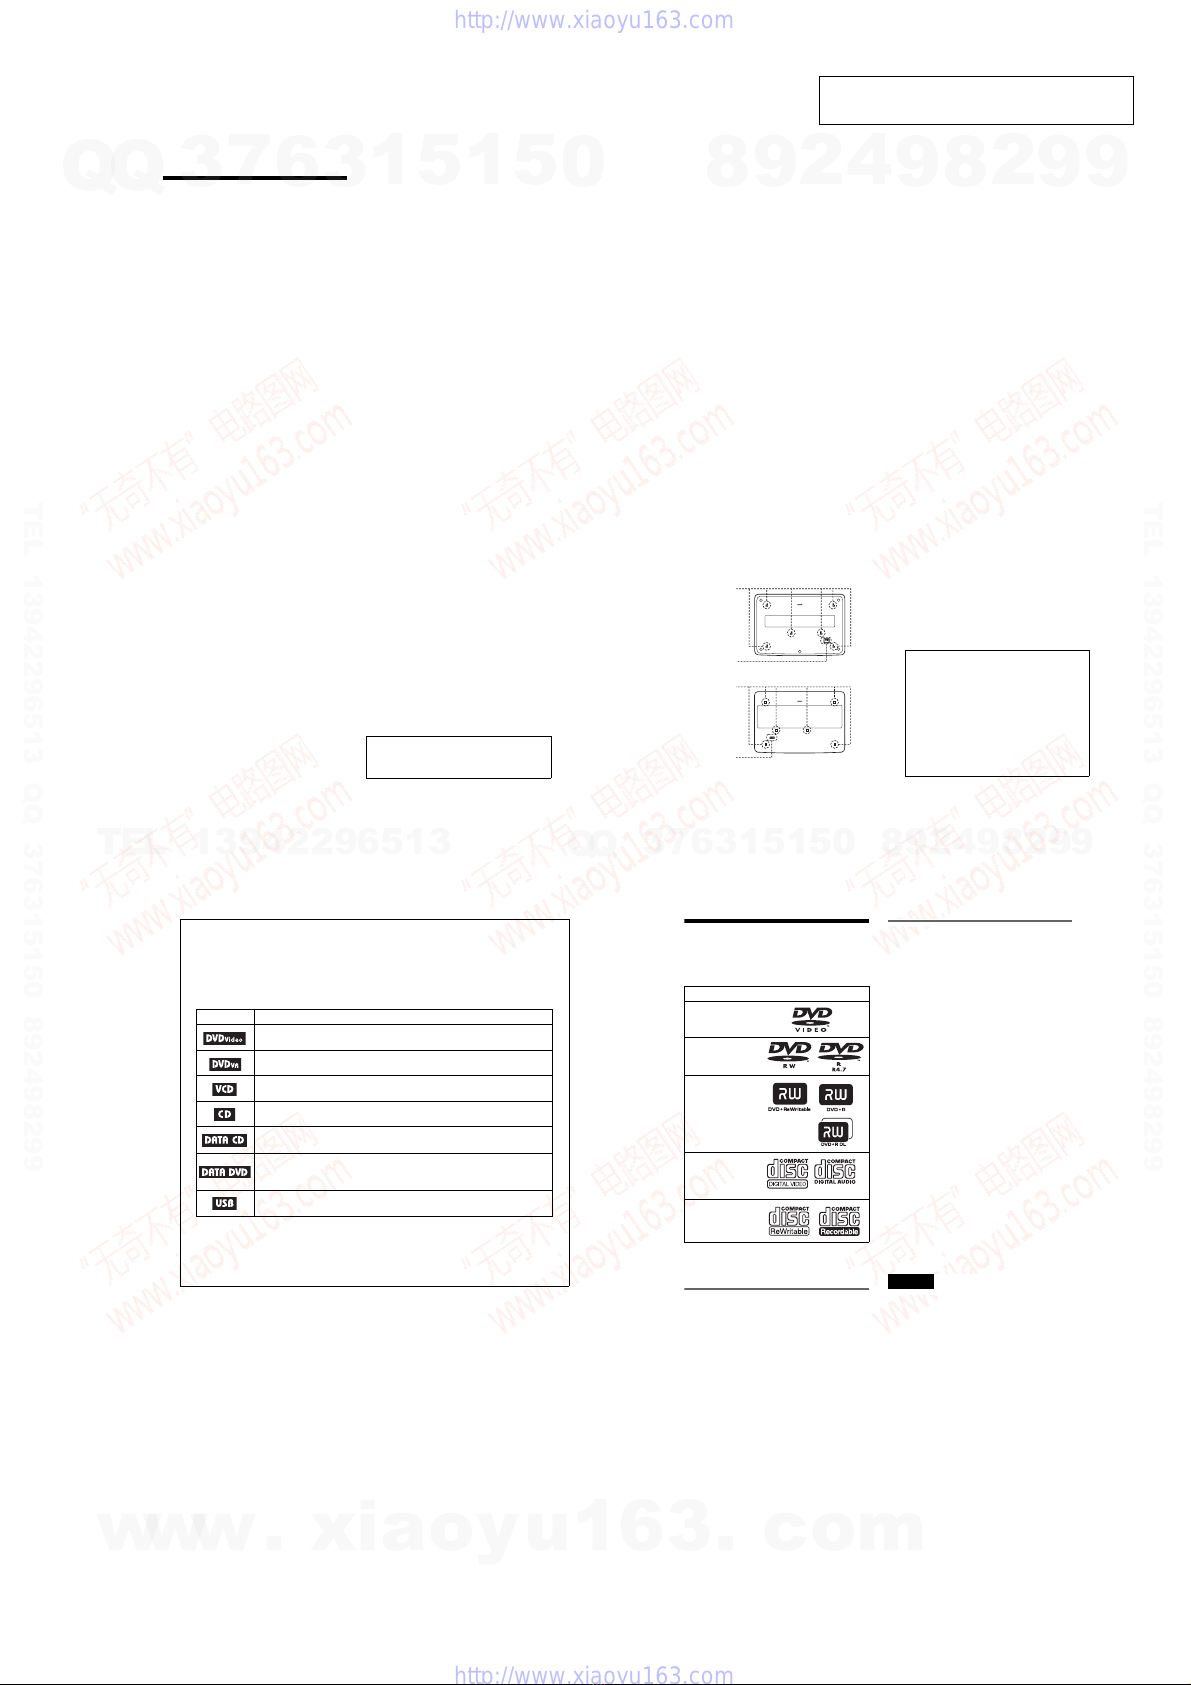
• The meaning of the icons used in this manual is described below:
Icons Meaning
Functions available for DVD VIDEOs and DVD+RWs/DVD+Rs in +VR
mode or DVD-RWs/DVD-Rs in video mode
Functions available for DVD-RWs/DVD-Rs in VR (Video Recording) mode
Functions available for VIDEO CDs (including Super VCDs or CD-Rs/CD-
RWs in video CD format or Super VCD format)
Functions available for music CDs or CD-Rs/CD-RWs in music CD format
Functions available for DATA CDs (CD-ROMs/CD-Rs/CD-RWs
containing MP3*1 audio tracks, JPEG image files, and DivX*2*3 video files)
Functions available for DATA DVDs (DVD-ROMs/DVD+RWs/DVD+Rs/
DVD-RWs/DVD-Rs containing MP3
*1
audio tracks,
JPEG image files, and
DivX*2*3 video files
)
Functions available for USB devices
containing MP3
*1
audio tracks, and
JPEG image files
*1 MP3 (MPEG-1 Audio Layer III) is a standard format defined by ISO (International Organization for
Standardization)/IEC (International Electrotechnical Commission) MPEG which compresses audio
data.
*2 DivX®is a video file compression technology, developed by DivXNetworks, Inc.
*3 DivX, DivX Certified, and associated logos are trademarks of DivXNetworks, Inc. and are used
under licence.
7
This Player Can Play the
Following Discs
“DVD+RW,” “DVD-RW,” “DVD+R,”
“DVD-R,” “DVD VIDEO,” and “CD” logos
are trademarks.
Note about CDs/DVDs
The player can play CD-ROMs/CD-Rs/CD-
RWs recorded in the following formats:
–music CD format
–video CD format
–MP3 audio tracks, JPEG image files, and
DivX video files of format conforming to
ISO 9660* Level 1, or its extended format,
Joliet
–KODAK Picture CD format
*Alogical format of files and folders on CD-
ROMs, defined by ISO (International
Organization for Standardization).
The player can play DVD-ROMs/
DVD+RWs/DVD-RWs/DVD+Rs/DVD-Rs
recorded in the following format:
–MP3 audio tracks, JPEG image files, and
DivX video files of format conforming to
UDF (Universal Disk Format).
Example of discs that the player
cannot play
The player cannot play the following discs:
•Blu-ray discs.
•Discs recorded in AVCHD format.
•HDDVDs.
•DVD-RAMs.
•CD-ROMs/CD-Rs/CD-RWs other than
those recorded in the formats listed on this
page.
•CD-ROMs recorded in PHOTO CD format.
•Data part of CD-Extras.
•DVDAudio discs.
•DATA DVDs that do not contain MP3
audio tracks, JPEG image files, or DivX
video files.
•HD layer on Super Audio CDs.
Also, the player cannot play the following
discs:
•ADVD VIDEO with a different region
code.
•Adisc that has a non-standard shape (e.g.,
card, heart).
•Adisc with paper or stickers on it.
•Adisc that has the adhesive of cellophane
tape or a sticker still left on it.
Notes
•Notes about DVD+RWs/DVD+Rs, DVD-RWs/
DVD-Rs or CD-Rs/CD-RWs
Some DVD+RWs/DVD+Rs, DVD-RWs/DVD-
Rs, or CD-Rs/CD-RWs cannot be played on this
player due to the recording quality or physical
condition of the disc, or the characteristics of the
recording device and authoring software.
The disc will not play if it has not been
correctly finalized. For more information, refer
to the operating instructions for the recording
device. Note that some playback functions may
not work with some DVD+RWs/DVD+Rs, even
if they have been correctly finalized. In this case,
view the disc by normal playback. Also some
DATA CDs/DATA DVDs created in Packet
Write format or multiple sessions cannot be
played.
•Notes about DVD+R DLs/DVD-R DLs
MP3 and JPEG files recorded on the second layer
of a DVD+R DL/-R DL (double layered) cannot
be played.
DVD-R DL discs recorded in VR mode cannot be
played.
Format of discs
DVD VIDEO
DVD-RW/-R
(finalized disc)
DVD+RW/+R
(finalized disc)
VIDEO CD/
Music CD
CD-RW/-R
,continued
w
w
w
.
x
i
a
o
y
u
1
6
3
.
c
o
m
Q
Q
3
7
6
3
1
5
1
5
0
9
9
2
8
9
4
2
9
8
T
E
L
1
3
9
4
2
2
9
6
5
1
3
9
9
2
8
9
4
2
9
8
0
5
1
5
1
3
6
7
3
Q
Q
TEL 13942296513 QQ 376315150 892498299
http://www.xiaoyu163.com

1-2
8
•Music discs encoded with copyright protection
technologies
This product is designed to playback discs that
conform to the Compact Disc (CD) standard.
Recently, various music discs encoded with
copyright protection technologies are marketed
by some record companies. Please be aware that
among those discs, there are some that do not
conform to the CD standard and may not be
playable by this product.
•Note on DualDiscs
A DualDisc is a two sided disc product which
mates DVD recorded material on one side with
digital audio material on the other side.
However, since the audio material side does not
conform to the Compact Disc (CD) standard,
playback on this product is not guaranteed.
Region code
It is the system that is used to protect
copyrights. The region code is shown on the
DVD VIDEO packages according to the
region of sale. DVD VIDEOs labelled “ALL”
or “2” will play on this player.
Note on playback operations of
DVDs and VIDEO CDs
Some playback operations of DVDs and
VIDEO CDs may be intentionally set by
software producers. Since this player plays
DVDs and VIDEO CDs according to the disc
contents the software producers designed,
some playback features may not be available.
Also, refer to the instructions supplied with
the DVDs or VIDEO CDs.
Copyrights
This product incorporates copyright
protection technology that is protected by
U.S. patents and other intellectual property
rights. Use of this copyright protection
technology must be authorized by
Macrovision, and is intended for home and
other limited viewing uses only unless
otherwise authorized by Macrovision.
Reverse engineering or disassembly is
prohibited.
Trademarks
•Manufactured under license from Dolby
Laboratories.
“Dolby,” “Pro Logic,” and the double-D
symbol are trademarks of Dolby
Laboratories.
•“DTS” and “DTS Digital Out” are
registered trademarks of DTS, Inc.
ALL
9
Preparations
Preparations
Checking the Accessories
Check that you have the following items:
•Audio/video cord (mini plug ×2 yphono
plug ×3) (1)
•Mains lead (1)
•AC adaptor (AC-FX150) (1)
•Car battery adaptor (DCC-FX150) (1)
•Battery pack (NP-FX110) (1)
•Remote (with battery) (1)
•Carry case (1)
Using the Remote
When operating, point it at the remote sensor on the player.
To replace the remote control battery
Insert a lithium battery CR2025 matching the 3and #ends of the battery.
1Pull out the battery holder (2) while
pressing the lock lever (1).
2Remove the old battery.
3Insert the new battery in the battery
holder with the 3side up and then push
the holder fully.
Notes
•Do not expose the remote sensor to direct sunlight or a lighting apparatus. Doing so may cause a
malfunction.
•No button operation can be made, when the battery drains. If the remote does not work at all, change the
battery and check the status.
•When disposing the used batteries, follow the battery maker’s instructions.
10
Using the LCD Panel
The LCD panel of the player can rotate a maximum of 180 degrees clockwise and still be used.
After rotation of the LCD panel, it can be folded down on the main body of the player and still
function.
Rotating the LCD panel
1
Place the player on a table or other flat stable surface.
2Push the LCD panel up with your thumbs until it is open to the vertical position.
3Slowly rotate the LCD panel 180 degrees in the direction indicated by the arrow
(clockwise).
Rotating and folding down the LCD panel
After rotating the LCD panel 180 degrees clockwise push the LCD panel down onto the main
body of the player. In this position the panel is facing up.
To return the LCD panel to its original position
Open the LCD panel to the vertical position and rotate the LCD panel counter-clockwise slowly.
Notes
•Donotrotate the LCD panel over 180 degrees. In addition, do not rotate in the opposite direction. Doing
so will break the LCD panel.
•If the LCD panel does not fully open, do not further rotate it. The LCD panel may become damaged.
•Return the LCD panel to its original positions after use. The LCD screen can be damaged by sudden shocks
or similar treatment.
11
Preparations
Connecting the AC Adapter
Connect the AC adaptor (supplied) in the order of 1to 3below.
To disconnect, follow the steps in reverse order.
See also “On AC adaptor” in “Precautions” (page 3).
Note
Stop playback before disconnecting the mains lead. Failure to do so, may cause a malfunction.
DC IN
9.5V
LINE SELECTAUDIO VIDEOPHONES
OPTICAL
OUT
AB INOUT
DC plug
2
To DC IN 9.5 V jack
AC Adaptor
(supplied)
1
Mains lead (supplied)
To mains
3
w
w
w
.
x
i
a
o
y
u
1
6
3
.
c
o
m
Q
Q
3
7
6
3
1
5
1
5
0
9
9
2
8
9
4
2
9
8
T
E
L
1
3
9
4
2
2
9
6
5
1
3
9
9
2
8
9
4
2
9
8
0
5
1
5
1
3
6
7
3
Q
Q
TEL 13942296513 QQ 376315150 892498299
http://www.xiaoyu163.com

1-3
12
Using with Battery Pack
When a mains connection is not available, the player can be enjoyed with the battery pack
(supplied) installed.
Please charge the battery pack before using it.
See also “On battery pack” in “Precautions” (page 4).
Installing the battery pack
1Aligning the battery pack with the lines on the player’s bottom, engage the hooks of
the battery pack in the holes on the bottom of the player.
2Slide the battery pack in the direction of the arrow until it clicks into place.
To remove the battery pack
Push the release knob and slide the battery pack in the direction of the arrow.
Notes
•Turn the player off before installing the battery pack.
•Donotremove the battery pack during playback.
•Donottouch the connecting points of the player and the battery pack. Doing so may cause a malfunction.
•Becareful not to drop the battery pack when installing and removing it.
Bottom of the player
Battery pack
Release knob
13
Preparations
Charging the battery pack
1Attach the battery pack to the player (page 12).
2Connect the AC adaptor to the player, and then connect the mains lead into a mains
(page 11).
When charging begins, the CHARGE indicator LED illuminates.
When charging ends, the CHARGE indicator LED extinguishes.
3After charging is finished, disconnect the mains lead from the mains and remove the
AC adaptor.
To check the battery level
When the player is stopped, a battery indicator is displayed on the screen. Recharge the battery,
when is displayed or the CHARGE indicator flashes.
The battery indicator is not displayed when a DVD, VIDEO CD or JPEG file are being played.
Stop the player and check the battery level.
Charging time and maximum playing time
*This is the indication of the longest continuous playback on the following conditions.
–normal temperature (20°C)
–Headphone Use
–Set Backlight Adjustment to the Minimum
–Set“Digital Output” to “Off” in “Audio Setup.”
Battery condition may reduce operating time.
Notes
•The battery indicator does not appear on the screen when the AC adaptor is used or when inputting from
external sources.
•Chargingtimes may differ from that indicated above due to conditions of use, environment, and other
factors. The recommended charge up surrounding temperature is in the 10-30°C range.
Charging time (with the player turned off) Playing time (with the display turned on)
Approx.
6 hours
Approx.
6 hours*
DC IN
9.5V
LINE SELECTAUDIO VIDEOPHONES
OPTICAL
OUT
VOLUME A B IN OUT
HOLD
CHARGE
CHARGE indicator
DC IN 9.5 V jack
Player Battery pack
Full Exhausted
14
Using With the Car Battery Adaptor
Use the car battery adaptor (supplied) to supply power from the cigarette lighter socket to the
player. The adaptor is for a 12V car battery. Do not use it with a 24V car battery. The adaptor is
also for use with negatively grounded cars. Do not use it with cars grounded positively.
zHint
If the car adaptor interferes with car operation, use a commercial cigarette lighter extension cord.
Notes
•Donotuse the car adaptor if it has been dropped or damaged.
•Arrange the cord so as not to interfere with the driver. Also, do not place the LCD panel where the driver
can watch.
•If the picture is not clear, keep the player away from the car battery adaptor.
•Usethe car battery adaptor with the car engine running. If it is used with the car engine off, the car battery
may become unusable.
•If the cigarette lighter socket is dirty with ash, etc, a bad connection may cause the plug to heat up. Always
clean well before use.
•Thecar battery adaptor may heat up while charging or after a long period of use. That is not a malfunction.
After using the car battery adaptor
After turning the player off, disconnect the car battery adaptor from the cigarette lighter socket.
Notes
•Donot turn off the car engine while the player is turned on. Doing so stops the power supply and may cause
damage to the player.
•Disconnect the car battery adaptor after use. Since some cars supply power to the cigarette lighter socket
even when the engine is turned off, the vehicles battery may discharge over time.
•When disconnecting the car battery adaptor, hold the plug to pull it out.
•When listening to the car radio, disconnect the car battery adaptor from the cigarette lighter socket to avoid
noise.
DC IN
9.5V
LINE SELECTAUDIO VIDEOPHONES
OPTICAL
OUT
AB INOUT
To cigarette lighter socket
To DC IN 9.5V jack
Car battery adaptor (supplied)
15
Playing Discs
Playing Discs
Playing Discs
Depending on the DVD or VIDEO CD, some
operations may be different or restricted.
Refer to the operating instructions supplied
with the disc.
Connect the AC adaptor or install the battery
pack.
1Open the player’s LCD panel.
Set the LINE SELECT switch on the
player’s right side to “OUT” and set the
CD/DVD USB switch on the player’s left
side to “CD/DVD.”
2Press [/1on the remote or slide
the [/1/HOLD switch of the player
to the right.
The player turns on and the power
indicator lights up in green.
3Slide the OPEN knob to the left and
open the disc lid.
4Insert the disc to be played.
Push with the playback side down until it
clicks.
5Push the PUSH CLOSE on the
player to shut the disc lid.
6Press H.
Playback starts.
•Some discs may start playing
automatically after the disc lid is shut.
•Depending on the disc, a menu may
appear on the screen. For DVD
VIDEOs, see page 17. For VIDEO
CDs, see page 20.
•After all titles have been played, the
player will stop itself and the display
will return to the menu screen.
Notes
•Ifthedisc is inserted with playback side up, a “No
Disc” message appears.
•Discscreated on DVD recorders must be correctly
finalized to play on this player. For more
information about finalizing, refer to the
operating instructions supplied with the DVD
recorder.
RETURN OPTIONSMENUDISPLAY
OPEN
HOLD
CHARGE
x
H
OPEN knob \/1/HOLD
123
456
78
0
9
\/1
H
x
Playback side facing down
,continued
w
w
w
.
x
i
a
o
y
u
1
6
3
.
c
o
m
Q
Q
3
7
6
3
1
5
1
5
0
9
9
2
8
9
4
2
9
8
T
E
L
1
3
9
4
2
2
9
6
5
1
3
9
9
2
8
9
4
2
9
8
0
5
1
5
1
3
6
7
3
Q
Q
TEL 13942296513 QQ 376315150 892498299
http://www.xiaoyu163.com

1-4
16
•Thediscmay be still spinning when the disc lid is
opened. Wait until the spinning stops before
removing the disc.
•During operation, “ ” may appear on the screen.
This symbol indicates that a function explained in
this operating instruction is not available on the
current DVD VIDEO.
•Some DVD-RWs/DVD-Rs (VR mode) may take
time before starting playback because of the
recorded content.
To adjust the volume
Adjust to the preferred level using the
VOLUME button on the right side of the
player.
To stop playback
Press x.
Pressing Hagain will start playback from
the point you stopped (Resume Play).
To play from the beginning, press xtwice,
then press H.
To turn off the power
Press the remote’s \/1button or slide the
player’s \/1/HOLD switch to the right.
To avoid accidental button operation on
the player
Set the player’s \/1/HOLD switch to
“HOLD.” All the buttons on the player are
locked, while the button on the remote
remains operable.
To play DTS sound tracks on a DVD VIDEO
•The player’s speaker does not output DTS
sound. When you play DTS sound tracks on
a DVD VIDEO, connect the player to an
AV amplifier (receiver) (page 40) and set
up “DTS” in “Audio Setup” (page 36).
•If you connect the player to audio
equipment such as an AV amplifier
(receiver) without a DTS decoder, do not set
“DTS” to “On” in “Audio Setup” (page 36).
A loud noise may come out from the
speakers, which may affect your ears or
cause speaker damage.
Notes
•Ascreen saver image appears when you leave the
player in pause or stop without operation for more
than 15 minutes. The image disappears when you
press H. See page 35 for details.
•Theplayerturns off, 15 minutes after starting the
screen saver function (Auto Power Off).
Additional playback operations
*DVD VIDEOs, DVD-RWs/DVD-Rs (VR mode)
only.
The above functions may not be used for some
scenes.
VOLUME
Min Max
To Operation
Stop Press x
Pause Press X
Go to the next chapter,
track, or scene in
continuous play mode
Press >
Go back to the
previous chapter,
track, or scene in
continuous play mode
Press .
Briefly fast forward
the current scene*
Press during
playback.
123
456
78
0
9
.>
X
x
17
Playing Discs
Resuming playback from the
pointwhereyoustopped the disc
(Resume Play)
When you stop playback, the player
remembers the stop point and displays a
message on the screen. You can resume from
the same point by pressing Hagain. Resume
Play works even after the player is turned off,
as long as the disc lid is kept closed.
1While playing a disc, press xto stop
playback.
A message appears.
2Press H.
The player starts playback from the point
you stopped in step 1.
zHints
•Toplay from the beginning of the disc, press x
twice, then press H.
•When turning power on again after power off,
resume play starts automatically.
Notes
•Depending on the stop point, Resume play may
not start from exactly the same point.
•The point where you stopped playing is cleared
when:
–you turn off the player while playing a DVD-
RW/DVD-R (VR mode).
–youopen the disc lid.
–youdisconnect the battery pack and the AC
adaptor.
Using the DVD’s menu
A DVD is divided into long sections of a
picture or a music feature called “titles.”
When you play a DVD containing several
titles, you can select the title you want using
the TOP MENU button.
When you play DVDs that allow you to select
items such as language for the sound and
subtitles, select these items using the MENU
button.
1Press TOP MENU or MENU.
The disc’s menu appears on the screen.
The contents of the menu vary from disc
to disc.
2Press C/X/x/cor the number buttons
to select the item you want to play or
change.
3Press ENTER.
Note
Depending on the disc, you may not be able to use
C/cof the player for the disc menu. In this case, use
C/con the remote.
123
456
78
0
9
H
x
123
456
78
0
9
TOP MENU
C/X/x/c
ENTER
MENU
Number
buttons
,continued
18
Changing the sound
When playing a DVD VIDEO recorded in
multiple audio formats (PCM, Dolby Digital,
or DTS), you can change the audio format. If
the DVD VIDEO is recorded with
multilingual tracks, you can also change the
language.
With CDs or VIDEO CDs, you can select the
sound from either the right or left channel and
listen to the sound of the selected channel
through both the right and left speakers. For
example, when playing a disc containing a
song with the vocals on the right channel and
the instruments on the left channel, you can
hear the instruments from both speakers by
selecting the left channel.
1Press
AUDIO repeatedly to select the
desired audio signal.
The default setting is underlined.
◆When playing a DVD VIDEO
Depending on the DVD VIDEO, the
choice of language varies.
When the same language is displayed two
or more times, the DVD VIDEO is
recorded in multiple audio formats.
◆When playing a DVD-VR mode disc
The types of sound tracks recorded on a
disc are displayed.
Example:
•1.Main(main sound)
•1.Sub (sub sound)
•1.Main+Sub (main and sub sound)
◆When playing a CD/VIDEO CD
•Stereo
: the standard stereo sound
•Left: the sound of the left channel
(monaural)
•Right: the sound of the right channel
(monaural)
◆When playing a Super VCD
•Stereo
: the stereo sound of the audio
track 1
•Left: the sound of the left channel of the
audio track 1 (monaural)
•Right: the sound of the right channel of
the audio track 1 (monaural)
•Stereo 1: the stereo sound of the audio
track 2
•Left 1: the sound of the left channel of
the audio track 2 (monaural)
•Right 1: the sound of the right channel
of the audio track 2 (monaural)
zHints
•You can check of the current audio format (Dolby
Digital, DTS, PCM, etc.) by pressing AUDIO
repeatedly while playing a DVD VIDEO.
•You can switch the sound in the Playback Settings
Display while playing a DVD (page 21).
Notes
•Depending on the disc, you may not be able to
change the audio format, even if it is recorded in
multiple audio formats.
•When playing a Super VCD that does not contain
audio track 2, no sound will come out if you select
“Stereo 1,” “Left 1,” or “Right 1.”
•When playing soundtracks on DVD-RW/DVD-R
(VR mode) with audio equipment such as an AV
amplifier (receiver) connected via the OPTICAL
OUT jack, set “Dolby Digital” in “Audio Setup”
to “Downmix PCM” (page 36).
•If “DTS” in “Audio Setup” is set to “Off”
(page 36), the player does not output the DTS
signal from the OPTICAL OUT jack even when
the disc contains a DTS track.
•When playing DTS sound tracks on a CD, you
cannot change the sound.
123
456
78
0
9
AUDIO
19
Playing Discs
Displaying the subtitles
If subtitles are recorded on the disc, you can
change the subtitles or turn them on and off
whenever you want while playing a DVD.
1Press SUBTITLE repeatedly to select a
setting.
Depending on the disc, the choice of
language varies.
To turn off the subtitles
Select “Subtitle Off” in step 1.
zHint
You can switch the subtitles in the Playback
Settings Display while playing a DVD (page 21).
Notes
•Depending on the DVD VIDEO, you may not be
able to change the subtitles even if multilingual
subtitles are recorded on it. You also may not be
able to turn them off.
•While you play a disc with subtitles, the subtitle
may disappear when you press .
Changing the angles
If various angles (multi-angles) for a scene
are recorded on the DVD VIDEO, “ ”
appears on the screen. This means that you
can change the viewing angle.
1Press ANGLE repeatedly to select an
angle number.
The scene changes to the selected angle.
Notes
•Some DVD VIDEOs prohibit changing angles
even when multi-angles are recorded.
•Youcannot change angles during Slow Play or
Scan Play.
•“ ”(anglemark) does not appear when
“Angle Mark” in “General Setup” is set to “Off”
(page 35).
123
456
78
0
9
SUBTITLE
123
456
78
0
9
ANGLE
,continued
w
w
w
.
x
i
a
o
y
u
1
6
3
.
c
o
m
Q
Q
3
7
6
3
1
5
1
5
0
9
9
2
8
9
4
2
9
8
T
E
L
1
3
9
4
2
2
9
6
5
1
3
9
9
2
8
9
4
2
9
8
0
5
1
5
1
3
6
7
3
Q
Q
TEL 13942296513 QQ 376315150 892498299
http://www.xiaoyu163.com

1-5
20
Selecting “Original” or “Play
List” on a DVD-RW/DVD-R
Some DVD-RWs/DVD-Rs in VR (Video
Recording) mode have two types of title for
playback: originally recorded titles
(Original), and titles that can be created on
recordable DVD players for editing (Play
List). You can select the type of title to be
played.
1Press TOP MENU when the player is in
stop mode.
The current mode appears.
The TOP MENU button does not work
when Resume Play is activated. Cancel
the Resume Play status first by pressing
xtwice, and then press TOP MENU.
2Switch the mode by pressing TOP
MENU repeatedly.
zHint
You can check the current mode by pressing
DISPLAY during playback. On the Playback
Settings Display (page 21), “PL” or “ORG” will be
displayed next to the title number.
Notes
•When a disc containing a Playlist title is inserted,
the player automatically starts playing the Playlist
title.
•When no Playlist title is recorded, “ORG” appears
in step 1. When you press TOP MENU once
more, “ ” appears.
Playing VIDEO CDs With PBC
Functions (PBC Playback)
Some VIDEO CDs have Playback Control
(PBC) functions allowing for interactive
search or playback options.
1Start playing a VIDEO CD with PBC
functions.
The menu appears for your selection.
2Press the number buttons to select the
item number you want and press
ENTER.
3Follow the instructions on screen for
interactive operations.
Refer to the instructions supplied with the
disc, as the operating procedure may
differ depending on the VIDEO CD.
zHint
To cancel the PBC function, set “PBC” to “Off” in
“General Setup” (page 35) and then, open and close
the disc lid.
Note
Depending on the VIDEO CD, “Press ENTER” in
step 2 may appear as “Press SELECT.” In this case,
press H.
123
456
78
0
9
TOP MENU
ENTER
H
Number
buttons
123
456
78
0
9
21
Playing Discs
Using the Playback
Settings Display
While playing a DVD, you can check the
current playback settings on the screen. The
Playback Settings Display also allows you to
change sound, subtitle, and angle or search
for a title or track by inputting numbers.
1Press DISPLAY while playing a
DVD.
The Playback Settings Display appears.
Example: When playing a DVD VIDEO
The corresponding icon for Play, Pause,
Search, or Slow Play is displayed in the
upper right corner of the screen.
When a DVD-RW/DVD-R (VR mode) is
played, “PL” or “ORG” is displayed next
to the title number.
2Press X/xto select the desired
item and press ENTER.
•Title
•Chapter
•Audio
•Subtitle
•Angle
•T.Time
•C.Time
•Repeat
•TimeDisp.
3Press X/xto select the setting,
and press ENTER.
To enter numbers, use the number
buttons or X/x.
Note
Depending on the disc, you may not be able to set
some options.
To turn off the display
Press DISPLAY or ORETURN.
Searching for a title/chapter,
etc.
By entering the number or the time code, you
can search a DVD by title or chapter.
1Press X/xto select the search method
on the Playback Settings Display, and
press ENTER.
•Title
•Chapter
•T.Time*
•C.Time*
*Youcan search the title or chapter of a DVD
VIDEO by entering the time code.
2Press the number buttons or X/xto
select the title or chapter number, and
press ENTER.
The player starts playback from the
selected number.
When you select “T.Time” or “C.Time” in
step 1, “00:00:00” will appear on the screen.
Enter the desired time code using the number
buttons, and press ENTER. Playback starts
from the entered time code. Elapsed or
remaining time appears on the footer of the
Playback Settings Display.
zHints
•Youcan use direct search without displaying the
control menu. See page 23 for details.
123
456
78
0
9
Number
buttons
DISPLAY
C/X/x/c
ENTER
O
Menu
Title
Chapter
Audio
Subtitle
02/07
03/20
02 2CH DOLBY DIGITAL English
01 English
Title Elapsed 00:12:01
Current playback settingsItems
Elapsed or remaining timeBattery status
,continued
22
•Seepage 23 for details about using direct search
for a CD or VIDEO CD.
Notes
•Thedisplayed title/chapter number is the same as
the number recorded on the disc.
•Chapter times are not displayed when a DVD-
RW/DVD-R (VR mode) is played. Chapter time
will be displayed as “--:--:--.”
•Depending on the disc, you may not be able to use
the time code.
Playing a DVD VIDEO repeatedly
(Repeat Play)
You can play all of the titles on a DVD
VIDEO, or a single title or chapter repeatedly.
1Select “Repeat” on the Playback
Settings Display, and press ENTER.
2Press X/xto select the setting, and
press ENTER.
•Chapter: repeats the current
chapter.
•Title: repeats the current title.
•All: repeats all of the titles.
To return to normal play
Select “Off” in step 2.
zHint
When playing a VCD or CD repeatedly, use
OPTIONS (page 24).
Note
Depending on the disc, the Repeat function may not
be available.
Checking the playing time and
remaining time
You can check the playing time and
remaining time of the current title or chapter.
1Select “Time Disp.” on the Playback
Settings Display, and press ENTER.
2Press X/xto select the time
information setting, and press ENTER.
•Title Elapsed
•Title Remain
•Chapter Elapsed
•Chapter Remain
zHint
See page 25 for details about displaying the elapsed
time of a CD or VIDEO CD.
Notes
•In the case of DVD-RWs/DVD-Rs (VR mode),
the playing time and remaining time of the
chapter is not displayed.
•The default setting for “Time Disp.” is “Title
Elapsed.” After selecting an other option of
“Time Disp.” and exiting from the Playback
Settings Display, the “Title Elapsed” appears
when the Playback Settings Display is re-entered.
Time Disp.
Title Elapsed
Title Remain
Chapter Elapsed
Chapter Remain
Title Elapsed 00:12:48
23
Playing Discs
Searching for a
Particular Point on a
Disc (Search, Scan, Slow Play,
Repeat Play, Random Play)
You can quickly locate a particular point on a
disc by monitoring the picture or playing back
slowly.
Notes
•Depending on the disc, you may not be able to
perform some of the operations described.
•For DATA CDs/DATA DVDs, you can search for
a particular point only on an MP3 audio track.
Locating a point quickly using
the ./>PREV (previous)/
NEXT buttons (Search)
During playback, press >or .once
briefly to go to the next or previous chapter/
track/scene.
zHints
When you know the title or chapter number, you
can search directly by entering these numbers using
the number buttons.
•While playing a DVD VIDEO, you can search for
a title or chapter using the number buttons and
ENTER. Press C/cto switch between title and
chapter.
•While playing CDs/VIDEO CDs, you can search
for a track using the number buttons and ENTER.
Locating a point quickly by
playing a disc in fast forward or
fast reverse (Scan)
Press mor Mto fast reverse or fast
forward during playback. To return to normal
play, press H.
Each time you press mor Mduring scan,
the scan speed changes.
With each press the indication changes as
shown below.
◆Playback direction
◆Opposite direction
The “3M”/“3m” playback speed is faster
than “2M”/“2m” and the “2M”/“2m”
playback speed is faster than “1M”/“1m.”
zHint
C/con the player works the same as m/Mon
the remote, and ENTER on the player works the
same as Hon the remote. This function is
effective when you play back a DVD.
123
456
78
0
9
Mm
>
OPTIONS
H
.
DISPLAY
Ht 1Mt2Mt3M
Ht1mt2mt3m
,continued
w
w
w
.
x
i
a
o
y
u
1
6
3
.
c
o
m
Q
Q
3
7
6
3
1
5
1
5
0
9
9
2
8
9
4
2
9
8
T
E
L
1
3
9
4
2
2
9
6
5
1
3
9
9
2
8
9
4
2
9
8
0
5
1
5
1
3
6
7
3
Q
Q
TEL 13942296513 QQ 376315150 892498299
http://www.xiaoyu163.com

1-6
24
Notes
•No sound is output during Scan play for a DVD or
VIDEO CD.
•Scan speed differs depending on the disc type.
Watching frame by frame
(Slow Play)
Press mor Mwhen the player is in pause
mode. To return to normal speed, press H.
Each time you press mor Mduring Slow
Play, the playback speed changes. With each
press the indication changes as follows:
◆Playback direction
◆Opposite direction (DVD only)
The “3 ”/“3 ” playback speed is slower
than “2 ”/“2 ” and the “2 ”/“2 ”
playback speed is slower than “1 ”/“1 .”
Note
Slow speed differs depending on the disc type.
Playing CD/VIDEO CD repeatedly
or in random order (Repeat Play,
Random Play)
You can play all of the tracks on a disc, or a
single track repeatedly (Repeat Play).
Also, you can play the tracks in random order,
too (Random Play).
1Press OPTIONS repeatedly during
playback to select the playback mode.
•Track: repeats the current track.
•All: repeats all tracks on the disc.
•Random: plays all tracks on the disc
randomly.
To return to normal play
Select “ Off” in step 1.
zHint
During Random Play, you can start playing other
randomly selected track by pressing >twice.
Notes
•You cannot use Repeat Play and Random Play
with VIDEO CDs or Super VCDs with PBC
playback.
•Depending on the disc, Random Play may not be
available.
•Thesame track may be repeated several times in
Random Play.
Ht 1t2 t3
Ht 1t2 t3
25
Playing Discs
Checkingtheplayinformation of
the disc
When playing a DVD
Press DISPLAY while playing a DVD, and
then use the Playback Settings Display
(page 21).
When playing a CD
Press DISPLAY.
The playing track number/the total number of
tracks and the elapsed time of the current
track appear. Press DISPLAY repeatedly to
switch the time information as below.
•Track Elapsed
•Track Remain
•DiscElapsed
•DiscRemain
When playing a VIDEO CD
Press DISPLAY.
The player displays “PBC On” (when you set
“PBC” to “Off,” the player displays the
playing track number/the total number of
tracks), the elapsed time, and the audio mode
on the screen.
Playing MP3 Audio
Tracks or JPEG Image
Files
You can play MP3 audio tracks and JPEG
image files on DATA CDs (CD-ROMs/CD-
Rs/CD-RWs) or DATA DVDs (DVD-ROMs/
DVD+RWs/DVD+Rs/DVD-RWs/DVD-Rs)
or USB devices.
For playable MP3 audio files and JPEG
image files, refer to page 44.
When you insert DATA CDs and DATA
DVDs, the list of albums appears.
To play back data on a USB device
1Set the CD/DVD USB switch on the
player’s left side to “USB.”
2Connect the USB device to the USB jack
on the player’s left side.
To disconnect a USB device
1Set the CD/DVD USB switch to “DVD/
CD.”
2Disconnect a USB device.
123
456
78
0
9
MENU
x
.
C/X/x/c
ENTER
X
H
>
USB device
CD/DVD USB switch
,continued
26
Compatible Sony USB devices
JPEG and MP3 file playback via USB port is
confirmed with Sony’s USB Memory Stick
Reader/Writer and USB Flash drive “Pocket
Bit.” (Confirmed device: MSAC-US40,
USM-EX series, USM-J series, USM-JX
series, USM-H series)
Notes
•Donotdisconnect the USB device while its
access indicator is flashing. Doing so may cause
data corruption or loss of data.
•Theaccess indicator on some USB devices may
keep flashing even after the data is transferred.
•USB devices which can connect to the player are
flash memory and multiple card reader. Other
devices (digital still camera, USB hub, etc.)
cannot be connected. When an incompatible
device is connected, “Cannot recognise the
connected device.” appears indicating that the
device is unrecognizable.
•DATA CDs recorded in KODAK Picture CD
format automatically start playing when inserted.
Playing an MP3 audio track
1
Press X/xto select an album on the
list, and press ENTER.
The list of tracks in the album appears.
•To go to the next or previous page,
press >or ..
•To return to the list of albums, press X/
xto select and press ENTER.
2Press X/xto select the track you want
to play, and press ENTER.
Playback starts from the selected track.
To go to the next or previous MP3 audio
track
Press >or ..
To stop playback
Press x.
Notes
•Thetotal albums and files the player can
recognize is approximately 648.
•Thenumber of albums in a disc the player can
recognize is approximately 299.
. .
MY BEST
001/003
03 Wing
02 Fire
01 Stardust
27
Playing Discs
Playing a JPEG image file
1Press X/xto select an album on the
list, and press ENTER.
The list of files in the album appears.
•To go to the next or previous page,
press >or ..
•To return to the list of albums, press X/
xto select and press ENTER.
2Press X/xto select the image you
want to view, and press ENTER.
The selected image appears.
Example:
To display the list of thumbnails
Press MENU when a file is displayed on the
screen.
The image files in the album appear in 12
subscreens with the displayed file in the lead.
•To move to the previous or next page of
the thumbnail list display, select
“bPrev” or “NextB” under the screen.
•To exit the list of thumbnails, press
MENU.
To go to the next or previous JPEG image
file
Press >or ..
To rotate a JPEG image
Press C/X/x/cwhile viewing the image.
X: Reverses the image vertically (up and
down).
x: Reverses the image horizontally (left and
right).
c: Rotates the image 90 degrees clockwise.
C: Rotates the image 90 degrees counter
clockwise.
Note that the view also returns to normal if
you press ./>to go to the next or
previous image.
Example: when Cis pressed once.
To stop viewing the JPEG image
Press x.
The display returns to the list of files.
Notes
•Images may take time to appear due to the number
of recorded files or the size of the folders. If no
image appears after a few minutes, some of the
files included may be too large.
•Some JPEG files, especially progressive JPEG
files or JPEG files of 3,000,000 pixels or more,
may take longer to display than others.
•Theplayer cannot play the JPEG image file that is
larger than 3078 (width) x 2048 (height) in
normal mode, or more than 3,300,000 pixels in
progressive JPEG. (Some progressive JPEG files
cannot be displayed even if the size is within this
specified capacity.)
•Thetotal albums and files the player can
recognize is approximately 648.
•Thenumber of albums in a disc the player can
recognize is approximately 299.
DSC00005
DSC00004
DSC00003
DSC00002
DSC00001
. .
HAWAII
001/028
1234
5678
9101112
,continued
w
w
w
.
x
i
a
o
y
u
1
6
3
.
c
o
m
Q
Q
3
7
6
3
1
5
1
5
0
9
9
2
8
9
4
2
9
8
T
E
L
1
3
9
4
2
2
9
6
5
1
3
9
9
2
8
9
4
2
9
8
0
5
1
5
1
3
6
7
3
Q
Q
TEL 13942296513 QQ 376315150 892498299
http://www.xiaoyu163.com

1-7
28
Enjoying JPEG Images as a Slide
Show
You can play JPEG image files on a DATA
CD or DATA DVD successively as a slide
show.
1While displaying the file you want
to start a slideshow, press MENU.
The list of thumbnails appears.
2Press C/X/x/cto select “Slide
Show” at the bottom of the screen,
and press ENTER.
A slideshow starts from the displayed
file.
To pause slideshow
Press X. By pressing Xagain or H, you can
return to slideshow.
To stop slideshow
Press xor MENU.
Adjusting the Picture
Size and Quality
You can adjust the picture displayed on the
LCD screen. See “General Setup” (page 34),
when outputting the video signal to TV, etc.
1Press OPTIONS.
The Option Menu appears.
2Press X/xto select “LCD Mode”
and press ENTER.
The items for “LCD Mode” appear.
3Press X/xto select items and
press ENTER.
•LCD Aspect: Change the picture size.
Select Normal or Full by pressing
X
/
x
*.
•Backlight: Adjust the brightness of the
LCD screen by pressing C
/
c.
•Contrast: Adjust the difference between
light and dark areas by pressing C
/
c.
•Hue: Adjust the red and green colour
balance by pressing C
/
c.
•Color: Adjust the richness of colours by
pressing C
/
c.
•Default: Returns all settings to the
factory defaults.
*In“Normal,” the pictures are displayed in the
original configuration, retaining the aspect ratio.
For example, a 4:3 picture will have black bands
on both sides, and the letterbox pictures recorded
either in 16:9 or 4:3 will have black bands on all
1234
5678
9101112
123
456
78
0
9
C/X/x/c
ENTER OPTIONS
29
Playing Discs
sides. In “Full,” a 16:9 picture will be adjusted to
fill the entire screen.
zHints
•The screen turns off automatically when the LCD
panel is closed.
•Youcan see the settings for the display in
“General Setup” (page 34).
Notes
•The screen size you can select differs depending
on the DVD.
•You cannot select “Normal” for a DVD recorded
in “16:9.”
•Youcannot adjust the picture size and quality
when playing a VIDEO CD with “PBC” set to
“Off.”
30
Enjoying DivX®Videos
Playing DivX Video Files
You can play DivX video files on DATA CDs
(CD-ROMs/CD-Rs/CD-RWs) and DATA
DVDs (DVD-ROMs/DVD+RWs/DVD+Rs/
DVD-RWs/DVD-Rs).
When you insert DATA CDs and DATA
DVDs, the list of albums appears.
Notes
•When the selected file is not supported, “Data
Error (DivX)” displays on the screen and the file
will not be played.
•Depending on the DivX video file, the picture
may pause or be unclear. In which case, it is
recommended that you create the file at a lower
bit rate. If the sound is still noisy, MP3 is the
recommended audio format. Note, however, this
player does not conform to WMA (Windows
Media Audio) format.
•Because of the compression technology used for
DivX video files, it may take some time after you
press H(play) for the picture to appear.
•Depending on the DivX video file, the sound may
not match the pictures on the screen.
•Theplayer’s speaker does not output DTS sound.
When you play DTS sound tracks on a DivX,
connect the player to an AV amplifier (receiver)
(page 40) and set up “DTS” in “Audio Setup”
(page 36).
•Depending on the DivX video file, you may not be
able to perform some operations.
Playing a DivX video file
1Press X/xto select an album on the
list, and press ENTER.
A list of files in the album appears.
•To go to the next or previous page,
press >or ..
•To return to the list of albums, press X/
xto select and press ENTER.
2Press X/xto select the file you want to
play, and press ENTER.
Playback starts from the selected file.
To go to the next or previous DivX video
file
Press >or ..
To locate a point quickly by playing DivX
video files in fast forward or fast reverse
(Scan)
Press M/mrepeatedly to select the
required speed for the search mode during
playback.
To watch frame by frame (Slow Play)
Press Mrepeatedly in pause mode to select
the required slow motion speed.
To display the playback information
Press DISPLAY repeatedly.
The playback information changes as follow
order, “Title Elapsed,” “Title Remain,”
“Display Off,” and “Subtitle.”
To change the sound
Press AUDIO repeatedly during playback to
select the desired audio signal. If “No Audio”
appears, the player does not support the audio
signal format contained in the disc.
123
456
78
0
9
C/X/x/c
ENTER
DISPLAY
>
.
M
AUDIO
SUBTITLE
x
m
. .
MY FAVORITE
001/002
02 VENUS
01 HAWAII
31
Enjoying DivX®Videos
To change the subtitles
Press SUBTITLE during playback.
Press X/x, and ENTER during displaying the
subtitle information.
To stop playback
Press x.
zHint
If the number of viewing times is preset, you can
play the DivX video files as many times as the
preset number. The following occurrences are
counted:
–when the player is turned off. This includes when
the player is automatically turned off by the Auto
Power Off function. Press Xinstead of xto stop
viewing.
–when the disc lid is opened.
–when another file is played.
Note
The slow reverse function is prohibited.
About DivX Video Files
DivX®is a video file compression
technology, developed by DivX, Inc. This
product is an official DivX®Certified
product.
You can play DATA CDs and DATA DVDs
that contain DivX video files.
DATA CDs and DATA DVDs that
the player can play
This player only plays DATA CDs whose
logical format is ISO 9660 Level 1 or Joliet,
and DATA DVDs of Universal Disk Format
(UDF).
Refer to the instructions supplied with the
disc drives and the recording software (not
supplied) for details on the recording format.
Note
The player may not be able to play some DATA
CDs/DATA DVDs created in the Packet Write
format or multiple sessions.
DivX video files that the player
can play
The player can play data that is recorded in
DivX format, and which has the extension
“.AVI,” or “.DIVX.” The player will not play
files with the extension “.AVI” or “.DIVX” if
they do not contain a DivX video.
Notes
•Theplayer may not play a DivX video file when
the file consists of two or more DivX video files
combined.
•Theplayer cannot play a DivX video file of size
more than 720 (width) u576 (height)/2 GB.
•Depending on the DivX video file, the picture
may be unclear or the sound may skip.
•Theplayer cannot play some DivX video files that
are longer than 3 hours.
•Theplayer can display a file name up to 14
characters. Any characters after the 14th character
do not appear on the screen.
•Characters that are not displayable appear as “*.”
•Depending on the disc, a file name that is not
displayable appears as “*.”
•Youcannot display correctly the CD-R/CD-RW
file names written in the UDF file system.
,continued
w
w
w
.
x
i
a
o
y
u
1
6
3
.
c
o
m
Q
Q
3
7
6
3
1
5
1
5
0
9
9
2
8
9
4
2
9
8
T
E
L
1
3
9
4
2
2
9
6
5
1
3
9
9
2
8
9
4
2
9
8
0
5
1
5
1
3
6
7
3
Q
Q
TEL 13942296513 QQ 376315150 892498299
http://www.xiaoyu163.com

1-8
32
About playback order of DivX
video files
Note that the playback order may not be
applicable, depending on the software used
for creating the DivX video file, or if there are
more than 299 albums and 648 DivX video
files in each album. See “About playback
order of albums, tracks, and files” (page 45).
33
Settings and Adjustments
Using the Setup Display
By using the Setup Display, you can make
various adjustments to items such as picture
and sound. You can also set a language for the
subtitles and the Setup Display, among other
things.
For details on each Setup Display item, see
pages from 34 to 38.
Note
Playback settings stored in the disc take priority
over the Setup Display settings, and not all of the
functions described may work.
1Press OPTIONS when the player is
in stop mode.
The Option Menu appears.
The Setup Display does not appear if
Resume Play is activated. Cancel the
Resume Play status first by pressing x
twice, and the press OPTIONS.
2Press X/xto select “Setup,” then
press ENTER.
The items for “Setup” appear.
3Press X/xto select the desired
Setup item from: “General
Setup,” “Audio Setup,”
“Language Setup,” or “Parental
Control,” then press ENTER.
The Setup item is selected.
Example: “General Setup”
4Press X/xto select an item, then
press ENTER.
The settings for the selected item appear.
Example: “TV Display”
5Press X/xto select a setting, then
press ENTER.
The setting is selected and setup is complete.
Example: “4:3 Pan Scan”
123
456
78
0
9
C/X/x/c
ENTER
OPTIONSO
x
ENTER RETURN
General Setup
TV Display
Angle Mark
16 : 9
On
On
On
Screen Saver
PBC
Select: Cancel:
DivX
Default
ENTER RETURN
General Setup
TV Display
Angle Mark
16 : 9
On
On
On
Screen Saver
PBC
Select: Cancel:
DivX
Default
Selected item
Setup items
ENTER RETURN
General Setup
TV Display
Angle Mark
4 : 3 Pan Scan
4 : 3 Letter Box
16 : 9
On
Screen Saver
PBC
Select: Cancel:
DivX
Default
Settings
Selected setting
ENTER RETURN
General Setup
TV Display
Angle Mark
4 : 3 Pan Scan
On
On
On
Screen Saver
PBC
Select: Cancel:
DivX
Default
,continued
34
To turn off the Setup Display
Press OPTIONS or ORETURN twice.
Settings for the Display
(General Setup)
Choose playback display options and settings
according to the TV to be connected.
Select “General Setup” in the Setup Display.
To use the display, see “Using the Setup
Display” (page 33).
The default settings are underlined.
◆TV Display (DVD only)
Selects the aspect ratio of the connected TV
(4:3 standard or wide).
4:3
Pan Scan Select this when you connect a
4:3 screen TV. Automatically
displays a wide picture on the
entire screen and cuts off the
portions that do not fit.
4:3
Letter Box Select this when you connect a
4:3 screen TV. Displays a wide
picture with bands on the upper
and lower portions of the
screen.
16:9 Select this when you connect a
wide-screen TV or a TV with a
wide mode function.
ENTER RETURN
General Setup
TV Display
Angle Mark 16 : 9
On
On
On
Screen Saver
PBC
DivX
Default
Select: Cancel:
16:9
4:3 Letter Box
4:3 Pan Scan
35
Settings and Adjustments
Note
Depending on the DVD, “4:3 Letter Box” may be
selected automatically instead of “4:3 Pan Scan” or
vice versa.
◆Angle Mark
Displays the angle mark when you can change the
viewing angles during playback of DVDs recorded
with multi-angles.
◆Screen Saver
The screen saver image appears when you
leave the player in pause or stop mode for 15
minutes. The screen saver will help prevent
your display device from becoming damaged
(ghosting). Press Hto turn off the screen
saver.
◆PBC
By using the PBC (Playback Control)
function, you can enjoy playing interactive
programmes and programmes with search
functions (page 20). This set up is effective
when you play back VIDEO CDs with the
PBC function. Set up becomes available by
opening and closing the disc lid after setting.
◆DivX
Displays the registration code for this player.
For more information, go to
http://www.divx.com
on the Internet.
◆Default
Each function returns to its original factory
settings. Note that all of your settings will be
lost.
Settings for the Sound
(Audio Setup)
“Audio Setup” allows you to set the sound
according to the playback and connection
conditions.
Select “Audio Setup” in the Setup Display.
To use the display, see “Using the Setup
Display” (page 33).
The default settings are underlined.
◆Audio DRC (Dynamic Range Control)
(DVD only)
Makes the sound clear when the volume is
turned down when playing a DVD that
conforms to “Audio DRC.”
This function affects the output from the
following jacks:
–AUDIO jack
–OPTICAL OUT jack only when “Dolby
Digital” is set to “Downmix PCM” (page
36).
◆Digital Output
Selects if audio signals are output via the
OPTICAL OUT jack.
On Display the angle mark.
Off Hide the angle mark.
On Activates the screen saver
function.
Off Deactivates the screen saver
function.
On By the PBC function, you can
play back VIDEO CDs via the
menu screen.
Off Turn off the PBC function.
On Makes low sounds clear even if
you turn the volume down.
Off Normally select this position.
On Normally select this position.
When you select “On,” see
“Setting the digital output signal”
for further settings.
Off The influence of the digital circuit
upon the analog circuit is
minimal.
ENTER RETURN
Audio Setup
Audio DRC
Digital Output
Off
On
Select: Cancel:
,continued
w
w
w
.
x
i
a
o
y
u
1
6
3
.
c
o
m
Q
Q
3
7
6
3
1
5
1
5
0
9
9
2
8
9
4
2
9
8
T
E
L
1
3
9
4
2
2
9
6
5
1
3
9
9
2
8
9
4
2
9
8
0
5
1
5
1
3
6
7
3
Q
Q
TEL 13942296513 QQ 376315150 892498299
http://www.xiaoyu163.com

1-9
36
Setting the digital output signal
Switches the method of outputting audio
signals when you connect an audio equipment
such as an AV amplifier (receiver) with the
OPTICAL OUT jack.
For connection details, see page 39.
After setting “Digital Output” to “On,” select
“Dolby Digital” and “DTS.”
If you connect a component that is
incompatible with the selected audio signal, a
loud noise (or no sound) may be heard from
the speakers, damaging your ears or speakers.
◆Dolby Digital (DVD only)
Selects the type of Dolby Digital signal.
◆MPEG (DVD only)
Selects the type of MPEG audio signal.
◆DTS
Selects whether or not to output DTS signals.
Setting the Display or
Sound Track Language
(Language Setup)
“Language Setup” allows you to set various
languages for the on-screen display or sound
track.
Select “Language Setup” in the Setup
Display. To use the display, see “Using the
Setup Display” (page 33).
◆OSD (On-Screen Display)
Switches the display language on the screen.
◆Disc Menu (DVD VIDEO only)
Switches the language for the disc’s menu.
When you select “Original,” the language
given priority in the disc is selected.
◆Subtitle (DVD VIDEO only)
Switches the subtitle language.
When you select “Off,” no subtitle is
displayed.
◆Audio (DVD VIDEO only)
Switches the language of the sound track.
When you select “Original,” the language
given priority in the disc is selected.
Note
If you select a language in “Disc Menu,” “Subtitle,”
or “Audio” that is not recorded on the DVD
VIDEO, one of the recorded languages will be
automatically selected.
Downmix
PCM Select this when the player is
connected to an audio
component without a built-in
Dolby Digital decoder.
Dolby Digital Select this when the player is
connected to an audio
component with a built-in
Dolby Digital decoder.
PCM Select this when the player is
connected to an audio
component without a built-in
MPEG decoder. If you play
multi-channel MPEG audio
sound tracks, only the Front (L)
and Front (R) signals will be
output from your two front
speakers.
MPEG Select this when the player is
connected to an audio
component with a built-in
MPEG decoder.
On Select this when the player is
connected to an audio
component with a built-in DTS
decoder.
Off Select this when the player is
connected to an audio
component without a built-in
DTS decoder.
ENTER RETURN
Language Setup
OSD
Disc Menu English
English
English
English
Subtitle
Audio
Select: Cancel:
37
Settings and Adjustments
Parental Control
Settings (Parental Control)
Playback of some DVD VIDEOs can be
limited, by the parental control function.
Select “Parental Control” in the Setup
Display. To use the display, see “Using the
Setup Display” (page 33).
◆Password
Enter or change a password. By setting a
password, you can limit playback of a DVD
that has the parental control function. When
the Password option is first accessed, enter a
new password (you do not need to enter the
old password.).
◆Parental Control
The lower the setting value, the stricter the
limitation.
To set the parental control, you need the
selected password in “Password,” therefore
first set the password in the set up.
Changing the password
1Press X/xto select “Password” in the
Parental Control setting display, and
press ENTER.
2Select “Change,” and press ENTER.
The display for entering the password
appears.
3Enter your current 6-digit password in
the “Old Password” box.
4Enter your new 6-digit password in the
“New Password” box.
5Enter your new 6-digit password once
again in the “Verify Password” box,
then press ENTER to confirm.
If you make a mistake entering your
password
Press CLEAR, or press Cto return one by one
before pressing ENTER in step 5, and then re-
enter the password.
Setting the parental control
(limited playback)
1Press X/xto select “Parental Control”
in the Parental Control setting display,
and press ENTER.
The display for setting the playback
limitation level appears.
2Press X/xto select the limitation level
(1-8), and press ENTER.
The lower the value, the stricter the
limitation.
The display for entering the password
appears.
ENTER RETURN
Parental Control
Password
Parental Control
Select: Cancel:
1
2
3
4
5
6
7
8 Adult
ENTER RETURN
Parental Control
Password
Parental Control
Select: Cancel:
,continued
38
3Enter or re-enter your 6-digit password
using the number buttons, then press
ENTER.
Parental Control setting is complete.
To play a disc for which Parental Control is
set
1Insert the disc and press H.
The display for entering your password
appears.
2Enter your 6-digit password using the
number buttons, then press ENTER.
The player starts playback.
If you forget your password
Remove the disc and repeat the steps outlined in
“Changing the password” (page 37). Enter
“136900” in the “Old Password” box, and then enter
your new 6-digit password in the “New Password”
box and “Verify Password” box.
Notes
•When you play discs which do not have the
Parental Control function, playback cannot be
limited on this player.
•Depending on the disc, you may be asked to
change the parental control level while playing
the disc. In this case, enter your password, then
change the level. If the Resume Play mode is
cancelled, the level returns to the previous level.
OK
Password
Enter password, then press .
Enter
Parental Control
39
Hookups
Hookups
Connecting to another device
To switch LINE SELECT (IN/OUT) switch
LINE SELECT IN: Input images or audio from an exterior device. The “Line in” message will
be displayed on the LCD screen until the signal from the exterior device
is received.
LINE SELECT OUT:Sends the playback signal from this player to a TV.
Notes
•Plugcords securely to prevent noise.
•Refertothe instructions supplied with the components to be connected.
•Youcannot connect this player to a TV that does not have a video input jack.
•Besure to disconnect the mains lead of each component before connecting.
•Connect the player to the TV directly. Image quality may suffer when the video output from the player is
passed through a video deck on to a TV.
Connecting to TV monitor
To send the playback signal to a TV or a monitor
1Set the LINE SELECT switch on the player’s right side to “OUT.”
DC IN
9.5V
LINE SELECTAUDIO VIDEOPHONES
OPTICAL
OUT
AB INOUT
TV or monitor with audio/
video intput jacks
To AUDIO/VIDEO
Audio/video cord (supplied)
,continued
w
w
w
.
x
i
a
o
y
u
1
6
3
.
c
o
m
Q
Q
3
7
6
3
1
5
1
5
0
9
9
2
8
9
4
2
9
8
T
E
L
1
3
9
4
2
2
9
6
5
1
3
9
9
2
8
9
4
2
9
8
0
5
1
5
1
3
6
7
3
Q
Q
TEL 13942296513 QQ 376315150 892498299
http://www.xiaoyu163.com

1-10
40
Connecting to an AV amplifier (receiver)
Example 1
To send the playback signal to an AV amplifier (receiver)
1
Set the LINE SELECT switch on the player’s right side to “OUT.”
*Theyellow plug is used for video signals (page 39).
Example 2
To send the playback signal to an AV amplifier (receiver)
1
Set the LINE SELECT switch on the player’s right side to “OUT.”
2
Set “Digital Output” to “On” in “Audio Setup” (page 35).
DC IN
9.5V
LINE SELECTAUDIO VIDEOPHONES
OPTICAL
OUT
AB INOUT
Stereo amplifier
To AUDIO
Audio/video cord (supplied)
To AUDIO input
DC IN
9.5V
LINE SELECTAUDIO VIDEOPHONES
OPTICAL
OUT
AB INOUT
Amplifier with Dolby Digital
or DTS decoder
To OPTICAL OUT
Optical digital cord (not supplied)
To AUDIO input
41
Hookups
Connecting to Video Player or Camcorder
To recieve the playback signal from a Video Player or Camcorder
1Set the LINE SELECT switch on the player’s right side to “IN.”
Note
Set the LINE SELECT switch to “OUT” after use. You cannot play back on the player if the switch is set to
“IN.”
DC IN
9.5V
LINE SELECTAUDIO VIDEOPHONES
OPTICAL
OUT
AB INOUT
Video player or camcorder
To AUDIO/VIDEO
Audio/video cord (supplied)
To AUDIO/VIDEO output
42
Additional Information
Troubleshooting
If you experience any of the following
difficulties while using the player, use this
troubleshooting guide to help remedy the
problem before requesting repairs. Should
any problem persist, consult your nearest
Sony dealer (For customers in the USA only).
Power
The power is not turned on.
,Check that the mains lead is connected
securely.
,When using with the battery pack, check
that the battery pack is sufficiently charged.
Picture
There is no picture/picture noise appears.
,The disc is dirty or flawed.
,The brightness is set at minimum. Set the
brightness in “LCD Mode” (page 28).
,When you play discs, set the LINE SELECT
switch to “OUT.” When you send the
playback signal to other device, set the
LINE SELECT switch to “OUT.” When
you receive the playback signal from other
device, set the LINE SELECT switch to
“IN” (page 39
).
,Re-connect the connecting cord securely.
,The connecting cords are damaged.
,Check the connection to your TV (page 39)
and switch the input selector on your TV so
that the signal from the player appears on
the TV screen.
,The player is connected to the
COMPONENT VIDEO IN (Y, P
B
, P
R
) jacks
of high-vision TV.
,If the picture output from your player goes
through your video deck to get to your TV
or if you are connected to a combination
TV/VIDEO player, the copy-protection
signal applied to some DVD programmes
could affect picture quality.
The picture does not fill the screen, even
though the aspect ratio is set in “TV
Display” under “General Setup.”
,The aspect ratio of the disc is fixed on your
DVD.
The black points appear and the red, blue,
green points remain on the LCD.
,This is a structural property of the LCD and
not mulfunction.
Sound
There is no sound.
,The player is in pause mode or in Slow Play
mode.
,The player is in fast forward or fast reverse
mode.
,While playing a Super VCD on which the
audio track 2 is not recorded, no sound will
come out when you select “Stereo 1,” “Left
1,” or “Right 1.”
,Re-connect the connecting cord securely.
,The connecting cord is damaged.
,The player is connected to the wrong input
jack on the amplifier (receiver) (page 40).
,The amplifier (receiver) input is not
correctly set.
,If the audio signal does not come through
the OPTICAL OUT jack, check the audio
settings (page 36).
The sound volume is low.
,The sound volume is low on some DVDs.
The sound volume may improve if you set
“Audio DRC” in “Audio Setup” to “On”
(page 35).
Operation
The remote does not function.
,The batteries in the remote are weak.
,There are obstacles between the remote and
the player.
,The distance between the remote and the
player is too far.
,The remote is not pointed at the remote
sensor on the player.
,Direct sunlight or strong illumination is
striking the remote sensor.
43
Additional Information
Nothing happens when buttons are
pressed.
,
The player’s
\
/
1
/HOLD switch is set on
“HOLD” (page 16).
The disc does not play.
,The disc is turned over.
Insert the disc with the playback side facing
down.
,The disc is not set correctly.
,The player cannot play certain discs
(page 7).
,The region code on the DVD does not match
the player
(
page 8
)
.
,Moisture has condensed inside the player
(
page 3
)
.
,The player cannot play a recorded disc that
is not correctly finalized
(
page 7
)
.
,Parental Control has been set. Change the
setting.
,The CD/DVD USB switch on the player’s
left side is set to “USB.”
,The LINE SELECT switch on the player’s
right side is set to “IN.”
The player starts playing the disc
automatically.
,The disc features an auto playback function.
Playback stops automatically.
,While playing discs with an auto pause
signal, the player stops playback at the auto
pause signal.
Some functions such as Stop, Search,
Scan, Slow Play, Repeat Play, or Random
Play cannot be performed.
,Depending on the disc, you may not be able
to do some of the operations above. Refer to
the operating instructions supplied with the
disc.
The language for the sound track cannot
be changed.
,Try using the DVD’s menu instead of the
direct selection button on the remote
(page 17).
,Multilingual tracks are not recorded on the
DVD being played.
,The DVD prohibits the changing of the
language for the sound track.
The subtitle language cannot be changed
or turned off.
,Try using the DVD’s menu instead of the
direct selection button on the remote
(page 17).
,Multilingual subtitles are not recorded on
the DVD being played.
,The DVD prohibits the changing of
subtitles.
The angles cannot be changed.
,Try using the DVD’s menu instead of the
direct selection button on the remote
(page 17).
,Multi-angles are not recorded on the DVD
being played.
,The angle can only be changed when the
“”indicator lights up on the screen
(page 19).
,The DVD prohibits changing of the angles.
The MP3 audio track cannot be played
(page 44).
,The DATA CD is not recorded in an MP3
format that conforms to ISO 9660 Level 1 or
Joliet.
,The DATA DVD is not recorded in MP3
format that conforms to UDF (Universal
Disk Format).
,The MP3 audio track does not have the
extension “.MP3.”
,The data is not formatted in MP3 even
though it has the extension “.MP3.”
,The data is not MPEG-1 Audio Layer III
data.
,The player cannot play audio tracks in
mp3PRO format.
,The MP3 audio track is damaged.
,continued
w
w
w
.
x
i
a
o
y
u
1
6
3
.
c
o
m
Q
Q
3
7
6
3
1
5
1
5
0
9
9
2
8
9
4
2
9
8
T
E
L
1
3
9
4
2
2
9
6
5
1
3
9
9
2
8
9
4
2
9
8
0
5
1
5
1
3
6
7
3
Q
Q
TEL 13942296513 QQ 376315150 892498299
http://www.xiaoyu163.com

1-11
44
The JPEG image file cannot be played
(page 44).
,The DATA CD is not recorded in a JPEG
format that conforms to ISO 9660 Level 1 or
Joliet.
,The DATA DVD is not recorded in JPEG
format that conforms to UDF (Universal
Disk Format).
,The JPEG image file does not have the
extension “.JPEG.”
,The data is not formatted in JPEG even
though it has the extension “.JPEG.”
,The JPEG image file format does not
conform to DCF (page 44).
,The image is larger than 3078 (width) u
2048 (height) in normal mode, or more than
3,300,000 pixels in progressive JPEG.
(Some progressive JPEG files cannot be
displayed even if the file size is within this
specified capacity.)
,The JPEG image file is damaged.
The DivX video file cannot be played.
,The file is not created in DivX format.
,The file has an extension other than “.AVI”
or “.DIVX.”
,The DATA CD (DivX video)/DATA DVD
(DivX video) is not created in a DivX
format that conforms to ISO 9660 Level 1 or
Joliet/UDF.
,The DivX video file is larger than 720
(width) × 576 (height).
The album/track/file names are not
displayed correctly.
,The player can only display numbers and
alphabet. Other characters are displayed as
“*.”
The disc does not start playing from the
beginning.
,Repeat Play or Random Play is selected
(pages 22 and 24).
,Resume play has taken effect (page 17).
The player does not operate properly.
,When static electricity, etc., causes the
player to operate abnormally, unplug the
player.
About MP3 Audio Tracks
and JPEG Image Files
MP3 is audio compression technology that
satisfies the ISO/IEC MPEG regulations.
JPEG is image compression technology.
You can play DATA CDs/DATA DVDs that
contain MP3 audio tracks or JPEG image
files.
DATA CDs/DATA DVDs that the
player can play
You can play back DATA CDs (CD-ROMs/
CD-Rs/CD-RWs) or DATA DVDs (DVD-
ROMs/DVD+RWs/DVD+Rs/DVD-RWs/
DVD-Rs) recorded in MP3 (MPEG-1 Audio
Layer III) and JPEG format.
However, this player only plays DATA CDs
whose logical format is ISO 9660 Level 1 or
Joliet, and DATA DVDs of Universal Disk
Format (UDF).
Refer to the instructions supplied with the
disc drives and the recording software (not
supplied) for details on the recording format.
Note
The player may not be able to play some DATA
CDs/DATA DVDs created in the Packet Write
format or multiple sessions.
MP3 audio track or JPEG image
file that the player can play
The player can play the following tracks and
files:
•MP3 audio tracks with the extension
“.MP3.”
•JPEG image files with the extension
“.JPEG” or “.JPG.”
•JPEG image files that conform to the DCF*
image file format.
*“Design rule for Camera File system”: Image
standards for digital cameras regulated by JEITA
(Japan Electronics and Information Technology
Industries Association).
45
Additional Information
Notes
•Change the extension to “.jpg,” for files with
“.jpe” or “.jpeg” extension.
•The player will play any data with the extension
“.MP3,” “.JPG,” or “.JPEG,” even if they are not
in MP3 or JPEG format. Playing this data may
generate a loud noise which could damage your
speaker system.
•The player does not conform to audio tracks in
mp3PRO format.
•Some JPEG files cannot be played.
•The player can display a file or track name up to
14 characters. Any characters after the 14th
character do not appear on the screen.
•Characters that are not displayable appear as “*.”
•Depending on the disc, a file or track name that is
not displayable appears as “*.”
•Youcannot display correctly the CD-R/CD-RW
file names written in the UDF file system.
•When playing an MP3 audio track recorded in
VBR mode, you cannot display the bit rate
correctly.
About playback order of albums,
tracks, and files
Tracks and files within an album play in the
order of the recorded media (CD-R etc.).
zHint
Since a disc with many trees takes longer to start
playback, it is recommended that you create albums
with no more than two trees.
Notes
•The player can recognize up to 299 albums
(including albums that do not contain MP3 audio
tracks and JPEG image files). The player will not
play any albums beyond the 299th album.
•The player can recognize a combined total of up
to 648 files, tracks, and albums. The player will
not play beyond the 648th file, track or album.
•Depending on the writing condition of the disc,
the total number of files, tracks, and albums
recognizable may be fewer than 648.
•The Album List displays only the currently
playing album name. Any album located on the
upper layer is displayed as “\..\.”
47
Additional Information
Index to Parts and Controls
For more information, see the pages indicated in parentheses.
Upper view
t
A./>(previous/next) buttons (16)
Bx(stop) button (16)
CX(pause) button (16)
DH(play) button (15)
ESpeaker (18)
FLCD panel (10)
GDISPLAY button (21)
HMENU button (17)
IRETURN button (21)
J(remote sensor) (9)
KOPTIONS button (20)
LC/X/x/cbuttons, ENTER button (17)
MDisc lid (15)
NPUSH CLOSE (15)
,continued 48
Front view
AOPEN knob (15)
B(remote sensor) (9)
CCHARGE indicator (13)
D\/1 (on/standby)/HOLD switch (15)
EPower indicator (15)
Left view
ACD/DVD USB switch (15) BUSB jack (25)
Right view
AVOLUME +/– (sound volume) button
(16)
BPHONES (headphone) jack A, B
CAUDIO (input/output) jack/OPTICAL
OUT (optical output) jack (39, 40)
DVIDEO (input/output) jack (39)
ELINE SELECT (IN/OUT) switch (15)
FDC IN 9.5V (AC adaptor input) jack
(11)
OPEN
HOLD
CHARGE
CD/DVD USB
DC IN
9.5V
LINE SELECTAUDIO VIDEOPHONES
OPTICAL
OUT
AB INOUTVOLUME
w
w
w
.
x
i
a
o
y
u
1
6
3
.
c
o
m
Q
Q
3
7
6
3
1
5
1
5
0
9
9
2
8
9
4
2
9
8
T
E
L
1
3
9
4
2
2
9
6
5
1
3
9
9
2
8
9
4
2
9
8
0
5
1
5
1
3
6
7
3
Q
Q
TEL 13942296513 QQ 376315150 892498299
http://www.xiaoyu163.com

1-12 E
49
Additional Information
Remote
ADISPLAY button (21)
BNumber buttons (17)
*
CTOP MENU button (17)
DC/X/x/cbuttons, ENTER button (17)
EORETURN button (21)
F./>PREV (previous)/NEXT
buttons (16)
Gm/M(scan/slow) buttons (23)
HADVANCE button (16)
IXPAUSE button (16)
J\/1(on/standby) button (15)
KVolume +/– buttons (16)
LCLEAR button (37)
MAUDIO button (18)
*
NMENU button (17)
OSUBTITLE button (19)
PANGLE button (19)
QOPTIONS button (20)
RHPLAY button (15)
*
SxSTOP button (16)
*Usethetactile dot as a reference when operating
the player. The number 5 button has a tactile dot.
123
456
78
0
9
50
Index
Numerics
16:9
34
4:3 Letter Box
34
4:3 Pan Scan
34
A
Album
45
Angle
19
Audio
18, 36
Audio DRC
35
Audio Setup
35
B
Batteries
9
C
CD
7, 15
Connecting
39
D
DATA CD
6, 31, 44
DATA DVD
6, 31, 44
Digital output
35
Disc Menu
36
Display
Playback Settings
Display
21
Setup Display
33
DivX
®
30, 31
Dolby Digital
18, 36
DTS
18, 36
DVD
6, 15
DVD+RW
6
DVD’s menu
17
DVD-RW
6, 20
F
Fast forward
23
Fast reverse
23
G
General Setup
34
H
Handling discs
2
J
JPEG
6, 44
L
Language Setup
36
M
MP3
6, 44
O
OPTICAL OUT
35
Original
20
OSD (On-Screen Display)
36
P
PBC Playback
20
Play List
20
R
Remote
9, 49
Repeat
CD/VIDEO CD
24
DVD
22
Repeat Play
22, 24
Resume Play
17
S
Scan
23
Screen Saver
35
Search
23
Setup
33
Setup Display
33
Slide Show
28
Slow Play
24
Subtitle
36
T
Top Menu
17
Troubleshooting
42
TV Display
34
U
Usable discs
7
V
VIDEO CD
6, 8, 15
w
w
w
.
x
i
a
o
y
u
1
6
3
.
c
o
m
Q
Q
3
7
6
3
1
5
1
5
0
9
9
2
8
9
4
2
9
8
T
E
L
1
3
9
4
2
2
9
6
5
1
3
9
9
2
8
9
4
2
9
8
0
5
1
5
1
3
6
7
3
Q
Q
TEL 13942296513 QQ 376315150 892498299
http://www.xiaoyu163.com

2-1
Note: Follow the disassembly procedure in the numerical order given.
2-1. MAIN BOARD, USB BOARD
SECTION 2
DISASSEMBLY
DVP-FX850
8four screws
(M2.5 ×11)
3two foot rubbers
1two foot rubbers
4two screws
(TS2 ×8.5)
2two screws
(TS2 ×8.5)
9bottom assy
qg six screws
(TS2 ×4.5)
qh MAIN board 0connector
qa connector
qf screw
(TS2 ×4.5)
6six screws
(TS2 ×8.5) 5two screws (TS2 ×8.5)
7open preve sheet
qh screw
(TS2 ×4.5)
qj USB board
qs connector
qd connector
w
w
w
.
x
i
a
o
y
u
1
6
3
.
c
o
m
Q
Q
3
7
6
3
1
5
1
5
0
9
9
2
8
9
4
2
9
8
T
E
L
1
3
9
4
2
2
9
6
5
1
3
9
9
2
8
9
4
2
9
8
0
5
1
5
1
3
6
7
3
Q
Q
TEL 13942296513 QQ 376315150 892498299
http://www.xiaoyu163.com

2-3
2-3. UPPER BLOCK
9disc lid assy
3damping support
2two screws
(TS2 ×4.5)
8disc open supp.
5disc lid open spr bracket
7two screws
(TS2 ×4.5)
4three screws
(TS2 ×4.5)
1two screws
(TS2 ×4.5)
qa upper block
0spring
6spring
w
w
w
.
x
i
a
o
y
u
1
6
3
.
c
o
m
Q
Q
3
7
6
3
1
5
1
5
0
9
9
2
8
9
4
2
9
8
T
E
L
1
3
9
4
2
2
9
6
5
1
3
9
9
2
8
9
4
2
9
8
0
5
1
5
1
3
6
7
3
Q
Q
TEL 13942296513 QQ 376315150 892498299
http://www.xiaoyu163.com

2-4 E
2-4. LCD PANEL ASSY/DRIVER BOARD
6four screws
(M2.5 ×7.5)
qf three screws
(TS1.7 ×5)
qd DRIVER board
8connector
3two screw pads
4two screws
(TS1.7 ×4)
4two screws
(TS1.7 ×4)
2two screws
(TS1.7 ×4)
5two screws
(TS1.7 ×2)
1two screw pads
3two screw pads
qa hinge assy
qg panel brace
qh panel assy
qk hinge brace
8housing assy
0connector
7two
connectors
9connector
qs three screws
(TS1.7 ×5)
qs three screws (TS1.7 ×5)
qf two screws
(TS1.7 ×5)
qj two screws
(TS1.7 ×2.5)
w
w
w
.
x
i
a
o
y
u
1
6
3
.
c
o
m
Q
Q
3
7
6
3
1
5
1
5
0
9
9
2
8
9
4
2
9
8
T
E
L
1
3
9
4
2
2
9
6
5
1
3
9
9
2
8
9
4
2
9
8
0
5
1
5
1
3
6
7
3
Q
Q
TEL 13942296513 QQ 376315150 892498299
http://www.xiaoyu163.com
Other manuals for DVP-FX850
3
Table of contents
Other Sony CD Player manuals

Sony
Sony CFD-G500L User manual

Sony
Sony MDP-600 User manual

Sony
Sony CDP-C435 - Compact Disc Player User manual

Sony
Sony HCD-F250AV - Compact Disc Receiver System User manual

Sony
Sony CFD-V30L User manual

Sony
Sony MZ-R37 User manual

Sony
Sony CFD-10 User manual

Sony
Sony CDX-R3300T Product guide

Sony
Sony CFD-449 User manual

Sony
Sony Discman D-170AN User manual

Sony
Sony Walkman MZ-E3 User manual

Sony
Sony Walkman D-NF600 User manual

Sony
Sony CFD-555 User manual

Sony
Sony CDX-L410 User manual

Sony
Sony CFD-V7 User manual

Sony
Sony D-EJ616CK - Portable Cd Player Setup guide

Sony
Sony CDP-297 User manual

Sony
Sony D-190 User manual

Sony
Sony CDP-X339ES User manual

Sony
Sony CDX GT310 - Radio / CD