Allegro Flexy Twin User manual
Flexy Twin

Z:\Istruzioni Articoli + Schede Tecniche\ISTRUZIONI VARIE TUTTI GLI ARTICOLI\FLEXY TWIN\TESTO\FLEXY TWIN- IT-20140119.doc
FLEXY TWIN
ISTRUZIONI DI MONTAGGIO E CONSIGLI DI UTILIZZO
COME PRIMA COSA LEGGERE QUESTO MANUALE
Queste istruzioni devono essere consegnate all'utilizzatore finale del prodotto che le deve leggere e conservare.
Queste istruzioni sono fornite per permettere un facile montaggio del FLEXY TWIN e per la Vostra sicurezza. E' necessario che
seguiate in modo preciso le istruzioni fornite.
Se ciò non avviene si possono verificare danni a cose o ferite a persone. In caso di dubbi consultate sempre una persona
tecnicamente esperta.
Questo simbolo indica informazioni di grande importanza. Fate molta attenzione a quanto riportato dove appare
questo simbolo. Ciò non significa che le altre informazioni riportate in questo manuale non sono importanti.
Conservate questo manuale per un utilizzo futuro.
ISTRUZIONI IMPORTANTI PER LA SICUREZZA
SI APPLICA A TUTTO IN QUESTA SEZIONE
1. ISTRUZIONI
Leggete e seguite per intero tutte le istruzioni. Viene fornito un manuale unico per tutte le varie possibilità di
combinazione del FLEXY TWIN.
Si possono verificare danni o ferite se il FLEXY TWIN non è montato e utilizzato come descritto nelle istruzioni.
Per garantire un utilizzo sicuro é molto importante che chiunque utilizzi il FLEXY TWIN abbia letto in
precedenza e per intero e le istruzioni.
Non lasciate utilizzare il FLEXY TWIN da nessuno che non sia pratico con gli aspetti riguardanti la sicurezza del
FLEXY TWIN.
2. PRECAUZIONI
Il FLEXY TWIN é principalmente una protezione contro il sole, non é una protezione contro tutte le intemperie.
Esso deve essere chiuso e protetto con il fodero in dotazione all'arrivo di vento forte o temporali, così come in
presenza di pioggia intensa o di neve (pericolo di sacche).
Chiudere sempre il FLEXY TWIN e applicare il fodero di protezione ogni qual volta non lo si può controllare.
La base deve essere zavorrata con un peso di 140 kg (≈302 libbre).

Z:\Istruzioni Articoli + Schede Tecniche\ISTRUZIONI VARIE TUTTI GLI ARTICOLI\FLEXY TWIN\TESTO\FLEXY TWIN- IT-20140119.doc
ISTRUZIONI DI MONTAGGIO
COMPONENTI (Fig. 1, 2):
FIG 1A—FLEXY TWIN CON SINGOLA TENDA
(Fig 2A) Nr 1 tenda scorrevole ( A ) con traversa ( C) e fodero di protezione ( B’ )
(Fig 3A) Nr 1 Palo verticale ( DA )
(Fig 4A) Nr 1 Gruppo leva ( E ) e un sacchetto contenente le chiavi a brugola da 3 ( e3)-da 4 ( e4 )-e da 5 ( e5 )
(Fig 5) Nr 1 base in ferro zincato a caldo ( F ), set di zavorre ( G’) ( G’’ ), un sacchetto di ferramenta ( H ) contenente Nr 6
piedini ( f ), nr 4 viti M 10X30 ( d ) e una chiave a brugola 6 ( e6 ).
FIG 1B—FLEXY TWIN CON DOPPIA TENDA
(Fig 2B) Nr 2 tende scorrevoli ( A ) con traversa ( C ) e fodero di protezione ( B’’ )
(Fig 3B) Nr 1 Palo verticale ( DB )
(Fig 4B) Nr 2 Gruppi leva ( E ) e un sacchetto contenente le chiavi a brugola da 3 ( e3)-da 4 ( e4 ) e da 5 ( e5 )
(Fig 5) Nr 1 base in ferro zincato a caldo ( F ), set di zavorre ( G’ ) ( G’’ ), un sacchetto di ferramenta ( H ) contenente Nr 6
piedini ( f ), nr 4 viti M 10X30 ( d ) e una chiave a brugola 6 ( e6 ).
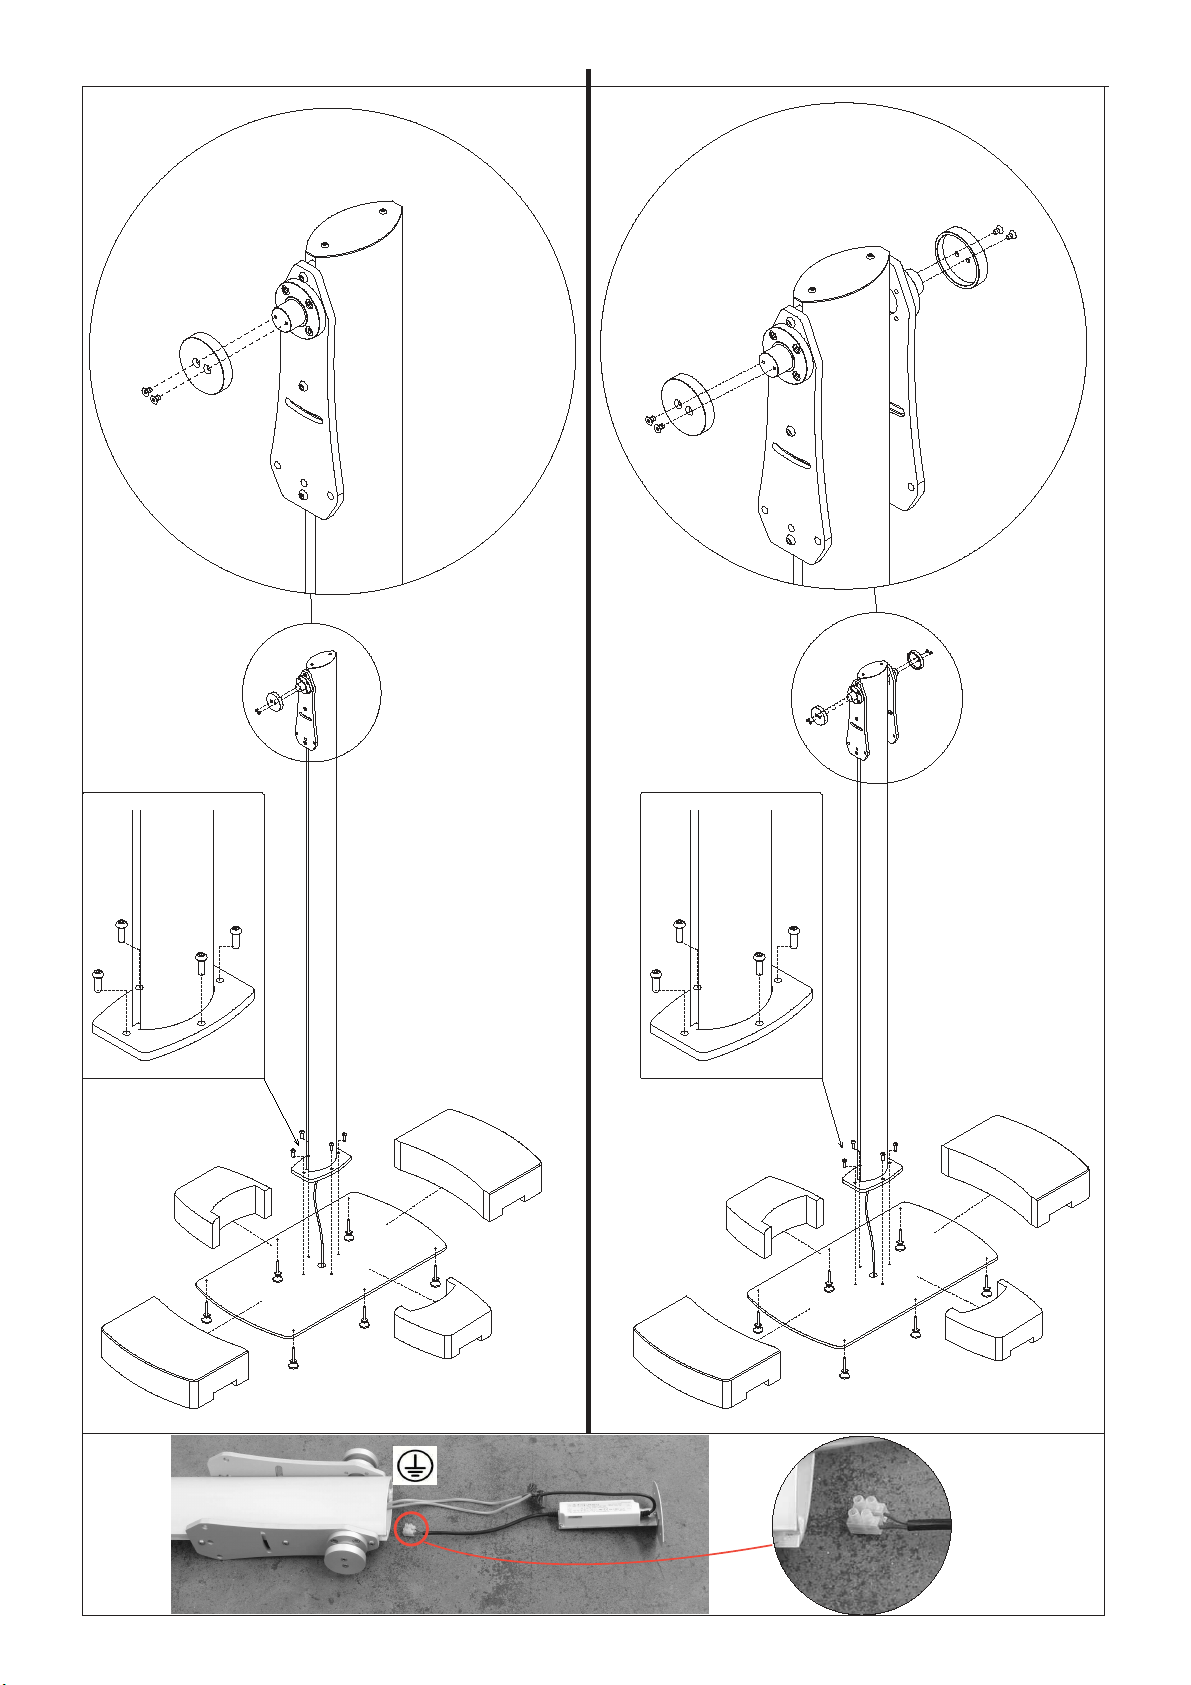
MONTAGGIO E POSIZIONAMENTO DELLA BASE (Fig. 6A, 6Be 6C )
Togliere il contenuto dal sacchetto della ferramenta ( H ).
Avvitare i piedini ( f ) alla base ( F ), posizionarla nel punto in cui si vuole montare il Flexy Twin. Verificare che la base ( F ) sia
in piano ed eventualmnte regolare i piedini ( f ).
Se il palo e’ provvisto di luci rimuovere il tappo ( L ). Fare passare il cavo di alimentazione dal foro della base all’interno del palo
e collegarlo all’alimentatore che è fissato al tappo ( L ). Attenzione il cavo e il relativo collegamento e’ a carico del cliente che lo
deve far eseguire da un elettricista avendo cura che il cavo di messa a terra sia fissato alla struttura del palo.
Fissare il palo verticale ( DA ) o ( DB ), alla base ( F ) con le 4 viti ( d ) e serrarle con forza usando la chiave a brugola ( e6 ).
Posizionare le 4 zavorre ( G’ ) e ( G’’ ) come illustrato nel disegno.
Per l’installazione con base Stylo GBASE003900 fare riferimento alle istruzioni della stessa.
Con la chiave a brugola ( e4 ) Svitare le viti ( g) e togliere la flangia ( I).
MONTAGGIO DELLA TENDA (Figg. 7, 8 e 9)
Rimuovere le 2 viti ( h) dalla traversa ( C ).
Con la chiave a brugola ( e3 ) rimuovere dal gruppo leva ( E)la vite ( i) e rondella (M).
Inserire la traversa ( C) nei carrelli della tenda ( A ) controllando che i due rami della fune ( O ) non siano attorcigliati, ma siano
paralleli.
Fissare il gruppo leva ( E) alla traversa ( C) con le viti ( h ).
ATTENZIONE: serrare bene le viti con la chiave a brugola ( e5).

Z:\Istruzioni Articoli + Schede Tecniche\ISTRUZIONI VARIE TUTTI GLI ARTICOLI\FLEXY TWIN\TESTO\FLEXY TWIN- IT-20140119.doc
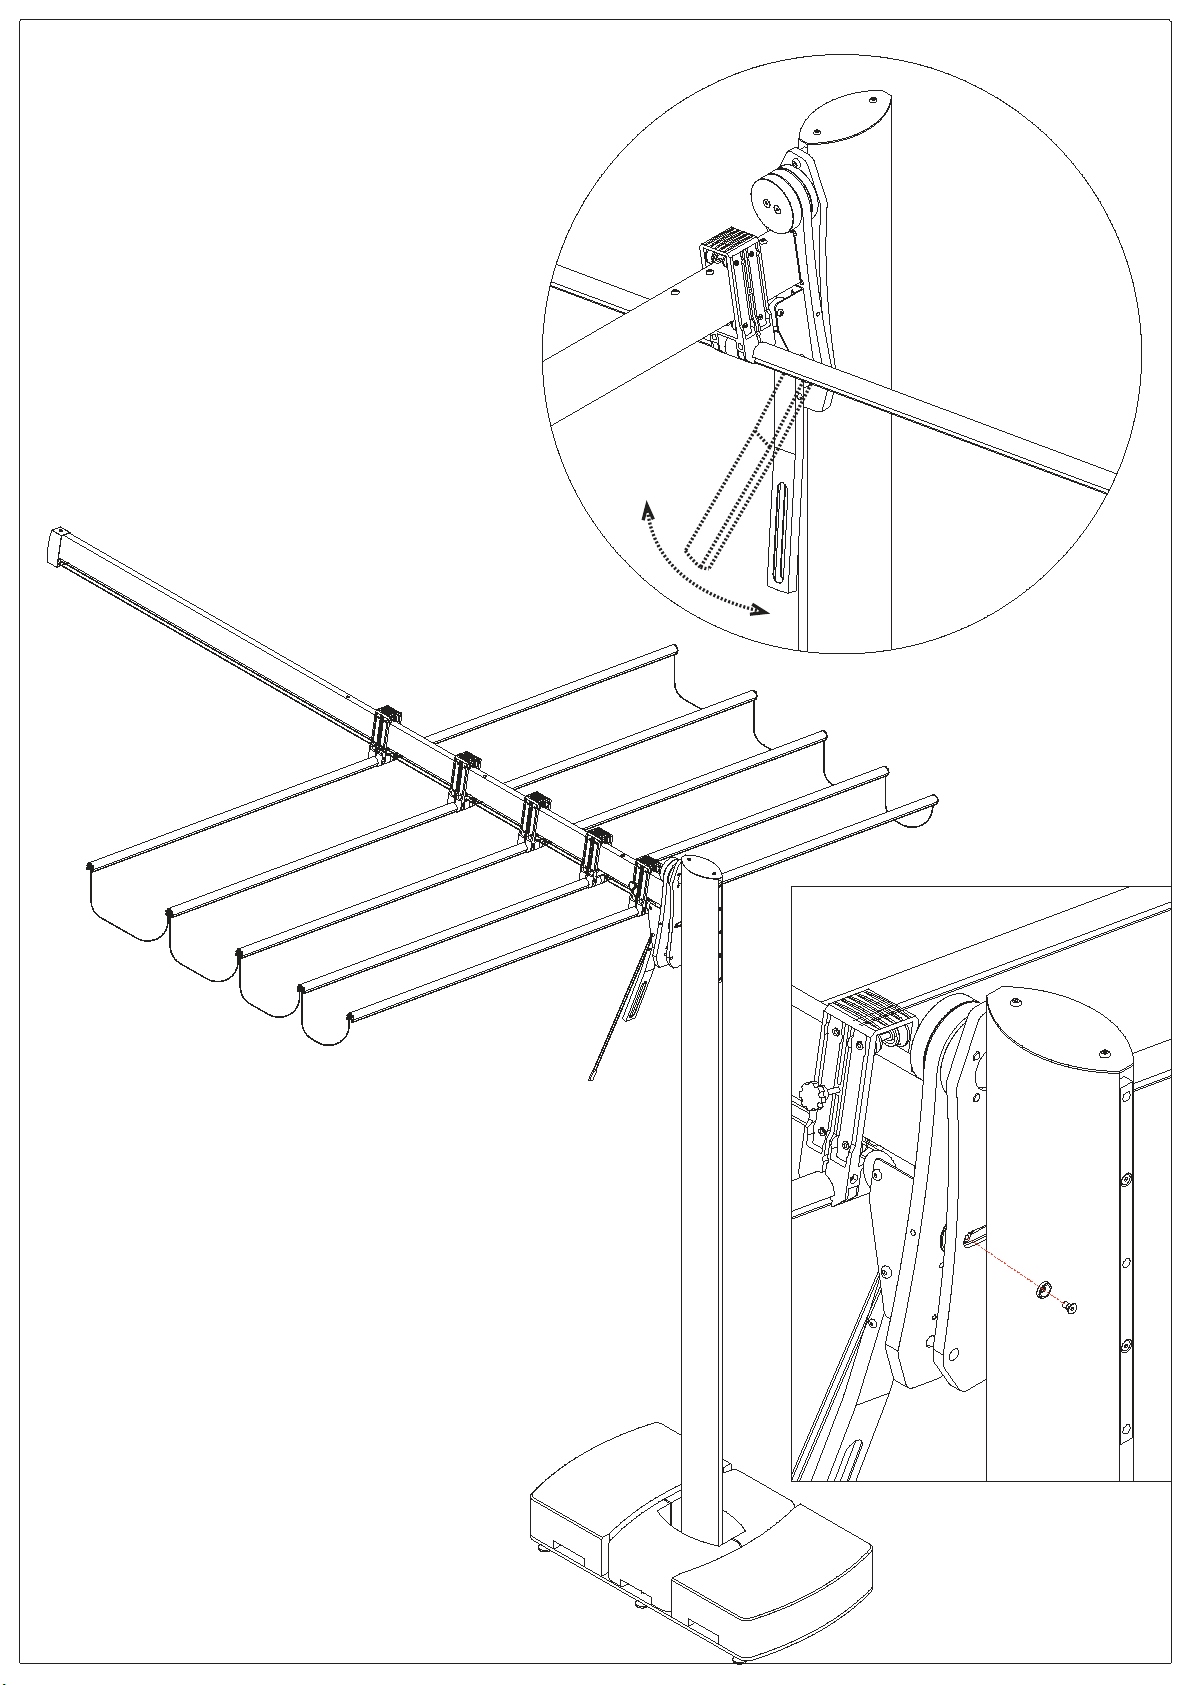
MONTAGGIO DELLA TENDA SCORREVOLE SUL PALO (Figg. 9, 10 e 11 )
ATTENZIONE: Per evitare di danneggiare il prodotto la seguente operazione deve essere eseguita
contemporaneamente da due persone con 2 scale.
Sollevare la tenda completa ed accoppiare il gruppo leva ( E) al perno ( P) del palo verticale ( DA oDB ).
Rimontare la flangia ( I ) ebloccare il tutto con le 2 viti ( g).
ATTENZIONE: nella fase descritta sopra quando il gruppo leva ( E) e’ accoppiato al perno ( P) spingere leggermente verso
l’alto la punta della tenda mentre si stanno titando le 2 viti ( g). Queste devono essere serrate con forza.
Tirare la leva ( Q)e inclinare la tenda su un lato. Inserire la rondella ( M) nell’asola ( R) e bloccarla con la vite ( i).
ATTENZIONE: questa operazione e’ indispensabile per la stabilita’ della tenda al vento.
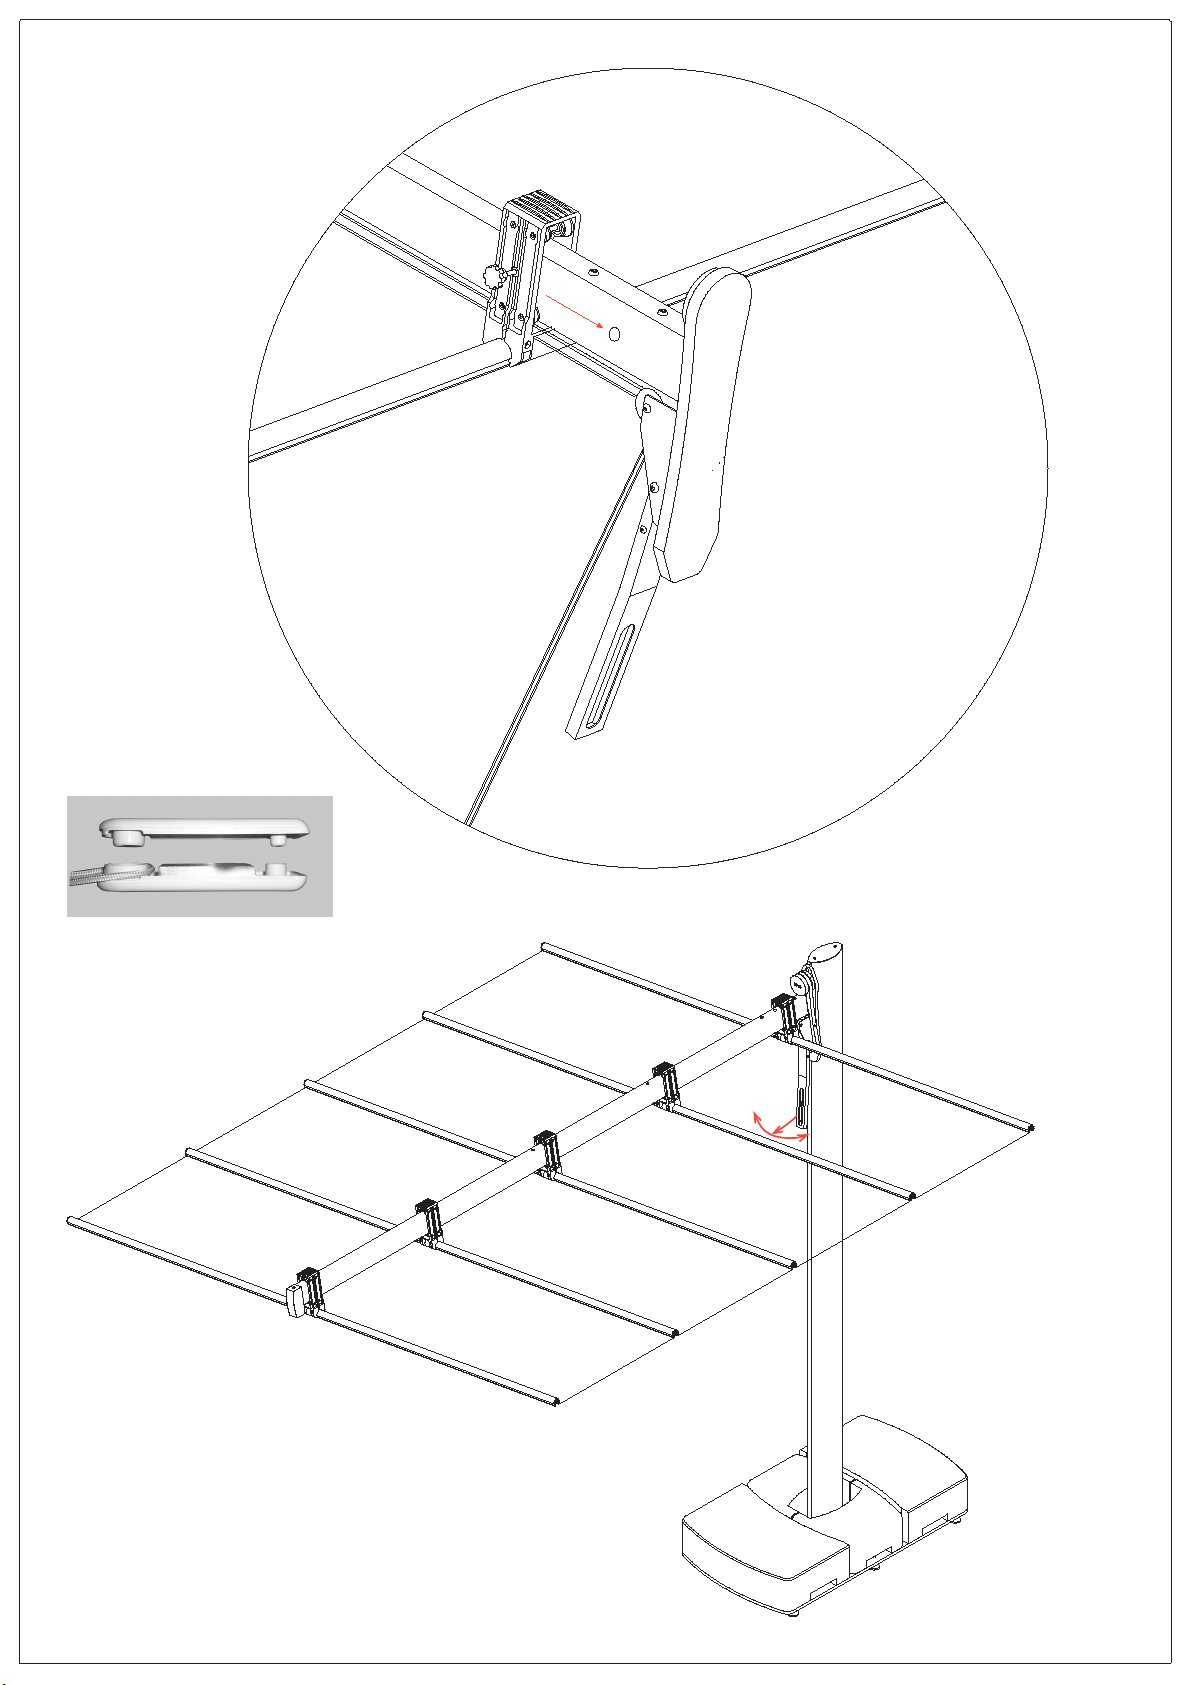
Spingere il carrello ( N’ ) contro il gruppo leva ( E) e avvitare il gambo del volantino ( m ) nel foro della traversa ( C ).
Rimuovere il peso ( S) applicato alla doppia cordicella, il peso è diviso in 2 metà incastrate fra di loro, rimetterlo dopo avere
infilato la fune ( O) nella carrucola ( T).
Importante: è indispensabile per il successivo scorrimento del telo che i due capi della cordicella siano distesi e non
attorcigliati
Il Flexy Twin ora è pronto per l’utilizzo.
Tirando un capo della cordicella la tenda scorre fino a completa apertura, tirando l'altro capo della cordicella la tenda si richiude.
Sia con la copertura aperta che chiusa bloccare sempre la fune in tensione nello strozzascotte fissato sulla leva ( Q ).
Per cambiare l’inclinazione della tenda tirare la leva ( Q ) .
SE IL FLEXY TWIN ACQUUISTATO E COMPOSTO DA 2 TENDE RIPETERE LE OPERAZIONI SOPRA
DESCRITTE PER L’ ALTRA TENDA.
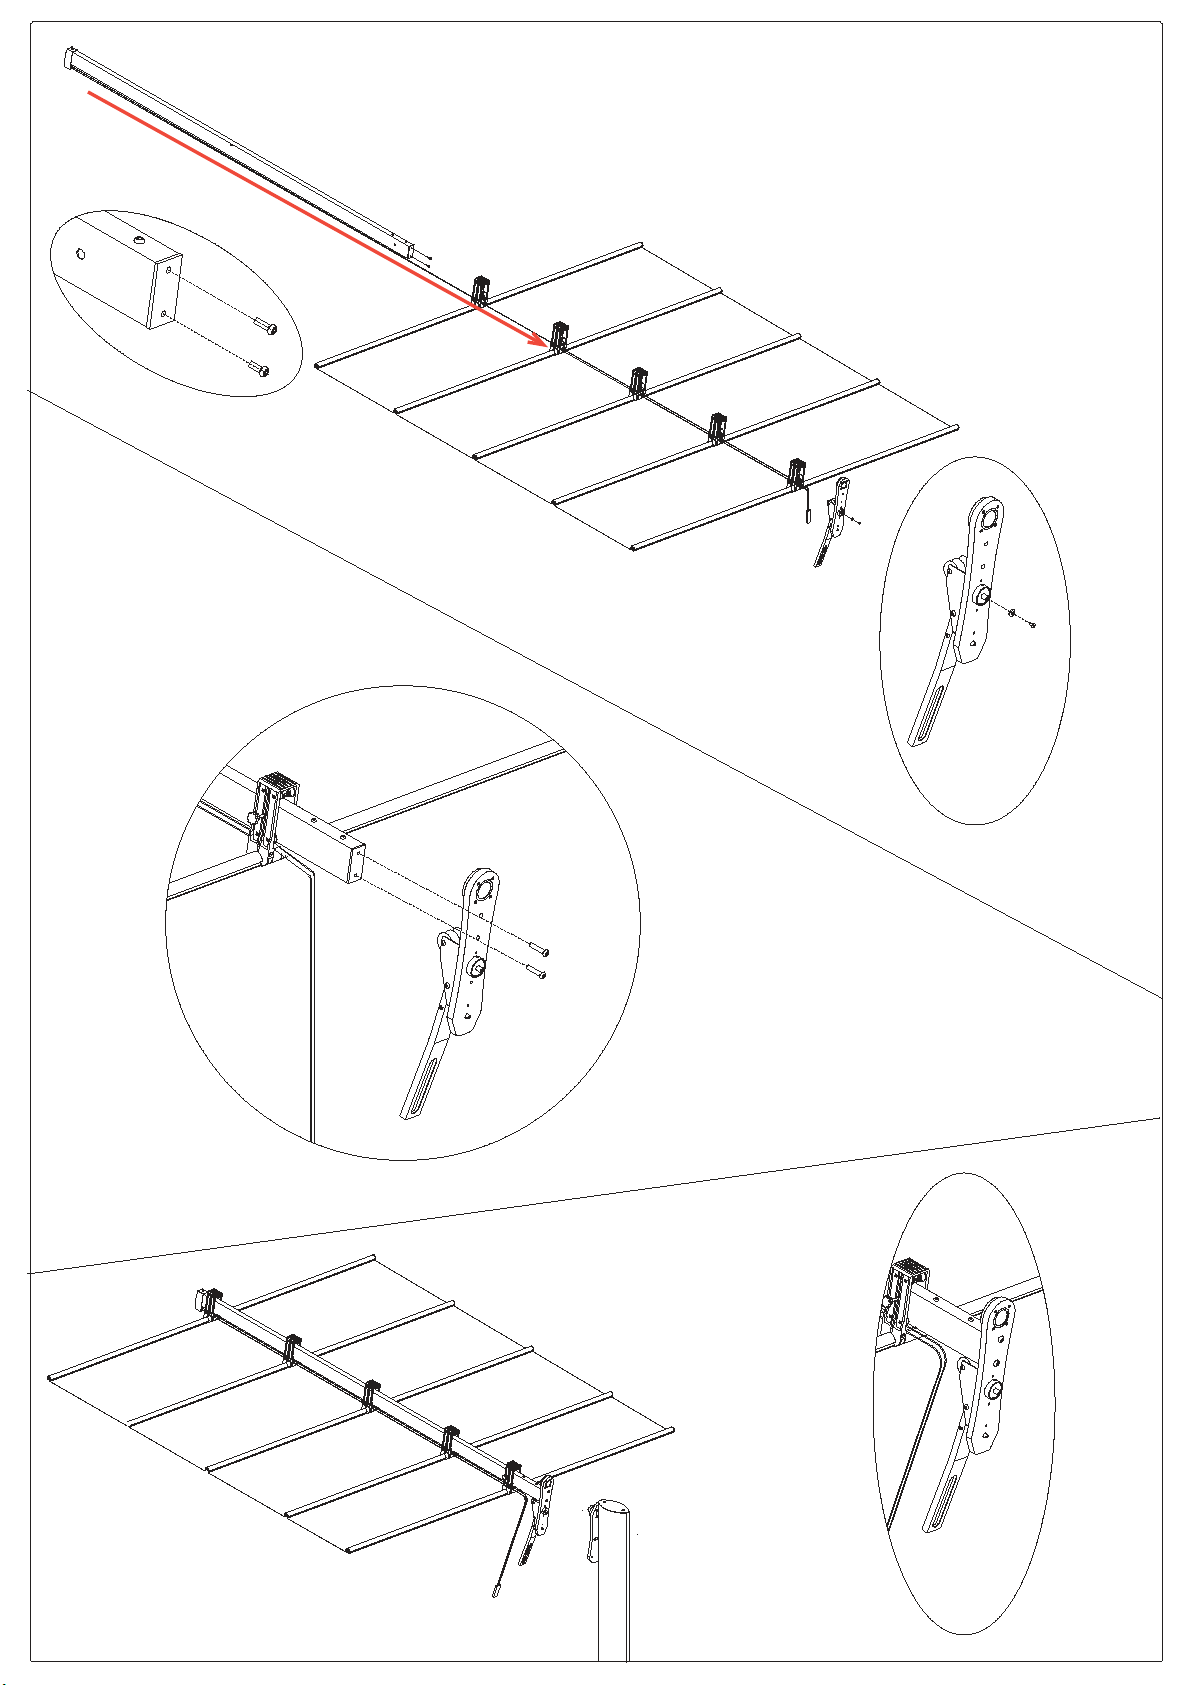
APPLICAZIONE DELLA CANALINA (Fig. 12, 13, 14 e 15 )
Togliere su entrambi i lati delle stecche le viti ( p) con il loro bottone ( n ).
Aprire la cerniera ( q) della canalina ( U) ed inserire la canalina nella gola di ciascuna stecca.
Per il montaggio imboccare i 2 lati della canalina ( U) nelle gole delle stecche. Prendere quindi canalina ( U) con 2 mani e farlo
scorrere su tutta la lunghezza delle stecche.
Chiudere la cerniera ( q) ed reinserire le viti ( p) con il loro bottone ( n ) avendo cura di inserire le asole della canalina e del
telo adiacente nel gambo della vite ( p).

Z:\Istruzioni Articoli + Schede Tecniche\ISTRUZIONI VARIE TUTTI GLI ARTICOLI\FLEXY TWIN\TESTO\FLEXY TWIN- IT-20140119.doc
MANUTENZIONE E CURA
PULIZIA E LUBRIFICAZIONE DELLA TRAVERSA SCORRIMENTO CARRELLI
Per un corretto funzionamento dell’ apertura e chiusura del Flexy TWIN si consiglia di pulire e lubrificare, con uno spray
lubrificante siliconico, periodicamente la traversa di scorrimento dei carrelli.
PULIZIA DELLA COPERTURA
La pulitura della copertura può essere effettuata manualmente con panno morbido, acqua tiepida (ca. 30°C) e un comune detersivo
per tessuti delicati. Dopo un'abbondante risciacquo il materiale deve essere fatto asciugare. Per garantire una maggiore durata del
tessuto, si consiglia di non effettuare questa operazione in pieno sole.
Per il lavaggio con lavatrici industriali rimuovere il telo dalla struttura e lavarlo con un detergente neutro, programma delicato,
abbondante risciacquo e temperatura dell'acqua non superiore ai 40°C. Fare asciugare all'aria (non utilizzare asciugatrici!) e non
stirare.
COME RITIRARE IL FLEXY TWIN A FINE STAGIONE
Per garantire una maggiore durata del prodotto, si consiglia di smontarlo e ritirarlo a fine stagione in un locale asciutto. Prima di
ritirare il vostro FLEXY TWIN pulire la struttura con un panno umido e asciugarla. Per la pulizia della copertura consultare il
paragrafo precedente.
ATTENZIONE: verificare l'integrità' di tutti i componenti. Nel caso che alcune parti siano danneggiate rivolgersi al
negoziante dove e' stato fatto l'acquisto per ordinare i relativi pezzi di ricambio.
Ritoccare con della vernice le parti eventualmente spelate.
Lubrificare leggermente tutte le parti in movimento con del silicone spray.
Importante: per evitare danni dovute a muffe od ossidazione non ritirare mai il FLEXY TWIN quando è bagnato o
umido.
APPLICAZIONE DEL FODERO DI PROTEZIONE
1. Chiudere completamente la tenda scorrevole ( A ).
2. Applicare il fodero di protezione ( B’ o B’’ ) chiuderlo con le apposite cerniere e laccetti.
ATTENZIONE: Chiudere sempre il FLEXY TWIN e applicare il fodero di protezione in caso di vento forte o temporali,
così come in presenza di pioggia intensa (pericolo di sacche) e quando non lo si può controllare.
RIMOZIONE E INSTALLAZIONE SINGOLI PANNELLI DELLA COPERTURA
(Fig. 13, 14 e 15))
Togliere su entrambi i lati delle stecche le viti ( p) con il loro bottone ( n ) ed afferrare le estremità del telo tirarlo verso
l’esterno, fino a sfilarlo completamente dalle stecche.
Per il montaggio imboccare i 2 lati della canalina ( U) nelle gole delle stecche. Prendere quindi il telo con 2 mani e farlo scorrere
su tutta la lunghezza delle stecche.
Reinserire le viti ( p) con il loro bottone ( n ) avendo cura di inserire le asole dei teli adiacenti nel gambo della vite ( p).

Pag 1---Z:\Istruzioni Articoli + Schede Tecniche\ISTRUZIONI VARIE TUTTI GLI ARTICOLI\FLEXY TWIN\TESTO- I _20140119-REV0
FLEXY TWIN
INSTRUCTIONS FOR ASSEMBLY AND
RECOMMENDATIONS FOR USE
READ THIS HANDBOOK IMMEDIATELY
These instructions have to be handed over to the end-user of the product who has to read and keep them.
These instructions are provided for an easy set-up of your FLEXY TWIN and for your safety. It is essential that the given
instructions are followed carefully.
Failure to do so may result in injury to people or damage to materials. If in doubt always contact a technical expert.
This symbol indicates very important information. Strictly follow instructions accompanied by this symbol. This
does not mean that the other information contained in this handbook is not important.
Keep this handbook for future reference.
IMPORTANT SAFETY INSTRUCTIONS
APPLIES TO ALL IN THIS SECTION
1. INSTRUCTION
Please read and follow all the instruction. Only one manual is supplied for all the possible combinations of the
FLEXY TWIN.
Damage or injuries may result if the FLEXY TWIN is not assembled and used as described in the instruction.
For safe use it is essential that anyone using the FLEXY TWIN read all the instruction in advance.
Only persons familiar with the safety aspects of the FLEXY TWIN should operate the FLEXY TWIN.
2. PRECAUTIONS
The FLEXY TWIN principally is a protection from the sun, not a protection against all bad weather. It must be
closed and protected with the protective cover supplied in presence of strong winds or thunderstorms, as well as
heavy rain or snow (danger of water pooling on the cover).
Always close the FLEXY TWIN and place the protective cover whenever the FLEXY TWIN is not under control.
The base must be weighed down with a weight of 140 kg (≈302 lbs).

ASSEMBLY INSTRUCTIONS
COMPONENTS (Pict. 1, 2):
Pict. 1A –FLEXY TWIN WITH A SINGLE CANOPY
(Fig. 2A) Nr 1 sliding canopy (A) with the crossbar (C) and protection cover (B’)
(Fig. 3A) Nr. 1 Upright pole (DA)
(Fig. 4a) Nr 1 Lever group (E) and a bag containing Allen keys of 3 (e3)- 4 (e4)- 5 (e5)
(Fig. 5A) Nr 1 hot dip galvanized steel base (F), set of ballasts (G’) (G’’), a bag of hardware (H) containing nr 6 feet (f), nr
4 screws M 10x30 (d), an Allen key 6 (e6).
Pict. 1B –FLEXY TWIN WITH A BOUBLE CANOPY
(Fig. 2B) Nr 2 sliding canopies (A) with the crossbar (C) and protection cover (B’)
(Fig. 3B) Nr. 1 Upright pole (DB)
(Pict. 4B) Nr 2 Lever groups and a bag containing Allen keys of 3 (e3)- 4 (e4)- 5 (e5)
(Pict. 5) Nr 1 hot dip galvanized steel base (F), set of ballasts (G’) (G’’), a bag of hardware (H) containing nr 6 feet (f), nr 4
screws M 10x30 (d), an Allen key 6 (e6).
BASE ASSEMBLY AND POSITIONING (Pict. 6A, 6B and 6C)
Take out the content of the bag of hardware (H).
Screw the feet (f) to the base (F), put the base where you want to assemble Flexy Twin. Make sure that the base is aligned and
regulate the feet (f).
In case pf the pole with lights remove the plug (L). Push the power cable through the base hole inside the pole and connect it to
the transformator fixed to the plug (L). Caution: the cable and its connection are at the client’s expense which should be followed
by an electrician. Make sure that the ground cable of the power supply is fixed to the pole.
Fix the upright pole (DA) or (DB) to the base (F) with 4 screws (d) and tighten them well with an Allen key (e6).
Placethe set of ballasts (G’) (G’’) as shown in the picture.
Loosen the screws (g) with an Allen key (e4) and take out the flange (I).
MOUNTING THE SLIDING CANOPY (Pict.7,8,9)
Remove 2 screws (h) from the crossbar (C)
Remove the screw (i) and washer (M) from the lever group (E) with an Allen key (e3).
Insert the crossbar (C) into the sliders of the canopy (A) and make sure that the two ends of the cord are not tangled together and
stay parralel.
Fix the lever group (E) to the crossbar (C) with the screws (h).
ΔCAUTION: tighten the screws with an Allen key (e5).
MOUNTING THE SLIDING CANOPY ON THE POLE (Pict. 9,10,11)
CAUTION: To avoid damage the operation has to be done simultaneously by two persons with 2 step ladders.
Raise the sliding canopy and join the lever group (E) to the pin (P) of the upright pole (DA or DB).
Remount the flange (I) and fix everything with 2 screws (g).
CAUTION: when the lever group (E) is joint to the pin (P) push the end of the canopy facing up while 2 screws (g) are
pulling. It should be firmly tightened.
Pull the lever group and tilt the canopy on one side. Insert the washer (M) into the buttonhole (R) and fix it with the screw (i).
CAUTION: The procedure is necessary for the wind resistance.
Push the slider (N’) against the lever group (E) and screw the handwheel stem in the hole of the crossbar (C).
Remove the weight (S) applied on the double cord, the weight is divided in 2, put it back after the cord (O) is inside the pulley
(T).
Important: it is essential for the subsequent smooth operation of the canopy that the two ends of the cord are kept extended
and not tangled together .

The Flexy Twin is now ready to be used. Pulling one end of the cord the canopy will slide fully open, pulling the other end of the
cord the canopy will close. In case the canopy is opened or closed block the cord in the rope cleat fixed on the lever (Q). To
change the canopy tilt pull the lever (Q).
IF THE PURCHASED FLEXY TWIN IS COMPOSED OF 2 CANOPIES THE ABOVE MENTIONED OPERATIONS
SHOULD BE REPEATED FOR ANOTHER CANOPY.
APPLICATION OF THE RAINGUTTER (Pict. 12,13,14,15)
Remove the screws (p) with the button (n) from both sides of the ribs.
1. Open the zipper (q) of the raingutter (U) and insert the raingutter inside each rib. To mount insert 2 sides of the raingutter
(U) into the ribs. Take the raingutter (U) with both hands and slide it along the rib length. Close the zipper and re-insert the
screws (p) with the button (n) after inserting the buttonholes of the raingutter and canopy into the screw stem (p)
MAINTENANCE AND CARE
CLEANING AND LUBRIFICATION CROSSBAR
For proper operation of opening and closing, Flexy Twin crossbar has to be cleaned and greased periodically with silicone spray
Lubricant.
CLEANING THE COVER
The cover can be cleaned by hand with a smooth cloth, lukewarm water (about 30°C ≈85°F) and a common detergent for delicate
fabrics. After extensive rinsing the material has to be dried. To extend the life span of the fabric, it is advisable not to perform this
operation in the bright sun.
For washing in industrial washing machines, take the cover off the structure and have it washed with a mild detergeant, delicate
program, extensive rinsing and water temperature not exceeding 40°C (≈110°F). Have it dried at the air (do not tumble dry!) and
do not iron.
STORING FLEXY TWIN AT THE END OF THE SEASON
To extend the life span of the product, it is advisable to disassemble and store the awning it away in a dry place at the end of the
season. Before storing away your FLEXY clean the structure with a damp cloth and dry it. For the cleaning of the cover see the
preceeding paragraph.
CAUTION: Check the integrity of all components. Should any part be damaged contact the dealer where it was
purchased and order the required spare parts.
Touch up any possibly chipped paint. Lightly lubricate all moving parts with silicon spray.
Important: to avoid damage caused by mold or oxidation never put your FLEXY TWIN away when it is wet or damp.
APPLICATION OF THE PROTECTION COVER
1. Close the sliding canopy (A) completely.
2. Put the protection cover (B or B’’) and close it with the zippers and the laces.
CAUTION: always close the FLEXY TWIN and put the protection cover on in presence of strong winds or
thunderstorms, as well as heavy rain or snow (danger of waterpockets on the cover) and whenever it is not under
control.
REMOVAL AND INSTALLATION OF THE CANOPY PANELS (Pict.13,14,15)
Remove the screws (p) with the button (n) from both sides of the ribs and push the end of the canopy outward removing it
completely from the ribs.
To mount insert 2 sides of the raingutter (U) into the ribs. Take the canopy with both hands and slide it along the rib length.
Re-insert the screws (p) with the button (n) after inserting the buttonholes of the raingutter and canopy into the screw stem (p).
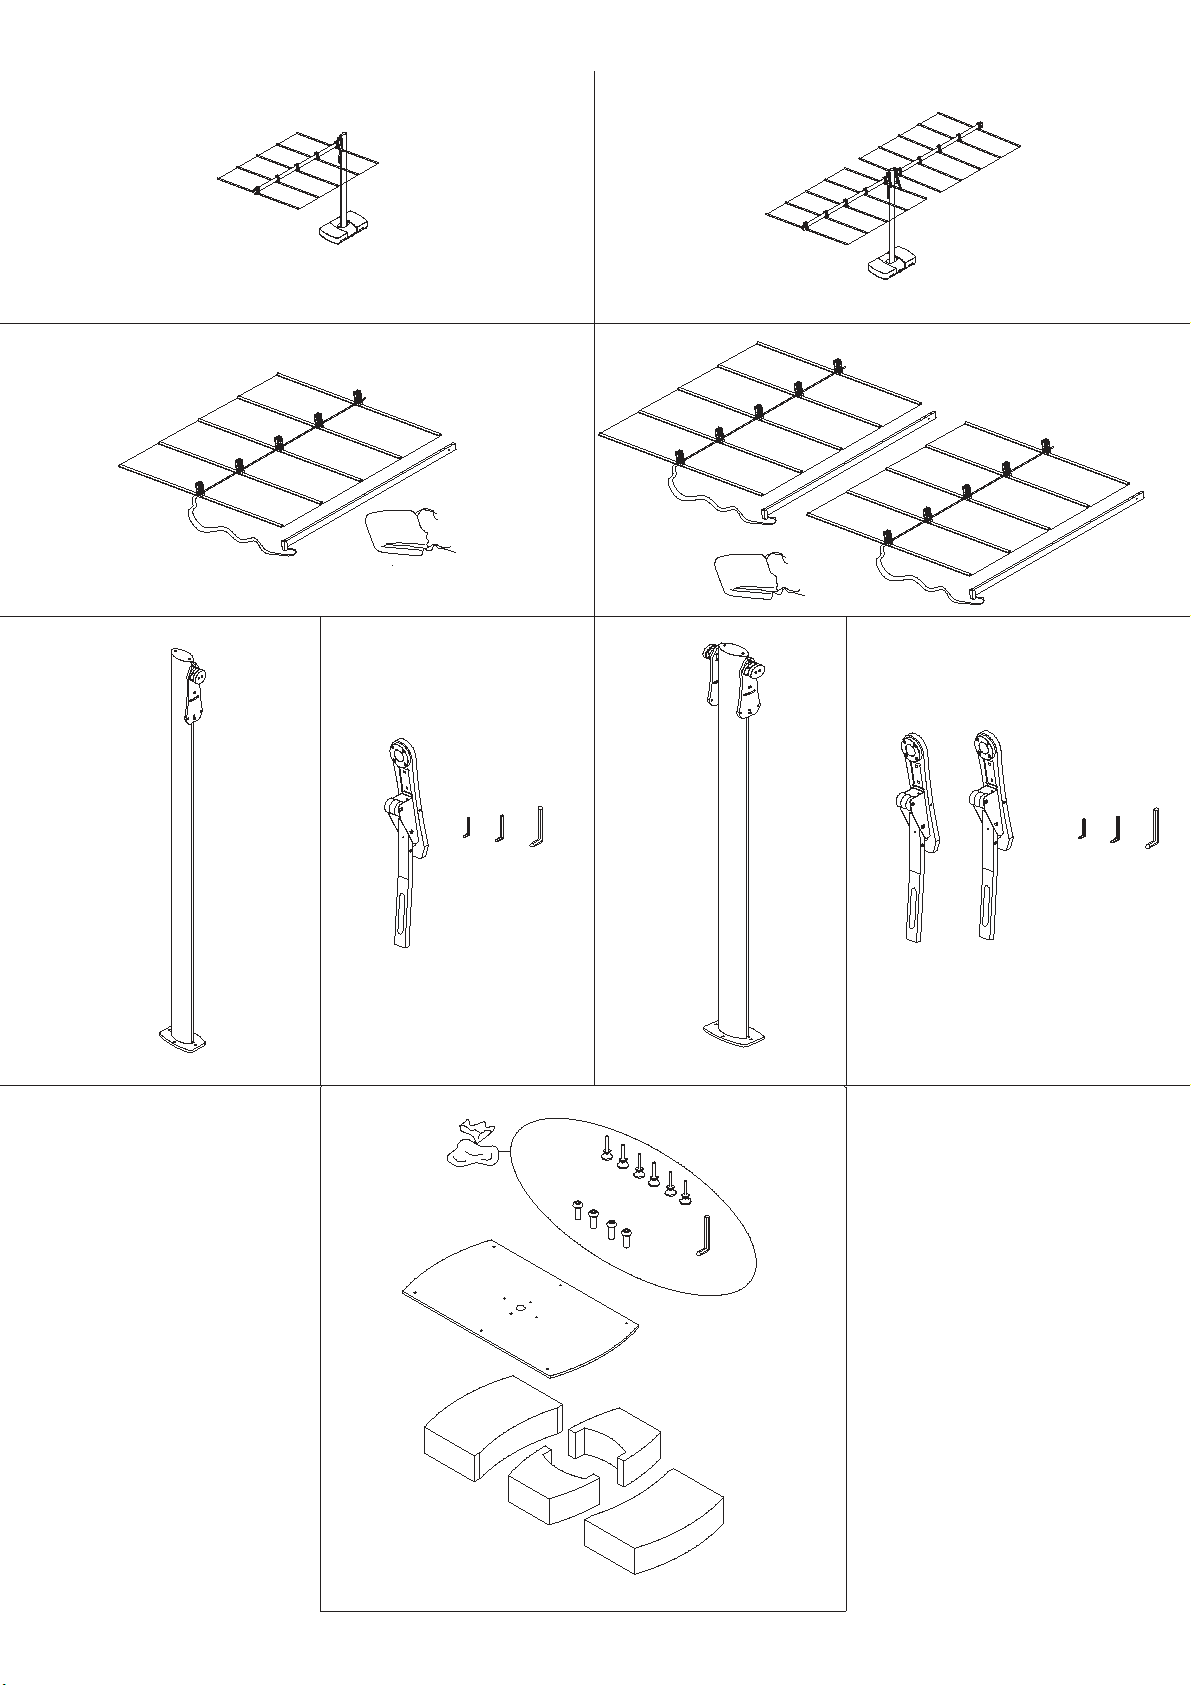
Fig. 1A Fig. 1B
Fig. 2A Fig. 2B
Fig. 5
Fig. 3BFig. 4A Fig. 4B
B'
C
AC
A
C
A
DA DB
e3 e4 e5
EE E
e3 e4 e5
G'
G'
G''
F
H
e6
f
d
Fig. 3A
B''
G''
G''
Fig. 6A Fig. 6B
f
d
d
d
dd
d
d
dd
f
f
f
f
f
G'
G'
G''
F
DA
DB
G''
f
f
f
f
f
f
G'
G'
G''
F
I
I
I
L
g
gg
g
g
g
L
P
P
P
Fig. 6C
220 V
C
Fig. 9
Fig. 8
h
C
h
i
M
E
A
h
h
E
m
C
O
O
h
E
O
N
h
C
Fig. 7
N
N
N
N
N'
N'
N
N
N
N
N'
E
P

E
I
g
g
P
Fig. 10
M
i
E
R
Q
Fig. 11
m
N'
S
O
T
C
S
Fig. 11

U
n
U
n
p
q
p
Fig. 12
p
p
n
n
Fig. 13
Fig. 14 Fig. 15
Table of contents
Languages:
Popular Patio Furniture manuals by other brands


vita
vita Fairfeld Arbor Assembly instructions

Seasons Sentry
Seasons Sentry UMB-822120 Assembly, care & use manual

JARDINICO
JARDINICO JCP.501 owner's manual

Outdoor Home
Outdoor Home UMB-879530 Assembly & care instructions

weinor
weinor Großschirm Lugano Series Maintenance instructions and directions for use

Atleisure
Atleisure seasons SENTRY UMB-546980M Assembly, care & use manual

CARAVITA
CARAVITA SAMARA 2012 Handling instructions

Treasure Garden
Treasure Garden UM8811RT Assembly and operation guide

Costway
Costway NP10245 user manual

Extremis
Extremis INUMBRINA 380 Assembly instructions

Clas Ohlson
Clas Ohlson Cafe Set BIS001 instruction manual

Treasure Garden
Treasure Garden UM810 Series Replacement instructions