AllSee High Vibrance Android Advertising Display Instructions for use

High Vibrance Android Advertising Display
Hardware User Manual
Manual Version HVA1.1

High Vibrance Android Advertising Display Hardware User Manual
Page 1
Safety Instructions
Please keep the display away from any heat sources. Place the display in a
stable and well-ventilated place.
Please handle with care as product contains glass.
The holes or openings on the display are designed for ventilation. Do not
cover or block the ventilation holes or openings with any objects.
Remove protective covering from the screen before you use the display.
Shut off the power supply before cleaning. Use a soft lint-free cloth
instead of a tissue to wipe the screen.
You may use a glass cleaner to clean the product as required. However,
never spray the cleaner directly onto the display surface.
Do not attempt to repair this product yourself! Improper disassembly of
the product may invalidate the warranty and lead to possible danger.
If you have a problem that cannot be solved using the "Troubleshooting" guidelines, please
contact your supplier.

High Vibrance Android Advertising Display Hardware User Manual
Page 2
Contents:
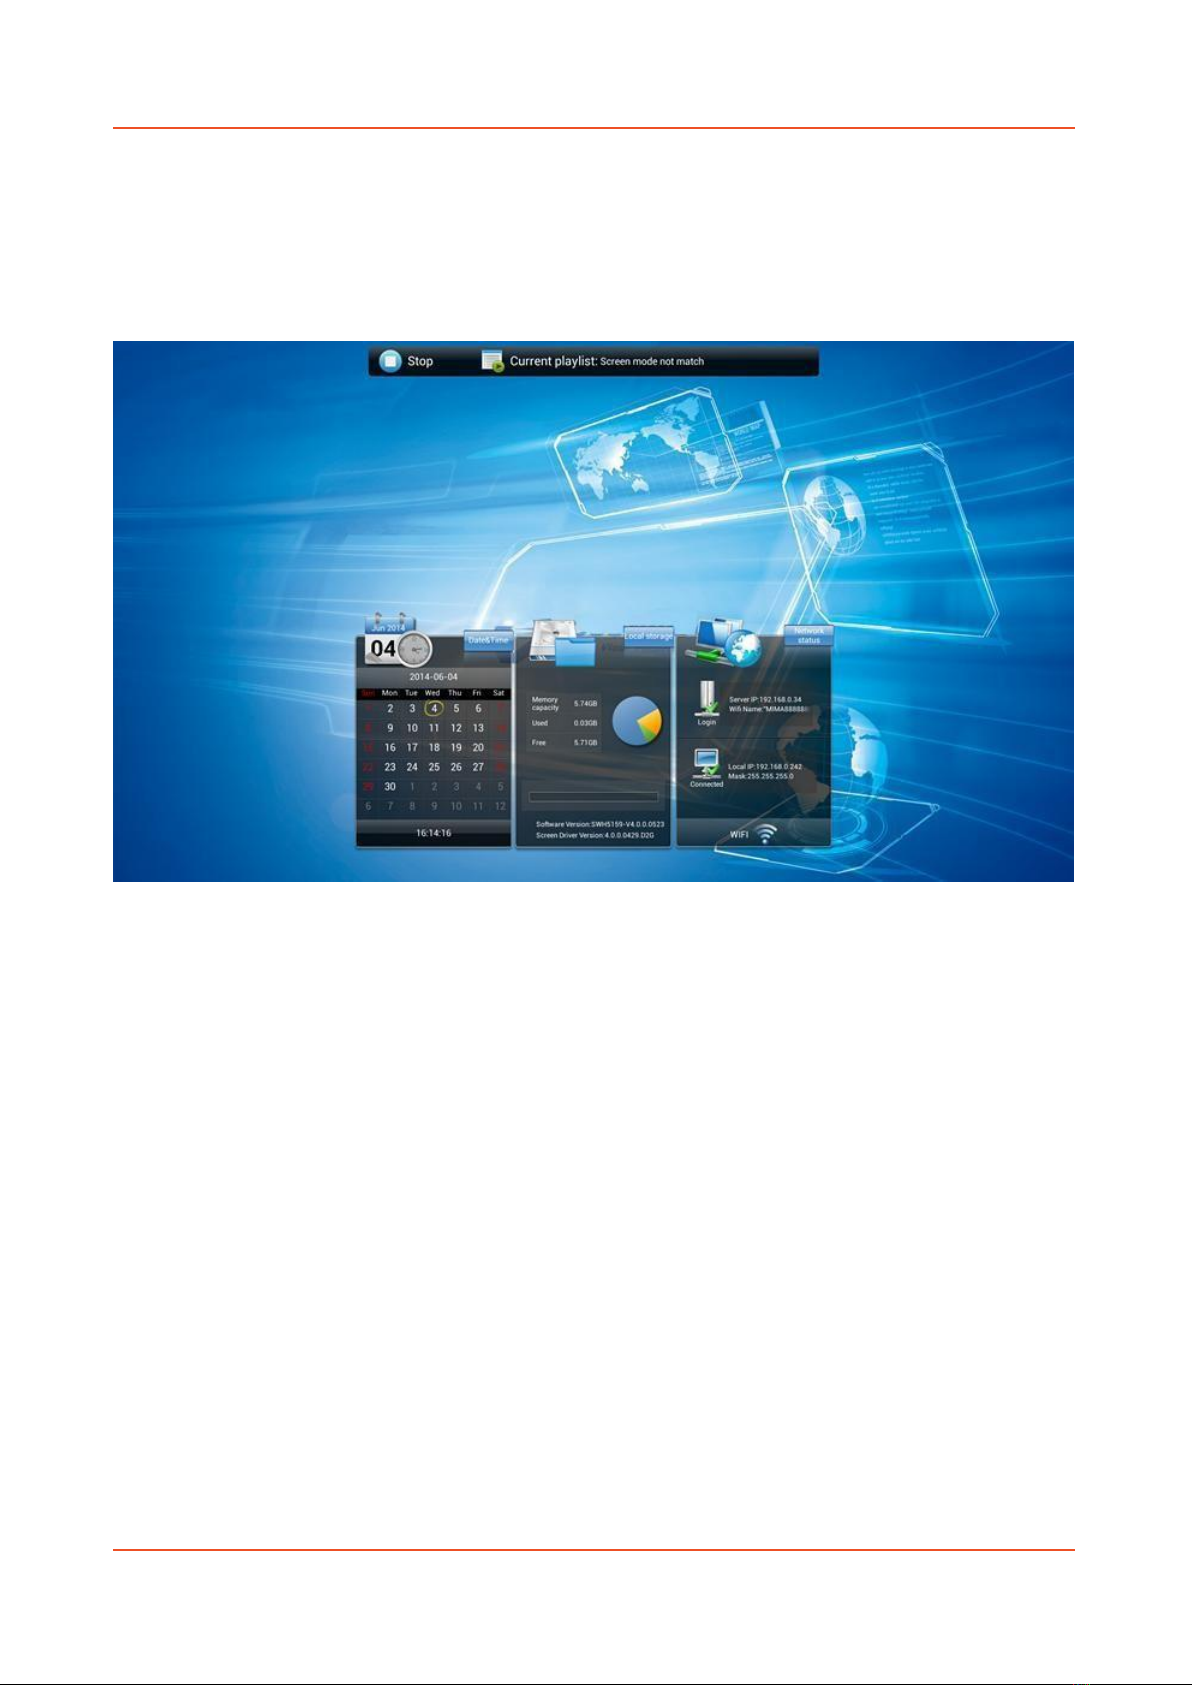
Quick Start Guide ...........................................................................................................................4
1. Introduction………………………………………………………………………………………………………………………… 5
1.1 Box Contents................................................................................................................5
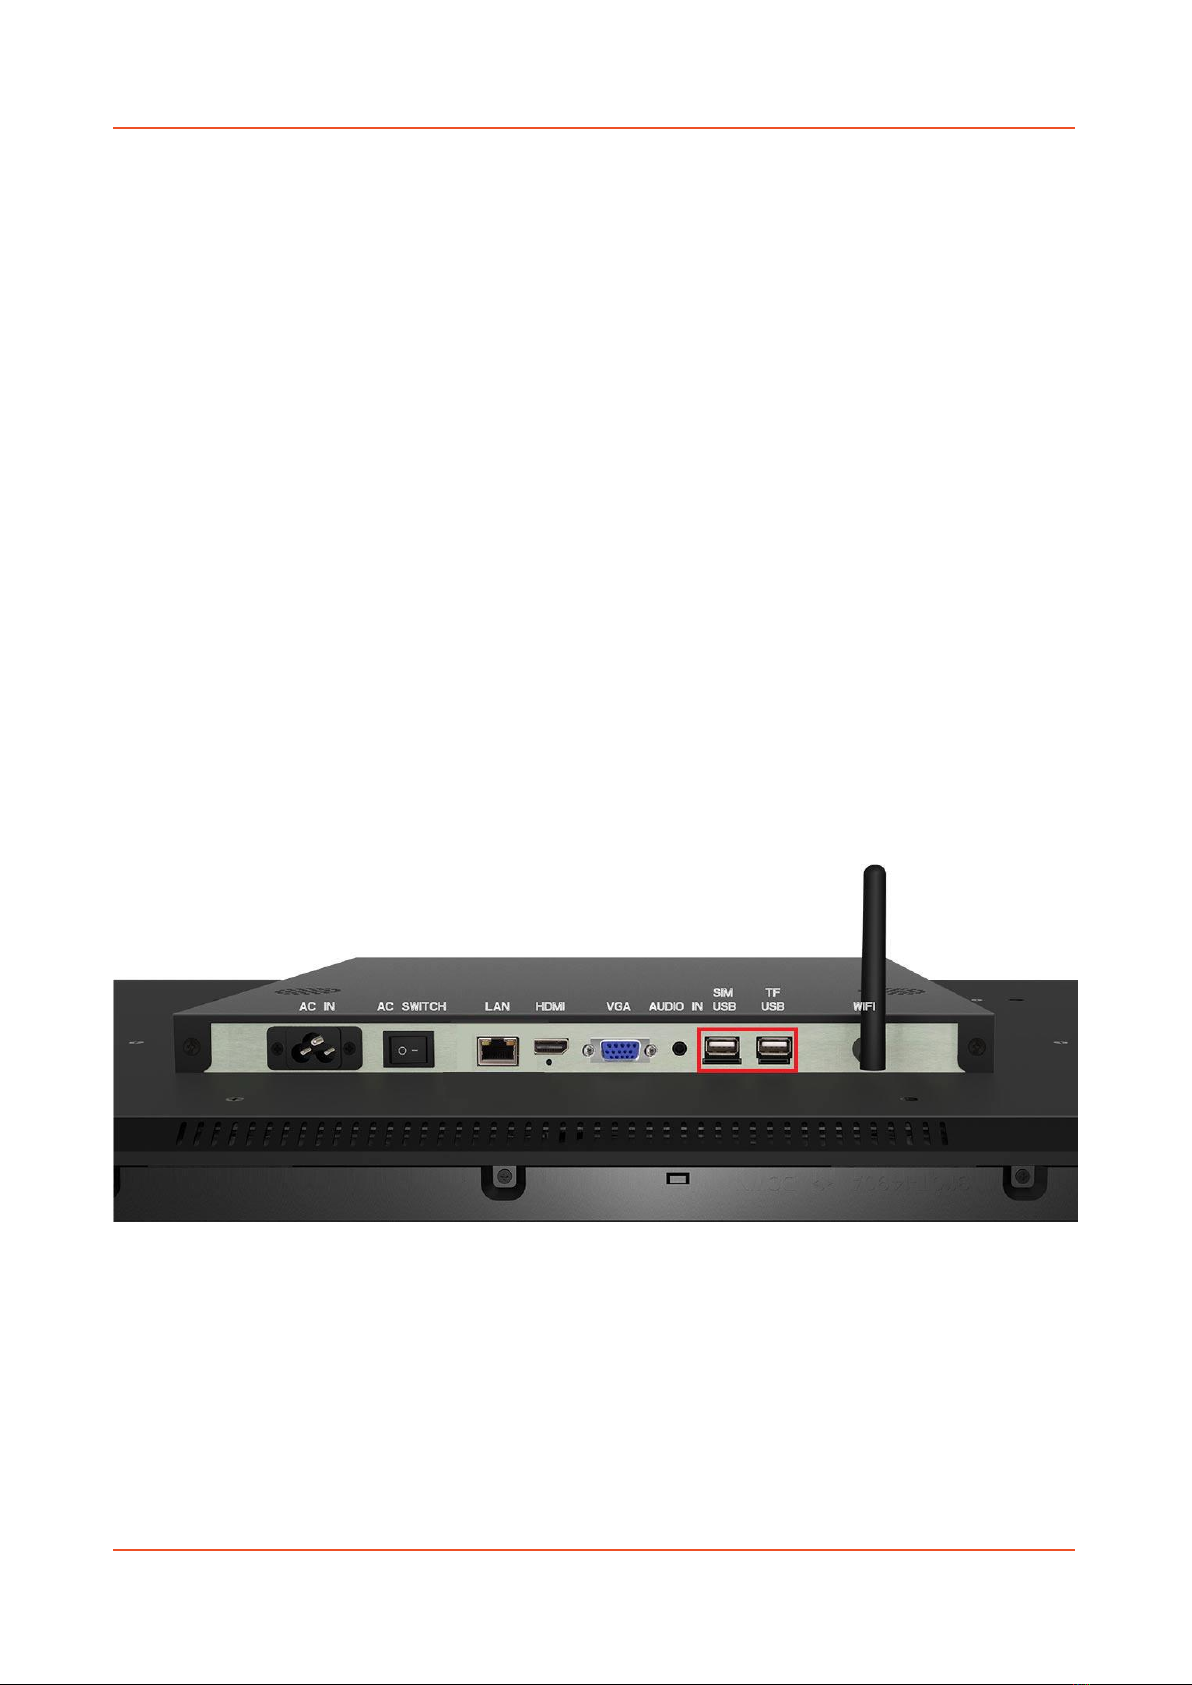
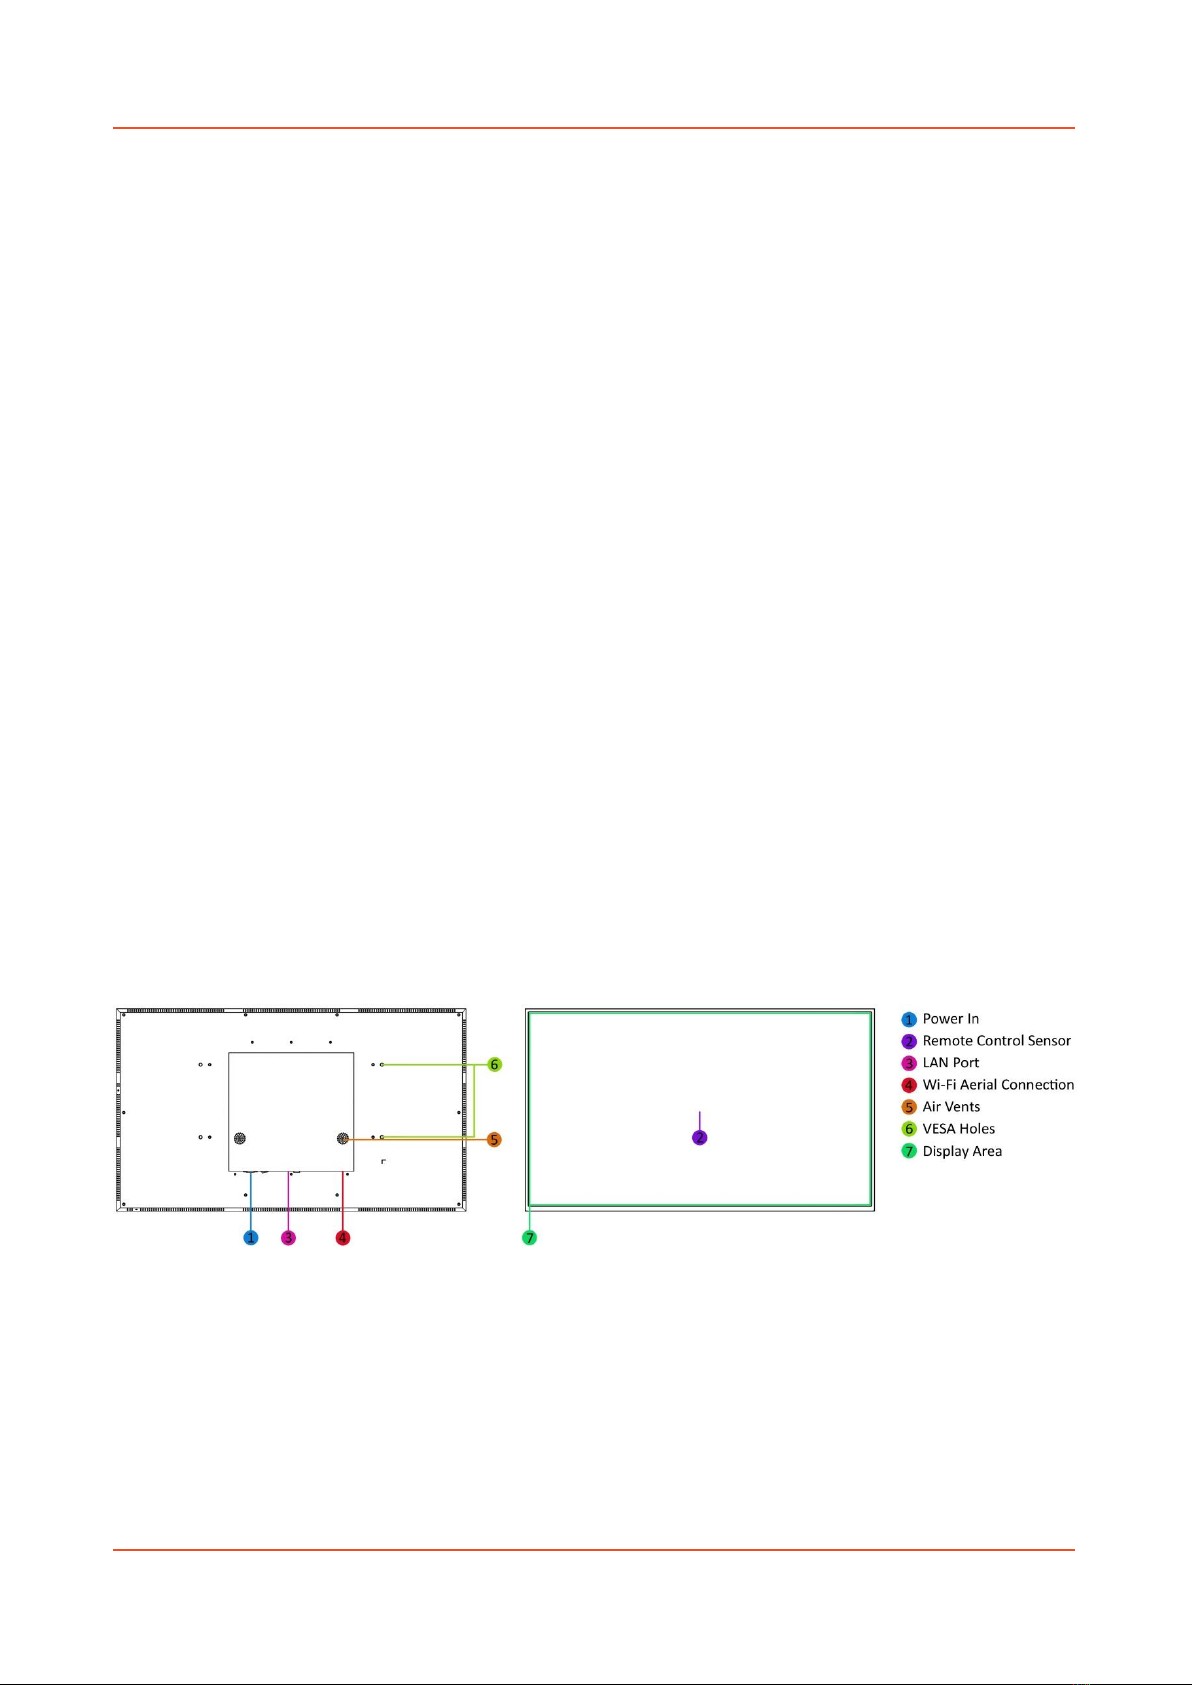
1.2 Product Overview.........................................................................................................5
2. Remote Control..........................................................................................................................6
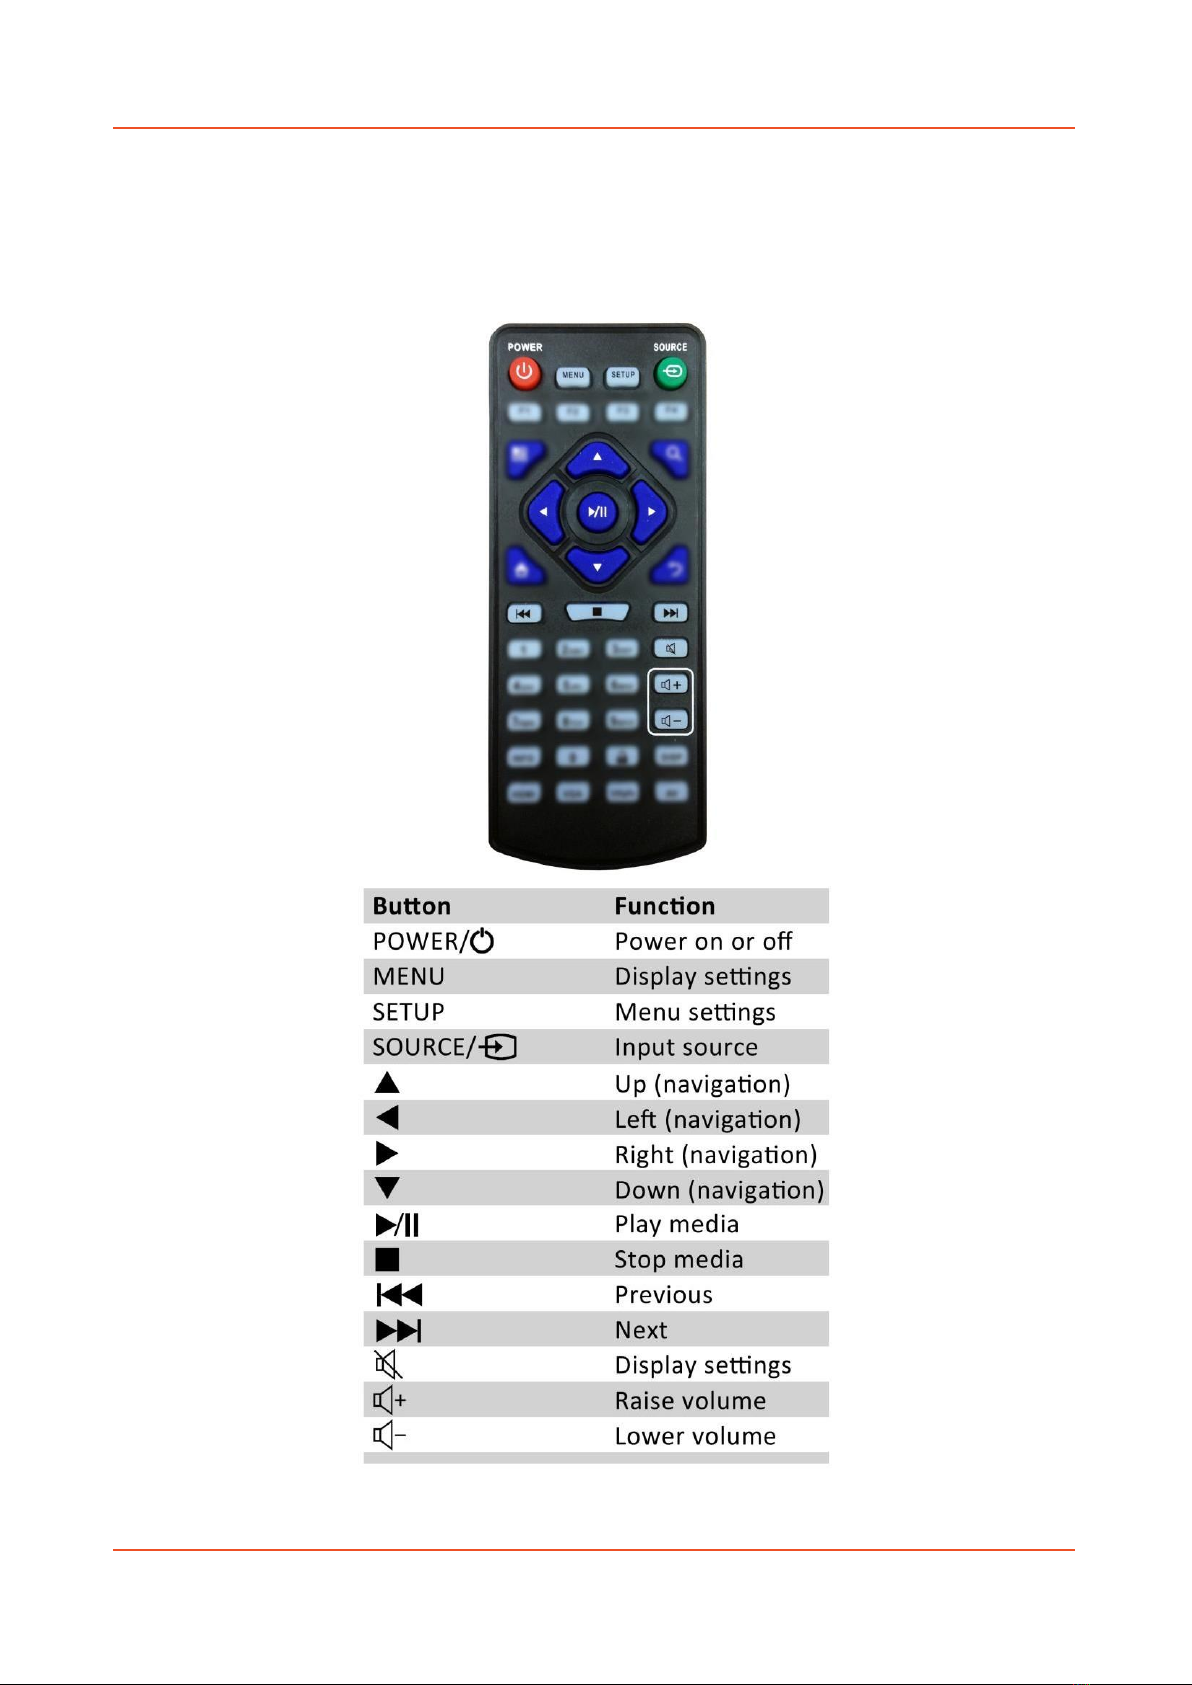
2.1 Handset ........................................................................................................................6
2.2 Replacing the Batteries in the Handset........................................................................7
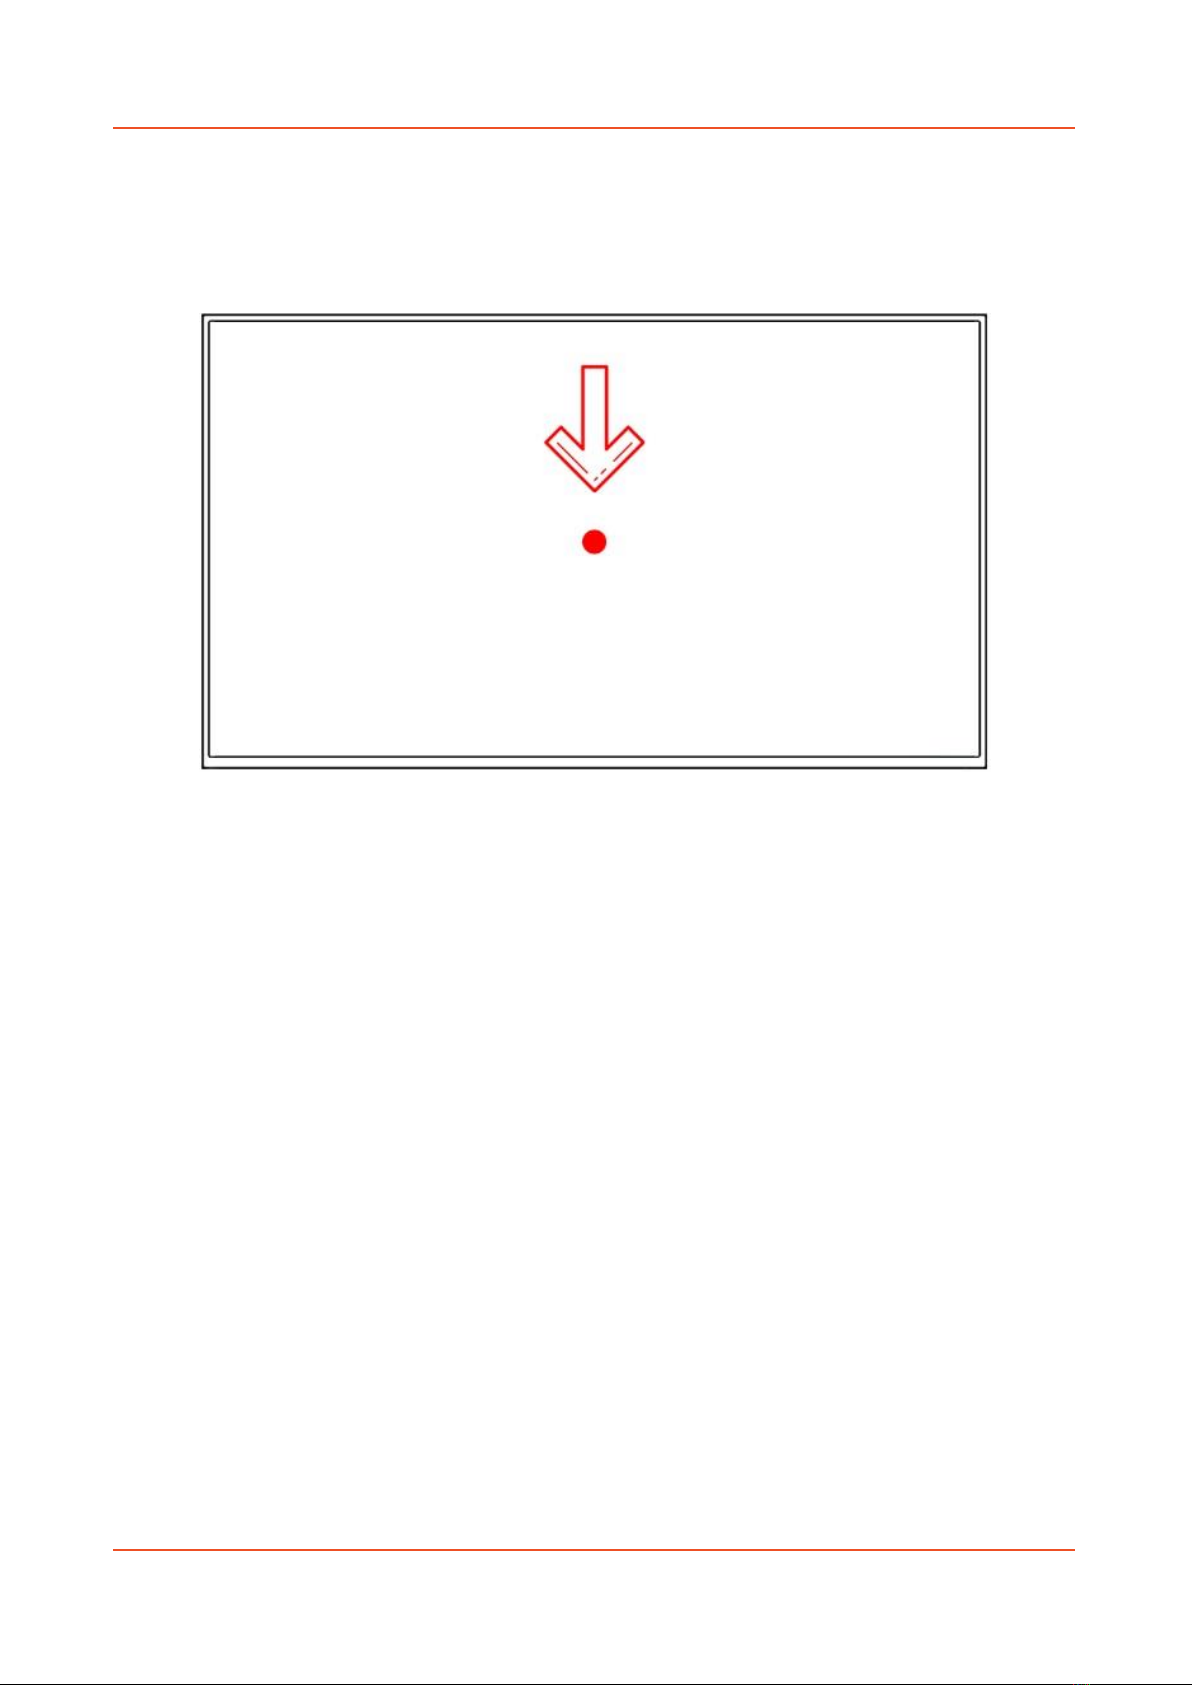
2.3 Location of the Remote Control Sensor.......................................................................8
2.4 Home Screen................................................................................................................9
2.5 System Menu Operation ............................................................................................10
2.5.1 System Settings............................................................................................10
2.5.2 System Control ............................................................................................16
2.5.3 Network Setting ..........................................................................................18
2.5.4 Date & Time ................................................................................................21
2.5.5 Power On/Off ..............................................................................................23
2.5.6 Timer Strategy ............................................................................................24
2.5.7 File Management .......................................................................................27
2.5.8 Exit...............................................................................................................27
2.6 Display Settings ..........................................................................................................28
3. System Operation.....................................................................................................................31
3.1 Supported Media Files ...............................................................................................31
3.2 Inputs…………………………………………………………………………………………………………………… 32
4. Advanced Guide .......................................................................................................................33
4.1 Main Menu.................................................................................................................33
4.2 Creating Playlists ........................................................................................................33
4.2.1 Add Schedule ..............................................................................................34
4.2.2 Add Selected Items .....................................................................................35
4.2.3 Saving ..........................................................................................................39
4.3 Editing Playlists ..........................................................................................................39
4.3.1 Deleting Items.............................................................................................39
5. F.A.Qs and Troubleshooting Guide ..........................................................................................40
5.1 How do I play PowerPoint presentations on my display?..........................................40
5.2 Video Format Conversion ..........................................................................................41
5.2.1 Format Factory............................................................................................41
5.3 My media file does not fit properly on the screen ....................................................45
5.4 My moving GIF files will not move.............................................................................45

High Vibrance Android Advertising Display Hardware User Manual
Page 3
Table of Figures
Figure 1 Product Overview...................................................................................................................5
Figure 2 Location of the IR Sensor .......................................................................................................8
Figure 3 Home Screen..........................................................................................................................9
Figure 4 Screen Inputs........................................................................................................................32

High Vibrance Android Advertising Display Hardware User Manual
Page 4
Quick Start Guide
This section of the guide is to allow swift set up and use of the unit. Please refer to the main part
of the User Guide for full information on use of the unit.
Please follow the steps detailed below:
1. Unpack the unit and place in the desired location.
2. Take the power lead from the accessories bag, connect the power lead and plug into a
mains outlet. The unit will power ON automatically. After powering up, you will be greeted
by the home screen.
3. Collect the files you wish to display and make sure they are supported by the unit (see
Section 3.1 Supported Media Files).
4. On a PC, copy the files you want to play onto an empty USB drive. These should be in the
root directory (without putting them into a folder). Remove the USB from the PC.
5. Insert the USB drive into the one of the USB ports located by the ports of the unit
(highlighted in red on the image below). The screen should indicate that it is copying the
files onto the unit. Please note that all files currently stored in the unit will be deleted.
Once completed, the screen will display a message to remove the USB drive.
6. Remove the USB drive. The unit will reboot and play the stored files in a loop.

High Vibrance Android Advertising Display Hardware User Manual
Page 5
1. Introduction
Congratulations on your purchase of our product. Please read carefully and follow all instructions
in the manual before first use.
The product should not be exposed to liquids dripping or splashing and no objects filled with
liquids, such as vases, should be placed on the product.
For user convenience, a number of operations can be performed through the remote control.
Attention:
1. Do not change any default setting when it is unnecessary.
2. Keep the product far away from water during installation and use.
1.1 Box Contents
1 x High Vibrance Display
1 x CD (User Manual)
1 x Power Cable
1 x Remote Control (with 2xAAA batteries)
1 x Wi-Fi Aerial
1.2 Product Overview
Figure 1 Product Overview

High Vibrance Android Advertising Display Hardware User Manual
Page 6
2. Remote Control
2.1 Handset

High Vibrance Android Advertising Display Hardware User Manual
Page 7
2.2 Replacing the Batteries in the Handset
1. Slide the battery cover off, as shown below.
2. Remove the used batteries.
4. Insert the two new AAA batteries with their terminals corresponding to the indicators.
5. Put the cover back on.

High Vibrance Android Advertising Display Hardware User Manual
Page 8
2.3 Location of the Remote Control Sensor
For this product, the IR sensor for the remote control is located in the centre of the screen.
Figure 2 Location of the IR Sensor

High Vibrance Android Advertising Display Hardware User Manual
Page 9
2.4 Home Screen
Once your screen has powered up and begins to play content, press the “STOP” button on the
remote control to go back to the Home Screen (pictured below).
Figure 3 Home Screen

High Vibrance Android Advertising Display Hardware User Manual
Page 10
2.5 System Menu Operation
From the Home Screen, you can bring up the Main Menu by pressing the “SETUP” button on the
remote control. The Main Menu includes following sub-menus: System Settings, System Control,
Network Settings, Date & Time, Power On/Off, Timer Strategy, File Management and Exit.
Press ↑ & ↓ to select the right item, then press “PLAY” to confirm selection. To get back to the
side menu, press the “LEFT” navigation button on the remote control.
2.5.1 System Settings
The sub-menus within this section are: Display Language, Screen Mode, Screen Resolution, On
Screen Clock, USB, Scrolling Text, Sync Settings, Restore to Factory Settings and Auto Start. To exit a
sub-menu, please press the “LEFT” navigation button the remote control. You can now navigate
through the Main Menu sub-menus.

High Vibrance Android Advertising Display Hardware User Manual
Page 11
Display Language
The On Screen Display (OSD) supports multiple languages, with the default being English. As with
all menu operation, press “DOWN” to access the sub-menu then use the navigation buttons to
select the right item, pressing “PLAY” to confirm selection.
Screen Mode
Here you can set the screens orientation so that the OSD and content display correctly. There are
4 options, as pictured below:
0° - Displays in landscape with the locker door on the right hand side.
90° (default portrait) - Displays in portrait with the locker door on the bottom.
180° (default landscape) - Displays in landscape with the locker door on the left handside.
270° - Displays in portrait with the locker door on the top.

High Vibrance Android Advertising Display Hardware User Manual
Page 12
Screen Resolution
This menu allows you to set the screen resolution; this should be set to 1920x1080.
On Screen Clock
This option allows you to display a clock while content is playing. There are 5 options, as pictured
below:
Close: The screen doesn’t display time.
Top Left: The time will be displayed on top left of the screen.
Top Right: The time will be displayed on top right of the screen.
Bottom Left: The time will be displayed on bottom left of the screen.
Bottom Right: The time will be displayed on bottom right of the screen.

High Vibrance Android Advertising Display Hardware User Manual
Page 13
Play Log
When the slider is turned on (blue), the screen will record all media files that are displayed.
USB
This allows you to enable or disable the USB port. If you want to be able to update the screen via
plug and play, please ensure this is turned on (blue).

High Vibrance Android Advertising Display Hardware User Manual
Page 14
Sync Settings
The synchronization feature allows multiple screens to display the same content at the same time.
Sync Settings - enable or disable the feature of synchronization.
Sync Setting - set the role that the screen has during synchronization.
Host - set the screen as the unique host in a network; the slave screens will synchronize
from this host.
Slave - as a slave, the screen will play synchronized content with the host.
Sync Methods - allows you to choose the player communication means for synchronization.
2.4G - The host and slave screens will communicate via 2.4G by using a 2.4G module, which
can achieve a short distance wireless communication of around 100 meters.
Network - the host and slave screens in a LAN will communicate via the network.
Note: This is only for the network version of this screen

High Vibrance Android Advertising Display Hardware User Manual
Page 15
Restore to Factory Settings
Highlight “Yes” and press “PLAY” to restore factory settings; this will restore all system settings
back to default.
Auto Start
This feature allows your screen to start playing the pre-loaded content as soon as it has finished
booting up. If you want to enable this feature (recommended), please ensure this is turned on
(blue).

High Vibrance Android Advertising Display Hardware User Manual
Page 16
2.5.2 System Control
To exit a sub-menu, please press the “LEFT” navigation button on the remote control. You can now
navigate through the Main Menu sub-menus. The sub-menus within this section are: Work Mode,
Content Management, Content Storage and Machine Name.
Work Mode
This feature allows you set the update method for your screen. It should be set to “SINGLE”.

High Vibrance Android Advertising Display Hardware User Manual
Page 17
Content Storage
This should be set to “Internal Memory”.
Machine Name
This feature will tell you what your screen’s name is on the CMS.
Note: This is only for the network version of this screen

High Vibrance Android Advertising Display Hardware User Manual
Page 18
2.5.3 Network Setting
Note: This is only for the network version of this screen
To exit a sub-menu, please press the “LEFT” navigation button the remote control. You can now
navigate through the Main Menu sub-menus. To set accurate values, first select the top “date”
field by pressing “PLAY”.
Server Configuration
This section contains the information that allows the screen to communicate with the server. All
settings within this section will be pre-set before you receive your goods. Please do not change any
of these settings unless you have adequate technical support. The settings should be set as follows:

High Vibrance Android Advertising Display Hardware User Manual
Page 19
Proxy Server Setup
In most cases, this should be turned off. If your network has a proxy server, the slider should be
turned on (blue). This will prompt three more options to appear:
2.5.1.1 Proxy server address
2.5.1.2 HTTP port
2.5.1.3 SOCKS port
All of these options must be given values. If the SOCKS port on your server is not open, please
ensure that it is open and that the port number is inputted correctly to the screen.
IP Mode
This feature is only available when the screen is set to “LAN” mode. It allows you to set a static IP
should this be necessary. In most cases, the “Addressing Method” should be set to DHCP.
To set a static IP address, press the “RIGHT” navigation button to move the slider to “Manual”. This
will open up four new fields: Local ID, Subnet Mask, Default Gateway and DNS. Once you have
inputted your information into these fields, navigate to and select “Back”. The system will ask if you
want to reboot the screen so that the changes can take effect –select “YES”.
Table of contents
Other AllSee Monitor manuals