Alternate Mode DITI User manual

DRUM INTELLIGENT TRIGGER INTERFACE
DITI is the world’s most powerful Trigger to MIDI Interface from Alternate Mode.
With 24 Trigger inputs, a large drum set can be MIDI converted with ease. The DITI is the first interface
of its kind to power and convert FSR drum triggers to MIDI. Products like our HybriHEAD™ and
HybriPAD™ are designed to work right out of the box with the DITI for unprecedented dynamic range and
control. Our new jamKAT, jamKAT’R and HybriKIT are multi-pad FSR pad configurations that are
preprogrammed on the DITI, offering the most powerful drum controllers ever made.
The DITI will capture your playing dynamics unlike anything else. Each input can be TRAINED to play
within your own personal performance style. Special Interaction Training ensures no false or double
triggering, a problem plaguing other trigger to MIDI interfaces.
The DITI can convert piezo triggers, dual zone piezo triggers, membrane switch triggers, cymbal choking
cymbals, and multi zone cymbals as well. The DITI can detect pad pressure on FSR pads allowing for
dampening, and Continuous Control data being sent. The DITI also has a continuous controller input for
hi hat. If all of this wasn’t enough, the DITI incorporates many of the legendary features of the drumKAT,
allowing for Alternate Note Modes, Velocity Shifts Modes , Note Shift Modes, Advanced Pad Linking,
Transpositions and much more. There is also a special mode called SWITCHED BY, that alters the note
on a pad if it detects pressure on another.
The DITI has built in KIT TYPES that can store THOUSANDS of programs from the most popular drum
modules on the market. You simply call up your favorite sound module, and all of the sound modules
presets will be preloaded as Sound Patches. You can also create your own Kits and Sound Patches and
even create your own CHAIN so that you can make your own Song List of Presets.
!
As new drum modules and soft synths from other manufacturers become available, new KITS can be
downloaded from our SYSEX Database from our website. This keeps the DITI modern and current.
Perhaps the most interesting feature of the DITI is that the controller stores “profiles” of the various drum
triggers on the market. Simply plug in the trigger, identify what you plugged in, call up one of the pre
programmed Kits (for your favorite drum module or vst soft synth) and your done. But unlike a forced
default, you can learn to tweak to the finest detail to get the DITI to respond to your every desire.
!1

TABLE OF CONTENTS
DRUM INTELLIGENT TRIGGER INTERFACE 1
DITI STARTUP GUIDE 5
Pad Types
Kit Types
Training
THINGS TO KNOW WITHOUT READING MANUAL 9
CORE FEATURES OF THE DITI 12
ONLINE TRAINING VIDEOS 14
DITI ORGANIZATION 16
EDITING THE DITI 18
The Interface - 18
Editable Kits and Reinitialization - 19
Plugging in Your Triggers - 20
The Four Edit Buttons - 22
The Arrows - 23
The Display - 24
LED's and Trigger Inputs -24
The Edit Button - 26
MIDI Channel – 27
Note Number Slots -27
aFREEZ, aRST1, aRST2, aRVRSE
Special DITI Functions -29
Transpose Modes -31
MIDI Velocity – 32
Dynamic Override -34
Dampen Mode -36
Gate Time -37
Roll Mode Gate Mode
Velocity Gate Gate Mode
Pad Control Modes – 39
Note Shift Mode – 39
Velocity Shift – 41
Slot Shift
Positional Sensing - 42
!2

Assigning FSR Trigger Switch - 43
Pressure Control - 44
Sound Function – 45
Pad Linking – 50
Link Toggle - 50
Hihat Select – 51
Foot Controller – 53
Patch Names – 55
Auxiliary Patch Changes – 57
All Notes OFF Command -57
MIDI Equalizer -58
UNDERSTANDING KITS and KIT TYPES 58
Reinitialize a Single Kit
GLOBAL SCREENS 60
Pad Types – 61
Important Pad Type Tips – 65
Importing and Exporting Pad Types -65
Train Override – 66
Thresholds – 67
Input Types – 68
Membrane Switch Trigger Pads -72
Slots in Switch Mode -73
Membrane Swithes – 75
FSR Dampen – 75
Piezo Dampen – 75
Input Type = Continuous Controller 76
Positional Sensing -77
Input Type = Hat Controller -79
eHAT 2 Pedal – 80
Input Type = Pressure Controller -81
Gain Control – 82
Tips for Setting Gain – 84
Threshold - 85
Mask Time – 85
Dynamic Curve -86
Curve Listings -88
Dynamic Range – 90
Program Change Receive 93
Reinitializing the DITI -94
Data Dumping System Exclusive -91
Copy Current Kit -93
DISPLAY Notes/Numbers
!3

Copy Input 93
Copy Pad -93
Copy Pad Type – 94
MIDI Merge – 94
Scan Count – 95
Interaction Control – 95
Envelope Duration – 97
Interaction Level – 97
Envelope Threshold -98
Multi Zone Triggers – 101
Remote Editing Controlling Editing via the Trigger Pads
Using the PMCP footswitch for Kit Advance and Kit Backwards
INTERACTION MODE SCREENS 102
Interaction Mode – 102
Train Envelope – 102
TRAIN MODE SCREENS 103
Train Mode – 103
Train Minimum Maximum Dynamic – 103
Train Mode Screens -105
Training Hihat Pedal 107
!4

DITI Start Up Guide
If your not going to read the manual
(at least) READ THIS
We understand that you might not want to read the manual. We understand. It's also true that we've
earned the reputation of having great products, but with a steep learning curve. No argument there either.
The DITI is different...kinda....It still has all of the complexity of our MIDI Controllers (and more), but we've
made an attempt to greatly reduce the pain and suffering we have inflicted on our customers. How you
might ask?
The DITI is about around three basic concepts, KIT TYPES, PAD TYPES and TRAINING. The KIT Type
defines what drum module you are using, the PAD TYPE defines what you’ve plugged into each input.
TRAINING is process of teaching the DITI how you play on those pads and also learns and corrects false
triggering.
KIT TYPES. Simply scroll through the list (up or down arrows) of the KIT TYPES on the top line of the
display until you see the name of the Drum Module or Virtual Synth that you are using. When you see
your favorite module, the DITI is ready to go. If you don’t see your drum module, go to our website and
download our every growing list of KIT TYPES.
http://www.alternatemode.com/DITI/diti_downloads.shtml
Here you will be able to download new KITs, Pad Types and All Memory Dumps.
On the second line of the screen, you will see the first 50 Kits in sequential order (called SOUND
PATCHES) that are preprogrammed in the drum module that you just selected. Just use the Left and
Right Arrows to scroll through the kits. It is possible to change the order of this list of Sound PATCHES
and build up your own CHAINs to create your order of sounds.
PAD TYPES. A Pad Type is simply the name of the trigger pad that you are plugging into one of the
DITI's inputs. After you plug in the trigger pad, you simply scroll through the list of Pad Types until you
find the name of the product that you are using. The names can be very specific like onHEAD™ or
inHEAD™ or altZONE, etc. They are also generic names like “piezo drum trigger”, etc. When you tap on
the ENTER key, the magic happens. The DITI loads in all kinds of critical information about the pad. The
gain structure, threshold settings, mask time settings..... on and on. It even loads in a response curve
designed for that trigger. By performing this one simple task, the DITI took the tech out of the instrument,
because all of the parameters are set and ready to go . Of course you can edit and save each factory
PAD TYPE or you can make your own User Pad Type as well so that you can fine tune the trigger’s
performance to your exact liking.
Because there can be so many PAD TYPES, it is possible to IMPORT PAD TYPES from our website,
mentioned above http://www.alternatemode.com/DITI/diti_downloads.shtml
TRAINING
After you call up your drum module in the KIT TYPE and assign the proper PAD TYPE for each input, you
have the opportunity to TRAIN your pads. Training teaches the DITI how you like to play. It asks you to
play your softest, and then you hardest hit and figures out how to maximize the dynamics of the pad
!5

within this performance range. This feature alone has a tremendous impact on how the pad plays. This
has been a staple feature on all of the KAT controller line since 1984! Every KIT TYPE can store the
TRAINING results on every input. This means that you can have different feels and dynamic range on
each and every KIT. There is also a default Training for every PAD TYPE so that the work can be
automatically set for you. The choice is yours.
So let’s review the concept and keywords with a bit more info….
PAD TYPE. When you call up a PAD TYPE, all of the settings relating to how the trigger will function are
automatically loaded in. This includes settings for both the A and B input of that trigger input on the DITI.
The PAD Type contains the INPUT TYPE which defines the function of the input… it tells the DITI what it
expects to “see” on the input… FSR, piezo, membrane switches, etc. It also loads in the gain, thresholds,
mask time settings etc.
There are Factory PAD TYPES and USER PAD TYPES with the same name. If you edit a Factory PAD
Type and make a change and hit ENTER, the DITI copies that PAD type with your changes and puts a “U”
in front of the PAD Type Name. Now you can go back and forth between the Factory PAD Type and your
edited one to make comparisons. There are also User Types that you can create from scratch.
PAD TYPES are Global in nature. Once you create a PAD Type, they can be used in every Factory or
User Kit. The selected Pad Type will have the same function with all of its parameters from Kit to Kit.
This means that when you adjust a PAD TYPE, ALL Kits will that use this PAD Type will have the same
changes automatically . This can save you lots of time because once you set up a PAD TYPE for a
particular pad, it can be used on any trigger input or any KIT without further adjustments. You can restore
a User PAD TYPE to its original Factory Setting simply by holding down the ENTER key for several
seconds when the cursor is blinking on the U in the PAD Type Screen
KITS will share the same PAD TYPE settings for that particular drum trigger, and this also includes a
dynamic training that’s part of the the PAD TYPE. Every pad in every KIT however can OVERRIDE the
Training settings of the PAD TYPE and can store its own TRAINING for that Input. This gives you the
maximum flexibility when creating your own setups.
KITs
A KIT is a collection of the PAD TYPES that are selected for each input. Every KIT on the DITI can have
a different collection of PAD TYPES.
!
A KIT Type also stores the MIDI note numbers, MIDI channels, gate times, etc that are used for each of
the inputs. Kit Types also store other important pad functions such as a Program Change and KIT Name
and much more. Kits are made to work with specific drum and sound modules, and the KIT names reflect
what module they are designed to work with.
There are tons of PRESET KITs that are predefined for most of the drum modules on the market. These
will have the name of the drum module as its name. As soon as you hit Enter, the DITI loads in the note
numbers needed to access the drum module’s sounds.
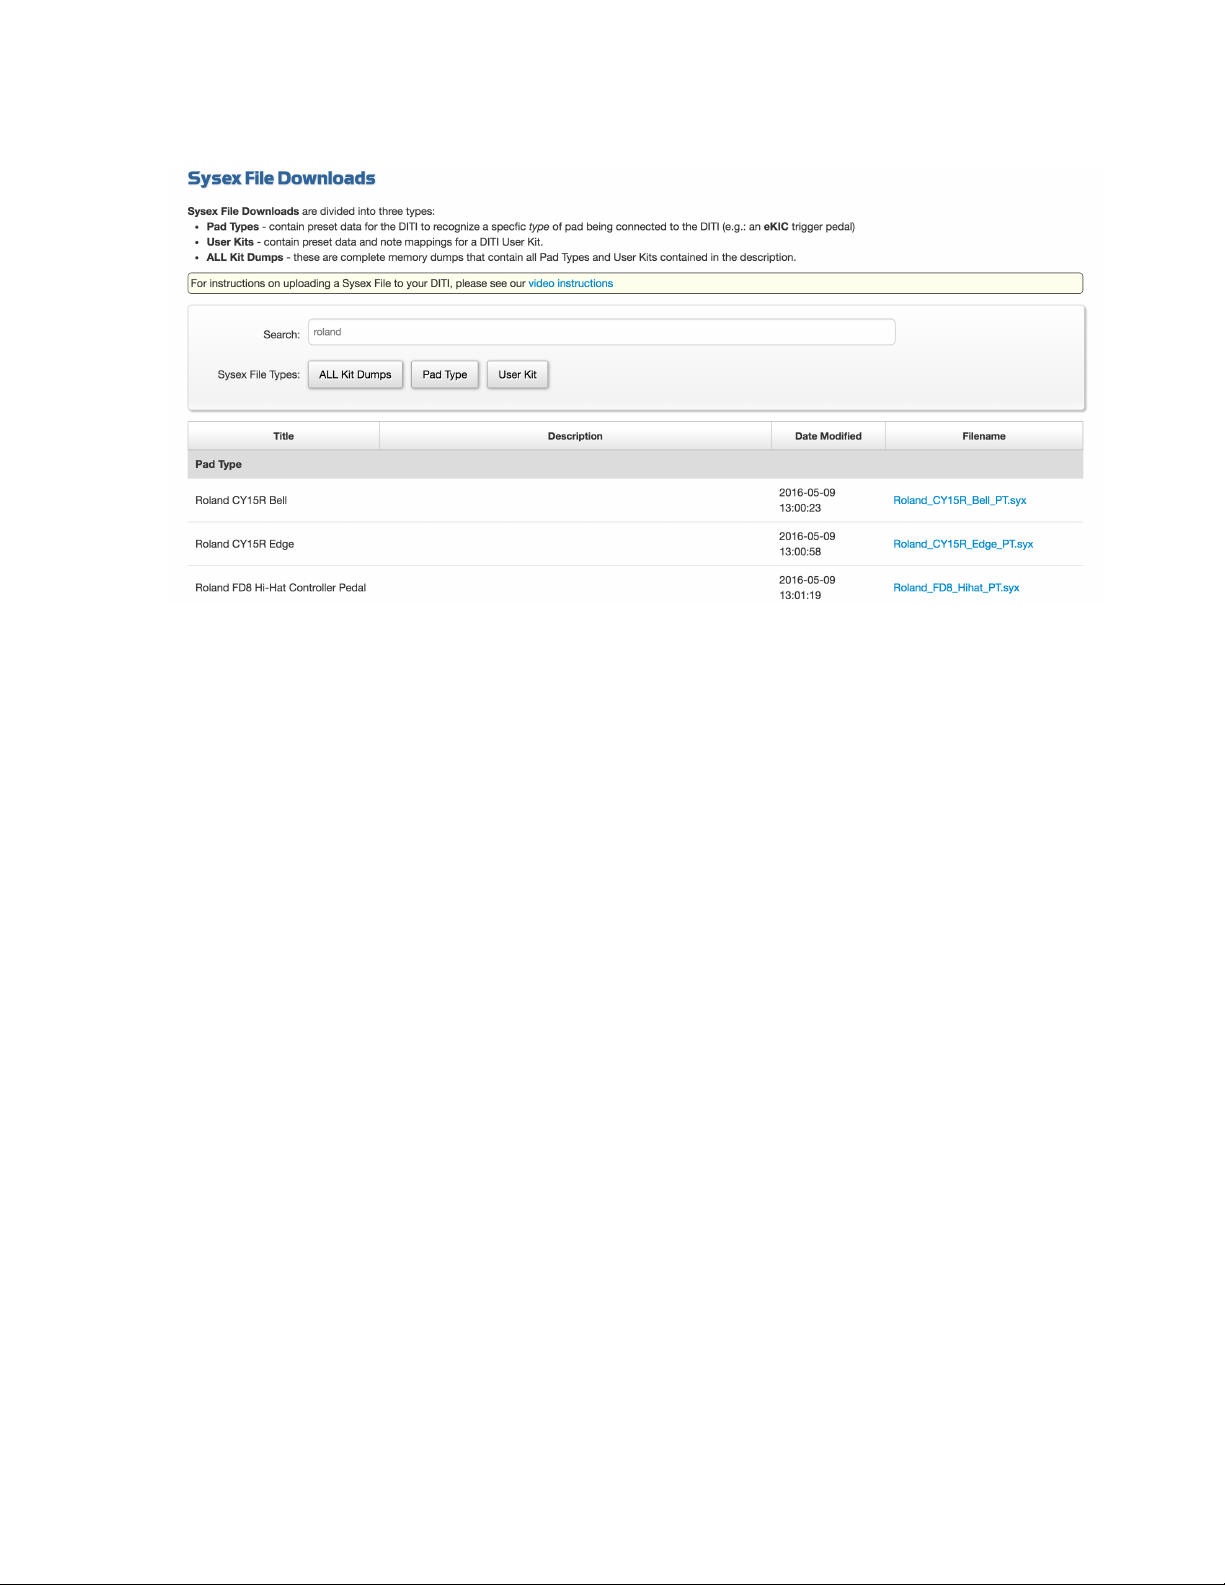
Because there are so many different sound modules on the market, we decided to have a database
available on our website where you can instantly find the sound module you want, and download it to your
computer. Then you can send a SYSEX file to the DITI (via SysEX Librarian - Mac or MIDOX -PC). The
DITI will automatically overwrite the current active kit, even if it is a Factory Kit.
http://www.alternatemode.com/DITI/diti_downloads.shtml
!6

If you edit any of these settings, the DITI will automatically remember your changes. You will know that
you are working on an Edited Factory KIT TYPE because there will be a (+) character after the KIT
number on the far right of the first line of the display.
You can restore a KIT TYPE back to the original factory setting simply by holding the the ENTER key for
several seconds
Most drum modules have many sound programs (kits) in them. You can access them simply by using the
left or right arrows on the DITI. You will see the name of the Sound Programs on the DITI as well as the
drum module.
When calling up each of these Sound Programs, the DITI sends out a program change to the drum
module so that its kit name matches the DITI’s screen. If you change the program number in the Kit, the
DITI will also change the name of the sound patch. This gives you the ability to create your own
CHAINS….. kits in the order you want. The DITI also sends out 4 ADDITIONAL (Auxiliary) Bank,
Program and Volume Change Commands on any MIDI Channel when you first load in your KIT TYPE.
Each KIT also stores up to 8 Controller Number Settings. These settings give you lots of control for
setting up a multi channel Kit setup.
Note numbers assigned to the KIT TYPE do not change when changing the KIT Types Sound Programs
(drum modules kits). One set of MIDI Channels, notes numbers, etc for each KIT TYPE
There are also 33 USER KIT TYPES, labeled 17 thru 50. You can create your own Kits from scratch.
USER KIT TYPES do not necessarily have pre assigned Sound Patches associated with them. The user
needs to determine what the PAD TYPES and note numbers are for each of the DITI’s inputs. User KIT
TYPES still allow you to attach up to 50 Sound Patches by using the Left and Right Arrows
IMPORTANT TIP
At Alternate Mode, will fill up these 33 User KITs with our favorite gigKAT Kits to be used with the
HybriKIT, jamKAT or jamKAT’R. In Edit Mode if you hold down the Enter pad for several seconds, the
existing kit information is reinitialized, and the Kit is preset with a General MIDI Setup.
!7

KIT PAD TRAINING
Every KIT can store your TRAINING of Soft and Hard Hits for each input. The KIT stores your soft and
hard hit settings, but not the envelope and interaction settings. These are Global.
++++++++++++++++++++++++++++++++++++++++++++++++++++++++++++++++++++
For some folks, that might be the extent of technology knowledge needed to get up and running on the
DITI.
In reality however, there might be some tweaking that you would want to do. Now before you say, “here it
comes”, let me explain.
There are two really powerful features in the DITI that separates itself from all the other MIDI trigger
converters on the market and from the normal tweaks that are in drum modules.
The DITI has the ability to LEARN how you play so that the full dynamics of the sound module are within
your defined soft and hard hits. When you TRAIN a trigger pad, meaning when you “teach” the DITI what
your soft and hard hits are, the DITI then takes the 127 levels of MIDI dynamics and spreads them inside
this range of velocity. Cool yes? This important feature was first introduced by KAT INC back in 1984. It
has been used ever since. The original “KAT mallet Controller had only 8 levels of dynamics. The
drumKAT and malletKAT have 256 levels of dynamics, The DITI…..1024 levels of Dynamics.
The other important DITI feature is its AUTOMATIC INTERACTION MATRIX. The DITI has the ability to
examine each input individually when a pad is struck so that it can eliminate crosstalk with other triggers,
and false triggering within itself. This is a very powerful feature.
Of course if you are not happy with how the DITI trained your pads or Interaction Matrix, you can go into
the Global Screens and tweak to your hearts content!
Another thing to remember is that the DITI allows you to combine different trigger pads from different
manufactures. No other interface allows you to combine FSR, Switch Pads, !and Piezo’s all in one box8
and in any combination in any of the DITI’s Kits.
So now that this is out of the way, below is a list of the bullets needed to perform the tasks necessary to
do all that was explained above. Perhaps your manual reading ends here.....BUT....you might want to
explore the real manual. The DITI can do so many amazing things. We'll list some of them AFTER this
TO DO LIST. Enjoy!
!8

THINGS TO KNOW
WITHOUT READING THE REAL MANUAL
This is our “MINI MANUAL”
less than three pages
●Start by using the Up or Down Arrows to find the name of the Sound Module (the KIT) that you
plan to use.
When you do this, the DITI loads in the note numbers and kits (sound programs) into Play Mode.
The next thing to do is to assign what triggers you are plugging into the unit. Remember every Kit
in the DITI can have its own arrangement of PAD TYPES, that is the name of the trigger product
itself. So assign the KIT first, and assign the PAD TYPES.
●Once the trigger pad is plugged in, manually use the Left and Right Arrows to find the correct
trigger input that is the PAD TYPE (the name of the trigger that you are using) Each jack has an
A and B channel. There is an AUTOMATIC function on the DITI that will jump to the trigger pad
(yes automatically) that you are editing, but this function works best after the basic training is
performed. The Automatic Trigger detection function is designed to work when you are editing
your KIT settings like channel and note numbers, etc.
●If you are using FSR Trigger Pads or Heads, after you plug it in and assign the PAD TYPE to the
Trigger Input, press on the TRAIN button TWICE. The DITI quickly analyzes the threshold on the
inputs and adjusts them automatically. This also happens every time you turn on the DITI. It
reads the inputs and adjusts its thresholds.
●Use stereo 1/4” jacks (TRS) if you are using FSR trigger pads. If you use mono jacks, they will
only work on piezo triggers, and you can only access the TIP of the signal. (that's the A Input).
You can purchase a stereo 1/4” male to 2 mono female adapter to access both Inputs on the
input jack.
●Use stereo ¼” jacks if you are using Membrane Switch pads. These are the dual zone variety of
triggers that have a piezo in the center of the drum, and a membrane switch on the edge (rim),
bell or both.
●Notice that the inputs on the DITI have names on it. BD = Bass Drum, SD = Snare Drum etc. By
using the appropriate input for the trigger, you will eliminate the need to set the note number for
the sound module because it will be automatically assigned when you call up the KIT. You can
however, plug whatever trigger you want into any input, and assign any MIDI note number to it.
●The HiHAT Foot Controller must be plugged into pad number 7. It is a designated input for the
foot pedal. You can use a mono 1/4” cable as the A input is reading the pedal variation.
●The HiHAT trigger pad is usually plugged into Input 8 or Input 9. There are several HiHAT Modes
which include Controller Numbers, HATNOTEs modes or general MIDI HiHAT. When you
selected the sound module KIT, the correct HiHAT setting was selected. If you are creating your
own, you will need to decide which mode works for you.
!9

●To Edit a Trigger Input, press the GLOBAL Button. Now match the input number (that you are
editing) by using the Up or Down Arrow Keys. Hit Enter. You can also try striking the pad if the
DITI is set to AUTOMATIC . If it doesn't jump to the input number, its because the input PAD
TYPE doesn't match. Go there manually
●Use the RIGHT Arrow to jump to the PAD TYPE Screen. Then use the Up / Down Arrows to find
the name of the trigger pad you have. If you don't know, or if you are using your own DIY trigger,
set it to “piezo”. Hit Enter
●Play for awhile...... Get used to the pads. You may notice that you are not entirely satisfied with
the response of a trigger pad. Now its time to TRAIN.
●Tap on the TRAIN Button. It will ask you to hit the pad you want to train. Do that. Then it will ask
you to hit the pad hard...... don't kill it..... just play the pad with your normal hard hit. Each time
you do that, the DITI will show you the MAXIMUM value it saw. When you feel good about that,
hit ENTER.
●Now the DITI will ask you to hit the pad soft. After you do that, hit ENTER. Start playing again.
Notice how much better it plays.
●If you notice that there is some interaction between pads, then it might be necessary to do the
INTERACTION TRAIN. Press the Interaction Button, tap on the pad you are training. Hit the pad
and WAIT two seconds. Do it one more time, then press on the INTERACTION button again.
Your interaction should be mitigated to satisfaction.
A Note Regarding FSR Trigger Pads
All FSR Trigger Pads need a stereo input. There are several different ways that they can be
plugged into the DITI.
Special Versions of the inHEAD™ and onHEAD™ from Aquarian as well as FSR trigger pads from
Alternate Mode such as the altZONE™ or triZONE™ can plug directly into the DITI without any
conversion boxes (inBOX™).
You will notice a DITI DIRECT label !on the trigger identifying that the trigger pad is ready to
connect directly to the DITI. That is because the wiring is set to TIP/RING, meaning that the DITI uses
the tip for the A Input as the trigger and the Ring or B input as the power source for the FSR.
Aquarian normally sells these FSR inHEAD and onHEAD triggers with a TIP/Sleeve configuration. These
triggers are designed to plug into the inBOX™, a device that converts the FSR into voltage, making
these triggers compatible with the various drum modules on the market today. If you already have one of
these triggers, you can purchase a simple conversion cable available from Alternate Mode converts the
tip sleeve to tip ring making it ready for the DITI.
!10

This is the basic operation of the DITI. Below is a list of some of the features that the DITI can do. You
might need to dig into the manual to learn how to do some of these things. In PDF format, just hit the
search key and type in the name of the function you need.
CORE FEATURES of the DITI
The ability to power FSR pads like the inHEAD™, HybriPADs, and altzones™ without an inBOX™
Up to 24 triggers including combinations of membrane switches, dual zones, cymbals with switching and
chokes, etc
The ability to power multi zone and variable zone FSR pads such as the jamKAT™ and HybriKAT™
The DITI can recognize pressure on an FSR pad and convert that into Continuous Controller Data. You
can sustain notes simply by holding down on the pad.
Can distinguish between cross stick and rim shot by FSR head pressure.
Can send out “positional sensing” data on any trigger pad.
The DITI can recognize dampening and choking gestures. It can even simulate choking on ordinary
piezo trigger pads.
Tweak-ability to the nth degree which includes the creation of personal dynamic curves, velocity ranges,
gate times etc.
The ability to play up to 32 notes per pad using alternate note patterns, or velocity shift modes or chords.
This includes the ability to control resets and note freezes on pads individually or globally. Each pad can
be set to its own MIDI Channel and velocity range settings.
Special Gate modes such as LATCH for looping, ROLL Mode, INFINITE Mode and Velocity Gate Mode.
Special KAT FUNCTION MIDI NOTE NUMBERS that can transpose notes, freeze and reset alternate
note patterns, send out sequence start commands and more.
The ability to LINK any pad to any pad in an unlimited fashion. One strike on one pad can send out
whatever is assigned to any of those linked pads. You can turn on and off links Globally or Locally per kit
and even control the velocity amount of each pad that you link.
You can assign pads to KIT ADVANCE/BACK or PROGRAM ADV/BACK so that you don’t need to touch
the DITI during a performance.
To ability to use a foot pedal (PMCP) in combination with a trigger pad to temporarily create a REMOTE
EDITOR. Any trigger pad can be assigned to function as a button (Edit, Global, Up, Down, etc) when the
pedal is depressed. Now you don’t need to touch the DITI at all.
!11

There are Bank and Program Changes per Kit (up to 5), 8 Controller Value Settings, plus the ability to
name your own Kits. There are many Factory KIT TYPES that can also be edited and saved. These KIT
TYPES store the presets of your favorite drum module. This means that there are THOUSANDS of
Presets built right into the DITI with the names of these sound programs taken directly from the drum
module. You can edit any of these Kit Names.
You can change the order of these presets (by changing the Program Change Number) to create your
own playing list. You can copy these KITS into the USER KITS to make your own CHAIN as well.
You can assign a pad to scroll through the list or you can simply press on the arrow.
There are also 33 USER KITS. You can create your own KITs from scratch, or copy one of the Factory
Kits into a User for easy setup. There are a total of 50 KITS on the DITI. Each Kit can send out 50
discrete bank and program changes. That means there are 2500 kits you can access.
Variable HiHAT control options including Continuous Control, HatNote mode and GM note number
standard.
Choice of Individual Dynamic Training per PAD per KIT or by PAD TYPE Stored Training.
Individual Interaction Matrix Training per pad.
Virtual Mixer / Controller- Ability to send out 8 Controller values each on their own MIDI Channel.
REMOTE EDITING. The DITI allows you to use any external trigger to replace the buttons on the DITI for
Editing when assigning our PMCP foot switch to EDIT. Using this foot switch allows the trigger to act as a
dual function….playing and editing.
!12

DITI ORANIZATION CHART 2.5
!13
KIT
EDIT FUNCTIONS
MIDI CH SLOTS 1-32 Min Velocity Max Velocity
Transpose
CountSwitch By
Sounds
1-4 Layer
Alternate Modes
Gate
Pad Cntrol
Note / Vel Shift
Cntrl Paths /Slot Shift
ALL Notes Off
DampenLINK
Equalizer
HIHAT
CONTROLLER
Chick Type
Edit Patch
Name AUX Bank LSB AUX Bank MSB AUX
Volume
Train Override
AUX MIDI
Channel
AUX Program
Change 1-4
PATCH Volume
CONTROLLER
MIXER
1-8
DITI SPECIAL
NOTE NUMBER
FUNCTIONS
PC-BCK
OFF sSTART sCOUNT aFREEZsSTOP aRST2aRST1 PC-ADV
LTOG-G LTOG-L chk AFT PB DWN
chkNTE PB UP
Transpose
T-12--T+12
TF TO
Gate Mode
Roll
VelGate
SOUNDS
FUNCTIONS
1-4 SWITCH 1-4
SIMULTANEOUS
Alternate Mode1-4 CrossFade 1-4 Layer
Transpose
Enable
Edit KIT
Name
PATCH
Program
Change
PATCH BANK
LSB
PATCH PROG
CHANGE
PATCH BANK
MSB
KT-adv KT-bck PC-rst KT-rst
aREVERSE aRST A-C
Slot Link
1A--12B
Hi Hat Select
TRAIN
Pad Type
Max Dyn
Pad Type
Min Dyn
Override
Max Dyn Override
Min Dyn
INTERACTION
TRAIN
ENVELOPE

!14
GLOBAL
EDIT FUNCTIONS
Select Edit
Pad Pad Type Input Type Dynamic
Curve
Gain Mask Time
Threshold
User Curve
1-5
SOUNDS
FUNCTIONS
1-4 SWITCH 1-4
SIMULTANEOUS
Alternate Mode1-4 CrossFade 1-4 Layer
PAD CONTROL
OFF SLOT SHIFT
CONTROL
PATHS
NOTE SHIFT VELOCITY
SHIFT
Blend Duration Switch Points Damp Lower
Exclusive Damp Ratio
Assign Edit
Pad Damp Upper
User Slot
Reset A-C
Damp Count Strip Rate Copy Pad Type
Program
Change
Channel
Copy Pad
Bank Change Copy Curve
Controller
Sensitivity
Copy Current
Kit MIDI Merge Data Dump Kit
Interaction
Env Duration Dump All Kits
Enthreshold Min Envelope
Instrument
Lock Display 0 or 1 Note Display
DataDump
Global
Glb- Reinitialize Scan Count
Min Dyn MAX dYN

EDITING ON THE DITI
THE INTERFACE
When you first turn on the DITI, the screen displays the current software version. Immediately
after that, the DITI goes into PLAY MODE. Play mode is the normal operation of the DITI when
you are playing, not editing.
On the top line of the display, you will see a KIT TYPE. A KIT TYPE is simply the name
of the drum module or soft synth that you are using. Use the UP OR DOWN ARROWS
to scroll through the list of KIT TYPES.
On the bottom Line, you will see the name of the preset. This is called the Sound
PATCH.
Use the LEFT or RIGHT ARROWS to scroll through the list of sound patches that are
built into the sound module.
TIPS
What is really happening here is that when you load in a KIT TYPE, you are calling up a
Factory or User KIT. A Kit contains all of the MIDI information for each input including
channel, note number, gate time, etc.
A KIT also contains the PAD TYPES that you assigned to each Input. Every KIT TYPE
can have its own collection of PAD TYPES. A PAD TYPE is used to identify what type
of trigger you are plugging into the KITI. So you must assign PAD TYPES to the Inputs.
When you are scrolling through the Sound Patches and you make a change to the KIT,
it affects ALL of the sound programs in that KIT TYPE. For example, if you change the
!15

snare drums MIDI note number to a different note number, then all of the Sound
Patches in that KIT will reflect that.
This makes editing a KIT TYPE very fast and easy because it effects all 50 presets
(sound patches) within that KIT TYPE.
There are some parameters that are unique to each of the 50 Sound Patches within the
KIT TYPE. These are the Bank and Program Number and the KIT NAME. What this
does is allow you to freely change the order of Sound Patches simply by changing the
Program Number for that Sound Patch. You can therefore create your own CHAIN by
arranging the sequence of program numbers as you scroll through the sounds using the
Left or Right Arrows. The Sound Patch will follow the drum modules sounds (kits)
change UNLESS you decide to rename the Sound Program to another name of your
liking. The modified name will be stored after you hit ENTER in the Kit Name screen.
You can assign a “special number number function” that allows you to change the
Sound Patch or Kit simply by hitting the pad.
EDITABLE FACTORY KITS AND REINITIALIZATION
You will also notice that a plus (+) sign is added to the FACTORY KIT Number when
ever you make a change, letting you know that you’ve edited a Factory Kit. This means
that Factory Kits are editable and save able. If you want to restore the Factory Kit back
its its original settings, simply hold down the ENTER button for 2 seconds while you are
in the Play Mode. The screen will give you verification that
the Factory Kit has been reinitialized back to its original setting.
!16
TRAIN
Pad Type
Max Dyn
Pad Type
Min Dyn
Override
Max Dyn Override
Min Dyn
INTERACTION
TRAIN
ENVELOPE

Besides the KIT TYPES, there are USER KIT TYPES. You can edit and store every
parameter in the Edit Screens. You can create a collection of these as well by storing
them in the order you want. You can scroll through these Kits by Using the Up and
Down Arrows. You can Copy a Factory KIT to a USER KIT, (or vice versa) and have the
ability to rename the KIT NAME.
User KIT TYPES also have 50 Sound Patches in each Kit. By default, each of these
user sound programs increment the MIDI Program Number by one. You can also
program each of these 50 Sound Patches with its own Bank, Program and Name.
If you plan on not using any bank or program numbers, then you can just use the KIT
TYPE. When you call up your User Kit Type, it will automatically load in the first Sound
Patch.
You can shut off the program number and rename the default Sound Patch to any name
that you want. You can also use the special function MIDI note functions for Program
Change Increment or Decrement.
Because there are many Factory Kit Types with names and 50 sounds programs in
each and 50 User Types, the DITI can store 1000’s of kits. If you can’t find a drum
module listed, you can download KITs directly from our website.
PLUGGING IN YOUR TRIGGERS
L.E.Ds
!
On the DITI you will notice that there are 12 inputs. These are stereo inputs, meaning that it is
possible to have up to 24 triggers active at once. Each trigger input also has a number
assigned to it (1-12), and in turn each input number has a letter ( A or B ). This letter represents
which channel you are editing. The letter “A” represents the TIP of stereo plug. The letter “B”
represents the RING of the stereo signal. If you plug a mono 1/4” jack into the DITI, you will
automatically be using the A channel.
Every time you strike your trigger pad, the DITI momentarily turns on the LED associated to that
trigger input. The TIP or A channel sends out a YELLOW light, the RING or B channel sends
out a RED light. This is to let you know immediately what you are triggering.
FSR
FSR (force sensing resistor) is a sensing technology that uses pressure to determine when and
how hard a trigger pad is struck. This advanced technology is very different from the trigger
pads that are made by most of the electronic drum manufacturers on the market. These
!17

companies use piezo triggers as their sensor of choice. These sensors work on vibration. They
are common because it is inexpensive technology that works fairly well. There are problems
with piezo sensors however because of the nature of vibration technology. It makes them prone
to cross triggering from neighboring trigger pads and stage loud noises. Also the response of
piezo triggers is not particularly linear.
Another amazing advantage of FSR is that it is possible to have multiple zones on one surface
without the fear of interaction or cross triggering. FSR relies on pressure to the sensor, not
vibration. Therefore multiple discrete zones on one surface is entirely possible. Complete
isolation is virtually impossible with piezo sensors unless a membrane switch is used. The
problem with this method is that the zones are monophonic meaning that only one zone speaks
at a time. This is not the case with FSR technology.
FSR however needs power in order to drive the conductive link that is the heart of the
technology. It is this requirement that has changed the nature of how the DITI operates.
The DITI uses the RING or B channel of each input to power FSR sensors. Normally, the power
channel does not function as a trigger channel. This means that the DITI with 12 FSR sensors
would be a 12 trigger system.
THE FOUR EDITING BUTTONS
There are Four Types of Editing on the DITI. Each Type gets it’s own BUTTON on the panel.
!
EDIT
GLOBAL
INTERACTION
TRAIN
!18

When you press on any of these buttons, the screen displays one of the functions that are
available within that Edit Type. When you press on the same button again, the display goes
back to PLAY mode, the default setting for playing.
There can be many screens within each of the EDITING TYPES. The DITI remembers the last
screen that you were working on for KIT and GLOBAL Edits. You will find that this can save lots
of time as you jump from pad to pad, especially if you want to edit that function for each trigger
pad. The AUTOMATIC Input Selector can be very useful for edits of this nature.
The DITI also has a “HOME BASE” for KIT and GLOBAL Editing. Simply hold down on the
button (Kit or Global), and the screen will display the first editing function for that TYPE.
You can also jump from EDITING TYPE to EDITING TYPE without going back to PLAY Mode. In
each case, the DITI remembers what you were editing last for each Type. To get back to PLAY
mode, just tap on the same button one more time.
!19

THE ARROWS
Notice that there are Up / Down arrows, Left / Right arrows and Enter.
These buttons work the same way for all functions.
The UP / DOWN Arrows change the VALUE of what you are editing
The LEFT / RIGHT Arrows move through the different Screens (like a cursor) within the
EDITING TYPE.
!
In Play Mode, the Up Down Arrows Changes the KIT TYPES, that is the name of the sound
module that you are using.
The Left and Right Arrows changes the SOUND PATCHES, that is the list of sounds
from that sound module.
When you are in Edit Mode, every time that you touch the right / left arrow, the cursor moves to
the next parameter that is editable. You know what is editable because the value is BLINKING.
When you touch the up / down arrows, the value increases, or decreases. At the same time,
you will notice that an ( * ) asterisk appears. This tells you that you have made a change.
When you tap on the ENTER button, the new value is automatically STORED, and the asterisk
disappears. You do not need to save the KIT, as each function is stored as you make changes
by pressing the ENTER button.
!20
Other manuals for DITI
1
Table of contents
Popular Media Converter manuals by other brands

Tehnologistic
Tehnologistic Train-O-Matic Lokommander II Next18 ECU user manual

Siemens
Siemens SINAMICS G120 PM240P-2 installation manual

Peak
Peak PCAN-Router FD user manual

Transition Networks
Transition Networks M/GE-SW-SFP-01-U Series user guide

STELJES
STELJES MS2 manual

Digi
Digi Edgeport/1 installation guide