Altman LSC GENESIS User manual

Lighting Control Console
Quick Start Guide

Have a question regarding this Guide?
The material in this manual is for information purposes only and is subject to change without notice. Altman Lighting
assumes no responsibility for any errors or omissions which may appear in this manual.Should you find an error,
have a suggestion or question regarding your Altman Lighting product, we would love to hear from you.
Altman Lighting
57 Alexander Street
Yonkers, New York 10701
1.914.476.7987 (Main)
1.914.963.7304 (Fax)
www.altmanlighting.com
Note: Information contained in this document may not be duplicated in full or in part by any person without prior
written approval of Altman Lighting. Its sole purpose is to provide the user with conceptual information on the equip-
ment mentioned. The use of this document for all other purposes is specifically prohibited.
The material in this manual is for information purposes only and is subject to change without notice. Altman
Lighting assumes no responsibility for any errors or omissions which may appear in this manual. For comments and
suggestions regarding corrections and/or updates to this manual, please visit the Altman Lighting web site at www.
El contenido de este manual es solamente para información y está sujeto a cambios sin previo aviso. Altman Lighting
con no asume responsabilidad por errores o omisiones que puedan aparecer. Cualquier comentario, sugerencia o
corrección con respecto a este manual, favor de dirijirlo a la oficina de Altman Lighting más cercana.
Der Inhalt dieses Handbuches ist nur für Informationszwecke gedacht, Aenderungen sind vorbehalten. Altman Light-
ing uebernimmt keine Verantwortung für Fehler oder Irrtuemer, die in diesem Handbuch auftreten. FürBemerkungen
und Verbesserungsvorschlaege oder Vorschlaege in Bezug auf Korrekturen und/oder Aktualisierungen in diesem
Handbuch, moechten wir Sie bitten, Kontakt mit der naechsten Altman Lighting Niederlassung aufzunehmen.
Our Commitment
Altman Lighting continually engages in research related to product improvement. New materials, production methods
and design refinements are introduced into existing products without notice as a routine expression of the philoso-
phy. For this reason any current Altman Lighting product may differ in some respect from its published description,
but will always equal or exceed the original design specifications unless otherwise noted.
Document Number: GEN-MAN101
Version as of: 1 February 2020
Genesis Console Quick Start Guide
©2020 Altman Lighting.
All rights reserved.
You can reach us at:
ABOUT THESE INSTRUCTIONS
The document provides basic information for a qualified, trained installer. These instructions provide information for the
following product:
• Genesis Lighting Control Console
Note: Additional product information can be found on our web site at
www.altmanlighting.com or by scanning the QR code to the right.
Please read all instructions before installing or using this product. Retain
these instructions for future reference. For Additional information
and a full operation manual
on the Genesis Lighting
Controller please scan the QR
Code above

1
Genesis Lighting Console
Table of Contents
Table of Contents ....................................................................................................................1
About This Manual..................................................................................................................2
Help ........................................................................................................................................2
Undo .......................................................................................................................................2
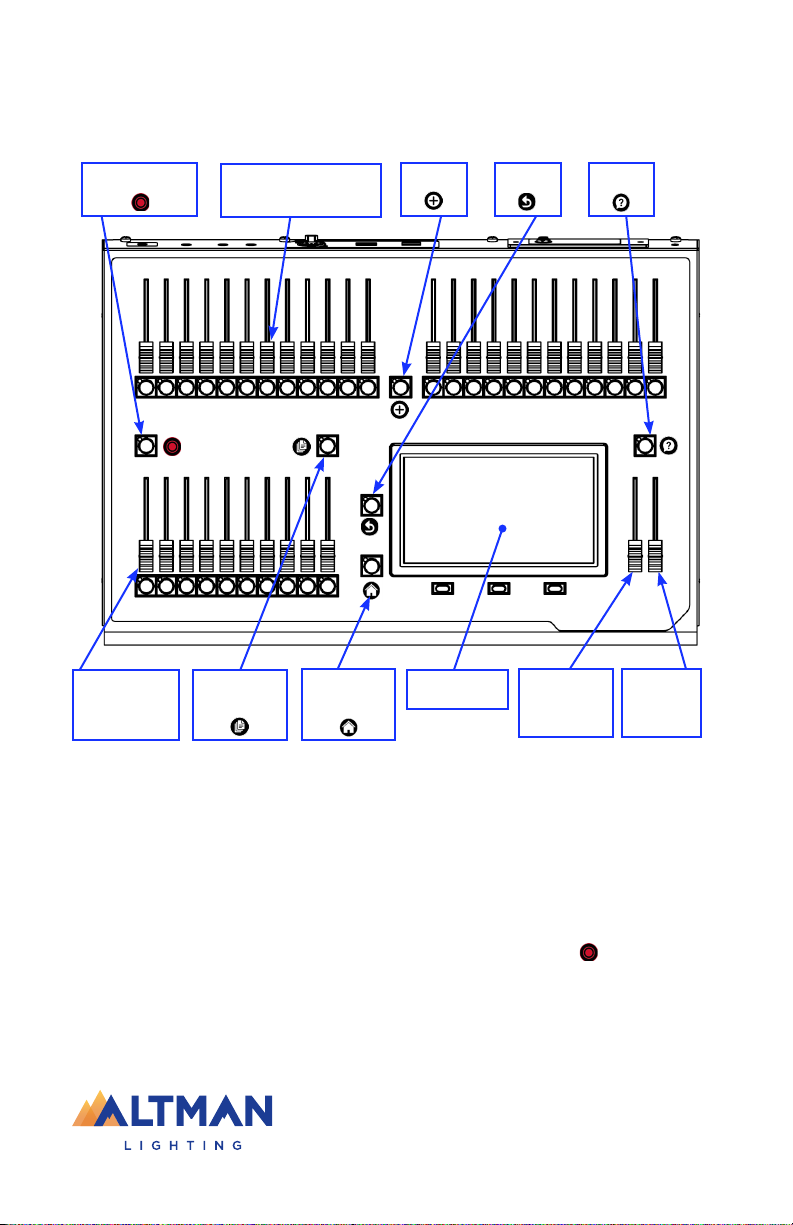
Front Panel..............................................................................................................................3
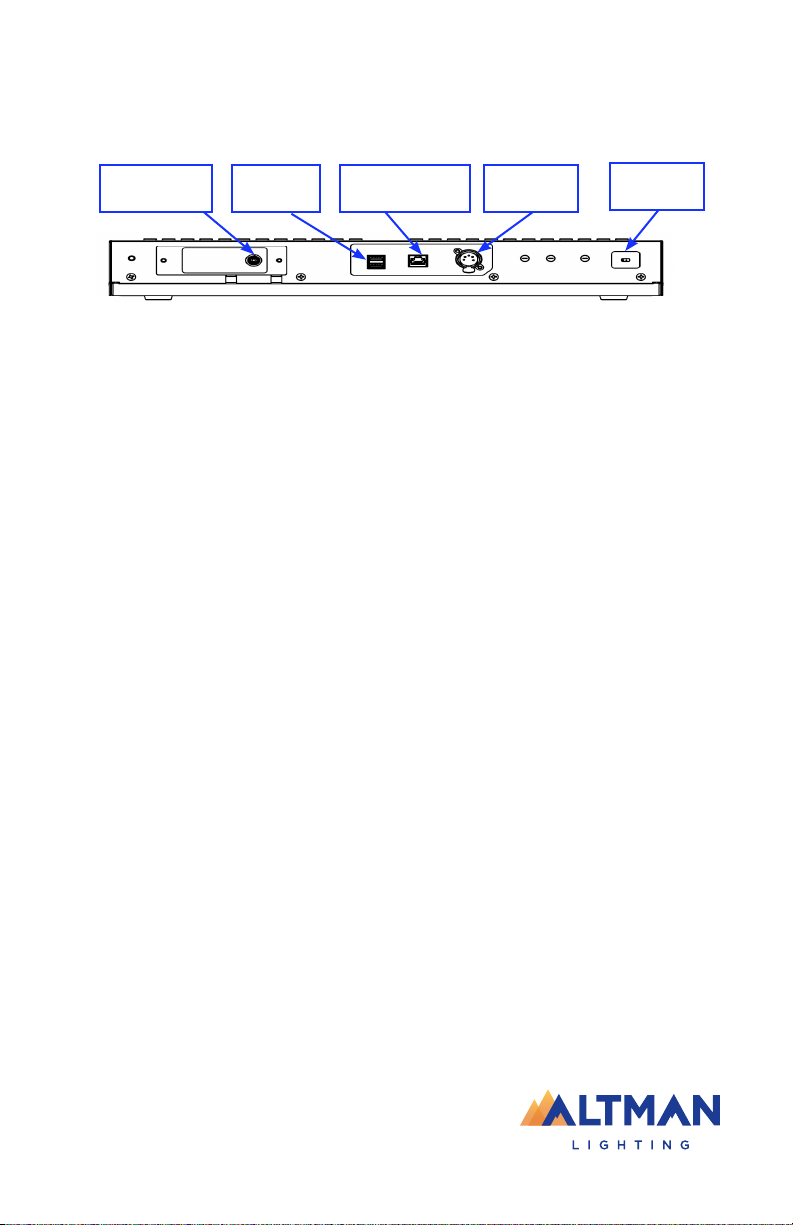
Rear Panel...............................................................................................................................4
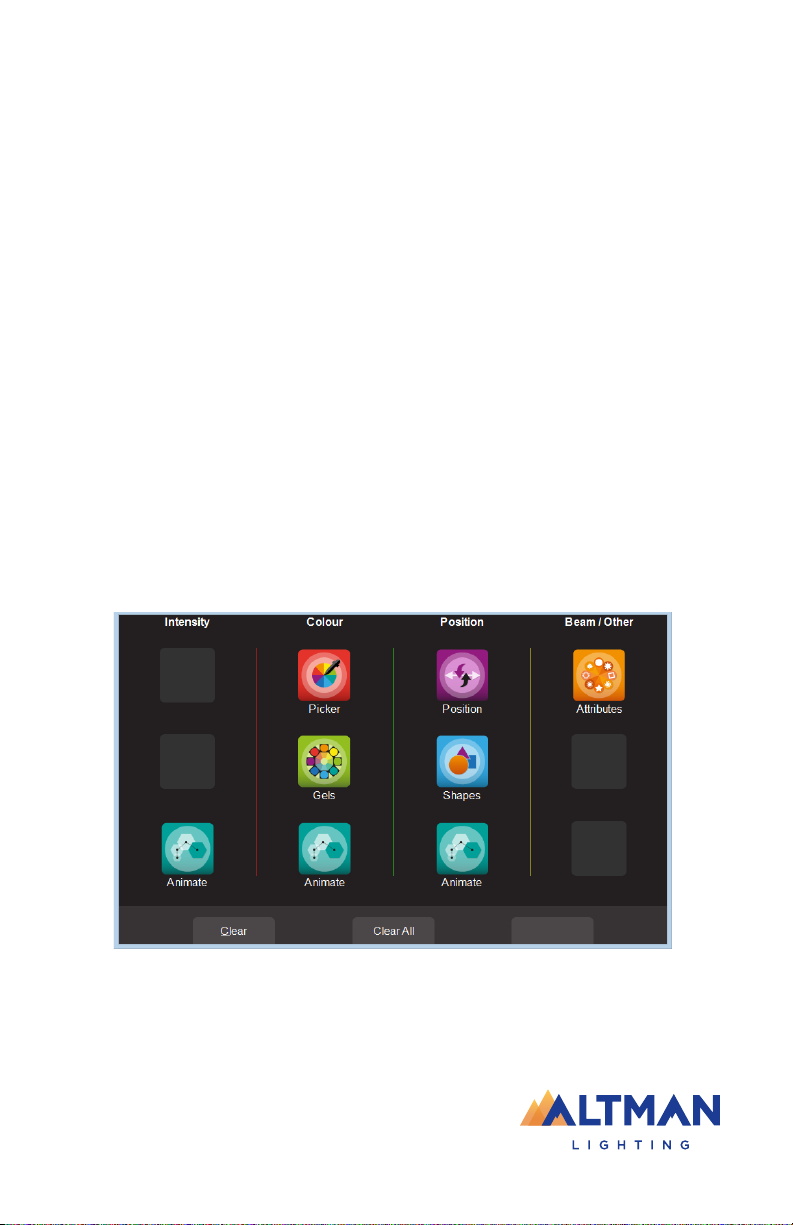
Touchscreen............................................................................................................................5
Controlling Fixture Intensity....................................................................................................6
Flash.............................................................................................................................................. 6
Controlling Fixture Attributes ..................................................................................................6
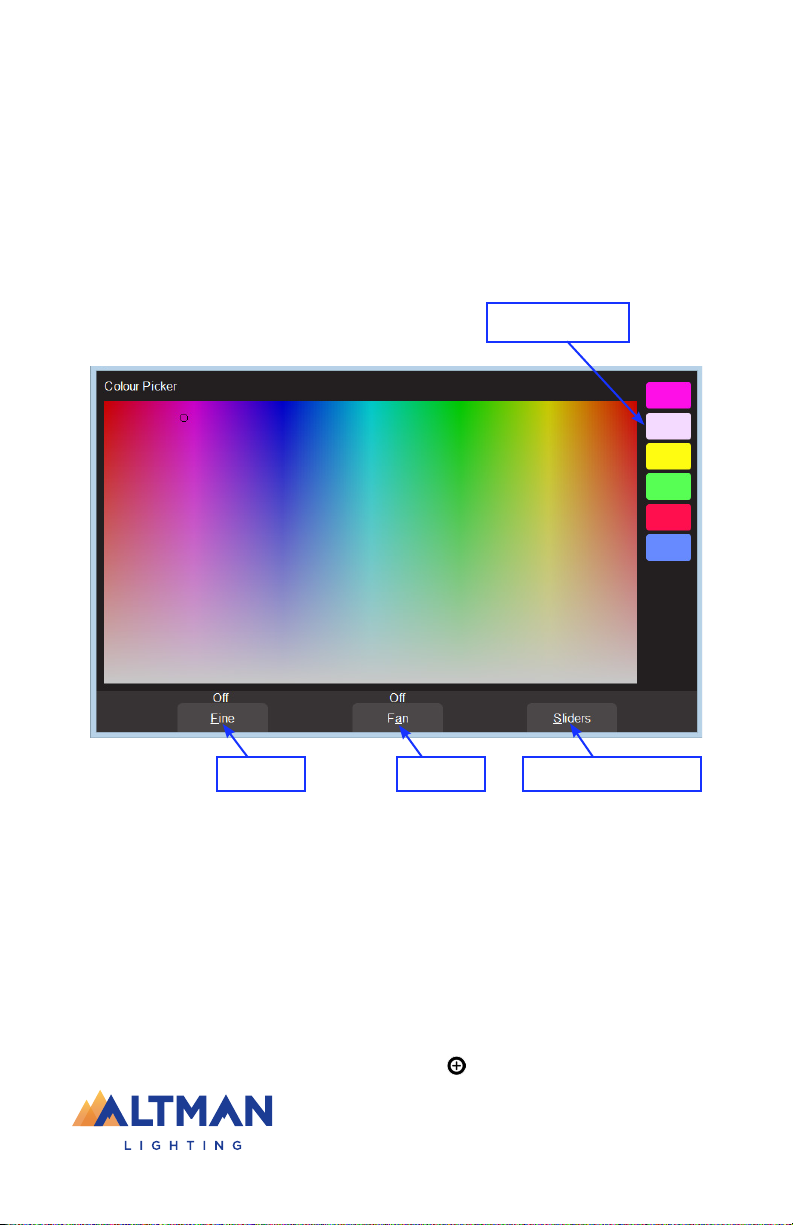
Controlling Color.....................................................................................................................7
Picker..........................................................................................................................7
Fan..............................................................................................................................7
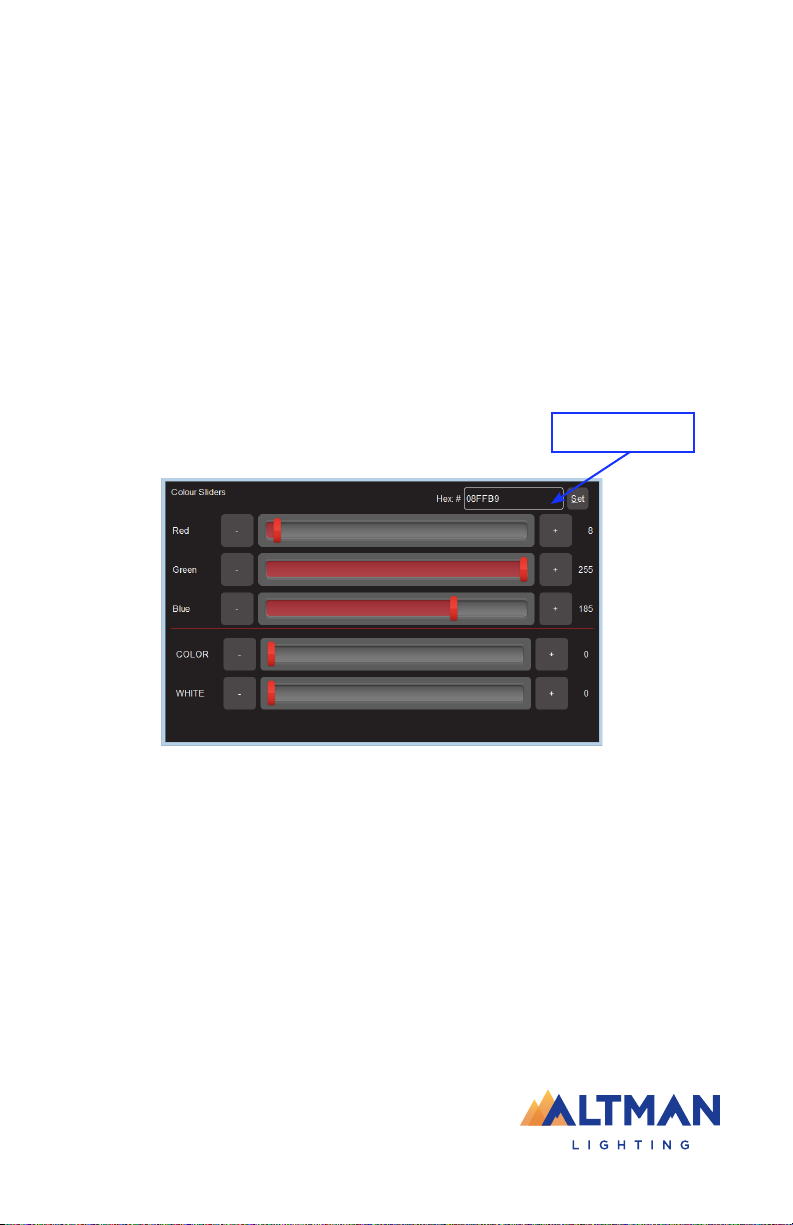
Sliders.........................................................................................................................8
Gels.............................................................................................................................8
Controlling Position ................................................................................................................9
Flip ................................................................................................................................................ 9
Center............................................................................................................................................ 9
Fan ................................................................................................................................................ 9
Automatic Fixture De-Select....................................................................................................9
Animate Apps........................................................................................................................10
Animate Controls Apps .............................................................................................11
Recording Animations...............................................................................................11
Shape Apps...........................................................................................................................11
Shape Apps Settings.................................................................................................12
Recording Shapes.................................................................................................................12
Clearing Fixtures ...................................................................................................................12
Recording the Output............................................................................................................12
Pages........................................................................................................................13
Playback....................................................................................................................13
Playback ...................................................................................................................14
Cue-List ....................................................................................................................14
ICPB Filters ...............................................................................................................14
Latest Takes Precedence (LTP) .................................................................................15
Live Speed ............................................................................................................................15
Live Speed Controls..................................................................................................16
Tap to Beat ................................................................................................................16
Page Freeze...............................................................................................................16
Editing Memories..................................................................................................................17
Chase a Cue-List ...................................................................................................................18
Editing Cues..........................................................................................................................18
Patching a Fixture .................................................................................................................19
Patch Example ..........................................................................................................20
Default Show.............................................................................................................20
Fixture Editor.............................................................................................................20
Rig View....................................................................................................................20
Tools Screen .........................................................................................................................21

Genesis Lighting Console
2
About This Manual
This “Quick Start Guide” provides basic information on patching, controlling intensity,
color & position, creating a simple animation plus recording and playback. Training
videos plus the “Genesis Operation Manual” containing full descriptions of all func-
tions are available at: www.altmanlighting.com
Genesis comes with a “Sample” show that you can load so that you can familiarize
yourself with the controls before patching your own fixtures. To load the sample
show from the “Home” screen touch: Tools/Load/SampleShow. If you don’t need the
sample show and want to patch your own fixture, go straight to section 20.
Genesis can control up to 24 lighting fixtures. The fixtures that you control might be:
• A conventional lighting dimmer.
• A multi-color LED fixture.
• A multi-color fixture with additional controls for position and/or beam shapes.
Each fixture is patched to a Yellow fader and button.
The Genesis Wing is an accessory for the Genesis lighting console. It can only be
operated when it is connected to a Genesis console. Connecting a Genesis Wing
provides control of an additional 12 lighting fixtures (25-36) and a further 10 play-
backs (11-20) (with 10 pages of memory) as well as a second DMX512 universe (U2)
output.
Connecting a second Genesis Wing provides control of an additional 12 fixtures (37-
48) and a further 10 playbacks (21-30) (with 10 pages of memory) as well as a third
DMX512 universe (U3) output. Connecting an provides an additional DMX universe
output.
Help
Undo
Context sensitive help is available on the touch screen for many functions of Genesis.
Tap the button to open the help screen. Tap to close.
To quickly undo the last action double tap . To undo more than one action tap
once to see the list of your actions. Touch Undo to undo an action and step down
the list. Touch Redo to redo an action and step up the list. Tap the [Back] button
to finish. Note: The undo list is automatically cleared whenever you save your show,
start a new show or load an existing show.

3
Genesis Lighting Console
Front Panel
Record Output 24 Fixture Faders and
Buttons ( Yellow)
Select Undo Help
Touchscreen
Back
Playback
Pages
10 Playback
Faders and
Buttons (Red)
Fixture
Master
(Yellow)
Playback
Master
(Red)
Touchscreen
The 24 Yellow fixture faders control fixture intensity. Moving a fixture fader automati-
cally selects that fixture allowing its other parameters such as color or position to be
controlled by Apps on the touch screen. Moving a fader to zero deselects the fixture.
The Yellow “Fixture Master” has overall intensity control of the yellow fixture faders.
The current output can be recorded into any of the Red playbacks by pressing
[Record] then pressing a Red playback button of your choice [ 1-10 ].
Different looks can be recorded on different Red Playback faders so that you can
easily change the entire look on stage by using the Red Playbacks.
See section 16 for more details.

Genesis Lighting Console
4
Power Input
The Genesis Console comes with a 12 volt 1.5A DC power supply.
USB Connector
The two USB connectors can be used to connect:
• A USB keyboard.
• A memory stick for show backup and software upgrades.
• A USB LED desk lamp (up to 250mA).
• One or two Expansion wings.
Ethernet Connector
The RJ45 Ethernet connector can be used to output sACN and ArtNet. These are
lighting control protocols that send DMX lighting data over a network or to a lighting
visualizer program running on a computer.
Connect a DMX data cable from the DMX512 output (one universe of 512 channels)
to the DMX512 input of your first fixture (Dimmer, LED or Moving light) and loop to
the next fixture/s. Only use specific DMX cable (never use audio cable) and always
terminate the end of the DMX line. Set the required DMX addresses on your equip-
ment. Patch each fixture to a yellow fixture fader. See section 20 for more details on
patching.
Rear Panel
DMX 512
Output
USB
Connectors
Power Input Ethernet Network
Connector
Kensington
Lock
DMX 512 Output
Note: Use of a USB Splitter is not recommend for use with the Genesis Console

5
Genesis Lighting Console
Dot shows position of moving
fixtures
Touchscreen
If the touch screen is not on the “Home” screen, pressing the [Back] button steps
back through the screens to the “Home” screen.
Double tapping [Back] quickly returns to the “Home” screen from any screen.
The “Home” screen is divided into two sections:
• The top section (yellow border) has fixture icons that displays the intensity,
color and position (if applicable) of the patched fixtures.
• The bottom section shows the contents of the Red Playbacks.
The 3 buttons below the touch screen have different functions for different screens.
Their current function is shown on the screen above each button. You can tap the
button or touch the screen to operate them.
Touching anywhere in the top “fixtures section” of the “Home” screen or touching
Apps opens the “Apps” screen. Apps are used to control the attributes of selected
fixtures. Move a yellow fader to automatically select that fixture. Use an App to adjust
the attribute. Other methods of selecting fixtures are described in section 9.
The bottom section of the “Home” screen has Playback icons showing the contents
of each Playback (if any have been recorded). Touch any playback icon to modify its
memory. See page 17 for Editing Memories
Current function of button
below
Fixture Icons show intensity,
color and position
Red Playback Page
Number
Playback
Contents “Home” Screen

Genesis Lighting Console
6
Controlling Fixture Intensity
The 24 (yellow) fixture faders (under the overall control of the yellow fixture master)
control the intensity of the fixtures that are patched to them. To see the output of a
fixture:
• Fade up the Yellow Master.
• Fade up a fixture fader to set its Intensity.
Flash
When the touch screen is on the “Home” screen, the buttons below the yellow faders
act as intensity [FLASH] buttons. You can set the flash intensity level in the Tools/
Setup screen.
If a red fader contains a single cue then its button acts as intensity [FLASH] button.
If a red fader contains a cue-list then its button “steps” the cue-list. See page 13 for
Playback.
Controlling Fixture Attributes
Genesis uses “Apps” on the touch screen to control the attributes of selected fixtures.
From the “Home” screen, open the “Apps” page by touching anywhere in the top half
of the touch screen or touching Apps.
There are 4 columns (Intensity, Color, Position, Beam/Other) that have Apps for their
type of attribute. Touch the App for the attribute that you want to control.
App Screen

7
Genesis Lighting Console
Controlling Color
From the “Home” screen, open the “Apps” page (described above) then touch the
color Picker app icon. Fixtures that have color attributes will flash their buttons. Select
the fixtures (described above) then drag your finger to change the color. The color is
selected when you “lift” your finger from the screen. The side of the color picker app
shows the recently selected colors. Touch any of the recent colors to re-use them.
Color Picker
Fan
When multiple fixtures are selected you can fan their colors to create rainbow effects.
Touching Fan selects “directional” fanning. Drag to fan the colors across the selected
fixtures.
Touching Fan again selects “symmetrical” fanning. Drag to fan the colors with your
finish color in the center of your fixture selection.
Touching Fan again turns fanning off.
Your fixture selection order is used by the Fan App. Experiment with different orders
of selection to get different color effects.
Previous selections can be re-used by tapping the [Select] button.
Recently Selcted
Color
Fine Control Fan Red Green Blue sliders for
individual control

Genesis Lighting Console
8
Sliders
Touching Sliders opens the “Color Sliders” screen that provides individual sliders for
all colors. Red, Green and Blue are located in a fixed section at the top of the window.
Other colors, White, Amber, UV and Lime, as well as Color wheels are located in the
scrolling bottom half of the screen. Sliding your finger vertically in the bottom half will
scroll the sliders up/down allowing access to more sliders if the selected fixture has
additional attributes. Touching Sliders opens the “Color Sliders” screen that provides
individual sliders for all colors. Red, Green and Blue are located in a fixed section at
the top of the window. Other colors, White, Amber, UV and Lime, as well as Color
wheels are located in the scrolling bottom half of the screen. Sliding your finger verti-
cally in the bottom half will scroll the sliders up/down allowing access to more sliders
if the selected fixture has additional attributes.
• + and – buttons are provided for small increments.
• The decimal values of each slider is shown on the right.
The Hexadecimal value of the last selected Red, Green, or Blue slider is shown at the
top. If you touch inside the Hex:# box you can enter exact values using the keyboard
that appears. Enter your values (in Hex) then touch Set.
Gels
The color Gels app is similar to the “Picker” app but has 100 commonly used color
gels to choose from.
RGB values in
Hexadecimal
Color Sliders

9
Genesis Lighting Console
Controlling Position
Flip
From the “Home” screen, open the “Apps” page then touch the Position app icon.
Fixtures that have Pan/Tilt attributes will flash their buttons. Select the fixtures then
drag your finger around the touchscreen to move the beam around the stage. You
don’t have to touch the current position icon to move a fixture, you can touch and
drag anywhere on the screen and the selected fixture(s) will follow your movements.
Touching Flip Pan or Flip Tilt reverses the direction of movement. These settings are
useful if the fixture movement is opposite to the movement on the touch screen.
Center
Touching Center moves the selected fixtures to their center position.
Fan
When multiple fixtures are selected you can fan their positions to create symmetrical
patterns
• Touching Fan selects “Centered” fanning. Drag to fan the positions around
the center fixture.
• Touching Fan again selects “Directional” fanning. Drag to fan the positions
around the first fixture in your selection.
• Touching Fan again selects “V–Shape” fanning. This pan works best when
fixtures are already fanned into a line. Drag to pull the line of fixtures into a
V shape.
• Touching Fan again turns fanning off.
Your fixture selection order is used by the Fan App. Experiment with different orders
of selection to get different shapes. Previous selections can be re-used by tapping
the [Select] button.
Automatic Fixture De-Select
When you open an App, fixtures that have attributes that can be controlled by that
App flash their buttons indicating that they are available for selection. When you select
fixtures their buttons are continually lit. After you have used the App to change any
attribute of the selected fixtures, the buttons of the un-selected fixtures stop flashing.
This tells you that selecting another fixture will cancel the previous selection and start
a new selection process. This speeds up operations because you don’t have to de-se-
lect fixtures once you have set their attributes.
For example: Open the Color Picker App and fade up fixtures 1 and 2. They are auto-
matically selected. Pick a color. Fade up fixture 3 and 4. This de-selects 1 and 2 and
selects 3 and 4. Pick a color for 3 and 4.
Automatic fixture de-select can be overridden by holding the [Select] button while
selecting additional fixtures.

Genesis Lighting Console
10
Example 1:
Let’s create a 2 color animation using RGB LED fixtures 1 through 4:
• From the “Home” screen, open the “Apps” page then touch the Color Picker app
icon.
• Fade up fixtures 1, 2 and 3. This automatically selects them.
• Select a color (Red) by touching the color picker.
• Fade up fixture 4. This automatically deselects the previous selection and selects
fixture 4.
• Select a different color (Blue). The output is shown in “Step 1“ below.
• Tap [Back] once to return to the Apps screen then open the Color Animate
app.
• Select all 4 fixtures by fading them up to full or tapping their buttons then touch
Create.
• The animation runs and the blue steps through the 4 fixtures.
Animate Apps
Animate Apps provides a simple and intuitive way of creating chases and moving pat-
terns. They work with 2 or more selected fixtures and they shift the attribute settings
(such as color or intensity, position or beam) from one fixture to the next and loop
the settings of the last selected fixture back to the first. There must be at least one
different setting amongst all of the selected fixtures so that you can see the different
setting being shifted from one fixture to the next.
Example 2:
Let’s create a 4 fixture intensity animation (a chase) using fixtures 1 to 4:
• Fade up the fixture 1 to full and fade down fixtures 2, 3 and 4 to zero (Step
1 below).
• Open the Intensity Animate app icon.
• Select fixtures 1 through 4 by holding fixture [1] button and tapping fixture
[4] button (or tap them individually).
Touch Create and the animation runs as an intensity chase.

11
Genesis Lighting Console
Animate Controls Apps
All animation Apps have controls for:
• Speed in BPM (Beats Per Minute).
• Crossfade: When set to “0%”, the animation snaps from step to step. When
set to “100%”, it fades from step to step. In between settings give a propor-
tional crossfade and a pause.
• Direction: Forward, Reverse, Center Out or Center In. Center Out and Center
In work best with an odd quantity of fixtures. If you select an even number
of fixtures you should start with a symmetrical pattern (e.g. First and Last
fixture).
The only limitation for animations is that there must be at least 2 fixtures selected and
there must be at least one different setting in one of the fixtures. Multiple animations
can be running simultaneously.
Recording Animations
When you record the output of the Genesis as a cue it includes any animations that
are running. Recording animations will automatically clear the animations from the
yellow faders. If you want to keep the animations running on the output, fade up the
red playback fader on which you make the recording. See page 13 for details on how
to record cues.
Shape Apps
The Shapes App provides a quick and simple way of creating continuously moving
positions on fixtures that have Pan and Tilt attributes by constantly varying those
attributes.
To create a shape, from the “Home” screen, open the “Apps” page (see section 8)
then touch the “Position” Shapes app icon.
Scroll down for “Rotate”

Genesis Lighting Console
12
Fade up the fixture(s) to which the shape is to be applied. This automatically selects
the fixture(s).
The Shape App has controls for:
• Ellipse (clockwise or anti-clockwise).
• Rectangle (clockwise or anti-clockwise).
• Triangle (clockwise or anti-clockwise).
• Random.
• Pan Amplitude.
• Tilt Amplitude.
• Speed (in seconds).
• Spread (in percentage). Applies when 2 or more fixtures are selected and
spreads them around the movement shape. When set to 0%, all fixtures are
focused on the same point as they move around the shape. When set to 100%
the fixtures are evenly spaced apart as they move around the shape. In between
values vary the spread. Does not apply to the “Random” shape.
• Rotate (in degrees). Rotates the shape about its axis. Does not apply to the
“Random” shape.
Touch Create and the shape runs.
Multiple shapes can be created by selecting New Shape and repeating the procedure
above.
Shape Apps Settings
Recording Shapes
When you record the output of the Genesis as a cue it includes any shapes that are
running. Recording a shape will automatically clear that shape from the yellow faders.
If you want to keep the shape running on the output, fade up the red playback fader on
which you make the recording. See page 13 for details on how to record cues.
Clearing Fixtures
If you have used any Apps to control fixture attributes such as selecting a color or
position or created an animation(s) or shape(s), you can clear these settings and
restore the fixture(s) to its default settings (open, white, centered beam) and delete
any animations.
From the “Apps” screen, touch Clear All or to only clear specific items touch Clear
then make your choices from the screen.
Note: Recording a cue (see below) that contains an animation or shape automatically
clears that animation or shape from the yellow faders.

13
Genesis Lighting Console
Recording the Output
When you have adjusted the intensity and color of your fixtures and possibly created
an animation(s) and or shapes you can record the current output of the Geneis onto a
Red Playback fader.
To record the current output onto a Red Playback fader, tap [Record] then tap the
button below the Red Playback fader of your choice [1-10]. All of the attributes of any
fixture with an intensity level greater than 0% will be included and the recording is
called a cue.
To include fixtures with no intensity, after taping [Record], tap [Select], then
tap (and light) the buttons of any fixtures with no intensity that you want to include in
the cue.
The look on stage can now be played back from the recorded cue (see Playback be-
low). This frees up the yellow faders ready for you to create another lighting look and
to record it into another cue.
If you record a cue to a Red Playback that already contains a single cue you are
offered 2 choices
• “Overwrite”. Replaces the existing cue.
• “Add”. Creates a “Cue-list” with the new cue following the existing cue. See Page
14
If you record a cue to a Red Playback that already contains a Cue-list the new cue is
added after the current cue in the list.
The Red “Playback Master” fader has overall intensity control of the Red playbacks.
Pages
There are 10 red playback faders and 10 pages of memory giving a total of 100 memo-
ries. Each memory can contain either a single cue or a “cue-list” which can contain up
to 250 cues.
• Repeated taps of the [Page] button will step through the 10 pages of memo-
ry.
• To switch directly to a page number; HOLD [Page] and TAP a red fader button
[1 to 10].
The current page number is shown in the top left corner of the “Home” screen and the
contents of the red playback faders are shown along the bottom.
Playback
To playback a recorded cue, fade up the Red Playback Master to full and fade up
the Red Playback fader where you recorded the cue (remember to select the correct
page). You might want to fade down the Yellow master (or all of the yellow fixture
faders) after you bring up the Red playback, so that you only see the recorded look on
the output.

Genesis Lighting Console
14
Different looks can be recorded in different cues so that you can easily change the
entire look on stage by only using the Red Playbacks.
Unlike the Yellow Fixture faders that only control intensity, the Red Playback faders
control all of the attributes of the fixture that have been recorded in the cue. This
allows you to crossfade from one Playback to another with a smooth transition of
intensity, color and position. See Latest Takes Precedence (LTP) on page 15.
Playback
If a Red Playback contains a cue-list you can crossfade to the next cue in the list by
tapping its playback button (below its fader). The crossfade uses the “fade in” and
“fade out” times in the cues. See page 17.
To crossfade in the reverse direction HOLD the [Back] button whiletapping the
playback button.
The current cue has a white background. A pointer indicates when a fade is in
progress.
Cue-List
The cue-list can be manually played as a “list” or automatically played as a “chase”.
See page 18.
When a memory is played back it includes all of the Intensity, Color, Position
and Beam (I C P B) attribute groups of the fixtures recorded in the cue however
for extra flexibility you can choose which groups of attributes are included in the
playback. For example you could choose to only playback colors from one cue list
or choose to only playback positions from another cue list. See section 17 for more
details.
ICPB Filters
Fade in
Progress
Playing as a
“List” Touch the Playback icon
to Modify the cue-lite
Current
Cue

15
Genesis Lighting Console
Latest Takes Precedence (LTP)
The value for each attribute of a fixture (intensity, color, position, etc.) that appears on
the output is determined by a method known as LTP (Latest Takes Precedence) and
by fader position. An LTP action occurs when a red fader is raised above zero. When
this occurs, the fader will take control of its attributes and they will fade to their levels
in that fader following the fader movement and fade times. When that fader reach-
es 100%, it fully overrides all other faders containing attribute values for the same
fixtures.
For example:
We have 3 cues recorded on red playback faders 1 to 3 with a single LED fixture in
each cue. In the first fader the fixture is red, in the second it is blue and in the third it
is yellow.
• Fade up fader 1 to full. The fixture fades to red.
• Fade up fader 2 to full. The fixture fades to blue.
• Fade down fader 1 and nothing happens because fader 2 is the latest (LTP) and
it is at full.
• Fade up fader 3 and the fixture fades to yellow because fader 3 is the latest.
• Fade down fader 3 and the fixture fades back to blue (the previous latest).
Remember that when the latest red fader to be raised from zero is at full, other faders
controlling the same fixtures can be faded down without having an effect.
Live Speed
“Live Speed” allows you to override the fade times and speeds of cues, chases, ani-
mations and shapes. The changes are only a temporary offset applied to the settings
saved in the cue or on the live yellow faders. The settings in recorded cues are not
altered.
From the “Home” screen press Live Speed.

Genesis Lighting Console
16
Live Speed Controls
The “Live Speed” screen has controls to override the following parameters:“Fade In/
Out” times of a cue.
• “Speed” “Pause/Play” of a chase, animation or shape.
• “Crossfade” of a chase or animation.
• Tap To Beat” to set the speed of a chase, animation or shape.
Each set of controls only becomes active when one of the above parameters is either
active on the output or “selected” as described below.
Moving the slider to the right or touching + increases the value by multiplying the
recorded value. Moving it to the left or touching - decreases the value by dividing the
recorded value.
When the Select button is grey, the controls will override all live output.
If you touch Select it turns blue and you can now choose which playback to override
by tapping the buttons below the playbacks. Multiple playbacks can be selected and or
deselected. The LED in the playback button lights to show it is selected.
Tap to Beat
You can set the speed of a chase, animation or shape and by tapping the beat.
Play the chase, animation or shape on the output then from the “Home” screen press
Live Speed.
Tap the Tap to Beat button at least 4 times at the desired rate. Genesis averages all
of your taps to set the speed. If you have tapped a speed and then want to change it,
pause for 2 seconds then start tapping again (at least 4 taps).
Page Freeze
A “PAGE FREEZE” feature prevents the contents of an “active” Red playback fader
from being changed if its level is above 0% when a different page is selected.
The color at the top of each playback icon shows its page status.
Red =
Current Page
Black = Not
Current Page

17
Genesis Lighting Console
Editing Memories
If you touch a playback icon you can edit its contents.
The “Edit Memory” page opens with the current cue selected.
Touch a cue to select/de-select it. You can:
• Select a Cue then touch Jump To. The cue-list will crossfade directly to the
selected cue. Useful if you have a long cue-list and you want to quickly playback
a cue without stepping through all of the intermediate cues.
• Re-order the selected cue using the (Up) or (Down) buttons.
• “Include ICPB”. When a memory is recorded it includes all of the intensity,
Color, Position and Beam (I C P B) attribute groups. Touching an attribute group
(I C P B) excludes that group from the playback. The selection applies to all cues
in the cue-list. For example, this allows you to create a color only cue-list and a
position only cue-list allowing multiple combinations of color and position to be
created by playing both cue-lists at the same time.
• Change “Fade In” time and a “Fade Out” times of the selected cue.
• Re-name the selected cue.
• Duplicate the selected cue.
• Delete the selected cue.
• Delete Memory (all cues in the list).
• Use the list as a chase (see below) or a cue-list.
Multiple cues can be selected when deleting, re-ordering or changing fade times.
To edit the intensity or attributes of a fixture in a cue see page 18.
Playback Icon
Selected Cue
Use as
Chase
Jump
To

Genesis Lighting Console
18
Editing Cues
To edit a fixtures intensity or attributes in a cue, first bring down all yellow and red
faders, then push up the red playback fader that contains the cue/cuelist and play the
cue that you wish to edit. Fade up the Yellow master.
• To edit the intensity of a fixture, fade the fixtures yellow fader up from zero.
When the fader matches the current level in the cue, the yellow fader will take
control of the intensity. Set the intensity to the required level.
• To edit the other attributes of a fixture select the appropriate App (Color, Position,
Beam / Other). Select the fixture(s) to be edited then use the App to make the
change.
Update the cue by pressing [Record] then press and HOLD (for 1 second) the
button below the Red Playback fader which contains the cue
Chase a Cue-List
To change a cue-list into an automatically stepping “Chase” touch its playback icon
then select “Use as Chase”. The list will automatically increment through the steps
using the speed and crossfade settings.
Traditionally chases will snap (instantly switch) from step to step but you may also set
a crossfade value so that it will fade from step to step.
You can manually step a chase by tapping its playback button (below its red fader). To
manually step in the reverse direction HOLD the [Back] button while tapping the
playback button.
Hint: Set a low speed if you want to manually step the chase.
Chases automatically stop when their red fader is at zero.
Editing Animations and Shapes
Recorded animations and shapes cannot currently be edited.
Table of contents
Other Altman Music Mixer manuals
Popular Music Mixer manuals by other brands

AMC
AMC iMIX 2 User manal

Avid Technology
Avid Technology S3 Replacement

Extron electronics
Extron electronics MIX 301 user guide

Louroe Electronics
Louroe Electronics RN-2 Installation and operating instructions

Behringer
Behringer Promixer DX 500 user manual

Motorola solutions
Motorola solutions MCC 7100 IP Setup and user guide