Alto 03K User manual

Instruction manual ..................... 2 - 13
Betriebsanweisung...................... 14 - 25
Manuel d’Instructions ................ 26 - 37
Gebruikershandleiding................ 38 - 49
Manual de Instrucciones ............. 50 - 61
Manuale di istruzioni.................. 62 - 73
Manual de Instruções.................. 74 - 85
γχειριδιο οδηγιων ...................... 86 - 97
03K
C3K
GB
P
NL
F
D
I
E
GR

3
14
4
5
6
7
17
12
10
15
13 11 16
9
8
12

2
Designations GB
(see drawing on the cover)
1. Electric cable
2. Connection of water and water filter
3. Start/stop button
4. Oil control and filling
5. Pressure gauge
6. Water regulation valve
7. Outlet connection
8. Spray handle
9. Spray lance
10. Model tag
11. Sludge container
12. High pressure hose
13. Drain plug
14. Transport handle
15. Winder for hose, cable and lance
16. Brake
17. Milled nuts
IMPORTANT: Read this instruction ma-
nual before you start up your high pres-
sure washer for the first time.
This machine is a high pressure washer producing
a water jet under high pressure which is why seve-
re injuries can occur if the safety precautions are
not observed.
Therefore a complete understanding of the con-
tents of this instruction manual is required in order
to prevent injuries to yourself, objects and persons
nearby, and the machine itself.
Contents 2 - 13 GB
1.0 Survey of models ........................................ 3
1.1 Model tag ............................................... 3
1.2 Technical data ....................................... 3
2.0 Instructions for use .................................... 4
Safety precautions and warnings
2.1 Starting-up ............................................. 4
2.2 Operation ............................................... 4
2.3 Safety devices on the cleaner ............... 5
2.4 General .................................................. 5
3.0 Operating instructions ............................... 6
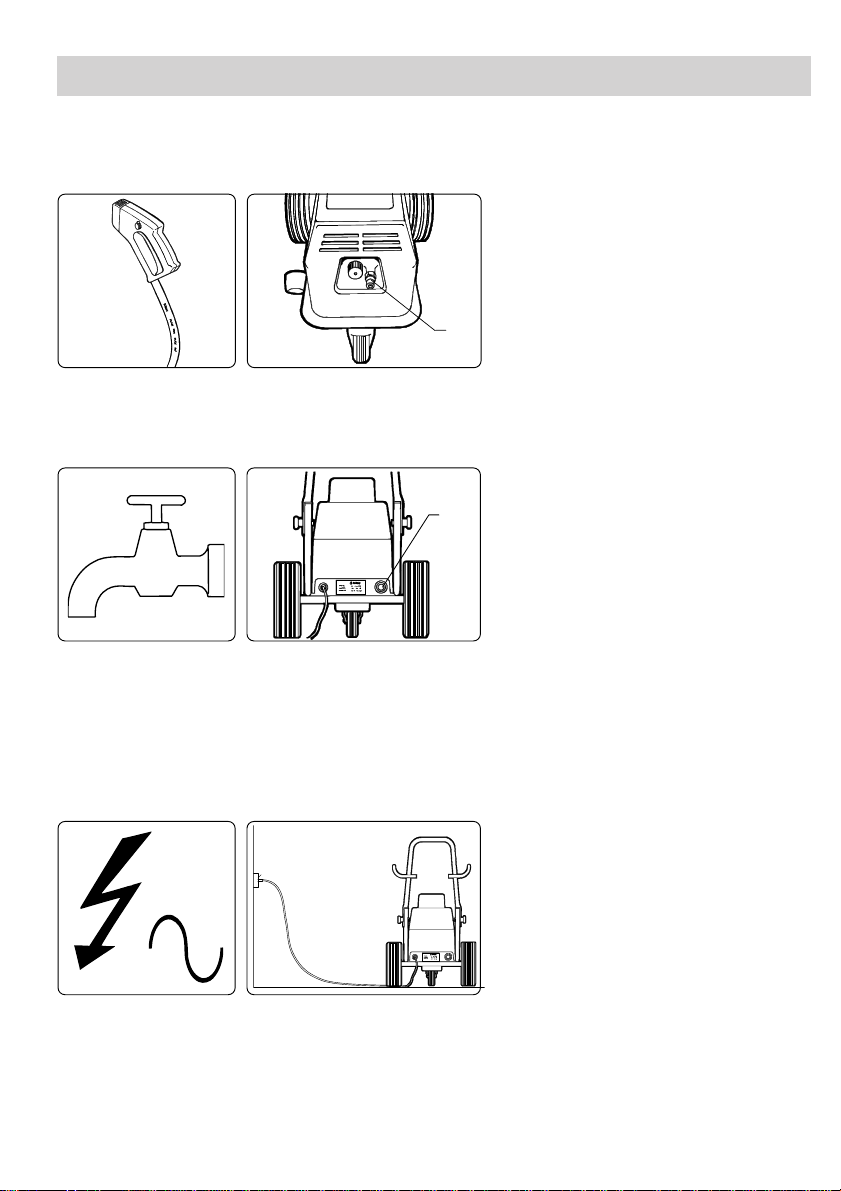
3.1 Connections ........................................... 6
1. High pressure hose ........................... 6
2. Water connection ............................... 6
3. Mains power connection .................... 6
4. Spray handle - accessories ............... 7
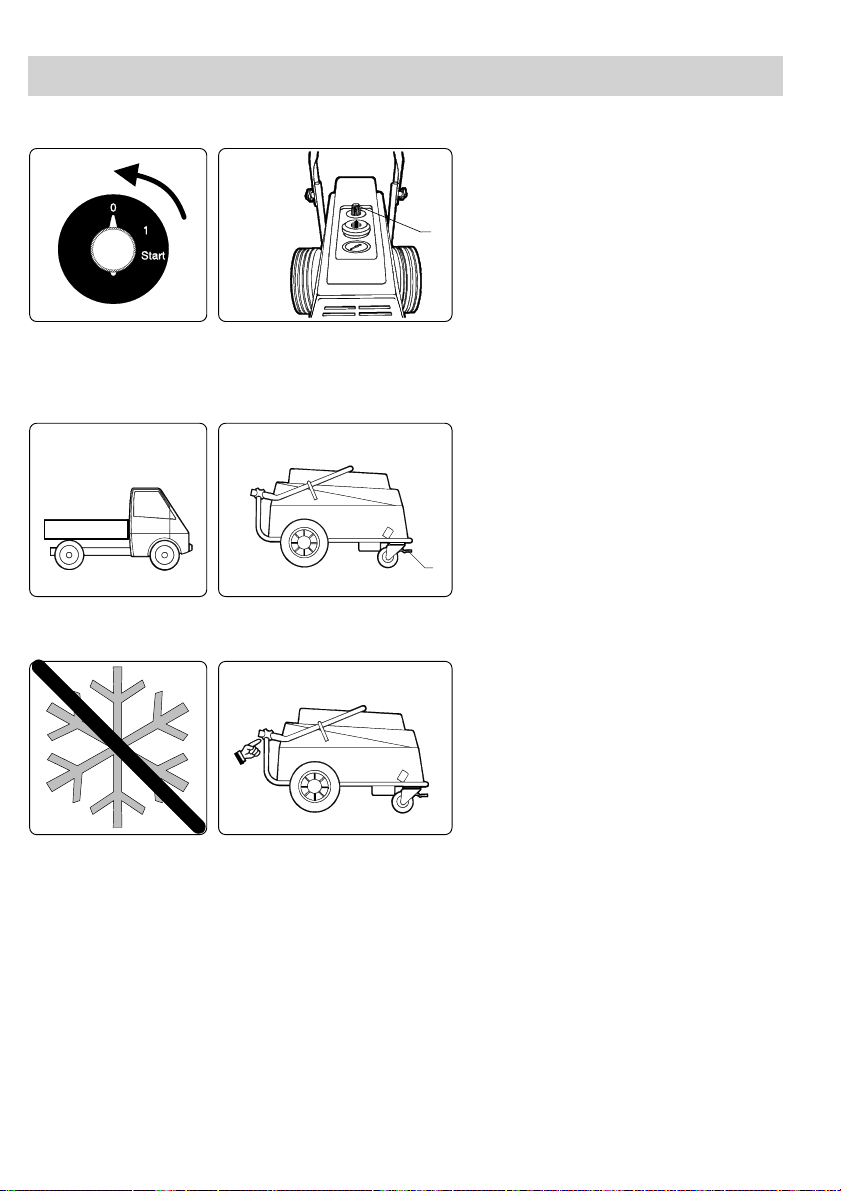
3.2 Starting-up procedure ............................ 7
3.3 Operation ............................................... 8
3.4 Spray lance, regulation of pressure and
water volume ........................................ 8
3.5 End of operation .................................... 9
3.6 Transport directions ............................... 9
3.7 Storage .................................................. 9
4.0 Fields of application and working
methods ..................................................... 10
4.1 Fields of application ............................. 10
4.2 Working pressure ................................ 10
4.3 Detergents ........................................... 10
4.4 Working methods ................................. 11
5.0 The environmental policy of ALTO ......... 11
6.0 Maintenance .............................................. 12
6.1 Oil ........................................................ 12
6.2 Sludge container .................................. 12
6.3 Water filter ........................................... 12
6.4 Cleaning of high pressure nozzle ........ 12
7.0 Troubleshooting and correction ............. 13
8.0 Functional description ........................ 98-99
United Kingdom:
Health and Safety at work Act 1974
Guidance note p.m. 29
This act imposes certain obligations with regard to
safety on both operators and suppliers of machines
used in the course of work.
ALTO’s policy has always been to ensure, so far as
is reasonably practicable, that all ALTO products
are safe and without risk to health when properly
used.
Although the proper use will vary from machine to
machine there is a constant factor which cannot be
overemphasized, namely the need for a good
standard of personal and industrial operation and
installation.
ALTO always endeavours to provide customers
with adequate information on the products they are
using, by the issue of descriptive literature which is
constantly being reviewed and updated.
We would also like to remind you of the importance
of avoiding misuse and the need to disseminate all
relevant information to individual employees.
If you have any doubts or problems relating to the
correct installation, application, storage or handling
of any of the products please do not hesitate to
contact your local ALTO distributor.
Details on earth leakage circuit breakers and moni-
toring devices are available on request.
ALTO Cleaning Systems Limited
Gilwilly Industrial Estate, Penrith, Cumbria -
01768-868995

3
ALTO Danmark A/S 72 18 21 00
1.0 Survey of models GB
1.1 Model tag
This ALTO high pressure washer has the serial designation C3KA. The model designation appears from
the text on the cabinet, ALTO 52C3KA as an example, and the model tag on the back of the machine (pos.
10).
The tag provides the following details:
1. Manufacture
2. Model designation
3. Production year and week
4. Serial number
5. Rated voltage
6. Electric coupling
7. Mains frequency
8. Power consumption
9. Power absorption
10. Pump pressure
11. Capacity
12. Max. pressure
13. Max. temperature
1.2 Technical data
Model 44C3KA 52C3KA
Pump pressure bar 170 190
Water volume, min/max pressure l/min. 20.0/18.6 21.3/19.6
Max. pressure, inlet water bar 10 10
Min. water supply l/h 1200 1280
Spray lance:
Nozzle diameter h.p./l.p. mm 1.53/3.5 1.53/3.5
Spray angle h.p./l.p. degrees 15/65 15/65
Nozzle type 06 06
Thrust, max. N/kp 49/5.0 54/5.5
Sound pressure level LpA measured in accordance with ISO 11202 [DISTANCE 1m] [FULL LOAD]:
78 dB(A).
This machine has been manufactured in accordance with the Low Voltage Directive 73/23/EEC and the
EMC directive 89/336/EEC inclusive of subsequent amendments.
Data at 3 bar inlet pressure and 12°C inlet water.
We reserve the right to make alterations.

4
2.0 Instructions for use Safety precautions and warnings GB
Before starting up your high pressure washer for the first time, we advise you to read through the following
sections: 2.0 Instructions for use and 3.0 Operating instructions and to follow all instructions to ensure the
protection of user, surroundings and machine.
2.1 Starting-up
Upon the unpacking of your machine please check it for any defects. If you find any, we kindly ask you to
contact your ALTO distributor.
Check the electric cable
The insulation of the electric cable should be quite faultless and without any cracks.
Please contact a qualified electrician or the nearest ALTO distributor if any doubts arise.
Check the voltage
Check that the voltage stated on the model tag corresponds to your mains voltage.
Power consumption, fuse
Check the power consumption stated on the model tag and then check correct prefuse.
Mains power connection
Faulty connection of the machine can cause electric shock.
1. Only connect the machine to an installation with earth connection.
2. If you are in doubt about connections, please contact a qualified electrician for correct installation.
3. We recommend you to connect the machine to a power source with a Residual Current Device (RCD),
which will disconnect the power supply if the leakage current exceeds 30 mA for 30 milli seconds.
4. The electric supply connection shall be made by an qualified electrician and comply with the latest editi-
on of the IEC Wiring Regulations.
Extension cable
If you want a wider radius of action ALTO highly recommend you to use an extension hose instead of an
extension cable. Where impracticable seek advice of a qualified electrician or the nearest ALTO distributor.
If you want to apply an extension cable when operating a three-phase high pressure washer, we re-
commend you to use the cable dimensions mentioned below: (The use of the stated cable dimensions
implies that the mains voltage supplies a stable voltage corresponding to that stated on the model tag).
NOTE: If an extension cable is required it must be earthed and connected through the plug to the
earth cable of your supply network in accordance with prescribed safety regulations.
5. Extension cable, plug and socket should be waterproof.
6. Always use a cable similar to the one mounted on the machine i.e. with earth connection and for outdoor
use. If you are in doubt, please contact a qualified electrician or the nearest ALTO distributor.
7. Cable connections should be kept dry and off the ground.
8. Check extension cables before usage. Don’t use damaged cables.
2.2 Operation
This machine produces a high pressure jet and operation contrary to the instructions can cause severe
injuries!
For your own and the safety of others the following precautions should always be observed:
1. WARNING! Never direct the water jet towards people, pets, electric wiring, or the machine
itself.
2. WARNING! Never try to clean clothes or footwear on yourself or other persons.
3. We recommend you to wear goggles during operation.
4. Never work barefoot or with sandals.
5. Operator and anyone in immediate vicinity of the site of cleaning should take action to protect
himself from being struck by debris dislodged during operation.
I 0<I<10 Amp 10<I<16 Amp 16<I<25 Amp 25<I<32 Amp
mmm²mm²mm²mm²
0-50 1,5 1,5 2,5 4,0
51-75 1,5 2,5 2,5 4,0
76-100 1,5 2,5 4,0 6,0

5
Safety precautions and warnings GB
6. According to regulations persons under the age of 18 must not operate cleaning machines with a work-
ing pressure above 70 bar (applies to this machine).
7. The machine should be placed as far away from the cleaning site as possible.
8. Only let instructed personnel operate the machine.
9. Don’t start the machine until the high pressure hose has been correctly mounted.
10. Spray handle and lance are affected by a thrust during operation - therefore always hold
the spray lance firmly with both hands.
11. At intervals during operation, the machine should be stopped and the spray handle secured against
inadvertent use by locking trigger with locking device.
12. Only activate the trigger by hand. Never tie it up or fix it in any other way.
13. Avoid damage to the high pressure hose such as running over by a car, squeezing, pull, knots/kinks
etc. and keep it away from oil and sharp or hot objects, as such may cause the hose to burst.
14. Never dismount the high pressure hose while the machine is in operation. Disconnect the cleaner and
the water connection before dismounting the high pressure hose.
15. Never jerk the cable to disconnect the plug from socket.
16. Always disconnect the plug from socket prior to disconnecting any extension cables.
17. Avoid damage to the electric cables such as running over by a car, squeezing, pull, knots etc. and
keep them away from sharp or hot objects.
18. According to the legislation in many countries it is forbidden to use the machine in an environment where
there could be a danger of explosion. If any doubt arises, please contact your local authorities.
Important: OFFSHORE - Never use the machine in an environment where there could be a danger
of explosion (according to EN-50014).
19. WARNING! High pressure hoses, nozzles and connections are important for safety when operating the
machine. Only use the high pressure hoses, nozzles and connections prescribed by ALTO.
20. For safety reasons only use original ALTO accessories and spare parts.
21. In icy conditions never start the cleaner until machine, hoses and accessories have thawed. Otherwise
the machine could be damaged.
22. The cleaner should not be covered during operation.
2.3 Safety devices on the machine
Circulation valve (safety valve)
The pressure side of the high pressure pump is fitted with a circulation valve (safety valve). This valve
circulates the water back to the suction side of the pump when the spray handle is closed or if a nozzle is
blocked. The circulation valve has been constructed as a safety function ensuring that the pressure will
never exceed the working pressure by more than 20 bar. At this pressure the circulation valve will automa-
tically switch from high pressure to circulation mode. The circulation valve ensures that the machine be-
comes devoid of pressure when it is stopped.
Motor protection
The electric motor features built-in thermal switches for protection of motor against overloading. In the
event of increased power consumption (maloperation) the power supply for the motor will automatically be
disconnected.
2.4 General
1. It is not allowed to clean asbestos-containing surfaces with high pressure, unless using special equipment.
2. Persons under the influence of alcohol, drugs and medicine should not operate the machine.
3. Never touch plug and socket with wet hands.
4. WARNING! This machine has been constructed for use with ALTO detergents. The use of other deter-
gents or chemicals may cause problems as to the operation and the safety.
5. When using detergents the instructions should always be strictly observed.
6. Always unplug before cleaning and maintenance of the machine.
7. Don’t use the machine if the electric cable or important parts of the equipment are damaged - i.e. safety
devices, high pressure hoses, spray handles, cabinet.
8. The most efficient cleaning is obtained if you adjust the distance to the surface which is to be cleaned.
Thus you will also avoid damaging the surface.

6
3.0 Operating instructions GB
3.1 Connections
1. High pressure hose
Max. length of extension hose: 50 m
Only use ALTO high pressure hose
The high pressure hose with imprinted max. working pressure and temperature should be attached to the
quick coupling (1) on the front of the machine.
2. Water connection
Min. length of hose: 6 m. 3/4"
Clean water inlet filter (1) at monthly
intervals
Max. water pressure 10 bar
Let water run through the inlet hose to remove any impurities.
Min. water supply - see section »1.2 Technical data«.
With hot water and high pressure hoses of more than 10 m the machine should be fitted with a water tank.
This also applies if the outlet of the machine is connected to a pipeline.
If there is a risk of running sand in the inlet water (i.e. from your own well), a filter should be mounted.
NOTE: Connection to the public mains according to regulations.
3. Mains power connection
Only connect to an approved socket with
earth connection.
Check voltage, fuse, cables and extension cables according to section 2.1.
In countries, where many different types of plugs are applied, the machine is delivered with an electric
cable without plug. The plug should be mounted by a qualified electrician.
1
1

7
Operating instructions GB
4. Spray handle - accessories
Clean nipple of any impurities each time
the spray lance has been dismounted.
Pull forward the grey quick coupling trigger (1) of the spray handle Insert the nipple of the spray lance (2) in
the quick coupling and release the trigger.
Pul forward the spray lance or any other accessory to ensure correct mounting before starting the cleaner.
Max. thrust of spray handle and lance - see section »1.2 Technical data«.
3.2 Starting-up
Check oil.
Turn to position "Start"
Check that the oil level in the oil glass is between the MIN. and the MAX. markings (2). Turn the red start/
stop button (1) to position Start (when releasing the button it will go back to position 1 = operation).
Automatic start/stop
When the spray handle is released, the machine will automatically stop after approximately 10 sec.
The machine can be restarted just by activating the spray handle or by turning the start/stop button (1) to
position Start.
1
2
1
2

8
Operating instructions GB
3.3 Operation
Always hold the spray lance with both
hands!
Always lock the spray handle when the
cleaner is not in operation.
Activate the high pressure washer by releasing the trigger of the spray handle (1). When starting up the
machine the pressure may be unsteady because of air in the pump system. After a short time the air has
escaped from the system and the pressure will become steady.
When the cleaner is not in use, secure the spray handle by turning the safety knob (2) into pos. 0.
3.4 Spray lance, regulation of pressure and water volume
Turn pressure reducing valve:
Clockwise (B): high pressure
Counter clockwise (A): low pressure
The spray lance features 2 nozzles, a high pressure nozzle and a low pressure nozzle.
High pressure mode
The max. working pressure of the machine is reached when the pressure reducing valve (1) is completely
closed (B), and the water regulation valve (2) is quite open (turned in the indicator direction). In this position
only the high pressure nozzle is used - high pressure mode. The water volume is infinitely variable between
min. and max. performance.
With closed spray handle close the valve for regulation of the water volume (2) completely (in the opposite
direction of the indicator). This corresponds to a working pressure of 40 bar and a water volume of approx.
9 l/min. If you want a bigger water volume the valve (2) should be turned in the indicator direction until the
required change has been achieved. 1 turn provides an increase of pressure of approx. 50 bar.
Low pressure mode
When the reducing valve (1) is completely opened (A), the pressure will be completely reduced. The nozz-
le pressure will be approx. 4 bar. In this position both spray lances are used - low pressure mode.
The water volume is infinitely variable between min. and max. performance.
1
2
1
2

9
Operating instructions GB
3.5 End of operation
Turn to position 0
Never detach the high pressue hose while
the machine is in operation = Position 1.
Turn the red start/stop button (1) to position 0. Disconnect the water supply and activate the spray handle.
Detach the high pressure hose. Never jerk the cable to disconnect the plug from socket.
3.6 Transport directions
Always secure the machine during trans-
port. The brake on the castor wheel (1)
should be applied during transport.
3.7 Storage
Frost-free room or anti-freeze solution
The transport handel of the machine can
be folded up by loosening the two miled
nuts (17).
Prior to storing the machine should be completely emptied of water as follows:
1. Detach the inlet hose and the high pressure hose and empty them of water.
2. Start the machine and let it run until the water has run out of the pump system. »The machine will auto-
matically stop«.
If the room is not frost-free the machine should be protected as follows:
1. Detach spray lance and empty the machine by allowing it to run without water.
2. Place the inlet hose in a container with an anti-freeze.
3. Draw in the anti-freeze by activating the spray handle. Activate the spray handle 2-3 times while placing
it above the container with anti-freeze so that the anti-freeze can circulate.
4. Remove the inlet hose from the container, activate the spray handle and the rest of the anti-freeze is
lead back to the container.
NB! By repeated use the anti-freeze will be diluted with water and thus loose its effect.
1
1

10
4.0 Fields of application and working methods GB
4.1 Fields of application
The most important fields of application for this product are:
Agriculture Cleaning of machinery, agricultural implements, stalls, and buildings
Transport Cleaning of trucks, buses, cars etc.
Building and construction Cleaning of vehicles, equipment, buildings etc.
Light industries Degreasing and cleaning of machines, and vehicles.
Service Cleaning of vehicles, cleaning of public paths, institutions etc.
4.2 Working pressure
The high pressure washer may be used with high or low pressure at your own option. At the standard
spray lance the working pressure is adjusted by turning the reduction valve.
Low pressure Is first and foremost used for application of detergents and for washing off.
High pressure Is used for cleaning.
Intermediate pressure As an example it may be used for the cleaning of surfaces, which cannot
stand a too powerful jet, i.e. soft surfaces.
4.3 Detergents
As standard the machine is delivered without a detergent injector.
Detergent should not be added to the inlet water, and thus pass through the pump. If you want to use
detergents these should be added through an external injector (see accessories catalogue).
The most efficient cleaning is reached with detergents in conjunction with the high pressure cleaning. For
that purpose ALTO can offer you a series of products specially developed for high pressure cleaning,
among other fields within
Cleaning of vehicles, machines, stalls etc. Disinfection
Degreasing Descaling
The products are water-based, without phosphates, and the applied tensides (surface active substances)
comply with the present requirements for easy biodegradability.
Contact your ALTO distributor for directions as to which product will fulfil your requirements.
The method of application and the dosage of the individual products appear from the product labels or the
data sheet.
Change from application of detergent under low pressure to cleaning under high pressure is simply ef-
fected by regulating from »low pressure mode«to »high pressure mode«on the spray lance.
For foam cleaning you will have to mount the special foam injector between the high pressure washer and
the high pressure hose. Insert the suction hose of the injector into the foam detergent. Mount foam lance
on spray handle and now you are ready for foam application. Upon the application dismount the foam
injector and replace the foam lance by a spray lance and you are ready for cleaning.

11
Fields of application and working methods GB
4.4 Working methods
Your high pressure washer has been developed for cleaning according to the so-called »2-step method«.
However, your high pressure washer must be equipped with an external detergent injector (see accesso-
ries catalogue).
STEP 1 Application of detergent
STEP 2 High pressure cleaning
In practice the working process is laid down in accordance with the actual job, but as a starting point the
following working method can be described for a job:
1. Apply detergent under low pressure. The dosage is chosen according to the job, which is to be carried
through, and the adjustment is made on the dosing unit.
2. Await acting time. Let the detergent act on the dirt/surface for a short time prior to pressure cleaning
- usually a few minutes.
3. High pressure cleaning. Clean all surfaces under high pressure.
4. Rinse afterwards, if necessary. To make sure that residual impurities are removed from the surface.
In connection with the working process the optimum cleaning will be reached by following these 3 pieces of
advice:
Advice no. 1
When using a detergent, usually alway apply it on a dry surface. If the surface is rinsed with water at first, it
may be difficult for it to absorb the detergent, and the result is a reduced effect of the detergent.
Advice no. 2
When applying a detergent on large vertical surfaces (i.e. the sides of a truck) work from below and up-
wards. Thus you will avoid the detergent running off the surface through grooves and dark streaks appe-
aring on the surface whilst cleaning.
Advice no. 3
During the high pressure cleaning you should work so that the high pressure water does not run over the
surface which has not been cleaned yet. This is to ensure that there is sufficient detergent on the surface
when the high pressure water hits the surface.
5.0 The environmental policy of ALTO
ALTO has made it a natural part of the concept of the company to reduce the effect on our environment as
much as possible. This plan is effected through a constant development in all branches of the company so
that the greatest number of elements in our high pressure
washers affects the environment to a minimum.
This product too is characterised by the attitude of ALTO towards our environment.
For the production of this high pressure washer the latest production technique within a cleaner technology
has been applied. The consumption of unnecessary subsidiary materials has been minimized and during
the final test of the product the test water is recycled.

12
6.0 Maintenance GB
Your ALTO high pressure washer is maintenance-free and therefore no special qualifications are required
for the daily use.
However, it applies to the most exposed components that a minimum of maintenance ensures a prolonged
and problem-free operation. Therefore it will be a good idea to make a habit of the following:
Before mounting the water hose and the high pressure hose the quick couplings should be cleaned of
dust and sand.
Before mounting spray lance or any other accessory on the spray handle, the machine should be
started and the quick coupling cleaned of dust and sand.
The machine should be stored in a frost-free room. If by mistake the machine freezes up, it must not
be started. Let machine, hoses and accessories thaw up before starting up.
NEVER START A FROZEN UP MACHINE.
6.1 Oil
The oil should be changed after each 1000 hours' use.
Remove the cover of the oil glass (Pos. 4). Unscrew the drain plug (Pos. 13). Allow the oil to run out and
clean the drain plug of impurities. Screw in the plug and refill the pump with fresh oil through the oil glass.
Holds approx. 1 l.
From ALTO the pump is filled with zincless hydraulic oil - ALTO Pump Oil 100. When refilling and changing
the oil this or an oil with the following specifications should be used:
ISO no. 100
Viscosity index (VI) min. 130
Pour point below -30°C
6.2 Sludge container
The used oil is caught in a sludge container (Pos. 11). The container should be emptied before it is full; this
oil must not be reused in the pump.
PROTECT THE ENVIRONMENT
Waste oil and oil sludge must be removed as laid down in the instructions.
6.3 Water filter
To avoid debris entering the high pressure pump, a water filter is fitted at the water inlet. Dependent on the
purity of the water this filter will have to be cleaned at regular intervals. The filter can be removed when the
quick coupling (Pos. 2) has been unscrewed.
6.4 Cleaning of high pressure nozzle
A clogging up in the nozzle causes a pump pressure which is too high, and cleaning is immediately re-
quired.
1. Stop the cleaner and dismount the spray lance.
2. Clean the nozzle with ALTO nozzle cleaning tool no. 6401654.
IMPORTANT: ONLY use the cleaning tool when the spray lance is dismounted
3. Flush the spray lance backwards with water.
4. If the pressure is still too high, repeat items 1-3.

13
7.0 Troubleshooting and correction GB
You have chosen the best quality and therefore deserve the best service. To avoid unnecessary disap-
pointments, you should check the following before contacting the nearest ALTO service organisation:
Fault Cause Correction
Machine will not start A fuse has blown Change the fuse
Power/plug not connected Connect power/plug
Defective extension cable Try without extension cable
Defective socket Try another socket
Thermal switches activated Let the motor cool. Restart machine and
check that the working pressure is not too
high, and that the mains voltage corresponds
to the specifications
Pump frozen up Let the pump thaw
Machine stops shortly Extension cables not cor- Remove extension cable or use
after the start rectly dimensioned correct cable dimension (see sec. 2.1).
Wait 1 minute and try to restart machine.
Wrong mains voltage Check that the mains voltage corresponds to
the data on the model tag (see sec. 1.1).
Fuses blow Change to an installation corresponding
to the ampere consumption of the machine
at a minimum.
Working pressure too high Nozzle partly clogged up Clean nozzle (see section 6.4)
Working pressure too low Water regulation valve Completely open the valve for
not set at max. pressure water regulation. Turn in the
direction of the indicator.
Pressure fluctuating High pressure hoses too Dismount high pressure hoses
long and retry. Extension hose max. 50m.
NB: Avoid long extension hoses
with many couplings.
No working pressure Nozzle clogged up Clean the nozzle (see sec. 6.4)
No inlet water Check inlet water
Hoses/spray lance frozen Let them thaw up
Should other malfunctions occur than those mentioned above, please contact the nearest ALTO service
organisation.
Customer services (only UK): Wap/ALTO Cleaning Systems Ltd. Phone: 01 768 868 995
Gilwilly Industrial Estate
Penrith, Cumbria CA11 9BN

14
Wichtig: Lesen Sie diese Betriebsanleitung
vor der Inbetriebnahme des Hochdruckreini-
gers.
Dieses Gerät ist ein Hochdruckreiniger, der einen
Wasserstrahl unter Hochdruck hervorbringt und
eine nicht vorschriftsmässige Bedienung kann
schwere Verletzungen verursachen.
Volles Verständnis des Inhaltes dieser Betriebsan-
leitung ist daher notwendig, um Schäden an Ihnen
selbst, an Gegenständen und Personen sowie am
Gerät selbst zu vermeiden.
Bezeichnungen D
(sehen Sie Zeichnung auf dem Umschlag)
1. Stromkabel
2. Wasseranschluß und Wassereinlaßfilter
3. Ein- und Ausschaltknopf
4. Ölkontrolle und Nachfüllen
5. Manometer
6. Wassermengenregler
7. Ablaßstutzen
8. Spritzpistole
9. Sprührohr
10. Typenschild
11. Schlammglas
12. Hochdruckschlauch
13. Ölablaßsschraube
14. Fahrbügel
15. Schlauch-, Stromkabel- und Sprührohrhalter
16. Bremse
17. Handmutter
Inhaltsverzeichnis 14-25 D
1.0 Modellübersicht........................................ 15
1.1 Typenschild ......................................... 15
1.2 Technische Daten ............................... 15
2.0 Gebrauchsanweisung .............................. 16
Sicherheitsvorschriften und Warnungen
2.1 Bei Inbetriebnahme ............................. 16
2.2 Im Betrieb ............................................ 16
2.3 Sicherheitsvorrichtungen am Gerät .... 17
2.4 Generell ............................................... 17
3.0 Bedienungsanleitung .............................. 18
3.1 Anschlüsse .......................................... 18
1. Hochdruckschlauch ......................... 18
2. Wasseranschluß ............................. 18
3. Stromanschluß ................................ 18
4. Spritzpistole - Zubehör .................... 19
3.2 Start ..................................................... 19
3.3 Betrieb ................................................. 20
3.4 Sprührohr, Druck-/Wassermengen-
regulierung .......................................... 20
3.5 Ausserbetriebnahme ........................... 21
3.6 Transportanweisungen ........................ 21
3.7 Aufbewahrung ..................................... 21
4.0 Anwendungsbereiche und
Arbeitsmethoden ...................................... 22
4.1 Anwendungsbereiche .......................... 22
4.2 Arbeitsdruck ........................................ 22
4.3 Reinigungsmittel .................................. 22
4.4 Arbeitsmethoden ................................. 23
5.0 Die Umweltpolitik von ALTO ................... 23
6.0 Wartung ..................................................... 24
6.1 Öl ......................................................... 24
6.2 Schlammglas....................................... 24
6.3 Wasserfilter ......................................... 24
6.4 Reinigung der Hochdruckdüse ............ 24
7.0 Fehlersuche und Abhilfe ......................... 25
8.0 Funktionsbeschreibung ..................... 98-99
Nur für Deutschland:
Richtlinien für Flüssigkeitsstrahler
Für den Betrieb des Gerätes in Deutschland gelten
die "Richtlinien für Flüssigkeitsstrahler", herausge-
geben vom Hauptverband der gerwerblichen Be-
rufsgenossenschaft, zu beziehen von Carl Hey-
manns-Verlag KG, 5000 Köln 41, Luxemburger
Straße 449.
Außerdem gilt die Unfallverhütungsvorschrift (VBG
87) "Arbeiten mit Flüssigkeitsstrahlern".
Hochdruckstrahler müssen nach diesen Richtlinien
mindestens alle 12 Monate von einem Sachkundi-
gen geprüft und das Ergebnis der Prüfung schrift-
lich festgehalten werden.

15
1.0 Modellübersicht D
1.1 Typenschild
Dieser ALTO Hochdruckreiniger hat die Serienbezeichnung C3KA. Die Modellbezeichnung geht aus dem
Text am Kabinett, z.B. 52C3KA, sowie aus dem Typenschild (Pos. 10) hinten am Gerät hervor.
Das Typenschild enthält folgende wichtige Informationen:
1. Hersteller
2. Modellbezeichnung
3. Baujahr und -woche
4. Seriennummer
5. Betriebsspannung
6. Schaltung
7. Frequenz
8. Stromverbrauch
9. Leistungsaufnahme
10. Pumpendruck
11. Kapazität
12. Max. Druck
13. Max. Temperatur
1.2 Technische Daten
Modell 44C3KA 52C3KA
Pumpendruck bar 170 190
Wassermenge, min./max. Druck l/min 20,0/18,6 21,3/19,6
Max. Druck des Einlaßwassers bar 10 10
Min. Wasserversorgung l/h 1200 1280
Sprührohr:
Düsendurchmesser HD/ND mm 1,53/3,5 1,53/3,5
Sprühwinkel, HD/ND Grad 15/65 15/65
Düse, Typ 06 06
Reaktionskraft, max. N/kP 49/5,0 54/5,5
Schalldruckpegel LpA gemessen nach ISO 11202 [ABSTAND 1 m] [VOLLAST]: 78 dB(A).
Dieses Gerät ist in Übereinstimmung mit der Niederspannungsrichtlinie 73/23/EWG und der EMC-Richtli-
nie 89/336/EWG einschl. nachfolgender Änderungen hergestellt worden.
Angaben bei 3 bar Einlaßdruck und bei 12°C warmem Wasser.
Technische Änderungen vorbehalten.
ALTO Danmark A/S 72 18 21 00

16
2.0Gebrauchsanweisung Sicherheltsvorschriften und Warnungen D
Vor der Inbetriebnahme Ihres Hochdruckreinigers sollten Sie die Abschnitte 2.0 Gebrauchsanweisung
sowie 3.0 Bedienungsanleitung lesen und sämtliche Anweisungen und Anleitungen befolgen, um den
Benutzer, die Umgebung und das Gerät zu schützen.
2.1 Bei Inbetriebnahme
Beim Auspacken sollten Sie das Produkt sorgfältig überprüfen, um eventuelle Mängel oder Schäden fest-
zustellen. Wenn solche festgestellt werden, wenden Sie sich bitte sofort an Ihren ALTO-Händler.
Das Stromkabel überprüfen
Die Isolation des Stromkabels soll völlig fehlerfrei und ohne Risse sein. Herrscht Zweifel diesbezüglich,
wenden Sie sich bitte an Ihren Elektroinstallateur oder den nächsten ALTO-Händler.
Die Spannung überprüfen
Überprüfen, ob die auf dem Modellschild angegebene Spannung mit der Spannung Ihrer Elektrizitätsver-
sorgung übereinstimmt.
Stromverbrauch, Sicherungsverhältnisse
Den auf dem Modellschild angegeben Stomverbrauch überprüfen und danach überprüfen, ob die Vorsi-
cherung korrekt ist.
Stromanschluß
Ein fehlerhafter Anschlußdes Gerätes kann zu lebensgefährlichen elektrischen Schlägen führen.
1. Das Gerät darf nur an eine Steckdose mit Erdung angeschlossen werden.
2. Falls Sie in bezug auf das Erdungssystem im Zweifel sind, wenden Sie sich bitte an einen autorisierten
Elektroinstallateur.
3. Es empfiehlt sich das Gerät an eine Stromversorgung mit einem Fi.-Schutzschalter anzuschließen, der
die Stromversorgung unterbricht, falls der Erdschlußstrom 30 mA in 30 ms übersteigt.
4. Anschlußnur an eine von einem autorisierten Elektroinstallateur ausgeführte Installation und gemäß der
spätesten Ausgabe der IEC Installationsbestimmungen.
Verlängerungskabel
Falls ein grösserer Aktionsradius erwünscht ist, empfiehlt ALTO dies durch einen Verlängerungsschlauch statt
eines Verlängerungskabels zu erzielen. Falls Sie einen Verlängerungskabel beim Betrieb eines dreiphasigen
Hochdruckreinigers verwenden wollen, empfehlen wir Ihnen Kabelabmessungen gemäß untenstehendem
Schema zu verwenden: (Die Verwendung der untenstehenden Kabelabmessungen setzt voraus, daßdie Netz-
spannung eine dauerhafte Spannung der auf dem Typenschild angegebenen Spannung entsprechend liefert.)
Beachten Sie: Bei Verwendung eines Verlängerungskabels MUSS der Hochdruckreiniger geerdet
werden. Es darf nur an eine vorschriftsmässig installierte Steckdose angeschlossen werden.
5. Verlängerungskabel, Stecker und Steckdose müssen wasserdicht sein.
6. Nur Kabel vom gleichen Typ wie das Gerätekabel verwenden. D.h. mit Erdung und für die Verwendung
im Freien geeignet. Falls Sie im Zweifel sind, wenden Sie sich bitte an Ihren Elektroinstallateur oder den
nächsten ALTO-Händler.
7. Alle Verbindungen trocken halten und nicht mit dem Boden in Berührung bringen.
8. Verlängerungskabel vor Gebrauch überprüfen. Schadhafte Kabel dürfen nicht benutzt werden.
2.2 Betrieb
Dieses Gerät erzeugt einen hohen Druck. Nicht vorschriftsmässige Bedienung kann zu schweren Verlet-
zungen führen! Mit Rücksicht auf Ihre Sicherheit und die Sicherheit anderer sollten folgende Regeln immer
eingehalten werden:
1. WARNUNG! Den Wasserstrahl nie auf Menschen, Tiere, elektrische Installationen oder
direkt auf den Hochdruckreiniger richten.
2. WARNUNG! Versuchen Sie nie Kleidung und Schuhe zu reinigen, die Sie selbst oder andere
Personen tragen.
3. Es wird empfohlen während der Arbeit eine Schutzbrille zu tragen.
4. Nie barfußoder in Sandalen arbeiten.
5. Es wird empfohlen, daßder Benutzer und jeder, der sich in unmittelbarer Nähe des Reini-
gungsplatzes befindet, sich während der Reinungsarbeit vor aufspringenden Partikeln schützt.
I 0<I<10 Amp 10<I<16 Amp 16<I<25 Amp 25<I<32 Amp
mmm²mm²mm²mm²
0-50 1,5 1,5 2,5 4,0
51-75 1,5 2,5 2,5 4,0
76-100 1,5 2,5 4,0 6,0

17
Sicherheitsvorschriften und Warnungen D
6. Gemäß den geltenden Rechtsverordnungen dürfen Personen unter 18 Jahren keine Reinigungsgeräte
bedienen, deren Arbeitsdruck 70 bar übersteigt. (Dies gilt für dieses Gerät.)
7. Das Gerät in der größtmöglichen Entfernung vom Arbeitsplatz anbringen.
8. Nur geschultes Personal das Gerät bedienen lassen.
9. Das Gerät erst einschalten, wenn der Hochdruckschlauch korrekt angeschlossen ist.
10. Spritzpistole und Sprührohr werden von einer Rückschlagkraft beeinflußt, wenn der Hoch-
druckreiniger arbeitet - halten Sie daher immer das Sprührohr mit beiden Händen fest.
11. Bei Arbeitspausen das Gerät ausschalten und den Auslösegriff der Spritzpistole mit einem
Schloßsichern, um unbeabsichtigte Aktivierung zu verhindern.
12. Den Auslösegriff nur mit der Hand aktivieren. Nie festbinden oder auf andere Weise festigen.
13. Schadhafte Beanspruchung der Hochdruckschläuche vermeiden, z.B. Überfahren, Einklemmen, Zug-
beanspruchung, Knoten/Knicke etc. Keine Berührung mit Öl, scharfkantigen Gegenständen oder Wär-
me, die den Schlauch zum bersten bringen könnten.
14. Nie den Hochdruckschlauch abmontieren, wenn das Gerät im Betrieb ist. Das Gerät ausschalten und
den Wasseranschlußvor Abmontierung des Hochdruckschlauches abschalten.
15. Kabelverbindung nicht durch Ziehen der Kabel unterbrechen.
16. Immer erst den Strom an der Steckdose ausschalten, bevor das Gerät entweder von der Steckdose
oder eventuellen Verlängerungskabeln unterbrochen wird.
17. Schadhafte Beanspruchung der elektrischen Kabel vermeiden, z.B. Überfahren, Einklemmen, Zugbe-
anspruchung. Keine Berührung durch scharfkantige Gegenstände oder Wärme.
18. Gemäß den gesetzlichen Bestimmungen in vielen Ländern ist es verboten, das Gerät in explosionsgefährde-
ter Umgebung zu benutzen. Herrscht Zweifel diesbezüglich, wenden Sie sich bitte an die Ortsbehörden.
Wichtig: Offshore
Das Gerät darf nicht in explosionsgefährdeter Umgebung benutzt werden (gemäß EN-50014).
19. WARNUNG! Hochdruckschläuche, Düsen und Kupplungen sind wichtig für die Verwendung des Gerätes. Nur
die von ALTO vorgeschriebenen Hochdruckschläuche, Düsen und Kupplungen verwenden.
20. Aus Sicherheitsgründen nur originale ALTO Zubehör-/Ersatzteile verwenden.
21. Das Gerät nie in Betrieb nehmen, bevor Maschine, Schläuche und Zubehör eisfrei sind. Andernfalls
kann das Gerät beschädigt werden.
22. Das Gerät darf während des Betriebs nicht zugedeckt werden.
2.3 Sicherheitsvorschriften am Gerät
Umlaufventil (Sicherheitsventil)
Die Hochdruckpumpe ist auf der Druckseite mit einem Umlaufventil (Sicherheitsventil) versehen, Dieses
Ventil leitet bei geschlossener Spritzpistole oder bei einer verstopften Düse das Wasser an die Saugsseite
der Pumpe zurück. Das Umlaufventil ist als eine Sicherheitsfunktion konstruiert, die sicherstellt, daßder
Druck niemals den Arbeitsdruck um mehr als 20 bar übersteigen kann. Bei diesem Druck schaltet das
Umlaufventil automatisch von Hochdruckbetrieb auf Umlaufbetrieb um.
Das Umlaufventil bewirkt, daßdas Gerät bei einem Betriebsstop automatisch drucklos wird.
Motorsicherung
Der Elektromotor ist mit Thermoschützen versehen, die den Motor gegen Überlastung schützen. Bei über-
höhtem Stromverbrauch (fehlerhaftem Betrieb) wird die Stromzufuhr zum Motor automatisch unterbrochen.
2.4 Generell
1. Hochdruckreinigung asbesthaltiger Materialien ist verboten, es sei denn das Spezialausrüstung dazu
verwendet wird.
2. Personen, die unter Einflußvon Alkohol, Rauschgiftmitteln und Medizin sind, dürfen das Gerät nicht verwenden.
3. Stecker oder Steckdose nie mit nassen Händen anfassen.
4. WARNUNG! Dieses Gerät ist für die Verwendung von ALTO Reinigungsmitteln konstruiert worden.
Verwendung von anderen Reinigungsmitteln oder Chemikalien mag Konsequenzen haben was Betrieb
und Sicherheit betrifft.
5. Bei Verwendung von Reinigungsmitteln die Gebrauchsanweisung auf der Verpackung genau befolgen.
6. Vor Reinigung und Wartung des Gerätes die Kabelverbindung unterbrechen.
7. Das Gerät darf nicht verwendet werden, wenn das Stromkabel oder wichtige Teile der Ausrüstung
beschädigt sind - z.B. Sicherheitsvorrichtungen, Hochdruckschläuche, Spritzpistole, Gehäuse.
8. Der beste Reinigungseffekt wird dadurch erreicht, den Abstand zur Oberfläche des zu reinigenden Ob-
jekts anzupassen. Dadurch werden Sie auch Beschädigung der Oberfläche vermeiden.

18
3.0 Betriebsanleitung D
3.1 Anschlüsse
1. Hochdruckschlauch
Max. Verlängerungsschlauch: 50 m.
Nur ALTO-Hochdruckschläuche verwen-
den.
Der Hochdruckschlauch wird mittels einer Schnellkupplung (1) vorn am Gerät angeschlossen. Max. Arbe-
itsdruck und Temperatur sind auf dem Hochdruckschlauch aufgedruckt.
2. Wasseranschluß
Min. Schlauchlänge: 6 m. 3/4".
Wassereinlaßfilter (1) monatlich reinigen.
Max. Wasserdruck 10 bar.
1
Wasseranschluß- Deutschland
Das Gerät darf nach DIN 1988 nicht unmittelbar an
die öffentliche Trinkwasserversorgung angeschlos-
sen werden, um zu vermeiden, daßunter Umstän-
den Reinigungsmittel in die Trinkwasserversorgung
zurück läuft Ein mittelbarer Anschlußan die öffentli-
che Trinkwasserversorgung ist zulässig z.B. über
ein Schwimmergehäuse.
Ein entsprechendes Schwimmergehäuse kann von
ALTO geliefert werden. Eine Wasserentnahme aus
einem nicht für Trinkwasserentnahme bestimmten
Brunnen oder Oberflächenwasser
ist möglich.
Wasser durch den Einlaßschlauch laufen lassen, um evt.
Schmutzteilchen zu entfernen. Min. Wasserversorgung -
siehe Abschnitt 1.2. Mit heißem Wasser und Hochdrucks-
chläuchen über 10 m mußdas Gerät mit einem Schwimmer-
gehäuse versehen werden. Dies gilt auch wenn der
Ablaßstutzen des Gerätes an eine Rohranlage angeschlos-
sen wird.
Beachten Sie bitte: Bei Anschlußan die öffentliche Trinkwas-
serversorgung ist diese gemäß den geltenden Vorschriften
vorzunehmen. Wenn das Risiko besteht, daßes Schwimm-
sand im Einlaßwasser gibt (z.B. vom eigenem Brunnen),
mußein Schwimmsandfilter montiert werden.
1
3. Stromanschluß
Nur an vorschriftsmässige elektrische
Installation mit Erdung anschliessen.
Überprüfen Sie Spannung, Sicherung, Kabel und Verlängerungskabel gemäß Abschnitt 2.1.
In Ländern, wo viele verschiedenen Typen von Steckern verwendet werden, wird das Gerät mit einem
Stromkabel ohne Stecker geliefert. Dieser mußvon einem Fachmann montiert werden.

19
Betriebsanleitung D
4. Spritzpistole - Zubehör
Den Nippel immer von eventuellen
Schmutzpartikeln säubern, wenn das
Sprührohr demontiert gewesen ist.
Den grauen Schnellkupplungsgriff (1) der Spritzpistole nach vorne ziehen.
Den Nippel (2) des Sprührohres in die Schnellkupplung stecken und den Schnellkupplungsgriff loslassen.
Das Sprührohr oder sonstiges Zubehör nach vorne ziehen, um korrekte Montage vor der Anwendung des
Hochdruckreinigers zu sichern.
Max. Reaktionskraft der Spritzpistole und des Sprührohrs - sehen Sie Abschnitt »1.2 Technische Daten«.
3.2 Start
Ölstand kontrollieren
In Position Start drehen
Kontrollieren, daßder Ölstand im Ölglas (2) zwischen den MIN. und MAX. Markierungen steht . Den roten
Ein- und Ausschaltknopf (1) in Position Start drehen (wenn den Knopf losgelassen wird, wird er in Position
1 »Betriebsstellung«zurückkehren).
Start/Stop Automatik
Wenn die Spritzpistole losgelassen wird, schaltet das Gerät nach ca. 6 Sek. automatisch ab.
Das Gerät kann durch Aktivierung der Spritzpistole oder durch Drehen des Ein- und Ausschaltknopfes
(1) in Position Start wieder in Betrieb gesetzt werden.
1
2
1
2
This manual suits for next models
4
Table of contents
Languages:
Other Alto Washer manuals