AMERICAN Coolair PT Manual

Cleaning and Adjustments. The entire fan should
be cleaned as necessary to remove accumulated dust, dirt
and other debris which may collect on the blades or other
fan parts. For belt drive units, the belt should be inspected
and tension adjusted (see below). Be sure to check for belt
misalignment which can result in excessive wear and
premature failure. Belt tension should be rechecked after
the rst 8-10 hours of use and periodically thereafter. If rust
or corrosion are found anywhere on the fan package, the
aected area should be thoroughly cleaned and renished.
Speed and Air Volume Adjustment. On belt drive
models equipped with an adjustable pitch motor pulley, the
pitch setting made at the factory operates the fan at the
maximum safe load for the motor. Do not close the pulley to
increase fan speed as this will overload the motor, causing
motor damage and/or motor trip-out. The pulley may be
opened to reduce fan speed and thus decrease CFM. If
further information is required contact your nearest
American Coolair representative.
Belt Replacement and Tensioning.
Applicable for Belt Drive units only
a) When replacing the belt, make sure the new belt matches
both the belt section type (4L or A) and size (length) exactly
with the old belt. To replace the belt, detach the entire blade
assembly from the frame by removing bolts which connect
the shaft to the X-Brace. Tilt or lift the blade assembly just
enough for the belt to clear the end of the shaft. If the fan’s
location makes detachment dicult, it may be possible to
remove the old belt and replace a new one by slipping the
belt over the blade tips - one at a time. Loosening the bolts
holding the shaft to the X-Brace simplies this procedure.
When replacing belt, do not roll it over the pulleys under
tension, as this may damage the belt and cause premature
failure.
Notice : Do not return damaged or defective parts to American Coolair
Corp without prior authorization. If repairs under warranty are claimed, see
warranty terms in the American Coolair catalog. Claims for warranty repairs
regarding the motor should be made directly with the motor manufactur-
er’s authorized repair center.
Form No. 520-40-3 (May, 2015)
b) The belt should be inspected and belt tension adjusted at
regular intervals. To check belt tension, place a nger
midway between fan pulley and motor pulley and push the
belt inward. For proper tension, the belt should deect
about 1/2” at approximately 5 lb. force. To adjust to the
proper tension, loosen the motor bracket bolts and tap
bracket up or down as necessary. Check the alignment of
the belt, motor pulley and fan pulley, and re- tighten all
motor bracket bolts.
Repair Parts.
Belts. Belts are standard V-belts used on industrial machines
and replacements may be obtained through local industrial
supply houses. To install belts, see previous instructions.
Motors. Motor repairs should be performed only by an
authorized motor repair center. Contact the motor
manufacturer or American Coolair for certied repair
locations.
Bearings. Field replacement of bearings is not
recommended. Contact your American Coolair
representative for more information.
Blades. If one or more of the blades of the blade assembly is
damaged, contact your American Coolair representative. If
an unbalanced condition develops, thoroughly clean the
blades to remove dirt and other build up. If unbalance
persists, contact your American Coolair representative.
Lubrication. Fan bearings are factory lubricated for
extended service. Relubrication as a part of regular mainte-
nance is not necessary. For lubrication of the electric motor,
see the instructions supplied by the motor manufacturer.
CAUTION : Over tensioning the belt will cause the belt
and bearings to fail in a short period of time. Do not
over tension.
Installation Instructions—Other Side
Operation and Maintenance Instructions
for Type PT Power Tube Fans

Form No. 520-40-3 (May, 2015)
Operation & Maintenance Instructions —Other Side
Installation Instructions
for Type PT Power Tube Fans
Orice
Extension
Eyelet
Clamp
Plastic TubeFan Assembled in
Wall Housing
Outside Building WallMotorized
Shutter
Air
Flow
Side with
Access and
Knockout
2 x 4s
(Actual Dim. 1 1/2 x 3 1/2)
Sash Chain
(By Others)
Pre-Installation Check of Fan. Before installation
of the fan, carefully check for shipping damage which may
aect the operation of the unit. The fan, motor and housing
are shipped in one package, completely assembled. The tube
and associated hardware are shipped in a separate package.
The shutter is shipped in another package (if shutter is
motorized, the motor assembly is shipped separately).
Concealed damage to these components is possible. If
damage is found, le a claim immediately with the delivering
carrier. On belt drive models, check the pulley alignment and
belt tension (see reverse side for instructions) and adjust as
necessary. Before connecting the fan to a power source,
check the motor nameplate to be sure that the correct phase
and voltage are being used. Make sure the propeller turns
freely without striking the frame or other objects. Note the
direction arrow adjacent to the propeller and ensure that the
rotation is correct when power is connected.
Installation Procedures. Type PT Power Tube fans
are shipped with the fan unit assembled. Fans should be
located as near to the roof as possible with an unobstructed
space available for the required length of tube. This location
should be away from moisture sensitive equipment.
a) Construct Opening. Construct a framed opening using
wood 2x4s. The opening size is determined by the unit’s size
(see chart below).
b) Position & Attach Unit. Raise the fan up and position it so
that the mounting holes in the anges align with the four sides
of the framed opening. Bolt the fan housing to the frame using
lag bolts or similar hardware.
c) Attach Fan Tube. Place duct tape over the bolt heads on the
fan unit orice extension. Then place the open end of the
plastic tube over the orice extension and place duct tape over
the tube in the area where the clamp will be attached. Finally,
secure with the clamp provided.
d) Secure Unit with Sash Chain. Connect an individual sash
chain (provided by others) to each reinforced eyelet located on
the tube. Attach the other end of the chain to the ceiling
joist/roof support. Alternately, the sash chains may be
supported by an overhead steel cable run the length of the
tubing. Cable kits can be provided by American Coolair as an
optional accessory.
DO NOTINSTALL FAN WITH MOVING PARTS WITHIN 8
FEET OF FLOOR OR GRADE LEVEL WITHOUT A GUARD
THAT COMPLIES WITH OSHA REGULATIONS. DO NOT
USE UNLESS ELECTRICAL WIRING COMPLIES WITH
ALL APPLICABLE CODES. DO NOT WIRE WITHOUT
PROVIDING FOR A POWER SOURCE DISCONNECT AT
THE FAN ITSELF. DO NOT SERVICE EXCEPT BY A
QUALIFIED MAINTENANCE TECHNICIAN AND ONLY
AFTER DISCONNECTING THE POWER SOURCE.
FAILURE TO OBSERVE THESE PRECAUTIONS CAN
RESULT IN SERIOUS INJURY OR DEATH.
WARNING CAUTION
e) Attach Motor Kit. Attach shutter motor kit to shutter.
Caulking around the edges will be required for weather-proong.
See instructions provided with shutter for more informaiton.
f) Wire Fan. Wire fan and check for proper rotation of the fan
unit. Wire motorized shutter and delay switch.
g) Weather Hood. If optional weather hood is provided, attach
to outside wall over shutter.
PT 18
PT 24
PT 30
22 5/8 x 22 5/8
28 7/8 x 28 7/8
34 7/8 x 34 7/8
28 5/8 x 28 5/8
34 7/8 x 34 7/8
40 7/8 x 40 7/8
Frame Opening
Fan
I.D. O.D.
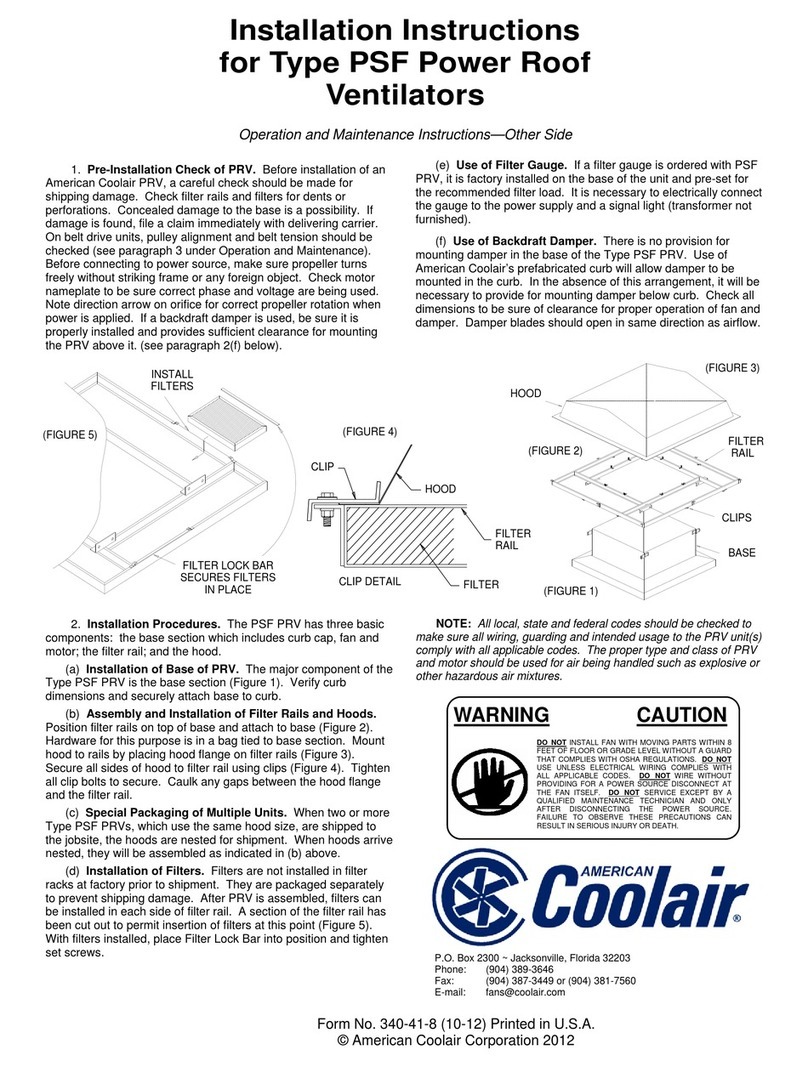
Note : All local, state and federal codes should be checked to make sure all wiring, guarding and intended usage of the PRV unit(s) comply with all applicable codes.
The proper type and class of PRV and motor should be used for air being handled such as explosive or other hazardous air mixtures.
This manual suits for next models
3
Other AMERICAN Coolair Fan manuals
Popular Fan manuals by other brands

Dr.Prepare
Dr.Prepare D-MF01 manual

Craftmade
Craftmade RGD52 installation guide

Overland Storage
Overland Storage REO 9000 Remove & Replace Instructions

Panasonic
Panasonic FV-05VF2 Supplementary installation instructions

Orbegozo
Orbegozo CF 101132 instruction manual

AirArtDeco
AirArtDeco AADQ-401 instruction manual