Quick Hardware Installation Guide English
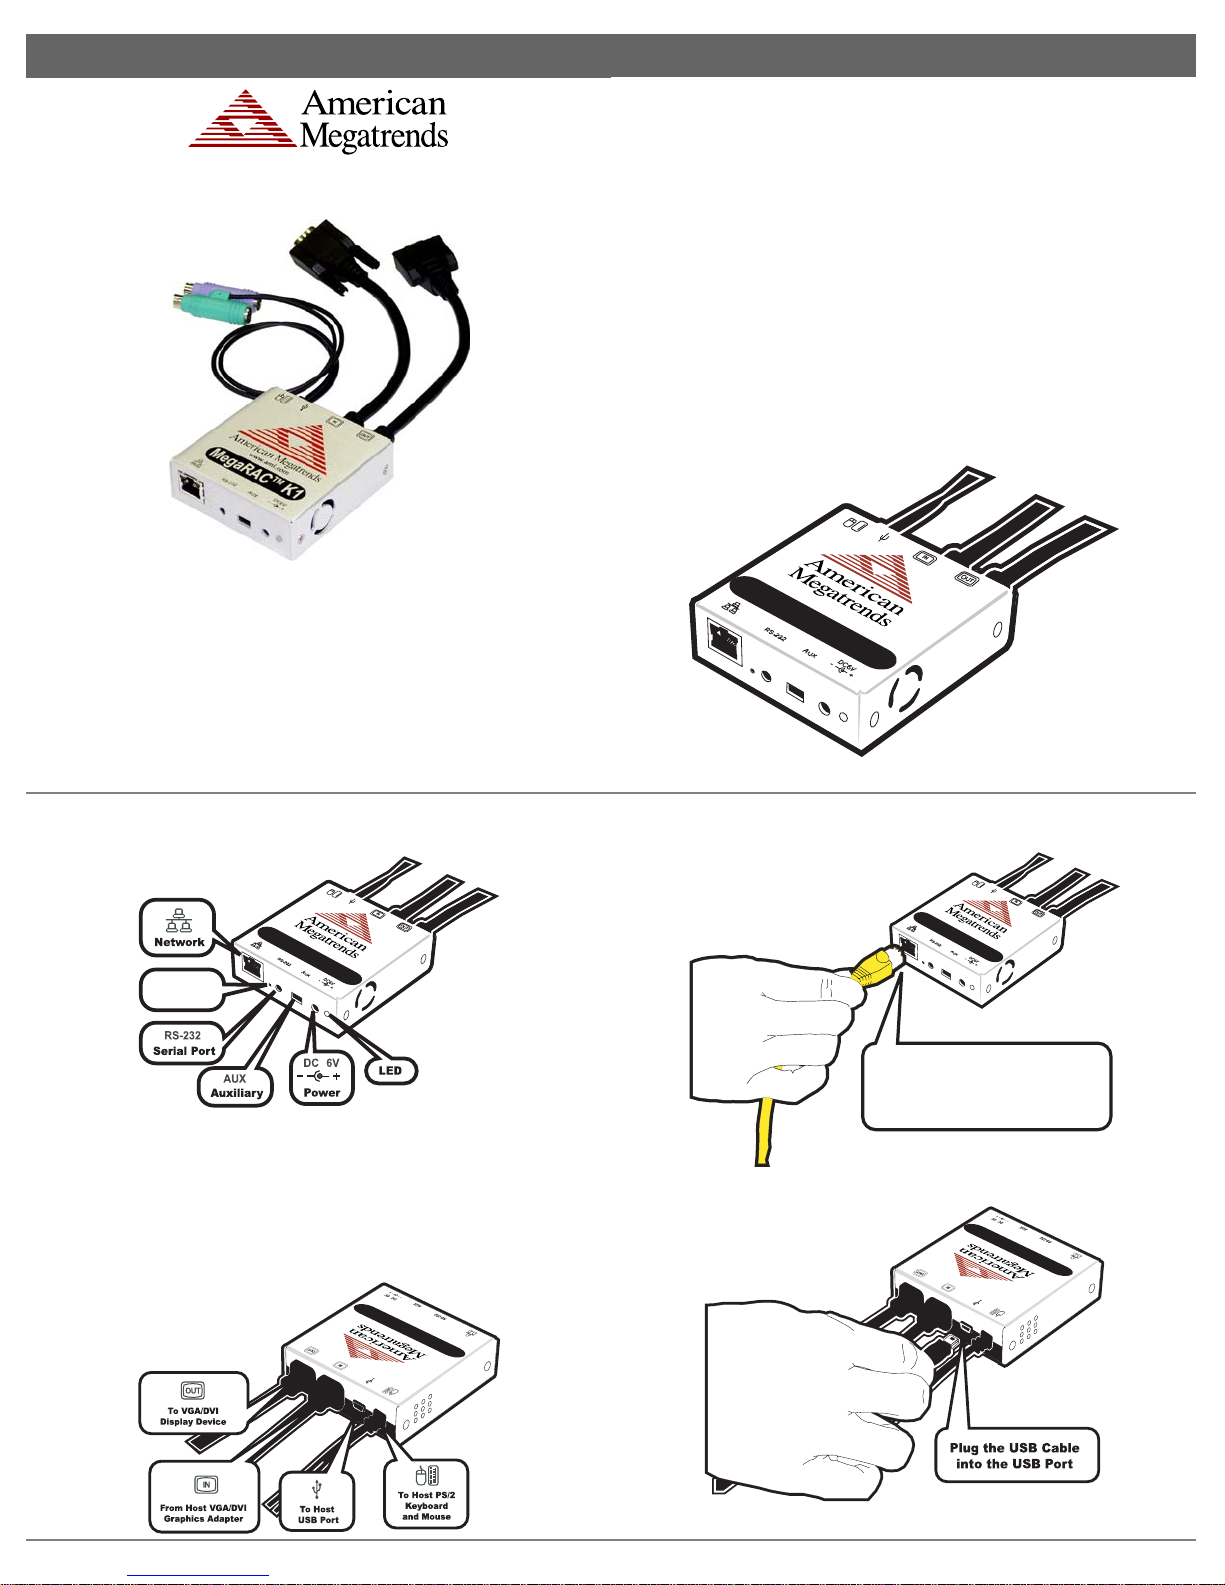
Step 2 Connect Cables, Continued
You can attach the cables in any order except for the AC Adapter cable. The AC Adapter cable must
be attached to the K1 before attaching the PS/2 mouse.
Plug your AC Adapter
into the Power Port
www.ami.com
MegaRAC K1
TM
Your K1 will boot up and become active. Connect the PS/2 Keyboard cable, PS/2 Mouse cable,
Video In cable, and opposite side of the USB cable to your host system. Connect your PS/2
Keyboard and PS/2 Mouse to the K1 PS/2 Keyboard and PS/2 Mouse connector. Plug the Video
Out cable to your Display Device.
www.ami.com
MegaRAC K1
TM
Step 3 Confirm the Motherboard’s BIOS Settings
Power on the motherboard and enter the BIOS. Check the following:
Boot Options> ATAPI CDROM : AMI Virtual CDROM
Advanced> PCIPnP> Configuration> Legacy USB Support : Enable
Save the BIOS settings and restart the computer.
Note: Make sure that your motherboard BIOS supports Legacy USB devices, USB Boot or
Boot to USB.
Step 4 Install the K1 Virtual CD-ROM Drivers
Install the operating system (if applicable) on the host system.
(Windows 2000/2003/XP only) When prompted for the virtual CD-ROM drivers, select the default
option Microsoft Windows provides. The Virtual CD-ROM device does not require any special
drivers.
Step 5 Setup Your Client System’s Internet Browser
You must first setup your Internet browser on the client system before you can redirect the host
system’s console. Open Internet Options. To get there, open your Internet Explorer browser, left
click Tools and then Internet Options. The Internet Options window opens. Left click the Settings
button. The Settings window opens. Left click the Every visit to the page button or Automatically
button. Left click the OK button to apply the change and to go back to the Internet Options window.
Next, you must setup Internet Explorer to allow the downloading of Signed ActiveX controls and
also allow it to run Signed ActiveX controls. To do this, left click the Security tab and then the
Custom Level button. The Security Settings window opens. Left click the Enable button under the
Download signed ActiveX controls section. Scroll down and left click the Enable button under the
Run ActiveX controls and plug-ins section. Left click the OK button. You are prompted with a
Warning window. Left click the Yes button to accept the changes to the Internet zone and to go back
to the Internet Options window. Left click the Apply button and then the OK button to make the
changes.
Note: At a minimum you must have Internet Explorer 6.0 (and above) installed on your client
system.
Note: You must restart Internet Explorer before the changes take effect. Remote Console
cannot run with any other security settings in Internet Explorer. Other settings can cause old data to
be displayed when performing operations on the MegaRAC K1.
Step 6 Connect to the MegaRAC K1 from a Client System
In order to connect to the MegaRAC K1, you must access the MegaRAC K1 from another system
on the same network. This document refers to this other system as the client system. To do this, you
must know the MegaRAC K1’s IP address. If you have installed the MegaRAC K1 on a network
that uses DHCP, you can find out the MegaRAC K1’s IP address using the On Screen Display
(OSD) utility. You can invoke OSD by depressing the <CTRL>, <ALT>, and <SHIFT> keys on
your keyboard simultaneously. Verify that the following is true before trying to enter the OSD
utility: Make sure that you are using the keyboard that is attached to the PS/2 port located on your
MegaRAC K1 device. Make sure that you have the MegaRAC K1 connected to your host system
correctly. Make sure that your host system is powered on.
The MegaRAC K1 OSD screen appears on the monitor that is physically attached to the MegaRAC
K1’s VGA Out port. It displays the current host name and IP address.
K1-VGA
F2 MENU F1 HELP
ESC EXIT
NAME
IP
:AI00.40.D9.XX.XX
:XX.XX.XX.XX
You now have enough information to access your MegaRAC K1. Using the IP address that you
gathered from the K1’s OSD session, you can now access the MegaRAC K1 from anywhere on
your Intranet through an Internet browser. This is a great way to maintain your critical server when
you are nowhere near it.
Open your Internet Explorer browser and type your MegaRAC K1’s IP address into your browser’s
address bar. Left click the Go button or depress the <ENTER> key to proceed.
Default User Name: root
Default Password: superuser
Note: The default user name and password are in lower-case characters.
MegaRAC K1 Software Shortcut Keys
Key Combination Description
Keystroke Description
<ALT> + <C> Opens the Console Redirection window dropdown menus
<ALT> + <S> Start Console Redirection
<ALT> + <T> Stop Console Redirection
<ALT> + <R> Restart Console Redirection
<ALT> + <F> Toggle Full Screen Mode
<ALT> + <M> Synchronize Mouse
<ALT> + <A> Hold/Unhold Right <ALT> Key
<ALT> + <B> Hold/Unhold Left <ALT> Key
<ALT> + <L> Hold/Unhold Right <CTRL> Key
<ALT> + <N> Hold/Unhold Left <CTRL> Key
<ALT> + <D> Generate <CTRL> + <ATL>+ <DEL>
<ALT> + <E> Toggle CDROM Redirection
Note: Occasionally, when invoking the <ALT> + <E> keys, the screen does not refresh and
will appear to be blank. You can hit any key on your keyboard or move the mouse to refresh the
screen.
Status LED
Color
Red
Amber
Green
Description
Failed
Booting
On and Ready
www.ami.com
MegaRAC K1
TM
MegaRAC K1 Default Username and Password
Default User Name: root
Default Password: superuser
AMI Corporate Headquarters
American Megatrends Inc.
6145-F Northbelt Parkway,
Norcross, Georgia 30071-2976
Main (770)246-8600 Fax (770)246-8790
www.ami.com
®2004 American Megatrends Inc. All Rights Reserved. Printed in the U.S.A.