ammoon POCKAMP User manual

MINI GUITAR AMPLIFIER
Bedienungsanleitung
Manual del Propietario
Manuel de l'utilisateur
Manuale del Proprietario
取扱説明書

Warranty
Thank you for choosing ammoon products.
Please read this manual carefully and keep
it for further reference.If there's any
questions regarding to this product, please
feel free to contact us via
[email protected] for faster support.
The ammoon product is protected by a
guarantee of ammoon for 12 months from
the date of purchase. You can download the
PDF manual or operating video by visit
ammoon support site
https://www.ammoon.com/support
Please visit website
https://www.ammoon.com
to get the newest product
information and more suprise.

* PLEASE READ CAREFULLY BEFORE PROCEEDING *
Connections
Always turn off the power of this and all other equipment before connecting
or disconnecting, this will help prevent malfunction and / or damage to other
devices. Also make sure to disconnect all connection cables and the power
cord before moving this unit.
Location
To avoid deformation, discoloration, or other serious damage, do not
expose this unit to the following conditions:
Direct sunlight
Heat sources
Magnetic fields
Extreme temperature or humidity
Excessive dusty or dirty location
High humidity or moisture
Strong vibration or shock
Interference with other electrical devices
Radios and televisions placed nearby may experience reception
interference. Operate this unit at a suitable distance from radios and
televisions.
Cleaning
Clean only with a soft, dry cloth. If necessary, slightly moisten the cloth.
Do not use abrasive cleanser, cleaning alcohol, paint thinners, wax,
solvents, cleaning fluids, or chemical-impregnated wiping cloths.
Handling
Do not apply excessive force to the switches or controls.
Do not let paper, metallic, or other objects into this unit.
Take care not to drop the unit, and do not subject it to shock or excessive
pressure.
Power Supply
Please connect the designated AC adapter to an AC outlet of the correct
voltage.
Please be sure to use only an AC adapter which supplies 9V DC, center
minus.
Unplug the AC power adapter when not using or during electrical storms.
Precautions
EN

Highly portable and light weight – Play guitar anywhere and everywhere
Comes complete with a belt clip to play your music on the move
2×3” speakers deliver powerful of output. Great for practice sessions
and street performance
Chorus/Tremolo/Reverb effects to embellish your guitar tones
80 x Drum Rhythms to jam along with tap tempo
Built-in Tuner to ensure you're instrument is always in tune
Headphone output for silent practice
Auxiliary input for playback of music from an external device
Plug the cable of ACAdapter (9V, 1.5A, center minus) into the [DC
Jack, or using batteries (AA/LR6 x 6), then use the Power Switch to turn the
device on.
For installing batteries
9V]
11
12
Could be powered by adaptor and batteries(AA/LR6*6).
Note: When the batteries are getting low, the display will show to
indicate this situation.
Main Features
EN
Power On

Panel Instruction & Basic Operation
Top Panel
DRUM/TUNERButton: Press the button to switch between 3 Drum items.
Channel Switch: Select channels between Clean/Overdrive/Distortion/Metal.
Press and hold this button to activate Tap Tempo.
LED Button: Press this button to start/stop the drum machine.
EFFECTS Knob: Select DSP effects (between Chorus/Tremolo/
Rotate the knob to adjust Drum parameters.Hold the button to enter tuner.
Reverb) and adjust modulation rate or reverb level (turn clockwise to increase).
VOLUME Knob: Control the output volume.
Display: Instruct the information of Drum Rhythm or tuner.
INPUTJack: 1/4” mono audio jack.
AUXIn Jack: 1/8” stereo audio jack
GAIN Knob: Adjust the gain of the DRIVE effects.
TONE Knob: Adjust the brightness of the sound.
02
03
04
01
05
06
07
08
09
10
EN
3
7 4 8 2
1
9
1056

Side Panel
11
12
12
11
14
13
Detailed Functions
Drum Rhythm
Selecting Drum Rhythm Types
Adjusting Drum Rhythm Volume
Start/Stop Drum Rhythm
Press [Play/Stop] button will start the drum rhythm ( [Play/Stop]
button’s LED will be lit up). When the rhythm is playing, press
[Play/Stop] button again to stop.
LED screen will show the rhythm type firstly, then rotate the
knob to [DRUM/TUNER]
Press [DRUM/TUNER]button, LEDscreen will show the drum
rhythm volume, then rotate [DRUM/TUNER] knob to change the
rhythm volume ( ~ , the default value is ).
select the rhythm type ( ~ ).
PHONESJack:
1/8” stereo audio jack.
11
POWERSwitch:
.Power On/Off
12
DC9V Jack:
9V DC 1.5A
13
HOOK:
For hanging Super Tiny Twin at waist.
14
01
02
03
EN

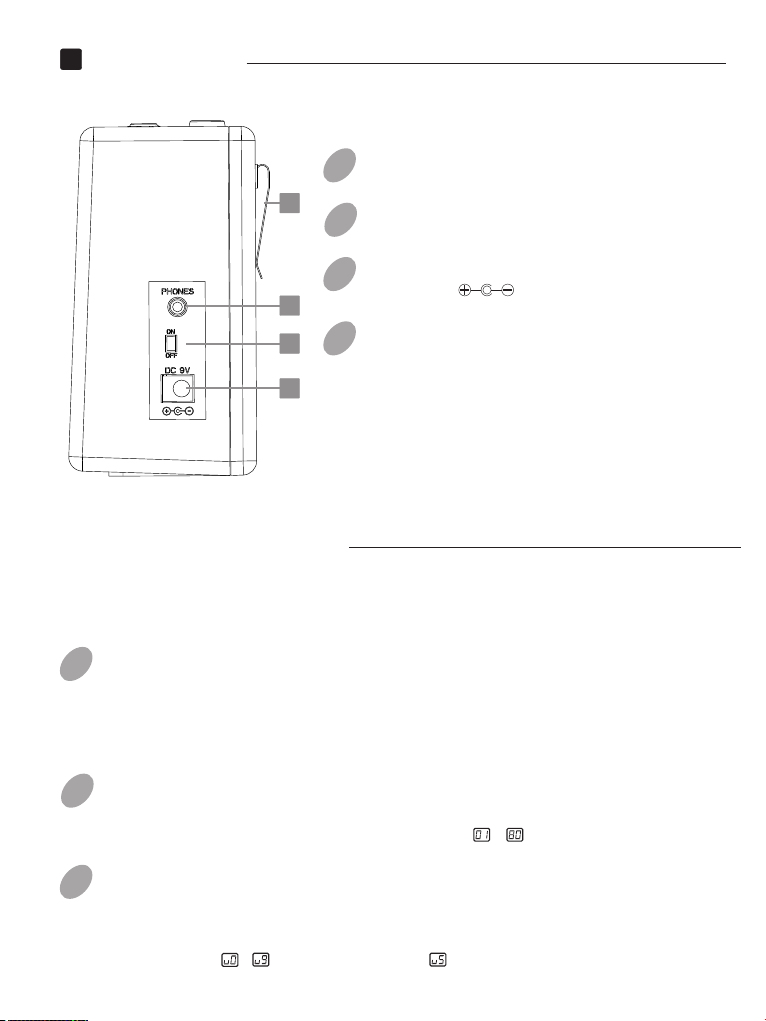
Changing Drum Rhythm Tempo
Press [DRUM/TUNER]button again, the number displayed in LED
indicates the tempo of drum rhythm, then rotate [DRUM/TUNER] knob
to change tempo. The range of the displaying tempo value is ~ ,
indicate the real tempo 60~270BPM, each rhythm has its own default
tempo value.
Tap Tempo Function
When the Drum Rhythm is playing, hold [Play/Stop] button 2 seconds
to enter/exit Tap Tempo function, [Play/Stop] button's LED will begin
flashing to show the current rhythm tempo.
And then, press [Play/Stop] button twice or more times, the tempo will
be set according to the interval between key presses, and the LED's
flashing will be changed too. If the speed of the interval is faster than
270BPM, the TEMPO value will be the max.(270BPM), screen displays
will be the min.(60BPM), screen displays .
; If the speed of the interval is less than 60BPM, the TEMPO value
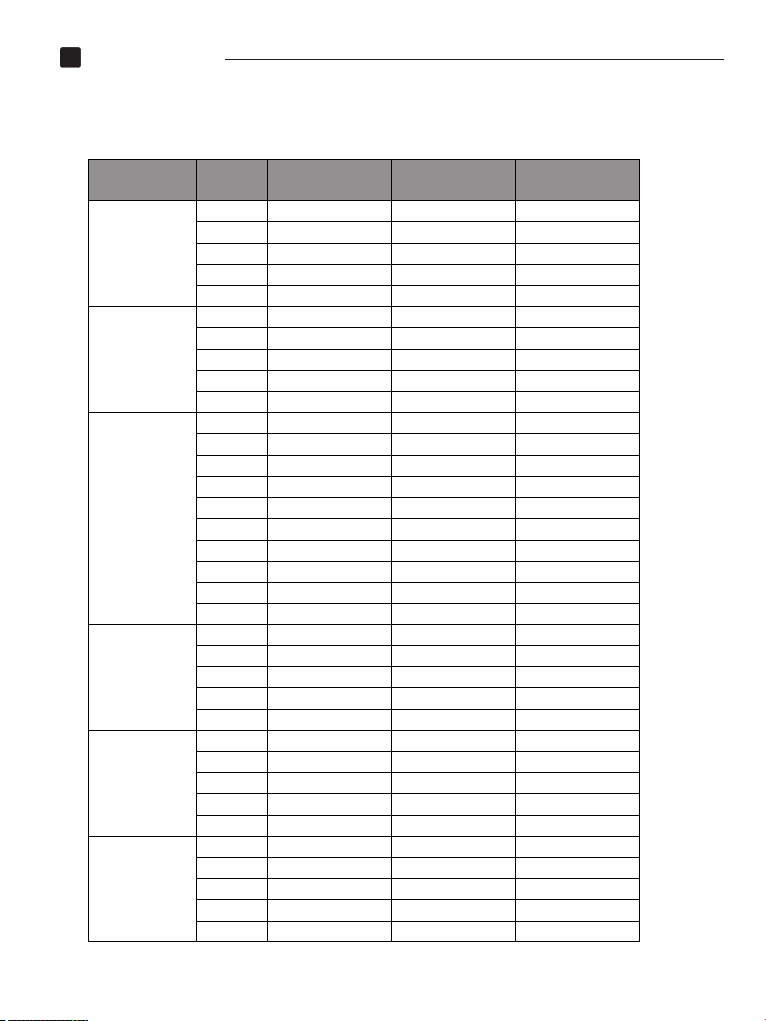
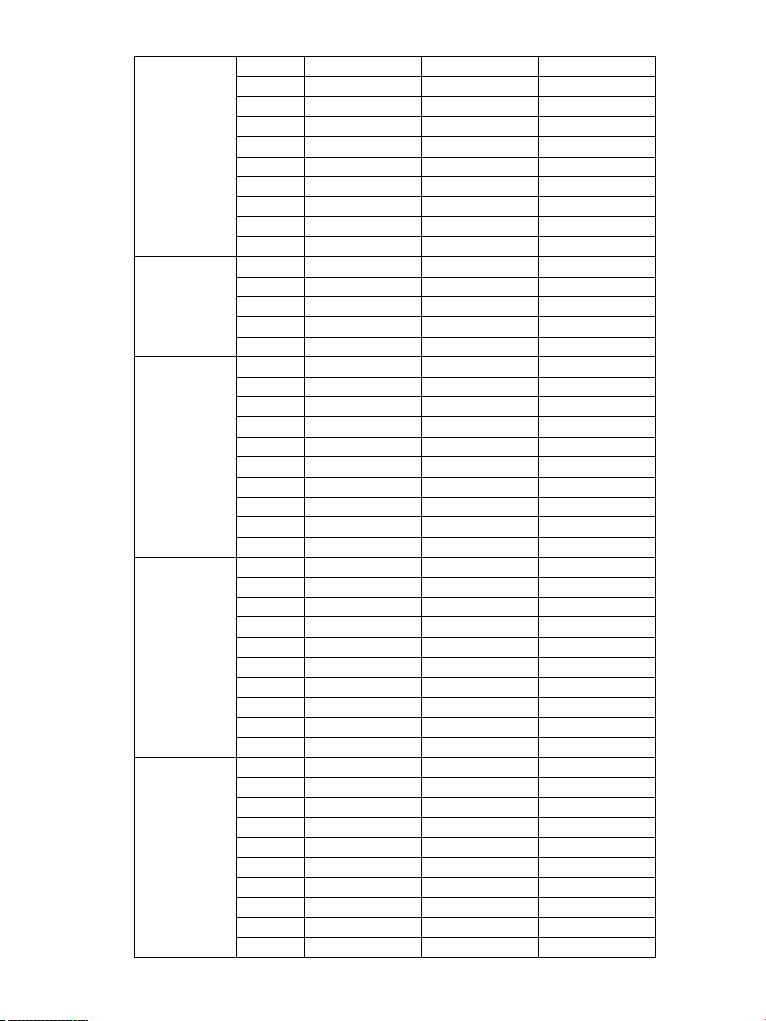
Tuning
Entering Tuning Mode
Hold [DRUM/TUNER]button 2 seconds to enter tuning mode.
Play one guitar string at a time, and adjust the guitar pitch as LED's
instruction.
Quit Tuner
When in tuning mode, press [DRUM/TUNER]buttontoquittuningstate.
LED will return to display the information of Drum Rhythm.
A-
C-
D -
#
F -
#
A -
#
C -
#
E-
G-
B-
D-
F-
G -
#
The left side shows the current pitch. The right side indicates how much the tuning
is off.
The indication rolls faster, the more the pitch
is off.
Flat Correct Sharp
.
.
.
.
.
04
05
Note: When the Tap Tempo is engaged, you need to exit Tap Tempo
function firstly (hold [Play/Stop] button 2 seconds), then press
[Play/Stop] button to stop Drum Rhythm.
01
02
03
Tuner

No. of Effect Types:
No. of Drum Rhythms:
Tempo Range: 60~270 BPM
Speakers:
Aux In:
Power requirements:
7 Types
80 Types
1/8” stereo jack
AC adapter 9V DC(center minus plug),
550g
Weight:
* Disclaimer: Any specification’s update won't be amended in this manual.
2 x 3 inches
1/4” monaural jack
1/8” stereo jack
Owner's Manual, AC adapter 9V DC
Guitar Input:
Phones:
Accessories:
or 6 AA/LR6 batteries
Dimensions: 165.5mm (W) × 67mm (D) × 126mm (H)
Specifications
EN

Appendix
Drum Rhythm List
Genre No. Type Time
Signature Default Tempo
01 8Beat1 4/4
02 8Beat2 4/4
03 8Beat3 4/4
04 8Beat4 4/4
8Beat
05 8Beat5
4/4
06 16Beat1
4/4
07
16Beat2
4/4
08
16Beat3
4/4
09
16Beat4
4/4
16Beat
10
16Beat5
4/4
11
Rock n' Roll
4/4
12
Classic Rock
4/4
13
Pop Rock
4/4
14
Slow Rock
4/4
15
Rock Shuffle
4/4
16
Rock Ballad
4/4
17
Punk
4/4
18
New Wave
4/4
19
Hard Rock 4/4
Rock
20
Metal 4/4
21
Classic Funk 4/4
22
Funk Rock 4/4
23
Electric Funk
4/4
24
Soul
4/4
Funk
25
R&B
4/4
26
Jazz
4/4
27
Big Band 4/4
28
Fusion 4/4
29
Swing 4/4
Jazz
30
Dixieland 4/4
31
Blues
4/4
32
Country 4/4
33 Country Folk 4/4
34 Rockabilly 4/4
Blues
120 BPM
120 BPM
120 BPM
120 BPM
120 BPM
120 BPM
120 BPM
120 BPM
120 BPM
120 BPM
210 BPM
120 BPM
120 BPM
72 BPM
120 BPM
66 BPM
240 BPM
120 BPM
135 BPM
120 BPM
114 BPM
114 BPM
108 BPM
105 BPM
100 BPM
120 BPM
180 BPM
120 BPM
144 BPM
240 BPM
108 BPM
114 BPM
138 BPM
180 BPM
35 Bluegrass 2/4 132 BPM
EN

36
37
38
39
46
47
48
49
Electronic
50
51
52
53
54
55
56
57
58
59
World
60
61
62
63
64
65
66
67
68
69
Various Beat
70
71
72
73
74
75
76
77
78
79
Metro
80
Boosanova
Rumba
Samba
Cha Cha
Hip Hop
Trip Hop
Techno
Break Beat
Drum n' Bass
Waltz
Polka
March
6/8 March
Army March
Mazurke
Musette
Ska
New Age
World
3/4 Beat1
3/4 Beat2
6/8 Beat1
6/8 Beat2
5/4 Beat
6/4 Beat
7/4 Beat
9/8 Beat
10/8 Beat
11/8 Beat
Metro 1/4
Metro 2/4
Metro 3/4
Metro 4/4
Metro 5/4
Metro 6/4
Metro 7/4
Metro 6/8
Metro 7/8
Metro 9/8
4/4
4/4
4/4
4/4
4/4
4/4
4/4
4/4
4/4
3/4
4/4
4/4
6/8
4/4
3/4
3/4
4/4
4/4
4/4
3/4
3/4
6/8
6/8
5/4
6/4
7/4
9/8
10/8
11/8
1/4
2/4
3/4
4/4
5/4
6/4
7/4
6/8
7/8
9/8
40
41
42
43
44
45
Latin
Tango
Reggae
Beguine
Latin Pop
Latin Rock
Latin Dance
4/4
4/4
4/4
4/4
4/4
4/4
120 BPM
114 BPM
108 BPM
126 BPM
84 BPM
84 BPM
132 BPM
138 BPM
174 BPM
174 BPM
120 BPM
120 BPM
180 BPM
120 BPM
150 BPM
192 BPM
144 BPM
90 BPM
108 BPM
120 BPM
120 BPM
120 BPM
120 BPM
156 BPM
125 BPM
114 BPM
120 BPM
120 BPM
120 BPM
120 BPM
120 BPM
120 BPM
120 BPM
120 BPM
120 BPM
120 BPM
120 BPM
120 BPM
120 BPM
120 BPM
90 BPM
120 BPM
108 BPM
135 BPM
126 BPM

FAQ’s
Q: Why does the POCKAMP not work?
A: Check that the power supply meets the specifications of the POCKAMP
Voltage (V) and polarity must match the specification exactly.
Current (mA) must be equal to or more than the specified minimum
requirement.
Ensure the instrument is connected to the POCKAMP’s INPUT
Q: Is it only for guitar?
A: It is not only for acoustic/electric guitar,bass guitar,violin and Keyboard,
but also support Mp3 AUX input.
Q: what adapter do I need to plug cellphone or mp3 player into this amp?
A: 1 8The unit has a / "(3.5mm) input jack in the back with its own volume
control forheadphones/MP3. So you will need cable with 3.5mm plug on
both ends.
Q: How do I attach it to guitar?
A: You need a jack that plugs between the guitar and the amp.
Q: Why is my POCKAMP making unwanted nosie?
A:Check that the input and output cables are not damaged.
Check that the POCKAMP is receiving sufficient from the power
supply.
Avoid interference from external devices such as radios,
televisions, speakers, magnets, fluorescent lighting, etc.
Ensure the instrument is fully shielded and grounded.
Instruments with single coil electromagnetic pickups can produce
cycle 60 hum.
EN

*BITTE LESEN SIE SORGFÄLTIG AUF, BEVOR SIE WEITER VERFAHRENP*
Verbindungen
Schalten Sie das Gerät und alle anderen Geräte vor dem Anschließen oder
Trennen immer aus, um Fehlfunktionen und / oder Schäden an anderen Geräten
zu vermeiden. Stellen Sie außerdem sicher, dass Sie alle Verbindungskabel und
das Netzkabel abziehen, bevor Sie das Gerät transportieren.
Ort
Um Verformungen, Verfärbungen oder andere ernsthafte Schäden zu vermeiden,
setzen Sie dieses Gerät nicht folgenden Bedingungen aus:
Direktes Sonnenlicht
Wärmequellen
Magnetfelder
Extreme Temperatur oder Feuchtigkeit
Übermäßige staubige oder schmutzige Lage
Hohe Feuchtigkeit oder Feuchtigkeite
Starke Vibration oder Schock
Interferenzen mit anderen elektrischen Geräten
In der Nähe befindliche Radios und Fernsehgeräte können Empfangsstörungen
verursachen. Betreiben Sie dieses Gerät in einer angemessenen Entfernung von
Radios und Fernsehern.
Reinigung
Nur mit einem weichen, trockenen Tuch reinigen. Wenn nötig, befeuchten Sie das
Tuch leicht. Verwenden Sie keine scheuernden Reinigungsmittel, Reinigungsalkohol,
Farbverdünner, Wachs, Lösungsmittel, Reinigungsflüssigkeiten oder chemisch
imprägnierte Wischtücher.
Handhabung
Wenden Sie keine übermäßige Kraft auf die Schalter oder Bedienelemente an.
Lassen Sie keine Papier-, Metall- oder anderen Gegenstände in dieses Gerät ein.
Energieversorgung
Bitte schließen Sie das vorgesehene Netzteil an eine Steckdose mit der richtigen
Spannung an.
Bitte achten Sie darauf, nur einen Netzadapter zu verwenden, der 9V DC,
Mitte minus, liefert.
Ziehen Sie den Netzadapter ab, wenn Sie ihn nicht verwenden oder während
eines Gewitters.
Vorsichtsmaßnahmen
DE
Achten Sie darauf, das Gerät nicht fallen zu lassen und es keinen Stößen
oder übermäßigem Druck auszusetzen.

Sehr portabel und leicht - Spielen Sie Gitarre überall und überall
Kommt mit einem Gürtelclip, um Ihre Musik unterwegs zu spielen
Chorus / Tremolo / Reverb-Effekte, um Ihre Gitarrensounds 80 x zu
verschönern
Drum Rhythms zum Stampfen mit Tap Tempo
Eingebauter Tuner, um sicherzustellen, dass Ihr Instrument immer stimmt
Kopfhörerausgang für stille Praxis
Auxiliary-Eingang für die Wiedergabe von Musik von einem externen Gerät
Angetrieben durch 9V DC oder 6 * AA Batterien für die ultimative Portabilität
Zum Einlegen von Batterien
Hinweis: Wenn die Batterien fast leer sind, zeigt das Display diese
Situation an.
Haupteigenschaften
Einschalt
2 × 3 "Lautsprecher liefern starke Leistung. Großartig für
Trainingssessions und Straßen-Performance
4 verschiedene Antriebsmodelle bieten einen Verstärkungsbereich für
jeden Musikstil
Stecken Sie das Kabel des Netzteils (9V, 1,5A, Mitte Minus) in die [DC9V]
Oder verwenden Sie Batterien (AA / LR6 x 6). Schalten Sie dann das Gerät
mit dem Netzschalter ein.
Kann mit Adapter und Batterien (AA / LR6 * 6) betrieben werden.
DE
11
12

Panel-Anleitung und grundlegende
Bedienung
Oberes Bedienfeld
3
7 4 8 2
1
9
1056
Trommel / Stimmgerät-Taste: Drücken Sie die Taste, um zwischen 3
Trommelelementen zu wechseln. Drehen Sie den Knopf, um die Drum-
Parameter einzustellen. Halten Sie die Taste gedrückt, um den Tuner aufzurufen.
02
Kanalumschaltung: Wähle Kanäle zwischen Clean / Overdrive / Distortion / Metal
03
GAIN Knopf: Passen Sie die Verstärkung der DRIVE-Effekte an.
04
LED-Taste: Drücken Sie diese Taste, um den Drumcomputer zu starten
/ stoppen. Drücken und halten Sie diese Taste, um Tap Tempo zu aktivieren.
01
TON-Knopf: Passen Sie die Helligkeit des Tons an.
05
EEFFECTS Knopf: Wählen Sie DSP-Effekte (zwischen Chorus / Tremolo /
Reverb) und die Modulationsrate oder den Hallpegel einstellen
(im Uhrzeigersinn drehen, um die Lautstärke zu erhöhen).
06
Lautstärkeregler: Kontrollieren Sie die Ausgangslautstärke.
07
Anzeige: Unterrichten Sie die Informationen von Drum Rhythm oder Tuner.
08
Eingangsbuchse: 1/4” Mono Audio-Buchse.
09
AUX In Buchse: 1/8” Stereo Audio-Buchse
10
DE

Seitenverkleidung
11
12
12
11
14
13
Detaillierte Funktionen
Trommelrhythmus
PHONESJack:
1/8” Stereo Audio-Buchse.
11
Stromschalter:
Einschalten / Ausschalten.
12
DC9V Jack:
9V DC 1.5A
13
HOOK:
Zum Aufhängen des Super Tiny Twin an
der Taille.
14
Trommelrhythmus starten / stoppen
ken Sie die [Play / Stop] -Taste, um den Schlagzeug-Rhythmus zu starten
([Play / Stop]Die LED der Taste leuchtet auf. Wenn der Rhythmus gespielt
wird, drücken Sie die [Play / Stop] -Taste erneut, um zu stoppen.
01
DE
Drum-Rhythmus-Typen auswählen
Der LED-Bildschirm zeigt zuerst den Rhythmus-Typ an und dann den
[DRUM / TUNER] -Regler, um den Rhythmus-Typ auszuwählen ( ~ ).
02
Drücken Sie den [DRUM / TUNER] -Taster, der LED-Bildschirm zeigt die
Drum-Rhythmus-Lautstärke und dann den [DRUM / TUNER] -Regler,
um die Rhythmus-Lautstärke zu ändern( ~ ), Der Standardwert ist ) .
Einstellen der Drum-Rhythm-Lautstärke
03

Tippen Sie auf Tempo-Funktion
Abstimmung
Eingabe des Abstimmungsmodus
Halten Sie die Taste [DRUM / TUNER] 2 Sekunden lang gedrückt,
um in den Abstimmmodus zu gelangen.
Spielen Sie jeweils eine Gitarrensaite und stellen Sie die Gitarrenstimmung
als LED-Anweisung ein.
Beenden Sie den Tuner
Drücken Sie im Tuning-Modus die [DRUM / TUNER] -Taste, um den
Tuning-Status zu verlassen.
Die LED wird zurückkehren, um die Informationen von Drum Rhythm anzuzeigen.
A-
C-
D -
#
F -
#
A -
#
C -
#
E-
G-
B-
D-
F-
G -
#
The left side shows the current pitch. The right side indicates how much the tuning
is off.
The indication rolls faster, the more the pitch
is off.
Flat Correct Sharp
.
.
.
.
.
04
05
Hinweis: Wenn das Tap Tempo aktiviert ist, müssen Sie die Tap Tempo Funktion
zuerst verlassen (halten Sie die [Play / Stop] Taste 2 Sekunden gedrückt halten)
und dann die [Play / Stop] Taste, um den Drum Rhythmus zu stoppen.
01
02
03
Tuner
Drum Rhythm Tempo ändern
Drücken Sie erneut die Taste [DRUM / TUNER], die in der LED angezeigte Nummer
zeigt das Tempo des Schlagzeugrhythmus an und dreht dann den [DRUM /
TUNER] -Regler, um das Tempo zu ändern. Der Bereich des angezeigten
Tempowertes ist ~ , geben Sie das tatsächliche Tempo an (60 ~ 270
BPM), jeder Rhythmus hat seinen eigenen voreingestellten Tempowert.
Wenn der Drum-Rhythmus gespielt wird, halten Sie die [Play / Stop] -Taste
2 Sekunden lang gedrückt, um die Tap-Tempo-Funktion aufzurufen und zu
verlassen. Die LED der [Play / Stop] -Taste blinkt nun, um das aktuelle
Rhythmus-Tempo anzuzeigen.
Drücken Sie dann die [Play / Stop] -Taste zweimal oder mehrmals, das
Tempo wird entsprechend dem Intervall zwischen den Tastendrücken
eingestellt und das Blinken der LED wird ebenfalls geändert. Wenn die
Geschwindigkeit des Intervalls schneller als 270 BPM ist, wird der TEMPO-
Wert der maximale (270 BPM) Bildschirm angezeigt ; Wenn die
Geschwindigkeit des Intervalls weniger als 60 BPM beträgt, ist der
TEMPO-Wert der min. (60 BPM), Bildschirm wird angezeigt .

Anzahl der Effekttypen:
Anzahl der Drum-Rhythmen:
Zeitbereich: 60~270 BPM
Lautsprecher:
Zu In:
Leistungsanforderungen:
7 Typen
80 Typen
1/8” Stereo Buchse
AC Adapter 9V DC (Mitte minus Stecker),
oder 6 AA/LR6 Batterien
550g
Gewicht:
*Haftungsausschluss: Aktualisierungen der Spezifikationen werden in diesem Handbuch
nicht geändert.
2 x 3 Zoll
1/4” monaurale Buchse
1/8” Stereo Buchse
Bedienungsanleitung, Netzteil 9V DC
Gitarren-Eingang:
Telefone:
Zubehör:
Maße: 165.5mm (W) × 67mm (D) × 126mm (H)
Spezifikationen
DE

Blinddarm
Trommel Rhythmus Liste
Genre No. Type Time
Signature Default Tempo
01 8Beat1 4/4
02 8Beat2 4/4
03 8Beat3 4/4
04 8Beat4 4/4
8Beat
05 8Beat5
4/4
06 16Beat1
4/4
07
16Beat2
4/4
08
16Beat3
4/4
09
16Beat4
4/4
16Beat
10
16Beat5
4/4
11
Rock n' Roll
4/4
12
Classic Rock
4/4
13
Pop Rock
4/4
14
Slow Rock
4/4
15
Rock Shuffle
4/4
16
Rock Ballad
4/4
17
Punk
4/4
18
New Wave
4/4
19
Hard Rock
4/4
Rock
20
Metal 4/4
21
Classic Funk 4/4
22
Funk Rock 4/4
23
Electric Funk 4/4
24
Soul 4/4
Funk
25
R&B
4/4
26
Jazz
4/4
27
Big Band 4/4
28
Fusion 4/4
29
Swing 4/4
Jazz
30
Dixieland 4/4
31
Blues
4/4
32
Country 4/4
33 Country Folk 4/4
34 Rockabilly 4/4
Blues
120 BPM
120 BPM
120 BPM
120 BPM
120 BPM
120 BPM
120 BPM
120 BPM
120 BPM
120 BPM
210 BPM
120 BPM
120 BPM
72 BPM
120 BPM
66 BPM
240 BPM
120 BPM
135 BPM
120 BPM
114 BPM
114 BPM
108 BPM
105 BPM
100 BPM
120 BPM
180 BPM
120 BPM
144 BPM
240 BPM
108 BPM
114 BPM
138 BPM
180 BPM
35 Bluegrass 2/4 132 BPM
DE

36
37
38
39
46
47
48
49
Electronic
50
51
52
53
54
55
56
57
58
59
World
60
61
62
63
64
65
66
67
68
69
Various Beat
70
71
72
73
74
75
76
77
78
79
Metro
80
Boosanova
Rumba
Samba
Cha Cha
Hip Hop
Trip Hop
Techno
Break Beat
Drum n' Bass
Waltz
Polka
March
6/8 March
Army March
Mazurke
Musette
Ska
New Age
World
3/4 Beat1
3/4 Beat2
6/8 Beat1
6/8 Beat2
5/4 Beat
6/4 Beat
7/4 Beat
9/8 Beat
10/8 Beat
11/8 Beat
Metro 1/4
Metro 2/4
Metro 3/4
Metro 4/4
Metro 5/4
Metro 6/4
Metro 7/4
Metro 6/8
Metro 7/8
Metro 9/8
4/4
4/4
4/4
4/4
4/4
4/4
4/4
4/4
4/4
3/4
4/4
4/4
6/8
4/4
3/4
3/4
4/4
4/4
4/4
3/4
3/4
6/8
6/8
5/4
6/4
7/4
9/8
10/8
11/8
1/4
2/4
3/4
4/4
5/4
6/4
7/4
6/8
7/8
9/8
40
41
42
43
44
45
Latin
Tango
Reggae
Beguine
Latin Pop
Latin Rock
Latin Dance
4/4
4/4
4/4
4/4
4/4
4/4
120 BPM
114 BPM
108 BPM
126 BPM
84 BPM
84 BPM
132 BPM
138 BPM
174 BPM
174 BPM
120 BPM
120 BPM
180 BPM
120 BPM
150 BPM
192 BPM
144 BPM
90 BPM
108 BPM
120 BPM
120 BPM
120 BPM
120 BPM
156 BPM
125 BPM
114 BPM
120 BPM
120 BPM
120 BPM
120 BPM
120 BPM
120 BPM
120 BPM
120 BPM
120 BPM
120 BPM
120 BPM
120 BPM
120 BPM
120 BPM
90 BPM
120 BPM
108 BPM
135 BPM
126 BPM

FAQ’s
Q: Warum funktioniert das POCKAMP nicht?
A: Überprüfen Sie, ob das Netzteil den Spezifikationen der POCKAMP-
Spannung (V) entspricht und die Polarität genau mit der Spezifikation
übereinstimmen muss.Der Strom (mA) muss gleich oder größer als
die angegebene Mindestanforderung sein.
Stellen Sie sicher, dass das Instrument an den POCKAMP INPUT
angeschlossen ist
Q: Ist es nur für Gitarre?
A: Es ist nicht nur für akustische / elektrische Gitarre, Bassgitarre,
Violine und Keyboard, sondern unterstützt auch Mp3 AUX-Eingang.
Q: Welchen Adapter brauche ich, um ein Handy oder einen MP3-Player an
diesen Verstärker anzuschließen?
A: Das Gerät verfügt über eine 3,5 mm Klinkenbuchse mit Lautstärkeregler
für Kopfhörer / MP3. Sie benötigen also ein Kabel mit 3,5 mm
Klinkenstecker an beiden Enden.
Q: Wie befestige ich es an der Gitarre?
A: Du brauchst eine Buchse, die zwischen der Gitarre und dem
Verstärker steckt.
Q: Warum ist mein POCKAMP machen unerwünschte Nosie?
A: Überprüfen Sie, dass die Eingangs- und Ausgangskabel nicht
beschädigt sind.
Vermeiden Sie Störungen durch externe Geräte wie Radios, Fernseher,
Lautsprecher, Magnete, Leuchtstofflampen usw.
Stellen Sie sicher, dass das Gerät vollständig abgeschirmt und geerdet ist.
Instrumente mit elektromagnetischen Single-Coil-Tonabnehmern
können 60-Hz-Brummen erzeugen.
DE
Überprüfen Sie, ob das POCKAMP ausreichend vom Netzteil versorgt wird.
Table of contents