AnyTone AT-D868UV User manual

Analog/digital handheld DMR transceiver
dual band (VHF/UHF) for amateur radio.
OPERATING MANUAL

Waste disposal. Direcve 2012/19 / EU
Informaon on waste disposal of electrical and electronic equipment
(WEEE).
This symbol on the product means that the electrical and electronic prod-
ucts used must not be mixed with household waste. For proper treatment,
recovery and recycling, take this product to designated collecon points
where it will be accepted for free.
The correct disposal of this product will help save valuable resources and prevent possible
negave eects on human health and the environment, which could otherwise arise from
the improper handling of waste..
Contact your local authority for more informaon about the nearest collecon point.
Sancons may be applied for the incorrect disposal of this waste, in accordance with its
naonal legislaon.
These symbols on the baeries mean:
Pb = contains more than 0.004 percent by weight of lead
Cd = contains more than 0.002 percent by weight of cadmium
Hg = contains more than 0.0005 percent by weight of mercury
You can also send the transceiver and the baery to our warehouse. Postal fees must be
paid by the sender.
This product complies with Direcve 2011/65 / EU about restricons on the use of
certain hazardous substances in electrical and electronic equipment.
This transceiver is suitable for use as long as the user has a license or
administrave authorizaon, issued and complying with the restricons
dened by the Telecommunicaons Authories of the state to which the
user belongs. You can request more informaon from your seller.
States of the European Union of permied use:
AT BE BG HR CY CZ DK
EE FI FR DE EL HU IE
IT LV LT LU MT NL PL
PT RO SK SI ES SE UK

THANK YOU!
Thank you very much for choosing our Dual Band Digital DMR and Analog two way radio.
This radio adopts the latest advances in technology, providing reliable communicaon in
today’s demanding communicaon environment.
This radio oers both DMR digital and analog communicaon, introduces innovave DMR
digital processing system to achieve SMS, high-audio quality and digital encrypon. It of-
fers great stability, and reliability, together with long distance communicaon as well as
fashionable design. AT-D868UV has Text message, recording, voice message, digital encryp-
on, emergency alarm, Man down alarm, lone work, GPS with APRS, Vibraon and Analog
DTMF, 2TONE, 5TONE, CTCSS/DCS encode/decode funcons.
IMPORTANT NOTE
This manual is for rmware version 1.18 of the transceiver. In case of updang the
Firmware version there could be changes with the features, menus and opons of
the transceiver.

2AT-D868UV Digital DMR & analog transceiver
CAUTIONS
• Keep the radio and accessories away from children.
• Please do not try to open or modify the radio unless authorized, non-professionals
repair may cause damage and void the warranty.
• Please use AnyTone baery and charger to avoid damages.
• Please use the supplied antenna to ensure good communicaon.
• Please do not expose the radio to direct sunlight for a long period of me or place
the radio near excessive heat.
• Please do not put the radio in extremely dusty or humid areas.
• Do not use harsh chemicals, cleaning solvents to clean the radio.
• Absolutely do not transmit without the antenna installed on the radio.
• When using this radio, we recommend transming for 1 minute then receiving
for 4 minutes. Connuously transming for a long me or working with the high
power seng will heat the back of the radio. Do not place the radio’s hot side
close to any surface of plasc.
• If abnormal odor or smoke is detected from the radio, power o the radio and
remove the baery pack. Then contact your local AnyTone dealer for advice.
ATTENTION
• The above also applies to accessories for your AnyTone two way radio. If any item
is not working normally, please contact your local AnyTone dealer.
• Accessories made by other companies are not guaranteed by AnyTone to operate
correctly and to keep the radio working safely.

AT-D868UV Digital DMR & analog transceiver 3
1. UNPACKING AND CHECKING THE EQUIPMENT ........................................................ 5
1.1 Supplied Accessories ...........................................................................................5
1.2 Standard Accessories ..........................................................................................6
1.3 Oponal Accessories ...........................................................................................6
2. BATTERY INFORMATION ......................................................................................... 7
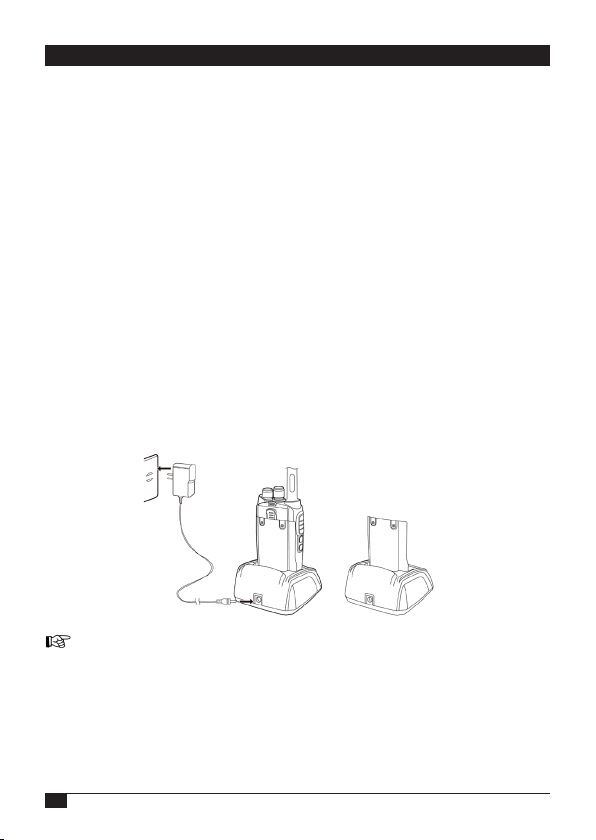
2.1 Charging the Baery Pack ...................................................................................7
2.2 Charger Supplied .................................................................................................7
2.3 Use Cauon with the Li-ion Baery ....................................................................7
2.4 How to Charge.....................................................................................................8
2.5 Normal Charging Tips ..........................................................................................9
2.6 How to Store the Baery ..................................................................................10
3. PREPARATION ....................................................................................................... 11
3.1 Installing / Removing the Baery ......................................................................11
3.2 Installing / Removing the Antenna ....................................................................11
3.3 Installing / Removing the Belt Clip ....................................................................12
3.4 Installing the Addional Speaker/Microphone (Oponal)................................12
4. RADIO OVERVIEW ................................................................................................ 13
4.1 LED indicator .....................................................................................................14
4.2 Programmed Key ...............................................................................................15
4.3 Default funcon ................................................................................................16
4.4 Hot Key ..............................................................................................................16
5. BASIC OPERATIONS............................................................................................... 17
5.1 Power on the Radio ...........................................................................................17
5.2 Adjust Volume ...................................................................................................17
5.3 Baery Voltage Test ..........................................................................................17
5.4 Main band/Sub band switch .............................................................................17
5.5 VFO/Channel switch ..........................................................................................17
5.6 Set up VFO frequency .......................................................................................17
5.7 Select a Zone .....................................................................................................17
5.8 Select a Channel ................................................................................................18
5.9 Receiving and Responding to a Radio Call ........................................................18
5.10 Make a call ......................................................................................................19
5.11 Temporary monitor .........................................................................................19
5.12 Monitor ...........................................................................................................20
6. ADVANCED FEATURES ........................................................................................... 21
6.1 Advanced Features for Private Call ...................................................................21
6.2 Advanced Features ............................................................................................21
INDEX

4AT-D868UV Digital DMR & analog transceiver
7. GPS POSITIONING FUNCTION ............................................................................... 22
7.1 Turn on GPS .......................................................................................................22
7.2 Check the GPS Informaon ...............................................................................22
7.3 Send GPS Informaon .......................................................................................22
7.4 Man Down Alarm ..............................................................................................23
8. RECORDING .......................................................................................................... 24
8.1 Turn on/ o the Recording ................................................................................24
8.2 Play the Record ................................................................................................24
8.3 Send the Record ................................................................................................24
8.4 Recording Manually ..........................................................................................25
9. MAIN MENU ......................................................................................................... 26
9.1 Contacts ............................................................................................................26
9.2 Messages ...........................................................................................................26
9.3 Call Log .............................................................................................................. 26
9.4 Zones ................................................................................................................. 26
9.5 Scan list .............................................................................................................26
9.6 Sengs ..............................................................................................................27
9.6.1 Radio Set ................................................................................................27
9.6.2 Chan Set .................................................................................................31
9.6.3 Device Info .............................................................................................34
10. TROUBLE SHOOTING GUIDE................................................................................ 35
11. PROGRAMMING GUIDE ..................................................................................... 36
12. ON-LINE SERVICE AND SUPPORT ........................................................................ 37
13. SECURITY ............................................................................................................ 38
14. TECHNICAL SPECIFICATIONS ................................................................................ 40
15. DECLARATION OF CONFORMITY ......................................................................... 41
INDEX

AT-D868UV Digital DMR & analog transceiver 5
1. UNPACKING AND CHECKING THE EQUIPMENT
Unpack the radio carefully. We recommend that you idenfy the items listed in the
following table before discarding the packing materials. If any items are missing or have
been damaged during shipment, please contact the carrier or the dealers immediately.
1.1. Supplied Accessories
Quanty
Antenna 1
Li-ion Baery Pack 1
Baery Charger 1
AC Adaptor 1
Belt Clip 1
Hand Strap 1
Instrucon Manual 1

6AT-D868UV Digital DMR & analog transceiver
1. UNPACKING AND CHECKING THE EQUIPMENT
1.2. Standard Accessories
1.3. Oponal Accessories
Antenna (*) Li-Ion Baery pack Charger AC Adapter
Belt clip Instrucon manual
(*) For frequency band of antenna, please refer to label indicated in the boom of the
antenna
USB Programming Cable Earphone Li-ion Baery Pack
Programming Soware Car Charger

AT-D868UV Digital DMR & analog transceiver 7
Li-ion Baery Pack
2. BATTERY INFORMATION
2.1. Charging the Baery Pack
The Li-ion baery pack is not charged at the factory; please charge it before use.
Charging the baery pack for the rst me aer purchase or extended storage (more than
2 months) may not bring the baery pack to its normal maximum operang capacity. Best
operaon will require fully charging/ discharging the baery two or three mes before
the operang capacity will reach its best performance. The baery pack life may be
depleted when its operang me decreases even though it has been fully and correctly
charged. If this is the case, replace the baery pack.
2.2. Charger Supplied
Please use the specied charger provided by AnyTone. Other models may cause explosion
and personal injury. Aer installing the baery pack, and if the radio displays low baery
with a red ashing lamp or voice prompt, please charge the baery.
2.3. Use Cauon with the Li-ion Baery
• Do not short the baery terminals or throw the baery into a re. Never aempt
to remove the casing from the baery pack, as AnyTone cannot be held responsi-
ble for any accident caused by modifying the baery.
• The ambient temperature should be between 5°C-40°C (40˚F - 105˚F) while
charging the baery. Charging outside this range may not fully charge the baery.
• Please turn o the radio before inserng it into the charger. It may otherwise
interfere with correct charging.
• To avoid interfering with the charging cycle, please do not cut o the power or
remove the baery during charging unl the green light is on.
• Do not recharge the baery pack if it is fully charged. This may shorten the life of
the baery pack or damage the baery pack.
• Do not charge the baery or the radio if it is damp. Dry it before charging to avoid
damage.

8AT-D868UV Digital DMR & analog transceiver
2. BATTERY INFORMATION
WARNING
When keys, ornamental chain or other electric metals contact the baery terminal,
the baery may become damage or injure a human. If the baery terminals are
short circuited it will generate a lot of heat.
Take care when carrying and using the baery. Remember to put the baery or radio
into an insulated container. Do not put it into a metal container.
2.4. How to Charge
• Plug the AC adaptor into the AC outlet, and then plug the cable of the AC adaptor
into the DC jack located on the back of the charger. The indicator light blinks
orange and is then ready to charge a baery.
• Plug the baery or the radio into the charger. Make sure the baery terminals
are good in contact with charging terminals. The indicator light starts to blink red
--- Pre-charging begins.
• Aer pre-charging for about 5 minutes, the red indicator will stop blinking ---
charging begins.
• It takes approximately 2-5 hours to fully charge the baery. When the lamp lights
green, the charging is completed. Remove the baery or the radio unit with its
baery from socket.
When charging a radio (with baery) the indicang lamp will not turn into green to
show the fully charged status if the radio is powered on. Only when the radio is switched
o will the lamp indicate normal operaon. The radio consumes energy when it is
power-on, and the charger cannot detect the correct baery voltage when the baery
has been fully charged. So the charger will charge the baery in constant voltage mode
and fail to indicate correctly when the baery has been fully charged.

AT-D868UV Digital DMR & analog transceiver 9
2. BATTERY INFORMATION
• Charging Process:
Charging Status LED Indicator
Standby (auto-test)
Pre-charging
Charging
Fully charged
Orange (only 1 second)
Red light twinkles for about 5 minutes
Lights red for about 5 hours
Lights green
• LED indicator:
Status LED
No Baery None
Auto-test Orange (1 second)
Pre-charging Red Light Twinkles for 5 Minutes
Charge Normally Red
Fully Charged Green
Trouble (*) Red twinkles for a long me
(*) Possible problems:
• The baery is too hot.
• The baery is short-circuited.
• The charger is short-circuited.
2.5. Normal Charging Tips
• Self-Test: When powering on the charger, the orange light blinks and stays o,
which means the charger has passed it self-test and it is ready to charge the bat-
tery. If the light remains orange or the red light blinks, it means the charger cannot
pass it self-test and cannot charge the baery.
• Trickle Pre-Charging: If red light blinks when the baery is inserted into the
charger, it means that the baery voltage is low and the charger is trickle-charging
the baery (Pre-Charging Mode). The charger will automacally turn into normal
charging when the baery reaches a certain electric charge, and if the red light
stops blinking, it means the baery voltage has reached a certain level, and the
charger will charge the baery in normal mode.

10 AT-D868UV Digital DMR & analog transceiver
2. BATTERY INFORMATION
Trickle charging (Pre-Charging Mode) me cannot last beyond 30 minutes. If the
indicang lamp sll blinks red aer 30-minute trickle-charging, it means that the charger
cannot charge the baery correctly. Please check whether the baery or charger is
damaged.
2.6. How to Store the Baery
• If the baery needs to be stored, keep it in status of 80% discharged.
• It should be kept in low temperature and dry environment.
• Keep it away from hot places and direct sunlight
And...
• Do not short circuit the baery terminals.
• Never aempt to remove the casing from the baery pack.
• Never store the baery in unsafe surroundings, as a short may cause an explosion.
• Do not put the baery in a hot environment or throw it into a re, as it may cause
an explosion

AT-D868UV Digital DMR & analog transceiver 11
3. PREPARATION
3.1. Installing / Removing the Baery
• Match the two boom grooves of the baery pack with the corresponding guides
on the back of the radio and then push it.
• To remove the baery pack, slide the release latch at the top away from the
baery and remove the pack away from the transceiver.
3.2. Installing / Removing the Antenna
• Installing the Antenna: Screw the antenna into the connector on the top of the
transceiver by holding the antenna at its base and turning it clockwise unl secure.
• Removing the Antenna: Turn the antenna counter-clockwise to remove it.

12 AT-D868UV Digital DMR & analog transceiver
3. PREPARATION
3.3. Installing / Removing the Belt Clip
• Installing the Belt Clip: Place the belt clip above the corresponding holes on the
back of the radio, and screw it into place clockwise with the two supplied screws.
• Removing the Belt Clip: Unscrew counter-clockwise to remove the belt clip.
3.4. Installing the Addional Speaker/Microphone (Oponal)
• Open the MIC-Headset rubber side cover and then insert the speaker / micropho-
ne connector into the double connector (Kenwood type). It is advisable to have the
transceiver turned o when connecng the micro-loudspeaker or micro-phone or
the programming cable.
When using a headset (oponal), avoid high volume levels to avoid possible hearing
damage.

AT-D868UV Digital DMR & analog transceiver 13
4. RADIO OVERVIEW
❶ Antenna
❷ Channel Switch
❸ POWER/VOLUME Switch
Turn clockwise to switch on the radio.
Turn counterclockwise ll a click is heard to switch o the radio.
Rotate to adjust the volume aer turning on the radio.
❹ MIC Input
Please keep your mouth about 10cm away from the microphone to achieve the best voice
quality.
❺ Speaker
❻ LCD
Display the frequency/channel informaon, operaon and status.

14 AT-D868UV Digital DMR & analog transceiver
❼ MENU Key
Press to enter funcon menu set up.
Program the hot keys in PC soware, press menu key, then press the hot key to perform the
programmed funcon.
❽ EXIT Key
In standby, press the key to enter the Contact list.
In menu, press the key to return the last menu.
❾ P1 Key / P2 Key
Programmable in PC soware for dierent funcons.
❿ Emergency Alarm Key
Programmable in PC soware for other funcons.
⓫ PTT Buon (Push-To-Talk)
To make a call, press and hold the PTT buon, then speak into the
microphone. Release the buon to receive the signals.
⓬ [PF1] / [PF2] Keys
Programmable in PC soware for dierent funcons.
⓭ Speaker/Microphone Jacks. PC program connector
Compable with standard Kenwood connecon.
⓮ Status Indicator
Indicate the dierent working status.
4.1. LED indicator
The top LED will help you to idenfy the current radio status.
LED Indicaon Status
Flashes Red Low baery voltage
Constant Red Transming
Constant Green Analog Receiving
Constant Cyan Digital Receiving
Flashes Green SCAN
4. RADIO OVERVIEW

AT-D868UV Digital DMR & analog transceiver 15
4. RADIO OVERVIEW
4.2. Programmed Keys
In PC soware – Public >> Oponal Seng >> Key funcon, it is possible to set dierent
funcons for [PF1], [PF2], , keys
Funcon Descripon
Voltage Check the current baery capacity voltage
Power Switch the power between super high, high, middle and low
power.
Repeater Switch between talk around and repeater mode.
Reverse Turn on/o the frequency reverse funcon.
Digital Encrypon Choose the encrypon group
Call In Analog mode, send the DTMF/5TONE/2TONE encode. This
funcon is only valid for analog channel.
TBST In Analog mode, send the tone press frequency signal to acve
the repeater.
VOX Set up the VOX level.
VFO/MR Switch between VFO mode and memory channel mode.
Sub PTT Sub channel PTT, press to start the call on sub channel.
Scan Scan on/o.
FM radio FM radio on/o.
Alarm Long press the key to start alarm, short press again to exit the
alarm.
Record switch Enable/disable the recording funcon.
Record Start/stop recording. When stop recording, the radio will remind
repeat or send the record.
SMS In digital mode, press to enter into messages.
Dial Start the manually dial.
GPS Check the GPS posion informaon.
Monitor Monitor the weak signal or the signal with unmatched ID.
Main channel switch Choose channel A or channel B as the main channel.
Hot key 1~6 Press the key to perform the programmed funcon in hot key
setup.
Alone Turn on/o the work alone funcon.

16 AT-D868UV Digital DMR & analog transceiver
4. RADIO OVERVIEW
4.3. Default funcon
[PF1] (The radio key below PTT) – Baery Voltage
[PF2] (The radio key 2 below PTT) – Monitor
[PF3] (Orange Alarm key) –Alarm
[P1] Key- Main channel Switch
[P2] Key - VFO/MR Switch
4.4. Hot keys
In PC soware – Public >> Hot key, it is able to set dierent funcons for hot keys
and + number key combinaon. When you use the combinaon +
number key, press key unl the message Next Please Press Dial Key appears on the
display; then press the numeric key and the programmed funcon will be executed.
For more details, see the soware for PC.
Call
Analog
Should edit the analog quick call rst, then choose analog
in the hot key set. Press the key to transmit 2Tone/5Tone/
DTMF to start the analog quick call.
Digital
It allows to select a contact from the digital contact
list, press the key to switch the channel to the contact
temporary. It will switch back to the original contact aer
the group/personal call hold me.
Menu
SMS Quick access to Messages in the menu
New Msg Quick access to New Msg in the Menu - Messages
Quick Text Quick access to Quick Text in the Menu - Messages
Inbox AQuick access to Inbox in the Menu - Messages
Outbox Quick access to Out box in the Menu - Messages
Contact List Quick access to Contact list in the Menu - Contacts
Manual dial Quick access to Manual Dial in the Menu - Contacts
Call Log Quick access to Call Log in the Menu
Sent Calls Quick access to Dialed Calls in the Menu - Call Log
Answered calls Quick access to Answered Calls in the Menu - Call Log
Missed calls Quick access to Missed Calls in the Menu - Call Log
Zone Quick access to Zone in the Menu
Radio Set Quick access to Radio Set in the Menu - Sengs

AT-D868UV Digital DMR & analog transceiver 17
5. BASIC OPERATIONS
5.1 Power on the radior
Turn on the radio by turning the [Power/Volume] switch clockwise ll a click is heard,
and the LCD displays will show a start-up message.
5.2 Adjust Volume
Rotate the [Power/Volume] knob to adjust the volume. Turn clockwise to increase
the volume and counterclockwise to decrease the volume. The LCD display will show
the volume status during an adjustment.
5.3 Baery Voltage Test
Press the [PF1] key to check the current baery voltage, then press the key again to
return.
5.4 Main band/Sub band switch
Press key to switch the main channel to the other channel if there is 2 channels
shown on the display. The channel with bold characters is the main channel.
5.5 VFO/Channel switch
Press key to switch between VFO and channel display.
If the Channel is set to display a Channel name, this funcon is invalid.
5.6 Set up VFO frequency
Turn the radio to VFO mode, press key to switch the channel to main band, the
VFO frequency can only be set up when the channel is the main “bold text” channel.
Operaon 1: Input the VFO frequency directly by the keyboard.
Operaon 2: Turn the channel selector to adjust the VFO frequency steps.
5.7 Select a Zone
A Zone is a group of channels grouped together. The D868UV DMR radio has 250
Zones. A Zone can have the maximum of 160 analog and/or digital channels.
Operaon 1: In stanby mode, press directly to switch the zone, the LCD
will display the selected zone number or name.

18 AT-D868UV Digital DMR & analog transceiver
5. BASIC OPERATIONS
Operaon 2:
• Press for main Menu
• Press to Zone and press Select
• Press to select a zone and press Select
When selecng a zone, these opons will appear:
• Edit Name: To enter / modify the name of the zone.
• Save: Press to save the name of the zone.
• Select Zone: Press to change the zone. The LCD will show the selected area.
5.8 Select a Channel
Operaon 1: Turn the channel switch to select a channel
Operaon 2: Press key to switch the radio to Channel mode, input the channel
numbers by the keyboard. For example, if you want switch to channel 99, input 0+0+9+9 a
total of 4 digits, and it will switch to channel 99.
A channel can either be Analog or Digital.
For the analog channels the Push-To-Talk buon is always available, and on the Digital
Channels parameters can be set up by the users / system operators by channel to allow
talk permit. There are four possible sengs:
• Always Allow: sThe user can transmit all the me.
• Channel Free: The radio can transmit only if the channel is free.
• Dierent Color Code: The radio can transmit if the channel is free, but the color
code is mismatch.
• Same Color Code: The radio can transmit only if the channel is free and the color
code matches.
5.9 Receiving and Responding to a Radio Call
When the radio is in the digital mode, it can receive and respond to a call with the same
frequency/color code/ slot.
When receiving a call:
• If the radio is programed with callers DMR ID number in the digital contact list,
when receiving a call, the radio will ring or vibrate briey.
• The blue LED lights up.
Other manuals for AT-D868UV
4
Table of contents
Other AnyTone Transceiver manuals

AnyTone
AnyTone AT-289P User manual

AnyTone
AnyTone NSTIG-8R User manual

AnyTone
AnyTone ANILE-8R User manual

AnyTone
AnyTone AT-3318UV User manual

AnyTone
AnyTone 5888UV III User manual

AnyTone
AnyTone AT-5888UVIII User manual

AnyTone
AnyTone AT-D878UVII PLUS User manual

AnyTone
AnyTone THE OBLITERATOR OBLTR-8R User manual
Popular Transceiver manuals by other brands

Kenwood
Kenwood NX-200GK instruction manual

Yaesu
Yaesu FT-707 Maintenance service manual

Advanced Wireless Communications
Advanced Wireless Communications AWR Advantage Plus quick start guide

GENLED
GENLED Acolyte DiGidot CTRLPIXELTRKITSP manual

ELECRAFT
ELECRAFT K3 quick start guide

Yaesu
Yaesu FT-180A instruction manual