Apex Digital AC7 User manual


Table of Contents
Getting to Know Your Camera.......................................................1
Charging the Battery.............................................................1
Component Introduction.......................................................2
Inserting an SD Card............................................................ 4
Installing the Battery............................................................. 5
Installing Teleconverter.........................................................6
Getting Started.................................................................................6
Mode Menu............................................................................ 6
Date Settings......................................................................... 7
Video Mode............................................................................ 9
Photo Mode..........................................................................11
Play Back............................................................................. 14
Slide Show........................................................................... 15
Settings.................................................................................16
Connecting With Computer............................................... 17
Technical Parameters......................................................... 18
Troubleshooting................................................................... 19

1
Getting to Know Your Camera
Charging the Battery
1.Take out the USB cable and connect with camera.
2.Plug the charger into a 100-240V power socket.
3.The camera charging indicator is always on during charging
and the charging indicator is off when the camera is fully
charged.

2
Component Introduction
For the function description of the related parts in the above
figure, please refer to the following table.
No.
Name
Function description
①
IPS Panel
Screen preview and video/photo
playback. It supports 270°rotation.
②
Speaker
/
③
Power Button
Power On/Off
④
T/W Zoom
Button
In video/Photo Mode, pull left/
right to zoom in/out.
It also can be "Options" button
⑩
⑪
⑨
①
③
⑦
⑤
⑥
②
⑧
⑫
⑬
④

3
when choosing functions
⑤
Photo Button
In photo mode, press to take photo.
It also can be "OK" button when
confirming functions
⑥
Status Light
Charging indicator and working
indicator.
⑦
Recording Button
1.Recording/stop video.
2.Stop playback when the video is
Playing
⑧
I/O Interface
MIC: Access to an external
microphone;
HDMI:External HD Cable to
connect to TV;
USB interface:Access the USB
Cable to charge
⑨
Mode Button
Press to enter the mode menu
⑩
DISP Button
Press once to close the screen data
display;
Press twice to close the screen
preview
⑪
Menu Button
Press to enter the menu
⑫
LED Light Switch
Press to turn on / off the LED light
⑬
Built-in
Microphone
Recording sound

4
Inserting SD Card
1.Open the Battery cover.
2.Insert SD memory card in the direction shown
3.Close the Battery cover.
※Open the Battery cover and press the memory card.
Note:
1.The camera supports up to 128G SD card.
It is recommended to use U1 high speed memory
card.
2. Please insert SD memory card under shutdown
status.
3. Do not take out the memory card when the camera
is working, Otherwise the files will get damaged.

5
Inserting the Battery
1.Open the Battery cover.
2.inserts a lithium battery.
3.Close the battery cover.
Note:
1.Do not violently open the battery cover and remove
the battery.
2.The battery needs to be loaded into the battery
compartment in a correct direction.

6
Inserting Teleconverter
1.Take out the teleconverter and remove the protection cover
on both sides.
2.Screw the teleconverter with the camera lens
Getting Started
Mode Menu
1.Open the screen or press the "POWER" button to turn on the
camera.
2.On the standby interface, press the "MODE" button to enter
the following options.

7
3.Press “T/W” zoom button to choose mode options,press
"Photo" button to confirm selecting
Date settings
1.Open the screen or press the "POWER" button to turn on the
camera.
2.Press "MODE" button to select “Date”
3.Press "T/W " zoom button and press "Photo" to confirm
selecting.
4.Select the Date function and Set Date by pressing "T/W”
zoom button and pressing "Photo" button to confirm
selecting.
Note: The default boot mode is video mode.

8
5. Select the date and time by pressing "T/W " button and
pressing "Photo" button to confirm selecting.
6. After setting the date, press "MODE" button to return to
mode menu interface.

9
Video Mode
1.Open the screen or press the "POWER" button to start video
mode Or selecting Video by pressing "Mode" button.
2.Press the "Recording" button to start recording.
3.During the recording process, you can pause the recording
by pressing the "Photo" button and continue the recording
by pressing the "Photo" button again.
4.Press the "Video " button again to stop recording.
Current Date
Current mode
Remaining recording time
Battery
Inserted SD card

10
Video Setting Mode
Pressing "MENU" button to choose different video settings
Name
Function Description
AWB
Auto,Daylight,Cloudy,Fluorescent,
Tungsten
Color
Standard,Sepia,Monochrome,Vivid
Exposure
+3、+2、+1、0、-1、-2、-3。
Metering
Multi、Center、Spot。
Time lapse
Select:Off、1 Second、3 Seconds、
5 Seconds. After turning on this
function, you can compress several
minutes and hours of video into a short
video.

11
Photo Mode
1.Open the screen or press "POWER" button to turn on the
camera, and press the "Mode" button to select "Camera"
Current Mode
Residual Quantity of Photos
Battery
Current Resolution
Inserted SD Card
Current Date
12
2.Press "T/W " zoom button and press " Photo " button to
confirm the selecting.
3. Press lightly "Photo" button to adjust focus, and press
"Photo" button to take photos.
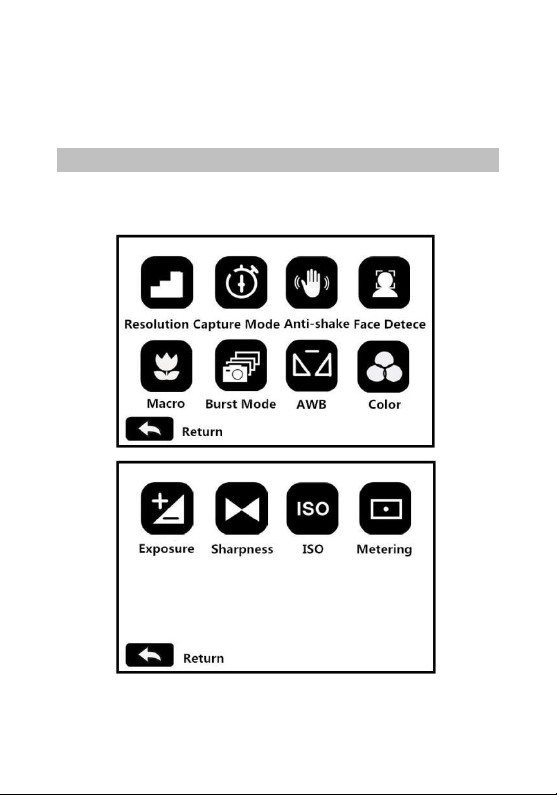
Photo Setting Mode
Pressing "MENU" button to choose different photo settings

13
Name
Function Description
Resolution
24M/20M/16M/12M/10M/7MHD/5M/3M
/2MHD/VGA
Capture
Mode
Off / 2S Timer / 5S Timer / 10S Timer
Anti-Shake
On / Off
Face Detect
On / Off
Marco
On / Off
Burst Mode
Take three consecutive photos
AWB
Auto/Daylight/Cloudy/Fluorescent/
Tungsten
Color
Standard/Sepia/Monochrome/Vivid
Exposure
+3/+2/+1/0/-1/-2/-3
Sharpness
Soft/Normal/Sharp
ISO
Auto/100/200/400
Metering
Multi / Center / Spot

14
Play Back
Video and photos are played quickly
1.Open the screen or press "POWER" button to turn on the
camera, and press the "Mode" button to enter the mode
menu
duration
Residual capacity
File Type
Resolution
Play
Quantity of Files
Preview

15
2.Press "T/W” zoom button and press " Photo” button to
confirm and select playback.
3. Press "T/W” zoom button to preview the file.
4.Press " Photo” button to start/pause the video playback;
press "T/W” zoom button to adjust the sound level; and
press "Video" button to stop the video playback.
5. Press “MENU” button to enter the delete/protection option
and select the "Delete" option to proceed to "Delete the
current video"/" Delete all files "/" Cancel ".
6. Press “MENU” button to enter the delete/protect option.
Select the "Protect" option to "lock current"/" unlock current
"/" Lock all "/" unlock all ".
Slide Show
Open the screen or press the "POWER" button to turn on the
camera, and press "MODE" button to enter the mode menu
1.Press "T/W” zoom button and press " Photo” button to
confirm selecting.

16
2.pressing the "MENU” Button , you can select 3S,5S,10S play
time.
3.Press the "Photo” button to start/stop the slide show.
Settings
1.Press “MODE” button to select “Setup”.
2.Press "T/W" zoom button to select and press "Photo” button
to confirm selecting.

17
Connecting with Computer
1.Connect USB Cable with camera and computer.
2.Turn on the camera. The screen shows “MSDC”.
Name
Function Description
Language
13 Languages.
Sound
On / Off
Auto Off
Off/3mins/5mins/10mins.
Frequency
Normally, 60Hz is suitable for US or other
countries. While 50 Hz is suitable for
European countries and Japan and so on.
Set Date
Customize the date and time of the photo
or video.
Format
This function can format the camera
memory card.
Default
This function can restore the camera to
Apex Settings.

18
Technical Parameters
Sensor
5.0MP CMOS
Aperture
F:2.8
Lens
f=4.95~49.5mm
Focus Range
Standard:1.5m~inf tele:1.5m~inf
Macro:0.1-1m
Lens Type
Optical zoom lens
Zoom
10X
External
Storage
Support SD Card Maximum
128GB
Screen
3.0-inch IPS Screen
Video
Resolution
QHD:2560*1440 30fps
Photo
Resolution
24M(5600*4200)/20M(5200*3900)
16M(4640*3480)/12M(4128*3096)
10M(3648*2736)/7MHD(3648*2052)
5M(3040*1712)/3M(2048*1536)
2MHD(1920*1080)/VGA(640*480)
ISO
Auto/100/200/400
Wi-Fi
Support
LED Light
Yes
Hot Shoe
Support external Microphone/LED light
USB Port
USB2.0:DC IN
Lens Caliber
M=37mm
Speaker
Built-in
Microphone
Built-in
Table of contents


