Aqua Jet SA 3995 User manual

Owner’s Manual
IMPORTANT NOTICE:
PLEASE READ THIS IN DETAIL
Please read this manual in detail prior to assembly and first use of the Aqua Jet
Beware of the warnings and follow the safety precautions mentioned
Hammer Head
Hammer Head
Aqua Jet SA 3995


Model No. SA 3995
1 x motor unit
1 x battery unit
1 x buoyancy cone
1 x control handle
bracket
2 x handles
1 x battery charger
& power cord
1 x instruction manual
1 motor unit
1 battery unit
1 battery charger
1 power cord
1 buoyancy cone
1 control handle bracket
2 handles
Contents
Contents
1
1

WARNING
WARNING
• The Safety Grille of the Aqua Jet must be kept on at all times
• Never wear loose clothing or equipment that could be drawn into the propeller of the Aqua Jet
• Extreme care must be taken by users with long hair as it may be drawn into the propeller. Users
with long hair must wear a swim cap or tie their hair up when using the Aqua Jet
• Users must observe the distance from the shore at all times and must be sure that they are able to
return to the shore safely even if the battery runs out
• Users must be aware of the weather conditions, flow of currents, water level, tidal change, wind
direction, boats, other swimmers, obstacles and any other factors that may cause danger during
use of the Aqua Jet
• Never consume alcohol or mind affecting drugs before using the Aqua Jet
• Always wear a personal flotation device when using the Aqua Jet for additional safety
• Should not be used with children under 8 years of age
• Disconnect battery after every use to avoid injury or damage
• Always keep the Aqua Jet from exposure to direct sunlight while not in use as heat may damage
the battery and shorten its product life and performance
• Never use the Aqua Jet in water with a depth of less than 40 inches (1 meter)
2
2

Motor Assembly
• Attach the buoyancy cone to a fully charged battery (please refer to page 5 & 6 for
how to charge battery) by aligning the cone key to the battery key as indicated in diagram 1
• Rotate the cone 90 degrees in a clockwise direction until it locks into place as indicated in diagram 2
• Place the motor driver onto a flat surface and place the battery unit onto the top of the motor driver
with the handle facing the opposite direction from the mounting post as indicated in
diagram 3
• Secure the battery to the motor unit by locking both latches firmly into place as indicated in
diagram 4
3
3
diagram 1 diagram 2 diagram 3 diagram 4
Motor Assembly
Motor Assembly

diagram 5
diagram 6
diagram 7
diagram 8
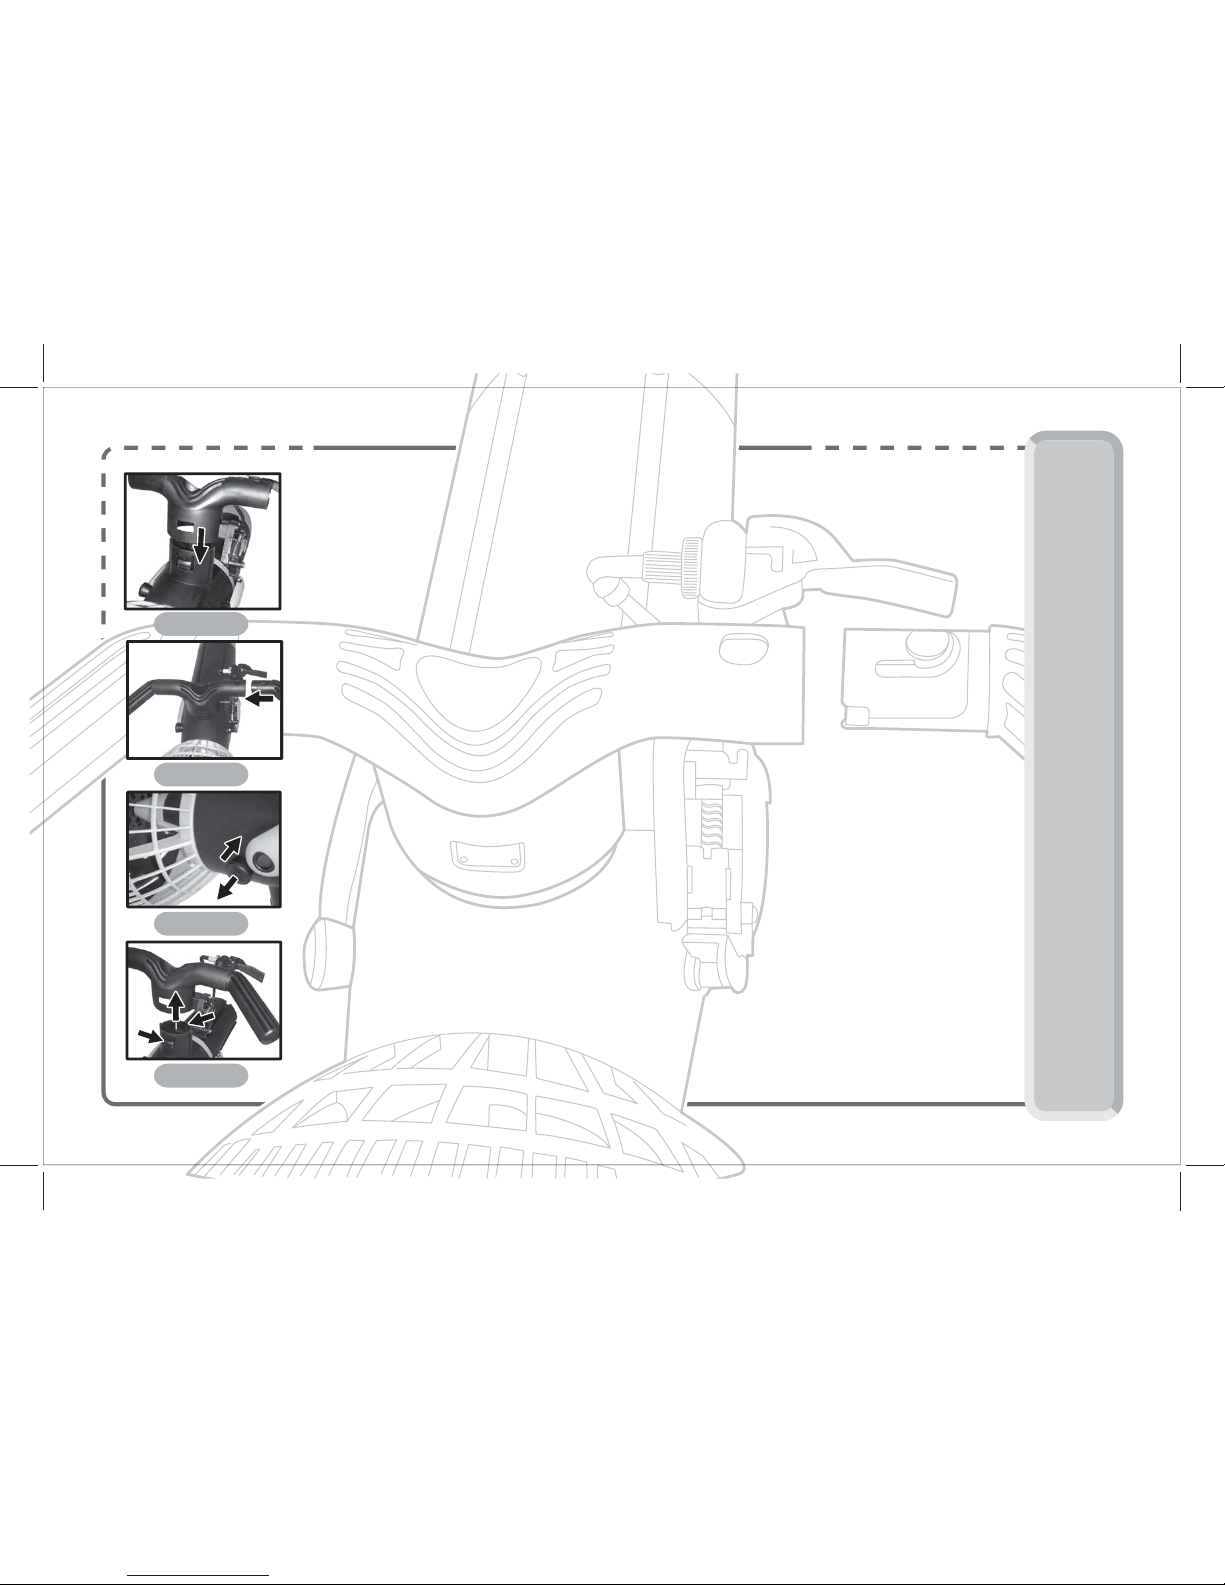
1. Attaching the Motor Unit to the Control Handle Bracket
-Place the motor unit on a flat surface and attach the control handle bracket to the
motor unit by slotting the mounting post of the motor unit into the hole in control
handle bracket until it clicks firmly into place as indicated in diagram 5.
-Fit the two black handles firmly into place as indicated in diagram 6.
-Pull out the safety switch on the side of the motor driver to the ‘ON’ position as
indicated in diagram 7.
-The motor cannot be started unless the safety switch is in the ‘ON’ position. The
safety switch should always be placed in the ‘OFF’ position when attaching or
removing the control bracket handle as indicated in diagram 7.
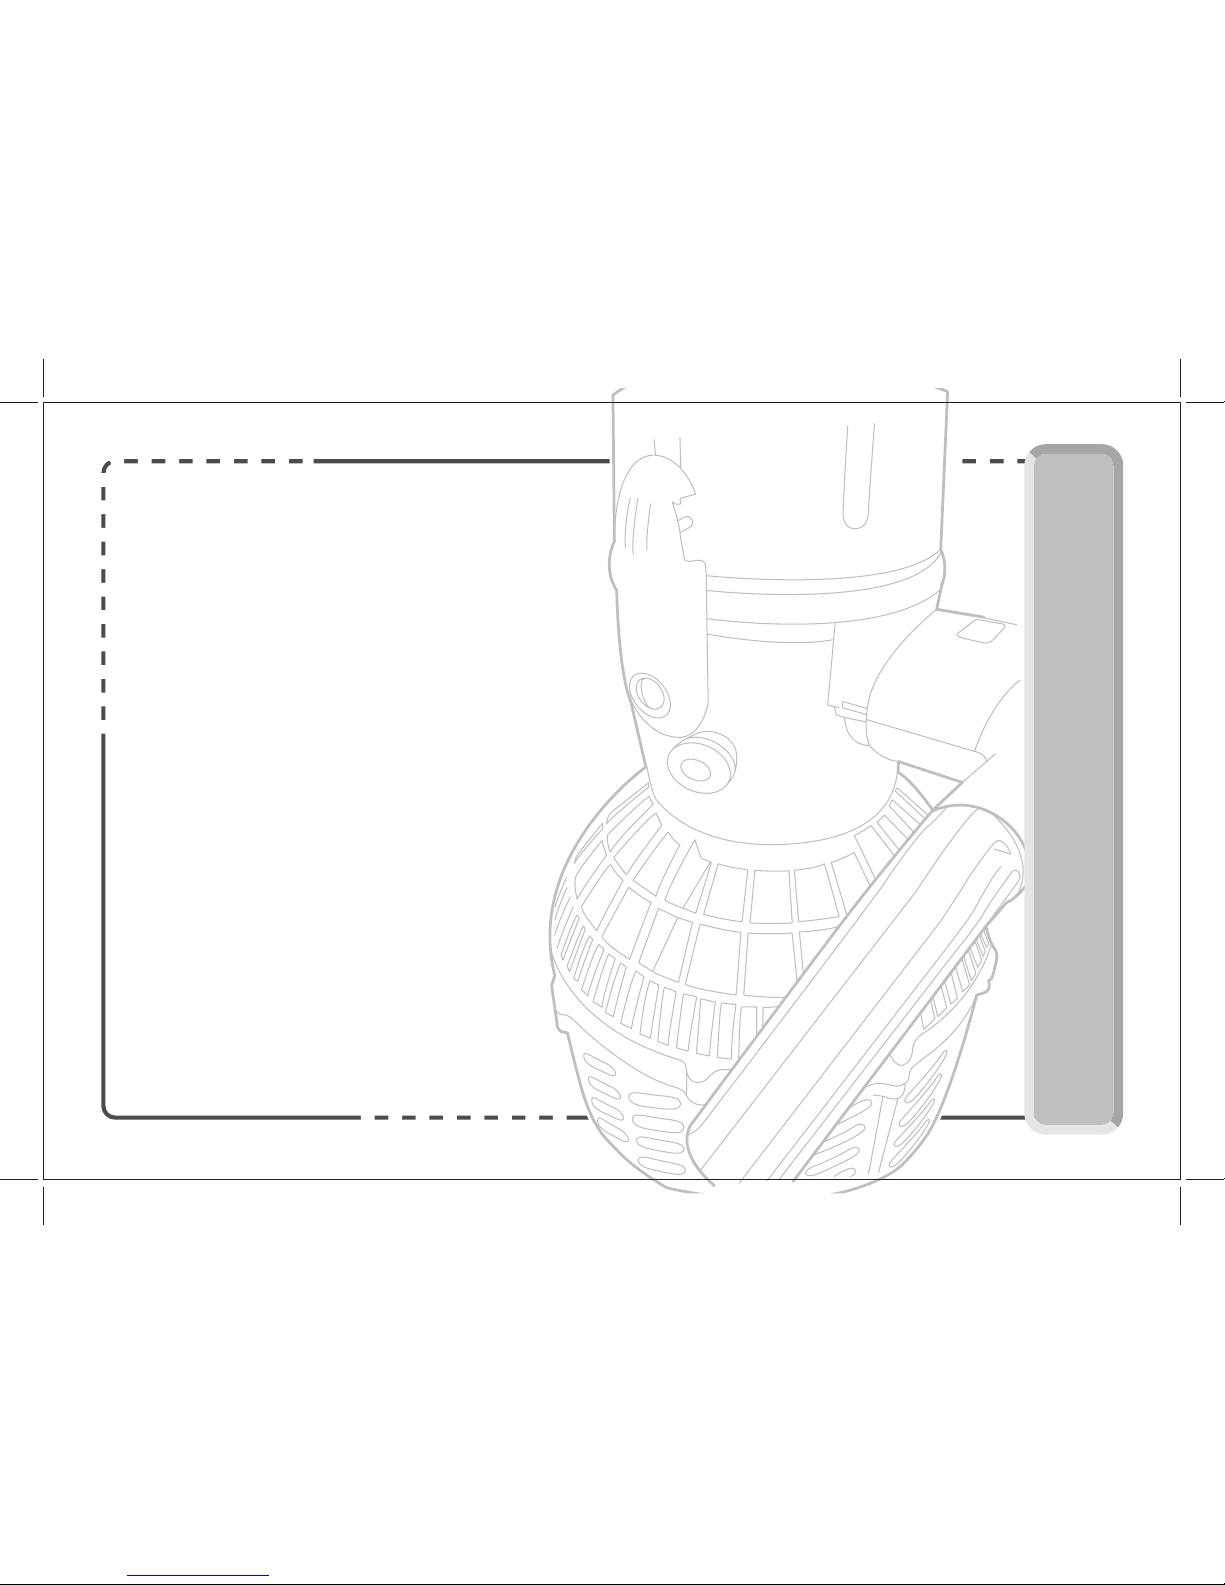
2. Using the Aqua Jet
-Prior to using the Aqua Jet, ensure that the control bracket mechanism and
propeller are clean and free from obstructions.
-Your Aqua Jet is now ready to use - simply put it into the water, squeeze the control
trigger and away you go! For optimum performance, your body should be in a
horizontal position as you glide through the water.
3. Removing the Motor Unit from the Control Handle Bracket
-We recommend that the motor unit remain attached to the control handle bracket
once the Aqua Jet had been assembled.
-In case the motor unit needs to be removed for storage or transport, place the motor
unit on a flat surface and remove the control handle bracket from the motor unit by
pressing firmly on the two black plastic buttons on the mounting post and
simultaneously pulling the control handle bracket entirely away from the motor unit
as indicated in diagram 8.
Getting Started
Getting Started
4
4
ON
OFF

How to charge the BATTERY
CAUTION
•Only charge the battery in a well ventilated place and ensure that there is enough room to dissipate
the gas arising from charging. The venting plug must be opened when charging the battery and always
allow at least one minute for the gas to dissipate after the venting plug is opened prior to removing or
attaching the custom-made charging plug
•Always plug the custom-made charging plug into the battery compartment first then plug into the main
power supply. Upon completion of charging, unplug the main power first then the charging plug.
•Always ensure the charger and the plug are in dry conditions and keep them away from water.
•Always charge the battery until the LED indicator on the charger turns to green. If in doubt about the
battery status, always recharge the battery again to ensure the battery is fully charged prior to use.
Charging the Battery
•
The
Aqua Jet is specially designed to enable the user to replace a used up battery on the Board easily.
Users should replace and charge the battery according to the following
procedures so as to provide the best care for the product:
1. Ensure that the Aqua Jet is out of the water and placed in a dry area
2. Turn off the Main Switch
3. Turn the two latches as indicated in diagram 10
4. Hold the handle and remove the battery from the Motor Driver
diagram 10
5
5

5. Pull open the vented plug as indicated in diagram 11
6. Allow at least one minute for the gas to dissipate
7. Plug the custom-made charge plug into the battery
(it will not fit in if inserted in the wrong direction).
See diagram 12
8. The battery must be placed on a horizontal surface
as indicated in diagram 13 using the cradle attached
to the power cord for support
9. Plug the charger to the Main Power Supply, the red
LED indicator light is on and charging starts
10. It will take at least 4 hours for a discharged battery
to fully charge up. A green LED will light up for
complete charge
11. Unplug the charger from the Main Power supply, then
unplug the charger plug from the battery
12. Allow the gas to dissipate for at least one minute and
plug in the venting plug as indicated in diagram 14
13. Ensure the sealing surfaces are clean and free from dirt
and debris and the O-ring is aligned and fitted correctly
14. Install the battery compartment onto the Motor Driver
as indicated in diagram 15
15. Turn the latches as indicated in diagram 16 to
lock on tightly between the Motor Driver and the
battery compartment
diagram 11 diagram 14
diagram 15
diagram 12
diagram 13
diagram 16
How to charge the BATTERY
6
6
CRADLE

Trouble Shooting
Trouble Shooting
If the control trigger is pressed and the motor driver does not respond or function properly
1
.Check whether the battery compartment is attached to the driver firmly and ensure that
the battery is fully charged. Also check whether there are any obstacles around the spring
mechanism of the motor unit bracket that may affect the operation of the spring control
2. If the tension of the control wire is incorrect, the motor may not start when the control trigger is
released. Adjust when necessary as per the following instructions:
-Unlock the control wire cable by rotating the locknut counter clockwise as indicated in
diagram 17
-To increase the tension of the control wire cable, rotate the tension barrel counter clockwise
a few turns and hold in place as indicated in diagram 17
-To loosen the tension of the control wire cable, turn the tension barrel clockwise
-Upon completion of the adjustment, the control wire cable must be locked tightly by
rotating the locknut clockwise as indicated in diagram 18
diagram 17 diagram 18
7
7
LOCK NUT TENSION
BARREL

Care of the Battery
•Battery must be recharged as soon as possible after use
•Only use the charger with the custom made plug provided with the Aqua Jet
• Never charge the battery in a sealed container
•Never short the circuit of the battery
•If the Aqua Jet is not used for a long period, ensure that the battery pack is released
from the Motor Driver and is charged fully every three months
• Never place the battery close to a source of heat such as a fire or oven
•When the battery is stored for a long period, ensure that the battery terminals are
insulated and kept in a dry and cool place (from -20C to 40C)
•
Always charge the battery in a ventilated place and keep the charger and battery out of the reach of children
Care of the Control Handle Bracket and Motor Driver
•Always be sure the propeller of the Aqua Jet is free from any object before and after use
always rinse the Aqua Jet thoroughly with fresh water after use
•Never turn on the Main Switch unless starting to use the Aqua Jet
•Ensure that the spring of the control is clean and free from dirt and debris
•
Handle the motor driver with care and never drop the motor driver as it may damage the control circuit board
• The battery contact on the Driver must always be dry prior to assembly of the battery
•Never drag the Aqua Jet along the ground
Care and Maintenance
8
8
Table of contents