manuals.online logo
Brands
  1. Home
  2. •
  3. Brands
  4. •
  5. AquaticLife
  6. •
  7. Water Pump
  8. •
  9. AquaticLife Smart Buddie Manual

AquaticLife Smart Buddie Manual

Flush Valve (Automatic):
• Flushing the Membrane is critical to obtaining peak
performance from the RO unit.
• Flushing clears debris build-up on the Membrane.
• The Smart Buddie Booster Pump unit includes an internal
automatic valve that flushes the Membrane for 18 seconds
every time the unit is powered on.
• The internal valve allows water to bypass the 300 cc
flow restrictor located inside the Smart Buddie Booster Pump
housing. After 18 seconds, the valve will force the water to
pass through the flow restrictor and build pressure against
the Membrane.
• After flushing, Filtered Water production will begin.
Low Pressure Switch:
• The Low Pressure Switch will disconnect power if the
Source Water pressure is between 4.35 and 7.25 PSI.
• Shutting off the source water when the pressure is low
will prolong the life of the Pressure Pump.
High Pressure Switch:
• The High Pressure Switch will disconnect power
if the Filtered Water supply line pressure is between
33.35 and 36.25 PSI.
• Many RO unit installations connect to storage containers
that use float valves or pressure canisters that create pressure
on the Filtered water line. When the containers are full, back
pressure on the Filtered Water line is created.
• The Smart Buddie Booster Pump unit will disconnect
power to the Pressure Pump and prevent water flow to
the Membrane.
Pressure Pump:
• The Pressure Pump increases incoming water pressure
to 80 - 100 PSI.
• This higher pressure increases the effectiveness of
the RO unit.
• The Pressure Pump is low voltage and is powered by
the included transformer.
THINGS TO KNOW
General:
• The Smart Buddie™ Booster Pump has
three sets of connections, one set for the
Supply Water, one set for the Waste/Flush
Water and one set for the Filtered Water.
• The water will flow in through the top row
and out through the bottom row.
• The connections on the Smart Buddie
Booster Pump are “Double Press
Connections”. When connecting ¼” tubing,
you will feel the tubing stop twice before
it is fully inserted.
• To avoid putting pressure on the pre-filters,
the Smart Buddie Booster Pump should be
installed between the final pre-filter
(usually the Carbon) and the Membrane.
• Before setting up the Smart Buddie Booster
Pump, ensure that the power cord is not
plugged into an electrical outlet.
Smart Buddie™ Instruction Guide
Smart Buddie™
BOOSTER PUMP
50 to 100 GPD RO Systems
IMPORTANT: Remove the flow restrictor on
the RO unit itself and use the flow restrictor
built into the Smart Buddie.
WARRANTY
Aquatic Life warrants that this Booster Pump shall be free from defective electrical components and leaks or cracks due to defects in materials or workmanship for a period of twelve (12) months
from the date of purchase. If a defect is shown, Aquatic Life will, at Aquatic Life’s sole discretion, either repair or replace the product without charge. No cash refunds will be made. This warranty is
provided solely to the original consumer purchaser of the product and may not be transferred or assigned.
This warranty does not apply to damage resulting from accident, misuse, abuse, lack of reasonable care, failure to follow safety and installation instructions. This warranty will not be effective
unless and until the Aquatic Life product is shown to have been used in accordance with the safety and installation instructions accompanying the product.
THIS CONSTITUTES AQUATIC LIFE’S ENTIRE WARRANTY AND AQUATIC LIFE MAKES NO OTHER WARRANTIES, WHETHER EXPRESS OR IMPLIED, WITH RESPECT TO THE
PRODUCT. AQUATIC LIFE SPECIFICALLY DISCLAIMS ANY AND ALL IMPLIED WARRANTIES, INCLUDING, WITHOUT LIMITATION, WARRANTIES OF MERCHANTABILITY AND FITNESS
FOR A PARTICULAR PURPOSE. IF AQUATIC LIFE CANNOT LAWFULLY DISCLAIM IMPLIED WARRANTIES UNDER THIS LIMITED WARRANTY, ALL SUCH WARRANTIES, INCLUDING
WARRANTIES OF MERCHANTABILITY AND FITNESS FOR A PARTICULAR PURPOSE ARE LIMITED IN DURATION TO THE DURATION OF THIS WARRANTY.
AQUATIC LIFE IS NOT RESPONSIBLE FOR DIRECT, SPECIAL, INCIDENTAL OR CONSEQUENTIAL DAMAGES RESULTING FROM ANY BREACH OF WARRANTY OR CONDITION,
OR UNDER ANY OTHER LEGAL THEORY. AQUATIC LIFE EXPRESSLY DISCLAIMS ALL ALLEGED DAMAGES FOR LOSS OF MARINE LIFE, PERSONAL INJURY, AND/OR PROPERTY
DAMAGE.
Some states and provinces do not allow the exclusion or limitation of incidental or consequential damages or exclusions or limitations on the duration of implied warranties or conditions,
so the above limitations or exclusions may not apply to you. This warranty gives you specific legal rights, and you may also have other rights that vary by state or province.
Aquatic Life shall not have any obligations under this warranty unless the owner notifies Aquatic Life in writing of any alleged defect(s) within 30 days of discovery of the defect(s).
Any notice to Aquatic Life must be delivered by United States or electronic mail to the following address: U.S. Mail: Aquatic Life, 2416 W. Victory Blvd, #136, Burbank, CA 91506 or electronic mail:
customersupport@aquaticlife.com. Aquatic Life shall be allowed a reasonable period of time to investigate any warranty claim and to perform any testing Aquatic Life deems necessary to
determine the cause of the defect. This warranty shall be interpreted under the laws of the State of California.
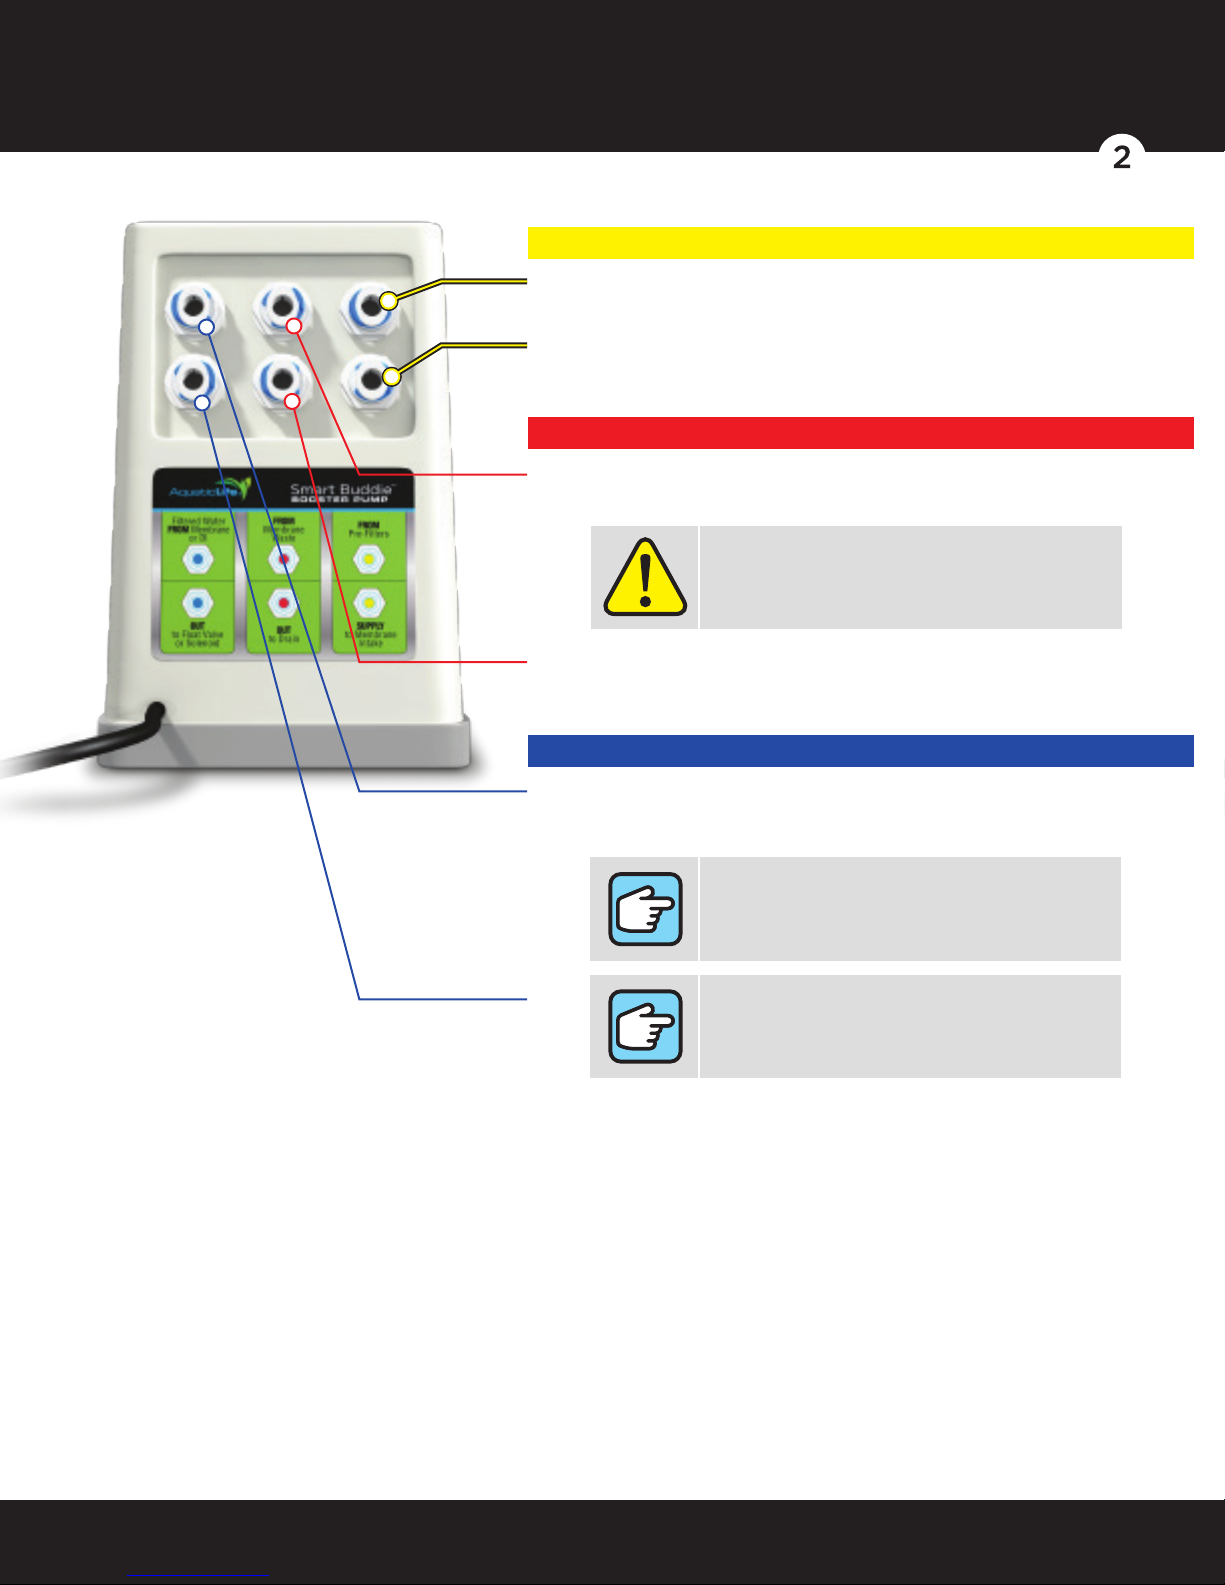
HOSE CONNECTION
Supply Water Connection
➊ Insert yellow supply ¼" tubing from final pre-filter
(usually the Carbon) into the top right connection.
➋ Insert yellow supply ¼" tubing from the bottom right
connection into the supply side of the membrane housing.
Waste/Flush Water Connection
➌ Insert red waste ¼" tubing from the waste water outlet of
your membrane housing to the top center connection.
➍ Insert red waste ¼" tubing from the bottom center connection
to the drain or waste water collection container.
Filtered Water Connection
➎ Insert blue filtered water ¼" tubing from the filtered water
outlet of the membrane or DI cartridge into the top left
connection.
➏ Insert blue filtered water ¼" tubing from the bottom connection
to the collection container.
Smart Buddie™ Instruction Guide
12-2015
IMPORTANT: Remove the flow restrictor on
the RO unit itself and use the flow restrictor
built into the Smart Buddie.
NOTE: If you are using a post deionization cartridge on
the system verify that it can handle the required PSI
needed to activate the high pressure switch.
NOTE: A check valve should be located between where
the filtered water exits the membrane housing and
where the tubing connects to the Smart Buddie Booster
Pump “Filtered Water FROM Membrane or DI”.

Popular Water Pump manuals by other brands

Graco Husky 716 series Instructions-parts list

Graco

Graco Husky 716 series Instructions-parts list

Ingersoll-Rand ARO 66266 Series Operator's manual

Ingersoll-Rand

Ingersoll-Rand ARO 66266 Series Operator's manual

AMT 3100-99 Specifications information and repair parts manual

AMT

AMT 3100-99 Specifications information and repair parts manual

Hypertherm HyPrecision 50S Operator's manual

Hypertherm

Hypertherm HyPrecision 50S Operator's manual

STA-RITE INTELLIPRO 2 VST Installation and user guide

STA-RITE

STA-RITE INTELLIPRO 2 VST Installation and user guide

Nibe VVM 225 Service instruction

Nibe

Nibe VVM 225 Service instruction

DROPSA PoliPUMP eco User Operating and Maintenance Manual

DROPSA

DROPSA PoliPUMP eco User Operating and Maintenance Manual

Lincoln FlowMaster A Series instruction manual

Lincoln

Lincoln FlowMaster A Series instruction manual

Graco LubePro H1900 instructions

Graco

Graco LubePro H1900 instructions

Veeder-Root Maxxum Big-Flo 6 Installation, Operation And Service

Veeder-Root

Veeder-Root Maxxum Big-Flo 6 Installation, Operation And Service

DAB Evosta2 11/139 SAN V Instruction for installation and maintenance

DAB

DAB Evosta2 11/139 SAN V Instruction for installation and maintenance

GEV GPM 308 Mounting and operating instructions

GEV

GEV GPM 308 Mounting and operating instructions

Aussie Pumps Scud Series Operator's instruction manual

Aussie Pumps

Aussie Pumps Scud Series Operator's instruction manual

Interpump 71 Series Instructions for use and maintenance

Interpump

Interpump 71 Series Instructions for use and maintenance

AL-KO JET F 1300 Instructions for use

AL-KO

AL-KO JET F 1300 Instructions for use

Liberty Pumps 240 Series installation manual

Liberty Pumps

Liberty Pumps 240 Series installation manual

Gardena 8200 Operator's manual

Gardena

Gardena 8200 Operator's manual

AMT Pumps 3150 Specifications information and repair parts manual

AMT Pumps

AMT Pumps 3150 Specifications information and repair parts manual

manuals.online logo
manuals.online logoBrands
  • About & Mission
  • Contact us
  • Privacy Policy
  • Terms and Conditions

Copyright 2025 Manuals.Online. All Rights Reserved.