Aquavibe SP3 User manual

Operation /Installation Manual
Bluetooth AM/FM Waterproof
Entertainment Center
SP3
MUTE
APS
FM/AM
MODE
VOL VOL
1
2 3 4 5 6
ALARM
CLOCK
DIMMER
SET
MENU

2
Please take the time to read all of the information in this manual. Familiarity with operation and installation
procedures will help you obtain the best possible performance from your new Entertainment Center.
WARNING!
• FCC REGULATIONS STATE THAT ANY UNAUTHORIZED CHANGES OR MODIFICATIONS
TO THIS EQUIPMENT MAY VOID THE USER’S AUTHORITY TO OPERATE IT.
• THIS DEVICE IS INTENDED FOR CONTINUOUS OPERATION.
• TO REDUCE THE RISK OF FIRE OR ELECTRIC SHOCK AND ANNOYING
INTERFERENCE, USE ONLY THE RECOMMENDED ACCESSORIES.
Introduction
Index
Button Locations and Functions ..................................................... 3-4
Remote Control Button Locations and Functions ........................................ 5
General Operation ................................................................ 6
Sound Controls .................................................................. 7-8
Clock and Alarm Operations ........................................................ 9
Radio Operations ................................................................. 10-11
External AUX Rear Audio Input ...................................................... 11
Bluetooth Operations .............................................................. 12
Installation ...................................................................... 13
Wiring ......................................................................... 14

3
Button Locations and Functions
1. Power and Mute Button:
Power Button: Press to turn the entertainment
center on. Press and hold the button for
3 seconds to turn the unit off.
Mute Button: Press to mute sound.
Press again to restore.
2. Bluetooth and APS Button:
Bluetooth Selection Button: Press to choose
Bluetooth input mode. Bluetooth device must be
paired before use.
APS Button: Press and hold for radio
Automatic Preset Scan and Storage.
3. Mode Button and Alarm Button:
Mode Button: Press to toggle between RADIO,
BT AUDIO (Bluetooth) and AUX.
Alarm Button: Press and hold to enter set
Alarm mode. (See Setting the Alarm section
for details).
4.
FM/AM Radio Selection:
Press to choose Radio mode. Sequential
presses will select radio bands: FM1, FM2,
FM3, AM1 and AM2.
Note: When playing another source such
as BT or AUX press this button to return to
Radio mode.
5. Radio Station Recall Buttons (1-3):
Press and release to recall preset radio
stations. Press and hold to memorize a
selected station as a numbered preset.
BT mode (available functions are dependent
upon the specific Bluetooth audio device and
the audio application):
: Press to pause track, press again
to resume.
:Press to Repeat One, press again to
Repeat All, press again to turn Repeat Off.
:Press to Random Shuffle the playback.
6. Clock and Dimmer Button:
DIMMER Button: Short press to toggle
between LED High, LED Mid and LED Low
.
CLOCK Button: Press and hold to enter set
clock mode
. (See Setting the Clock
section for details).
7. Radio Station Recall Buttons (4-6):
Press and release to recall preset radio
stations. Press and hold to memorize a
selected station as a numbered preset.
8. Volume Down Button:
Press to decrease volume level.
Also use for selection down through
adjustments within the SET/MENU options:
sound controls, display, area location,
speaker selection and alarm.
9. Volume Up Button:
Press
VOL
to increase volume level.
Also use for selection up through adjustments
within the SET/MENU options: sound controls,
display, area location, speaker selection
and alarm.
10. Seek Down Button :
Radio Mode: Short press to automatically
seek for next lower tunable frequency.
Press and hold to move into manual
tuning mode.
Bluetooth Mode: Press to search for the
beginning of the previous track.
MUTE
APS
FM/AM
MODE
VOL VOL
1
2 3 4 5 6
ALARM
CLOCK
DIMMER
SET
MENU
7
1 2
3
8
10
5
12
13
4
6
9
11

4
11. Seek Up Button :
Radio Mode: Short press to automatically seek
for next higher tunable frequency. Press and
hold to move into manual tuning mode.
Bluetooth Mode: Press to search for the
beginning of the next track.
12. SET / MENU Button:
Short press to enter and then short presses
to toggle between sound adjustments: Bass,
Treble, Balance, Fader then DSP: Pop/Rock/
Classic, Boost On/Off and then back to
Volume. Use the
VOL
or
VOL
to
make adjustments.
Press and hold to enter 2nd menu and then
short press to toggle between AREA USA1/
AREA USA2/AREA EUR, Speaker A & B
Selection, Stereo / Mono and Alarm On/
Off. Use the
VOL
or
VOL
to make
adjustments.
See desired feature adjustment selection for
operation details.
13. Reset Button:
To reset the unit to its factory settings use a
pointed object like a ball point pen to press the
RESET button.
Button Locations and Functions (Continued)

5
Optional Remote Controls – Button Locations and Functions
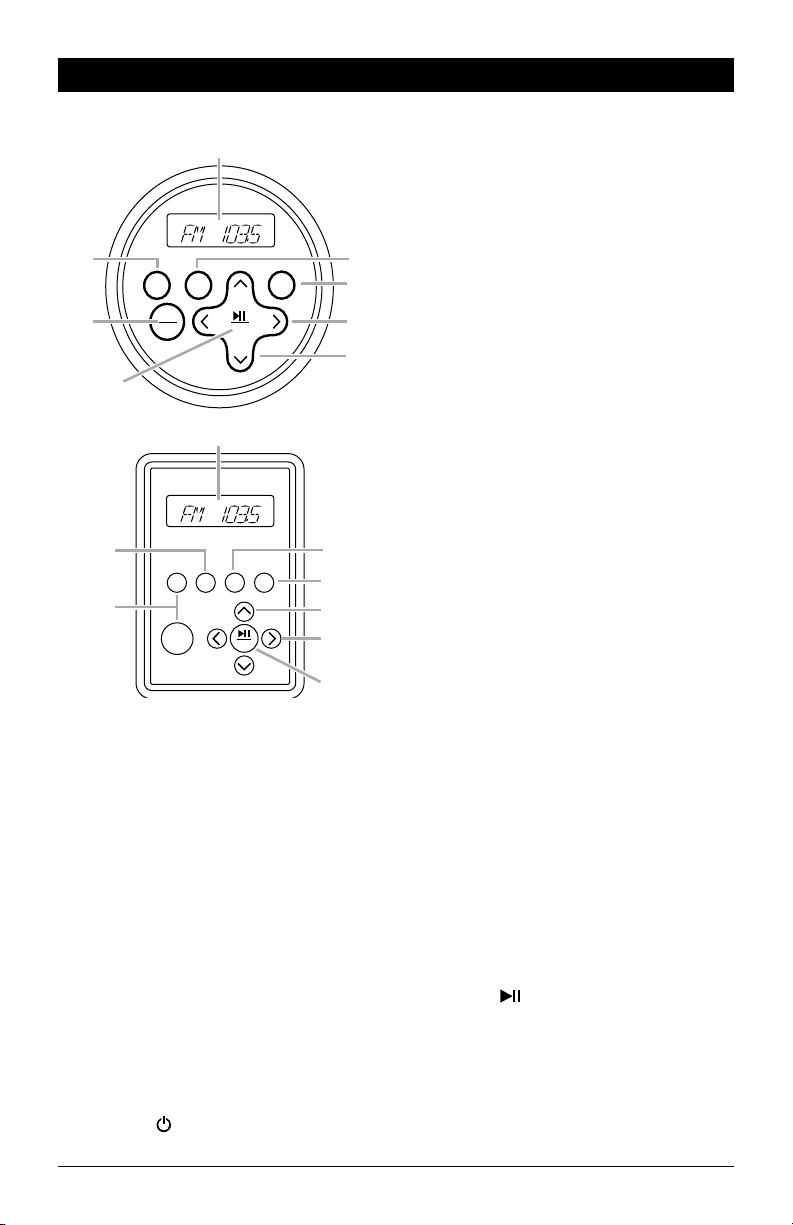
1.
Display Area: This area displays mode
information, in the radio mode the radio
frequency is dis
played.
2. BAND Button: Press to select down through
radio presets and for random playback in
Bluetooth mode.
3. Power and Mode Buttons:
Wired Remote Controller’s Power Button:
Press to turn the entertainment center on.
Press and hold the button for 2 seconds to
turn the unit off.
Wireless Remote Controller’s Power Button:
Press to turn on the entertainment center
on. Press again to turn the unit off.
Mode Button: Press to select between input
sources:
Radio: FM tuner.
AUX: Rear RCA connectors.
Bluetooth: Wireless connectivity.
4.
P-SETS Button:
Press to select up through
radio presets and for repeat controls in
Bluetooth mode.
5.
Select Button:
Short press to enter and then
short presses to toggle between sound adjust-
ments: Balance, Fader, DSP: Pop/Rock/Classic,
Boost On/Off and then back to Volume.
Press and hold to enter 2nd menu and then
short presses to toggle between Area USA1/
AREA USA2/AREA EUR, Speaker A & B
Selection, Stereo / Mono and Alarm On / Off.
6.
Volume: Press to increase or decrease the
volume level. Use up and down volume
buttons to adjust to desired settings within
Select Button modes.
7. Track Buttons:
Radio Mode: Press for automatic seek up or
down for radio stations. Press and hold to
activate manual tuning.
Bluetooth Mode: Press to select the next or
previous tracks.
AUX Mode: Track selection controlled from
connected device, not the SP3.
8. Play/Pause / MUTE Button:
Radio Mode: Press to mute audio. Press
and hold for radio Automatic Preset Scan
and Storage.
Bluetooth Mode: Press to pause play back.
Press again to resume play.
AUX Mode: Play functions controlled from
connected device, not the SP3.
Wired Remote
Controller
Go to www.magnadynestore.com to purchase the
optional remote controllers for the SP3.
Wireless Remote
Controller
Pairing the Wireless Remote Controller:
1. To pair the wireless remote with the SP3 push
and hold the MODE button on the remote
controller until “PAIR” appears in it’s display.
2. While still holding the MODE button on the
wireless remote controller, press the RESET
button on the front of the SP3 to pair the
devices.
3. If pairing is successful, the SP3 will restart
and “PAIR” will disappear from the remote’s
display. Release the MODE button on the
remote controller.
Note 1: The wireless remote controller’s display
will disappear after approximately 30 seconds of
no button activity to conserve it’s battery. Press
any button on the remote controller and the LCD
display will be restored.
Note 2: When the main unit is turned off, the
wireless remote controller’s display will disappear
to conserve it’s battery. Press any button on the
remote controller to restore the remote’s display.
Then press the
button to turn on the entertain-
ment center.
P-SETS SEL
MUTE
1
2
3
4
5
7
6
8
BAND
P-SETS
MUTE
PWR
MODE
BAND SEL
PWR
MODE
1
2
3
4
5
6
7
8
Table of contents