manuals.online logo
Brands
  1. Home
  2. •
  3. Brands
  4. •
  5. Samsung
  6. •
  7. Home Theater System
  8. •
  9. Samsung HT-EM35 User manual

Samsung HT-EM35 User manual

dOHBu dayTMk_..) ,
.........................:','tf¢,,.4_!s:'_,
the possibilities
Thankyoufor purchasingthisSamsungproduct
Toreceivemoreconlpleteservice,
pleaseregisteryour productat
www.samsung.comiregister
TO REDUCE THE RISK OF ELECTRIC SHOCK, DO NOT REMOVE THE COVER (OR BACK).
NO USER-SERVICEABLE PARTSARE INSIDE,REFER SERVICINGTO QUALIFIEDSERVICEPERSONNEL.
The lightingflash andArrowhead
within thetriangle is awarning sign
alertingyou of dangerousvoltage
inside theproduct.
CAUTION
CAUTION:TOREDUCETHERISKOFELECTRIC
SHOCK,DONOTREMOVECOVER(ORBACK)
NOUSERSERVICEABLEPARTSINSIDE.REFER
SERVICINGTOQUALIFIEDSERVICEPERSONNEL.
Theexplanationpointwithinthe triangle
is awarningsignalertingyou of important
instructionsaccompanyingthe product.
WARNING CLASS 1 LASER PRODUCT
• To reduce the risk of fire or electric shock, do
not expose this appliance to rainor rnoisture.
FCC NOTE (for U.S.A)
This equipment has been tested and found to
comply with the limits for a Class B digital device,
pursuant to Part 15 of the FCC rules, These lirnits
are designed to provide reasonable protection
against harrnful interference in a residential
installation, This equipment generates, uses
and can radiate radio frequency energy and, if
not installed and used in accordance with the
instructions, may cause harmful interference
to radio or television reception, which can be
deterrnined by turning the equiprnent off and on.
The userisencouragedto tryto correct the
interferenceby oneor moreof the followingmeasures
• Reorient or relocate the receiving antenna.
• Increase the separation between the equiprnent
and receiver.
• Connect this equiprnent into an outlet on a
circuit different frorn that to which the receiver is
connected,
• Consult the dealer or an experienced radio/TV
technician for help.
• This class B digital product meets all
requirernents of the Canadian Interference -
Causing Equipment Regulations.
This Compact Disc player is classified as a CLASS
1 LASER product. Use of controls, adjustments
or performance of procedures other than those
specified herein may result in hazardous radiation
exposure,
Cornplies with 21CFR 1040.10 except for
deviations pursuant to Laser Notice No. 50, dated
June 24, 2007.
DANGER :
• VISIBLE AND INVISIBLE LASER RADIATION
WHEN OPEN. AVOID DIRECT EXPOSURE TO
BEAM. (FDA 21 CFR)
CAUTION :
• CLASS 3B VISIBLE AND INVISIBLE LASER
RADIATION WHEN OPEN, AVOID EXPOSURE
TO THE BEAM (IEC60825-1)
• THIS PRODUCT UTILIZESA LASER,
USE OF CONTROLS OR ADJUSTMENTS
OR PERFORMANCE OF PROCEDURES
OTHER THAN THOSE SPECIFIED HEREIN
MAY RESULT IN HAZARDOUS RADIATION
EXPOSURE. DO NOT OPEN COVERAND DO
NOT REPAIRYOURSELR REFERSERVICING
TO QUALIFIED PERSONNEL,
2 English
ImportantSafetyInstructions
Readtheseoperatinginstructionscarefullybefore
usingtheunit,Followallthesafetyinstructions
listedbelow.
Keeptheseoperatinginstructionshandyforfuture
reference.
1. Readtheseinstructions.
2. Keeptheseinstructions.
3. Heedallwarnings.
4. Followallinstructions.
5. Donotusethisapparatusnearwater.
6 Cleanonlywithadrycloth,
7 Donotblockanyventilationopenings.Install
inaccordancewiththemanufacturer's
instructions.
8 Donotinstallnearanyheatsourcessuch
asradiators,heatregisters,stoves,orother
apparatus(includingAVreceivers)that
produceheat.
9 Donotdefeatthesafetypurposeofthe
polarizedorgrounding-typeplug.Apolarized
plughastwobladeswithonewiderthanthe
other.Agroundingtypeplughastwoblades
andathirdgroundingprong,Thewideblade
orthethirdprongareprovidedforyoursafety,
Iftheprovidedplugdoesnotfitintoyour
outlet,consultanelectricianforreplacement
oftheobsoleteoutlet,
10.Protectthepowercordfrombeingwalkedon
orpinchedparticularlyatplugs,convenience
receptacles,andthepointwhereitexitsthe
apparatus,
11.Only use attachments/accessories specified
by the manufacturer.
12. Use only with the cart, stand, tripod, bracket,
or table specified by the
manufacturer, or sold with
the apparatus, When a cart
is used, use caution when
moving the cart/apparatus
combination to avoid injury
from tip-over.
13. Unplug this apparatus during lightning storms
or when unused for long periods of tirne.
14. Refer all servicing to qualified service
personnel. Servicing is required when the
apparatus has been damaged in any way,
such as when the power-supply cord or plug
is damaged, liquid has been spilled or objects
have fallen into the apparatus, the apparatus
has been exposed to rain or rnoisture, does
not operate norrnally, or has been dropped,
. Holding Discs
- Fingerprints or scratches on
a disc may reduce sound and
picture quality or cause skipping,
- Avoid touching the surface of a disc where
data has been recorded.
- Hold the disc by the edges so that fingerprints
will not get on the surface.
- Do not stick paper or tape on the disc.
o Cleaning Discs
- Ifyou get fingerprints or dirt on a J,
disc, clean it with a rnild detergent
diluted in water and wipe with a
soft cloth.
- When cleaning, wipe gently from the inside to
the outside of the disc.
- Disc Storage
, Do not keep in direct sunlight.
, Keep in a cool ventilated area,
, Keep in a clean protection jacket and store
vertically,
. Do not expose this apparatus to dripping or
splashing, Do not put objects filled with liquids,
such as vases, on the apparatus.
. To turn this apparatus off completely, you must
pull the power plug out of the wall socket,
Consequently, the power plug rnust be easily
and readily accessible at all tirnes.
. Do not touch the power plug with a wet hand.
Itcan cause an electric shock.
. Do not plug rnultiple electric devices into the
same wall socket. Ovedrloading a socket can
cause it to overheat, resulting in a fire.
o
O3
5"
6"
English 3
• Maintenance of the Cabinet
- Before connecting other components to this
product, be sure to turn them off.
- Ifyou rnove your product suddenly from a
cold place to awarrn place, condensation
rnayoccur on the operating parts and lens
and cause abnorrnal disc playback. Ifthis
occurs, unplug the product, wait for two
hours, and then connect the plug to the
power outlet. Then, insert the disc, and try to
play back again.
• Ifthe product rnakes an abnormal noise or
produces a burning srnell or srnoke, turn off
the power switch imrnediately and disconnect
the power plug frorn the wall outlet. Then,
contact the nearest custorner service center for
technical assistance, Do not use the product.
Using the product as itis may cause a fire or an
electric shock.
• To turn this apparatus off cornpletely, you rnust
pull the power plug out of the wall socket.
Consequently, the power plug must be easily
and readily accessible at all times.
I'Ti DOLBY
"rRu_ 1
DiGiTAL PLUS 1
• Dolby and the double-D symbol are registered
tradernarks of Dolby Laboratories.
MasterAudioIEssential
• Manufactured under license under U.S. Patent
Nos: 5,956,674; 5,974,380; 6,226,616;
6,487,535; 7,392,195; 7,272,567; 7,333,929;
7,212,872 & other U.S. and worldwide patents
issued & pending. DTS-HD, the Symbol, & DTS-
HD and the Syrnbol together are registered
tradernarks& DTS-HD Master Audio IEssential
is atradernark of DTS, Inc. Product includes
software. @ DTS, Inc. All Rights Reserved.
i..l m|
•The terrns HDMI and HDMI High-Definition
Multirnedia Interface, and the HDMI Logo are
tradernarks or registered trademarks of HDMI
Licensing LLC in the United States and other
countries.
4, English
Java,_
POWERED
,, Oracle and Java are registered tradernarks of
Oracle and/or its affiliates. Other narnes rnay be
tradernarks of their respective owners.
• This item incorporates copy protection
technology that is protected by U,S. patents
and other intellectual property rights of
Rovi Corporation. Reverse engineering and
disassernbly are prohibited.
,, Blu-ray DiscTM, Blu-ray TM, and the Iogos are
tradernarks of Blu-ray Disc Association.
• This product usesCinavia technology to limit the
use of unauthorized copies of sorne cornmercially-
produced film and videos andtheir soundtracks.
When a prohibited use of an unauthorized copy
is detected, a rnessage willbe displayed and
playback or copying will be interrupted.
More information about Cinaviatechnology
is provided at the Cinavia Online Consurner
Information Center at http://www,cinavia.corn. To
request additional inforrnation about Cinavia by
mail,send a postcard with your mailing address
to: Cinavia Consurner Information Center, RO,
Box 86851, San Diego, CA, 92138, USA."
This product incorporates proprietary technology
under license from Verance Corporation and is
protected by U.S. Patent 7,369,677 and other
U.S. and worldwide patents issued and pending
as well as copyright and trade secret protection
for certain aspects of such technology, Cinavia
is a tradernark of Verance Corporation.
Copyright 2004-2010 Verance Corporation, All
rights reserved by Verance, Reverse engineering
or disassembly is prohibited.
• Open Source License Notice
- In the case of using open source software,
Open Source Licenses are available on the
product rnenu.
@2012 Samsung Electronics Co.,Ltd.
All rights reserved; No part or whole of this user's
rnanual rnay be reproduced or copied without the
prior written perrnission of Sarnsung Electronics
Co.,Ltd.
I
ItT Elkf35_ZA_n227.indd 4 2012 02 27 _._] 10:52:54
/
iii[iiiii!iiii!lliii!iiii:i ii ii!llii!llii!lli!
2 Warning
3 Precautions
3 Disc Storage & Management
3 Handling Cautions
4 License
4 Copyright
18 The Initial Settings Procedure
19 The Home Screen
20 Accessing the Settings Screen
21 Settings Menu Functions
25 Networks and the Internet
26 Upgrading Software
28 Setting Up AIIShare
6 Disk and Format Compatibility
7 Logos of Discs the product can play
10 Accessories
11 Front Panel
11 Rear Panel
12 Remote Control
13 Connecting the Speakers
13 Speaker Cornponents
14 Connecting The Speakers
15 Connecting to a iV
15 Method 1 Connecting to a TV
with an HDMI Cable - Best Quality
(Recommended)
15 Method 2 Connecting to a TV with a
Video Cable - Good Quality
15 Attaching the Toroidal Ferrite Core to the
Power Cord of the Main Unit
16 Connecting to External Devices
16 Method 1 AUX IN : Connecting an
External Analog Component
16 Method 2 OPTICAL : Connecting an
External Digital Audio Component
17 Connecting the FM Antenna
17 Connecting to a Network Router
29 Using the Streaming Media Services
29 Playing Files on a USB Device
30 Playing a Disc with User Recorded
Content
30 Playing a Commercial Video Disc
30 Playing a Pre-Recorded Commercial
Audio Disc
31 Controlling Video Playback
32 Controlling Music Playback
33 Controlling Photo Playback
34 Listening to Radio
34 Using the Special Effects Remote Control
Buttons
35 Using BD-UVE TM
35 Using AIIShare
36 Additional Information
41 Troubleshooting
44 Specifications
English 5
I
liT I_lkf35_ZA_022?.indd 5 2012 02 27 2.,_! lo:D3:oe
/
Disc types and contents your product can play
Blu-rayDisc BD--ROMor BD-RE/-RdiscrecordedintheBD--REformat.
VIDEO DVD--VIDEO,DVD--RW, DVD--VIDEO,recordedDVD+RW/DVD-RW(V)/DVDR/+Rdiscsthathave
DVD-R,DVD+RW, beenrecordedandfinalized,or aUSBstoragemediacontainingMKV,MP4
DVD+R contents.
CD-RW/-R,DVD-RW/-R, MusicrecordedonCD-RW/-R,DVD-RW/-R,BD-RE/-RdiscsoraUSBstorage
MUSIC BD-RE/-R mediacontainingMP3orWMAcontents.
CD-RW/-R,DVD-RW/-R, PhotosrecordedonCD-RW/-R,DVD-RW/-R,BD-RE/-Rdiscsora USBstorage
PHOTO BD-RE/-R mediacontainingJPEGcontents.
INOTE I
_, TheproductmaynotplaycertainCD--RW/--RandDVD-Rbecauseofthedisctypeor recordingconditions.
_, Ifa DVD-RW/-RdischasnotbeenrecordedproperlyinDVDvideoformat,it willnotbe playable.
_, YourproductwillnotplaycontentthathasbeenrecordedonaDVD--Ratabitratethatexceeds10Mbps.
_, YourproductwillnotplaycontentthathasbeenrecordedonaBD-RorUSBdeviceatabitratethatexceeds30Mbps,
_, Playbackmaynotworkforsometypesofdiscs,orwhenyouusespecificoperations,suchasanglechangeandaspectratio
adjustment.Informationaboutthe discsiswrittenindetailon thediscbox,Pleasereferto thisif necessary.
_, Whenyouplaya BD-Jtitle,loadingmaytakelongerthananormaltitleorsomefunctionsmayperformslowly,
Disc types your product cannot play
,, HD DVD o DVD-RAM ,, DVD-RW(VR mode) o 3.9 GB DVD-R Disc
,, DVD-ROM/PD/MV- . Super Audio CD ,, CVD/CD-ROM/CDV/ for Authoring.
Disc, etc (except CD layer) CD-G/CD-I/LD
(CD-Gs play audio
only, not graphics.)
INOTEI
_, ThisproductmaynotrespondtoalloperatingcommandsbecausesomeBlu--rayDisc,DVD,andCDdiscsallowspecificor
limitedoperationandprovideonlycertainfeaturesduringplayback.
Pleasenotethatthisisnotadefectintheproduct.
_, Samsungcannotguaranteethatthisproductwill playeverydiscbearingtheBlumayDisc,DVDor CDlogobecausedisc
formatsevolve,andproblemsanderrorsmayoccurduringthecreationofBlu-rayDisc,DVD,andCDsoftwareand/orthe
manufactureofdiscs,
_, PleasecontacttheSAMSUNGCustomerCareCenterat 1-800-726-7864if youhavequestionsorencounterdifficultywhen
playingBlu-rayDisc,DVD,orCDdiscsinthisproduct.Also,refertorestofthisusermanualfor additionalinformationon
playbackrestrictions.
_, SomecommercialdiscsandDVDdiscspurchasedoutsideyourregionmaynotplayonthisproduct.
6 English
I
liT ElkI35 ZA 0227.indd 6 2012 02 27 _._] lo:Da:04
/
Region Code ...............................................................
Blu-ray players and discs are coded by region.
These regional codes must match for a disc to
play, Ifthe codes do not match, the disc will not
play,
The Region Number for this product is displayed
on the rear panel of the product.
NorthAmerica,CentralAmerica,
SouthAmedca,Korea,Japan,
Taiwan,HongKongandSouth
EastAsia.
Blu-ray Disc ......
h,,.,I
I...... I
DVD-VIDEO
I NOTEI
Europe,Greenland,French
territories,MiddleEast,Africa,
AustraliaandNewZealand,
india,China,Russia,Centraland
SouthAsia.
TheU.S.U.S.territoriesand
Canada
Europe,Japan,theMiddleEast,
Egypt,SouthAfrica,Greenland
Taiwan,Korea,thePhilippines,
indonesia,HongKong
Mexico,SouthAmerica,
CentralAmerica,Australia,
NewZealand,Pacificislands,
Caribbean
Russia,EasternEurope,india,
mostofAfrica,NorthKorea,
Mongolia
China
_, IftheRegionnumberofa Blu-rayDisc/DVDsdoesnot
correspondtotheRegionnumberof thisproduct,the
productcannotplaythedisc,
Supported Formats
Music File Support
*.rap3 MP3 MP3
*.wma WMA WMA
*Samplingrates(in
kHz)-8,11,16,
22,32,44.1,48
*Bitrates--Aii
bitratesfrom
5kbpsto384kbps
o
Po
o
O.
English 7
I
liT Elkf35_ZA_022?.indd 7 2012 02 27 2._] 10:D3:06
/
Video Fib Support
*.avi
*.mkv
*.wmv
*,mp4
*,mpg
*,mpeg
AVI
MKV
WMV(wmv9)
MP4
PS
MP4v3
H,264BP/MP/HP
VC-1AP
H,264BP/MP/HP
VC-1AP
VC4 SM
MP4(mp4v)
H.264BP/MP/HP
MPEG1
MPEG2
H,264BP/MP/HP
MP3
DolbyDigital
DTS
WMA
PCM
MP3
DolbyDigital
DTS
WMA
AAC
MP1,2
DolbyDigital
DTS
1920xl080
1920xl080
1920xl080
1920xl080
1920xl080
1920xl080
1920xl080
1920xl080
1920xl080
1920xl080
1920x1080
! Limitations
- Evenwhen the file is encoded by a supported codec mentioned above, a file might not be played if its
content has a problern.
- Normal playback is not guaranteed if the file's container information is wrong or the file itself is
corrupted.
- Fileshaving a higher bit rate or frarne rate than standard may stutter during sound/video playback.
- The Seek (skip) function is not available ifthe file's index table is darnaged.
Video decoder
- Supports up to H.264 Level 4.1 and AVCHD
- Does not support H.264 FMO/ASO/RS and VC1 SP/MP/AP L4
- MPEG4 SP,ASP :
Below 1280 x 720 :60 frarnes max
Above 1280 x 720 : 30 frarnes rnax
- Does not support GMC 2 or higher
Audio decoder
- Supports WMA 7, 8, 9 and STD
- Does not support WMA sarnpling rate of 22050Hz rnono.
8 English
I
liT Elk[35 ZA 0227.indd 8 2012 02 27 2. x] 10:53:17
/
Notes on the USB connection
, Your product supports USB storage media,
MP3 players, digital cameras, and USB card
readers.
• The product does not support folder or file
names longer than 128 characters,
, Some USB/External HDD/digital camera devices
may not be compatible with the product.
, Your product supports the FAT16, FAT32, and
NTFS files systems.
, Connect USB devices directly to the product's
USB port. Connecting through a USB cable
may cause compatibility problerns.
, Inserting more than one memory device into
a multi-card reader may cause the reader to
operate improperly.
, The product does not support the PTP protocol.
, Do not disconnect a USB device during a
"loading" process.
, The bigger the image resolution, the longer the
image takes to display,
, This product cannot play MP3 files with DRM
(Digital Rights Management) downloaded from
commercial sites.
, Your product only supports video that is under
30fps (frame rate).
, You must remove the USB storage device safely
(by performing the "Safely Remove USB"
function) to prevent possible damage to the
USB memory.
Press the HOME button to move to the home
menu, press the YELLOW (O)button, and then
press the _ button.
, SAMSUNG is not responsible for any data file
damage or data loss.
AVCHD
(Advanced Video Codec High Definition)
, This product can play back AVCHD format
discs. These discs are normally recorded and
used in camcorders.
, The AVCHD format is a high definition digital
video camera format.
, The MPEG-4 AVC/H.264 format compresses
images with greater efficiency than the
conventional image compressing format,
, Some AVCHD discs use the "x.v.Color" format.
This product can play back AVCHD discs that
use "x.v,Color" format.
, "x.v.Color" is a trademark of Sony Corporation.
, "AVCHD" andthe AVCHD logo aretrademarks
of Matsushita Electronic Industrial Co., Ltd. and
Sony Corporation.
INOTEI
SomeAVCHDformatdiscsmaynotplay,dependingon
therecordingconditions.
AVCHDformatdiscsneedtobefinalized.
"x.v.Color"offersawidercolorrangethannormalDVD
camcorderdiscs.
SomeMKVandMP4formatdiscsmaynotplay,
dependingontheirvideoresolutionandframerate.
o
b_
O.
English 9
I
2012 02 27 2.,_! 10:,53:18
ItT I_I_f'35_ZA_022 ?.indd 9 /
Check for the supplied accessories below.
ForPowercord)
_0 English
I
liT I¢lkI{_}5ZA 0227,indd 10 2012 02 27 2.,_! 10:D3:20
/
T
1
DISCTRAY
PLAY/PAUSE--] _ ENTER
STOPI IOPEN'CLOSE
FUNCTION VOLUMECONTROL
l
REMOTECONTROL
SENSOR
INOTE i
_,;b upgradetheproduct'ssoftwarethroughtheUSBHostjack,youmustuseaUSBmemorystick.
_,WhentheproductdisplaystheBlu--rayDiscmenu,youcannotstartthemoviebypressingtheD buttonontheproductor
theremote,lb playthemovie,youmustselectPlayMovieor Startinthediscmenu,andthenpressthe[] button.
COOLINGFAN A
,oo o ?
SPEAKEROUTPUT LANTERMINAL HDMIOUT
CONNECTORS
AUXIN VIDEOOUT
EXTERNALDIGITAL
AUDIOIN (OPTICAL) FMANTENNA
o
_3
d)
¢t,
INOTE i
_, Ensureaminimumof4 inchesofclearspaceonallsidesofthehometheaterto ensureadequateventilation.
Donotobstructthecoolingfanorventilationholes,
English _
I
liT I_1k[35 ZA 0227.indd 11 2012 02 27 2.¢1 10:53:27
/
Tour of the Remote Control
Turn the product on and off.
Adjust the volume.
Press numeric buttons to operate
options.
Press to view the disc menu.
Press to skip backwards or forwar
Press to play a disc.
Press to stop a disc.
Press to move to the Home
Press to use Netflix.
Press to use the Tools menu.
Select on-screen menu items and
change menu value.
Return to the
These buttons are used both for
menus on the product and also
several Blu-ray Disc functions.
Select the desired Dolby Pro Logic
audio mode.
Press to apply sound effects.
Press to select Blu-ray's mode.
To open and close the disc tray.
Cut off the sound temporarily.
Use to enter the Popup menu/
Title menu.
Pressto searchbackwardsor
forwards.
Press to pause a disc.
Press to use Pandora.
Use to display the playback
information when playing
a Blu-ray/DVD disc.
Press to exit the menu.
Select MONOor STEREOfor
radiobroadcasts.
Search for active FM stations and
to change channels.
Installing batteries in the Remote Control
_' Makesuretomatchthe"+" and"-" endsofthebatterieswiththe
diagraminsidethecompartment.
_, AssumingtypicalIV usage,thebatterieslastforaboutoneyear.
_, Theremotecontrolcanbeuseduptoapproximately23feet(7 meters)
fromtheproductin astraightline.
12 English
I
liT I_lkfa5_ZA_0227.indd 12 2e12 02 27 2.,_! 10:53:31
/
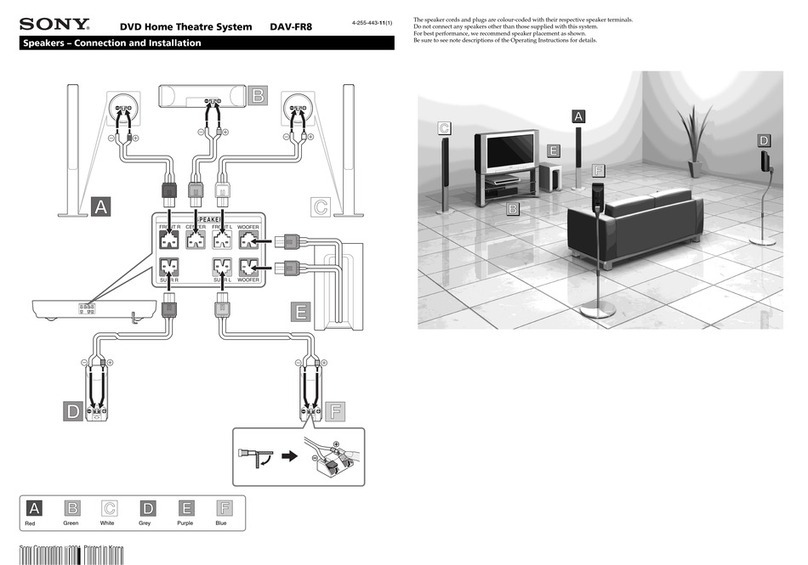
This section describes various methods of connecting the product to other external components.
Before moving or installing the product, be sure to turn off the power and disconnect the power cord,
Position of the product
Place it on a stand or cabinet shelf,
or under the TV stand,
Selecting the Listening Position
The listening position should be
located about 2.5 to 3 times the
size of the TV's screen from the TV.
For example, if you have a 46 inch
screen, locate the listening position
115 to 138 inches (9.6 to11.5 feet)
from the screen.
o
co
©
o
d)
o
o_
Place these speakers in front of your listeningposition, facing inwards (about 45°)
toward you, Placethe front speakers so that their tweeters will be at the same
height as your ear.Align thefront face of the front speakers with the front face of
the center speaker or place them slightly infront of the center speakers.
Itis best to installthe Center Speaker at the same height as the front speakers.
You can also install it directly over or under the T_,
Place these speakers to the side of your listening position, Ifthere isn't enough
room, place these speakers so they face each other. Position them about 2 to
3 feet (60 to 90cm) above your ear, facing slightly downward,
Unlike the front and center speakers, the surround speakers are used mainly
for sound effects. Sound will not come from them all the time.
The position of the subwoofer is not so critical. Place it anywhere you like.
Speaker Components
English _3
I
liT Elk[35 ZA 022?.indd 13 2012 02 27 _.q] 10:53:38
/
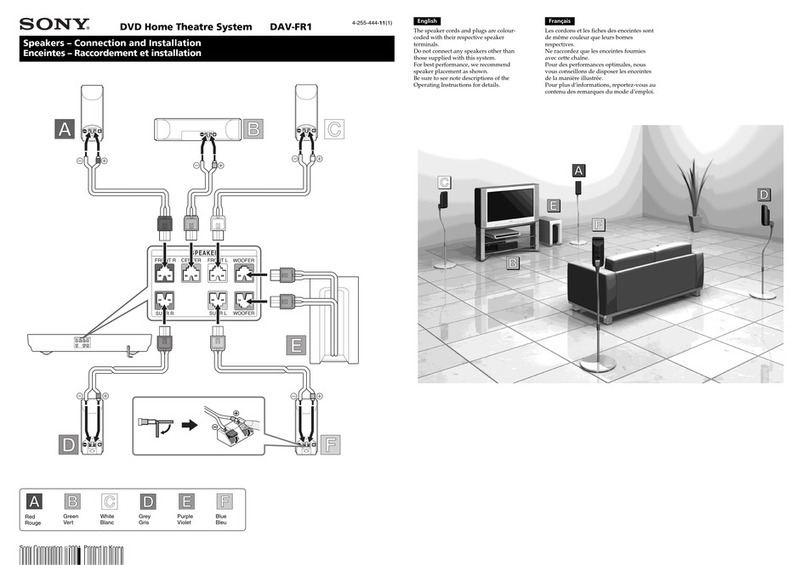
Connecting The Speakers
1. Connect the speaker wire plugs from each speaker to the back of the product by matching the
colors of the speaker plugs to the colors of the speaker jacks.
ICAUTIONI
Ifyouwanttoinstalltheproductonthewall,fastenthescrewsornailsonthewallfirmlyandusetheholesontherearofspeakertoinstall.
However,whenyouinstallit,accessories(nailsorscrews)andinstallationisnotprovidedbythecompany.
Donotletchildrenplaywithornearthespeakers.Theycouldgethurtif aspeakerfalls.
Keepthesubvvooferspeakeroutofreachofchildrentopreventchildrenfrominsertingtheirhandsoraliensubstancesintotheduct(bole)
ofthesubweoferspeaker.
Donotbangthesubwooferonthewallthroughtheduct(bole).
[NOTE[
if youplaceaspeakernearyourTVset,thescreencolormaybedistortedbecauseofthemagneticfield.
14 English
I
liT I_1k['35 ZA 0227.indd 14 2012 02 27 2.,d 10:53:47
/
Select either Method 1 or Method 2. o
co
©
o
o
Connecting to a TV with an HDMI Cable - Best Quality (Recommended)
Connect an HDMI cable (not supplied) from the HDMI OUT jack on the back of the product to the HDMI IN
jack on yourTY
Ifthe TV supports ARC, you can hear TV sound from home theater with only connect this cable.
Connect the supplied Video cable from the VIDEOOUT jack on the back of the product to the VIDEO IN
jack on yourTY
INOTEI
TheVIDEOOutjackalwaysoutputshi the480i resolutionregardlessoftheresolutionsetin theSetupmenu.
DonotconnecttheunitthroughaVCR,VideosignalsfedthroughVCRsmaybeaffectedbycopyrightprotectionsystemsand
thepicturewillbedbtortedonthetebvbion,
Ifyou attach a Toroidal ferrite core to the power
cord of the main unit, it will help to prevent RF
interference from radio signals.
1. Pullthe fixing tab of the Toroidal ferrite core
to open it.
2. Make a loop twice in the main unit power
cord.
3. AttachtheToroidalferritecoreto the mainunit
power cord as the figure showsandpressit
untilit clicks,
English 15
I
liT I¢lkfa5 ZA e227.indd 15 2e12 02 27 2.x] lO:D3:5e
/
Toselectthe correct mode for anexternaldevice, pressthe FUNCTION button. Eachtime you pressthe button,
the mode changes inthisorder :BD/DVD-_ D.IN-_ AUX-_FM
AUX IN : Connecting an External Analog Component
Using an RCA audio cable (not supplied), connect the AUDIO Injack on the product to the AUDIO Out
jack on the external analog component. =>Select the AUX mode.
• Besure to match the colors on the cable plugs to the colors on the input and output jacks.
0PT_CAC°nnec!!n anExterna!D!g!taAu! ComP°nent............................................................................................................
To connect the digital audio output of digital signal cornponents such as Cable Boxes and Satellite
Receivers (Set-Top-Boxes).
Using a digital optical cable (not supplied), connect the Optical Digital Audio Injack on the product to the
Digital Optical Out jack of the external digital device using a digital optical cable.
q_Select the D. IN mode.
INOTE I
ToseevideofromyourCableBox/Satellitereceiver,youmustconnectitsvideooutputdirectlytoyourTV.
ThissystemsupportsDigitalsamplingfrequenciesof32kHzor higherfromexternaldigitalcomponents.
ThissystemsupportsonlyDTSandDolbyDigitalaudio.MPEGaudio,abltstreamformat,isnotsupported.
16 English
I
ItT I_lkI35 ZA ()227.indd 16 2012 02 27 2.,_! 10:53:55
/
o
co
©
o
d_
1. Connect the FM antenna supplied to the FM ANTENNA Jack,
2. Slowly move the antenna wire around until you find a location where reception is good, then fasten it
to a wall or other rigid surface,
INOTEI
_' ThisproductdoesnotreceiveAMbroadcasts,
INOTEI
_, Internetaccessto Sameung'esoftwareupdateservermaynotbeallowed,dependingontherouteryouuseoryourISP's
policy.Formoreinformation,contactyourISP(InternetSewiceProvider),
_, DSLusers,pleaseusea routertomakeanetworkconnection,
_, FortheAlISharefunction,aPCmustbeconnectedin thenetworkasshowninthefigure.
English 17
I
liT I_lkI35 ZA 0227.indd 17 2012 02 27 2. x] 10:53:58
/
2
3
Turn on your TV after connecting the product,
and then turn on the product. When you turn
on the product for the first time, the product
automatically displays the Initial Settings
Language screen.
!InitialSettings]On-ScreenLanguage
Press the A T buttons to select the desired
language, and then press the [] button.
Press the [] button to start function setup.
InitialSetting
The TV Aspect screen appears. Press the
AT buttons to select desired aTV Aspect
ratio, and then press the [] button.
You have four choices:
16:9 Original - For widescreen TVs. Displays
widescreen pictures in their original 16:9
format and 4:3 pictures (the old, standard
format) in 4:3 pillar box format with black bars
on the left and right.
18 English
16:9 Full - For widescreen TVs. Displays
widescreen pictures in their original 16:9
format and expands 4:3 pictures to fill the
16:9 screen.
4:3 Letter Box - For older, standard screen
analog TVs. Displays 4:3 pictures in full
screen and 16:9 pictures in letter box format
that retains the 16:9 aspect ratio but puts
black bars above and below the picture.
4:3 Pan-Scan - For older, standard screen
analog TVs. Displays 4:3 pictures in full
screen and 16:9 pictures in Pan-Scan format
that fills the screen, but cuts off the left and
right sides of the picture and enlarges the
middle vertically.
5. The Network - Wired screen appears.
- Ifyou have a network with dynamic IP
addresses - and most people do - select
Auto, press the [] button, and then go to
Step 6.
- Ifyou have a network with static IP
addresses, we suggest you select Skip by
pressing the BLUE (D)button, and then go
to "Configuring Your Network Connection"
on page 25 after you have completed the
initial setup. "Configuring Your Network
Connection" provides afull explanation of
how to configure your network connection
manually.
- Ifyou have no network, select Skip by
pressing the BLUE (D)button. The Initial
Settings Complete screen appears, and
then the Home screen appears.
INOTEI
Ifyouskipnetworksetuphereorthesetupdoesnot
workcorrectly,youcangoto"ConfiguringYourNetwork
Connection"onpage25tosetuptheproduct'snetwork
connectionlater.
I
liT Elkf35_ZA_n22?.indd 18 2012 02 27 2._! 10:D4:()2
/
InitialSettingsINetwork-wired
6. The product verifies the network connection
and then connects to the network. When
it is done, press the [] button. The Initial
Settings Cornplete screen appears, and then
the Home screen appears.
"_ InitialSettingsINetwork-Wired
INOTEI
_' ifyouwanttodisplaytheInitialSettingscreenagainand
makechanges,selecttheResetoption.(Seepage24)
_, ifyouuseanHDMIcabletoconnecttheproducttoan
Anynet+(HDMI--CEC)-compliantSamsungTVand 1.)You
havesettheAnynet+(HDMhCEC)featuretoONinboth
theTVandtheproductand2.)YouhavesettheTVtoa
languagesupportedbytheproduct,theproductwillselect
thatlanguageasthepreferredlanguageautomatically.
n
VideosP,ayvideos,ocatedondiscsUSB
devices,oryourPC.
Photos.Viewphotoslocatedondiscs,USB
devices,oryourPC.
NetworkServices.Selectanetworkservice:
Netfiix,Vudu,CinemaNow,Pandora,orYouTube.
Music.Playmusiclocatedondiscs,USBdevices,
oryourPC.
Settings.Setvariousfunctionstosuityour
personalpreferences.
Displaysthecoloredbuttonsonyourremotethat
youcanpresstoaccessor performfunctions.
, SelectinganOptionontheHomeScreen
1.To select an option on the Home screen,
move the cursor using the _ _ buttons until it
highlights the option of your choice, and then
press the [] button.
INOTEI
_, lo playorviewvideo,music,or photofileslocatedon
yourPC,youmustconnectyourhometheaterandPC
toahomenetworkandyoumustdownload,install,and
configuretheAIISharesoftwareonyourPC.(Seepage
2s.)
o
4_
09
5'
English _9
I
liT Elkf35_ZA_022?.indd 19 2012 02 27 2._] 10:D4:08
/
1.Select Settings on the Horne screen, and
then press []. The Settings screen appears.
2. To access the rnenus, sub-menus, and
options on the Settings screen, please refer
to the remote control illustration below.
INOTEI
Ifyouleavetheproductinthestopmodeformorethan
5 minuteswithoutusingit,ascreensaverwillappearon
yourTV.Iftheproductisleftinthescreensavermodefor
morethan20minutes,thepowerwillautomaticallyturn
off.
Buttons on the Remote Control Used
for the Settings Menu
INOTEI
The[] buttonontheproduct'sfrontpanelcanbe
usedfor samepurposeasthe[] buttonontheremote
control.
Detailed Function Information
Each Settings function, menu item, and individual
option is explained in detail on-screen. Toview an
explanation, usethe A T _ _ buttons to select the
function, menu item, or option.
The explanation will usuallyappear on the bottom
of the screen. A short description of each Settings
function starts on next page. Additional information
on some of the functions is also in the Appendix of
this manual.
m
iii ii!ilililiiiiiiii
HOMEButton:PresstomovetotheHomescreen.
RETURN(9) Button:Returntothepreviousmenu.
[] (Enter)/DIRECTIONButton:
PressA v .__ tomovethecursororselect
anitem.
• Pressthe[] buttonto activatethecurrently
selecteditemorconfirma setting.
EX,TButton:Presstoex,tthecurrentmenu
20 English
I
liT Elkf35 ZA 0227.indd 20 2012 02 27 2.,_! 10:54:15
/

Other manuals for HT-EM35

1

Other Samsung Home Theater System manuals

Samsung HT-P40 Setup guide

Samsung

Samsung HT-P40 Setup guide

Samsung HT-Z220 User manual

Samsung

Samsung HT-Z220 User manual

Samsung HT-D4500 User manual

Samsung

Samsung HT-D4500 User manual

Samsung HT-D450 User manual

Samsung

Samsung HT-D450 User manual

Samsung HT-E355 User manual

Samsung

Samsung HT-E355 User manual

Samsung HT-D7000 User manual

Samsung

Samsung HT-D7000 User manual

Samsung HT-DB770 User manual

Samsung

Samsung HT-DB770 User manual

Samsung HT-DB1750 User manual

Samsung

Samsung HT-DB1750 User manual

Samsung HT-J7500W User manual

Samsung

Samsung HT-J7500W User manual

Samsung HT-X200 User manual

Samsung

Samsung HT-X200 User manual

Samsung HT-XA100 User manual

Samsung

Samsung HT-XA100 User manual

Samsung HT-TZ122 User manual

Samsung

Samsung HT-TZ122 User manual

Samsung HT-DM550 User manual

Samsung

Samsung HT-DM550 User manual

Samsung HT-D7100 User manual

Samsung

Samsung HT-D7100 User manual

Samsung HT-C730 User manual

Samsung

Samsung HT-C730 User manual

Samsung HT-D550K User manual

Samsung

Samsung HT-D550K User manual

Samsung HT-D6530 User manual

Samsung

Samsung HT-D6530 User manual

Samsung HT-DM150J User manual

Samsung

Samsung HT-DM150J User manual

Samsung AH68-01339B User manual

Samsung

Samsung AH68-01339B User manual

Samsung HT-Z320 User manual

Samsung

Samsung HT-Z320 User manual

Samsung HT-D4200 User manual

Samsung

Samsung HT-D4200 User manual

Samsung HT-C345 User manual

Samsung

Samsung HT-C345 User manual

Samsung HT-THX22 User manual

Samsung

Samsung HT-THX22 User manual

Samsung HT-E550/ZA User manual

Samsung

Samsung HT-E550/ZA User manual

Popular Home Theater System manuals by other brands

Philips HTS5520 quick start

Philips

Philips HTS5520 quick start

Philips HTS 3610 quick start guide

Philips

Philips HTS 3610 quick start guide

Pioneer HTZ131DVD Setup guide

Pioneer

Pioneer HTZ131DVD Setup guide

Teac PL-D100V Service manual

Teac

Teac PL-D100V Service manual

Sony HT-DDW960 Speakers Connection

Sony

Sony HT-DDW960 Speakers Connection

Bose CineMate 15 owner's guide

Bose

Bose CineMate 15 owner's guide

Philips MCD705/93 user manual

Philips

Philips MCD705/93 user manual

Sony BRAVIA DAV-HDX279 quick start

Sony

Sony BRAVIA DAV-HDX279 quick start

Philips MCD705 series Specification sheet

Philips

Philips MCD705 series Specification sheet

Elenberg HT-125 user manual

Elenberg

Elenberg HT-125 user manual

LG LHD675 manual

LG

LG LHD675 manual

Sony BDV-HZ970W  (UWA-BR100) operating instructions

Sony

Sony BDV-HZ970W (UWA-BR100) operating instructions

Yamaha GX-5 owner's manual

Yamaha

Yamaha GX-5 owner's manual

Harman Kardon DIGITAL LOUNGE 640 owner's manual

Harman Kardon

Harman Kardon DIGITAL LOUNGE 640 owner's manual

Philips HTS3520/12/05 Service manual

Philips

Philips HTS3520/12/05 Service manual

AEG HES 4890 DVB-T/DVD instruction manual

AEG

AEG HES 4890 DVB-T/DVD instruction manual

Philips HTB3581/93 manual

Philips

Philips HTB3581/93 manual

LG S65T3-S owner's manual

LG

LG S65T3-S owner's manual

manuals.online logo
manuals.online logoBrands
  • About & Mission
  • Contact us
  • Privacy Policy
  • Terms and Conditions

Copyright 2025 Manuals.Online. All Rights Reserved.