Archgard OPTIMA PS1 Owner's manual

200-0242
MAY 2007
Users’ Installation
Operation and
Maintenance Manual
7116 Beatty Dr
Mission, BC V2V 6B4
Canada
OPTIMA PS1
OPTIMA PS1
Pellet Stove
Installer: Please complete the details on the back cover
and leave this manual with the homeowner.
Homeowner: Please keep these instructions for future reference.
PRIOR TO FIRST FIRE: Remove all labels from glass. Clean fingerprints from plated surfaces with a
non-abrasive liquid glass cleanser and soft cloth to prevent permanent staining. (See Page 28)
CHILDREN AND ADULTS SHOULD BE ALERTED TO THE HAZARDS OF HIGH SURFACE
TEMPERATURES, ESPECIALLY THE STOVE GLASS, AND SHOULD STAY AWAY TO AVOID
BURNS OR CLOTHING IGNITION.

OPTIMA PS1 PELLET STOVE 2
2
Congratulations on choosing a state-of-the-art
Archgard Hearth Product!
The hand crafted Optima PS1 has been designed to
provide you with comfort, security and economy for
many years of trouble-free enjoyment.
It has been our experience that the overall enjoyment
of your new appliance will be greatly enhanced by
becoming familiar with its installation, operation and
maintenance. Prior to installation, we ask that you
take a few moments to read this manual.
We wish you and your family many years of
enjoyment in the warmth and comfort of this hearth
appliance.
Thank you for choosing Archgard
Industries!

OPTIMA PS1 PELLET STOVE 3
3
Important Safety Notes 4
Rating Plate Label 6
Specifications 7
Dimensions 8
INSTALLATION METHODS
Important Installation Notes 9
Residential & Mobile Home Installation 10
Combustion Air Supply 11
Venting 12-16
OPERATING INSTRUCTIONS
Operating Safety Precautions 18
Start-Up Check List 19
Filling the Hopper 20
Control Functions 21-23
Start-Up and Shut-Down Instructions 24
Thermostat 26
MAINTENANCE
Cleaning Door Glass 27
Ash Disposal 27-28
Miscellaneous Maintenance 29
Electrical Circuit Diagram 30
Component Locations 31
Troubleshooting 32-34
ACCESSORY / PARTS REPLACEMENT
Accessory & Replacement Parts List 35
Archgard Warranty 36-37
Warranty Registration Card 38
Notes 39
Installation Information 40
Fine Tuning Stove 25-26
TABLE OF CONTENTS

OPTIMA PS1 PELLET STOVE 4
4
IMPORTANT SAFETY NOTES
• When installing your stove, particular attention should be paid to fire
protection. If this room heater is not properly installed, a house fire may result.
To reduce the risk of fire, follow the installation instructions. Contact local
building, fire officials or authority having jurisdiction about restrictions,
installation inspection and permit requirements in your area.
• CAUTION: Never use gasoline, gasoline-type lantern fuel, kerosene, charcoal
lighter fluid, or similar liquids to start or “freshen up” a fire in this heater. Keep
all such liquids well away from the heater while it is in use.
• DO NOT BURN GARBAGE OR FLAMMABLE FLUIDS SUCH AS GASOLINE,
NAPHTHA OR ENGINE OIL.
• Do not store any fuel closer than 2 feet from your unit. Do not place wood,
paper, furniture, drapes or other combustibles near the appliance.
• RISK OF FIRE! Do not operate with stove door open.
• WARNING! Never draw outside combustion air from a wall, floor or ceiling
cavity or from any enclosed space such as an attic or garage, carport or under
a mobile home.
• Check your chimney system thoroughly when installing into an existing metal
or masonry chimney. Seek professional advice if in doubt about its condition.
• Comply with all minimum clearances to combustibles as shown in this manual
for this appliance.
• HOT WHILE IN OPERATION! Keep children, pets, clothing and furniture away.
Contact can cause skin burns.
• All fuel burning appliances consume oxygen during operation. It is important
that you supply a source of fresh air to your unit while burning. A slightly
opened window is sufficient for this purpose. If you also have a fireplace in your
home, a downdraft may be created causing a draft down your chimney. Provide
adequate ventilation. This does not apply if the stove is installed with outside
combustion air connection.
• The controls of your unit or the air supply passages should not be altered to
increase firing for any reason.
• Do not permit soot or ash build-up in the venting system. Check and clean
venting system at regular intervals.
• Cool ashes should be disposed of carefully, using a metal container.
• Do not connect to any air distribution duct or system.
• Do not connect this unit to a chimney flue already serving another appliance.
• This appliance must be connected to a vent and terminate to the outside of the
building envelope. Never vent to another room or inside a building.
• Do not operate if the gasket on the door is missing or damaged.
• Do not operate with broken glass.
• For further information refer to NFPA 211 (USA) or CAN/CSA-B365 (Canada).

OPTIMA PS1 PELLET STOVE 5
5
SAFETY NOTE: If this stove is not properly installed, a house fire may result. For your
safety, follow the installation instructions, vent manufacturer’s instructions, contact local
building, fire officials, or authority having jurisdiction about restrictions and installation
inspection requirements in your area.
The authority having jurisdiction should be consulted before installation to determine
the need to obtain a permit.
WHEN LOCATING YOUR STOVE: Consider safety, convenience, traffic flow, and the
fact that the stove will need a chimney and chimney connector. It is a good idea to plan
your installation on paper, using exact measurements for clearances and floor
protection, before actually beginning the installation.
These installation instructions describe the installation and operation of the OPTIMA
PS1 pellet stove. This stove meets the U.S. Environmental Protection Agency’s
emission standards. The Optima PS1 is listed by Warnock Hersey Test Laboratories,
Inc. to ASTM E1509-04. The Optima PS1 is approved for mobile home installation ( in
the US and Canada) when not installed in a sleeping room and when an outside
combustion air inlet is provided. The structural integrity of the mobile home floor,
ceiling, and walls must be maintained. The stove must be properly grounded to the
frame of the mobile home. See instructions for connecting the stove to get outside
combustion air.
SAFETY LABEL
A copy of the label that accompanies each Archgard Optima PS1 pellet stove is printed
on the next page for your convenience.
NOTE: Archgard units are constantly being improved. If there is a conflict between the
label on the unit and the one printed here, the label on the unit is the correct one. The
safety label is located on the underside of the hopper lid.
YOUNG CHILDREN SHOULD BE CAREFULLY SUPERVISED WHEN
THEY ARE IN THE SAME ROOM AS THE STOVE.

OPTIMA PS1 PELLET STOVE 6
6
CAUTION
• HOT WHILE IN OPERATION.
• DO NOT TOUCH, KEEP CHILDREN, CLOTHING AND FURNITURE AWAY.
• CONTACT MAY CAUSE SKIN BURNS. READ NAMEPLATE AND INSTRUCTIONS.
LISTED ROOM HEATER, PELLET FUEL-BURNING TYPE.
ALSO SUITABLE FOR MOBILE HOME INSTALLATION.
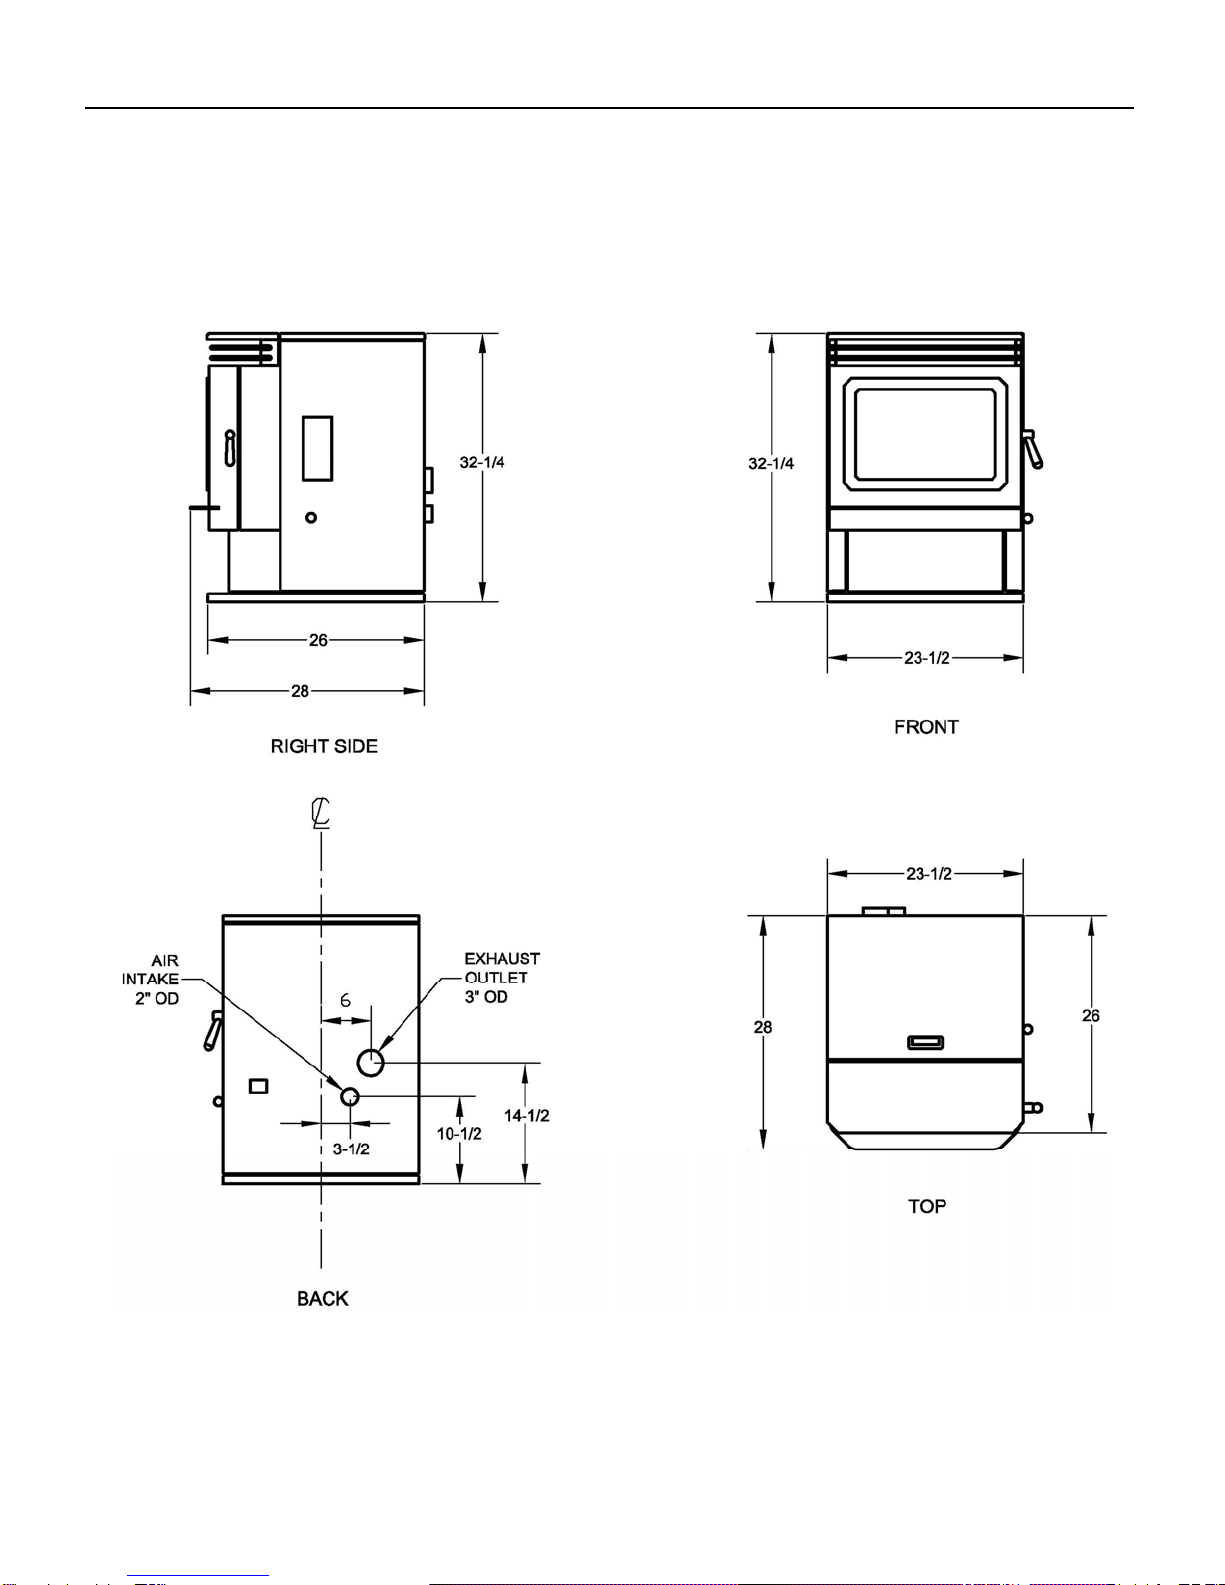
MODEL: OPTIMA PS1 FREE STANDING STOVE
TESTED TO: ASTM E1509-04
SERIAL NUMBER / NUMÉRO DE SÉRIE:
DO NOT REMOVE THIS LABEL
MAXIMUM INPUT RATING: 42,000BTU/HR (APPROXIMATELY 5LB/HR OF WOOD PELLETS OR 6LB/HR OF SHELLED CORN)
ELECTICAL RATING: 120VAC, 60HZ, LESS THAN 5A.
THIS APPLIANCE IS SUITABLE FOR MOBILE HOME INSTALLATION IN US & CANADA. SEE MANUAL FOR INSTALLATION
INSTRUCTIONS.
PREVENT HOUSE FIRES:
INSTALL ONLY IN ACCORDANCE WITH THE MANUFACTURER’S INSTALLATION AND OPERATING INSTRUCTIONS. CONTACT LOCAL
BUILDING OR FIRE OFFICIALS ABOUT RESTRICTIONS AND INSTALLATION INSPECTION IN YOUR AREA. USE ONLY LISTED TYPE L,
TYPE PL VENT OR OTHER LISTED VENT SYSTEMS SUITABLE FOR PELLET FUEL BURNING STOVE. STRICTLY FOLLOW VENT
MANUFACTURER’S CLEARENCES AND INSTALLATION INSTRUCTIONS. DO NOT CONNECT THIS UNIT TO A CHIMNEY SERVING
ANOTHER APPLIANCE. DO NOT INSTALL A FLUE DAMPER IN THE EXHAUST VENTING SYSTEM OF THIS UNIT. DO NOT CONNECT
THIS UNIT TO A CHIMNEY FLUE SERVING ANOTHER APPLIANCE.
UNITED STATES ENVIROMENTAL PROTECTION AGENCY
CERTIFIED TO COMPLY WITH PARTICULATE EMMISION STANDARDS
FOR USE WITH SUITABLE PELLETIZED FUEL ONLY. See instruction manual on the specifications of fuels. USE OF OTHER FUELS MAY
DAMAGE THE HEATER AND CREATE A HAZARDOUS CONDITION. DO NOT OBSTRUCT THE COMBUSTION AIR OPENING. RISK OF
SMOKE AND FLAME SPILLAGE, OPERATE ONLY WITH ASH CLEAN-OUT SLIDER AND ASH DRAW IN PLACE; AND THE DOOR
FULLY CLOSED. KEEP FURNISHINGS AND OTHER COMBUSTIBLE MATERIALS AWAY FROM STOVE. DANGER, RISK OF
ELECTRICAL SHOCK, DISCONNECT POWER BEFORE SERVICING STOVE. MOBILE HOME INSTALLATION REQUIRE OUTSIDE
COMBUSTION AIR, PROPER ELECTICAL GROUNDING AND PROPER FASTENING OF STOVE TO THE FLOOR. DO NOT INSTALL IN
SLEEPING ROOM. THE STRUCTUAL INTEGRITY OF THE MANUFACTURED HOME FLOOR, WALLS AND CEILING/ROOF MUST BE
MAINTAINED. See manual for instructions. Inspect and clean stove and vent system regularly, see instruction manual for servicing
instructions. Replace glass only with 5mm ceramic glass. Optional Multi-fuel burn pot kit Part # PS1-MF. See manual for other stove options.
Manufactured by: ARCHGARD INDUSTRIES LTD.
MISSION, BC ~ CANADA Made in Canada
DEC
NOVOCTSEPAUGJULJUNMAYAPRMARFEBJAN2008DATE OF MANFACTURE: 20072006
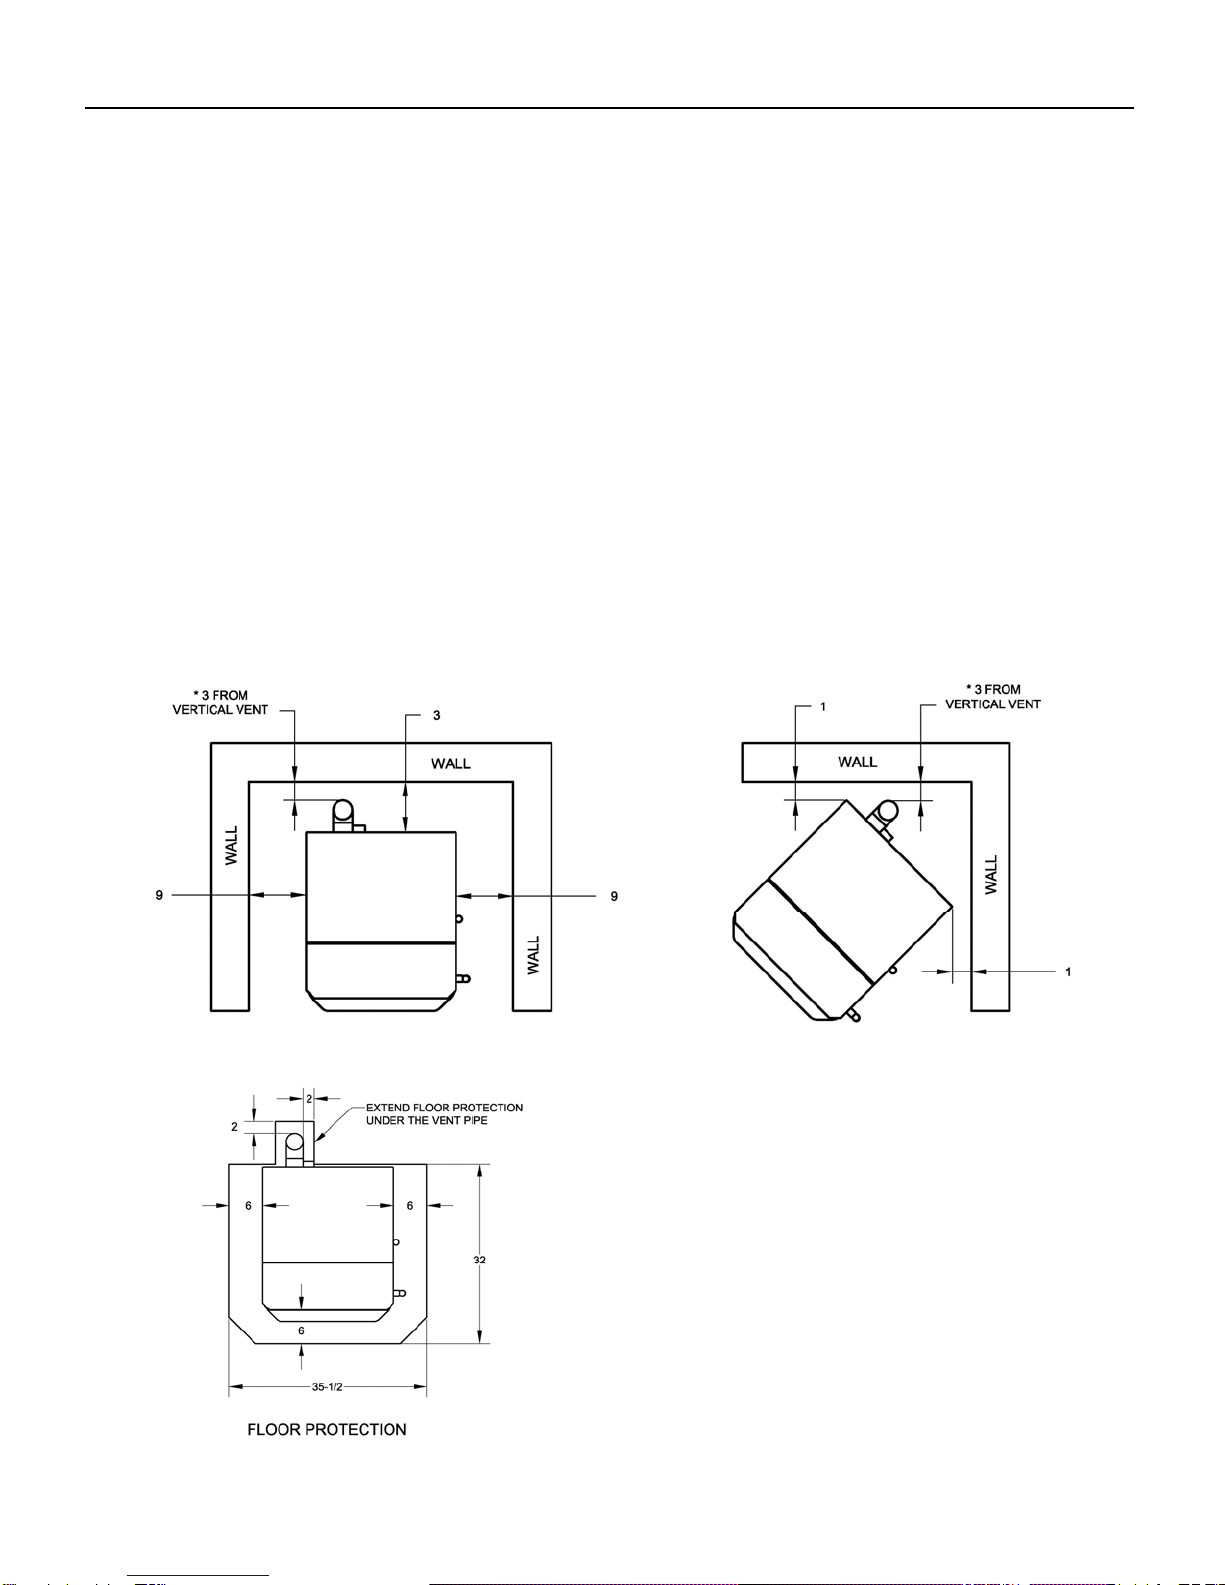
MINIMUM CLEARANCES TO COMBUSTIBLE MATERIALS
RESIDENTIAL & MOBILE HOME INSTALLATION
SIDEWALL A - 229 mm / 9”
BACKWALL B - 76 mm / 3”
CORNER C - 26 mm / 1”
ALCOVE INSTALLATION
SIDEWALL D - 229 mm / 9”
BACKWALL E - 76 mm / 3”
MINIMUM ALCOVE CEILING HEIGHT : 1220 mm / 48”
MAXIMUM ALCOVE DEPTH : 915 mm / 36” , Minimum 381 mm /
15” clearance from stove top to ceiling.
6”6”
6”
FRONT
SIDE
SIDE
FLOOR PROTECTION
Any combustible flooring or floor covering beneath the appliance and / or within the area extending
153mm / 6” horizontally beyond the appliance on any side equipped with a door, and beyond the appliance
on the other sides, shall be protected by a continuous, durable, non-combustible pad that will provide
ember protection. Refer to Canadian CSA B365 and USA NFPA 211 Installation Codes for details. It is
recommended that floor protection extends beneath the vent pipe.
BACKWALL
SIDEWALL
D
E
D
SIDEWALL
A B
BACKWALL ADJACENT WALL
SIDEWALL
C
C

OPTIMA PS1 PELLET STOVE 7
7
SPECIFICATIONS
MODEL OPTIMA PS1 FREESTANDING Pellet Stove
DEPTH 28” (711 mm)
HEIGHT 32.5” (826 mm)
E.P.A. EMISSIONS 0.9 grams / hour
INPUT RATING (APPROX) 12,000 - 42,000 Btu/hr (3.5 - 12.3 kW)
APPROXIMATE HEATING AREA 800 - 1,500 FEET2 (74.3 - 139.4 METRE2)
HOPPER CAPACITY 95 lb (43 kg)
DURATION ON LOW FIRE Approximately 60 Hours with full hopper
STOVE BODY WEIGHT
WITH PACKAGING 250 lb (113 kg)
WIDTH 23.75” (603 mm )
PELLET FUEL SPECIFICATIONS:
Use the best quality Premium pellet fuel available. This will give the most heat output with less
maintenance.
The standard for pellet fuel is set out by the Pellet Fuels Institute with the following qualities:
Density: consistent hardness and energy content (minimum 40 pounds/cubic foot)
Dimensions: length (1 ½” maximum) and diameter (1/4” to 5/16”) to assure predictable fuel
amounts and to prevent jamming
Fines: limited amount of sawdust from pellet breakdown to avoid dust while loading and
problems with pellet flow during operation (amount of fines passing through 1/8” screen no
more than .5 percent by weight)
Chlorides: limited salt content (no more than 300 parts per million) to avoid stove and vent
rusting
Ash content: important factor in maintenance frequency
The only difference that determines the Premium and Standard pellet fuel is their ash content.
Standard grade fuel is usually up to 3% ash content, while premium grade is less than 1
percent. This difference is a result of the pellet contents. Standard pellets are derived from
materials that produce more residual ash, such as tree bark or agricultural residues. Premium
pellets are usually produced from hardwood or softwood sawdust containing no tree bark.
Premium pellet fuel is the most common and makes up 95 percent of pellets sold on the
market.
OPTIONAL MULTI-FUEL BURN POT KIT
This pellet stove can burn shelled corn as fuel with the installation of the optional multi-fuel
burn pot kit, PART #: PS1-MF. Follow the operating instructions included with the kit.

OPTIMA PS1 PELLET STOVE 8
8
DIMENSIONS
(661mm)
(820mm)
(820mm)
(712mm)
(597mm)
(51mm)
(90mm)
(77mm) (712mm)
(267mm) (369mm)
(597mm)
(661mm)

OPTIMA PS1 PELLET STOVE 9
9
INSTALLATION INSTRUCTIONS
IMPORTANT INSTALLATION NOTES:
• Please read this entire manual before you install and use your new Optima
PS1 Pellet stove. Failure to follow instructions may result in property
damage, bodily injury or even death. Be aware that local codes and
regulations may override some items in this manual. Check with your local
authority having jurisdiction.
• Select a location for your Archgard Optima PS1 pellet stove. Double check
the clearances on the label and set the stove in place.
• Check that the intended location of the vent does not interfere with trusses,
joists or rafters before proceeding further.
• Check that the intended location of the vent termination is located in a
suitable location. See the diagram of allowable vent terminal location.
• Make sure there is a nearby suitable grounded receptacle to supply 120VAC,
60HZ and at least 5A of electrical power needed to operate the stove.
• Obtain any necessary permits for the installation of the stove.

OPTIMA PS1 PELLET STOVE 10
10
RESIDENTIAL & MOBILE HOME INSTALLATION
MINMUM CLEARANCES TO COMBUSTIBLE MATERIALS
SIDEWALL A - 229 mm / 9”
BACKWALL B - 76 mm / 3”
CORNER C - 26 mm / 1”
MAXIMUM ALCOVE DEPTH: 915 mm / 36” with minimum back wall clearance or front of
stove door recessed a maximum of 178mm / 7” into alcove.
MINIMUM ALCOVE CEILING HEIGHT:1220 mm / 48” OR MINIMUM 381 mm / 15”
CLEARANCE FROM TOP OF STOVE TO CEILING.
CLEARANCE TO VENT PIPE MUST ALSO BE OBSERVED. PLEASE SEE VENT
MANUFACTURES’ INSTRUCTIONS FOR VENT PIPE CLEANRANCE TO COMBUSTIBLES.
NOTE—Even though the pellet stove is safe to install to the minimum clearances listed
above, additional clearances should be considered for the ease of fueling, operating
and maintenance.
The floor pad (ember pad) must be of non-
combustible material and must extend 6" (153mm)
in front of the door opening and 6" (153mm) to the
sides and rear of the unit.
If the listed stove clearance is less than the
required floor pad, use the stove listing. Contact
your local Authority Having Jurisdiction and/or the
CSA B365 in Canada or NFPA 211 in USA for
more details.
Hearth pad should also extend beneath the
horizontal or vertical vent.
(229mm)
(229mm)
(76mm)
(76mm) (76mm)
(26mm)
(26mm)
(51mm)
(51mm)
(153mm)
(153mm) (153mm)
(902mm)
(813mm)

OPTIMA PS1 PELLET STOVE 11
11
COMBUSTION AIR SUPPLY
Fresh outside air is not required for normal residential installation. The stove consumes oxygen
during operation. It is important that you supply a source of fresh air to your stove while
burning. A slightly opened window is sufficient for this purpose. If you also have a fireplace in
your home, a downdraft may be created causing a draft down your chimney. Provide adequate
ventilation in the room.
Outside combustion air is a requirement for mobile home installation. It is also highly
recommended for tightly insulated homes and a good feature for normal installations.
A metallic 2” diameter rigid or flexible pipe should be securely connected to the air intake
connector at the back of the stove. The fresh air may be taken from outside of the house
through a hole in an adjacent wall or from the floor of houses with ventilated craw space. Be
sure not to damage the structural integrity of the house The pipe and penetrations should be
properly sealed and weather-proofed. The intake pipe should be properly terminated with a
cap or elbow to shield the inlet from the weather. The termination openings should be
protected by a rodent screen. Keep the pipe length as short as possible for optimal
performance. For best performance, keep 2” diameter intake pipe length under 10 feet. If
longer runs are required, use an adapter to connect to 3” diameter intake pipe.
Outside air can also be obtain by installing a listed direct-vent system for pellet stoves. Follow
the vent manufacturer’s instructions.
Never draw outside combustion air from a wall, floor or ceiling cavity or from any enclosed
space such as an attic, garage, carport or under a mobile home.

OPTIMA PS1 PELLET STOVE 12
12
VENTING
Use only listed type L, PL or other suitable listed vents for pellet fuel burning
stoves. Install venting system according to the vent manufacturer’s instructions.
Strictly follow the vent manufacturer's clearances and use the proper vent
components when passing the vent through walls and ceilings. A suitable vent
termination should also be used. The performance of your pellet stove can also
be hindered by improper venting system. It is recommended that your pellet
stove be installed by a professional installer who is certified to install pellet
stoves. An improper installed and vented pellet stove can be a fire and health
hazard.
CAUTION: At no time can unlabelled parts, or substitute parts made for another venting
system be used.
Maintain the structural and vapor barrier integrity of the house when cutting holes in the walls,
ceiling and roof to suit the venting system and do any necessary framing as required by the
vent manufacturer.
NOTE: Interior vents shall be enclosed where they extend through closets, storage areas,
occupied spaces, or anyplace where the surface of the vent could be contacted by persons or
combustible materials.
The stove has a 3” diameter flue connector. Vent systems with pipes either 3” diameter or 4”
diameter (with a step up adapter) maybe used. The use of 4” diameter vent pipe system is
preferred with longer and more restrictive vent runs.
For best performance from the pellet stove, it is recommended that the total horizontal vent
runs is kept to a maximum of 10 feet. Use a maximum of two 90 elbows or equivalent and one
tee. Limit total vertical vent run to a maximum of 35 feet. This pellet stove is equipped with an
exhaust slider restrictor just upstream of the exhaust blower. The installer can use this to
balance the flow of exhaust on high draft vent configurations. This is a one time adjustment to
be done only by the installer. Loosen the 1/4” hex screw securing the slider. Push the slider in
to restrict the exhaust flow. Adjust till the stove burns properly on high and tighten the screw to
secure the slider.
The venting system of a pellet stove is pressurized. Make sure all pipe joints and connections
are air-tight to prevent the leakage of flue gas and ash. Follow the vent manufacturer’s
instructions to seal the vent system. Otherwise, apply a continuous bead of 500F (260C) high
temperature silicone sealant at the joints and securely fasten with no less than 3 sheetmetal
screws per joint or connection.
In seismically active areas, Archgard recommends that your stove be secured to the floor by
using 3” long, ¼” lag bolts in the bolt down holes on the pedestal. This is mandatory with
mobile home installations.
Do not connect this stove to a chimney serving another appliance.
Do not connect your stove to an air distribution duct.

OPTIMA PS1 PELLET STOVE 13
13
A= Clearance above grade,
veranda, porch, deck, or
balcony
12 inches (30 cm) J= Clearance to non-mechanical air
supply inlet to building or the
combustion air inlet of any other
appliance
9 inches (23 cm)
B= Clearance to window or
door that may be opened 12 inches (30 cm) K= Clearance to a mechanical
air supply inlet 3 feet (91 cm) above if
within 10 feet (3 m)
horizontally
C= Clearance to permanently
closed window * L= Clearance above paved
sidewalk or paved driveway
located on public property
7 feet (2.13 m) +
D= Vertical clearance to
ventilated soffit located
above the terminal within a
horizontal distance of 2 feet
(61 cm) from the center line
of the terminal
* M= Clearance under veranda,
porch, deck, or balcony 12 inches (30 cm) ++
E= Clearance to unventilated soffit *
F= Clearance to outside corner *
G= Clearance to inside corner *
H= Clearance to each side of
center line extended above
meter/regulator assembly
3 feet (91 cm) within a
height 15 feet (4.5 m)
above the
meter/regulator assembly
L= Clearance to service
regulator vent outlet 3 feet (91 cm)
(+) A vent shall not terminate directly above a side walk or paved driveway that is located
between two single family dwellings and serves both dwellings
(++) Permitted only if veranda, porch, deck, or balcony is fully open on a minimum of two
sides beneath the floor.
(*) Clearances shall be in accordance with local installation codes.
TYPICAL EXHAUST TERMINATION LOCATIONS
(CHECK FOR ACCORDANCE WITH LOCAL INSTALLATION CODES)

OPTIMA PS1 PELLET STOVE 14
14
TYPICAL VENTING CONFIGURATIONS:
HORIZONTAL VENTING
NOTE: Horizontal venting with vertical offset is preferred. The additional vertical vent rise will
improve venting performance and provide natural draft to evacuate smoke from the stove in
case of power failure.

OPTIMA PS1 PELLET STOVE 15
15
VERTICAL VENTING

OPTIMA PS1 PELLET STOVE 16
16
VENTING INTO FIREPLACE OR CHIMNEY
Make sure the chimney top is properly sealed to prevent the intrusion of weather with suitable
flashings, collars and sealants.
Outside air maybe obtained by running an intake vent pipe up along side the exhaust and properly
terminated at the top to prevent the inlet of rain or exhaust gases. Outside air may also be taken from
a suitable duct passing through the ash clean-out opening.
Similar installations are applicable to factory build fireplaces and chimneys.
Check with local code for any installation restrictions.

OPTIMA PS1 PELLET STOVE 17
17
ADDITIONAL MOBILE HOME INSTALLATION REQUIREMENTS:
In addition to standard installation instructions, the following requirements are mandatory for
installation in a mobile home.
• The stove must be permanently bolted to the floor of the mobile home using screws. Once
you have properly marked the position of your stove and the floor protection as outlined in
the installation instructions, secure it to the floor using two lag bolts 1/4" x 3" through the
two holes in the pedestal base just inside, near the front of the two side access panels.
• The stove must have a permanent outside air source for combustion as outlined in the
installation instructions.
• The stove must be electrically grounded to the steel chassis of the mobile home. Use a #8
ground wire with approved termination and star washer.
• The stove must be installed with a listed pellet stove venting system, roof thimble, spark
arrestor and roof flashing kit suitable for use in mobile homes.
• The vent shall extend at least 3 ft. (914mm) above the part of the roof through which it
passes. The top of the vent should project at least 2ft. (610mm) above the highest
elevation of any part of the mobile home within 10 ft. (3048mm) of the vent. Top sections
of chimney must be removable to allow maximum clearance of 13.5 ft. (411cm) from
ground level for transportation purposes.
CAUTION: THE STRUCTURAL INTEGRITY OF THE MOBILE HOME ROOF, FLOOR,
WALLS AND CEILING MUST BE MAINTAINED. Also maintain the integrity of
the vapor barrier at the location where the chimney or other component
penetrates the exterior of the structure.
WARNING: DO NOT INSTALL THE STOVE IN A SLEEPING ROOM OF A MOBILE HOME.
Never draw outside combustion air from a wall, floor or ceiling cavity or
from any enclosed space such as a garage, carport or under a mobile home.
Check any other local building code as other local codes may apply.

OPTIMA PS1 PELLET STOVE 18
18
OPERATING SAFETY PRECAUTIONS
• Hot while in operation. Contact may cause skin burns. Keep
children, pets, clothing and furniture away.
• Use only pelletized fuel recommended by the manufacturer. See
pellet fuel specifications.
• Only service and maintain the stove when it not operating and
cool to the touch. Electrical power to the stove must be
disconnected for any servicing that require the open of the side or
back service panels.
• Do not use any flammable liquids, such as gasoline, kerosene,
lighter fluid or other similar liquids to start or freshen up the fire.
Keep all such liquids well away from the stove while it is in use. If
manually starting the pellet stove, use only suitable solid or gel
fire starter products designed specifically for starting pellet
stoves.
• Provide adequate fresh air to room for pellet stove installed
without outside combustion air.
• Relocate any smoke detectors that maybe false triggered by the
normal operation of the stove.
• Keep a suitable fire extinguisher within easy reach. As with any
fuel burning appliance, there is always a potential fire hazard.
• Keep stove door tightly close during operation.
• Keep area around stove free of debris, lint and any objects that
might be a potential fire hazards. Do not store pellet fuel next to
the stove. Keep it at least 3 feet away.
• Keep stove grill and air openings free of lint and any obstructions
to maintain optimal efficiency.
• Unplug the stove when it is not going to be used for an extended
period of time.

OPTIMA PS1 PELLET STOVE 19
19
OPERATING INSTRUCTIONS
Check List Before Starting Your Pellet Stove:
• Check that the pellet stove is properly plugged into a 3-prong grounded 115VAC
electrical receptacle. Make sure there is electrical power to the stove.
• Check around the pellet stove for any potential safety hazards.
• Check that the pellet stove is connected to a proper venting system to exhaust the
stove’s combustion gases outdoors. Check that the vent cap is not damaged or
obstructed. Also check for any potential fire hazards around the vent cap.
• Make sure there is adequate supply of pellet fuel in the hopper and that the pellet fuel
is in good condition and suitable for burning in this pellet stove.
• Make sure the burn pot is seated properly and empty of ash or clinkers. Check to make
sure all the air holes of the burn pot are unobstructed and clear out any obstructions.
• Close and latch the door securely. The stove will not operate with the door open.
• Close the hopper lid. The fuel feed auger will stop if the hopper lid is opened.
NOTE: It is normal for the stove to emit some odor and smoke with the first few initial
operations. This is due the curing of the paint and ‘burning-off’ of manufacturing oils.
For the first few operations, keep the heat setting low to medium to reduce emissions
and keep the room well ventilated by open windows.
SIDE VIEW OF
BURN POT
Opening the stove door:
Rotate the handle clockwise towards the front of the door
until the handle is about the 9 O’clock position and swing
the door to the left.
Closing the stove door:
Keep the handle horizontal about the 9 O’clock position.
Swing the door to the right and push the door firmly
against the stove. Rotate the handle to the 6 O’clock po-
sition to lock.
Install the burn pot by tucking the top of the burn port under the pellet drop chute. Line
up the burn pot with the holder and drop the burn pot in. Make sure the burn pot is
squarely seated in its holder.

OPTIMA PS1 PELLET STOVE 20
20
FILLING THE HOPPER WITH PELLET FUEL:
Open the hopper lid by placing your fingers in the recessed handle on the hopper lid and lifting
up. Lift the lid until the prop rod catches and keeps the lid up.
Fill the hopper only with dry quality pellet fuel as noted in the fuel specification at the front of
the manual.
Check and remove any foreign objects or debris mixed in with the pellet fuel that could jam up
the fuel feed auger.
Be careful not to spill any fuel on the stove top and adjoining gaps. Spilling pellet fuel on the
floor can also pose a slipping hazard.
To close the hopper lid, support the hopper lid with the left hand while using the right hand to
pull the prop rod forward to release it from the catch. CAUTION: Be sure to support the
hopper lid to prevent possible pinching of the fingers while releasing the lid prop rod.
Do not overfill the hopper so that the hopper lid will not close flush. When refilling the
hopper while the stove is operating, please do so as quickly as possible to minimize the
interruption of the fuel feed. The stove will shut down if the hopper lid remains open for
more than 5 minute. It is also likely that the flames in the burn pot will go out before the
time limit, especially on lower heat settings.
Do not allow the hopper run completely empty if possible. Once emptied, the auger feed
system will takes a long time to reload with pellets before starting to drop pellets into
the burn pot. If this happen, use the FUEL FEED button on the control panel to speed up
the process. Two or three restart cycle of the stove will be required before fuel will start
dropping into the burn pot.
WARNING: This stove is equipped with a fuel feel auger interlock switch,
which will stop the fuel feed to the stove with the hopper lid opened. Re-fuel
as quickly as possible. The stove will not operate with the hopper lid open.
Table of contents
Popular Pellet Stove manuals by other brands

Enviro
Enviro M55C-FPI owner's manual

PFTAS
PFTAS Matilda owner's manual

Breckwell
Breckwell Tradition P24FS owner's manual

Superior
Superior Sofia Instructions for installation, use and maintenance

Hearth and Home Technologies
Hearth and Home Technologies Quadra-Fire CB1200M-MBK owner's manual

Moretti Design
Moretti Design ARIA ALADINO GLASS/STYLE/ALL STYLE A/C/RELAX... DEDICATED MANUAL

IronStrike
IronStrike WINSLOW PS40 quick start guide

Harman
Harman P43 Installation & operating manual

Smith & Wesson
Smith & Wesson SWS022 owner's manual

England's Stove Works
England's Stove Works 25-EPI Installation and operation manual

Harman Home Heating
Harman Home Heating P61A owner's manual

United States Stove
United States Stove 5510 owner's manual