ARCHIPELAGO LIGHTING LED SL-9 User manual

D SL-9/4/7.5/40/4RMELLEDOM
1
PREPARATION PACKAGE CONTENTS
Before beginning installation of the product, make sure
all parts are present. If any part is missing or damaged,
do not attempt to assemble, install or operate the
product.
Estimated Assembly Time: 10 Minutes
INSTALLATION INSTRUCTIONS
For 5 years from the date of purchase, this product is warranted for the original purchaser to be free from defects in
materials and workmanship through normal use. In order to obtain this service, please return this item to the place of
purchase with valid proof of purchase and the defective product will be replaced at no charge. This guarantee gives
you specific legal rights, and you may have other rights that vary from state to state.
This shop light was carefully packed and thoroughly inspected before leaving our factory.
ARCHIPELAGO LIGHTING |MONTCLAIR, CA (866) 912-3220 FAX (909) 627-2887 www.archipelagolighting.com| | |
AFixture
Install screw
Assembly
B
C Chains
D
E
“J” Hooks
Wall anchors
PART DESCRIPTION QUANTITY
1
3
2
2
3
LIMITED WARRANTY
SAFETY INFORMATION
Please read and understand this entire manual before attempting to assemble, operate or install the product
WARNING: RISK OF SHOCK
House electrical current can cause painful shock or serious injury unless handled properly. For your safety, always
remember to:
-Turn off the power at the fuse or circuit breaker box before you install the shop light.
2. This shop light is designed for use in acircuit protected by a fuse or circuit breaker. This shop light is intended to be
directly beneath aceiling-mounted receptacle and any excess cord should be kept out of the workspace. It isinstalled
installed in accordance with local electrical codes. If you are unsure about your wiring, consult aalso designed to
electrical inspector, and consult your electrical code.qualified electrician or local
3. Account for small parts and destroy packing material, as these may be hazardous to children.
4. WARNING: RISK OF INJURY
Do not open shop light. No serviceable parts inside.
5. WARNING: RISK OF FIRE
Most dwellings built before 1985 have a supply wire rated 60˚C. Do not overload the circuit and wiring. Consult a
electrician.qualified
6. Operation is subject to the following 2conditions:This device complies with part 15 of the FCC Rules.
(2) this device must accept any interference received, including(1) This device may not cause harmful interference, and
equipment has been tested and found to comply with theinterference that may cause undesired operation. Note: This
Rules. These limits are designed to provide reasonablelimits for aClass Bdigital device, pursuant to part 15 of the FCC
This equipment generates, uses and can radiate radioprotection against harmful interference in aresidential installation
instructions, may cause harmful interference tofrequency energy and, if not installed and used in accordance with the
will not occur in aparticular installation. If thisradio communications. However, there is no guarantee that interference
which can be determined by turning theequipment does cause harmful interference to radio or television reception,
or more of the following measures:equipment of and on, the user is encouraged to try to correct the interference by one
and receiver. Connect theReorient or relocate the receiving antenna. Increase the separation between the equipment
the dealer or anequipment into an outlet on a circuit different from that to which the receiver is connected. Consult
experienced radio/TV technician for help.
1. !
!
!
!
5012662
A
B
D
E
C
LED SHOP/UTILITY LIGHT

2
INSTALLATION INSTRUCTIONS
ARCHIPELAGO LIGHTING |MONTCLAIR, CA (866) 912-3220 FAX (909) 627-2887 www.archipelagolighting.com| | |
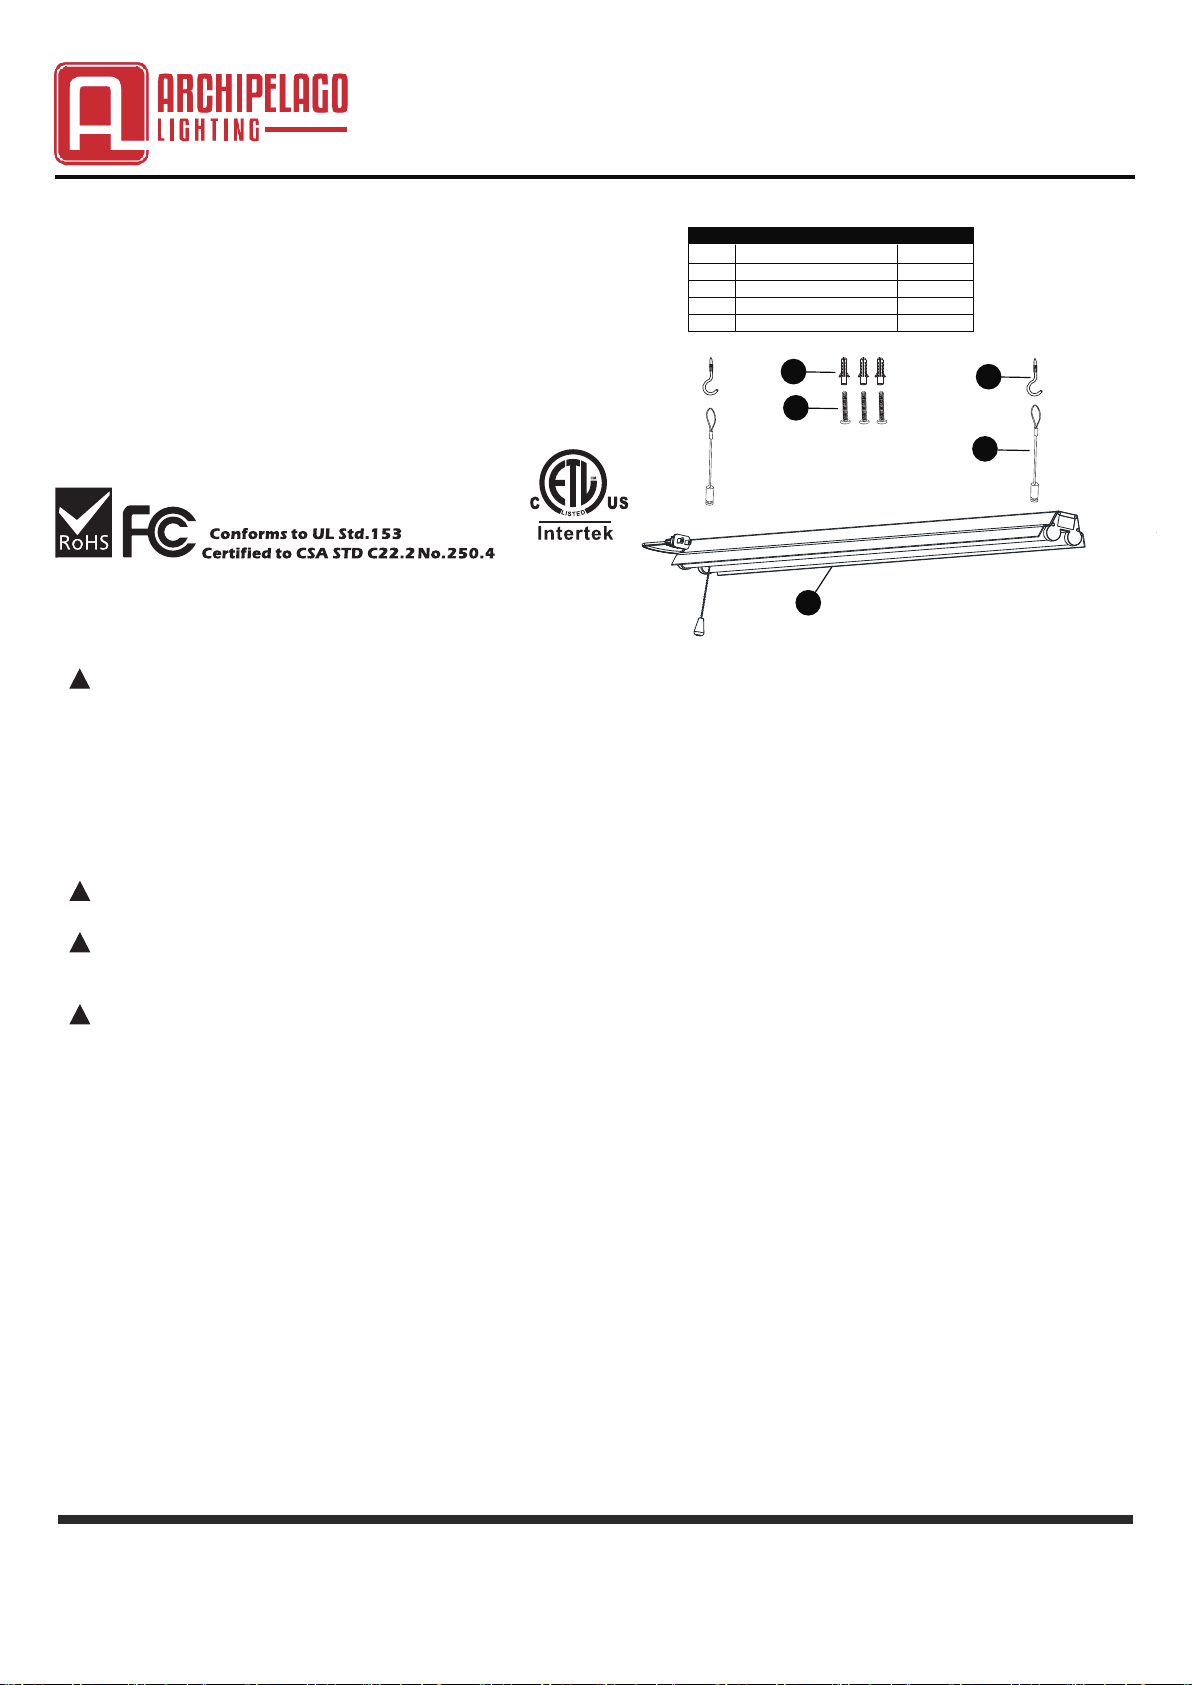
WARNING:“J” Hooks are for mounting onto wood ceiling or a plaster board surface(Recommend
minimum 3/8" thick). Install each “J” hook ( ) or other mounting/hook option exactly 35.5 inches apart.
Check to make sure the hold is secure and appropriate for the weight of the shop light. Never hang
on the shop light or hang any object from the shop light.
WARNING: DO NOT INSTALL on radiant-heating ceilings.
WARNING:
These hooks are to engage the hanging chain only and not the electric cord.
D
!
!
!
Optional Surface Mounting
1Securing fixture to ceiling
Once the head of the screw is in beyond the opening gently slide the fixture
to the right or left to secure it in place
You may need to adjust the depth of both screws to get a tight fit
Your fixture is made from quality materials that will last many years with minimum care. You may want to
periodically clean the diffuser, or interior of the fixture using a mild, non-abrasive glass cleaner and a soft cloth.
DO NOT use solvents, or cleaners containing abrasive agents. When cleaning the inside of the fixture, make sure
you have the power turned off, and do not spray liquid cleaner directly onto the LEDs, LED driver or wiring.
Care & Cleaning
CAUTION: Before attempting to clean the fixture,
disconnect the power to the fixture by turning the breaker
off or removing the fuse from the fuse box.
2Locking the fixture to ceiling
With each fixture installation, insert additional
screw in ceiling opposite screw installed in
Church Key hole. This will prevent the fixture from
accidently sliding of screw mounting.
Screw
“Church Key”
hole
Screw
Please check with your local inspector to insure this mounting
method meets local requirements.
Connecting the power
cord
After installation, plug the power cord (B)
into the power supply.Pull to turn on the
Switch (C).
5
Mounting to drywall
Drill a ¼ in. hole in the ceiling to clear
the closed flaps of the toggle bolt.
Make sure to fasten the
toggle bolt into the butterfly nut before
inserting the flaps into the ceiling.
Tighten the toggle bolt.
1Mounting to wood
Drill a 1/16 in. diameter pilot hole in the
ceiling. Make sure to fasten the combo
wood-machine end into the metal hook.
Tighten the hook screw into the wood.
2Attaching the light to the
chain
Install one header of chain to the hook
on the fixture body. Repeat
this step on the other side of the
fixture.
3Attaching the chain to
the ceiling
4
Before beginning assembly, installation or operation of product, make sure all parts are present. Compare parts with package contents list on previous page. If any part is
missing or damaged, do not attempt to assemble, install or operate the product. Contact customer service for replacement parts. Select suitable location that can support
the weight of the fixture. Determine method of mounting before drilling. Mark two spots on the ceiling 44-1/2 in. apart for the mounting hardware .
Install the pendant to the screw,tight-
ened by hand.Hang the fixture body
by placing one chain set over each
hook that has been installed on the
ceiling.Adjust chains to level light.
The fixture must hang at least 3 in.
from the ceiling.
B
C
9/4/7.5/40/4RM-LSDELLEDOM
LED SHOP/UTILITY LIGHT

1
CONTENIDOS DEL PAQUETE
PREPARACIÓN
Antes de comenzar la instalación del producto,
asegúrese que todas las partes están presentes. Si
alguna pieza falta o está dañada, no intente ensamblar,
instalar o operar el producto.
Tiempo estimado de montaje: 10 minutos
ARCHIPELAGO LIGHTING |MONTCLAIR, CA (866) 912-3220 FAX (909) 627-2887 www.archipelagolighting.com| | |
A Accesorio
Empulgueras
B
CCadenas
D
E
“J” manos
ancla de pared
Parte Descripción Cantidad
1
3
2
2
3
INFORMACIÓN DE SEGURIDAD
Lea y comprenda todo este manual antes de intentar ensamblar, operar o instalar el producto.
1. ADVERTENCIA: RIESGO DE CHOQUE
La corriente eléctrica de la casa puede provocar descargas dolorosas o lesiones graves a menos que se maneje
correcta-mente. Por tu seguridad, siempre.
-Apague la energía en la caja de fusibles o disyuntores antes de instalar la luz de utilidad.
2.Esta luz de utilidad está diseñada para usarse en un circuito protegido por un fusible o disyuntor. Esta luz de utilidad
está destinada a ser instalado directamente debajo de un receptáculo montado en el techo y cualquier cable sobrante
debe mantenerse fuera del espacio de trabajo. Está también diseñado para instalarse de acuerdo con los códigos eléctri-
cos locales. Si no está seguro de su cableado, consulte a un electricista calificado o inspector eléctrico local, y consulte
su código eléctrico.
3.Tenga en cuenta las piezas pequeñas y destruya el material de embalaje, ya que pueden ser peligrosos para los niños.
4. ADVERTENCIA: RIESGO DE LESIONES
No abra la luz de utlidad. No hay piezas reparables en el interior.
5. ADVERTENCIA: RIGESGO DE FUEGO
!
!
!
La mayoría de las viviendas construidas antes de 1985 tienen un cable de suministro de 60 ° C. No sobrecargue el circuito
y el cableado. Consulte a un electricista calificado.
6. ! Este dispositivo cumple con la parte 15 de las reglas de la FCC. El funcionamiento está sujeto a las 2 condiciones
siguientes: (1) Este dispositivo no puede causar interferencias dañinas, y (2) este dispositivo debe aceptar cualquier
interferencia recibida, incluyendo interferencias que pueden causar un funcionamiento no deseado. Nota: Este equipo ha
sido probado y cumple con las límites para un dispositivo digital de Clase B, de conformidad con la parte 15 de las Reglas
de la FCC. Estos límites están diseñados para proporcionar protección contra interferencias perjudiciales en una insta-
lación residencial Este equipo genera, utiliza y puede irradiar radio energía de frecuencia y, si no se instala y utiliza de
acuerdo con las instrucciones, puede causar interferencias comunicaciones por radio. Sin embargo, no hay garantía de
que no se produzcan interferencias en una instalación en particular. Si esto El equipo causa interferencia dañina en la
recepción de radio o televisión, lo cual se puede determinar girando el equipo de y en adelante, se recomienda al usuario
que intente corregir la interferencia mediante una o más de las siguientes medidas: Reorientar o reubicar la antena
receptora. Aumente la separación entre el equipo y el receptor. Conecta el equipo a una toma de corriente en un circuito
diferente al que está conectado el receptor. Consulte con el distribuidor o un técnico experimentado de radio / TV téchnico
para obtener ayuda.
GARANTIA LIMITADA
Durante 5 años a partir de la fecha de compra, este producto está garantizado para el comprador original contra defectos
en materiales y mano de obra mediante el uso normal. Para obtener este servicio, devuelva este artículo al lugar de
compra con un comprobante de compra válido y el producto defectuoso será reemplazado sin cargo. Esta garantía da
sus derechos legales específicos y es posible que tenga otros derechos que varían de un estado a otro.
Esta luz de utilidad se empacó cuidadosamente y se inspeccionó minuciosamente antes de salir de nuestra fábrica.
5012662
A
B
D
E
C
LED LUZ DE TIENDA / UTILIDAD
MODELO SL-9/4/7.5/40/4RM
INSTRUCCIONES DE INSTALACIÓN
De acuerdo a UL Std. 153
Certificada de CSA Std

LED LUZ DE TIENDA / UTILIDAD
MODELO SL-9/4/7.5/40/4RM
INSTRUCCIONES DE INSTALACIÓN
2
ARCHIPELAGO LIGHTING |MONTCLAIR, CA (866) 912-3220 FAX (909) 627-2887 www.archipelagolighting.com| | |
ADVERTENCIA: "J"ganchos son para montar en el techo de madera o en una superficie de
placa de yeso (recomendado mínimo 3/8 in. de grosor). Instale cada "J" hook u otra opción de
montaje / gancho a exactamente 35.5 in de distancia. Verifique para asegurarse de que la
sujeción sea segura y adecuada para la luz de utilidad. Nunca cuelgue en la luz de utilidad o
cuelgue cualqui-er objeto de la luz de utilidad.
ADVERTENCIA: NO INSTALE en techos con calefacción radiante.
ADVERTENCIA: Estos ganchos son para enganchar solo la cadena colgante y no el cable
eléctrico.
!
!
!
Su luminaria está fabricada con materiales de calidad que durarán muchos años con el mínimo cuidado. Es posible que desee Limpie periódicamente el
difusor o el interior del aparato con un limpiacristales suave no abrasivo y un paño suave. NO use disolventes ni limpiadores que contengan agentes
abrasivos. Al limpiar el interior del aparato, asegúrese de tiene la energía apagada y no rocíe limpiador líquido directamente sobre los LED, el controlador
de LED o el cableado.
Cuidado y limpieza
PRECAUCIÓN: Antes de intentar limpiar el dispositivo,
desconecte la energía del aparato girando el disyuntor
apagado o quitando el fusible de la caja de fusibles.
Conectando el Cable de
Alimentación
Después de la instalación, enchufe el
cable de alimentación (B) en la fuente
de alimentación. Interruptor (C).
5
Montaje en paneles de yeso
Taladre un agujero de ¼ de pulgada en el
techo para despejar las solapas cerradas
del perno de palanca. Asegúrese de
sujetar el coloque el perno en la tuerca de
mariposa antes insertando las solapas en
el techo. Apriete el perno de palanca.
1Montaje en madera
Taladre un orificio piloto de 1/16 pulg.
De diámetro en el techo. Asegúrate de
abrochar el combo extremo de la
máquina de madera en el gancho de
metal. Apriete el tornillo del gancho en
la madera.
2Colocando la luz en el
cadena
Instale un cabezal de cadena en el
gancho en el cuerpo del aparato.
Repetir este paso al otro lado de la
accesorio.
3Colocando la cadena
en el techo
4
Antes de comenzar a ensamblar, instalar u operar el producto, asegúrese de que todas las piezas estén presentes. Compare las piezas con
la lista del contenido del paquete en la página anterior. Si alguna parte es falta o está dañado, no intente ensamblar, instalar u operar el
producto. Comuníquese con el servicio al cliente para obtener repuestos. Seleccione una ubicación adecuada que pueda soportar el peso
del accesorio. Determine el método de montaje antes de perforar. Marque dos puntos en el techo a 44-1 / 2 in. de distancia para los
accesorios de montaje
Instale el colgante en el tornillo,
apriete a mano Colgar el cuerpo del
accesorio colocando un juego de
cadenas sobre cada gancho que se
ha instalado en el techo Ajuste las
cadenas para nivelar la luz. El
accesorio debe colgar al menos 3
pulg. desde el techo.
B
C
This manual suits for next models
4
Table of contents
Languages:
Other ARCHIPELAGO LIGHTING Outdoor Light manuals