Aruba ClearPass Policy Manager C1000 User manual
ClearPass 6.7 Getting Started Guide| 1
ClearPass 6.7 Getting Started Guide
This Getting Started Guide describes the procedures for installing and configuring ClearPass Policy Manager on
a hardware appliance, as well as how to install ClearPass on a VMware vSphere Hypervisor host and on a host
that runs Microsoft's hypvervisor, Hyper-V™.
Due to a negative performance impact when ClearPass 6.7 is installed on a KVM appliance, Aruba will not post the
KVM image with this release. For more information, refer to the "6.7.0 Upgrades on KVM Hypervisors are Deferred"
section in the ClearPass 6.7 Release Notes.
This Getting Started Guide provides the following information:
lAbout the ClearPass Access Management System
lSetting Up the ClearPass Hardware Appliances
lUsing the VMware vSphere Hypervisor Web Client to Install ClearPass on a Virtual Machine
lUsing Microsoft Hyper-V to Install ClearPass on a Virtual Appliance
About the ClearPass Access Management System
This section contains the following information:
lClearPass Access Management System Overview
lSupported Browsers
lKey Features
lAdvanced Policy Management
lClearPass Policy Manager Hardware and Virtual Appliances
lClearPass Specifications
ClearPass Access Management System Overview
The Aruba ClearPass Access Management System provides a window into your network and covers all your
access security requirements from a single platform. You get complete views of mobile devices and users and
have total control over what they can access.
With ClearPass, IT can centrally manage network policies, automatically configure devices and distribute
security certificates, admit guest users, assess device health, and even share information with third-party
solutions—through a single pane of glass, on any network and without changing the current infrastructure.
Role-Based and Device-Based Access
The ClearPass Policy Manager™ platform provides role-based and device-based network access control for
employees, contractors, and guests across any wired, wireless, and VPN infrastructure.
ClearPass works with any multivendor network and can be extended to business and IT systems that are
already in place.

Self-Service Capabilities
ClearPass delivers a wide range of unique self-service capabilities. Users can securely onboard their own
devices for enterprise use or register AirPlay, AirPrint, Digital Living Network Alliance (DLNA), and Universal Plug
and Play (UPnP) devices that are enabled for sharing, sponsor guest Wi-Fi access, and even set up sharing for
Apple TV and Google Chromecast.
Leveraging Contextual Data
The power of ClearPass comes from integrating ultra-scalable AAA (authentication, authorization, and
accounting) with policy management, guest network access, device onboarding, and device health checks with
a complete understanding of context.
From this single ClearPass policy and AAA platform, contextual data is leveraged across the network to ensure
that users and devices are granted the appropriate access privileges.
ClearPass leverages a user’s role, device, location, application use, and time of day to execute custom security
policies, accelerate device deployments, and streamline network operations across wired networks, wireless
networks, and VPNs.
Third-Party Security and ITSystems
ClearPass can be extended to third-party security and IT systems using REST-based APIs to automate work
flows that previously required manual IT intervention. It integrates with mobile device management to
leverage device inventory and posture information, which enables better-informed policy decisions.
Supported Browsers
The supported browsers for ClearPass are:
lMozilla Firefox on Windows 7, Windows 8.x, Windows 10, and macOS
lGoogle Chrome for macOS and Windows
lApple Safari 9.x and later on macOS
lMobile Safari 5.x on iOS
lMicrosoft Edge on Windows 10
lMicrosoft Internet Explorer 10 and later on Windows 7 and Windows 8.x
When accessing ClearPass Insight with Internet Explorer (IE), IE 11 or above is required.
Key Features
ClearPass's key features are as follows:
lRole-based network access enforcement for multivendor Wi-Fi, wired, and VPN networks
lVirtual and hardware appliances that can be deployed in a cluster to increase scalability and redundancy.
lSupport for popular virtualizations platforms such as VMware vSphere Hypervisor (ESXi), Microsoft Hyper-
V, and Amazon AWS (EC2).
lIntuitive policy configuration templates and visibility troubleshooting tools.
lSupports multiple authentication/authorization sources—AD, LDAP, and SQL dB.
lSelf-service device onboarding with built-in certificate authority (CA) for BYOD.
lGuest access with extensive customization, branding and sponsor-based approvals.
lSupports NAC and EMM/MDM integration for mobile device assessments.
lComprehensive integration with the Aruba 360 Security Exchange Program.
lSAML 2.0 Identity Provider, which allows seamless single sign-on (SSO) to cloud or on-premise applications.
ClearPass 6.7 Getting Started Guide 2

lSAML 2.0 Service Provider, which allows seamless and secure access to ClearPass components using
federated/unified identity.
lAdvanced reporting and granular alerts.
lActive and passive device fingerprinting
lHigh performance, scalability, High Availability, and load balancing
lA Web-based user interface that simplifies policy configuration and troubleshooting
lNetwork Access Control (NAC), Network Access Protection (NAP) posture and health checks, and Mobile
Device Management (MDM) integration for mobile device posture checks
lSocial and Cloud Identity Network and Cloud Application single sign-on (SSO) via OAuth 2.0
lFacebook, Twitter, LinkedIn, Azure Active Directory and Office 365, Google G Suite, and so on.
lDevice and User certificate enrollment via Simple Certificate Enrollment Protocol (SCEP), Enrollment over
Secure Transport (EST) and REST API-based workflows
lAdvanced reporting of all user authentications and failures
lEnterprise Reporting, Monitoring, and Alerting
lHTTP/RESTful APIs for integration with third-party systems, Internet security, and MDM
lDevice profiling and self-service onboarding
lGuest access with extensive branding and customization and sponsor-based approvals
lIPv6 administration support
Advanced Policy Management
ClearPass advanced policy management support includes:
lEmployee access
ClearPass Policy Manager offers user and device authentication based on 802.1X, non-802.1X, and Web
Portal access methods. To strengthen security in any environment, you can concurrently use multiple
authentication protocols, such as PEAP, EAP-FAST, EAP-TLS, EAP-TTLS, and EAP-PEAP-Public.
For fine-grained control, you can use attributes from multiple identity stores, such as Microsoft Active
Directory, LDAP-compliant directory, ODBC-compliant SQL database, token servers, and internal databases
across domains within a single policy.
Additionally, you can add posture assessments and remediation to existing policies at any time.
lBuilt-in device profiling
ClearPass provides a built-in profiling service that discovers and classifies all endpoints, regardless of device
type. You can obtain a variety of contextual data(such as MAC OUIs, DHCP fingerprinting, and other
identity-centric device data) and use this data within policies.
Stored profiling data identifies device profile changes and dynamically modifies authorization privileges.
For example, if a printer appears as a Windows laptop, ClearPass Policy Manager can automatically deny
access.
lAccess for unmanaged endpoints
Unmanaged non-802.1X devices (such as printers, IP phones, and IP cameras) can be identified as known
or unknown upon connecting to the network. The identity of these devices is based on the presence of
their MAC address in an external or internal database.
lSecure configuration of personal devices
ClearPass Onboard fully automates the provisioning of any Windows, macOS, iOS, Android, ChromeOS, and
Ubuntu devices via a built-in enrollment workflow.
Valid users are redirected to a template-based interface to configure required SSIDs and 802.1X settings,
and download unique device credentials.
3 ClearPass 6.7 Getting Started Guide

Additional capabilities include the ability for IT to revoke and delete credentials for lost or stolen devices,
and the ability to configure mobile email settings for Exchange ActiveSync and VPN clients on some device
types.
lCustomizable visitor management
ClearPass Guest simplifies work flow processes so that receptionists, employees, and other non-IT staff can
create temporary guest accounts for secure Wi-Fi and wired network access. Self-registration allows guests
to create their credentials.
lDevice health checks
ClearPass OnGuard, as well as separate OnGuard persistent or dissolvable agents, performs advanced
endpoint posture assessments. Traditional NAC health-check capabilities ensure compliance and network
safeguards before devices connect.
You can use information about endpoint integrity (such as status of anti-virus, firewall, and peer-to-peer
applications) to enhance authorization policies. Automatic remediation services are also available for non-
compliant devices.
ClearPass Policy Manager Hardware and Virtual Appliances
ClearPass Policy Manager is available as a hardware or a virtual appliance. To increase scalability and
redundancy, you can deploy virtual appliances, as well as the hardware appliances, within a cluster.
lFor hardware and virtual appliance installation and deployment procedures, see ClearPass 6.7 Getting
Started Guide.
Virtual appliances are supported on the following platforms:
lVMware ESX and ESXi
For installation and deployment procedures, see Using the VMware vSphere Hypervisor Web Client to
Install ClearPass on a Virtual Machine.
lMicrosoft Hyper-V
For installation and deployment procedures, see Using Microsoft Hyper-V to Install ClearPass on a Virtual
Appliance.
ClearPass Specifications
Hardware and Virtual Appliances
ClearPass is available as hardware or as a virtual appliance. Virtual appliances are supported on VMware
vSphere Hypervisor (ESXi), Microsoft Hyper-V, and Amazon EC2.
lVMware ESXi 5.5 up to 6.5 Update 1
lMicrosoft Hyper-V Server 2012 R2/2016, and Windows Server 2012 R2 with Hyper-V
lAmazon AWS (EC2)
ClearPass Platform
lDeployment templates for any network type, identity store, and endpoint
l802.1X, MAC authentication and captive portal support
lClearPass OnConnect for SNMP-based enforcement on wired switches
lAdvanced reporting, analytics and troubleshooting tools
lInteractive policy simulation and monitor mode utilities
lMultiple device registration portals—Guest, Aruba AirGroup, BYOD (bring your own device), and
unmanaged devices
ClearPass 6.7 Getting Started Guide 4

lAdmin/Operator access security via CAC (Common Access Card) and TLS (Transport Layer Security)
certificates
Framework and Protocol Support
lRADIUS, RADIUS CoA, TACACS+, Web authentication, and SAML v2.0
lEAP-FAST (EAP-MSCHAPv2, EAP-GTC, EAP-TLS)
lPEAP (EAP-MSCHAPv2, EAP-GTC, EAP-TLS, EAP-PEAP-Public)
lEAP-TTLS (EAP-MSCHAPv2, EAP-GTC, EAP- TLS, EAP-MD5, PAP, CHAP)
lEAP-TLS
lPAP, CHAP, MSCHAPv1, MSCHAPv2, and EAP-MD5
lWireless and wired 802.1X and VPN
lOAuth .02
lMicrosoft NAP and NAC
lActive Directory machine authentication
lOnline Certificate Status Protocol (OCSP)
lSNMP generic MIB, SNMP private MIB
lCommon Event Format (CEF), Log Event Extended Format (LEEF)
lSimple Certificate Enrollment Protocol (SCEP)
lEnrollment over Secure Transport (EST)
Supported Identity Stores
lMicrosoft Active Directory
lKerberos
lAny LDAP-compliant directory
lMicrosoft SQL, PostgreSQL, MariaDB, and Oracle 11g ODBC-compliant SQL server
lBuilt-in SQL store
lBuilt-in static-hosts list
lToken servers
lBuilt-in SQL store, static hosts list
lMicrosoft Azure Active Directory (via SAML and OAuth 2.0)
lGoogle G Suite (via SAML and OAuth 2.0)
IPv6 Support
lWeb and CLI based management
lIPv6 addressed authentication & authorization servers
lIPv6 accounting proxy
lIPv6 addressed endpoint context servers
lSyslog, DNS, NTP, IPsec IPv6 targets
lIPv6 Virtual IP for high availability
lHTTP Proxy
lIngress Event Engine Syslog sources
Profiling Methods
lActive: Nmap, WMI, SSH, SNMP
5 ClearPass 6.7 Getting Started Guide

lPassive: MAC OUI, DHCP, TCP, Netflow v5/v10, IPFIX, sFLOW, ‘SPAN’ Port, HTTP User-Agent, IF-MAP
lIntegrated and Third-Party: Onboard, OnGuard, ArubaOS, EMM/MDM, Rapid7, Cisco device sensor
Setting Up the ClearPass Hardware Appliances
This section documents the procedures for installing and configuring ClearPass on a hardware appliance, as
well as how to complete important administrative tasks, such as registering for ClearPass software updates and
changing the admin password.
This section contains the following information:
lAbout the ClearPass Hardware Appliances
lClearPass C1000 Hardware Appliance
lClearPass C2000 Hardware Appliance
lClearPass C3000 Hardware Appliance
lBefore Starting the ClearPass Installation
lActivating ClearPass
lLogging in to the ClearPass Hardware Appliance
lPowering Off the ClearPass Hardware Appliance
lResetting the System Passwords to the Factory Defaults
About the ClearPass Hardware Appliances
Aruba provides three hardware appliance platforms:
lClearPass Policy Manager C1000
lClearPass Policy Manager C2000
lClearPass Policy Manager C3000
Table 1: Functional Description of the ClearPass Hardware Appliance Ports
Port Description
Data port (Gigabit
Ethernet)
The Data port (ethernet 1) provides a point of contact for RADIUS, TACACS+,
Web authentication, and other dataplane requests. This configuration is
optional. If this port is not configured, requests are redirected to the
Management port.
iLO port The iLO (Integrated Lights-Out) port is an Ethernet port that provides out-of-
band management facilities. The iLO port makes it possible to perform
activities on the ArubaOS switch or an HP server from a remote location. The
iLO card has a separate network connection (and its own IP address) to which
one can connect via HTTPS.
Available on theClearPass C2000 and C3000 hardware appliances.
Management port
(Gigabit Ethernet)
The Management port (ethernet 0) provides access for cluster administration
and appliance maintenance using the WebUI, CLI, or internal cluster
communication. This configuration is mandatory.
ClearPass 6.7 Getting Started Guide 6

Port Description
Serial port The Serial port is used to initially configure the ClearPass hardware appliance
using a hard-wired terminal.
SPAN ports A SPAN (Switched Port Analyzer) port is a method of monitoring network
traffic. The switch sends a copy of all network packets seen on one port (which
is the monitored or source port) to a destination SPAN port, where the packets
can be analyzed.
Available on the ClearPass C3000 hardware appliance.
USB ports Two USB v2.0 ports are provided on each ClearPass hardware appliance.
VGA connector You can use the VGA Connector to connect the ClearPass hardware appliance
to a monitor and keyboard.
ClearPass C1000 Hardware Appliance
The ClearPass Policy Manager C1000 hardware appliance (SKU: JZ508A) is a RADIUS/ TACACS+ server that
provides advanced policy control for up to 500 simultaneous sessions.
The ClearPass C1000 appliance has a single 1 TB SATA disk with no RAID disk protection.
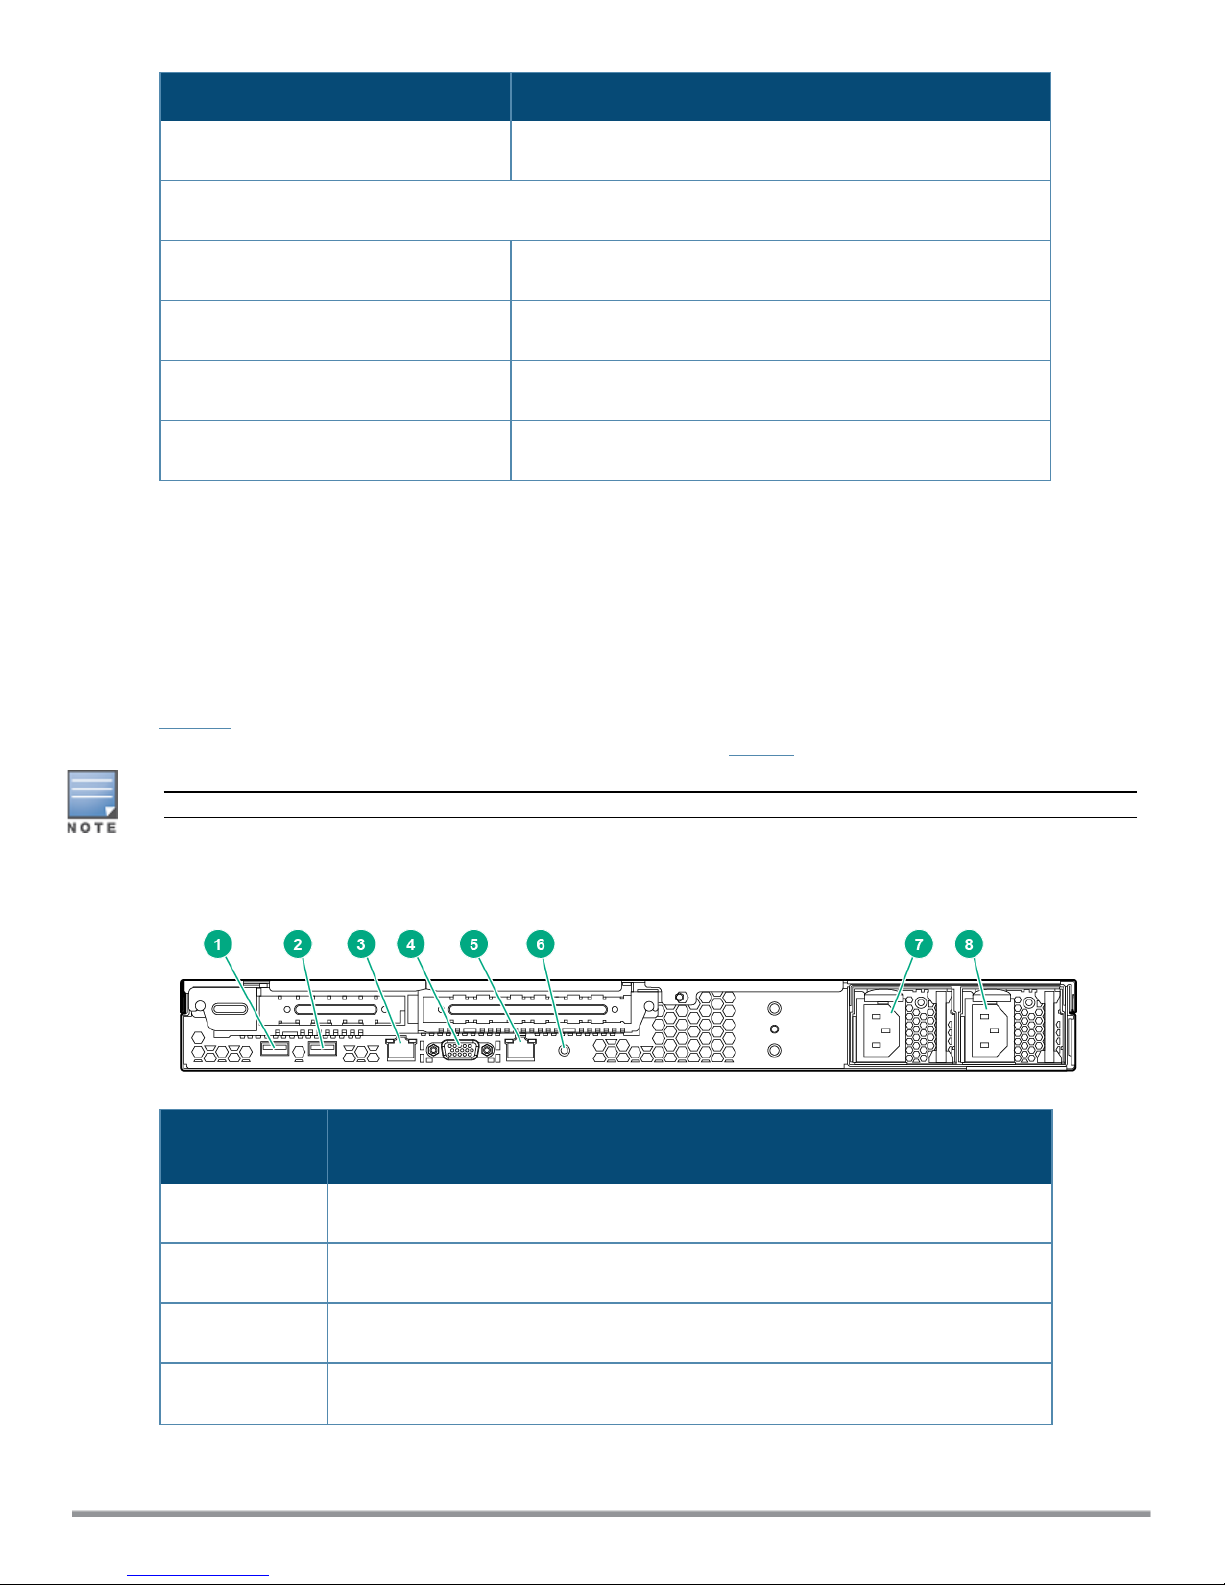
Figure 1 shows the ports and components on the rear panel of the ClearPass C1000 hardware appliance. The
function of each of these ports and components is described in Table 1.
Figure 1 Ports and Components on the ClearPass C1000 Hardware Appliance
Callout
Number C1000 Port/Component
1 Fan
2 Power Supply
3 Serial port
4 Data port
7 ClearPass 6.7 Getting Started Guide

Callout
Number C1000 Port/Component
5 Management port (eth0)
6 USB ports (2)
7 VGA Connector
You can also access the ClearPass hardware appliance by connecting a monitor and keyboard to the hardware
appliance.
Table 2 provides the specifications for the ClearPass Policy Manager C1000 hardware appliance.
Table 2: ClearPass C1000 Appliance Specifications
ClearPass C1000 Appliance Specifications
Hardware Model Unicom S-1200 R4
CPU (1) Eight Core 2.4 GHz Atom C2758
Memory 8 GB (2 x2 GB)
Hard drive storage l(1) SATA (7.3K RPM), Serial ATA
l1 TB hard drive
Serial Port Yes: RJ-45
Performance &Scale Please refer to the ClearPass Scaling & Ordering Guide
Form Factor
Rack mount Included
Dimensions (WxHxD) 17.2” x 1.7” x 11.3”
Weight (max configuration) 8.5 lbs
Power
Power consumption (maximum) 200 watts
Power supply Single
AC input voltage 100/240 VAC auto-selecting
ClearPass 6.7 Getting Started Guide 8
ClearPass C1000 Appliance Specifications
AC input frequency 50/60 Hz auto-selecting
Environmental
Operating temperature 5º C to 35º C (41º F to 95º F)
Operating vibration 0.26 G at 5 Hz to 200 Hz for 15 minutes
Operating shock 1 shock pulse of 20 G for up to 2.5 ms
Operating altitude -16 m to 3,048 m (-50 ft to 10,000 ft)
ClearPass C2000 Hardware Appliance
The ClearPass Policy Manager C2000 hardware appliance (SKU: JZ509A) is a RADIUS/ TACACS+ server that
provides advanced policy control for up to 5,000 simultaneous sessions.
The ClearPass C2000 appliance ships with two x 1TB SATA disk drives. These drives are managed by an LSI
RAID-1 controller. The drives are configured as a RAID-1 pair. The LSI controller presents to ClearPass a single
virtual 1TB drive, masking the two underlying physical drives.
Figure 2 shows the ports and components on the rear panel of the ClearPass C2000 hardware appliance. The
function of each of these ports and components is described in Table 1.
The image of the ClearPass C2000 hardware appliance shown here includes the optional redundant power supply.
Figure 2 Ports and Components on the ClearPass C2000 Hardware Appliance
Callout
Number C2000 Port/Component
1 and 2 USB ports (2)
3 iLO (Integrated Lights-Out) port and Management port (eth0)
4 VGA Connector
5 Data port (eth1)
9 ClearPass 6.7 Getting Started Guide

Callout
Number C2000 Port/Component
6 UID (Unit ID)
The UID LED helps you identify and locate a system, especially in high-density rack
environments. Additionally, the UID is used to indicate that a critical operation is
underway on the host, such as Remote console access or ROM flash.
The "current state" (on or off) of the UID is the last state chosen using one of these
methods. If a new state is chosen while the UID is blinking, this new state becomes
the current state, and takes effect when the UID stops blinking.
NOTE: The Unit ID Light web page does not automatically refresh itself if the state
of the actual light changes after the page is loaded. To ensure the page accurately
reflects the state of the UID Light, click on the Virtual Indicators link to update the
page.
7 Power Supply
8 Optional redundant Power Supply
You can also access the ClearPass hardware appliance by connecting a monitor and keyboard to the hardware
appliance.
Table 3 provides the specifications for the ClearPass C2000 hardware appliance.
Table 3: ClearPass C2000 Appliance Specifications
ClearPass C2000 Appliance Specifications
Hardware Model HPE DL20 Gen 9
CPU (1) Xeon 3.5Ghz E3-1240v5 with four cores (8 Threads)
Memory 16 GB
Hard drive storage l(2) SATA (7.2K RPM) 1TB hard drive
lRAID-1 controller
Out-of-Band management HPE Integrated Lights-Out (iLO) Standard
Serial Port Yes: Virtual Serial via iLO
Performance &Scale Please refer to the ClearPass Scaling & Ordering Guide
Form Factor
Rack mount l1U SFF Easy Install Rail
l1U Cable Management Arm
ClearPass 6.7 Getting Started Guide 10

ClearPass C2000 Appliance Specifications
Dimensions (WxHxD 17.11” x 1.70” x 150.5”
Weight (max configuration) Up to 19.18 lbs
Power Specifications
Power consumption (maximum) 250 watts
Power supply HPE 900W AC 240 VDC Power Input FIO Module
NOTE: The optional HPE 900W Redundant Power Supply
supports 100 VAC to 240 VAC; this power supply also
supports 240 VDC.
Power redundancy Optional
AC input voltage 100/240 VAC auto-selecting
AC input frequency 50/60 Hz auto-selecting
Environmental Specifications
Operating temperature 10º C to 35º C (50º F to 95º F)
Operating vibration Random vibration at 0.000075 G²/Hz, 10Hz to 300Hz, (0.15
G’s nominal)
Operating shock 2 G's
Operating altitude 3,050 m (10,000 ft)
ClearPass C3000 Hardware Appliance
The ClearPass Policy Manager C3000 hardware appliance (SKU: JZ510A) is a RADIUS/ TACACS+ server that
provides advanced policy control for up to 25,000 simultaneous sessions.
The ClearPass C3000 appliance ships with six Serial-Attach SCSI (SAS) (10K RPM) 600GB Hot-Plug hard drives
(RAID-10 controller).
The LSI controller presents to ClearPass a single virtual 1.675 TB drive, masking the underlying two physical
drive groups (two groups of two mirrored drives).
Figure 3 shows the ports and components on the rear panel of the ClearPass C3000 hardware appliance. The
function of each of these ports and components is described in Table 1.
The image of the ClearPass C3000 hardware appliance shown here includes the optional redundant power supply.
11 ClearPass 6.7 Getting Started Guide

Figure 3 Ports and Components on the ClearPass C3000 Hardware Appliance
Callout
Number C3000 Port/Component
1 UID (Unit ID) LED
The UID LED helps you identify and locate a system, especially in high-density rack
environments. Additionally, the UID is used to indicate that a critical operation is
underway on the host, such as Remote console access or ROM flash.
The "current state" (on or off) of the UID is the last state chosen using one of these
methods. If a new state is chosen while the UID is blinking, this new state becomes
the current state, and takes effect when the UID stops blinking.
NOTE: The Unit ID Light web page does not automatically refresh itself if the state of
the actual light changes after the page is loaded. To ensure the page accurately
reflects the state of the UID Light, click on the Virtual Indicators link to update the page
2 USB ports (2)
3 Serial port
4 iLO (Integrated Lights-Out) port and Management port (eth0)
5 Management port (eth0)
6 Data port (eth1)
7 Destination SPAN ports (2)
8 VGA Connector
9 Fan and Power Supply
10 Optional redundant fan and Power Supply
Table 4 provides the specifications for the ClearPass C3000 hardware appliance.
ClearPass 6.7 Getting Started Guide 12

Table 4: ClearPass C3000 Appliance Specifications
ClearPass C3000 Appliance Specifications
Hardware Model HPE DL360 Gen 9
CPUs (2) Xeon 2.4GHz E5-2620_V3 with Six Cores (12 Threads)
Memory 64 GB Memory
Hard drive storage (6) 300GB Serial-Attach SCSI (SAS) (10K RPM) 60GB Hot-
Plug hard drives (RAID-10 controller)
Out-of-Band Management HPE Integrated Lights-Out (iLO): Advanced
Serial Port Yes: DB-9
Performance &Scale Please refer to the ClearPass Scaling & Ordering Guide
Form Factor
Rack mount l1U SFF Easy Install Rail
l1U Cable Management Arm
Dimensions (WxHxD 17.1” x 1.7” x 27.5”
Weight (max configuration) Up to 33.3 lbs
Power Specifications
Power supply HPE 500W Flex Slot Platinum Hot Plug Power Supply
Power Redundancy Optional
AC input voltage 100/240 VAC auto-selecting
AC input frequency 50/60 Hz auto-selecting
Environmental Specifications
Operating temperature 10º C to 35º C (50º F to 95º F)
13 ClearPass 6.7 Getting Started Guide

ClearPass C3000 Appliance Specifications
Operating vibration Random vibration at 0.000075 G²/Hz
Operating shock 2 G's
Operating altitude 3,050 m (10,000 ft)
Before Starting the ClearPass Installation
Before starting the ClearPass installation and configuration procedures for the hardware appliance, determine
the following information for the ClearPass server on your network, note the corresponding values for the
parameters listed in Table 5, and keep it for your records:
Table 5: ClearPass Server Configuration Reference
Required Information Value for Your Installation
Host name (Policy Manager
server)
Management port IP
address
Management port subnet
mask
Management port gateway
Data port IP address
(optional) NOTE: Make sure that the Data port IP address is not in the same
subnet as the Management port IP address.
Data port subnet mask
(optional)
Data port gateway
(optional)
Primary DNS
Secondary DNS
NTP server (optional)
ClearPass 6.7 Getting Started Guide 14

Configuring the ClearPass Hardware Appliance
The initial setup dialog starts when you connect a terminal, PC, or laptop running a terminal emulation program
to the Serial port on the ClearPass hardware appliance.
To configure the ClearPass Policy Manager hardware appliance:
1. Connect the Serial port.
a. Connect the Serial port to a terminal using a null modem cable.
b. Power on the hardware appliance.
The hardware appliance is now available for configuration.
2. Configure the Serial port.
lBit Rate: 9600
lData Bits: 8
lParity: None
lStop Bits: 1
lFlow Control: None
3. Log in.
Use the following preconfigured credentials to log in to the hardware appliance.
(You will create a unique appliance/cluster administration password in Step 5.)
nlogin: appadmin
npassword: eTIPS123
This initiates the Policy Manager configuration wizard.
4. Configure the ClearPass hardware appliance.
Follow the prompts, replacing the placeholder entries in the following illustration with the information you
entered in Table 5:
nEnter hostname:
nEnter Management Port IP Address:
nEnter Management Port Subnet Mask:
nEnter Management Port Gateway:
nEnter Data Port IP Address:
nEnter Data Port Subnet Mask:
nEnter Data Port Gateway:
nEnter Primary DNS:
nEnter Secondary DNS:
5. Specify the cluster password.
Setting the cluster password also changes the password for the CLI user appadmin, as well as the Administrative
user admin. If you want the admin password to be unique, see Changing the Administration Password on page 18.
a. Enter any string with a minimum of six characters, then you are prompted to confirm the cluster
password.
b. After this configuration is applied, use this new password for cluster administration and management of
the ClearPass virtual appliance.
6. Configure the system date and time.
a. Follow the prompts to configure the system date and time.
b. To set the date and time by configuring the NTP server, use the primary and secondary NTP server
information you entered in Table 5.
15 ClearPass 6.7 Getting Started Guide

7. Apply the configuration.
a. To apply the configuration, press Y.
nTo restart the configuration procedure, press N.
nTo quit the setup process, press Q.
Configuration on the hardware appliance console is now complete. The next task is to activate the ClearPass
product.
Activating ClearPass
To activate ClearPass Policy Manager and apply the ClearPass license:
1. After the configuration has been applied at the virtual appliance console, open a web browser and navigate
to the ClearPass Policy Manager server:"
https://x.x.x.x/tips/
where x.x.x.x is the IP address of the management interface defined for the ClearPass server as listed in
Table 5.
2. Accept any security warnings from your browser regarding the self-signed SSL certificate, which comes
installed in ClearPass by default.
The Admin Login screen appears with a message indicating that you have 90 days to activate the product
and a link to activate the product.
Figure 4 Activating ClearPass
3. To activate ClearPass on this hardware appliance, click Activate Now.
When you click Activate Now, ClearPass Policy Manager attempts to activate the product over the
Internet with Aruba Networks license activation servers.
If the ClearPass Policy Manager hardware appliance does not have Internet access, you can perform the
product activation offline by following the steps for offline activation presented in the Offline Activation
section shown in Figure 5.
ClearPass 6.7 Getting Started Guide 16
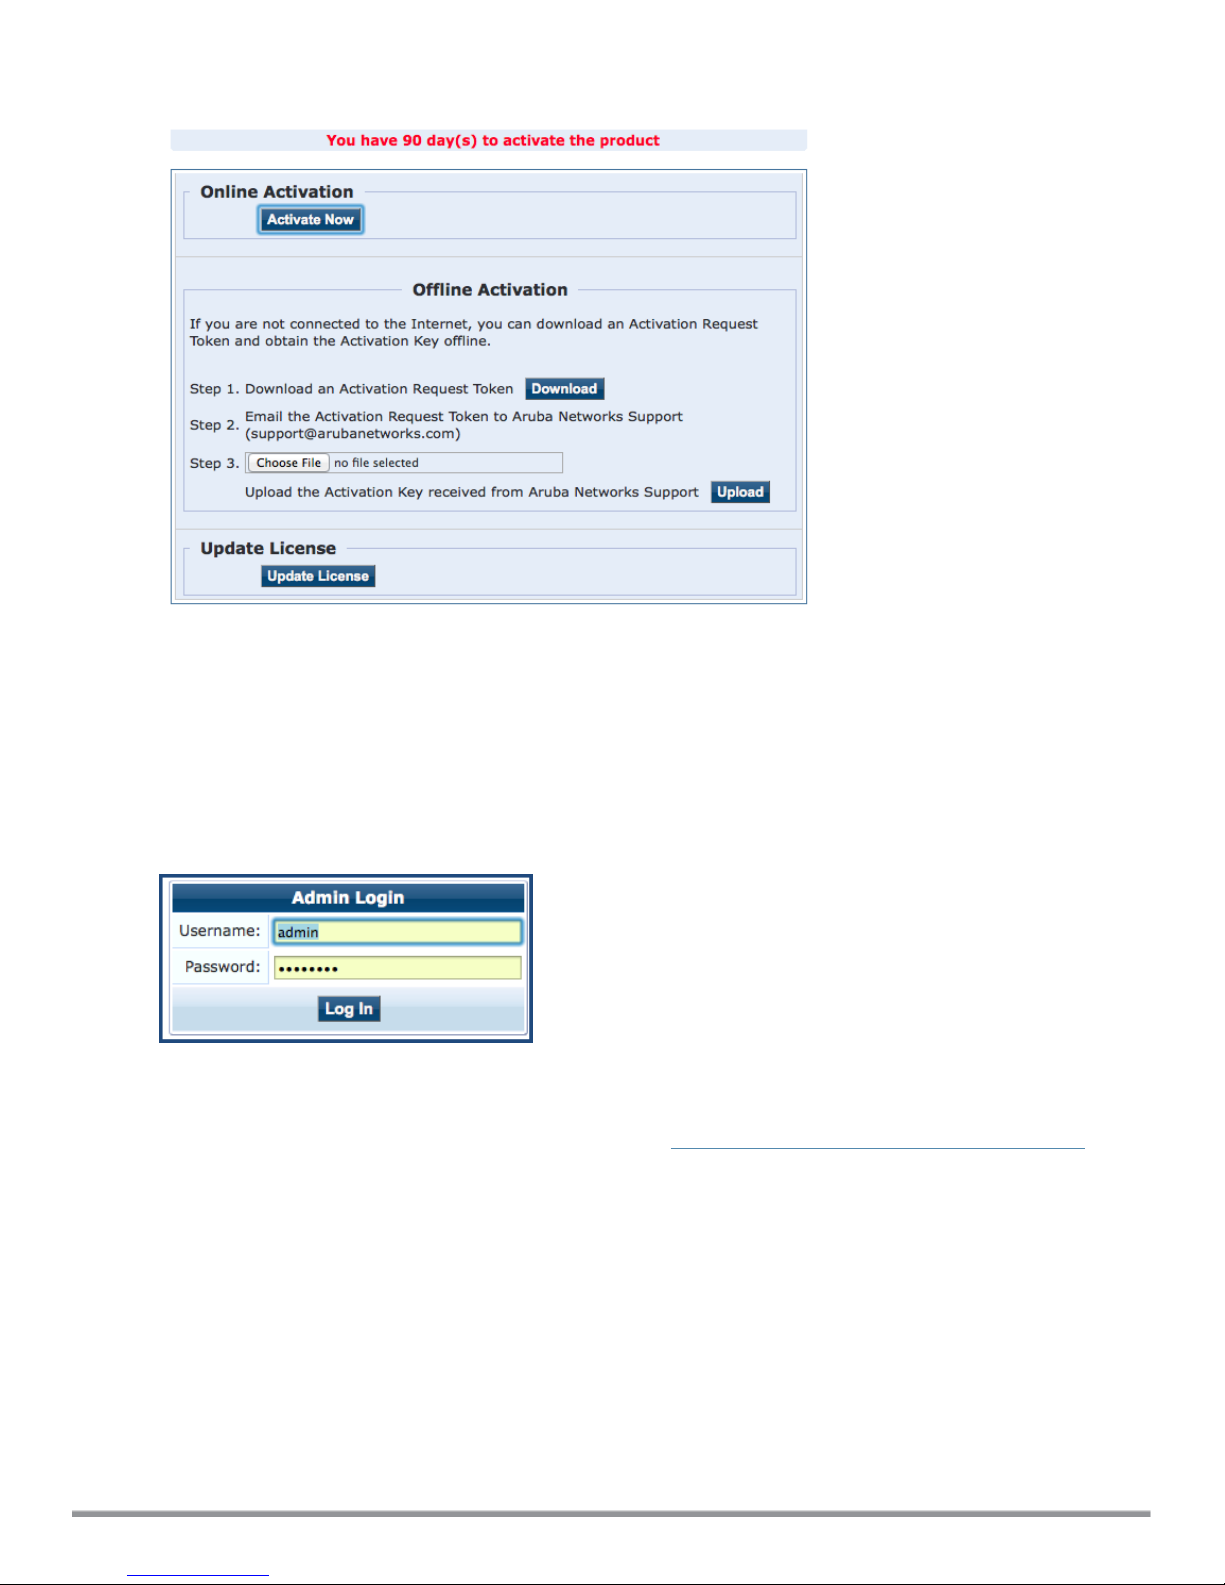
Figure 5 Performing Offline Activation
4. If the ClearPass server is connected to the Internet, click the Activate Now button.
You receive the message, "Product has been successfully activated" and the Admin Login dialog is
displayed.
Logging in to the ClearPass Hardware Appliance
After a successful activation, the Admin Login dialog appears.
Figure 6 Logging in to the ClearPass Hardware Appliance
1. Log in to the ClearPass hardware appliance with the following credentials:
nUsername: admin
nPassword:Enter the cluster password defined in Configuring the ClearPass Hardware Appliance.
2. Click Log In.
The ClearPass Policy Manager Landing Page opens.
17 ClearPass 6.7 Getting Started Guide

Figure 7 ClearPass Policy Manager Landing Page
Changing the Administration Password
When the cluster password for this ClearPass server is set upon initial configuration, the administration
password is also set to the same password (see Configuring the ClearPass Hardware Appliance).
If you wish to assign a unique admin password, use this procedure to change it.
To change the administration password:
1. In ClearPass, navigate to Administration >Users and Privileges >Admin Users.
The Admin Users page opens.
Figure 8 Admin Users Page
2. Select the appropriate admin user.
The Edit Admin User dialog opens.
ClearPass 6.7 Getting Started Guide 18
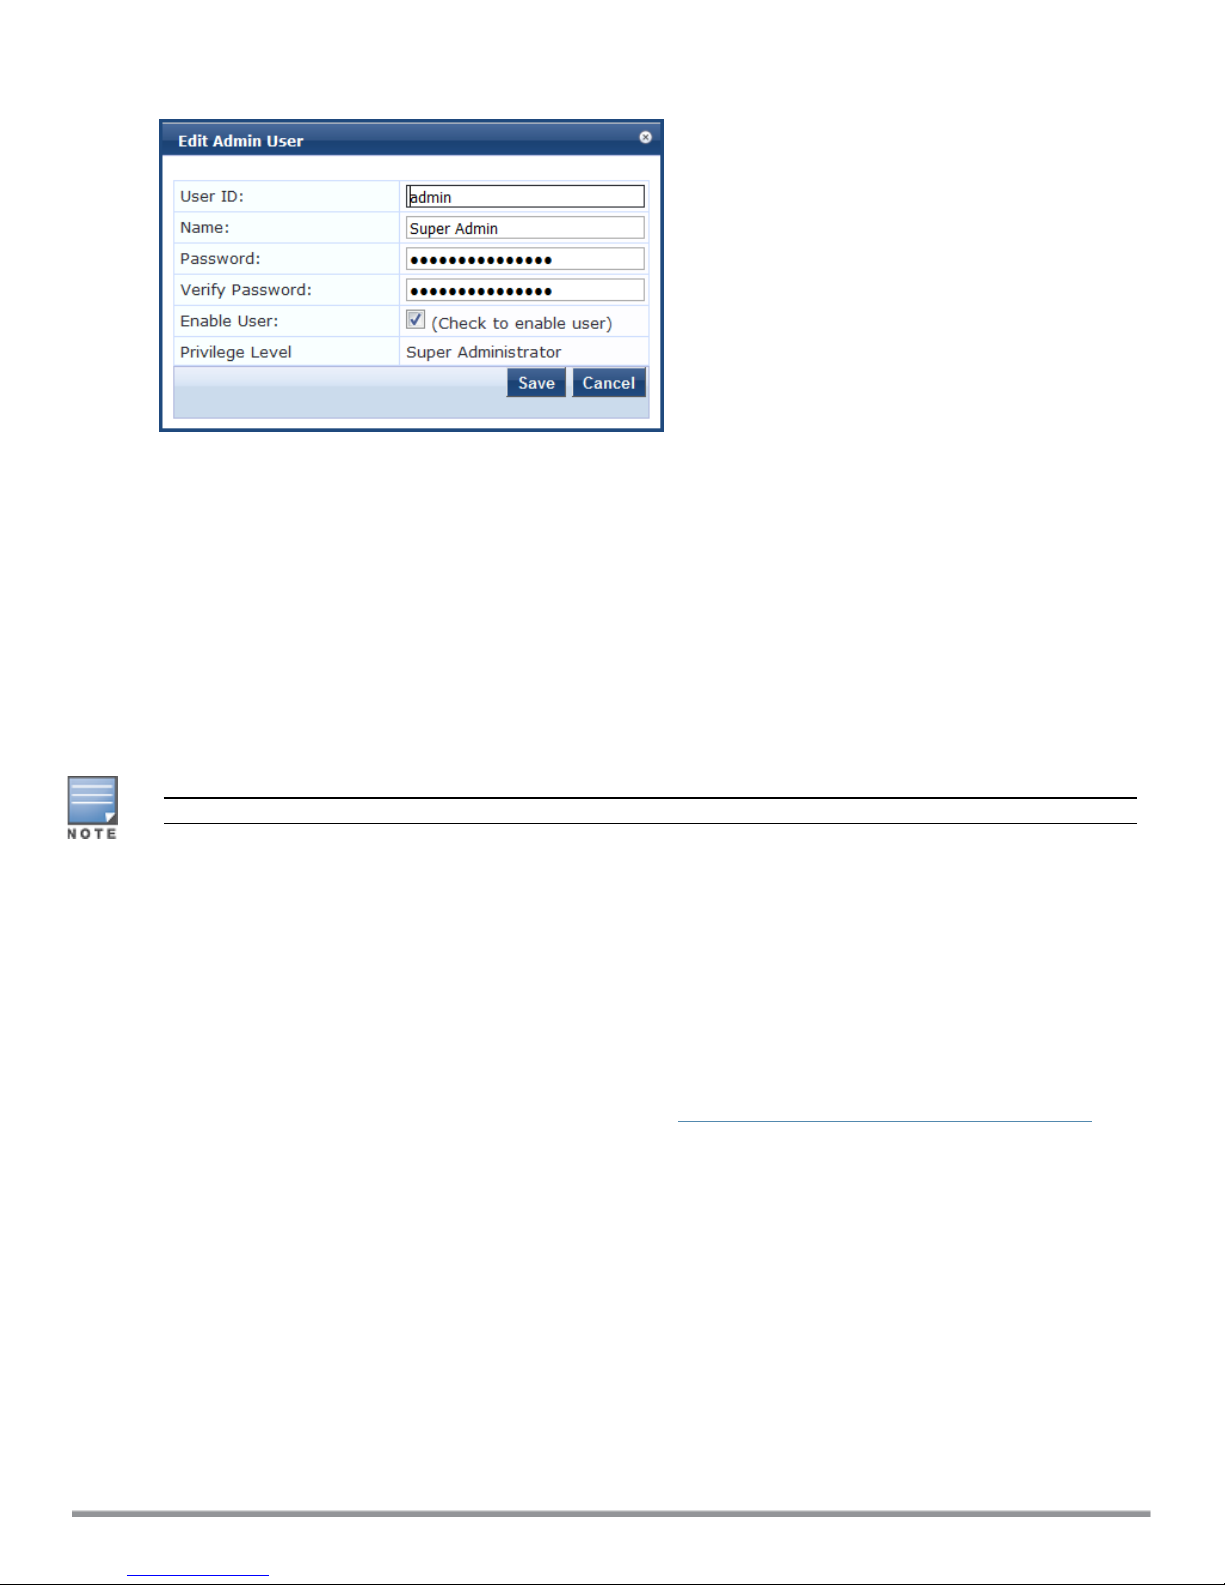
Figure 9 Changing the Administration Password
3. Change the administration password, verify the new password, then click Save.
Powering Off the ClearPass Hardware Appliance
This procedure gracefully shuts down the hardware appliance without having to log in.
To power off the ClearPass hardware appliance:
1. Connect to the CLI from the serial console using the serial port.
2. Enter the following commands:
nlogin: poweroff
npassword: poweroff
The ClearPass hardware appliance shuts down.
You can also power off from the WebUIand the appadmin prompt.
Resetting the System Passwords to the Factory Defaults
To reset the system account passwords in Policy Manager to the factory defaults, you must first generate a
password recovery key, then log in as the apprecovery user to reset the system account passwords.
Generating the Password Recovery Key
To generate the password recovery key:
1. If you are employing a hardware connection, connect to the ClearPass Policy Manager hardware appliance
using the serial port (using any terminal program). See Configuring the ClearPass Hardware Appliance for
details.
a. If you are employing a virtual appliance, use the VMware console or the Hyper-V hypervisor (see for
details).
2. Reboot the system using the restart command.
3. After the system reboots, the following prompt is displayed for ten seconds:
Generate support keys? [y/n]:
4. At the prompt, enter y.
The system prompts you with the following choices:
Please select a support key generation option.
1) Generate password recovery key
19 ClearPass 6.7 Getting Started Guide

2) Generate a support key
3) Generate password recovery and support keys
Enter the option or press any key to quit.
5. To generate a password recovery key, select option 1.
6. After the password recovery key is generated, email the key to Aruba Technical Support.
A unique password is dynamically generated from the recovery key and emailed to you.
Resetting the System Account Passwords to the Factory Defaults
To reset the administrator password:
1. Log in as the apprecovery user with the password recovery key provided by Aruba Technical Support.
2. Enter the following command at the command prompt:
[apprecovery]app reset-passwd
*******************************************************
* WARNING: This command will reset the system account *
* passwords to factory default values *
*******************************************************
Are you sure you want to continue? [y/n]: y
INFO - Password changed on local node
INFO - System account passwords have been reset to factory default values
3. To reset the system account passwords to the factory default values, enter y.
4. You can now log in with the new administrator password emailed to you by Aruba Technical Support.
Using the VMware vSphere Hypervisor Web Client to Install
ClearPass on a Virtual Machine
This section documents the procedures for using the VMware vSphere® Web Client to install ClearPass on a
vSphere Hypervisor (ESXi)host, as well as completing important administrative tasks, such as registering for
ClearPass software updates and changing the admin password.
This section contains the following information:
lIntroduction
lVirtual Appliance Platforms
lBefore Starting the ClearPass Installation
lvSphere Web Client ClearPass Installation Overview
lClearPass VMware Virtual Appliance Installation Setup
lAdding a Virtual Hard Disk
lLaunching the ClearPass Virtual Appliance
lCompleting the Virtual Appliance Setup
lInitial Login and Activation of the ClearPass Platform License
lLogging in to the ClearPass Virtual Appliance
lAbout Software Updates
lSoftware Updates Page
lChanging the Administration Password
lPowering Off the ClearPass Virtual Appliance
ClearPass 6.7 Getting Started Guide 20
This manual suits for next models
2
Table of contents


