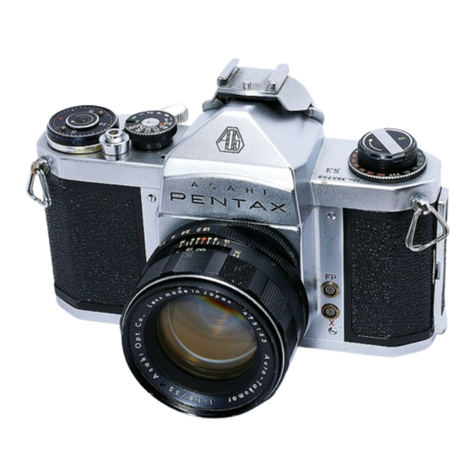
ASAHI Spotmatic II User manual

ASAHI
PENTAX
SPOTMATIC II
W

file:///C|/Documents%20and%20Settings/Tim/Desktop/carburetor-manual-welcome/index.htm[4/25/2009 11:42:20 AM]
www.carburetor-manual.com
Would you like some Free Manuals?
http://carburetor-manual.com/free-shop-manual-club-t-13.html
Also visit http://freeshopmanual.com for more Free Manuals
Also Visit my website for 7 FREE Download Manuals starting
with this one.
"The ABC's of Carburetion"
Click Here Now

lndex
Introduction 1
Major working parts of the Asahi Pentax Spotmatic II z
Specifications 4
Short operating course 6
ilil;:fiT:::::-::a..............
Film wind and rewind
Bright field focusing
Microprism L
L
Automatic diaphragm l?
Shutter 13
Depth-of-field
guide
I
I
il
{
I
I
10
1t.
13
14
16
17
18
Depth-of-field
tables:..
..
Range of light measurement
Mercury battery .,
Flash synchronization
Clip-on meter SL
Asahi Pentax prism binoculars
Asahi Pentax telescopes
Guide book for Asahi Pentax system of photography
Asahi Pentax warranty policy
Self-timer
Infra,red photography
How to make deliberatedouble exposure 19
Importantnotes ...:.
How to take care of your camera Zz
Difference
of angle
of Takumar lenses ..... ...
Zs
Takumar interchangeable
lenses ..26
Specifications
of Takumar lenses 35
complete system of Asahi Pentax accessories
for close-ups,
macrophotography,
photomicrography
and other miscellaneous
accessories 36
42
43
43
44
45
46
48
Super-Lite electronic flash
Spot exposure
meter III

ASAHI
PENTAX
SPOTMATIC II
Your Asahi Pentax Spotmatic II is the finest photographic instru-
ment on the market. The "Super-Multi-Coating" on the Takunrar lens,
developed by Pentax and available only on Spotmatic II Takumars,
reduces flare and boosts contrast to a degree far beyond rvhat was
previously possible in optical technology. It is a tougher coating than
is available on any competitive lenses and results in pictures rvith more
detail and richer colours than is possible with any other system at
any price.
The Spotmatic II itself is an outgrowth and refinement of the orig-
inal Spotmatic which introduced through-the-lens metering to the world
of photography. Its stopped-down metering system is the most accurate
method for perfect exposure determination. It also automatically gives
you a depth-of-field preview. It is an averaging system for the easiest
and most dependableexposures in typical picture-taking situations. This
metering system has been refined and improved each year in the Spot-
matic to a degree of accuracy unmatched in the industry.
The original Spotmatic was the most compact 35mm SLR made.
The Spotmatic II retains that same traditional compactness and classic
feel. It also is designed for use with the accessories from the Pentax
system, including all of the superb Takumar lens ranging frorri the
ultra-wide-angle 17mm Takumar up to the super-telephoto l000mm
Takumar. The Pentax system can grow with you as your interests
develop in any direction.
We are very proud of the Pentax Spotmatic
II. We are sure you
will be,too.

M
aior
working
parts
of theASAHI
Y
F
G
H
c
A - Shutter speed
index
B - Shutter speeddial
C - Rapid wind lever
D - ASA film speedsetting
E - Shutter release
F - Automatic reset exposure
counter
'Cocked'indicator
D-ring lug
Self-timer cocking lever
Focusingring
X flash terminal
FP flash terminal
G-
H-
I
J
K-
L-
2\

PENTAX
SPOTMATIC II
F
w
G
E.
t-
T
U
v
R
P
o
M
x
J
(-'
FI
o
(-
FI
.Fl
a
\af,
o
v!
d
rt'
*4'
H-,
,)
s
t
F
B
M - Preview lever
N - Exposure
meter switch
O - Film rewind crank
P - Film rewind knob
a - Film type reminderdial
R - Reminder dial selector
S - FP/X switch rim
T - Diaphragm ring
U - Diaphragm
anddistance
index
V - Distance
scale
'W- Exposure
counter index
X - Depth-of-field
guide
Y - Hot shoe
Z - Hot shoeflash contact

Specifications
Type
35mm single-lensreflex with built-in light
meter.
Filmand Picture
Size
35mm
film (20
or36
exposures).24mm
x
36mm.
StandardLenses
Super-Multi-Coated
Takumar 50mm f./L.4 or
55mm f 1I.8with fully automatic diaphragm.
Filters and lenshoodsize: 49mm. Equipped
with diaphragm preview lever which affords
visual checkof depthof field. Distance scale:
45cm
(18'/)to infinity.
Shutter !
Focal plane shutter, with single non-rotating
dial. Speeds:
B, 1-111000
sec. Film speed
(ASA) setting dial and window on shutter
speeddial. Built-in self-timer releases
shut-
ter in 5-13seconds. Shutter curtains of spe-
cial rubber
ized silk
.
Warning
Signal
The indexof shutterspeeds
turns to red when
the shutter andfilm speed
settingsareoff the
meter'smeasurabilityrp: - -,fer
to page16.
Finder
Pentaprism finder with micropl^srrt Fresnel
lens for instant focusing; 0.88xmagnification
with 50mm lens and approximately life-size
with 55mm lens.
Focusing
Turn the distance
scalering until the subject
image
on the ground glass
comesinto focus.
Reflex
Mirror
Instant return type with special
shock absorb-
ers for minimum vibration.
Lens
Mount
42mmthreaded lens mount.
4
L

FT
o
FT
F{
.Fl
r-d
o
B
o
,t)
F.
)
J4
*,
r{
I,.
B
B
FilmAdvance
Ratchet-type rapid wind lever (for film ad-
vance and shutter cocking). 10' pre-advanc-
ing and 160
" advancing angle.
"Cocked"Indicator
A red disk appears in a small window along-
side the shutter release button when the shut-
ter is cocked,and blacks out when it is released.
Film Exposure
Gounter
Automatic re-settype.
Flash
Synchronization
FP + X Lontacts for conventional flash cord
connection. Separate FP/X contact on hot shoe
for convenient flash cordless connection.
Exposure
Meter
Built-in meter measures
the brightness
of the
ground glass,
and couples
directly to shutter
andfilm speedsettings.
Film speed
(ASA) set-
ting ranges from 20to 3200
(LV1-18 for ASA-
100
film with standard
lens.) Meteris
powered
with a mercury battery.
Film Rewind
Rapid rewind crank:r'for
speedy
film take-up.
Film rewind releas 'uttonon bottomof cam-
erabodyrotates v, ^i film isbeing rewound.
Loaded
Film Indicator
Loaded
film reminderdial underneath
film re-
wind knob is marked EMP. (empty), Z0and
36(exposures)
in green(for colour; tungsten
type),in white (black
andwhite) andin orange
(for colour;
daylight type).
Dimension
Width 143mm
(5.6') x height 93mm
(3.66,)x
thickness
88mm (3.4,).
Weight
853
grams
(1lb. tI oz.)
with 50mm f
/I.4 lens.
Body alone: 622
grams(1lb.4oz.)

Short
operating
course
A mercury battery for the light meter
insert it into the batterl' housing ivhen
tery insertion, refer to Page17.
is packed separately. Be sure to
operating the camera. For bat-
1.,SET
FILM SPEED
Lift the outer ring of theshutter speed
dial,
turn it around and set the same number as
the ASA number of the loadedfilm to the
small red index which appears
alongside
the
figure 1. Then cock the rapid wind lever.
2. SET SHUTTERSPEED
Turn theshutterspeeddial
andsetthe
speed
you wish touseto the index. When outdoors,
set the speed
at l/125 sec.
or faster, depend-
ing uponthe lighting.Whenindoors,set
it at
L/30, or in its neighbourhood. Change the
shutter speed
later, when necessary.
(Refer
to 5 on the next page.)
3. COMPOSE
AND FOCUS
While viewing through
theviewfinder,
turn
thedistance
scalering with your thumband
index finger until you getthe sharpest
image
of your subjectat the microprismcentre
of
the finder.
6

4.TURN ON LIGHT METERSWITCH
Push
up thesrvitchbutton
with vortr
thurnb.
Throughtheviewfinder,
youwili obsbrve
the
movement
of themeter's
needle
on theright
side
of the ground glass. Be sureto turn off
themeter's
switchwhennot actuallytaking
readings.
5. ROTATE DIAPHRAGM RING
The needle
moves
up
and
downwith theturn
. of thed,iaphragm
ring. Whenthe needlerests
at the centre, you will get correct exposure.
If theneedle
does
not come
to thecentreno
matter how far you turn the diaphragmring,
change
theshutter speed.
When theneedle
is
off centre
andclose
tothe(t ) mark,youwill
get over-exposure:
change
the shutter speed
to a faster setting. If the needle
iscloser
to
the (-) mark, you will get under-exposure:
change
the shutter speed
to a slowersetting.
6. RELEASE
SHUTTER
Hold your camera,firmly and trip the
shut-
ter. Whentheshutterisreleased,
themeter
switch will automatically
turn off, and the
needle
will remain fixed
off and underneath
thecentre. The diaphragm
will reopen
toits
full aperture
andthe overali image will look
brighter. Cock the rapid wind leyer for the
next picture. (When taking a series
of pic_
tures under the same iighting conditions,
it
isnotnecessary
torepeat
instructions
4and
5.)

Howto holdyour
camera
In horizontal position A. Hold
the camera firmly with your
left hand, and draw your arm
close to your body.
In vertical position B. Hold
your camera tightly to your fore-
head with your left hand, and
draw your right arm close to
your body.
In vertical position C. Hold
your camera tightly to your fore-
head with your left hand, raise
your right arm and draw your
left arm to your body.
Asa
general
rule,
yourcamera
should
beheldmorefirmly by the left hand
which does
not releasethe shutter.
If you hold your camera with the
right hand
-- thehand
which releases
the shutter- it may cause camera
movement. Very often, pictures
which are not sharparedueto move-
ment of the camera. When youfocus
with the camera held horizontally
(Position A), hold the lens barrel as
illustrated. Cradle the camera with
your left hand thumb and little fin-
ger. Turn the diitance scale ring
with your thumb and index finger.
When holding the cameravertically,
some
people release
the shutter with
the thumb (PositionB), while others
releaseit with the index finger (Posi-
tion C). Position C ismore desirable
for fast focusing and shooting. With
the Asahi Pentax, whether held ver-
tically or horizontally, you see your
subject image through the taking
lens, enabling you to compose,
focus
and shoot with a minimum of time
and effort.
8

Film type reminderdial
Usethe film
type dial to
show what
type of film
is in your
camera.
When you
have pulled out the rewind knob to
open the back when loading the
film, turn the dial selector so that
the type of film appearsin the win-
dow. To check whether the camera
isloaded,
turn the film rewind knob
clockwise. If it turns freely. the
camera is not loaded.
Film
loading
Avoid direct sunlight when loadingyour
film.
l. Open the back by pulling out the
rewind knob until back cover snaps
open.
2. Place the film cassette
into the cas-
sette chamber,
andpushbackthe re-
wind knob. Draw outthefilm leader
and insert it into slotof the take-uo
spool.
3. Advancethe film by alternately turn-
ing the rapid wind lever and releas-
ing the shutter until both sprockets
have properly engaged
the film per-
forations. Close
the backby pressing
it firmly.
4. If the film is properly loaded,
the re-
wind knob will turn counter-clock-
wise when you advancethe film by
turning the rapid wind lever.
Setting ASA film speed
The ASA film
speed
rating of all
35mm films is
given in the data
sheet
packed
with
each roll of film.
The higher the
ASA number,the
more
sensitive
the
film. Lift theout-
er ring of the shutter speed
dial and
rotate it until the ASA number of
your film is opposite
the red index
mark.
Be sure to set your film speedon
the shutter speed dial becausethe
dial is connected to the exposure
meter system.
/,
x.
D
cf
l0{
n

I
1 The first portions
ofthefilm can-
not beusedfor picture taking as
they have alreadybeenexposed
tolight. Generally,
two blankex-
posures should be made before
taking your first picture. Cock
therapidwind leveruntil it stops.
Watchtoseethat thefilm rewind
knob automatically turns coun-
ter-clockwise,
indicatingthat the
film is moving from cassetteto
take-up
spool. Trip the shutter.
Film
windand
rewind
Cock the rapid wind lever for
the first picture; the exposure
counter automatically turns to
'1',
indicatingthat the first pic-
ture is ready to be taken.
2 After the final picture on the
roll (20
or36exposures)
hasbeen
taken, the rapid wind lever will
notturn all the way as
youstroke
it. This indicates
that thefinal
picture has been taken on your
film, and that the film must be
rewound. DON'T open
theback
of the camera, or all exposed
frames will be ruined.
3 Unfold the film rewind crank.
Depressthe film rewind release
button. Turn the rewind crank
to rewind the film into the film
cassette.The film rewind crank
permits rewinding at a smooth,
evenrate. (Under someatmos-
pheric conditions,erratic or too
rapid rewinding will cause
static
electricity marks,on the film.)
You will feelthe tensionon the
rewind crank lessen
as
theleader
endofthe film slipsoff the take-
up spool.
Stop rewinding when you feel
this happen. AVOID DIREC'f
SUNLIGHT WHEN UNLOAD.
ING YOUR FILM. (The rewind
release button will return to
normal position
asyou loadyour
next film and turn the rapid
wind lever.)
Pull out the film rewind knob
(the back will open automati-
cally), and removethe film cas-
sette.
10

Bright
field
focusing
1 You can start viewing andfocusing
before and after cocking'
the rapiA
wind lever. When the previewlever
is in "AUTO" (automatic) position,
and the meterisat "OFF", the dia-
*ffift':i:g;ffl except
for
the
2 Turn the distance scale ring until
yoursubject
image
isclearly
in focus.
It is not always necess
aryfor you to
view and focus with the diaphragm
fully open. In bright sunlight, you
can easily focus with diaphragm
closed to f/5.6 or f/8 and still ob-
servethe depth of field. It is easi-
€r, however, to focus with the dia-
phragm fully open as your subject
image is much brighter.
When the letters "MAN" appears
besidethelever,
the lens
isin manual
position; when "AUTO" appears,
it
is in automatic position.
Microprism
AsahiPentax
cameras
have
aFresnel
lens
with amicroprism centreunder-
neaththe groundglass. As you look
through the finder, you will see
that
the Fresnel lens consistsof many
concentric rings which provide the
brightest possible image on the
ground glass.
The microprism is the centre por-
tion of this diagram. When your
subjectis in focus,the image in the
microprism will be sharp and per-
fectly clear. If your subject is not
in focus,the microprism will break
the imageup into many small dots,
much like engraver's screen. You
can focus your subject on any por-
tion of the ground glass.
11

Automatic
diaphr
agnt
tWhen the preview lever is in "AIJ-
TO" (automatic) position, and the
exposure
meter is turnedto "OFF",
the fully automatic diaphragm is at
its largest aperture
at all times, ex-
cept for the instant of exposure,
no
matter rvhat aperture is set on the
diaphragmring. When you release
the shutter,
the diaphragmautomat-
ically stops down to the predeter-
mined aperture
andthe shutter cur-
tains
starttraveling instantly. When
the exposure
is completed,
the dia-
phragm reopensto maximum aper-
ture completely automatically and
you arereadyto compose,
focusand
shoot
yournextpictures. If youwish
to visuallycheck
exact
depth-of-field
before
making theexposure,
movethe
preview lever to "MAN" (manual)
position. This stopsthe diaphragm
to the aperture selectedand shows
you exactlyhow much depth-of-field
will appear
in your picture. The pre-
view lever may be moved back to
"AUTO" (automatic)position
before
or after making your exposure,
or, if
you are making pictures in bright
sunlight, it may be left in manual
position, which permits a constant
check of depth of field.
*When the exposure
lneter switch is
turnedto the "on" Position,
thelens
diaphragm changes
from the auto'
matic
tomamual
position
eaen
though
the preuiew
leaer
is in the"AU TO"
(
autornatic)
position. When
theshut-
ter is released,the lens diaphragln
will autornatically return to its au'
tomatic position if the leuer is set
on "A(JTO" .
OUT
OF
FOCUS
$
.IN
FOCUS
L2

Turn the shutter speeddial clock-
wise or counter-clockwise to the
shutter speed
desired. The shutter
1 At slowspeeds-slower thanI/J0
- support your camerarigidly or
use
a tripod to prevent movement
of your camera.
Shutter
speed may be set either before or
after cocking the rapid wind lever.
As you cock the shutter by turning
the rapid wind lever, the "cocked"
indicator turns to red showing that
the shutter is cocked. .
The indicator window blacksout
asyou trip the shutter button. For
use of the X setting on the shutter
speeddial, refer to page18.
With the shutter speed
dial set on
B (bulb), the shutter will stay open
as long as you depress the shutter
button. As you releaseyour finger
from the shutter button,the shutter
closes. When a long exposure is
desired while using the B setting,
attach a shutter release
cablewith a
locking device
to the shutter button.
This will permit a "Time" exposure.
2 To protect the shutter mechan-
ism, trip the shutter release
be-
fore putting the camera out of
use for any extended period.
If you want to know how great the
depth of field is at a certain aper-
ture, look at the depth-of-field
guide.
In the above
photograph,
the distance
scaleis setat 5meters... the lensis
focusedon a subject 5meters away.
The calibrations on each side
of the
distance index correspond to the
diaphragm setting and indicate the
rangeof in-focus distancefor differ-
ent lens apertures. For example,if
the lens opening
of f/8 is to beused.
Depth-of-field
guide
the rangeon the distancescalering
covered within the figure 8 on the
depth-of-field guide indicates the
area in focus at the lens opening.
You will notefrom the depth-of-field
guide in the photograph that the
range from approximately 10 to 25
feetisin focus. Note that asthe lens
apertureschang€,
the effective depth
of field alsochanges. For the depth
of' fields at different apertures and
distances,
refer to page
14-15.
f Depth of fi.etdis the range betweenthe I
I nearest and farthest distances uthich I
L are in focus at different lens apertures. J

Depth-of-field
table:
Super-Multi-Goated
Takumar
50mm lel
Depth-of-field
table:
Super-Multi-Goated
Takumar55mm lel
\ Distance
\ Scale
rs.G'N 0.45
m. 0.6 l1.5 ?5r0
m. co
'f
f 1.4 0.45
0.453 0.5e
0.6
|0.e8
|
.02 .46
.54 r.93
2.07 4.57
5.52 8.40
|
2.36 5r.75
eOO
f/2 0.45
0.454 0.5e
0.61 0.e8
r
.02 .45
.56 t.e0
2.t
I4.41
5.78 7.86
r3.75 36.24
ryOO
f
/2.9 o.44
0.46 0.59
0.6
|o.e7
|
.03 .43
.58 r.87
2.t6 4.21
6.r6 7.24
16.r9 25.e0
ryOo
f/4 0.44
0.46 0.5e
0.62 0.e5
|
.05 .a0
,62 r
.8l
2.23 3.9
4
6.84 6.48
22.05 18.14
ryOO
f
/5.6 O.n
a
0.46 0.58
0.62 0.9
a
t.o7 .36
.68 t.75
2.3a 3.64
8.03 5.68
42.68 12.97
-OO
r/a O.aa
0.tt 0.s7
0.63 0.e
I
t.ll .30
.77 r
.66
2.52 3.26
|
0.87 a.80
ryOO
e.t0
rOO
f/tl 0.43
0.47 0.56
0.65 0.88
t.t5 .2a
.89 t.56
2.80 2.88
1e.53 4.02
-OO 6.63
\- OO
(/t6 O.tz
0.48 0.54
0.67 0.8a
1.24 t.t6
2.1
6
|
.42
3.42 2.42
ryOo 3.1
6
+CO 4.57
-OO
\ Distance
\ Scale
f s"J;N 0.45
m. 0.6
ln" I1.5
m. 25
m, l0
m. oo
t/t.g 0.45
0.45 0.5e
0.6
|0.e8
r.02 |
.46
1.54 r.93
2.07 4.57
5.52 8.3e
|
2.38 51
.27
oo
t/2 0.45
0.45 0.5e
0.61 0.e8
'1
.02 1.46
r.54 |
.92
2.08 4.53
5.59 8.24
|2.72 46.r5
oo
f
/2.9 0.45
0.45 0.5e
0.6
|0.98
|
.03 1.44
r.56 r.89
2.t2 4.36
5.86 7.70
|
4.27 32.98
oo
r/4 0.aa
0.46 0.5e
0.6
|o.e7
r
.04 |.42
t.59 t.85
2.t
74.t3
6.33 7.01
17.48 23"10
co
{
/5.6 0.44
0.46 0.58
0.62 0.e5
I
.05 r.39
r.63 |
.80
2.25 3.87
7.09 6.27
24.97 |
6.52
oo
t/B 0,44
0.46 0.s8
0,62 0.e3
|
.08 1.34
t.70 1.73
2.38 3.s3
8.65 5.4
|
70.27 Ir.58
oo
f/tl O.4A
0.47 0.57
0.63 0.9
|
t.tI |
.29
t.79 1.64
2,57 3.r8
I
t.93 4.62
oo 8.u
oo
f
/16 0.43
0.17 0.56
0.6s 0.87
t.t7 |
.22
|
.96 |
.52
2.9
52.73
3275 3.7
|
oo 5.82
oo
L4

\ Distance
\ Scale
rs.-Gr l'6" 2' 3' 5' r0' t5' 30' oo
t/1.4 lt 6.12'l
l' 6.13" |/Il.g"
2' O.2" 2'|
|.5"
3' 0.6" 4'10.4"
5' |
.7" g' 5.6"
|
0' 7.2' |3' 9.7"
l6' 4.9" 25' 6.6"
36' 4.2" |
69 ' 9.2'l
oo
t/2 l'5,9"
l' 6.1
"l'| |.6"
2' 0.4" 2'||
.3"
3' O.g" 4' g.g"
5' 2.4" g' 3.1"
t
0'10.6" |
3' 4.3"
l7' 1.2' 24' 0.20
39'| |
.9" I I
g' 3.5"
oo
f
/2.9 l'5.9"
l'6.2" l'| 1.5"
2' 0.5" 2'10.9"
3' |
.1" 4t g'
5' 3.4" g'l |
.g'
I
l' 3.2" |
2' g.6"
lg' 1.4" 22' 3"
16' 1.1' 84'|
1.6"
oo
f/4 l' 5.6"
l'6.4" l'||.4"
2' A.6" 2'|0.6"
3' |.7" 4' 7.7
"
5' 5" g' 7.4'
l
l'11
.20 l2' 0.60
lg'll" 20' o.4,
59'l |
.6n 59' 6.4'l
oo
f/5.6 l'5.5"
l' 6.5" l'||.2"
2' l" 2'|o"
3' 2.3" 4' 6.20
5' 7.2" 8' l.9n
l2' 11
.2" ll'2"
22'1O.7' l7' 9.3"
100' 1
.3" 42' 6.9'l
OO
f/B l' 5.4"
l' 6.6" |'|
0.g"
2' |.3" 2' g,l
"
3' 9.4" 4' 4.1"
5'l0.go 7' 6.9"
|4' 9.5" |0' l"
2g' 7,2" l5' a.7'
oo 29'1o.2"
oo
f/tl l' 5.2"
l'7" l'10.4"
2' l.gn 2' 9,2"
3' 4.8" 4t 1.6"
6' 4.2" 6'|1.3"
lg' 0.6" g'l |
.9,
46' 9.7" l2' 9.4"
oo 2l' g"
oo
t/16 l' 4.8"
l' 7.3" l'9.7"
2' 2,9' 2' 6.7
"
3' 7.6" 3'lo"
7' 3' 6' 1.2"
2g' 7.6" 7' 7.2"
oo l0' I
oo t5'
oo
Depth-of-field
table:
Super-Multi-Goated
Takumar
50mm ler
Depth-of-field
table:
Super-Multi-CoatedTakumar
55mm lel
\ Distance
\ Scale
t t".,lil)-r l'6" 2' 3' 5' l0' l5' 30' oo
t/t.B l'5.9"
l' 6.1" l
'l l.g"
2' O.2" 2'|
1.5"
3' 0.6' 4'10.4"
5' 1.7" g' 5.6"
l0' 7
.2" |
3' 9.7"
|6' 5" 25' 6.4'
36' 4.7'l l6g' 2.4"
oo
t/2 l'5.9'
l' 6.1" l'l.|
.9"
2' 0.2' 2'|1.4"
,3' 0.6" 4'la3"
5' l.g" g' 4.9"
|0' g" |
3' 9.3"
|
6' 7.1" 25'1.3"
37'3.2"l5 f
' 4.8"
@
t
/2.9 l'5.9'
l' 6.1" l'||.6"
2' 0.4" 2'||
.2"
3' 0.9" 4' 9.6"
5' 2.6'! g' 2.3"
l0'||.5" l3' 2.9"
l7'4" 23' 7"
4l' 3.4" |
0g' 2.3"
oo
t/4 l' 5.9"
l' 6,2" I
'l
1.5"
2' 0.5" 2'lo.g"
3' 1.2" 4' 9.6"
5'3.9" g'1a.7"
||' 5.3" |2' 7.1"
l
g' 6.7" 2l' 7.2'
4g' 2.9" 75' 9.5"
@
t
/5.6 l'5.6"
l' 6.4" l'||.4"
2' 0.7' 2'1a,4"
3' l.g" 4' 7.4"
5' 5.4" g' 6.1"
|2' |.7" l
l
'10.1
"
20' 6.2" lg' 5.2'
66' 3.4" 54' 2.3"
oo
f/8 l' 5,5"
l' 6.5" l'l
I
2'l 2' g.g"
3' 2.5" 4' 5.6"
5' 9.2" 8'
l3' 4.4" |
0'|0.3"
24' 4.6" l6'10.7"
I3g' 2.9" 37'|
|
,9"
oo
f/11 l'5.4"
l'6.7' |
'|
0.9"
2' l,g" 2' g"
3' 3.6" 4' 3.6"
s'|
1.8" 7' s.4"
l5/ 3.7" g'lo.l
"
3l
'I
o.g' |
4' 6.2"
oo 27'9.2"
oo
t/16 l'5.2"
l' 7" |'|
0.3"
2' 2" 2' 7.9"
3' 5.5" 4' 0.6"
6' 6,9" 6' 9.2"
20' 3" g' 6.2"
66' 9.2" I
l' 9.4"
oo lg' l"
'@
15

Range
of lightmeasurement
The exposure
meter of the Spotmatic measures
the brightness
of the ground
glass. Therefore, the meter should be turned on alter you have focused
your subjecton the ground glass. The follorring table shows the range of
the meter's light measurement,
and should not be interpreted asthe cam-
era's total range of f/stop-shutter speedcombinations. As you will note
from the table below, with an ASA100 film, -v-ou
may use
any shutter speed
from 1sec.to 1/1000
sec.in combination rvith any aperture that will bring
the meter needle to the midpoint in the viervfinder. The total range of
the aperture settings is, of course,determined by the minimum and max-
imum aperturesof the lens being used. For example,u,ith the 50mmf./I.4
lens and ASA100 film, an aperture from f ll.4 (the maximum aperture of
this lens) to f
/16 (the minimum aperture) may be used with any shutter
speedfrom 1
sec.to 1/1000
sec.that wili bring the meter needleto midpoint.
ASA
20
.25
32
.40
.50
64
.80
100
o11
2I I
8I
15 1
30 I
60 I
r25 1
250 I
500 I
I OO0
r25 l
I OU
200
. 25o
. 320
400
500
640
800
I000
1250 :lj {'li
1600 .i.l
r 2000 tl
. 25A0
3200 t;_'.
l;
TheareaA indicatesthereading
rangeofthemeter. TheareaB indicates
thatalthoughthe
shutterspeed
index
is
blackandthemeterneedlemoves,the meterisNoToperating
properly.
When ihe rrcter needleis ceqtered with tlxe
shutter sfeed dia! setat B usittg ASA 20-5O filttts, this
indicates that tirc eaactshutt€l sbeed
requif,eC
is 2 seconds Please erpose
your Picture
for 2 seconds
16

Mercury
battery
How to check it
1. Set the shutter speed dial to B
(bulb) position.
2. Turn the ASA dial to ASA 100.
3. Push the meter switch to "on"
position.
Look at the meter's needle through
the viewfinder. lf the needlerapidly
drops,the meter battery hassufficient
capacity; if it does not, replace the
mercury battery.
How to replace it
Openthe battery housingcover
onthe
bottom cover plate with a coin. Re-
moveold battery and insert new bat-
tery with 11) side toward the top of
the camera. For replacement, use
Mallory PX-400
or RM-400-R
or equiv-
alent.
GAUTION: The mercury battery is
like a phonograph record. It can be
damagedby skin acids. Handle
by the
edgeswith a dry cloth only. Be sure
the battery is cleanedwith the cloth
before
insertioninto the camera. The
battery is not rechargeable.
DANGER! A serious accident has been reported of a small child who has put a rnercurt
battery into his mouth and has been hos/italized for serious gripes and stomach inflamma-
tion. Please aluays heep a mercury battery from the reach of small children.
L7
Other manuals for Spotmatic II
1
Table of contents
Other ASAHI Film Camera manuals

