Aseko AR-PE6 User manual

Body Worn Video Camera User Manual
1
User Manual
Body Worn Video Camera

Body Worn Video Camera User Manual
2
CONTENT
1. Introduction .......................................................................................................................................... 4
2. Operation Manual .............................................................................................................................. 5
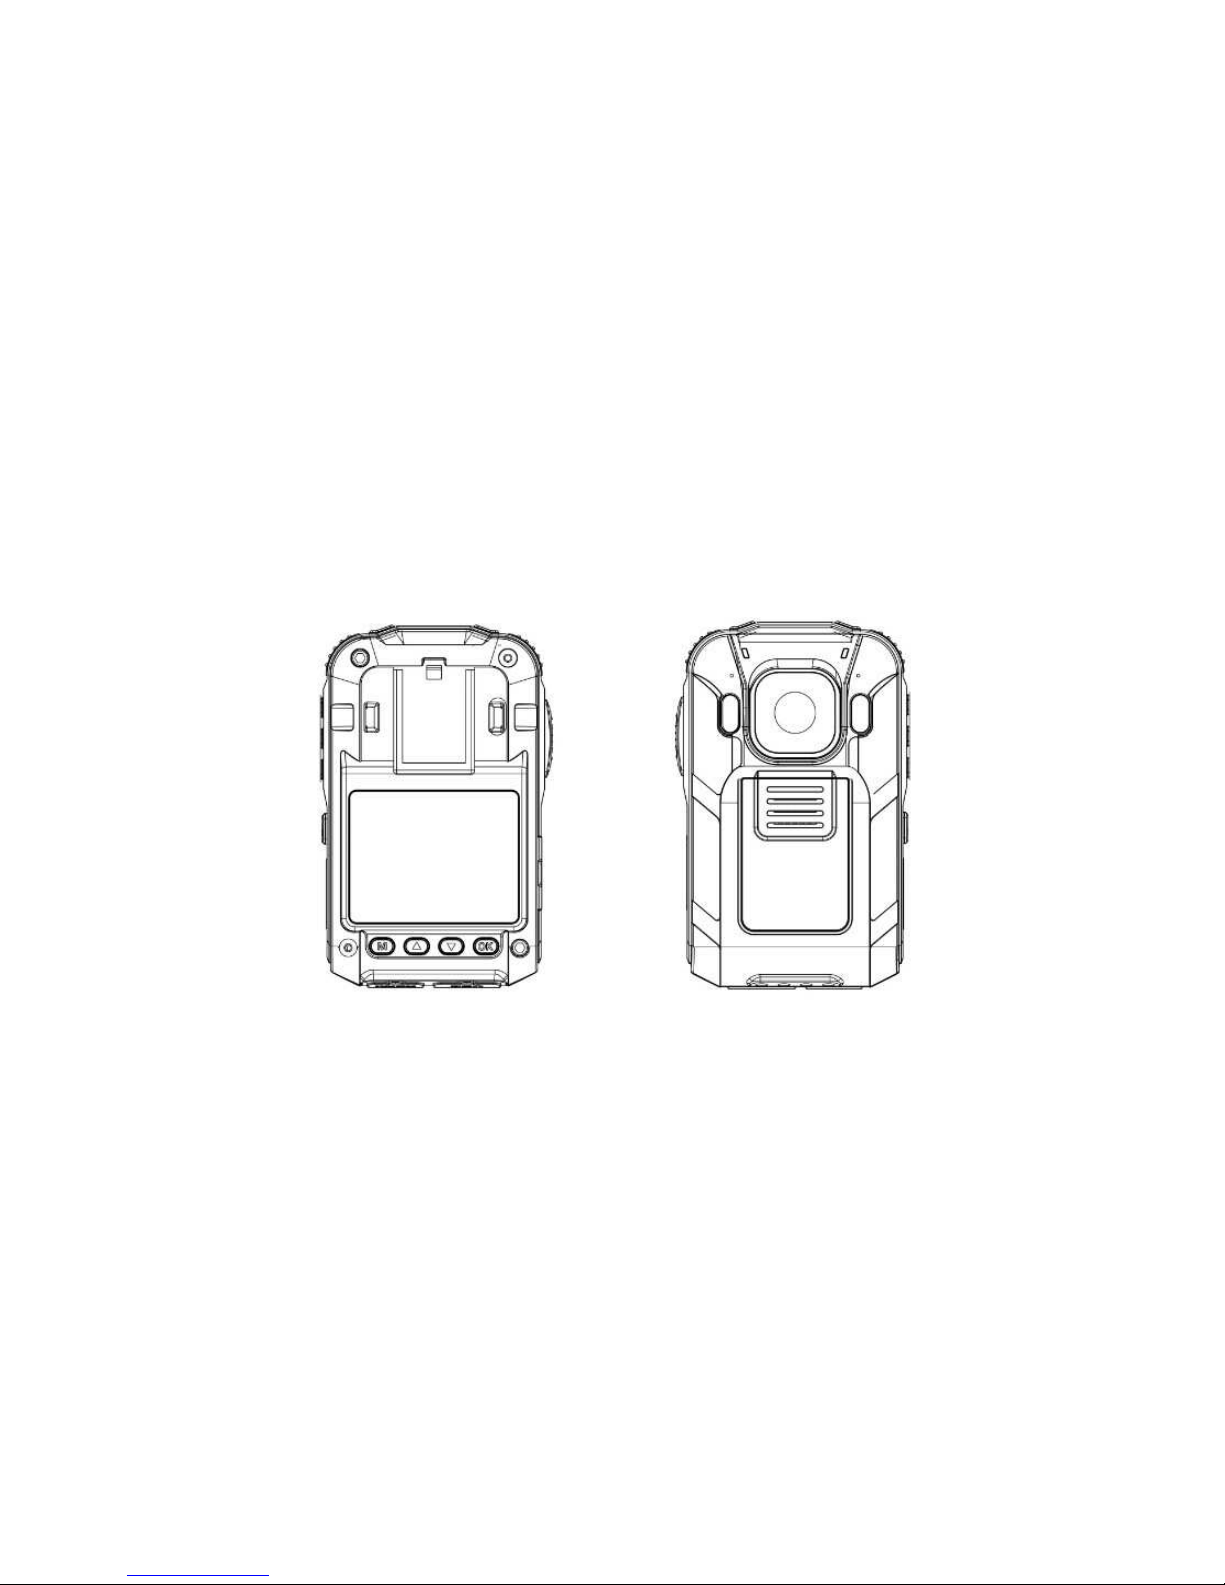
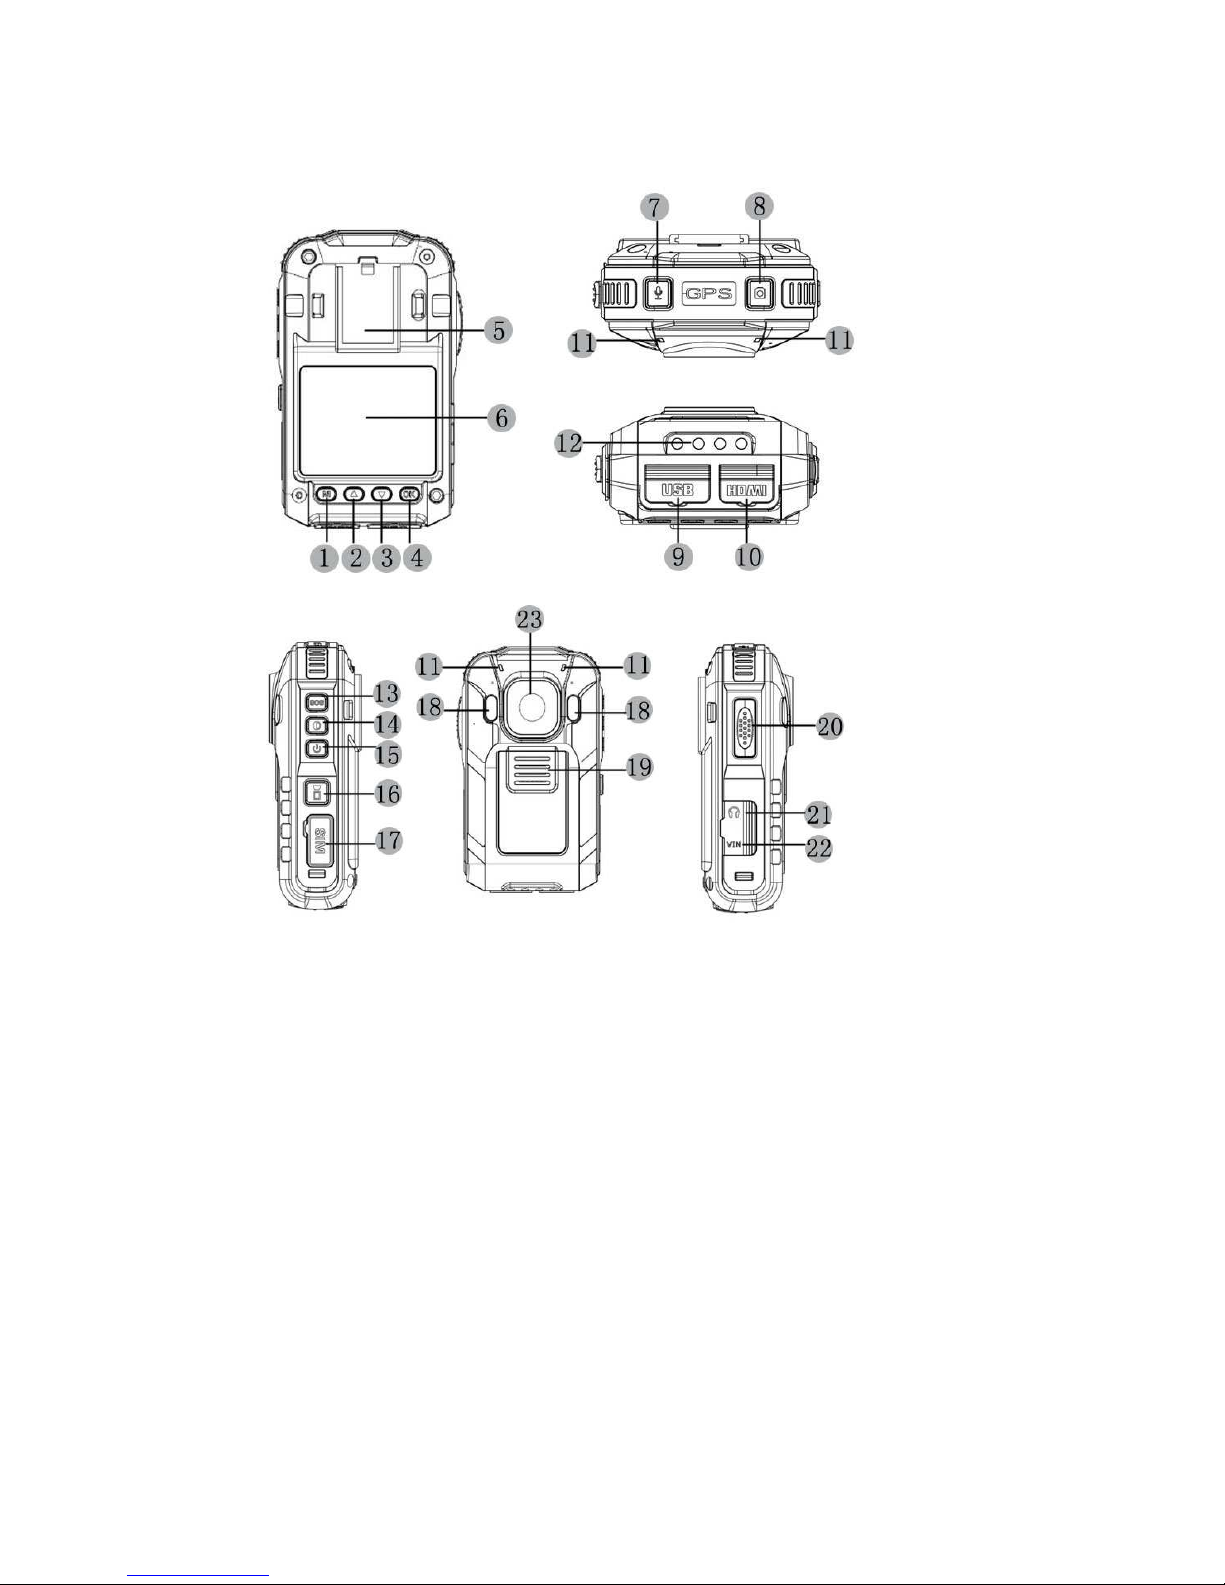
2.1 Appearance Structure ......................................................................................................................... 5
2.2 ower On/Off ..................................................................................................................................... 6
2.2.1 One Button Turn On & Recording ............................................................................................ 6
2.3 Reset ................................................................................................................................................... 6
2.4 Video Recording ................................................................................................................................. 6
2.5 Audio Recording ................................................................................................................................. 6
2.6 Capture ............................................................................................................................................... 6
2.7 IR lED On/Off ...................................................................................................................................... 6
2.8 Mic On/Off .......................................................................................................................................... 6
2.9 Zoom In/Out ....................................................................................................................................... 6
2.10 Lock the file ...................................................................................................................................... 6
2.11 SOS One Button Alarm(AR- E6G) ..................................................................................................... 7
2.12 layback ............................................................................................................................................ 7
2.13 TT Talkback ................................................................................................................................... 7
2.14 External Camera ............................................................................................................................... 7
2.15 Setup Menu ...................................................................................................................................... 7
2.15.1 Resolution .......................................................................................................................... 7
2.15.2 hoto Size ........................................................................................................................... 7
2.15.3 Record Overwrite ............................................................................................................... 8
2.15.4 File Size ............................................................................................................................... 8
2.15.5 Flicker ................................................................................................................................. 8
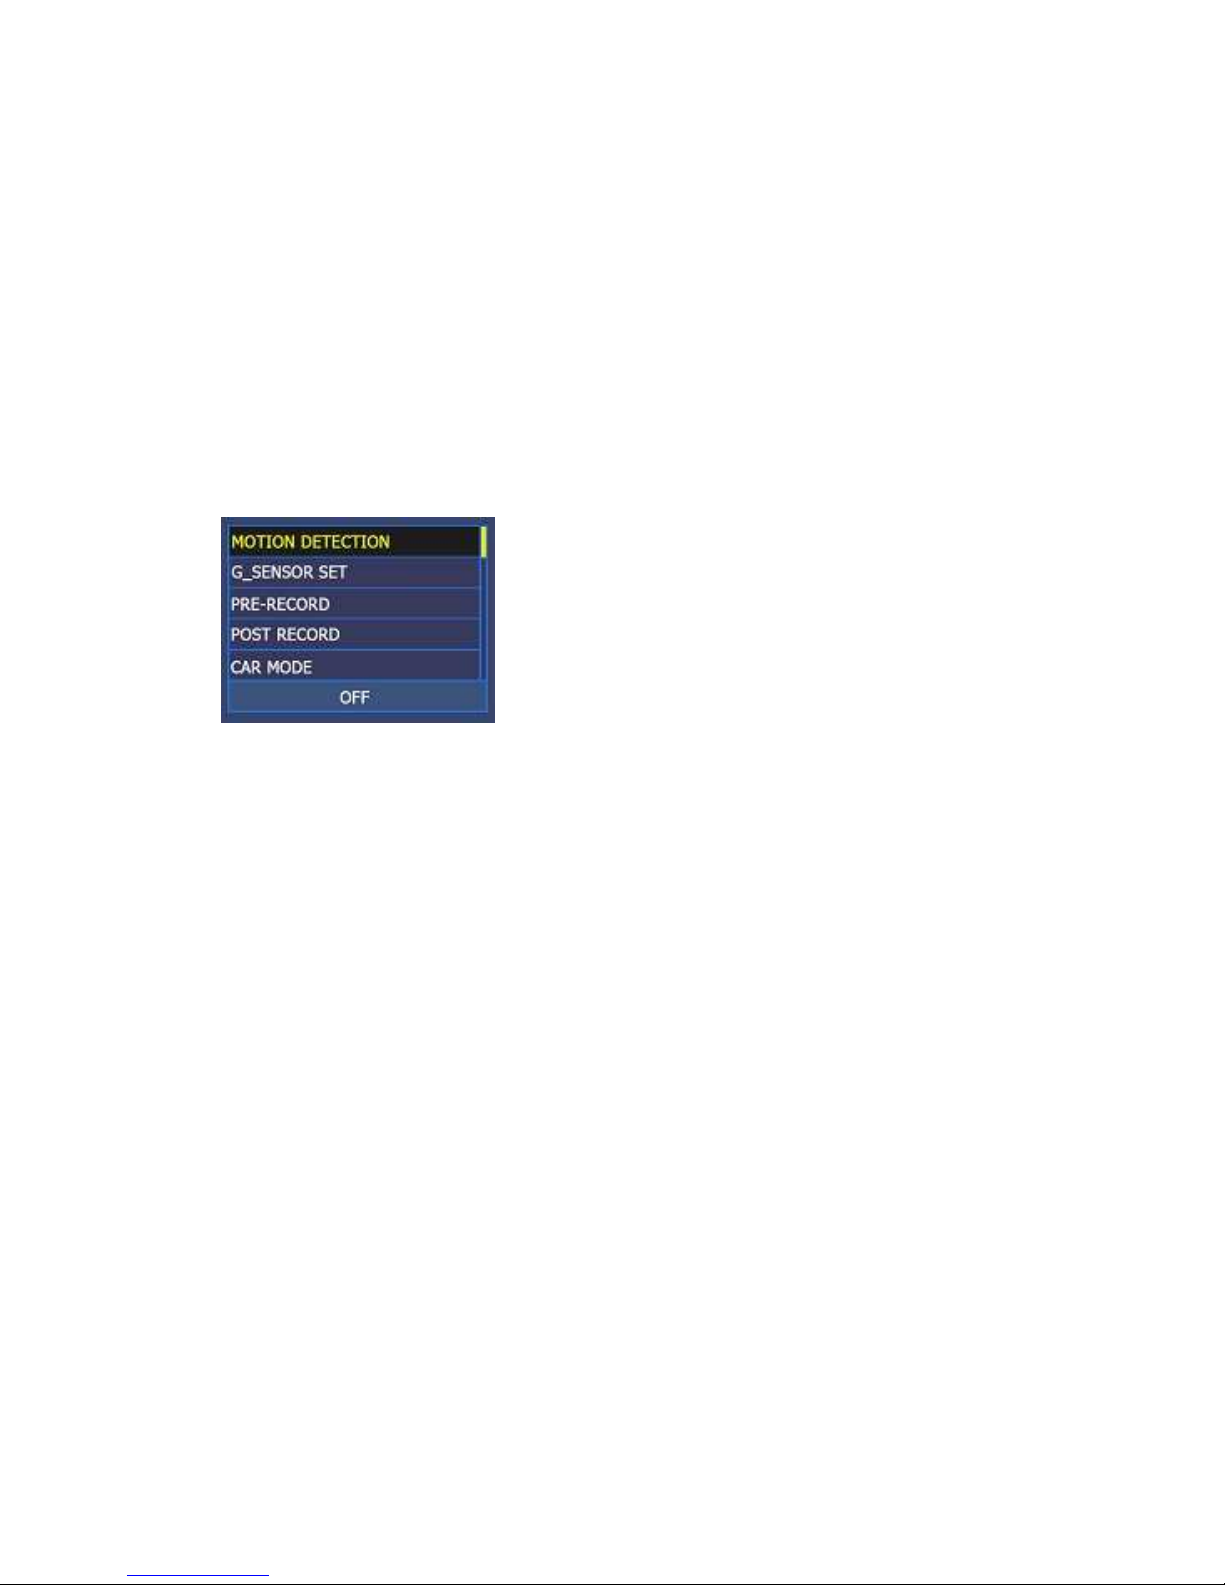
2.15.6 Motion Detection ............................................................................................................... 8
2.15.7 G_ Sensor Set ..................................................................................................................... 8
2.15.8 re-Record ......................................................................................................................... 8
2.15.9 ost Record ........................................................................................................................ 8
2.15.10 Car Mode .......................................................................................................................... 8
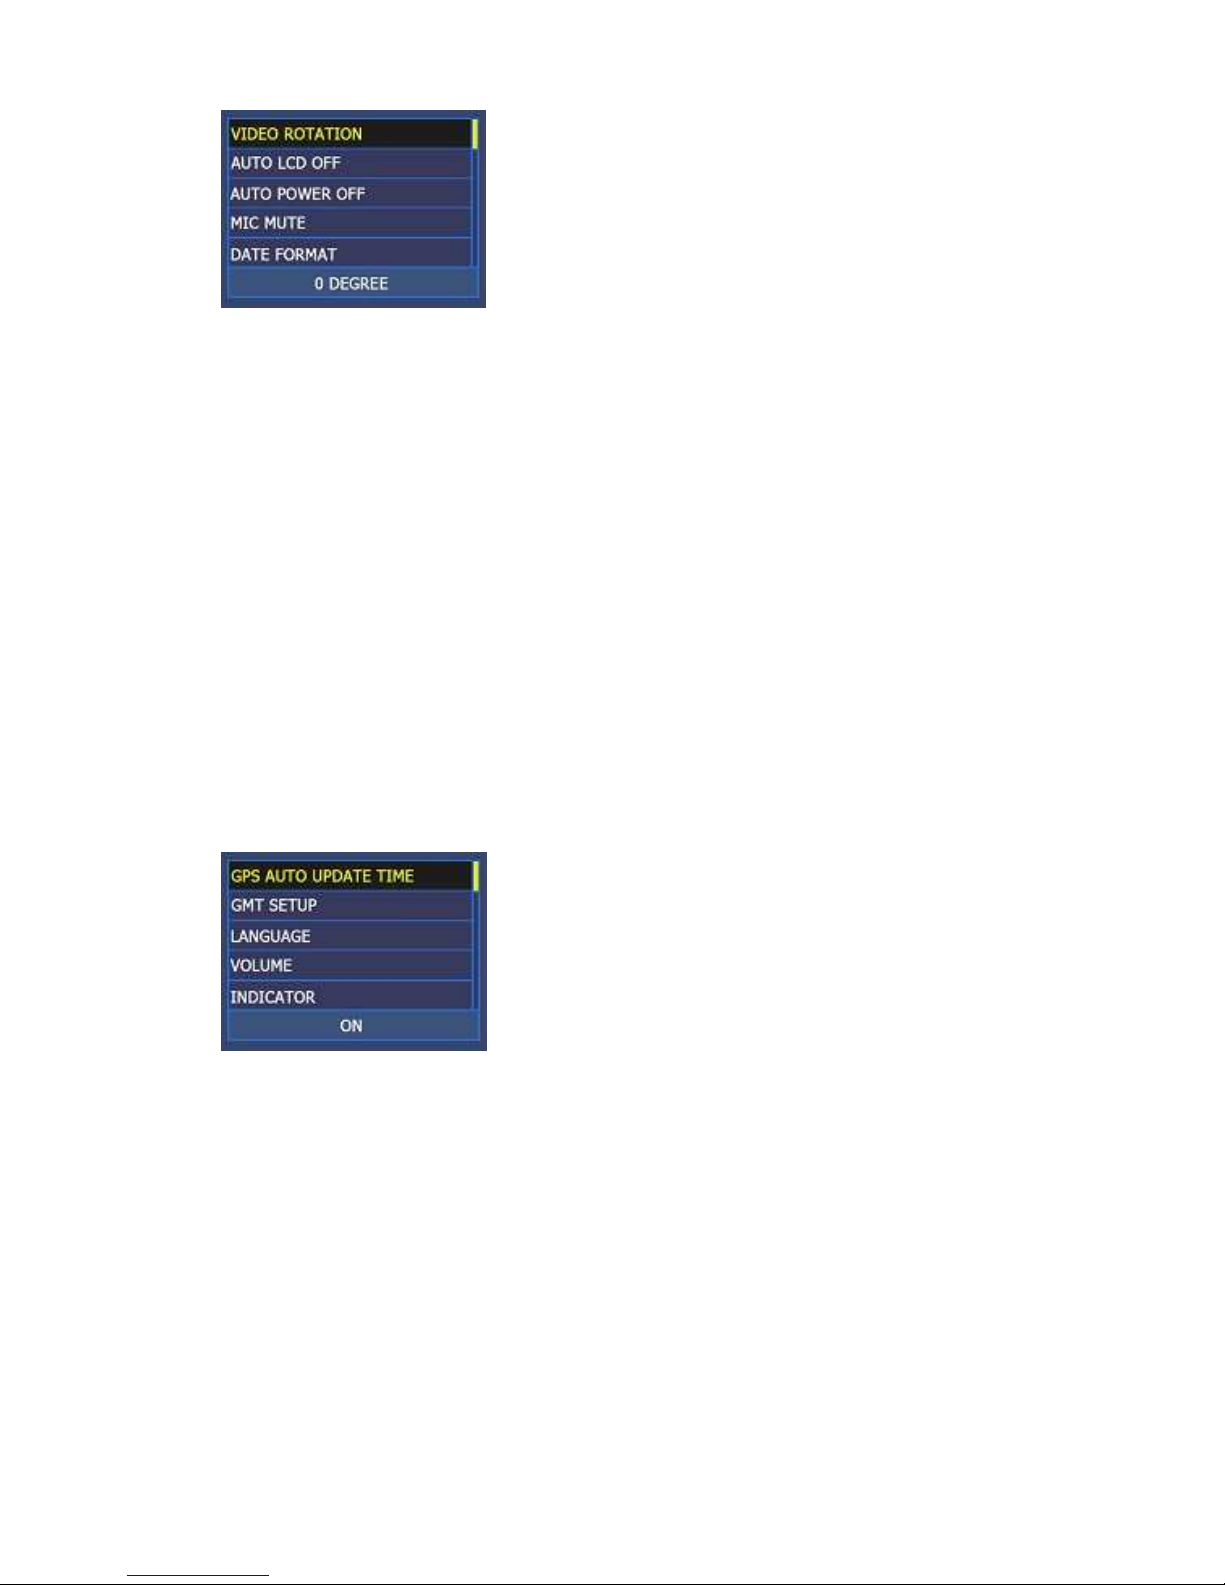
2.15.11 Video Rotation ................................................................................................................. 8
2.15.12 Auto LCD Off ..................................................................................................................... 9
2.15.13 Auto ower Off ................................................................................................................ 9
2.15.14 Mic Mute .......................................................................................................................... 9
2.15.15 Date Format ..................................................................................................................... 9
2.15.16 G S Auto Update Time ..................................................................................................... 9
2.15.17 GMT Setup ....................................................................................................................... 9
2.15.18 Language .......................................................................................................................... 9
2.15.19 Volume ............................................................................................................................. 9
2.15.20 Indicator ........................................................................................................................... 9
2.15.21 Auto MSC ....................................................................................................................... 10
2.15.22 Free Space ...................................................................................................................... 10
2.15.23 Officer ID ........................................................................................................................ 10
2.15.24 Firmware Version ........................................................................................................... 10
2.15.25 Default Setting ............................................................................................................... 10

Body Worn Video Camera User Manual
3
2.16 G S Function................................................................................................................................... 10
2.16.1 G S On ............................................................................................................................. 10
2.16.2 G S layback .................................................................................................................... 10
2.17 2G Function(AR- E6G) .................................................................................................................... 10
3. Management Software(Connect USB) ................................................................................................ 11
3.1 C Removable Disc ................................................................................................................... 11
3.2 CamManager_V1.2 & Camplayer_V1.3 .................................................................................... 11
3.3 Camplayer_V1.3 ....................................................................................................................... 13
4. WIFI Function ...................................................................................................................................... 15
5. FAQ ..................................................................................................................................................... 15

Body Worn Video Camera User Manual
4
1. Introduction
This product could record the static and dynamic scenes on the site of law enforcement. It’s with
function of Video Recording, Audio Recording, Capture, G S, Walkie talkie shoulder microphone , IR,
assword rotection, Stamp for Data, and Support Android hone App for monitoring. It could be
connected to the intercom and carried on the shoulder. With the design of long-distance infrared
ray and white light, reliable effect of the law enforcement under the dark condition at night could be
guaranteed. This machine could be a strong weapon for the law-enforcement dept. to achieve a
standardized workflow through the informationized way.
It’s also called the Law Enforcement Video Recorder, it offers increased accountability - not just for
police officers, but for the people they arrest. Without video, it can be the officer's word against the
suspect's word. Now with this recorder, every potential deployment can be documented with full
audio and camera video.
Remind:
1. This model is with built-in Li-battery, please ensure to charge full of the battery at your first time
use.
2. lease use USB Cable for charging more than 6 hours.

Body Worn Video Camera User Manual
5
2. Operation Manual
2.1 Appearance tructure
1. Menu/ Return Button 2. Up/Left 3. Down/Right
4. OK Button/ (WIFI on/off) 5. Clip Slot 6. LCD
7. Audio Recording Button 8. Capture Button 9. USB ort
10. HDMI ort 11. Status Indicator 12. Charger interface
13. SOS Alarm Button(AR- E6G) 14. IR On/Off Button
15. ower On/Off Switch 16. Video Recording
17. Reset and SIM Slot(AR- E6G) 18. IR LED
19. Speaker 20. TT Intercom Button
21. Earphone ort 22. External Camera ort
23. Lens

Body Worn Video Camera User Manual
6
2.2 Power On/Off
Long ress the ower Button for 2 seconds to turn on/off the camera.
2.2.1 One Button Turn On & Recording
Support one button turn on the camera and recording. Long press for 1.5 seconds, the camera will
turn on automatically and get into the video recording mode.
2.3 Reset
When the device can not be normal to shutdown or startup ,lease use the reset button to turn off
the camera to restart.
2.4 Video Recording
Under the preview mode, press video recording button to start video recording, the icon will turn to
red ;Under the video recording mode, press the video record button to stop recording, the icon
will turn to green . The video file will save automatically in MOV format.
2.5 Audio Record
Under the preview mode, press the audio record button, it will go to start audio recording. Under the
audio recording mode, press the audio record button again, to stop audio recording and go back to
preview mode. The video file will save automatically in WAV format.
2.6 Capture
Under the preview mode, press the capture button, it will go to start capturing a photo. After the
capture it will go back to preview mode and save automatically in J G format.
2.7 IR lED On/Off
Under the preview mode, press the IR On/Off button, it will go to start IR Mode and the IR icon will
turn to green . When IR is off, the IR icon is white .
2.8 Mic On/Off
Under the recording mode, press SOS Alarm button, it will turn on or turn off the mic. It will show the
status of the mic ( or ). When the mic is turn off, the video recording file will be in mute
mode without sound.
2.9 Zoom In/Out
Under the recording mode, press Up or Down Button to zoom in or out picture.
2.10 Lock the file
Under the recording mode, press OK button to lock the files well avoiding to be delete
when loop recording.

Body Worn Video Camera User Manual
7
2.11 O One Button Alarm(AR-PE6G)
Long press SOS button for 2 seconds, the system will send alarm record to monitor center and capture
a photo back automatically and send back to monitor center. The operation of SOS(Capture or
Emergency call) could be configured at the Manage Tool. (The Capture operation just could work
under the preview or video recording mode)
2.12 Playback
Under the preview mode, press twice the Menu Button to get into the file list. ress the right or left
button to choose the video list or photo list. ress OK button to play or pause the data. Under the play
mode, press up or down button for forward or fast forward or slow down.
2.13 PTT Talkback
When the camera is connected to intercom by cable, the camera could use for shoulder microphone
of the intercom, press TT button to start the intercom function.
2.14 External Camera (External Camera support 1920x1080 30f/s, 1280x720 30f/s)
The built-in Camera is not working when use the external camera.
The camera will turn off automatically when the external camera is plugged out.
2.15 etup Menu
Under the preview mode, press the Menu Button to get into the submenu.( ress Up or Down Button
to select the item). assword is needed for setup, press OK button to get into the interface. Default
password is 000000.
2.15.1 Resolution
2304×1296 30f/s, 1920×1080 30f/s, 1280×720 30f/s (For all the settings, press OK Button for selecting.
After the settings, press up or down button to go to the previous or next item)
2.15.2 Photo ize
1600M , 1200M , 800M , 500M , 200M optional( ress OK Button for selecting. After the settings,
press up or down button to go to the previous or next item)

Body Worn Video Camera User Manual
8
2.15.3 Record overwrite
ON: Under the recording mode, when the memory card is full recording, camera will delete the
earliest video file to keep continuing recording.
Off: When the memory card is full with records, camera will stop recording.
2.15.4 File ize
5 Minutes: If record a video for 60 minutes, then there will be with 12 video files each for 5 minutes.
2.15.5 Flicker
The rate of illuminant flicker, generally, for Europe or USA market, please choose 60HZ.
2.15.6 Motion Detection
Application for recording during static status, camera will automatically start to record a video when
lens catch some speed/ dynamic image.
2.15.7 G_ ensor et
Setup for sensitivity of gravity acceleration. If choose On, under the recording mode, camera will
automatically put the current video file to be a "protected file" when camera is shocked. (Camera will
not delete the protected files when the Record overwrite is on)
2.15.8 Pre-Record
Under the preview mode, camera will automatically pre-record a period of image and save it in the
video recorded.
2.15.9 Post Record
Under the video recording mode, press video record button to stop recording, the camera will extend
for a while later for recording. Options: OFF, 3 Sec. 5 Sec., 15 Sec, press ok button for setting, it will go
to extend record mode automatically.
2.15.10 Car Mode
Set the Car Mode to be ON, the camera will go to video recording mode in auto and start to record
when connect to the car charger.
2.15.11 Video Rotation
the image of the camera screen will rotate 180° to display.

Body Worn Video Camera User Manual
9
2.15.12 Auto LCD Off
Under the standby mode, it’s with options for OFF, 30 Sec., 60 Sec., 3 Min, press ok button for setting,
the LCD screen will turn off automatically according to the settings for saving power.
2.15.13 Auto Power Off
The camera will turn off automatically when there’s no any operation, for saving power. It’s with OFF,
3 MIN, 5MIN for options.
2.15.14 Mic Mute
Microphone mute recovery . 15 SEC: If Mic is manual muted, set this item, Mic will automatically
restart in 15 minutes.
2.15.15 Date Format
Date display format, Y/M/D or D/M/Y
2.15.16 GP Auto Update Time
Setup this item to be ON, it could use G S time to update the camera time.
2.15.17 GMT etup
Setup according to timezone of your location.
2.15.18 Language
Support Multi Language in Chinese, English, Russian, Japanese, Korean etc. Standard: Chinese/English
2.15.19 Volume
Options: High, Middle, Low.
2.15.20 Indicator
For the indicator on or off. Some officer do not like the indicator is always on when the camera is on.
So this setup could shut down the indicator. This setup will not work to charging indicator. Means

Body Worn Video Camera User Manual
10
even you set the indicator to be off, but when you charge the camera, the charging indicator is still
on.
2.15.21 AUTO M C
Auto connect to C. Setup this item, when camera screen shows the USB Menu interface(Connect
USB, Charge, Skip) for 5 seconds without any operation, then camera will automatically go into USB
Connect mode to connect the C directly.
2.15.22 Free pace
Show the total space and residual space size of the memory card.
2.15.23 Officer ID
It shows the officer ID which setup by the management tool.
2.15.24 Firmware Version
Show the Version No. of the firmware
2.15.25 Default etting
Setup this item to be Yes, it will go back to the original setting; Select No, it will remain the current
setting.
2.16 GP Function
2.16.1 GP On
G S function is on by default. It will take 3-5 minutes to finish the G S signal researching at the first
boot.During the positioning, the icon status is white . When G S successful positioning, the icon
status is green . The video file taken under this G S mode, will generate the
G S coordinate information file automatically and saved in the SD card, named "video file
name.(dat)".
2.16.2 GP Playback
The player software is needed when playback the G S information in C. Import a video of the
camera to the player software, you could check the complete trajectory at the same time when
playing a video.
2.17 2G Function(AR-PE6G)
DV02G support 2G real-time data transmission. (Customized options)

Body Worn Video Camera User Manual
11
lease insert the GSM SIM card to the SIM slot firstly before use this function. It will search and
register network after the camera is power on. It will show the signal icon when successful
registration. (It will take 5-8 Min. for GSM network registration)
3. Management oftware(Connect U B)
Connect the camera to C by usb cable or via dock station, then use the software CamManager or
Camplayer for data management.
3.1 PC Removable Disc: Directly connect AR- E6 to C via usb cable or dock station --> screen will
show connect to usb, charge, skip --> choose connect to usb --> password needed, input
password(default: 000000), go back to ok button of the numeric keypad --> press ok button of
AR- E6 --> usb connecting... --> open your C find removable disc
3.2 CamManager_V1.2 & Camplayer_V1.3: based on AUTO M C is off --> Turn off AR- E6 --> Connect
AR- E6 to C via usb cable directly or via base dock, AR- E6 will auto boot on --> please do no more
any operation to AR- E6(do not press any button) and just open CamManager or Camplayer -->
waiting for few seconds --> CamManager will recognize AR- E6 then it will show Device ID as below
Iuput password(default: 000000) -->
ress OK --> Then set the user info or other information.

Body Worn Video Camera User Manual
12
If you choose Start UDisk here, then your C will
recognize AR- E6 and you could directly go to C to open removable disc to check video, audio and
image.

Body Worn Video Camera User Manual
13
3.3 Camplayer: Same to Cammanager, connect AR- E6 to C without any other operation(do not
press any button of AR- E6) once connect AR- E6 to C it will directly boot on open Camplayer
Camplayer will recognize AR- E6 device ID password needed, input password(default: 123456)
then choose video button, choose one video then press play or double press left button of C mouse
to play the video.

Body Worn Video Camera User Manual
14
Audio
hoto

Body Worn Video Camera User Manual
15
4. WIFI Function
Step1: Install the A K file “LinikInEyes_V1.0.24 ” to Android phone.
Step2: Long press the OK Button for 6 sec. to turn on the WIFI, the white icon of the WIFI will turn to
green when the WIFI is on.
Step3: Find the WLAN: “amba_boss ” of the Settings of the hone,
Choose amba_boss --> assword: 1234567890 --> The camera and phone is connected.
Step4: Open LinkinEyes to do more operations.
6. FAQ:
1. Power on failure
lease check whether the battery is running low. Charging the camera.
2. No response by pressing buttons when the camera is turning on.
ress the Reset Button, to reboot the camera.
3. Display wrong time and date.
lease connect the camera to C, use data manage tool to setup the sync. System time.
When the camera support G S auto update time, the time will update automatically when G S
positioning successful. lease check the GMT setup is correct.

Body Worn Video Camera User Manual
16
4. Camera failure connection to PC
Install the manage tool software to C, connect the camera to C by USB cable directly, use manage
tool to do operations, then it could connect well.
5. The video and photo are distortion
lease check whether the IR function.
6. GP is unable to locate well for a long time
G S signal is affected by environment and weather, should avoid high-rise block environment around
to use it.
7. Monitoring platform have no positioning information.
lease check whether the SIM card is insert well and with enough balance. In addition, the stability of
data transmission will be affected by the network signal.
Table of contents