Asnish PJ-168 User manual

MODEL NO. : PJ-168
Home Theater Projector with Bluetooth
INSTRUCTION MANUAL
PLEASE READ BEFORE OPERATING THIS EQUIPMENT

1
ImportantSafetyInstructions
1. Read these Instructions.
2. Keep these Instructions.
3. Heed all Warnings.
4. Follow all instructions.
5. Do not use this apparatus near water.
6. Clean only with a dry cloth.
7. Do not block any ventilation openings. Install in accordance with the manufacturer’s
instructions.
8. Do not install near any heat sources such as radiators, heat registers, stoves, or other
apparatus (including amplifier) that product heat.
9. Protect the power cord from being walked on or pinched particularly at plugs, convenience
receptacles, and the point where they exit from the apparatus.
10. Only use attachments/accessories specified by the manufacturer.
11. Unplug this apparatus during lightning storms or when unused for long periods of time.
12. Refer all servicing to qualified service personnel. Servicing is required when the apparatus
has been damaged in any way, such as power‐supply cord or plug is damaged, liquid has
been spilled or objects have fallen into the apparatus, the apparatus has been exposed to
rain or moisture, does not operate normally, or has been dropped.
13. Use only with a cart, stand, tripod, bracket, or table specified by the
manufacturer or sold with the apparatus. When a cart is used, use
caution when moving the cart/ apparatus combination to avoid injury
from tip‐over.

2
AdditionalWarningsandPrecautions
1. Do not look directly into the projector light.
2. Don’ttouchtheprojectlens
3. Mains adapter is used as disconnect device and it should remain readily operable
during intended use. In order to disconnect the apparatus from the mains
completely, the mains plug should be disconnected from the mains socket outlet
completely.
4. CAUTION: Use of controls or adjustments or performance of procedures other
than those specified may result in hazardous radiation exposure.
5. WARNING: Changes or modified to this unit not expressly approved by the party
responsible for compliance could void the user’s authority to operate the
equipment.
6. WARNING: Use of this unit near fluorescent lighting may cause interference
regarding use of the remote. If the unit is displaying erratic behavior move away
from any fluorescent lighting, as it may be the cause.
7. WARNING: Shock hazard - Do Not Open.
8. Caution and marking information is located at the rear or bottom of the
apparatus.
9. WARNING: To reduce the risk of fire or electric shock, do not expose this apparatus
to rain, moisture, dripping, or splashing.
10. Objects filled with liquids, such as vases, shall not be placed on the apparatus.

3
FCCWarning
Any Changes or modifications not expressly approved by the party responsible for
compliance could void the user's authority to operate the equipment.
This device complies with Part 15 of the FCC rules. Operation is subject to the following
two conditions: (1) this device may not cause harmful interference, and (2) this device
must accept any interference received, including interference that may cause undesired
operation.
NOTE: This equipment has been tested and found to comply with the limits for a Class
B digital device, pursuant to Part 15 of the FCC Rules. These limits are designed to
provide reasonable protection against harmful interference in a residential installation.
This equipment generates, uses, and can radiate radio frequency energy and, if not
installed and used in accordance with the instructions, may cause harmful interference
to radio communications. However, there is no guarantee that interference will not occur
in a particular installation. If this equipment does cause harmful interference to radio or
television reception, which can be determined by turning the equipment off and on, the
user is encouraged to try to correct the interference by one or more of the following
measures:
• Reorient or relocate the receiving antenna.
• Increase the separation between the equipment and receiver.
• Connect the equipment into an outlet on a circuit different from that to which the
receiver is connected.
• Consult the dealer or an experienced radio/TV technician for help.
• This equipment complies with FCC radiation exposure limits set forth for an
uncontrolled environment .This equipment should be installed and operated with
minimum distance 20cm between the radiator& your body.
• This transmitter must not be co-located or operating in conjunction with any other
antenna or transmitter.
InTheBox
Remote
AC Power Adapter
Main Unit
HDMI Cable
Lens Cover
User Manual

4
TableofContents
Important Safety Instructions - - - - - - - - - - - - - - - - - - - - - - - - - - - P1
Additional Warnings and Precautions - - - - - - - - - - - - - - - - - - - - - P2
FCC Warning - - - - - - - - - - - - - - - - - - - - - - - - - - - - - - - - - - - - - - - - P3
In The Box - - - - - - - - - - - - - - - - - - - - - - - - - - - - - - - - - - - - - - - - - P3
Table of Contents - - - - - - - - - - - - - - - - - - - - - - - - - - - - - - - - - - - -P4
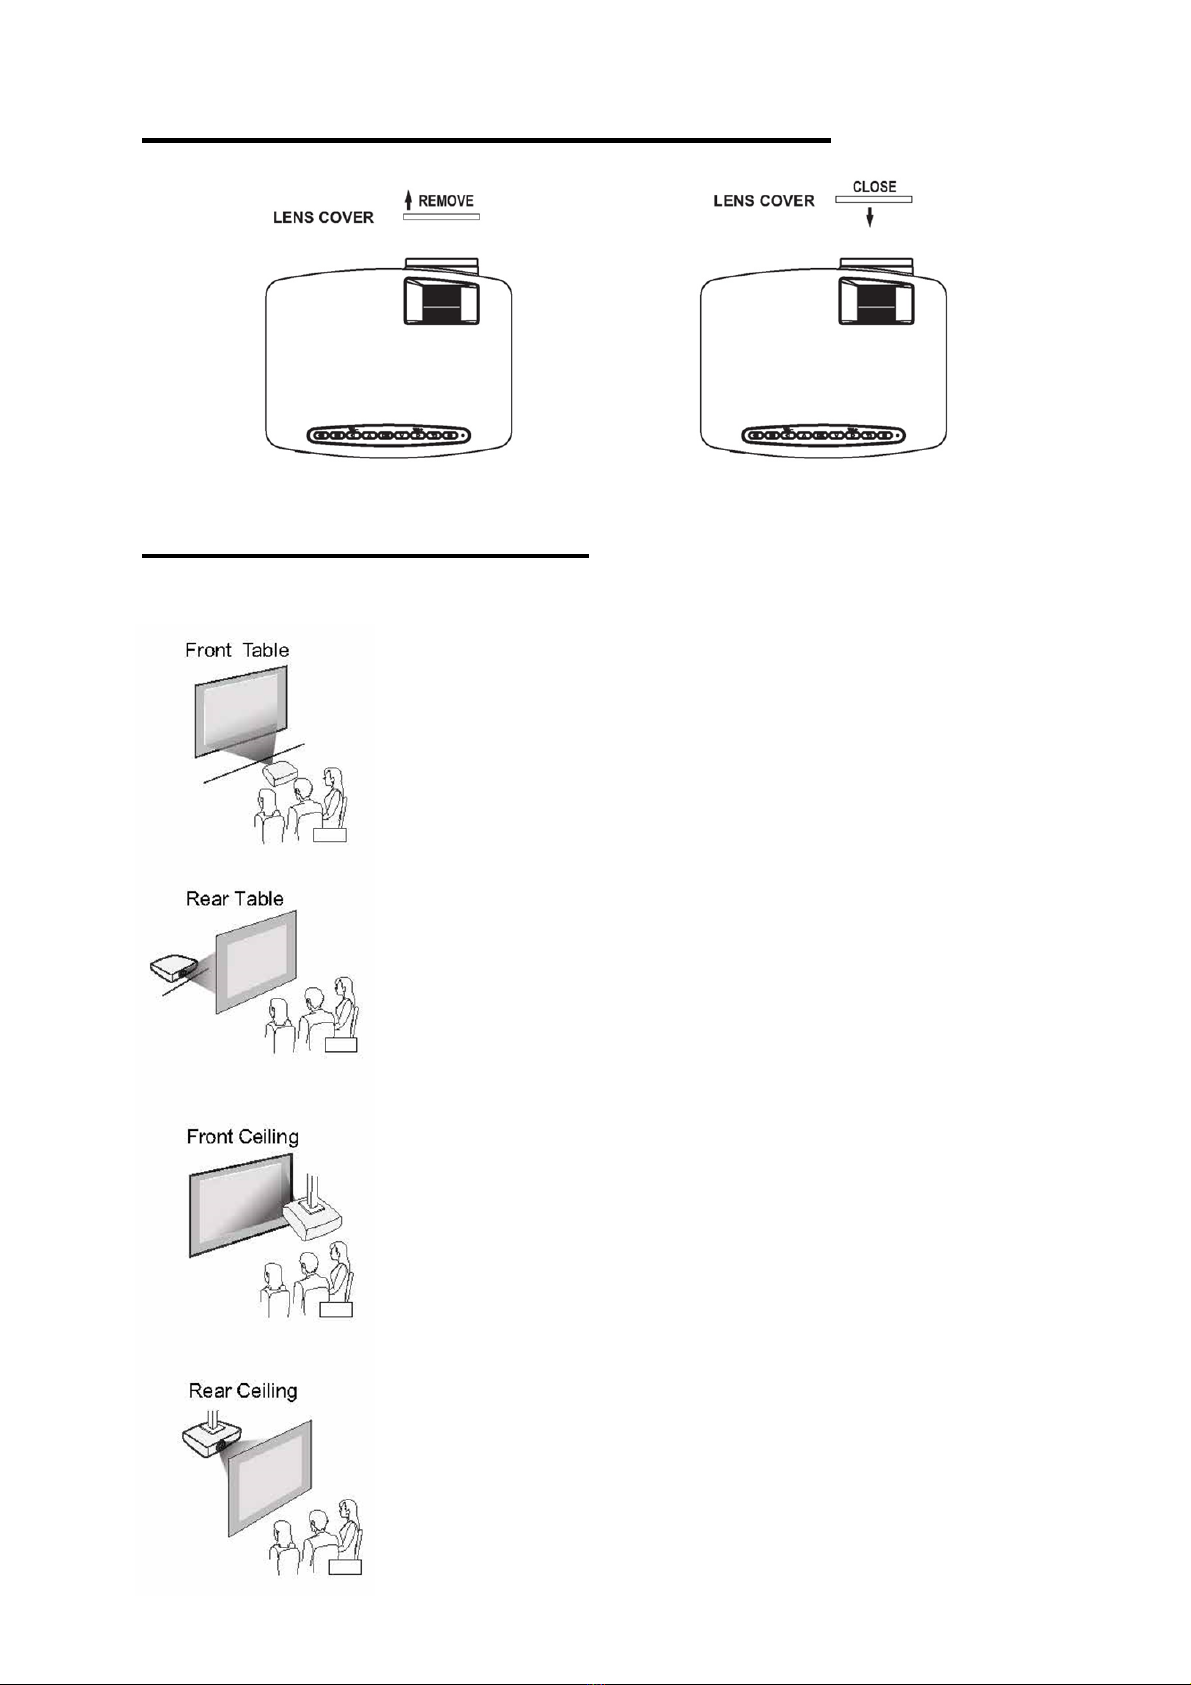
Remove & Close The Lens Cover - - - - - - - - - - - - - - - - - - - - - - - - P5
Placing of Your Projector - - - - - - - - - - - - - - - - - - - - - - - - - - - - - - P5
To Reduce Image Distortion - - - - - - - - - - - - - - - - - - - - - - - - - - - - P6
Distance Between The Projector And Screen - - - - - - - - - - - - - - - - P6
Installing your Projector in the Ceiling - - - - - - - - - - - - - - - - - - - - P6
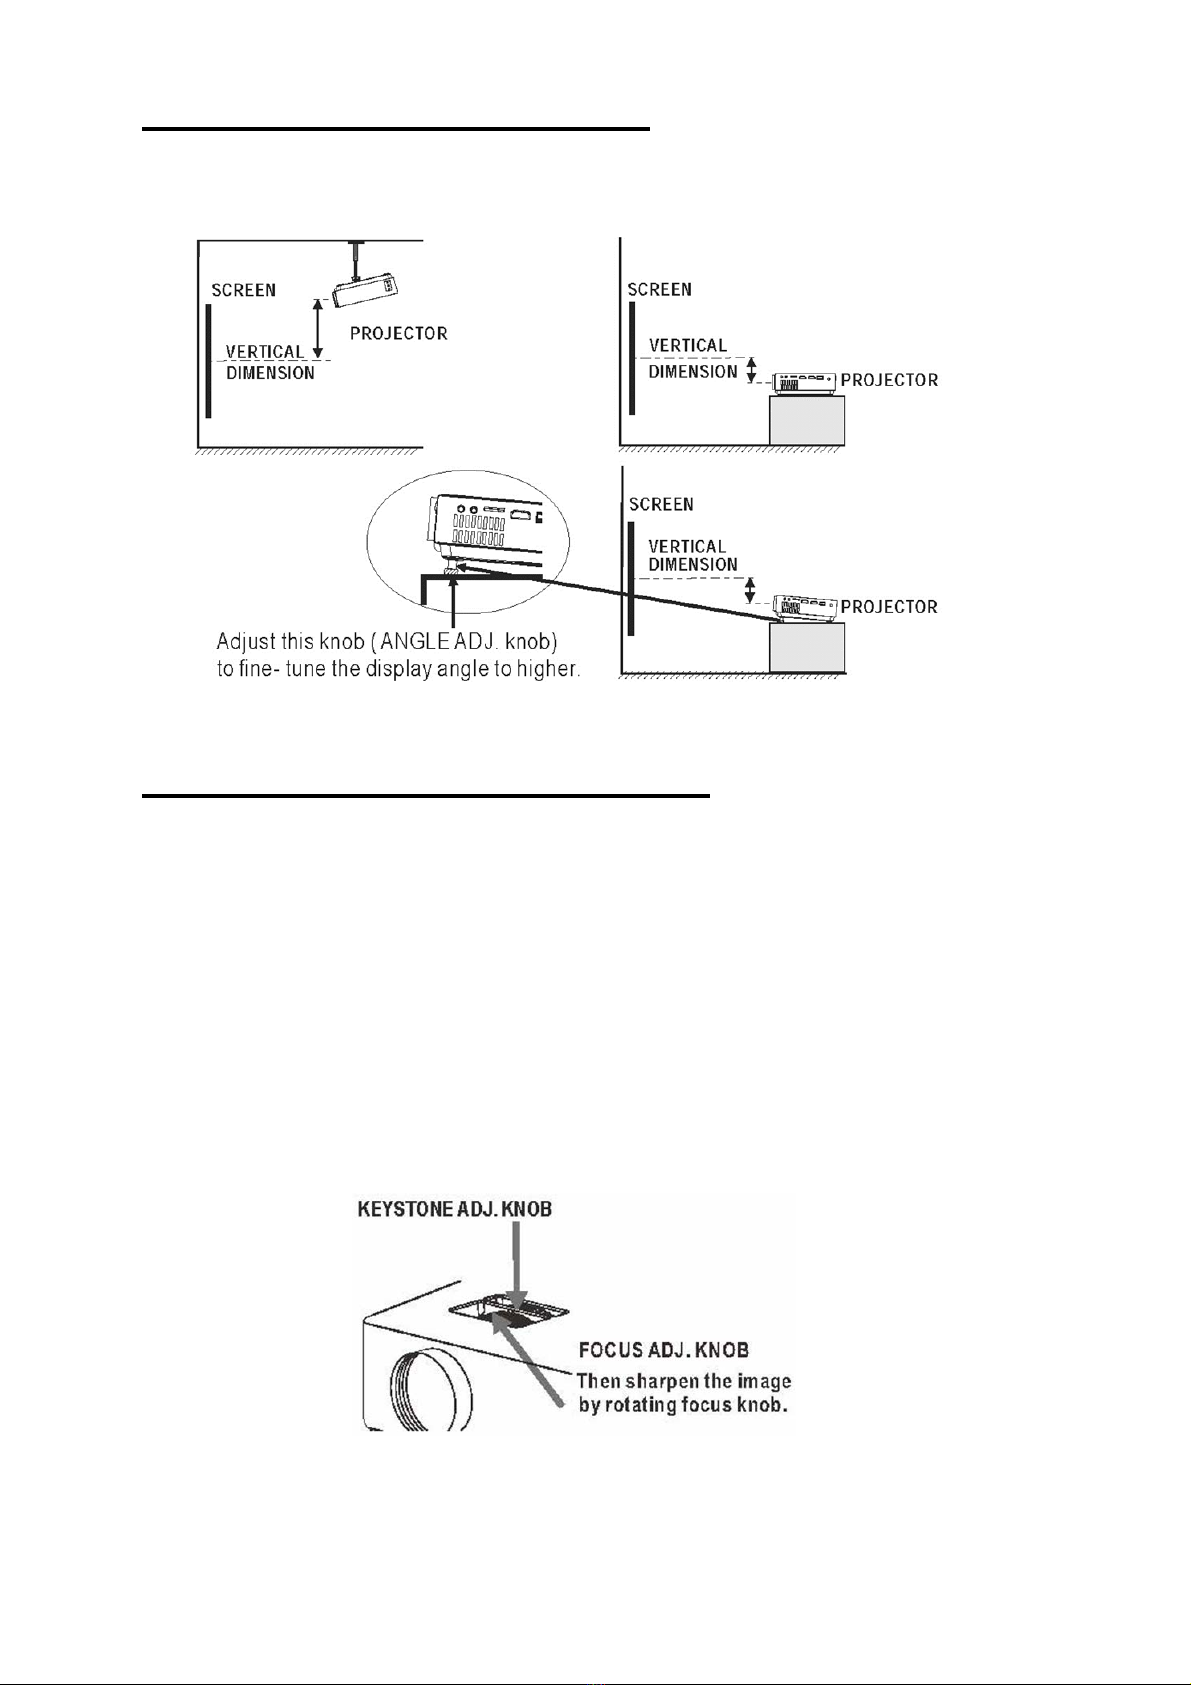
Adjust the Vertical Location - - - - - - - - - - - - - - - - - - - - - - - - - - - -P7
Adjust the Focus And Keystone - - - - - - - - - - - - - - - - - - - - - - -P7
Controls of Remote - - - - - - - - - - - - - - - - - - - - - - - - - - - - - - - - - - P8
Install / Remove Batteries of Remote - - - - - - - - - - - - - - - - - - - - - P8
Controls of Projector - - - - - - - - - - - - - - - - - - - - - - - - - - - - - - - - - P9
Install Power Adapter - - - - - - - - - - - - - - - - - - - - - - - - - - - - - - - - - P10
Main Button Operation - - - - - - - - - - - - - - -- - - - - - - - - - - - - - - - - P10
Connect HDMI show The Image On Projector Screen - - - - - - - - - P11
Connect AV Show The Image On Projector Screen - - - - - - - - - - - P11
Connect VGA Show The Image On Projector Screen - - - - - - - - - - P12
Connect Audio Output (Aux Out / Line Out / Earphones) - - - - - - - P13
Install USB Device And TF card (Micro SD Card) - - - - - - - - - - - - P13
Using TF Card and USB Playback (Media Player)- - - - - - - - - - - - - P14
Using Bluetooth Playback - - - - - - - - - - - - - - - - - - - - - - - - P15
Multi-screen interactive connection for phone and projector - - - - P16
Using Projector Menu 0 - - - - - - - - - - - - - - - - - - - - - - - - - - - - - - P18
Using Projector Menu 1 - - - - - - - - - - - - - - - - - - - - - - - - - - - - - - P18
Using Projector Menu 2 - - - - - - - - - - - - - - - - - - - - - - - - - - - - - - P19
Using Projector Menu 3 - - - - - - - - - - - - - - - - - - - - - - - - - - - - - - P19
Specifications - - - - - - - - - - - - - - - - - - - - - - - - - - - - - - P20

5
Remove & Close The Lens Cover
RemovethelenscoverbeforeusingClosethelenscoverwhenunitisnotusing
PlacingofYourProjector
Your projector can be installed in four different configurations (see picture below):
Front Table:
Select this location with the projector placed near the floor in
front of the screen. This is the most common way to position the
projector for quick setup and portability.
Rear Table:
Select this location with the projector placed near the floor
behind the screen.
NOTE: That a special rear projection screen is required.
Front Ceiling:
Select this location with the projector suspended upside-down
from the ceiling in front of the screen.
NOTE: A projector mount is required to install the projector in a
ceiling.
Rear Ceiling:
Select this location with the projector suspended upside-down
from the ceiling behind the screen.
NOTE:
A projector mount is required to install the projector in a ceiling.
A special rear projection screen is required.

6
ToreduceImageDistortion
Move the projector as close to the center of the
screen as possible.
The light beam from the projector should be
perpendicular to the screen for a rectangular or
square image.
DistanceBetweenTheProjectorAndScreen
Measure the distance between the projector and where you want to position the
screen. This is the projection distance.
InstallingyourProjectorintheCeiling
When installing the projector in the ceiling, please purchase a projector mount
recommended by an installation professional and follow the instructions that come with
the mount.
Before installing the projector in the ceiling, please check to make sure the ceiling
structure can support the weight of the projector and the mount. If in doubt, please ask
the advice from an installation professorial.
NOTE: Projector mount and screw(s) not included
Distance Screen Size
1.16m 36inch
1.35m 45inch
1.51m 50inch
1.79m 60inch
2.15m 72inch
2.81m 100inch
3.43m 120inch
4.44m150inch

7
AdjustTheVerticalLocation
Follow below picture to adjust the vertical location.
AdjustTheFocusAndKeystone
Follow below picture to adjust the focus and trapezoidal screen.
Adjust the focus by turning the knob while observing the image pixels near the center of
the screen. Optimal focus is obtained when the pixels are clearly visible. Depending on
the projected screen size, the focus near the screen edges may be less sharp than the
screen center.
Keystone image is created when the projector lens is projected from above or below the
center of the screen. Keystone correction restores the distorted image to a rectangular
or square shape.

8
ControlsofRemote
Install/RemoveBatteriesofRemote
Remove the battery compartment cover on the back of your remote by carefully sliding
to open. The battery cover can then be lifted away. Fit the correct batteries (included),
referring to the polarity markings. Finally, replace the cover.
NOTES:
Batteries shall not be exposed to excessive heat such
as placing under the sunlight or near a fire.
Please make sure the batteries are installed with their
correct polarities.
Do not mix old and new batteries.
Use only the same type of batteries.
Do not dispose of the batteries in fire, battery may
explode or leak.
Do not recharge a non-rechargeable battery.

9
ControlsofProjector
1 LENS 12 Button
2 IR Sensor (Front) 13 Buttons
3 ANGEL ADJ. Knob 14 RETURN Button
4 VGA IN Port 15 POWER Button
5 IR Sensor (Rear) 16 POWER Indicator
6 SPEAKER 17 TF Card Slot
7 FOCUS ADJ. Knob 18 Audio Out Jack
8 TRAPEZOIDAL ADJ. Knob 19 AV IN Jack
9 SOURCE Button 20 HDMI 1 & 2 Ports
10
11
MENU Button
Vol- Vol+
Buttons
21
22
USB Port
DC IN Jack

10
InstallPowerAdapter
Follow below picture to connect power adapter
Connect small end of adapter FIRST. Plug the adapter body to power outlet.
WARNING:
Before connecting to the power supply, ensure that the supply corresponds to the
information on the rating label at the back of the apparatus.
MainButtonOperation
- Press the button to switch on unit, press again to turn off.
/ SOURCE - Press the button to select input source.
/ MENU - Press the button to enter projector menu.
- Press the buttons to navigate and select screen item of menu.
- Press the button to return to previous status or exit the menu.
/ - Press the buttons to select the sound level on the remote.
Vol- / Vol+ -Press and hold the buttons to turn the volume up/down on the pannel.
- Press to mute the audio. Press again to resume.

11
ConnectHDMIShowTheImageOnProjectorScreen
Refer to the following picture to connect a set top box, a BD/DVD player or a streaming
player to the HDMI input.
1. Press the button to standby mode before connect HDMI cable.
2. After connection, press the button to turn on unit and power indicator will light GREEN
3. Press the / SOURCE button to home screen, use buttons to select
HDMI 1 or HDMI 2 icon and press the button to enter HDMI mode. The video
from the connected device will be shown on projector screen.
4. Press the button to turn unit to standby.
Important Note:
If there is no sound from the internal speakers when playing media contents
from a set top box, BD/DVD or streaming players connecting to the HDMI
input, please check the set top box or the player's digital audio settings and
make sure it is set to "PCM Stereo" mode.
ConnectAVShowTheImageOnProjectorScreen
Follow below picture to connect AV cable and device.
1. Press the button to standby mode before connectAV cable.
2. Use AV cable to connect follow below figure
3. After connect, press the button to turn on unit and power indicator will light
GREEN
4. Press the / SOURCE button to home screen, use buttons to select
AV mode and the video ofAV device will show on projector screen.
5. Press the button to turn the unit to standby.

12
ConnectVGAShowTheImageOnProjectorScreen
Follow below picture to connect VGA cable and device.
1. Press the button to standby mode before connect VGAcable.
2. After connect, press the button to turn on unit and power indicator will light
GREEN.
3. In home screen, use buttons to select VGA icon and press the button
to enter VGA mode. The video of VGA device will show on projector screen
4. Press the button to turn the unit to standby.
Pleaserefertothefollowingtabletoadjusttheoutputsignalfromcomputer
Type Resolution Frequency Field Frequency
PC
VGA 640x480
31.5 60
34.7 70
37.9 72
37.5 75
SVGA 800x600
31.4 50
35.1 56
37.9 60
46.6 70
48.1 72
46.9 75
XGA 1024x768
40.3 50
48.4 60
56.5 70
NOTE: VGA connections do not support audio. You will need to use the laptop or computer’s connected
speakers

13
ConnectAudioOutput(AuxOut/LineOut/Earphones)
Follow below picture to connect audio cable and device.
1. Press the button to standby of your projector before connection.
2. Use audio cable to connect follow below figure.
3. After connect and turn on both units. Your projector sound from external device
now.
4. After using , turn off both unit
Important Note:
If there is no sound from the stereo audio output when playing media contents from a
set top box, BD/DVD or streaming players connecting to the HDMI input, please check
the set top box or the player's digital audio settings and make sure it is set to "PCM
Stereo" mode.
InstallUSBDeviceAndTFcard(MicroSDCard)
Follow below picture to install USB and TF card
Turn off the unit before install USB / TF card.

14
UsingTFCardAndUSBPlayback(MediaPlayer)
Install USB / TF device:
1. Press the button to standby before install USB / TF card.
2. Install the USB device into USB port / Install the TF device into TF slot.
3. After install, press the button to turn on unit and the power indicator light
GREEN.
4. In home screen, use buttons to select PHOTO / MUSIC / MOVIE / TEXT
icon and press the button to enter.
5. Use the button to select C and press button to enter.
6. Use buttons to search the correct file to preview and press the button
to playback file.
NOTE: Remove USB / TF device, press the button to turn off power FIRST.
Sub-Menu on Movie screen
1. When movie playback, press
the button and more function
screen show on lower (figure 1).
2. Use the button to select
icon and press the button to
play special function.
Figure 1.
Sub-Menu on Photo screen
1. When photo playback, press
the button and more
function screen show on lower
(figure 2).
2. Use the button to select
icon and press the button to
play special function.
Figure 2.
Sub-Menu on Music screen
1. When music playback, press
the button and more
function screen show on lower
(figure 3).
2. Use the button to select
icon and press the button to
play special function.
Figure 3.
Sub-Menu on Text screen
1. When text playback, press the
button and more function
screen show on lower (figure 4).
2. Use the button to select
icon and press the button to
play special function.
Figure 4.

15
UsingBluetoothPlayback
Pairing is the term used when two Bluetooth devices are connected wirelessly for the
first time. This allows the devices to see each other and sets up a one to one
communication channel between both devices.
Bluetooth Connection
1. Press the button to turn on unit and power indicator will light GREEN.
2. Press the /MENU button to enter the projector menu.
3. Press buttons to select SOUND menu as Figure.
4. Use the button to select BT Setting column.
5. Press the buttons to select “BT Setting On”
6. Turn on your External Bluetooth Speaker and select to
Bluetooth pairing mode
7. A few seconds, next the BT logo will show the connected External Bluetooth
Speaker name in the main function page.
8. After connection completed, the unit sound to External Bluetooth speaker.
Disconnect the Bluetooth
1. Press the /MENU button to enter the projector menu
2. Press buttons to select SOUND menu as Figure.
3. Use the button to select BT Setting column.
4. Press the buttons to select “BT Setting Off”. The Bluetooth will disconnect.

16
Multi‐screeninteractiveconnectionforphoneandprojector
Wireless Projection
First, ensure the projector and the mobile is connected to the same wireless network.
Following below steps.
Connect local WiFi router
1. Press the button to turn on unit and power indicator will light GREEN.
2. Press the / SOURCE button to select Miracast icon and press button to enter
Miracast / Airplay page on the screen.
3. Click the WiFi menu to search and select “Display_XXXX” (XXXX is numbers and
letters which show on the Miracast / Airplay page on the screen) and enter password
“12345678” to connect on your mobile device.
4. After connect, scan QR code or click the browser, input IP “192.168.XX.XXX”
(XX.XXX is numbers which show on the Miracast / Airplay page on the screen) on
the mobile. The Screen Mirroring Device Management menu will show on your
mobile to configure screen mirroring parameters, choose local WiFi router and enter
password to connect.
5. After connected, local WiFi router name and icon will show on the Miracast / Airplay
page on the screen.
6. If you want to connect another local WiFi router, repeat step 4 to choose another one.
Note: When the router is successfully connected, the projector will automatically
Android Mirroring Function (Miracast mode) (no need to connect the WiFi
router)
1. Press the / SOURCE button to select Miracast icon and press button to enter
Miracast / Airplay page.
2. Turn on WiFi function on your mobile device (no need to connect any WiFi router)
3. Click Miracast function (different mobile models with different names for example:
Multi-screen, Wireless Display, Screen Mirroring, Smart View etc…) and select
“Display_XXXX-Mira”(XXXX is numbers and letters which show on the Miracast /
Airplay page on the screen) on the mobile settings
4. After connected, the mobile device contents will mirror on the projector screen
Android Mirroring Function (DLNA mode) (unit need to connect the WiFi
router)
1. Press the / SOURCE button to select Miracast icon and press button to enter
Miracast / Airplay page.
2. Connect the same WiFi network as previous “Connect local WiFi router” section
for projector and mobile.
3. Open the App and select the video / movie to play on your mobile
4. Click “Projection Screen” and select “Display_XXXX” (XXXX is numbers and letters
which show on Miracast / Airplay page) on the mobile settings.
5. After connected, the mobile device contents will project on the projector screen.

17
iOS mobile Screen Mirroring Function (no need to connect the WiFi router)
1. Press the / SOURCE button to select Miracast icon and press button to enter
Miracast / Airplay page
2. Click the Wi-Fi menu to search, select “Display_XXXX” (XXXX is numbers and
letters which show on the Miracast / Airplay page on the screen) on the mobile
device and enter Pin “12345678” to connect
3. Click Screen Mirroring function and select “Display_XXXX” (XXXX is numbers
and letters which show on the Miracast / Airplay page on the screen) on the mobile
device to connect
4. After connected, the mobile device contents will mirror on the projector screen
iOS mobile Airplay Function (unit need to connect the WiFi router)
1. Press the / SOURCE button to select Miracast icon and press button to enter
Miracast / Airplay page.
2. Connect the same WiFi network as previous “Connect local WiFi router” section
for projector and mobile.
3. There are two modes for using (a) Screen Mirroring mode or (b) Airplay mode
(a) Screen Mirroring mode:
1. Click Screen Mirroring function and select Display_XXXX (XXXX is numbers
and letters which show on the Miracast / Airplay page on the screen) on the
mobile device to connect
2. After connected, the mobile device contents will mirror on the projector screens
(b) Airplay mode:
1. Open the App and select the video / movie to play on your mobile
2. Click “Projection Screen” and select “Display_XXXX” (XXXX is numbers and
letters which show on the Miracast / Airplay page on the screen) on the mobile
settings.
3. After connected, the mobile device contents will project on the projector screen.
Wired Projection
iOS mobile
Follow below picture to connect projector to mobile with the data cable.
1. Press the button to standby mode before connect
data cable (not included).
2. After connect, press the button to turn on unit and
power indicator will light GREEN
3. In home screen, use buttons to select MIRACAST
icon and press the button to enter Miracast / Airplay page.
4. Select “trust” on the popup window of your mobile. The video of
mobile device will show on projector screen
5. Press the button to turn the unit to standby.
Note: Wired Projection function supports iOS mobile device only.

18
UsingProjectorMenu0
Press /MENU button to enter projector menu.
This Screen menu showed on right upper of view screen.
(Active in VGA mode)
Use
buttons to adjust Horizontal Pos. level -16 to 16.
Use
buttons to adjust Vertical Pos. level -16 to 16.
Use
buttons to adjust Clock digit -30 to 30.
Use
buttons to adjust Phase digit 0 to 31.
UsingProjectorMenu1
Press /MENU button to enter projector menu.
This Picture menu showed on right upper of view screen.
Use
to select different picture effect to Standard /
Dynamic / Mild / User. Use to select and to
adjust Contrast / Brightness / Color / Sharpness digit If
chose User item.
Use
buttons to adjust Contrast level 0 to 100.
(Active in User item of Picture Mode).
Use
buttons to adjust Brightness level 0 to 100.
(Active in User item of Picture Mode).
Use
buttons to adjust Color level 0 to 100.
(Active in User item of Picture Mode).
Use
buttons to adjust Sharpness level 0 to 100.
(Active in User item of Picture Mode).
Use buttons to select different color temperature to
Cool / Medium / Warm.
Use buttons to select Off / Low / Middle / High

19
UsingProjectorMenu2
Press /MENU button to enter projector menu, press buttons to select SOUND
menu.
This sound menu showed on right upper of view screen.
Use to select different sound effect Standard / Movie /
Music / Sports / User. Use to select and to
adjust Treble and Bass digit if chose User item.
Use buttons to select Treble level 0 to 100.
(Active in User item of Sound Mode).
Use buttons to select Bass level 0 to 100.
(Active in User item of Sound Mode).
Use buttons to select Balance level to -50 to +50.
Use buttons to select On /Off
UsingProjectorMenu3
Press /MENU button to enter projector menu, press buttons to select OPTION
menu.
This OPTION menu showed on right upper of viewing
screen.
Use button to select different language.
Use button to select Front Table / Front Ceiling / Rear
Table / Rear Ceiling
Use to select differentAspect Ratio 4:3 / 16:9 / Full /
Zoom1 / Zoom2 / Panorama / Just Scan. (Active by Movie)
Use buttons to select Y or N. If choose “Y” that your
unit will go to factory default setting.
For service center use only
Table of contents