Astivita ASTMICOM User manual

Microwave Instructions
220 V – 240 V; 50 Hz;
Microwave output: 1000 W, 2450 MHz;
1500 W (Microwave); 2550 W (Grill); 2550 W (Combination);
ASTMICOM

USERINSTRUCTIONS
GENERALWARNINGS
Read carefully all the instructions contained in this booklet. It provides you with important
information regarding the safe installation, use and maintenance of the appliance as well as useful
advice for getting the best out of your oven. Keep this booklet in a safe place for future reference.
After removing the packing, check that the appliance is not damaged in any way.
Be careful not to leave the packing materials (plastic sheeting, expanded polystyrene etc.) where
children can get at them, as they can be dangerous.
IMPORTANT: do not use the oven door handle to move the appliance, such as to remove it
from the packaging
The first time you switch the oven on, acrid smelling smoke may appear. This is caused by the
heating of the adhesive used on the insulation panels surrounding the oven. There is nothing
unusual about this. If it happens, simply wait until the smoke disappears before putting any food in
the oven. Never roast or bake on the oven base.
Safety is a good habit to get into
◎ This appliance is designed for non-professional, household use and its functions must not be
changed.
◎ The electrical system of this appliance may be used safely only when it is correctly connected
to an efficient earthing system in compliance with the safety standards currently in effect.
◎ The manufacturer will not be held liable for any damages that might arise out of incorrect
installation or improper, incorrect or unreasonable use of the appliance.
The following items are potentially dangerous, and therefore, appropriate measures must be taken
to prevent children and the disabled from coming into contact with them:
-Controls and the appliance in general;
-Packaging (bags, polystyrene, nails, etc.);
-The appliance immediately after use of the oven or grill due to the heat generated;
-The appliance when no longer in use (potentially dangerous parts must be made safe).
Avoid the following:
-Touching the appliance with wet parts of the body;
-Using the appliance when barefoot;
-Pulling on the appliance or the supply cord to unplug it from the electrical outlet;
-Obstructing the ventilation or heat dissipation slots;
-Allowing power supply cords for small appliances to come into contact with the hot parts
of the appliance;
-Exposing the appliance to atmospheric agents (rain, sun);
ATTENTION
The oven is an appliance which, for its nature, becomes hot, especially in correspondence of
the glass door.
It is therefore a good rule that children do not approach the oven when it is functioning,
particularly when the grill in used.

-Using the oven for storage purposes;
-Using flammable liquids near the appliance;
-Using adaptors, multiple sockets and/or extension cords;
-Attempting to install or repair the appliance without the assistance of qualified personnel.
WARNING- Accessible parts will become hot when in use. To avoid burns and scalds
children should be kept away
During use the appliance becomes hot, Care should be taken to avoid touching heating
elements inside the oven.
Qualified personnel must be contacted in the following cases:
-Installation (following the manufacture’s instructions);
-When in doubt about operating the appliance;
-Replacing the electrical outlet when it is not compatible with the plug for the appliance.
Service Centres authorized by the manufacturer must be contacted in the following cases:
-If in doubt about the soundness of the appliance after removing it from the packaging;
-If the power supply cord has been damaged or needs to be replaced;
-If the appliance breaks down or functions poorly; ask for original spare parts.
It is a good idea to do as the following:
-Only use the appliance to cook food, nothing else;
-Check the soundness of the appliance after it has been unpacked;
-Unplugged the appliance from the electrical mains if it is not functioning properly and
before cleaning or performing maintenance;
-When the appliance is not used for an extended period of time, unplugged the appliance
and close the gas cock (it present);
-Use cooking gloves to place cookware in the oven or when removing it;
-Always grasp the oven door in the centre because the ends may be hot due to the escape
of hot air;
-Make sure that the control knobs are on the “o”setting when the appliance is not in use;
-Unplug the appliance when you decide not to use the appliance any longer.
◎ The manufacturer may not be held responsible for any damage due to: incorrect installation,
improper, incorrect and irrational use.

IMPORTANT SAFETY INSTRUCTIONS READ CAREFULLY
AND KEEP FOR FUTURE REFERENCE
– WARNING: If the door or door seals are damaged, the oven must not be operated until it
has been repaired by a competent person.
– WARNING: It is hazardous for anyone other than a competent person to carry out any
service or repair operation that involves the removal of a cover which gives protection
against exposure to microwave energy.
– WARNING: Liquids and other foods must not be heated in sealed containers since they
are liable to explode.
– Only use utensils that are suitable for use in microwave ovens.
– When heating food in plastic or paper containers, keep an eye on the oven due to the
possibility of ignition.
– The microwave oven is intended for heating food and beverages. Drying of food or clothing
and heating of warming pads, slippers, sponges, damp cloth and similar may lead to risk
of injury, ignition or fire
- The oven should be cleaned regularly and any food deposits removed
-Failure to maintain the oven in a clean condition could lead to deterioration of the surface
that could adversely affect the life of the appliance and possibly result in a hazardous situation.
The appliance must not be placed in a cabinet.
When using electrical appliance basic safety precautions should be followed, including the
following:
WARNING: To reduce the risk of burns, electric shock, fire, injury to persons or exposure to
excessive microwave energy:
1. Make sure that all the packing materials are removed from the inside of the door.
2. WARNING: Check the oven for any damage, such as misaligned or bent door, damaged door
seals and sealing surface, broken or loose door hinges and latches and dents inside the cavity
or on the door. If there is any damage, do not operate the oven and contact qualified service
personnel.
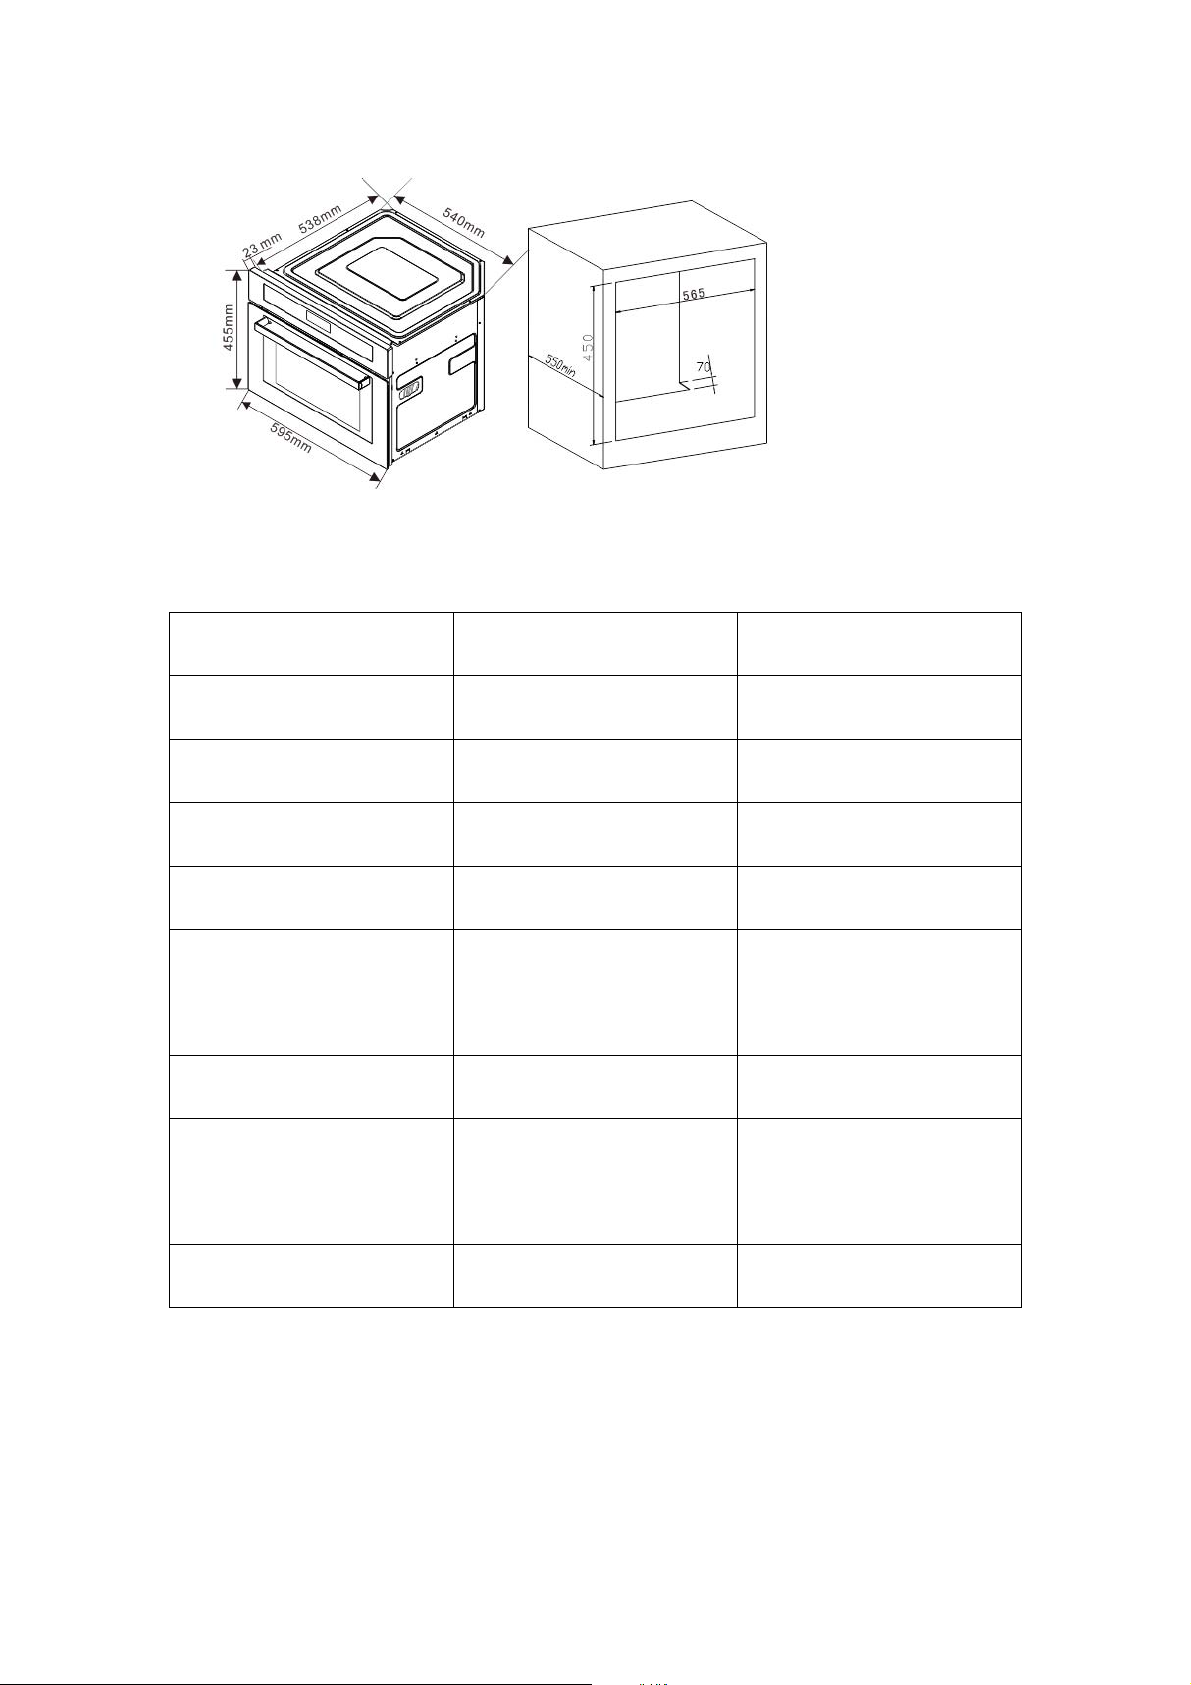
3. This microwave oven must be placed on a flat, stable surface to hold its weight and the
heaviest food likely to be cooked in the oven.
4. Do not place the oven where heat, moisture, or high humidity are generated, or near
combustible materials.
5. Do not operate the oven when empty.
6. Do not operate this appliance if it has a damaged cord or plug, if it is not working properly or
if it has been damaged or dropped. If the supply cord is damaged, it must be replaced by the
manufacturer or its service agent or a similarly qualified person in order to avoid a hazard.
7. WARNING: Liquid or other food must not be heated in sealed containers since they liable to
explode.
8. Microwave heating of beverage can result in delayed eruptive boiling, therefore care has to be
taken when handle the container.

9. Do not fry food in the oven. Hot oil can damage oven parts and utensils and even result in
skin burns.
10. Eggs in their shell and whole hard-boiled eggs should not be heated in microwave ovens since
they may explode even after microwave heating has ended.
11. Pierce foods with heavy skins such as potatoes, whole squashes, apples and chestnuts before
cooking.
12. The contents of feeding bottles and baby jars should be stirred or shaken and the temperature
should be checked before serving in order to avoid burns.
13. Utensils should be checked to ensure that they are suitable for use in microwave oven..
14. WARNING: It is hazardous for anyone other a trained person to carry out any service or
repair operation which involves the removal of any cover which gives protection against
exposure to microwave energy.
15. This appliance is not intended for use by persons (including children) with reduced physical,
sensory or mental capabilities, or lack of experience and knowledge, unless the have been
given supervision or instruction concerning use of the appliance by a person responsible for
their safety.
16. Children should be supervised to ensure that they do not play with the appliance.
17. To reduce the risk of fire in the oven cavity:
18. When heating food in plastic or paper container, check the oven frequently to the possibility
of ignition.
Remove wire twist-ties from paper or plastic bags before placing bag in oven.
If smoke is observed. Switch off or unplug the appliance and keep the door closed in order to
stifle any flames.
not use the cavity for storage purposes. Do not leave paper products, cooking utensils or
food in the cavity when not in use.
WARNING: The appliance and its accessible parts become hot during use.
Care should be taken to avoid touching heating elements.
Children less than 8 years of age shall be kept away unless continuously supervised
This appliance can be used by children aged from 8 years and above and persons with
reduced physical, sensory or mental capabilities or lack of experience and knowledge if they
have been given supervision or instruction concerning use of the appliance in a safe way and
understand the hazards involved. Children shall not play with the appliance. Cleaning and user
maintenance shall not be made by children without supervision.
During use the appliance becomes hot. Care should be taken to avoid touching heating
elements inside the oven.
WARNING: Accessible parts may become hot during use. Young children should be kept
away.
Do not use harsh abrasive cleaners or sharp metal scrapers to clean the oven door glass since
they can scratch the surface, which may result in shattering of the glass.
Steam cleaner is not to be used.

WARNING: Ensure that the appliance is switched off before replacing the lamp to avoid the
possibility of electric shock.
This appliance is for house hold use only.
INSTALLING THE APPLIANCE
Important: Unplug your oven before performing installation or maintenance!
Installation should be carried out according to the instructions by a professionally qualified
person.
The manufacturer declines all responsibility for
any damage to persons, animals or things due to a
wrong installation.
FITTING THE APPLIANCE
Fit the appliance into its surround (beneath a
work-top or above another appliance) by inserting screws into the 4 holes that can be seen in the
frame of the oven when the door is open.
For the most efficient air circulation, the oven should be fitted according to the dimensions shown
in fig. 1-2.
The rear panel of the cabinet must be removed so that air can circulate freely. The panel to which
the oven is fitted should have a gap of at least 70 mm at the rear.
NB: where ovens are to be matched with hobs, it is essential to follow the instructions
contained in the booklet supplied with the other appliance.
IMPROTANT
During use the appliance becomes hot, Care should be taken to avoid touching heating
elements inside the oven.
Accessible parts may become hot during use.Yong children should be kept away.
Do not use harsh abrasive cleaners or sharp metal scrapers to clean the oven door glass since
they can scratch the surface, which may result in shattering of the glass.
For a built-in oven to work well the cabinet must be of the right type.
The panels of the adjoining furniture should be heat resistant. Particularly when the adjoining
furniture is made of veneered wood, the adhesives should be able to withstand a temperature of
120℃. Plastic materials or adhesive which cannot withstand this temperature will become
deformed or unstuck.
To comply with safety regulations, once the appliance has been fitted it should not be possible to
make contact with the electrical parts.
All parts which offer protection should be fixed in such a way that they cannot be removed
without the use of a tool.

ELECTRICAL CONNECTION
The appliance must be fitted correctly to guarantee electrical safety. During fitting and
maintenance operations, the appliance must be unplugged from the electrical grid; fuses must be
switched off or removed.
The electrical connections are made before the appliance is installed in its housing.
Ensure that:
-the electrical installation has sufficient voltage,
-the electrical wires are in good condition,
-the diameter of the wires complies with the installation requirements.
The oven must be connected with a power cable (standardized)with 3 1.5mm2conductors (1
ph+1N+ground) that must be connected to a monophase 220-240V~ network via a CEI 60083
standardised receptacle 1 ph+1 neutral + ground lead or an allpole cut-off device in accordance
with installation rules.
WARNING
The safety wire (green-yellow) is connected to the appliance’s terminal and must be
connected to the earth terminal of the electrical set-up.
You must enable the appliance to be disconnected from the supply network after installation.
Disconnection can be enabled by ensuring that there is an accessible power plug or by
incorporating a switch into the fixed wiring in compliance with the installation rules. The fuse in
your set-up must be 16 amperes. If the power cable is damaged , it should be replaced by the
manufacturer, its after-sales service department or a similarly qualified person to avoid danger.
WARNING
We cannot be held responsible for any accident resulting from non-existent, defective or incorrect
earthing. If the electrical installation in your residence requires any changes in order to hook up
your appliance, call upon a professional electrician.
If the oven malfunctions in any way, unplug the appliance or remove the fuse corresponding to the
sector where the oven is hooked up.

fig. 1-2.
Technical Data:
Name Built-in Combination
Microwave Built-in Microwave
Model
Rated voltage 220-240V~ 220-240V~
Rated frequency 50Hz 50Hz
Rated Grill power 2550W -
Rated Micro Input
power
1500W 1500W
Combination Power 2550W -
Microwave
rated output power
1000W 1000W
Volume 40L 40L
ASTMICOM ASTMICOM

Description of the appliance
①Programmer
②Control panel
③Wire shelf supports

Programming selection

●ACCESSORIES
●Wire shelf (Fig.1)
The wire shelf allows you to brown or grill
food. The shelf should not, under any
circumstances, be used with other metal
cookware when using the microwave, grill +
microwave or fan + microwave settings.
However, you can heat food in an aluminum
tray providing it is separated from the shelf by
a plate.
●Enameled tray (Fig.2)
It can be used for bain-marie cooking when
filled with water to mid-height. It can also be
used as a cooking dish
Comments:
★Be careful never to use the enamel dish
with the micro-wave function. You could
damage your oven.
●The side shelf supports (Fig.3)
2 hook-on shelf supports allow you to use the
accessories on three levels.
Three cooking levels are available, depending
on the method used and the type of food.
With the Grill or Grill + Micro-wave setting,
the accessories (shelf or glass dish) are placed
on the first level for thick foods like roasts and
on the third level for thinner foods like chops
and sausages
In the cooking wither or without
micro-wave position, you can put the shelf or
glass dish on the first or second levels
depending on the item being cooked.
Fig.1
Fig.2

Fig.3
Before using the oven for the first time, heat it
to maximum temperature, empty, and leave it
on for at least one hour,
With the door closed Then switch it off, open
the oven door and air the room.
The smell is caused by the evaporation of
products to protect the oven.
Never pace objects on the oven floor, as this
may damage the enamel.
Dishes must always be placed on the grids
supplied with the appliance.
When baking cakes or breads that rise, it is
best not to open the door during cooking, to
prevent sinking.
Prolonged pressure on the ∨ ∧ - and +
buttons causes the display to run quickly
through the lists or values that are being
adjusted.
Each time the oven is switches on, the
CREATION menu appears.
If, when the display switches on, the user does
not activate any button, the screen will switch
off automatically after 2 minutes.
Cooling system
To cool the temperature outside the oven, a
cooling system blows out air via a slot located
above the oven control panel.
At the end of cooking, the fan switches itself
on and stops automatically, when the oven has
cooled down the door is opened.
Oven lighting
When the oven is off, the light switches on
when door is opened.
Using your oven for the first time
After connecting the oven to the mains and
running it empty (see above), activate the
control panel by pressing the buttons:
The list of available languages is displayed in
the menu. Choose your language using the
∨ ∧up/down buttons: press “OK” to
confirm. Once the choice has been made, the
following parameters are displayed:
LANGUAGE Language selection
TIME setting the clock
SOUND Touchpad volume
TIMRAdjusting the timer
EXIT Exit from the menu
After selecting the language in the menu, if no
further operation is carried out in the
following 60 seconds, the display moves on to
the CRDATION menu.
Setting the time
To set the time, first press the button to
switch on the oven: then press the “MENU”
button and follow the procedure below.
1. Select TIME and press “OK” to change
the time.

2. The 4 digits will start to flash.
3. Adjust using the - and + buttons.
4. Press “OK” to confirm.
Setting the timer
The timer can be set with the oven off or on.
When the oven is off:
1. Press the “MENU” button.
2. The 4 digits will start to flash.
3. Adjust using the – and + buttons.
4. Press “OK” to confirm.
If the oven is on:
1. Press the “MENU” button.
2. Select TIMER and press “OK” to change
the timer.
3. The 4 digits will start to flash.
4. Adjust using the – and + buttons.
5. Press “OK” to confirm.
6. Once the timer has been set. The oven
may be switched off.
The timer is displayed: once the time is up, the
oven beeps for one minute or until any of the
icons is pressed.
The timer does not control the switching on or
off of the oven.
Child safety device
The child safety function can be used to lock
the oven controls.
To activate the child lock, press the button
the select“Do not to switch on” and press
“OK” to confirm. To deactivate the child lock,
press the button again, select “switch off”
and press “OK” to confirm. The child lock
may be activated whether the oven is on or off.
The child safety device may be deactivated
when the oven has finished cooking and in all
situations described above.
Each time the oven is switched on, the
CREATION menu appears.
To return to the main display of the
programmed selection menu, press the “P”
button
1. Press the button to switch on the
control panel.
2. The screen displays:
CREATION
SUCCES
With the first selection (written in black on a
white)
3. Make your selection using the ∧∨
buttons: and press “OK” to confirm.
The screen now displays the cooking
programmers.
4. Select the desired programmer using the
up/down buttons: ∧or ∨and press “OK” to
confirm.
5. Press the “START/STOP” button to start
cooking.
6. The oven begins heating.
7. An audible signal, followed by the lighting
up of all the pre-heating indicators, indicates
that the oven has reached the desired
temperature.
8. During cooking, it is possible to change the
temperature at any time, by pressing the “ ”
button. Adjust using the –or +buttons and
press “OK” to confirm;
- programmed the duration of a cooking
programme;
- stop the cooking programme by pressing the
“START/STOP” button;
- set the timer;
- Switch off the oven by pressing the
button.
9. In the event of a power cut, if the oven
temperature is not too low. A special device
causes the programme to restart at the point
where it was was interrupted. However, any
programmes that have not yet started must be
reprogrammed once the power returns.
CREATION cooking programmes

All programmes have a preselected cooking
temperature. It is possible to adjust it manually,
anywhere between 30°C and 225°C (if this
option exists).
The CREATION programmes include
manual cooking programmes.
For each of these, the oven manages only the
essential parameters in order for all recipes to
succeed, from the most simple to the most
complex: temperature, heat source, humidity
level and for ode air circulation are the values
that ale controlled automatically, This chapter
was written with the invaluable help of our
culinary expert. We recommend following the
advice below to make the most of this
expertise and obtain perfect results in the
kitchen.
The choice of cooking modes, temperatures
and shelf levels are those that our culinary
expert use regularly to obtain the best results.
For each CREATION function, the following
table indicates whether the dish should be
placed in a cold or hot oven.
Following these recommendations guarantees
optimum results optimum results. To cook in a
preheated oven, wait for the set of audible
signals indicating that the oven has preheated.
The temperature set automatically according
possible to modify it to adapt it to a specific
recipe.
It is also possible to select a cooking duration
with immediate or delayed start.
MULTLLEVEL programme
Starting up all the heating elements and the
fan. The heat is constant and evenly
distributed inside the oven, the air
Cooks and browns in a uniform manner all
over. A maximum of two cooking shelves may
be used simultaneously.
BARBECUE programme
The upper heating element is connected. The
high, direct heat from the grill is
recommended for all foods that require a high
temperature on the surface. The oven door
stays closed during cooking.
BROWNING programme
The upper heating element, the circular
heating element, and the fan are all working.
The heat is radiated in a single direction, in
combination with the fan, inorder to spread
the heat evenly throughout the oven. This is
ideal for dishes that hat need both cooking and
browning, such as lasagna, etc.
The oven door stays closed during cooking.
TRADITION programme
For this traditional cooking programme, it is
best to cook on one level only. Recommended
for slow cooking or when using a bain-marie.
For a bain-marie, we recommend placing the
water directly in the enamel dish.
ROASTING programme
The upper heating element, the circular
heating element and the fan are all working.
The heat is radiated in a single direction, in
combination with the fan, in order to spread
the heat evenly throughout the oven. The risk
of burning food on the outside is greater and
the heat penetration is greater. The oven door
stays closed during cooking.
WARMING programme
Both the circular heating element and the fan
are used, but only during the reheating phase.
The temperature of the oven is ideal for rising
dough. During the rising phase, do not open

the oven door.
BRIOCHE programme
The parameters used make this cooking
programme programme ideal for cakes thes
that use yeast rather than baking powder.
PASTRY programme
The parameters used make this cooking
programme ideal for all pastry recipes.
PATISSERIE programme
This cooking programme is recommended for
patisserie (profiteroles and other choux pastry
recipes, for example, or Genoise cake), but not
for BRIOCHES, PASTRY or CAKES
CONTAINING BAKING POWDER.
WHITE/GOLDEN MERINGUE
programme
The temperatures are preselected and cannot
be changed.
The WHITE MERINGUE programme is ideal
for drying meringues. The GOLDEN
MERINGUE programme is unbeatable for
cooking meringues.
DEFROST programme
The fan at the bottom of the oven circulates
the air at room temperature around the food.
This function can be used to defrost any type
of food but it is particularly recommended
heat, sucn as pavlovas, cream cakes, custard
deserts, cheesecakes or fruit flaps.
LOW TEMPERATURE programme
This type of cooking, that has been used for
many years by professional chefs, can be used
to cook (meat, fish, fruit, vegetables) at very
low temperatures (85, 95 and 120 C) and
obtain perfect results to delight even the most
demanding of chefs.
Main advantages:
Since the cooking temperatures are very low
(in theory, lower than evaporation point) the
cooking juices are not dispersed and the final
dish is much more succulent
In meat, the muscle fibres shrink less
compared to traditional cooking.
The result: the meat is more tender and does
not need to rest after cooking. Meat should be
browned before it is put in the oven.
Low-temperature, vacuum cooking,
Which has been used for thirty years by the
best chefs, has many qualities:
Gastronomical qualities: it brings out the full
flavour of the food, while ensuring that it
remains succulent and tender.
Hygiene: standards of hygiene are respected:
this type of cooking protects food against the
harmful effects of oxygen and protects the
length of time that cooked dishes may be kept
in the fridge.
Organization: since foods can be kept for
longer, dishes may be prepared well in
advance.
Healthy eating: this type of cooking requires
less fat and the dishes are therefore lighter and
more easily digested.
Economy: this mode considerably reduces the
weight loss of foods during cooking.
To use this technique, a vacuum machine and
special sachets are required.

Follow the manufacturer’s instructions
carefully for vacuum-packing food.
The vacuum technique can be used to preserve
raw foods (fruits, vegetables, etc.) and cooked
foods (traditional cooking).
PASTEURIZATION programme
This type of cooking is suitable for fruit,
vegetables, etc.
Small recipients can be cooked on 2
levels(enamel tray on level 1 and grid on level
3). Leave the recipients to cool inside the oven.
Cook from cold.
AUTOMATIC cooking programme
So as not to distort the cooking times or
change the temperature, do not open the oven
door during cooking.
The cooking temperature and duration are
preselected using the C.O.P (Programmed
Optimal Cooking) system, which
automatically guarantees a perfect result.
Cooking stops automatically and the oven
signals signals that the dish is ready. This
chapter was written with the invaluable advice
below to make the most of this expertise and
obtain perfect results in the kitchen. The
choice of cooking modes, temperatures and
shelf levels are those that our culinary expert
uses regularly to obtain the best results.
ROASTING programme
Choose this function to roast beef, pork,
chicken or lamb.
Cook dishes from cold. They may also be
cooked in a preheated oven. Some
ROASTING programmes give the option of
selecting how well to cook the meat: WELL
DONE, MEDLUM-RAE or RARE.
PASTRY programme
This is the ideal function for all pastry tarts
(that need to be well cooked from below)
Cook from cold.
Dishes may also be cooked in a preheated
oven.
BRIOCHE programme
This is the ideal function for cakes made with
yeast rather than baking power. Cook dishes
for cold. Dishes may also be cooked in a
preheated oven.
CAKE programme
This is the ideal function for all recipes using
baking powder. Cook from cold. Dishes may
also be cooked in a preheated oven.
PATISSERIE programme
This is the ideal function for all other recipes
(without baking powder or yeast, and
excluding pastry). Cook from cold. It is also
possible to cook in a preheated oven.
BREAD programme
This is the ideal function for baking bread.
Refer to the next paragraph for a detailed
recipe. To obtain the best results, we
recommend carefully following the advice
below:
Follow the recipe to the letter.
Do not forget to put 150 ml of cold water in
a pie dish placed on the base of the oven.
Cook from cold. If the oven is already hot
from prior cooking, the display will show the
message “Oven too hot” until the temperature
has dropped to 40°C. The bread may then be
cooked.

BREAD recipe (maximum quantity of
dough):
Ingredients:
650 g flour
350g water
12 g salt
25 g baker’s fresh yeast or 4 sachets of dry
yeast.
Preparation:
Mix the flour and salt in a large recipient.
Dilute the fresh yeast in tepid water
(approximately 35°C).
Make a well in the centre of the flour.
Pour the water and yeast into the well.
Mix and knead lightly to obtain a non-sticky,
uniform dough then knead for 10 minutes by
stretching and folding the dough over on
itself.
Form a ball, place it in a bowl and cover with
plastic film to prevent the surface of the dough
from drying out. Place the bowl in the oven,
select the manual WARMING
Programme at 40°C and leave to rise for 30 to
45 minutes, or at room temperature for about
an hour (the dough should double in volume).
●Take the dough and knead it lightly; divide it
into several pieces.
●Place the bread rolls on the grid covered with
baking parchment (cut to size, to fit the drip
tray) and sprinkle them with flour.
●Make cuts with a sharp knife.
●Side the grid into level 1.
●Place a pie dlish on the base of the oven
and pour in 100 ml cold water.
●Cook form cold.
●Start the automatic BREAD function.
●When cooked, leave the bread to cool
completely on the grid.
PIZZA programme
This is the ideal function for cooking pizza
(sufficiently thick dough). Refer to the next
paragraph for a detailed recipe. Option of
selecting the desired cooking level: MEDIUM,
CRISPY or SOFT
To obtain the best results, we recommend
carefully following the advice below;
Follow the recipe to the letter.
The weight of the dough must be between
350g and 500g.
Lightly oil the drip tray or oven dishes. Cook
from cold. If the oven is already hot from
prior cooking, the display will show the
message “Oven too hot” until the temperature
has dropped to 120°C. The pizza may then be
cooed.
PIZZA recipe:
Recipe for 3 or 4 pizzas: 1,000 g 500 g water,
20 g salt, 20 g sugar, 100 ml olive oil, 20 g
fresh baker’s yeast (or2 sachets of dry yeast).
●Allow to rise at room temperature: 1 hour or
manual WARMING function at 40°C and
leave for about 30/45 minutes.
●Cook from cold.
●Start the ∣PIZZA cooking programme.
Programming a cooking cycle
Programming the duration
N. B. The duration can only be selected for
CREATION cooking programmes.
It is even possible to programme the duration
before starting a cooking programme with the
“START/STOP” button.
Press the button, then:
1. SELECT DURATION and press “OK” to
confirm.
2. The 4 digits will start to flash.
3. Adjust using the – and + buttons.

4. Press “OK” to confirm.
5. A beep indicates the end of the cooking
time and the oven switches off.
●Example: it is 09:00 and the programmed
duration is 1 hr 15min. The programme stops
automatically at 10:15.
Programming delayed cooking
The duration selection operation gives the
option of a delayed start time.
It is only possible to operation gives the
option of a cooking programme has been
selected, but not started.
1. Press the button and follow the procedure
described for the duration, from 1 to 3.
2. Select END OF COOKING and press
“OK” to confirm.
3. The 4 digits will start to flash.
4. Adjust using the – and + buttons.
5. Press “OK” to confirm.
6. Press the “START/STOP” button to
activate the programming.
7. A beep indicates the end of the cooking
time and the oven switches off.
●Example: it is 09:00 and the programmed
duration is 1 hr 15min and the cooking eng
time is set at 12:30. The programme begins
automatically at 11:15.
The message WAIT is displayed to indicate
that the programme has been registered. The
display shows the cooking end time and the
duration, alternately.
The cooking end time may be changed as long
as the oven is in wait mode: follow the
procedure indicated above.
To cancel a programme, switch off the oven
.
COOKING advice
For fan-assisted cooking, do not use shelf 1 or
5: they are in the direct line of the air, which
could burn delicate dishes.
If cooking in BARBECUE mode, place the
drip tray on level 1 to catch the cooking juices
and grease.
MULTI-LEVEL
●Place the drip tray at the bottom and the
grids at top.
PIZZAS or FOCACCIA
●Use a light aluminium dish with maximum
diameter of 30 cm and place on the oven grid.
●If the pizzas have plenty of topping, add the
mozzarella only half way through cooking.
BARBECUE
●Preheat the oven for 5 minutes.
●Close the oven door during cooking
●Place the grid on shelf level 2 or 3, and place
the dishes in the middle of the grid.
●This function is recommended for: sealing
meat; browning dishes or browning meringues;
preparing toasted sandwiches, cooking small
portions of barbecued, lean, thin meats.
●We recommend selecting the maximum
energy level. Do not worry if the upper
heating element is not permanently on: it is
controlled by a thermostat.
MICROWAVE cooking programmes
For each MICROWAVE function, the

following table shows the power and
pre-selected cooking time for each cooking
mode.The power is fixed automatically
depending on the type of cooking chosen. It is,
however, possible to modify it to adapt it to a
specific recipe.
You can alter the cooking time at any moment.
MICROWAVE programme
Select this function for the quick heating of
drinks, water and food that contains a lot of
liquid.The following microwave power levels
are available: 100-200-300-400-500-600-700
-800-900-1000W , Cooking dishes containing
lots of water (soups. Sauces, tomatoes, etc).
(See Cooking guide)
DEFROST programme
This is the ideal function for defrosting frozen
vegeta-bles. Your microwave oven saves you
lots of time To defrost food use the DEFROST
or MICROWAVE func-tions, set to 200W
power.
Tips:
Small cuts of meat or fish can be cooked
immediately atter defrosting. Larger cuts such
as meat roasts or whole fish will still be
slightly frozen at the end of the defrost
programme.
We recommend that you let the food stand for
a prioa of time at least equal to the defrosting
time to ensure an even temperature.
Food covered with ice crystals will take longer
to defrost, In this case, you should increase the
defrosting time.
Recommendatios:
The defrosting time depends on the type of
appliance. It also depends on the shape, size,
starting temperature and quality of the food.
In most cases, the food must be removed from
its packaging.
Remember to remove any metal staples from
the packaging.
Half way through defrosting, the pieces of
food should be turned over. Stirred ang
separated if thy were frozen together.
Defrost meat or fish by putting it on an
upside-down saucer on top of a plate to allow
the juices to run. If they stay in contact with
the food, will overheat.
Never refreeze food before cooking it.
MULTI-LEVEL programme
The circulating heat + micro-wave cooking
mode combines microwave cooking with
circulating heat cooking, which saves you
considerable time, The following microwave
power levels are available:
100-200-300-400-500 W. The cooking
temperature can be adjusted in increments of
5°C in the range 30-220°C.
The cooking time may be set for between
23hours and 59 minutes.
GRILL programme
This function allows you to use the grill and
microwave modes at the same time, making
cooking quicker. You power levels up to
700W
CONVECTION programme
The cooking by convection programme lets
you use microwave cooking in conjunction
with traditional +micro-wave mode, do not
use metal cookware.
Comments:
The cooking time can be adjusted any time.
You can preheat your microwave oven just as
you would for a fan oven programme.

Rack position
Function
Food
Weight(kg)
No.of shelves Tray Grid
Preheating Recommended
Temperature(°C)
Cooking
Duration
Universal
Multilevel Tarts
4/4 Cup cake
Pizza
Fruit pie
Pudding
1 2
2
2
2
2
1
1
1
1
1
3
3
3
3
3
Yes
Yes
Yes
Yes
yes
190
180
200
200
170
15 20
15 20
15 25
40 45
35 45
Conventional Pudding
Pate
Casserole
1
1
1
1
1
1
Yes
Yes
yes
170
170
170
35 45
50 60
1h 3h
Pastries Pastries 1 1 1 yes 170 180 30 50
Tarte Fruits Tarts
Tart
1
1
1
1
1
Yes
yes
190
200
35 45
20 30
Dessert Profiteroles
Biscuits
Choux pastry
Genoise Cake
1
1
1
1
1
1
1
1
Yes
Yes
Yes
yes
190
190
200
190
25 35
15 20
35 45
25 35
Roasting Roast Meats 1 1 1 no 210 220 45 75
Fan Grilling Gratin 1 1 no 200 210 35 50
Grill Rib Roast
Sausages
Pork rib
Fish
Toast
1
1
1
1
1
1
1
1
1
1
203
3
3
203
3
no
no
no
no
yes
220
220
220
220
220
20 30
15 235
15 25
15 25
3 5
Proving Dough 1 1 1 no 40
Table of contents