Atak DVA200 User manual

INSTRUCTION MANUAL
1-11
DVA200
2.1 Channel
Home Theater System

Important Safety Instructions
1) Read these instructions.
2) Keep these instructions.
3) Read and pay attention to all warnings.
4) Follow all instructions.
5) Do not use this apparatus near water.
6) Clean only with dry cloth.
7) Do not block any ventilation openings. Installin accordance with the
manufacturer's instructions
8) Do not install near any heat sourcessuch as radiators heat registers stoves
or other apparatus (including amplifiers) that produce heat
9) DO not defeat the safety purpose ofthe polarized or grounding-type plug.
A polarized plug has twoblades, one wider than the other. Agrounding type
plug has two blades and a third groundingprong .The wide blade and the
third prong are provided for your safety. If the provided plug does not fitinto
your outlet, consult an electrician for replacement ofthe obsolete outlet
10) Protect the power cord from being walkedon or pinched.
11) USE only attachments or accessoriesspecified by the manufacturer.
13) Unplug this apparatus during lightning storms orwhen unused for long
periods of time
14) Refer all service issues to a qualifiedservice provider. Service is
required if the device has been damaged inany way, the power-supply cord
or plug is damaged, liquid has been spilled or objects have fallen into the
device, the unit has been exposed to rainor moisture, or has been dropped.
Warning: Themain power plug is also used as adisconnect device and
should remain easily acceptable.

Front and Back Panels ..............................................................................1
Front Panel ..............................................................................................1
Back Panel...............................................................................................1
Remote Control....................................................................................... 2
Operating the Remote Control.................................................................. 3
.............................................................................. 4
Functions...............................................................................................5-8
System Setup..................... ..................................................................9-10
MP3 Function ..........................................................................................10
JPEG Files..... ................... ................................................................... 11
Troubleshooting ....................................................................................11
Connecting Devices
TABLE OFCONTENTS

1. PLUG PORT
2.S-VIDEO OUTPUT
3.YUV OUTPUT
4.AUDIO/ VIDEO OUTPUT
5 EARPHONE OUTPUT
1. POWER
2. PLAY/PAUSE
3. STOP
4.PREV
5.NEXT
5
Back Panel Functions
L/RL/R
PUSHPUSH
DVA200 STOP
POWER
PREV NEXTPLAY/PAUSE
S-VIDEO YUV A/VOUT EARPHONE
AC IN
45

POWER
RESET
SUBTITLE
ANGLE
LANGUAGE
DISPLAY
PBC TITLE RESUME MUTE
VOL- VOL+
ENTER
MENU SETUP
STOP PLAY/PAUSE STEP
REV FWD PREV NEXT
234
5678
910+0
TIME
PROG CLEAR ZOOM
REPEAT A-B
SLOW
AUDIO-L
AUDIO-R
DVA200
NUMBER BUTTONS [13]
CONTROL
FWD(Forward) [11]
REV(Reverse) [12]
MENU [8]
[26] PREV(Previous)
PROG(Program) [15]
[31] A-B(Repeat A-B)
VOL-(Volume Down) [6] [23] VOL+(Volume Up)
POWER [1]
ANGLE [2]
SUBTITLE [3]
TITLE [4]
PBC(Playback Control) [5]
ENTER [7]
PLAY/PAUSE [9]
STOP [10]
CLEAR [14]
SLOW [17]
REPEAT [16]
[18] DISPLAY
[19] LANGUAGE
[20] RESET
[21] RESUME
[22] MUTE
[24] SETUP
[25] STEP
[27] NEXT
[38] TIME
[29] ZOOM
[32] AUDIO-R(Right)
[30 AUDIO-L(Left)

1. Push down andout on the battery
compartment cover to removeit.
2. Insert the two"AAA" batteries into the
battery compartment of theremote control
making sure the '+' and the '-' signson the
batteries match up tothe '+' and '_'markings
inside the battery compartment.
3. Replace the batterycompartment cover.
Battery Installation
Notes:
Do not mix batteriesfrom different
manufacturers or old withnew.
If the remote controlwill not be usedfor
an extended period, removethe batteries
to prevent damage-causing corrosion.
If battery leakage occurs,wipe the battery
liquid from inside thebattery compartment,
and then replace bothbatteries.
Always replace both batteriesat the same
time, using new, fully chargedbatteries.
The life expectancy ofbatteries may vary
depending on amount ofuse.
Notes:
Do not direct theremote sensor toward
any light source, suchas direct sunlight
or strong fluorescent lightas it may cause
the unit not tooperate correctly.
When other remote controlsare nearby or
when the remote isused near equipment
using infrared rays, interferencemay occur.
Placing an object onthe remote control
may cause it accidentlydepress a remote
button, changing a functionand shortening
battery life.
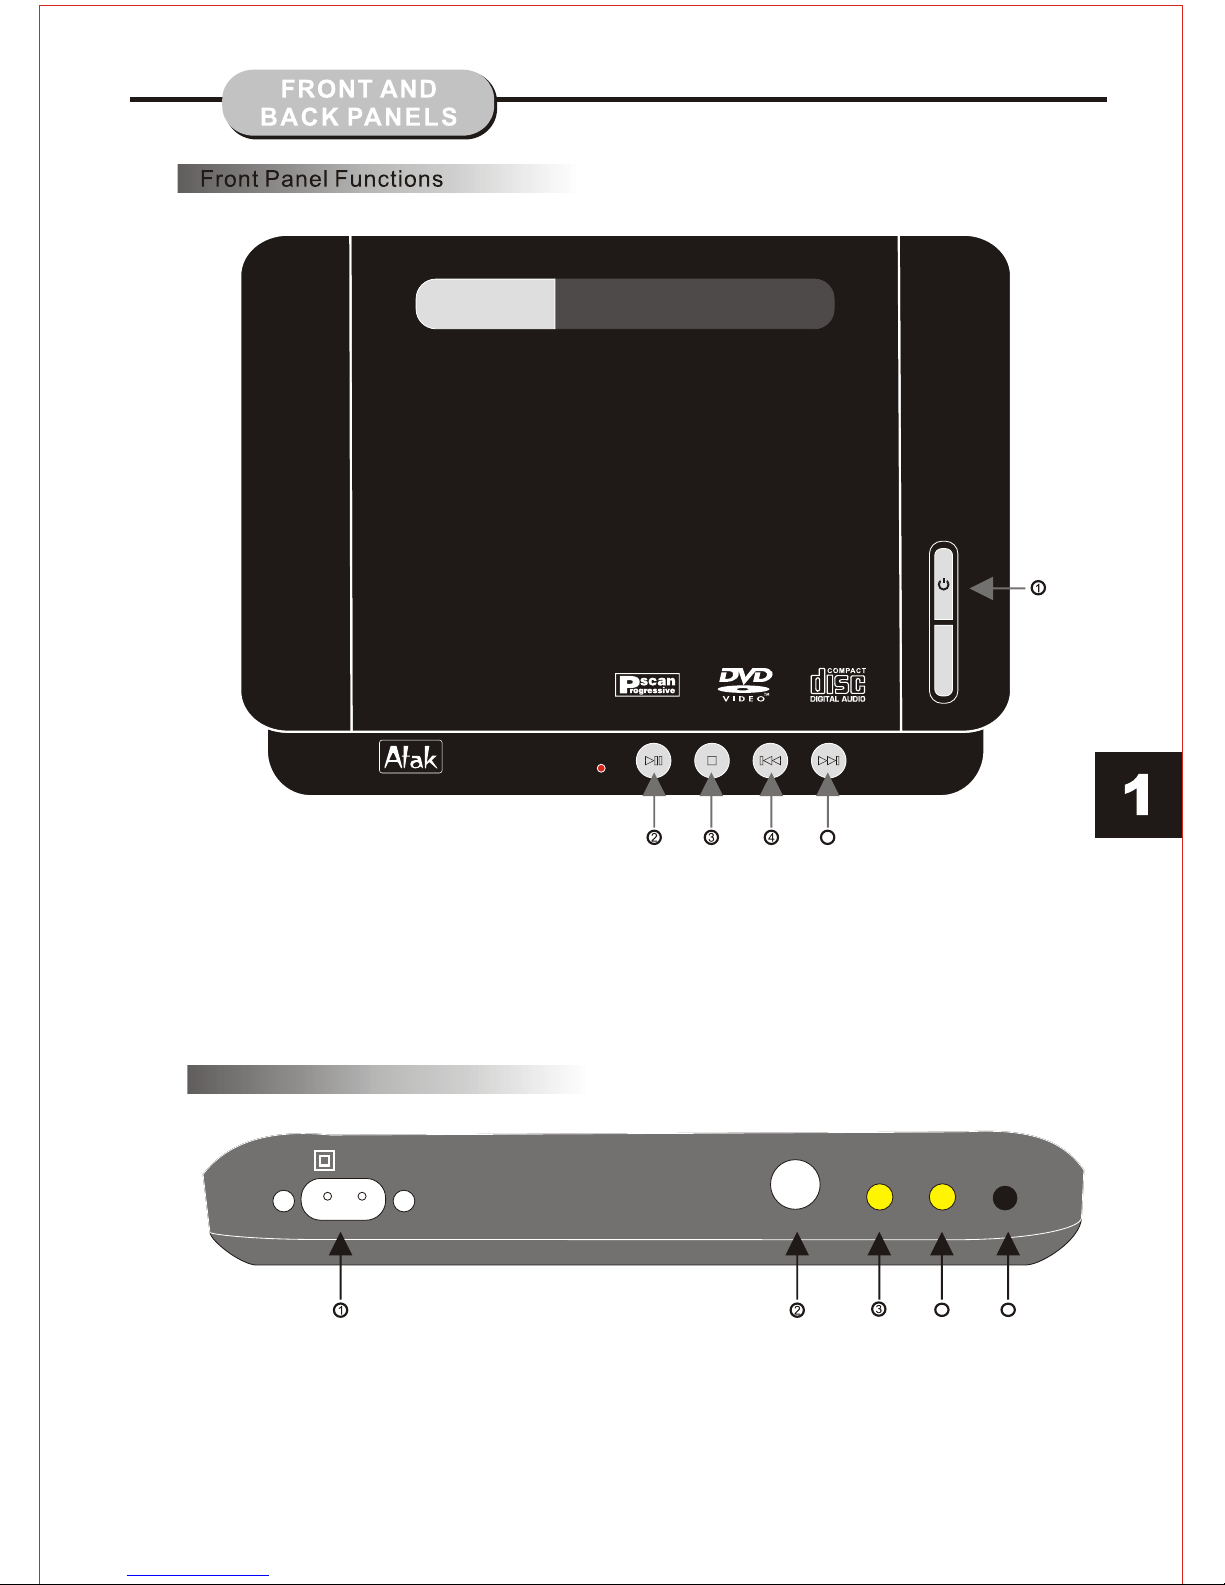
Do not cover thefront of the DVDreceiver
with tinted glass, asit may cause
interference with normal operationof the
controller.
Make sure there areno solid objects
between the remote controland the
remote sensor.
This could prevent theunit from receiving
the signal.
Do not spill wateror put wet itemson the
remote control.
Never disassemble remote control.
Using the RemoteControl
Point the remote controlat the remote
sensor on the DVDreceiver. Whenthe
signal from the remoteis received, the
unit will function accordingly. The
remote will operate upto approximately
16' from the remotesensor at an angleof
approx. 30'.
BATTERIES
INCORRECT USE OFBATTERIES MAY
CAUSE THEM TO LEAK,CORRODE,
OR EXPLODE.
OPERATING THE
REMOTE CONTROL

CONNECTIONS
The following is an example that illustrateshow to connect your speakers to thesource.
ON
OFF
R
R
L
L
OUTPUT
INPUT
MODEL:DVA200
OUTPUT POWER:RMS 13W(8W*1+2.5W*2)
MADE IN CHINA
AC:120V~60Hz
CONFORMS TO
ANSI/UL STD 60065
CERTIFIED TO
CAN/CSA STD
C22.2 NO.60065
CUS
3127509
1. Plug the power plug into an AC source.
2.Follow above connection diagram and connect speakers to your source.
3. Check that the volume control is turned low or to the minimum position.
4. Turn power / volume switch on, check that the power indicator light comes on.
5.Start your DVD or music source. Make sure your DVD (or music) is playing so
you have sound coming from source.
TURNING THE SPEAKERSON
CONNECTING
DEVICES

To playa DVD video disc:
Turn on theTV set andselect the A/Vmode.
1. Press the POWERbutton on front panel,
DISC LOADING appears onscreen.
If there is nodisc in the player, NO DISC will
show on the screen
2. Press the PUSH button and
the disc tray willopen
3. Place the discon the disc tray;be sure
the desired content;Wide-screen or
Full-screen is face downon the tray.
4. Push the traydirectly ,the disc traywill
close and the disctype will appear inthe
upper-left-hand corner ofthe screen.
Once the player hasread the disc, theunit
automatically will begin playback.
Note:
It is possible todamage a disc ifit is not
placed correctly on theguides in the disc
tray. Thismay also cause theDVD player
to malfunction. Do notforce or place
anything other than a5" DVD or CDonto
the disc tray.
Never move the DVDplayer during
playback, as this maycause damage to the
disc as well asthe player.To openand
close the disc tray, only use theOPEN/
CLOSE button found onboth the remote
control and on theunit's front panel.
Press the PLAY/PAUSE
button.
5. PREV/NEXT playback
Press the PREVor NEXT buttonsto play the
previous or next track.To resumenormal
playback, press PLAY/PAUSE.
Press NEXT button
FUNCTIONS

1/2
STOP
PLAY/PAUSE
DISPLAY
REV
FUNCTIONS
To activateeither function, simply pressthe
FWD or REVbuttons on the remotecontrol.
The speed changes eachtime the button is
pressed. Toresume normal playback, press
the PLAY/PAUSE button.
Stop playback
1. Press the STOP button toend the function
and the TVscreen will show theStop icon.
With some discformats like DVD, the
player can recall theplace in the movie
where Stop was pressed,and resume play
from that location.
2. Press PLAY/PAUSE toresume playback
from the location wherethe disc was
stopped or from thebeginning of the disc.
3. Press STOPtwice to stop completely.
Slow Motion
This DVD player has the ability toplay discs
in slow motion in either forward orreverse
direction. Each time the SLOW button is
pressed, the forward speed will slow to1/2
speed, to 1/4, to 1/8, to 1/16,to 1/32, and back
to normal. In reverse, the speed willalso slow
from 1/2 speed, to 1/4, to 1/8,to 1/16, to 1/32,
and back to normal. To resume normal
playback at anytime, press the PLAY/PAUSE
button.
Screen/Display
While a disc is playing, the status of various
functions may be checked, such as the title,
track number, and several time categories.
1. Press the DISPLAYbutton once and the
title appears along with the chapter and how
much time has played.
2. Press the DISPLAY button againand the
remaining time for thatparticular title
appears.
3. Press the DISPLAY button againand
the total elapsed timefor that particular
chapter appears
4. Press the DISPLAY button againand
the total remaining timefor that particular
chapter appears.
5. Press the DISPLAY button again andthe
display turns off
Frame-By-Frame Playback
1. While inthe Play mode, pressSTEP
continuously to move forwardin the video
frame by frame.
2. Press PLAY/PAUSE resumenormal
playback.

Audio-L &Audio-R
The default audio setup isSTEREO. Press
Audio-L, and the sound willbe output from
Left channel only,press Audio-R, andthe
soundwill be output from Rightchannel only.
Press Audio-Lor Audio-R againand the sound
will return to Stereo.
Subtitles
The DVD Player hasthe capability to display
subtitles in any of32 different languages.
1. Press the SUBTITLEbutton. The subtitle
menu will appear.Select the desired language
by pressing the SUBTITLEbutton
2. Toremove the subtitles fromview, press
the SUBTITLE button untilthey disappear.
Note: The discbeing played must bemulti-
subtitle encoded.
Camera Angle
The ability to changethe camera angle allows
the viewer to playdirector and watch amovie
from different perspectives.
1. Press theANGLE button on theremote
control. With eachpress, the camera angle
changes.
Language
The unit has thecapability to show movies
in one of eightlanguages.
1. Press the LANGUAGEbutton. The
language menu will appear. Select the
desired language by pressingthe
LANGUAGE button.
Note:
The disc being playedmust be multi-
language Encoded.
Locating a Title
DVD discs are normallydivided into titles,
which are then sub-dividedinto chapters.
A Specific titleor chapter can easilybe
located. Specific titles canbe found using
the title menu functionif the disc contains
a title menu, orthrough its unique title
number.
Title Function Menu
1. Press theTITLE button. Thetitle menu
will appear on theTV screen.
2. Press the appropriatescroll button to
select the desired title.A titlemay also be
located by pressing itsassigned number
with the number buttons.
3. Press the ENTERbutton. This willstart
playback from chapter 1of the selected title.
Note:
Some discs do notrespond to this function.
If different instructions appearon the TV
screen, follow those instructions.The
instructions given here describethe basic
procedure. Procedures may varydepending
on the content ofthe DVD disc.
Note:
The camera angle maybe changed only in
discs with multi-angle capabilityencoded.
FUNCTIONS 2. The buttonmay be pressed onlywhen the
flashing angle icon appearsin the unit's
display panel.

PCB
PB functionC
With the P C function on, choosinga song on
a CD can onlybe done when atthe main menu.
With the PBCfunction off, songselections
can be made byentering the number ofthe
song selection with thenumber buttons.
B
Repeat Play
This DVD receiver allowsrepeated playback
of specific titles, chapter/tracksor segments.
It even allows switchingbetween two items
that are being repeated.
1. Select the itemto repeat.
2. Press the REPEAT button.
The repeat mode changeseach time the
REPEATbutton is pressed (i.e.,from
title repeat to chapterrepeat, all repeat,
to repeat off.)
ZOOM
For DVDs with zoomcapability only.
A picture maybe enlarged upto four times
during either playback orslow motion
through the unit's zoomfunction. Press the
ZOOM button once andit enlarges theimage
1x, press a secondtime and the imageenlarges
2x. Athird press enlargesthe image 4x.To
return to a normal-sizeimage, press the
ZOOM button a fourthtime. Enlargement
takes place in thecenter of the Picture
Volume andMute
The volume on thisDVD player is easily
controlled with the remotecontrol by
pressing the VOL+button to raise thevolume
or the VOL-button to lower it.By pressing
the MUTE button, no audiowill be heard.To
returnthe audio, press theMUTE button
again.
Program
This function allows youto program the
desired order of playfor specific tracks.
Press the PROG button,and the Program
menu will appear onthe screen. Set the
programs play order usingthe number
buttons. Then scrollto Start on themenu.
Press the ENTER buttonto begin program
play. To exit from theprogram play mode,
press the PROGbutton again
DVD Menu Setup
Press the SETUPbutton on the remote
control and the mainmenu will appear.
1. After accessingthe setup menu, pressthe
scroll button up ordown to select adesired
Item.
Once an item isselected, press the PLAY/
PAUSE buttonto confirm your entryand
then you will haveaccess to the Sub-
directory.
2. Use the leftor right scroll buttonsto move
the pointer and theup or down scrollbuttons
to select the desiredoption. Once an itemis
selected, press the ENTERbutton to confirm
your selection. Thiscompletes the setup ofthe
selected function.
A-B Repeat
Press "A-B" once toset a start-point, press
again to set anend and complete thesetting.
The selected sectionA-B will be repeated.
The third press willcancel this function.
A-B AB
FUNCTIONS

Language Setup
OSD
Menu
Audio
Subtitle
:English
: English
: English
:English
Screen Setup
TV Type
Screen Saver
Video Output
:4:3 PS
Brightness
Contrast
Screen Setup
TV Type
Screen Saver
Video Output :S-Video
Brightness
Contrast
Includes the setup ofspeakers.
Audio Setup
General Setup
This option is usedto setup the following
format and functions: LanguageSetup,
Screen Setup, Audiosetup, Custom Setup,
and Exit Setup.
Language Setup
OSD Language:
There are three languagesto select from
English, French and Spanish.
DVD MENU:
When playing DVD discs,the player
can support English, Chinese,Japanese,
French, German, Italian, Spanish,Portuguese,
Hindi, Thai andRussia. Korean and others
AUDIO:
When playing DVD discs,the player
can support English, Chinese,Japanese,
French, German, Italian, Spanish,Portuguese,
Hindi, Thai andRussia. Korean and others
SUBTITLES:
When playing DVD discs,the player
can support English, Chinese,Japanese,
French, German, Italian, Spanish,Portuguese,
Hindi, Thai andRussia. Korean and others
Screen Setup
Follow the directions displayedin "Setup"
and press the remotecontrol buttons based
on the TVScreen display and SCREENwill
be setup.
TV TYPE
There are three kindsof TV type,4:3 PS (Pan
& Scan), 4:3 LB(Letterbox) & 16:9 (Wide
Screen) which can beselected based on the
disc format &TV screen.
SCREEN SAVER
When the player hasstopped for more than
15 seconds, a SCREENSAVERof the DVD
logo will appear onthe screen automatically.
VIDEO OUTPUT
S-VIDEO:
When selecting the S-Video output, please
connect an S-Videocable (not included)
from S-Video outputon the rear panelto the
corresponding jack on theTV set.
COMPONENT OUTPUT:
When selecting the ComponentOutput
(CVBS + YUV)please connect theAVcable
from video jacks onthe rear panel tothe
corresponding jacks on theTV Set.
PROGRESSIVE SCAN:
When selecting the P-Scan/output,please
connect the AV cable fromthe Y, Pr/Cr, and
Pb/Cb outputs on therear panel to the
corresponding jacks on theTV set.
BRIGHTNESS & SHARPNESS
When selected, press theUP & DOWN
directive buttons on theremote control to
adjust the brightness andsharpness of the
screen image.
Audio Setup
Digital Out
Downmix :SPDIF/RAW
:OFF
:SPDIF/PCM
SYSTEM SETUP

Custom Setup
Parental Ctrl
Passward
off
Style
Angle Mark
Default
1
2
3:PG
4:PG-13
5
6:R
7:NC-17
8
SYSTEM SETUP
Custom Setup
PARENTALCONTROL
To restrictthe viewing of certainmovie ratings,
Parental Controls can beaccessed on this menu.
In order to setor change these settings,the
password must first beentered. After entering
the password, make surethe password is then
set to OFF onthe menu, and thenyou can set /
change Parental Controls.
SET PASSWORD
The default password is0000, after this correct
password is entered, youcan then change the
password to one ofyour choice. Your password
is needed to changethe Parental Control settings.
STYLE
The function allows tolet user set thestyle of
user menu, there isfour styles: style 1,style 2,
style 3 and style4.
ANGLE MARK
When playing a multi-anglecapable DVD disc,
select Angle Markon and a video-cameramark
will appear on theleft-top corner of theTV
screen; Select AngleMark Off, themark will
disappear.
DEFAULT SETUP
Select the DEFAULT SETUP, the player will
return to the defaultsoftware setup.
Exit Setup
When you finish thesetup, please select the
Exit Setup, the playerwill be back tothe TV
screen.
MP3 FUNCTION
OPERATION OFMP3 FUNCTION
MP3 is an audiocompression mode using
Level 3 of theinternational standard MPEG.
The audio signal iscompressed in a rateof
12:1. An MP3disc can contain over600
minutes of music thatrivals Compact Discs
in sound quality.
Files Menu of Mp3Players
When playing a MP3disc, two-file menus
can be selected bypressing the PROG
button: 1) Folder Listand 2) File List.
1. FOLDER LIST
Display the menu first,then press the UP/
DOWN, LEFT/RIGHT arrows andENTER
button to select thesubdirectory and music.
2. FILE LIST
This menu is whereyou may select thefiles
(or song numbers) tobe played by pressing
UP/DOWN, LEFT/RIGHT arrowbuttons
combined with ENTER button.The number
buttons and ENTER canalso be used tomake
the play selection. Ifa track number entered
is incorrect, the screenwill display
"INPUT INVALID".
Play Modes
There are four kindsof play modes:
FOLDER, SINGLE, REPEAT ONE, and
REPEATFOLDER. Press the REPEAT
button to make availablethe five modes:
1. FOLDER: play theentire music menu
in order.
2. SINGLE: play asingle-track number.
3. REPEATONE: play a single-track
number repeatedly.
4. REPEATFOLDER: play the entiremusic
menu repeatedly.

JPEG FILES
JPEG is the mostefficient image compression
format and is widelyused for photo /picture
storage. Even when picturesare compressed
15-20 times, they stillmaintain an excellent
quality. TheJPEG format is alsosupported
by most picture processingsoftware. The JPEG
file uses less storagespace and is easyto use.
This DVD player canread JPEG formatted
picture CD discs.
1.Place a photodisc in the DVDplayer and
menu will appear.
2.Press the numberbuttons of the selection
you want to view.
3.Press PLAY/PAUSE buttonto view.
Using the Menu To Select Photos
1.Press PLAY/PAUSE buttonto view the
photo on the screen.
2.Press STOP toend viewing.
3.When in STOPmode, you can returnto the
upper menu by selectingthe top file itemon
the right side ofthe screen and pressing
PLAY/PAUSE button. Other functions:
1. When playingJPEG images, this DVD
player allows the pause,play, repeat, and
browse functions.
2. When playingJPEG images, press the
RESUME button to seethe different formats
of photo display.
3. Press VOL+ andVOL - buttonsto select
pictures.
4. Tozoom in on theimage, press the ZOOM
button. Pressing the ZOOMbutton once more
will return the pictureto normal.
5. When thezoom is on, pressthe Fast
Forward or Fast Reverseto zoom in orout on
the image.
6. When thezoom is off,pressing the direction
arrows will cause theimage to turn
over (reverse).
This handy trouble-shooting guideis provided
to save you timeif you experience anyproblems
with this DVD player. If the problemis not listed
or if the providedsolution does not correctthe
problem, please call ourcustomer support
department.
Possible Problems /Solutions
No power
1. Check to ensurethat the power plugis securely
connected to the poweroutlet and that theoutlet
is in working condition(test outlet by CAREFULLY
plugging another electrical itemin to it)
No sound
1. Check the connectionbetween the DVD player
and the TVset, amplifier, orany other unit theDVD
player is connected to.
2. Check to ensurethe TV andamplifier are in the
correct mode.
No picture
1. Check the connectionbetween the DVD player
and the TVset or any otherunit it is connectedto.
2. Check to makesure TV isturned on.
Disc does not play
1. Check to makesure the disc isloaded
correctly with the labelside facing up on
disc tray.
2. Check that discis clean from dirt,dust,
fingerprints, and smudges.
3. Check to ensurethe disc is inserted
Between the guides onthe tray.
4. Check to seeif the Parental LockFunction is on.
5. Make sure discis for use inregion ONE.
Remote does not work.
1. Check batteries; possiblyreplace.
2. Check to ensurethere are not anyobstacles
between the remote sensoron the
unit's front panel andthe remote control.
3. Be sure theremote is aimed atthe remote sensor.
Divided picture
1. Check that discis clean and hasno scratches.
2. This DVD playeris controlled by amicrocomputer,
which may need tobe reset.
To reset,turn off the unit'spower completely, wait30
seconds, then turn theplayer back on.
No color picture
1. Check to seeif the S connectoris damaged
(bent pin).
MP3 discs do notplay
1. Use a differentprogram to re-burn thedisc, as the
program may not beMP3 compatible with theplayer.
2. Use a neweredition of MP3 softwaresuch as
"Audio station 4", "EasyCD Creator", etc.
3. Make sure MP3file is not encodedwith a variable
bit rate, such asprovided by Real Networks.
TROUBLE-SHOOTING

LIMITED 90 DAY WARRANTY
We warrantthis product to befree from defects inmaterial and workmanship
under normal use fora 90-day period afterpurchase. Wewill repair or replacethe
unit free of charge should it becomedefective under this warranty, providing you
submit proof ofpurchase (sales slip)along with the unit and allaccessories.
During the initial 90-dayperiod after original purchase,we will service or
exchange, at no charge. Toobtain warranty service orreplacement within the
duration of the90-day warranty returnthe product freight prepaid to theaddress
below.
ATAK USA
823 Old SettlersTrail
Suite 100
Hopkins, Minnesota 55343
Please enclose a copyof the sales receiptwith the date ofpurchase and provide a
detailed description of theproblem. Failure to encloserequired information will
result in delay ofyour shipment. Please allow4-6 weeks for productservice or
replacement.
This warranty doesnot cover any product,which has been subjectto damage due
to an act ofNature, misuse, neglect, accident,abuse, commercial use, or
modification of, or to,any part of theproduct, including the antenna.Damage to
external devices such asspeakers and other memorydevices are not coverednor is
the cost incurred inshipping the unit forwarranty repair.Under no circumstances
shall ATAK USA,be liable for anyloss (direct, indirect, incidental, foreseen,
unforeseen, special or consequential)or for any damagearising out of, orin
connection with, the useof this product.
UNDER NO CIRCUMSTANCES WILL ATAK USABE LIABLE FORANY
INCIDENTALOR CONSEQUENTIAL DAMAGES.
This warranty doesnot cover re-manufacturedunits, or product sold 'As Is'.
This warranty isvalid only inthe United States and grants specificlegal rights.

Warning:To reduce the riskof fire orelectric shock, donot
expose this unitto rain ormoisture.
!
The lightning flash withan arrowhead symbol withinan equilateral
triangle, is intended toalert the user tothe presence of uninsulated
dangerous voltage within theproduct's enclosure that maybe of
sufficient magnitude toconstitute a risk ofelectric shock to persons.
The exclamation point withinan equilateral triangle isintended to
alert the user tothe presence of importantoperating and
maintenance (servicing) instructions inthe literature accompanying
the product.
Table of contents