ATD Tools ATD-10506 User manual

ATD-10506
RANDOM ORBITAL POLISHER
OWNER’S MANUAL
* Shown with both handles included
Features:
ͻRandom orbit polishing acƟon for swirl-free Įnish
ͻIncludes mulƟ-posiƟon side handle and D-handle for comfort
ͻVariable speed seƫngsallows the correctamount of polishing power for eachapplicaƟon
ͻSoŌstart feature provides improved speed control
ͻRubber grip provides added comfort and reduces vibraƟon
ͻ6” hook and loop backing padmakes changing pads fast and easy
ͻAccepts 5/16”x24 spindle threadaccessories
ͻ6A, 120V AC, 60 HZ
ͻNo load speed: 2500-6500 OPM
Made in China to ATD Tools, Inc. Specications
Visit us at www.atdtools.com
WARNING: This product may contain chemicals, including lead, known to the State of California
to cause cancer, birth defects or other reproductive harm. Wash hands after handling.

General Safety Warnings:
WARNING: The instrucƟons andwarnings contained in this manual should be read and
understood before using or operaƟng this tool. Do not allow anyone to use or operate this tool unƟl they
have read this manual and have developed a thorough understanding of how this tool works. Failure to
observe any of the following instrucƟons could result in severe personal injury to tool user and
bystanders, or cause damage to the tool and property. Keep thismanual for future reference.
Note: The warnings and cauƟons discussed in this instrucƟon manual cannot cover all possible
condiƟons and situaƟons that may occur. It must be understood by the operator that common sense and
cauƟon are factors whichcannot be built into this product, but must be supplied by the operator.
WARNING: Use safety equipment. User and bystanders should use safety goggles or safety
glasses with side shields which comply with current naƟonal standards, or when needed, a face shield.
Use an ANSI approved dust mask or respirator when working around metal,wood, and chemical dusts
and mists. This applies to all persons in the work area. Also use non-skid safety shoes, hardhat, gloves,
dust colleĐƟon systems, and hearing protecƟon when appropriate.
WARNING: Keep bystanders and children out of the work area while operaƟng this tool.
WARNING: Always keep your work area clean, uncluƩered, and well lit. CluƩered or dark areas
invite accidents and injuries. DO NOT work on Ňoor surfaces that are slippery.
WARNING: Do not operate thistool if you areƟred or under the inŇuence of alcohol, drugs, or
medicaƟonsthat could aīect your ability to use the tool properly.
WARNING: Dress properly. Do not wear loose clothing or jewelery as they can be caught in
moving parts. Wear restriĐƟve hair covering to contain long hair.
WARNING: Do not reach overor across running machines. Keep proper fooƟng and balance at
allƟmes. Non-skid footwear is recommended when working.

Electrical Safety Warnings:
WARNING: Read all safetywarnings and instrucƟons. Failure to follow all warnings and
instrucƟons may result in electric shock, Įreand/or serious injuryor death.
WARNING: Before conneĐƟng a tool to a power supply, always check to ensure the power supply
corresponds to the voltage on the nameplate of the tool. A power supply with a voltage greater than
that specŝĮed for thetool can result in serious injury to the user, as well as damage to the tool. Using a
power supply with a voltage less than the nameplate raƟng is harmful to the motor. If in doubt, do not
plug in the tool.
NOTE:Double insulated tools are equipped with a polarized plug (one blade is wider than the
other). This plug will Įt in a polarized outlet only one way. If the plug does not Įt fully in the outlet,
reverse the plug. If it sƟll doesn’t Įt, contact a quaůŝĮed electrician to install a polarized outlet. Do not
change the plug in any way.
WARNING: To reduce the risk of electric shock, DO NOT use in damp condiƟons, on wet surfaces,
or expose to rain. Do not plug in this tool or operate it with wet hands or while standing in water.
WARNING: Never use the cordfor carrying, pulling or unplugging the powertool. Graspplug
and pull to disconnect from outlet. Keep cord away from heat, oil, sharp edges or moving parts. Replace
damaged cords immediately.
WARNING: Do not carry the power tool with your Įnger on the switch. Ensure the switch is in
the oīposiƟon before plugging the tool into the power outlet. In the event of a power failure while a
tool is being used, turn the switch oīto prevent surprise starƟng when the poweris restored.
WARNING: Always remove the powercord from the electric outlet when making adjustments,
changing parts, cleaning or working on the tool.
WARNING: Care shouldbe taken to arrange the cord so it will not be stepped on, tripped over,
or otherwise subjected to damage or stress.
WARNING: Never aƩempt to plug in or operate equipment with defecƟve or damaged wires,
power cord or power cord plug. Have any defecƟve or damaged parts replaced immediately by quĂůŝĮed
personnel.

WARNING: Avoid body contact with electrically grounded surfaces. There is an increased risk of
electric shock if your body is grounded.
WARNING: If the work area is not equipped with a permanently installed Ground Fault Circuit
Interrupter outlet (GFCI), use a plug-in GFCI between the power tool or extension cord and the power
receptacle.
WARNING: If an extension cord is necessary, use only ‘Listed’ extension cords. If used outdoors,
they must be marked “For Outdoor Use”.
WARNING: Use of improper size or gauge of extension cord may cause unsafe or ineĸcient
operaƟon of yourtool, or cause damage to your tool. Be sure your extension cord is rated to allow
suĸcient current Ňow to the motor. If in doubt, always use a larger gauge cord. Be sureto checkthe
voltage requirements of the tool to your incoming power source.
NOTE:The table below showsthe correct size to use according to cord lengthand the amperage
draw of the tool (speciĮedon the nameplate). When in doubt, use the next heavier gauge. The smaller
the gauge number, the heavier the cord. (AWG = American Wire Gauge).
Minimum Gauge for Extension Cords (AWG)
(when using 120 volts only)
Ampere RaƟng Total Length of Cord in Feet (meters)
More Than Not More Than 25' (7.6m) 50' (15m) 100' (30.4m) 150' (45.7m)
0 6 18 16 16 14
6 10 18 16 14 12
10 12 16 16 14 12
12 16 14 12 Not Recommended
Power Tool Use and Care:
NOTE:The term “powertool” inthe warnings refers toyour electrically operated(corded) power
tool or baƩery operated (cordless) power tool.
WARNING: Beware ofall power lines, electrical circuits, water pipes and other mechanical
hazards in your work area,parƟcularly those below the work surface hidden from the operators view.
UnintenƟonal contact with these hazards may cause personal injury or property damage.

WARNING: Do not force the power tool. Use the correct power tool foryour applicaƟon. The
correct power tool will do the job beƩer and safer at the rate for which it was designed.
WARNING: Do not usethe power tool if the switch loses its funcƟon. Anypower tool that
cannot be controlled with the switch is dangerous and must be repaired.
WARNING: Do not operate power tools in explosive atmospheres, such as inthe presence of
ŇĂmmable liquids, gases or dust. Power tools create sparks which may ignite the dust or fumes.
WARNING: Make sure that stored or idle power tools are out of the reach of children and do not
allow persons unfamiliar with the power tool orthese instrucƟons to operate the power tool. Power
tools are dangerous in the hands of untrained users.
WARNING: Maintain power tools. Check for misalignment or binding of moving parts, breakage
of parts and any other condiƟons that may aīect the power tools operaƟon. If damaged, have the power
tool repaired before using it. Many accidents are caused by poorly maintained power tools.
WARNING: If devices are provided for the connecƟon of dust extracƟon and collecƟon faciliƟes,
ensure that these are connected and properly used.
WARNING: Remove adjusƟng keys or wrenches before turning the tool on. A wrench or a key
that is leŌaƩached to a rotaƟng part of the tool mayresult in personal injury.
WARNING: Have your power tool serviced by a quĂůŝĮed repair person using only idenƟcal
replacement parts. This will ensure that the powertool is safe.
REPETITIVE MOTION / VIBRATION HAZARDS:
WARNING: Avoid prolonged exposure to vibraƟon. VibraƟon, repĞƟƟve moƟons, or
uncomfortable posiƟons over extended periods of Ɵme may be harmful to your hands and arms. Do not
ignore symptoms or persistent or recurring discomfort, pain, throbbing, aching, Ɵngling, numbness,
burning sensaƟon, or sƟīness. DisconƟnue use of the tool and seek medical advice before resuming use.
WARNING: Adopt a comfortable posture while maintaining secure fooƟng and avoiding
awkward or oībalance postures. Changing posture during extended tasks can help avoid discomfort and
faƟgue.
Setup - Before Use:
Read the ENTIRE IMPORTANT SAFETY INFORMATION section at the beginning of this
manual including all text under subheadings therein before set up or use of this power tool.
TO PREVENT SERIOUS INJURY FROM ACCIDENTAL OPERATION:
Make sure that the Power Switch is in the off-position and unplug the tool from
its electrical outlet before performing any procedure in this section.
Note: For additional information regarding the parts listed in the following pages,
refer to the Assembly Diagram near the end of this manual.
ASSEMBLY
Installing the Side Handle
TO PREVENT SERIOUS INJURY:
Do not operate this tool with one hand only or without one of the two handles properly installed.
1. The Side Handle may be installed in one of two
positions, on either side of the Gear Housing. 2. Screw the threaded end of the
Side Handle into the selected position.
Tighten securely before beginning work.
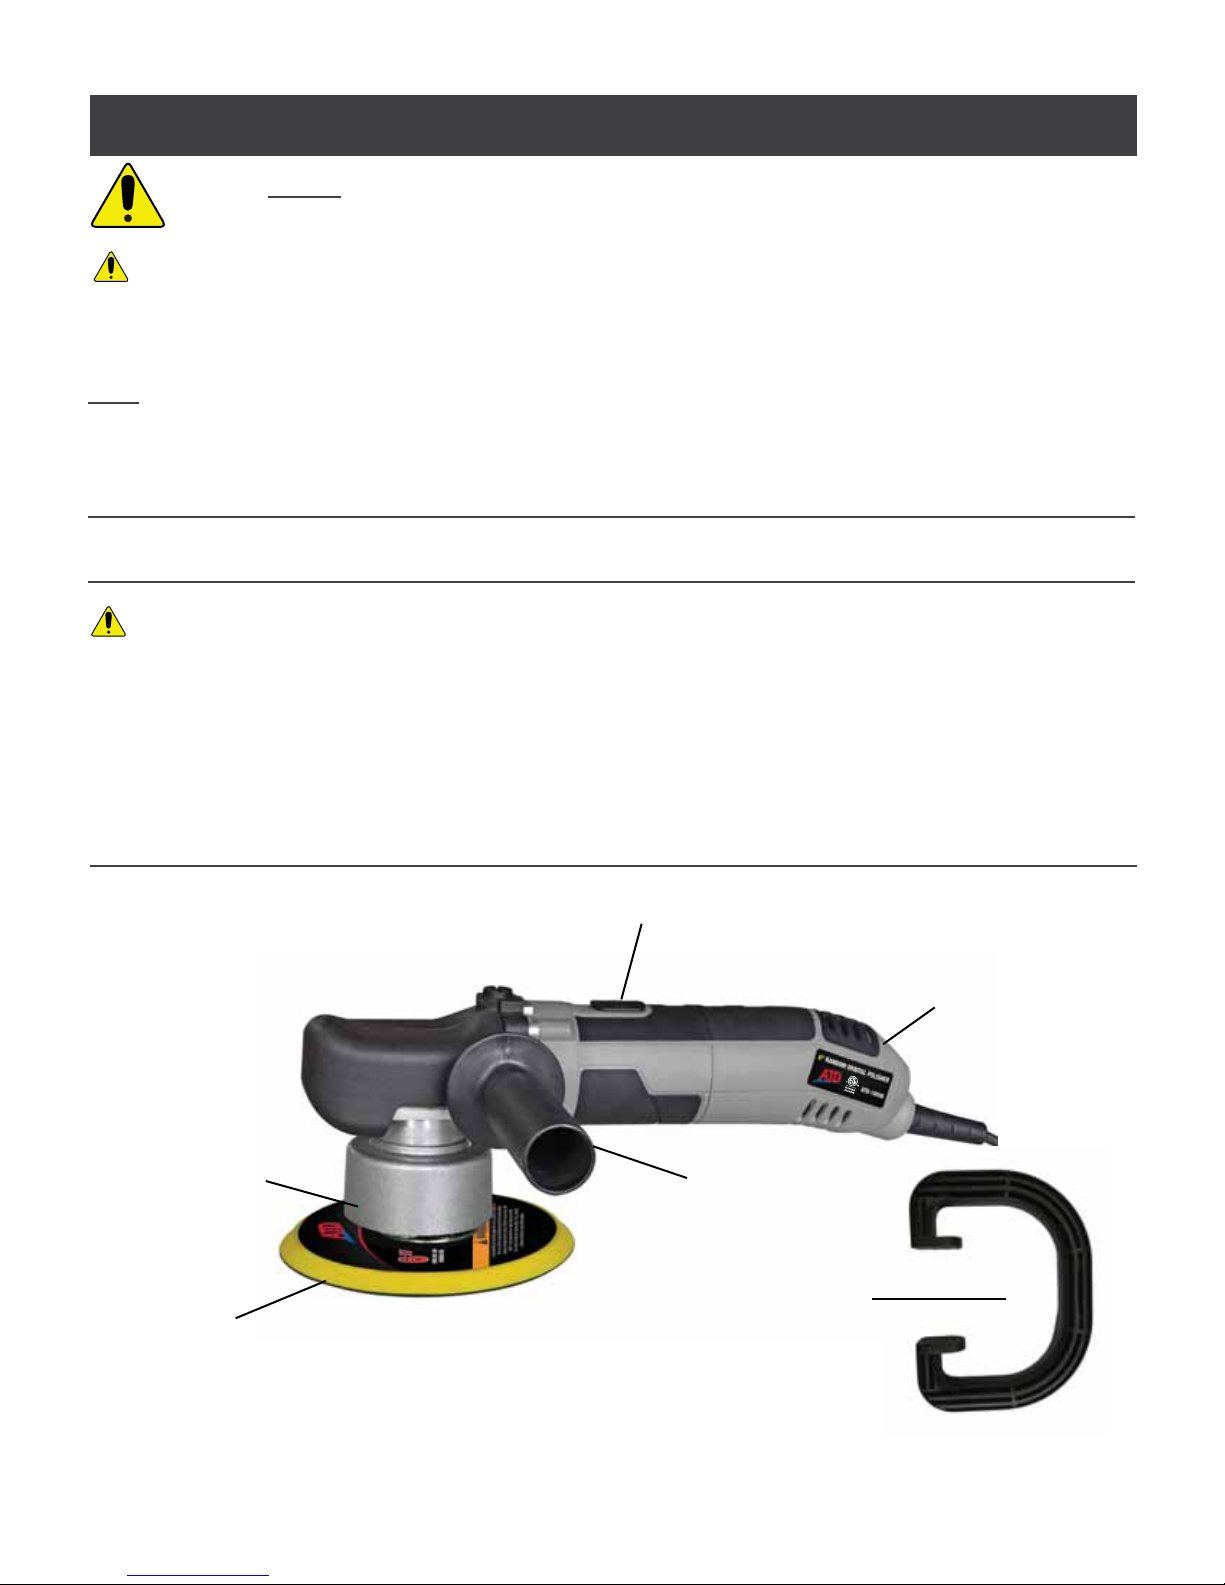
Functions
Backing
Pad
Pad Connector
(under shroud)
Switch
Side Handle
“D” Shaped
Handle
Speed
Control
Operating Instructions
WARNING:
WARNING:

Operating Instructions
Read the ENTIRE IMPORTANT SAFETY INFORMATION section at the beginning of this
manual including all text under subheadings therein before set up or use of this product.
TOOL SET UP
TO PREVENT SERIOUS INJURY FROM ACCIDENTAL OPERATION:
Make sure that the power switch is in the off-position and unplug the tool from
its electrical outlet before performing any procedure in this section.
Installing a Threaded Accessory
1. The accessory MUST be:
Rated to at least 6,500 OPM.
1RODUJHUWKDQƎPPLQGLDPHWHr.
Fitted with a threaded opening of Ǝ81F.
Undamaged.
A sanding disc, polishing bonnet or foam pad
VROGVHSDUDWHO\DQGEDFNLQJSDG.
2. Use the included wrench to prevent
the spindle from turning.
3. Thread disc accessory firmly onto the spindle.
Remove the wrench before use.
WORKPIECE AND WORK AREA SET UP
1. 'HVLJQDWHDZRUNDUHDWKDWLVFOHDQDQGZHOOOLW
The work area must not allow access by children
or pets to prevent distraction and injury.
2. Route the power cord along a safe route
to reach the work area without creating a
tripping hazard or exposing the power cord to
possible damage. The power cord must
reach the work area with enough extra length
to allow free movement while working.
3. Secure loose workpieces using a vise or clamps
QRWLQFOXGHGWRSUHYHQWPRYHPHQWZKLOHZRUNLQJ
There must not be hazardous objects, such
as utility lines or foreign objects, nearby that
will present a hazard while working.
5. You must use personal safety equipment including,
but not limited to, $16,DSSURYHGH\HDQGKHDULQJ
SURWHFWLRQDVZHOODVKHDY\GXW\ZRUNJORYHV
ASSEMBLY
Installing the “D” Shaped Handle
TO PREVENT SERIOUS INJURY:
Do not operate this tool with one hand only or without the one of the two handles properly installed.
1. The “D” Shaped Handle may be installed in place
of the Side Handle. 2. Use the two hex socket cap screws provided to
screw the “D” Shaped Handle into selected position.
Once screw on each side of the gear housing.
Tighten securely before beginning work.
WARNING:
WARNING:

Polishing Instructions
TO PREVENT SERIOUS INJURY: Grip the tool firmly in both hands.
1. Wash the work surface thoroughly, and
make sure it is free of dust, dirt, oil, grease, etc.
2. 3ODFHDFOHDQIRDPSDGVROGVHSDUDWHO\
securely onto the backing pad.
2. Apply about two tablespoons of wax
QRWLQFOXGHGHYHQO\RQWKHFOHDQIRDPSDG
NOTICE: Do not apply the wax directly to the surface
of the vehicle. The amount of wax needed will vary
according to the size of the vehicle being waxed.
NOTICE: Only use slower speeds for polishing.
Otherwise, damage may occur to the paint
being polished. ATD Tools, Inc. is not
responsible for damage to the vehicle’s
finish due to improper use of this tool.
3. Make sure that the switch is in the off
position, then plug in the tool.
WARNING! To prevent electric shock, keep
electrical connections off ground.
CAUTION! Start and stop the tool only while it
is held firmly against the surface of the vehicle.
Failure to do so may result in the foam pad or
polishing bonnet being thrown from the polishing pad.
To start, position the unit on the area to be polished,
grip the tool firmly with both hands and press
the Trigger. Release the trigger to stop.
5. Keep pressure off of the tool when operating.
The foam pad should LIGHTLY
contact the polishing surface.
NOTICE: To prevent damage to the foam pad, polishing
bonnet, and vehicle finish:
Only apply the pad/bonnet flat against
the surface, see below.
Figure A: Polishing Angle
6. Begin using the tool to apply wax to the vehicle.
Apply the wax to all flat surfaces with broad,
sweeping strokes in a crisscross pattern.
Apply the wax evenly over the surface of the vehicle.
7. Add additional wax to the polishing pad as needed.
To add additional wax:
a. Stop the tool and allow the tool to
come to a complete stop.
b. Add a small amount of wax evenly
over the pad surface.
c. Avoid using too much wax. For additional
applications of wax to foam pad, reduce the
amount of wax. The foam pad will not absorb
as much wax in subsequent applications.
d. Resume operation.
Note: The most common error when waxing/polishing
a vehicle is applying too much wax. If the foam
pad becomes saturated with wax, applying wax will
be more difficult and will take longer. Applying too
much wax may also reduce the life of the foam pad.
If the foam pad continually comes off the backing pad
during use, too much wax may have been applied.
8. After the wax has been applied to the
vehicle’s surface, turn off the tool.
Unplug the power cord from the extension cord.
9. Remove the foam pad from the backing pad and
with your hand and the foam pad, apply wax to
any hard to reach areas of the vehicle such as
around lights, door handles, under bumpers, etc.
10. Allow sufficient time for the wax to dry.
11. 3ODFHDFOHDQSROLVKLQJERQQHWVROGVHSDUDWHO\
securely onto the backing pad.
CAUTION! Tightly pull the string to secure the
polishing bonnet. Secure the string and keep
it out of the way by tying several knots.
CAUTION! Start and stop the tool only while it
is held firmly against the surface of the vehicle.
Failure to do so may result in the bonnet
being thrown from the backing pad.
12. Start the tool and begin buffing off the dried wax.
13. When as much wax as possible has been removed
with the tool, turn off the tool. Unplug the tool.
WARNING! Allow the tool to come to a
complete stop before setting it down.
15. Remove the polishing bonnet from backing pad.
Using the polishing bonnet, remove the wax
from all hard to reach areas of the vehicle.
16. Clean, then store the tool indoors
out of children’s reach.
WARNING:

Sanding Instructions
TO PREVENT SERIOUS INJURY: Grip the tool firmly in both hands.
1. Wipe the work surface clean of all dirt and debris,
especially that of previous
coarser sanding sessions, which will scratch
the surface of a finer grit sanding session.
2. Attach the desired grit sanding disk
VROGVHSDUDWHO\RQWRWKHEDFNLQJSDG
3. Make sure that the switch is in the off
position, then plug in the tool.
To start, grip the tool firmly with both hands and
press the trigger. Release the trigger to stop.
5. Wait until the tool has reached full speed,
then gently contact the surface.
6. Keep heavy pressure off of the tool when operating.
Allow the tool to do the work.
7. Move the tool in a uniform pattern up and down or
side to side while sanding to ensure even sanding.
8. Periodically, stop the tool and check for disc wear.
Replace worn sanding discs as needed.
9. TO PREVENT ACCIDENTS, AFTER USE:
Turn off the tool.
WARNING! Allow the tool to come to a complete
stop before setting it down.
Unplug the tool. Clean, then store the
tool indoors out of children’s reach.
Maintenance and Servicing
Procedures not specifically explained in this manual must
be performed only by a qualified technician.
TO PREVENT SERIOUS INJURY FROM ACCIDENTAL OPERATION:
Make sure that the power switch is in the off-position and unplug the tool from
its electrical outlet before performing any procedure in this section.
TO PREVENT SERIOUS INJURY FROM TOOL FAILURE:
Do not use damaged equipment. If abnormal noise or vibration occurs,
have the problem corrected before further use.
CLEANING, MAINTENANCE, AND LUBRICATION
1. BEFORE EACH USE, inspect the general
condition of the tool. Check for:
loose hardware,
misalignment or binding of moving parts,
damaged cord/electrical wiring,
cracked or broken parts, and
any other condition that may
affect its safe operation.
2. AFTER USE, wipe external surfaces
of the tool with clean cloth.
3. Periodically, wear $16,DSSURYHGVDIHW\JRJJOHV
DQG1,26+DSSURYHGEUHDWKLQJSURWHFWLRQ
and blow dust and grit out of the motor
vents using dry compressed air.
WARNING! If the supply cord of this
power tool is damaged, it must be replaced
only by a qualified service technician.
WARNING:
WARNING:

Troubleshooting
Problem Possible Causes Likely Solutions
Tool will not start. 1. Cord not connected.
2. No power at outlet.
3. Tool’s thermal reset
EUHDNHUWULSSHGLIHTXLSSHG
Internal damage or wear&DUERQ
EUXVKHVRUVZLWFKIRUH[DPSOH
1. Check that cord is plugged in.
2. Check power at outlet. If outlet is unpowered,
turn off tool and check circuit breaker.
If breaker is tripped, make sure circuit is right
capacity for tool and circuit has no other loads.
3. Turn off tool and allow to cool.
Press reset button on tool.
Have technician service tool.
Tool operates slowly. 1. Excess pressure applied to workpiece.
2. Power being reduced by long or small
diameter extension cord.
1. Decrease pressure, allow tool to do the work.
2. Eliminate use of extension cord.
If an extension cord is needed, use one with
the proper diameter for its length and load.
See Extension Cords in GROUNDING section.
Performance
decreases over time. Carbon brushes worn or damaged. Have qualified technician replace brushes.
Excessive noise
or rattling. Internal damage or wear.
&DUERQ brushes or bearings, for H[DPSOH
Have technician service tool.
Overheating. 1. Forcing tool to work too fast.
2. Blocked motor housing vents.
3. Motor being strained by long or
small diameter extension cord.
1. Allow tool to work at its own rate.
2. Wear $16,DSSURYHGVDIHW\JRJJOHVDQG
1,26+DSSURYHGGXVWPDVNUHVSLUDWRUZKLOH
blowing dust out of motor using compressed air.
3. Eliminate use of extension cord.
If an extension cord is needed, use one with
the proper diameter for its length and load.
See Extension Cords in GROUNDING section.
Tool does not
sand effectively. 1. Accessory loose.
2. Accessory damaged, worn or
wrong type for the material.
1. Confirm accessory arbor is correct and tight.
2. Check condition and type of disc accessory.
Use only proper type of disc
accessory in good condition.
Follow all safety precautions whenever diagnosing or servicing
the tool. Disconnect power supply before service.
ATD-10506
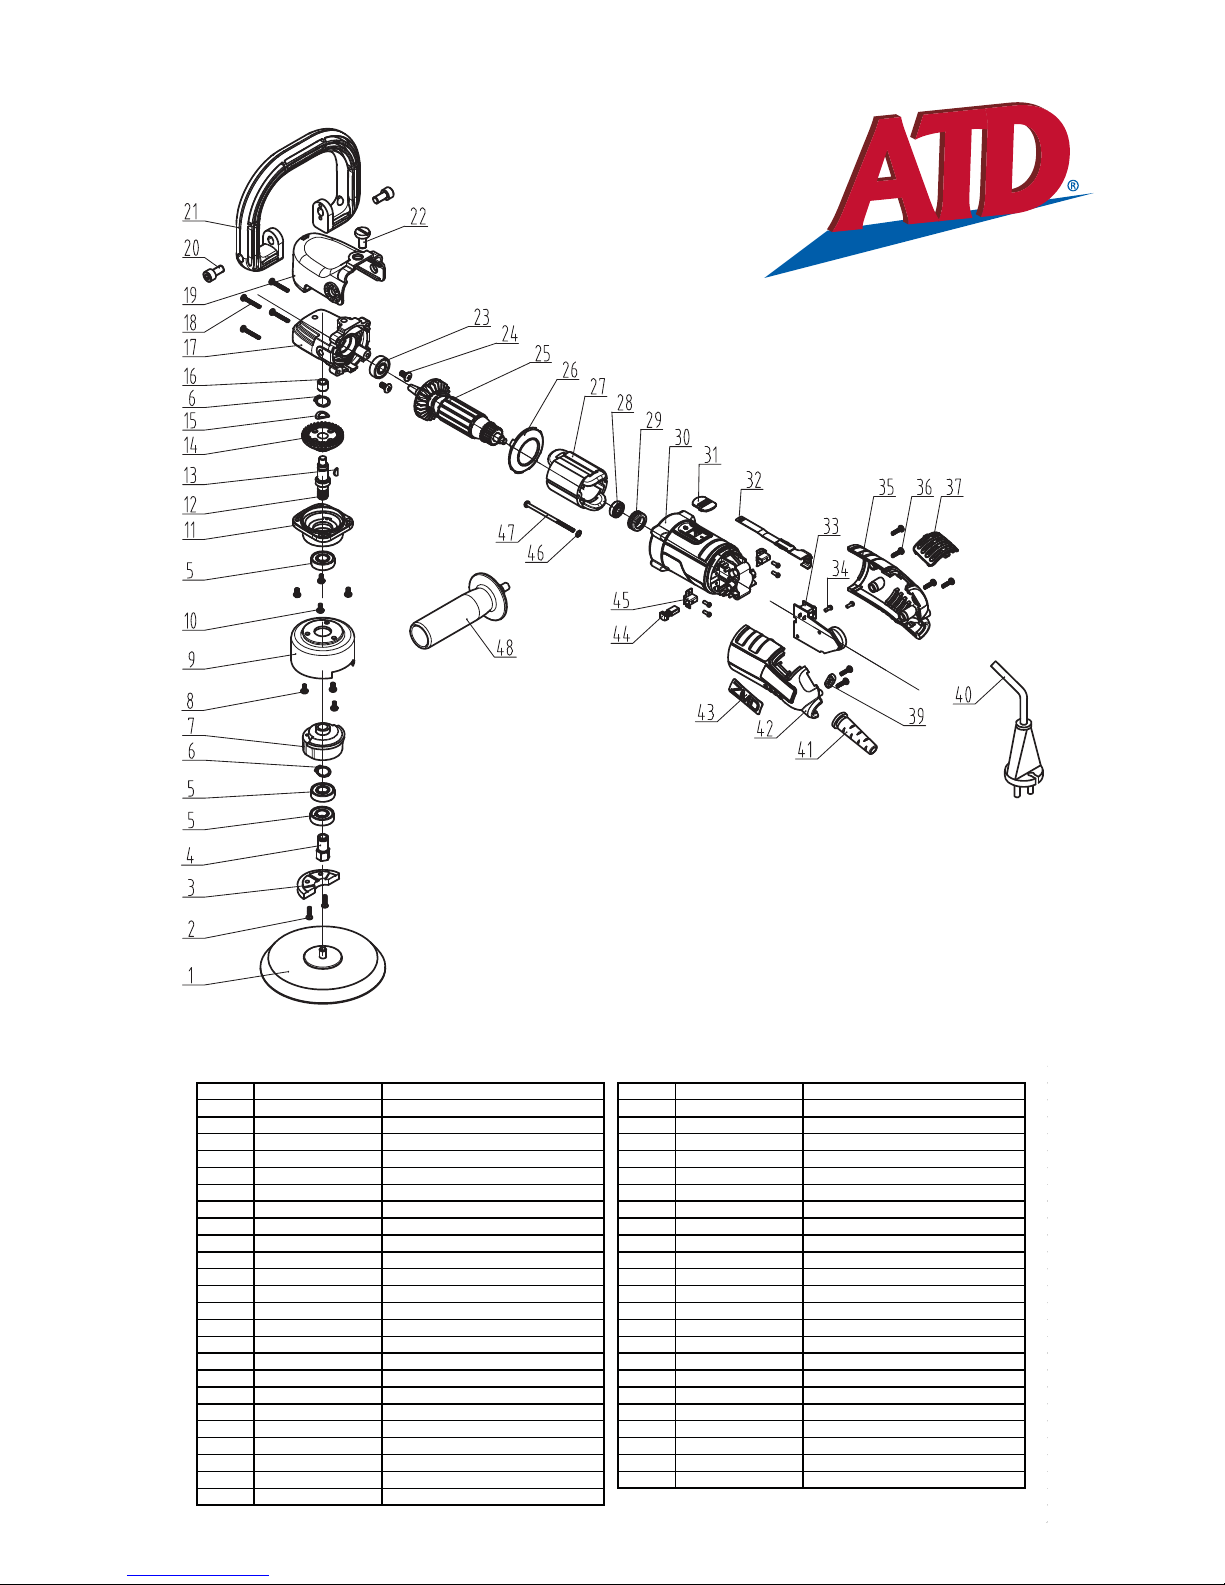
ITEM# ORDERING PART# PART DESCRIPTION ITEM# ORDERING PART# PART DESCRIPTION
1 PRT1050601 BACKINGPAD 25 PRT1050625 ROTOR
2 PRT1050602 SCREW MX12 26 PRT1050626 FAN SHROUD
3 PRT1050603 COUNTER WEIGHT 27 PRT1050627 STATOR
PRT105060SPINDLE 01 28 PRT1050628 BEARING 607
5 PRT1050605 BEARING6001 29 PRT1050629 BEARINGBUSHING607
6 PRT1050606 RING 12 30 PRT1050630 HOUSING
7 PRT1050607 ECCENTRIC WHEEL 31 PRT1050631 PUSHBUTTON
8 PRT1050608 SCREW MX10 32 PRT1050632 TIE ROD
9 PRT1050609 ECCENTRIC PLATE 33 PRT1050633 PC BOARD AND SWITCH
10 PRT1050610 SCREW MX13PRT105063SCREW ST2.9X10
11 PRT1050611 GEARBOX CAP 35 PRT1050635 RIGHT REAR HOUSING
12 PRT1050612 SPINDLE 02 36 PRT1050636 SCREW ST.2X1
13 PRT1050613 WOODRUFF KEY3X3.7X10 37 PRT1050637 AIRINTAKE FASTENER
1PRT105061BIG GEAR 39 PRT1050639 CORD CLAMP
15 PRT1050615 GEAR RETAINING RING 0 PRT105060POWERCORD
16 PRT1050616 BEARING 12X8X10 1 PRT105061 CORD SLEEVE
17 PRT1050617 GEAR BOX 2 PRT105062 LEFTREARHOUSING
18 PRT1050618 SCREW ST.2X22 3 PRT105063 LABEL
19 PRT1050619 GEARBOX COVER PRT10506 CARBON BRUSH
20 PRT1050620 SCREW M8X15 5 PRT105065 BRUSH HOLDER
21 PRT1050621 DHANDLE 6 PRT105066 CARRIER RING
22 PRT1050622 SCREW M8X12 7 PRT105067 SCREW ST.2X60
23 PRT1050623 BEARING 6000 8 PRT105068 SIDE HANDLE
2PRT105062SCREW M5X10

WARRANTY
1 YEAR LIMITED WARRANTY
THIS WARRANTY AND CONFIRMED RECEIPT(S) SHOULD BE RETAINED BY THE CUSTOMER AT ALL TIMES
PURCHASED FROM: _______________________________________
DATE PURCHASED: ____________________________________________
INVOICE/RECIEPT NUMBER: _________________________________________
<RXU$7'LVZDUUDQWHGIRUDSHULRGRIPRQWKVIURPWKHRULJLQDOSXUFKDVHGDWH
)RUDSHULRGRIRQH\HDUIURP\RXUSXUFKDVHGDWH$7'7RROV,QFZLOOUHSDLURUUHSODFHDWLWVRSWLRQZLWKRXWFKDUJH\RXU
ATD product if it was purchased new and the product has failed due to a defect in material or workmanship which you experienced
during normal use of the product. This limited warranty is your exclusive remedy.
To access the benefits of this warranty, contact your supplier, or point of sale directly. You may be advised to return the product
under warranty, freight prepaid, to your supplier for warranty determination.
If this ATD product is altered, abused, misused, modified, or undergoes service by an unauthorized technician, your warranty will
be void. We are not responsible for damage to ornamental designs you place on thisATD product and such ornamentation should
not cover any warnings or instructions or they may void the warranty. This warranty does not cover scratches, superficial dents, and
other abrasions to the paint finish that occur under normal use. It also does not cover noremal wear items such as but not limited to
brushes, batteries, drill bits, drill chucks, pads or blades.
Subject to the law in your state:
<RXUVROHDQGH[FOXVLYHUHPHG\LVUHSDLURUUHSODFHPHQWRIWKHGHIHFWLYHSURGXFWDVGHVFULEHGDERYH
$7'LVQRWOLDEOHIRUDQ\LQFLGHQWDOGDPDJHVLQFOXGLQJEXWQRWOLPLWHGWRORVWSURILWVDQGXQIRUHVHHDEOHFRQVHTXHQFHV
7KHUHSDLUDQGUHSODFHPHQWRIWKLVSURGXFWXQGHUWKHH[SUHVVOLPLWHGZDUUDQW\GHVFULEHGDERYHLV\RXUH[FOXVLYHUHPHG\DQGLV
provided in lieu of all other warranties, express or implied. All other warranties, including implied warranties and warranties of
merchantability or fitness for a particular purpose are disclaimed and, if disclaimer is prohibited, these warranties are limited to
one year from your date of purchase of this product.
Some states’ laws do not allow limited durations on certain implied warranties and some states’ laws do not allow limitations on
incidental or consequential damages. You should consult the law in your state to determine how your rights may vary.
[Affix receipt or invoice here for safe keeping]
Table of contents
Other ATD Tools Sander manuals


Popular Sander manuals by other brands

DeWalt
DeWalt D26453 instruction manual

Dynabrade
Dynabrade 53271 Safety, operation and maintenance manual

Grizzly
Grizzly H0594 instruction sheet

Ingersoll-Rand
Ingersoll-Rand 8448-A1C-EU Operator's manual

Feider Machines
Feider Machines FPO350 Original instructions

Westfalia
Westfalia 85 88 46 instruction manual


