Auburn Gear Power Wheel Model 8 User manual

AUBURN, INDIANA 46706-3499
U.S.A. PHONE: (219) 925-3200
FAX: (219) 925-4725
OPTIONAL
Power Wheel® Service Manual
Model 8 Double Reduction
Wheel Drives With Integral
Parking Brake Option
38
39
37
31
29
28
27
26
19 23
9
7
6
5
4
3
2
11 12 13
16
17
15
25
32
36
8
10
18
35
33
30
14
24
21
22 20
1
34

IDENTIFICATION
IMPORTANT: All Power Wheel units and kits are shipped with a nameplate that includes the Auburn Gear part number and order code as shown.
Example:
PowerWheel®
ORDER CODE: 6WB13156C
PART NO.: 6000236
SERIAL NO.: 143434
AUBURN, IN U.S.A.
2
In addition to the nameplate, Power Wheel drives are stamped with an identification number which
appears on the cover or hub flange as shown.
Example: 6000236-A-4-9
When ordering parts, the information included on the nameplate or the stamped identification number is
necessary to accurately identify the drive and obtain the correct replacement parts. Once this information
has been obtained, contact Auburn Gear for the appropriate parts list.
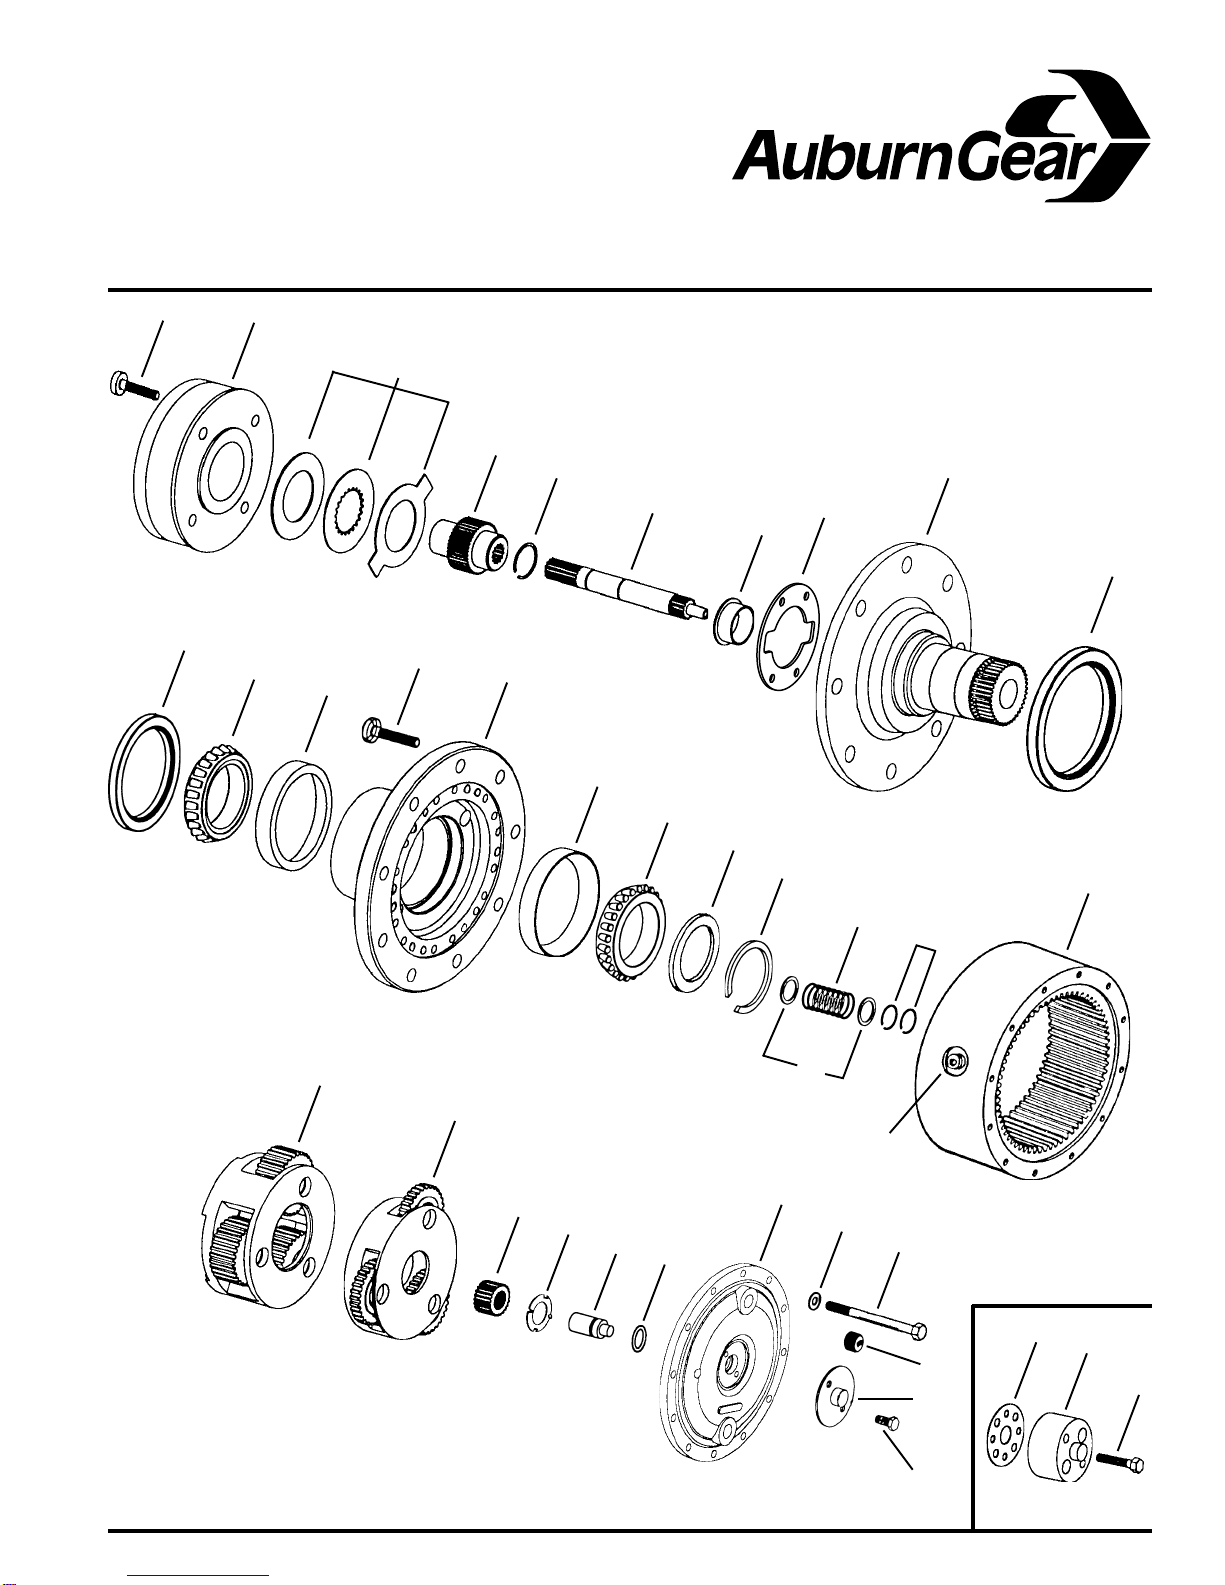
DISASSEMBLY OF POWER WHEEL
STEP 1
Ifbrakeportionof driveis tobe servicedremove motorfrom planetarydrive.Tempo-
rarilyinstalltwo1/2-13x1.25screwsintohydraulicmotormountingholesandtorque
to 50 lb. ft. (67 Nm). These must be used to hold spring back-up plate in position
whenparkingbrakeassemblyis removedfromthe drive.Ifthebrakeportionofdrive
does not require service go to step 5.
STEP 2
Remove the four T-50 Torx head screws (1) holding the parking brake assembly in
position. It may be necessary to lightly strike the piston assembly (2) with a rubber
mallet to loosen from spindle or cover.
STEP 3
Remove disc pack (3) from drive only if necessary. Be careful to maintain discs in
order.
STEP 4
If brake piston assembly (2) has been removed slide the coupling (4) and retaining
ring (5) from splines on input shaft (6). Remove sleeve bearing (7) if replacement is
required.
STEP 5
Position the assembly upright on face of spindle (9).
STEP 6
Remove the disengage cover (35) if necessary.
STEP 7
Remove twelve bolts (33), flat washers (32), and large cover (31) from the unit. The
thrust washer (28) and the disengage plunger (29) will usually remain attached to
the large cover (31) when it is removed. Remove thrust washer (28), disengage
plunger (29) and “O” ring (30) from the large cover (31).
STEP 8
Remove primary sun gear (27) from end of input shaft (6).
STEP 9
Remove primary carrier assembly (26).
STEP 10
Remove the secondary carrier assembly (25). It may be necessary to remove the
ring gear (23) first, if difficulty is encountered in removing the carrier.
STEP 11
Remove the input shaft (6) from spindle (9). Remove the retaining rings (20), wash-
ers (21), and spring (22) from input shaft (6) only if replacement is required.
STEP 12
If not previously removed (see step 10) remove ring gear (23) from hub (15). It may
be necessary to strike ring gear (23) with a rubber mallet to loosen from hub (15).
STEP 13
Removetheretainingring(19)frominfrontofthethrustwasher(18)andlift hub(15)
from spindle (9). If bearings are not a loose fit, it may be necessary to press spindle
(9) from hub (15). N
OTE
:Use a retaining ring expander tool to remove retaining ring
(19).
STEP 14
If included on unit, remove boot seal (10) from hub (15). Remove the oil seal (11)
and bearing cones (12 & 17) from hub (15). Inspect bearing cups (13 & 16) in
position and remove only if replacement is required.
ASSEMBLY OF POWER WHEEL
STEP 1
Press new bearing cups (13 & 16) in each side of the hub (15). It is recommended
that bearing cups (13 & 16) and cones (12 & 17) be replaced in sets.
STEP 2
Assemble bearing cone (12) into cup (13) at seal end of hub (15) and press a new
seal (11) into hub (15). Install boot seal (10) on hub (15) if unit is so equipped.
STEP 3
Positionspindle (9)uprightonbench.Lubricatelipsofseals(10 &11)andlowerhub
(15)onto spindle(9).Hub(15)shouldbecenteredasit islowered overspindle(9)to
prevent seal damage.
STEP 4
Assemble bearing cone (17) over spindle (9) and into bearing cup (16). If bearings
(12, 13, 16, & 17), hub (15) or spindle (9) is replaced, a new retaining ring (19) is
requiredforproperbearingsetting.Donotre-usesnapringafterithasbeeninstalled
andremovedfromunit. Selectthethickestretainingring(19)thatcanbeassembled
into the ring groove of the splined end of spindle (9) above bearing cone (17). Bear-
ing should have from .000 – .006 inches (.00 – .15mm) of end play when proper
retaining ring (19) is installed.
STEP 5
Assemble a washer (21), spring (22), a second washer (21), and a retaining ring
(20) in the middle groove of input shaft (6).Assemble a second retaining ring (20) in
grooveoppositepilotendofinputshaft(6).Someshaftshaveashoulderandrequire
only one retaining ring (20).
STEP 6
Assemble the splined end of the input shaft (6) down into spindle (9).
STEP 7
Assemble secondary carrier assembly (25) to spindle (9) at splines.
STEP 8
Clean mating surfaces and apply a bead of silicone sealant to face of hub (15) that
mates with ring gear (23). (See instructions on sealant package). Position ring gear
(23) on hub (15) being careful to align bolt holes.
STEP 9
Assemble the primary carrier assembly (26) into the ring gear (23). It will be neces-
sary to rotate carrier to align secondary sun gear {part of primary carrier assembly
(26)} with planet gear teeth in secondary carrier assembly (25). Assemble primary
sun gear (27) over input shaft (6). Rotate primary sun gear (27) to align input shaft
(6) to gear splines and gear teeth in primary carrier assembly (26).
STEP 10
Lubricate“O”ring (30)andassemble ingrooveinside coverhole,push plunger(29)
into cover with pointed end facing inside of unit.
STEP 11
Assemble the thrust washer (28) with tangs engaged with cover (31). N
OTE
:Asmall
amount of grease applied to the back side of thrust washer (28) will hold washer in
place.Applyabeadofsiliconesealanttoend faceof ringgear (23).Assemblecover
(31)aligningholesofcoverandringgear.Assemblethetwelveflatwashers(32)and
3/8 – 16x5 1/2 inch hex head bolts (33). Torque bolts to 45 – 50 lb. ft. (61 - 67 Nm).
STEP 12
Assemblethedisengage cover (35)withdimpled center protrudingoutif wheel isto
beusedtodrivethevehicle.Assembleandtorquethetwo5/16–18bolts(36).Torque
bolts to 10 – 20 lb. ft. (13 – 27 Nm).

3
STEP 13
InvertthePowerWheelassemblyandassemblethesleevebearing(7),coupling(4)
and retaining ring (5) with counterbore out to the input shaft (6).
STEP 14
TheproperdiscpackandpistoncylinderassemblywilldependonthePowerWheel
brake model number: Contact Auburn Gear for specific part numbers. Disc packs
are supplied as a matched set. Replacement packs are packaged individually to
retain the matched characteristics.After removing from package pre-soak the disc
pack in the oil used in the Power Wheel drive before placing into the unit. Take care
to keep disc pack (3) in proper order and separate from other disc packs.
STEP 15
Align the tangs on the steel separator plates and carefully place the complete disc
pack (3) into the Power Wheel drive so that the tangs on the separator plates are
within the slots in the drive. Also, the spline on the friction discs should be aligned
with the spline on the Power Wheel adapter coupling (4). Check to make sure that
the disc pack is properly seated.
STEP 16
Clean seal surface of the drive and piston assembly (2) of any old sealant and wipe
any oil from seal surface of spindle or cover. Most piston kits include a gasket (8)
which should be placed on spindle face to seal interface with piston assembly. If no
gasket is included apply a continuous 1/32 bead of silicone sealant to seal surface
oninsideofthebolt circle.N
OTE
:Donotuseexcessiveamount ofsealantasthiscan
interfere with proper operation of the parking brake.
STEP 17
Alignthefourpistonassemblyholeswith thefour holesin thePowerWheelspindle.
Apply Locktite 262 to the four screws (1) to be installed and torque to 80 – 94 lb. ft.
(108 – 127 Nm).
STEP 18
Remove the two screws installed in motor mounting holes.
STEP 19
Before using the brake, it is recommended that a pressure release check be per-
formed.Usingasuitablehydraulic source,bleed theairfromthebrake andpressur-
ize the brake to the specified release pressure. The brake plates should now turn
freely.Ifthehydraulicsourcewillprovide atleast1000PSIpressure,apply1000PSI
and check to make sure that the pressure does not decay more than 30 PSI in 60
seconds.
STEP 20
After motor is assembled to drive or drive is sealed at spindle, fill with lubricant to
proper level and replace all plugs.
NOTE: When installing a hydraulic motor to the Power Wheel drive it is
necessary to place an “O” ring or gasket (not supplied byAuburn Gear)
between the motor and the planetary drive. “O” ring sizes: SAEA2-042, SAE
B 2-155, SAE C 2-159.
It is recommended that the secondary and primary carrier assemblies (25 & 26) be serviced in their entirety to protect the integrity of the Power Wheel drive.
CARRIER ASSEMBLIES
LUBRICATION RECOMMENDATIONS
IMPORTANT: POWER WHEEL PLANETARY DRIVESARE SHIPPED WITHOUT LUBRICANT AND MUST BE FILLED TO THE PROPER LEVEL PRIOR
TO START UP.
Observe lubrication recommendations given by the original equipment manufacturer. When specific recommendations are not available, use mild extreme
pressure lubricantAPI-GL-5, No. 80 or 90 when filling the Power Wheel under normal temperature ranges between 0 - 120°F (-18 to 49°C). Power Wheel is to
be half full of oil when unit is mounted level and horizontal. Use drain and fill plugs located in cover and ring gear. Oil is to be changed after first 50 hours of
operation with subsequent changes every 1000 hours or yearly, which ever comes first. If unit is to be operated vertically, if ambient conditions are outside the
specified range, or if the oil temperature exceeds 200°F (93°C) contactAuburn Gear for oil and level recommendations.
CAUTION: The Power Wheel will not normally be damaged by towing; however, the hydraulic drive components may be damaged unless the Power Wheel is
disengaged from the drive motor. Road speeds in excess of 25 MPH should be avoided unless clearly specified to be permissible by the equipment manufac-
turer.
TOWING VEHICLE
CAUTION: For units equipped with the standard spring disconnect, assemble the disengage cover (35) with the dimpled center protruding inward. For units
equipped with the optional quick disconnect, push in center plunger of disconnect. PARKING BRAKE WILL NOT FUNCTION IF UNIT IS DISENGAGED.
TO DISENGAGE POWER WHEEL
Aprotective film is applied to the Power Wheel at the factory to prevent rust during shipment. Additional protection may be required if the Power Wheel is to be
stored for an extended period of time.
STORAGE
Silastic RTV732 sealer and General Electric Silimate RTV No. 1473 or RTV No. 1503 are currently recommended for sealing gasket surfaces. Sealant should
be applied in a continuous bead, which should be centered on the surface to be sealed but should move to the inside of the hole at each bolt hole location. For
service requirements orderAuburn Gear part number 604101.
SEALING COMPOUND
Maximum intermittent output torque............................................................................................................................................. 100,000 lb. in. (11,300 Nm)
Maximum input speed .......................................................................................................................................................................................2,500 RPM
Oil capacity ................................................................................................................................................................................................52oz(1,540 ml)
Maximum parking brake release pressure...............................................................................................................................................3,000 PSI (206 bar)
SPECIFICATIONS

ITEM DESCRIPTION* NO. USED
NO. IN ASS’Y.
* ContactAuburn Gear with part number and order code of drive to obtain the appropriate parts list.
Refer to parts list for the specific part numbers and quantities.
MH430 - 0497 Power Wheel®is a registered trademark of
Auburn Gear
ITEM DESCRIPTION* NO. USED
NO. IN ASS’Y.
Model 8 Power Wheel®Service Kits
Part No. Description Included Items
14-05-410-001 Retaining Ring Kit 19 (6 Retaining Rings)
641011** Bearing and Seal Kit 11, 12, 13, 16, 17, 19 and 30
641018** Seal Kit 11, 19, and 30
** Indicates kit also includes a tube of sealant, part number 604101.
1 Torx Head Screw 618320 4
2 Piston Assembly 1
3 Disc Pack 1
4 Coupling 1
5 Retaining Ring 1
6 Input Shaft 1
7 Sleeve Bearing 612701 1
8 Brake Gasket 1
9 Spindle 1
10 Boot Seal 604405 1
11 Oil Seal 14-00-044-011 1
12 Bearing Cone 14-00-133-007 1
13 Bearing Cup 14-00-133-006 1
14 Wheel Bolt 8-10
15 Hub 1
16 Bearing Cup 14-00-133-008 1
17 Bearing Cone 14-00-133-009 1
18 Thrust Washer 1
19 Retaining Ring Kit 14-05-410-001 1
20 Retaining Ring 2
21 Washer 2
22 Disengage Spring 1
23 Ring Gear 1
24 Magnetic Plug 14-00-052-002 1
25 Secondary Carrier Assembly 1
26 Primary Carrier Assembly 1
27 Primary Sun Gear 1
28 Thrust Washer 1
29 Disengage Plunger 610801 1
30 “O” Ring 614101 1
31 Large Cover 1
32 Flat Washer 12
33 Hex Head Bolt 12
34 Pipe Plug 605204 1
35 Disengage Cover 14-02-039-005 1
36 Hex Head Bolt 2
37 Quick Disconnect Gasket 1
38 Quick Disconnect Assembly 1
39 Hex Head Bolt 2
Table of contents
Other Auburn Gear Microphone System manuals

Auburn Gear
Auburn Gear Power Wheel Model 250 User manual

Auburn Gear
Auburn Gear Power Wheel Model 145 User manual

Auburn Gear
Auburn Gear Power Wheel Model 6 User manual

Auburn Gear
Auburn Gear Power Wheel Model 6 User manual

Auburn Gear
Auburn Gear Power Wheel Model 8 User manual

Auburn Gear
Auburn Gear Power Wheel Model 6 User manual

Auburn Gear
Auburn Gear Power Wheel Model 8 User manual

Auburn Gear
Auburn Gear Power Wheel Model 145 User manual

Auburn Gear
Auburn Gear Power Wheel Model 6 User manual

Auburn Gear
Auburn Gear Power Wheel Model 6 User manual