Audibax Waco Prolife 350RGBALC User manual
Waco Prolife 350RGBALC
Please read the manual before using the product
USER´S
MANUAL
11
Waco Prolife
350RGBALC
Please note: All information is subject to change without prior notice. 24.08.2022
Fixture Cleaning
Due to fog residue, smoke, and dust cleaning the internal and external optical lenses and
mirror should be carried out periodically to optimize light output. Cleaning frequency
depends on the environment in which the fixture operates (I.e. smoke, fog residue, dust,
dew). In heavy club use we recommend cleaning on a monthly basis. Periodic cleaning will
ensure longevity, and crisp output.
To clean the fixture:
1. Disconnect the fixture from power and allow it to cool for at least 10 minutes.
2. Vacuum or gently blow away dust and loose particles from the outside of the fixture with
low-pressure compressed air.
3. Clean the surfaces by wiping gently with a soft, clean lint-free cloth moistened with a
weak detergent solution. Do not rub glass surfaces hard: lift particles off with a soft repeated
press. Dry with a soft, clean, lint-free cloth or low-pressure compressed air. Remove stuck
particles with an unscented tissue or cotton swab moistened with glass cleaner or distilled
water.
4. Check that the fixture is dry before reapplying power.
Fuse Replacement
This fuse is located in a fuseholder next to the MAINS OUT socket on the connections panel.
To replace a fuse:
1. Disconnect the fixture from power and allow it to cool for at least 10 minutes.
2. Unscrew the cap of the fuseholder and remove the fuse. Replace with a fuse of the same
size and rating only.
3. Reinstall the fuseholder cap before reapplying power.
Troubleshooting
Listed below are a few common problems that you may encounter, with solutions.
The fixture does not work, no light
• Check the connection of power and main fuse. Be sure the external fuse has not blown.
• Measure the mains voltage on the main connector.
Technical specifications
Model
Waco Profile 350RGBALC
Power supply:
AC100 - 240V, 50/60Hz
Light source:
350W LED
LED color:
RGBALC(Red, Green, Blue, Amber, Lime, Cyan)
Color temperature:
2700K - 8000K
Color Rendition:
CRI 95(CT channel), 85(full on)
Lens:
19°, 26°, 36°, 50° optional
Power connection:
PowerCON in&out
Fuse:
F5A, 250V
Maximum power linking:
6 units
Signal connection:
3-pin XLR in & out
DMX channels:
2/8/12
Control protocol:
DMX512
Housing:
Colour black, aluminum
Size
700 x 270 x 263mm
N.W.:
9.2 kg
G.W.:
11 kg
Enviroment:
IP20
USER´S
MANUAL
Waco Prolife 350RGBALC
1 10
Table of Contents
Caution!........................................................................................................................2
Introduction..................................................................................................................2
Safety instructions.........................................................................................................2
Installation.....................................................................................................................3
Read ‘Safety information’ before installing the fixture..............................................3
Fastening the fixture to a flat surface..........................................................................3
Mounting the fixture on a truss.....................................................................................3
Securing with a safety cable........................................................................................4
DMX-512 connection/connection between fixtures.................................................4
Power connection.........................................................................................................4
Operation......................................................................................................................5
Control Menu Map........................................................................................................5
Control Menu.................................................................................................................6
Main Menu.....................................................................................................................6
Addressing.....................................................................................................................6
Universal DMX Control...................................................................................................7
RDM control...................................................................................................................7
Rotary Knob function....................................................................................................8
Set dimmer curves.......................................................................................................9
DMX Protocol................................................................................................................9
Fixture Cleaning.........................................................................................................11
Fuse Replacement.....................................................................................................11
Troubleshooting..........................................................................................................11
The fixture does not work, no light..............................................................................11
Technical specifications............................................................................................11
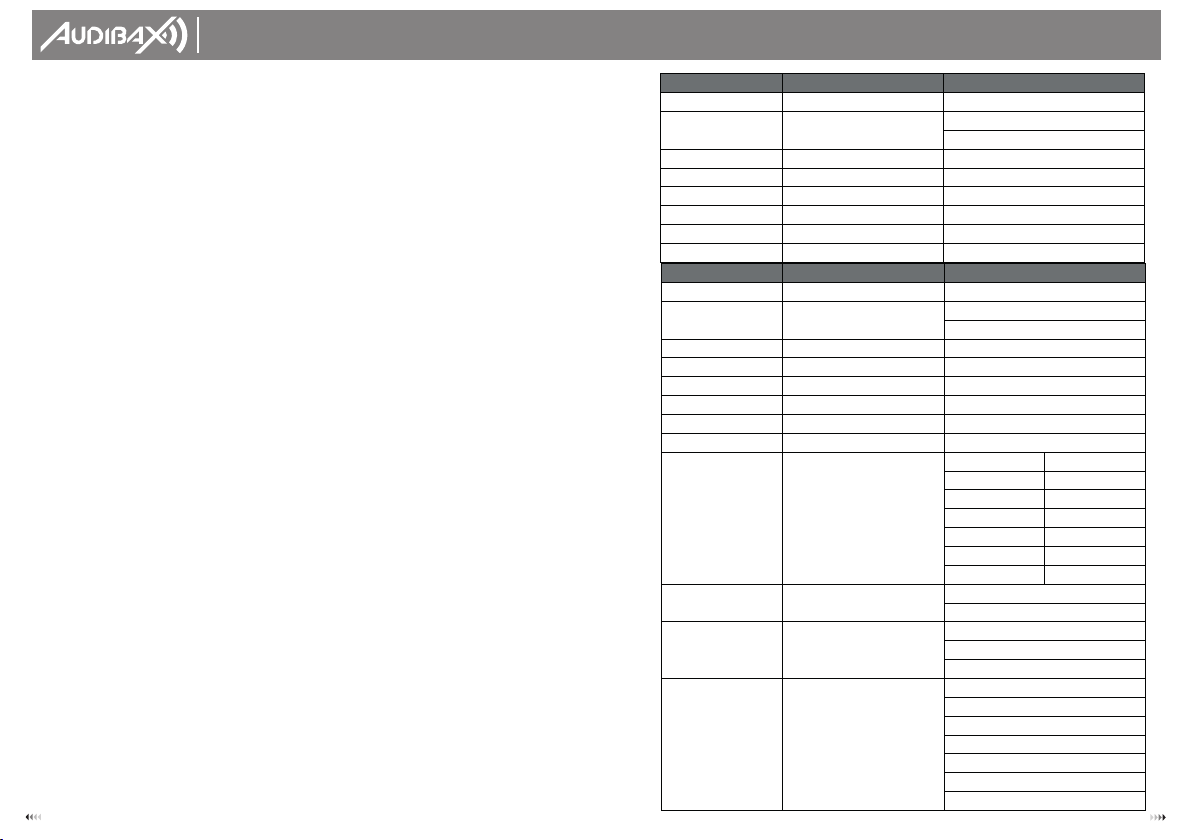
8 Channels Mode Function Function Control
CH1 Dimmer
000-255: 0-100% dimmer
CH2
Strobe
000-004: No function
005-255: Strobe with speed increasing
CH3 Red
000-255: Red dimmer 0-100%
CH4 Green
000-255: Green dimmer 0-100%
CH5 Blue
000-255: Blue dimmer 0-100%
CH6 Amber
000-255: Amber dimmer 0-100%
CH7 Lime
000-255: Lime dimmer 0-100%
CH8 Cyan
000-255: Cyan dimmer 0-100%
12 Channels Mode Function Function Control
CH1 Dimmer
0
00-255: 0-100% dimmer
CH2
Strobe
0
00-004: No function
0
05-255: Strobe with speed increasing
CH3 Red
0
00-255: Red dimmer 0-100%
CH4 Green
0
00-255: Green dimmer 0-100%
CH5 Blue
0
00-255: Blue dimmer 0-100%
CH6 Amber
0
00-255: Amber dimmer 0-100%
CH7 Lime
0
00-255: Lime dimmer 0-100%
CH8 Cyan
0
00-255: Cyan dimmer 0-100%
CH9
Color temperature
0
00-005: No function
1
31-151: 4500K
0
06-025: 2700K
1
52-172: 5600K
0
26-046: 3000K
1
73-193: 6000K
0
47-067: 3200K
1
94-214: 6500K
0
68-088: 3500K
2
15-235: 7200K
0
89-109: 4000K
2
36-255: 8000K
1
10-130: 4200K
CH10
Color fading
0
00-004: No function
0
05-255: Color fading
CH11
Color marco
0
00-004: No function
0
05-130: Color jump, speed increasing
1
31-255: Color fading, speed increasing
CH12
Dimmer mode
0
05-005: No function
0
06-047: Dimmer mode, Standard
0
48-089: Dimmer mode, Stage
0
90-131: Dimmer mode, TV
1
32-173: Dimmer mode, Architecture
1
74-215: Dimmer mode, Theatre
2
16-255: Custom dimmer curve

USER´S
MANUAL
Waco Prolife 350RGBALC
9 2
Caution!
Every person involved with the installation, operation and maintenance of this device has to
- Be qualified
- Follow the instructions of this manual
- Consider this manual to be part of the total product
- Keep this manual for the entire service life of the product
- Pass this manual on to every further owner or user of the product
- Download the latest version of the user manual from the Internet
Introduction
Thank you for having chosen Waco Profile 350RGBALC. You will see you acquired a powerful
and versatile device.
Unpack your item. Before your initial start-up, please make sure that there is no damage
caused by transportation. Should there be any, consult your dealer and do not use the
device.
Safety instructions
This device has left our premises in absolutely perfect condition. In order to maintain this
condition and to ensure a safe operation, it is absolutely necessary for the user to follow the
safety instructions and warning notes written in this user manual. Always disconnect from the
mains, when the device is not in use or before cleaning it. Keep away children and
amateurs from the device! There are no serviceable parts inside the device. Maintenance
and service operations are only to be carried out by authorized dealers
Be careful with your operations. With a dangerous voltage you can suffer a
dangerous electric shock when touching the wires!
Avoid looking directly into the light source!
Wear protective glasses and other PPE (personal protective equipment) when
working on or near the fixture.
Always make sure you are connecting this product to the proper voltage in
accordance with the specifications in this manual or on the product’s specification
label. Make sure it is grounded when using it!
Unplug mains lead before opening the housing!
Make sure that the power cord is never crimped or damaged by sharp edges.
Check the fixture and the power cord from time to time.
Make sure to replace the fuse with another of the same type and rating.
For your own safety, please read this user manual carefully before your initial start-up.
Follow operating safety precautions and pay attention to warning signs methods and
equipment on the user manual.
Warning! This symbol indicates a hot surface. Certain parts of the housing can
become hot during operation. After use, wait for a cool-down period of at least 10
minutes before handling or transporting the device.
Indoor use only! To prevent risk of fire or shock, do not expose this product to rain or
moisture. IP 20 rating.
The ambient temperature must always be between -5° C and +45° C.
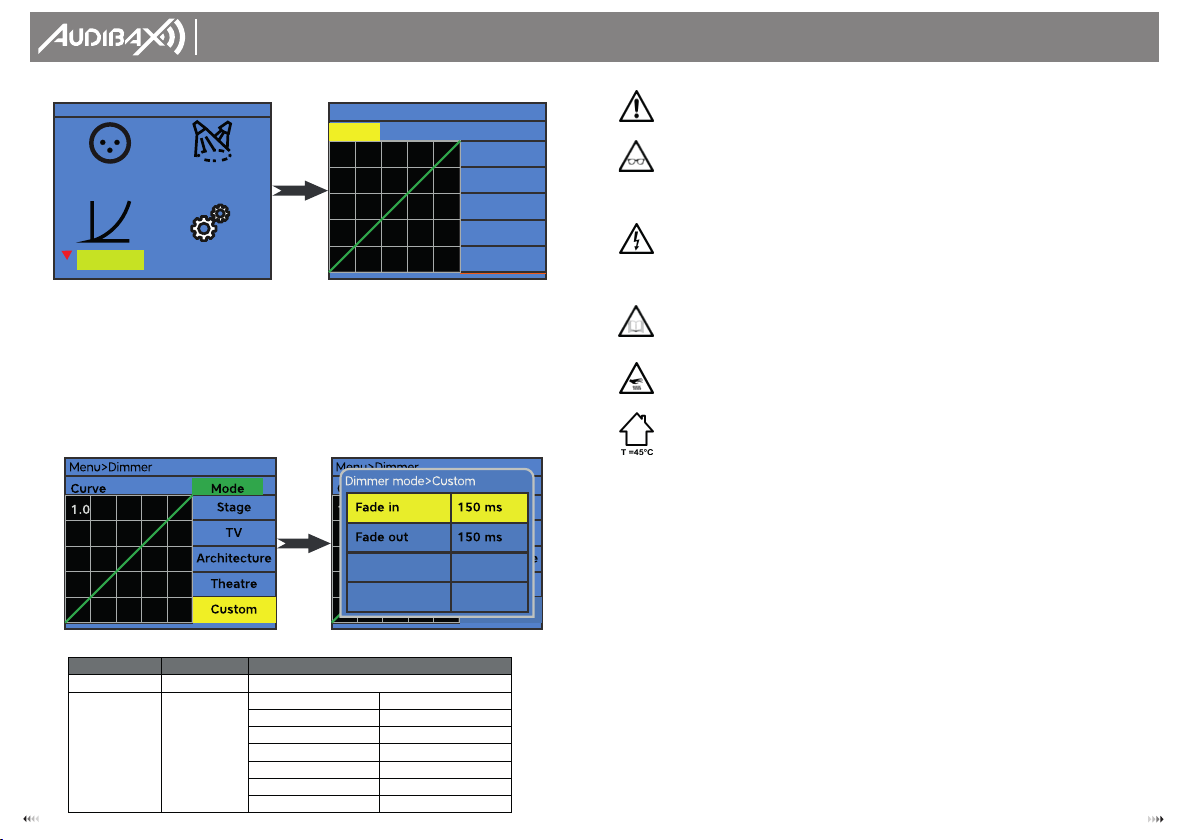
Set dimmer curves
This function allows you to select preset dimmer curves as well as custom dimmer curves.
To set preset dimmer curves:
1. Press the MENU button to enter the main menu.
2. Press the UP or DOWN button to select Dimmer menu and press ENTER.
3. Press DOWN menu and select Mode sub menu.
4. Select disired dimmer mode.
Custom dimmer curves:
1. Press the MENU button to enter the main menu.
2. Press the UP or DOWN button to select Dimmer menu and press ENTER.
3. Press DOWN menu and select Mode sub menu.
4. Press the UP or DOWN button to select Custom menu and press ENTER.
5. Adjust fade in and fade out time to customize yout dimmer curves. Time vary from 150 ms
to 2230 ms.
DMX Protocol
Menu>Dimme r
Curv e
1. 0
Mode
St andard
St age
TV
Architectur e
Theatre
Menu
DMX
Advance
Mode
Dimme r
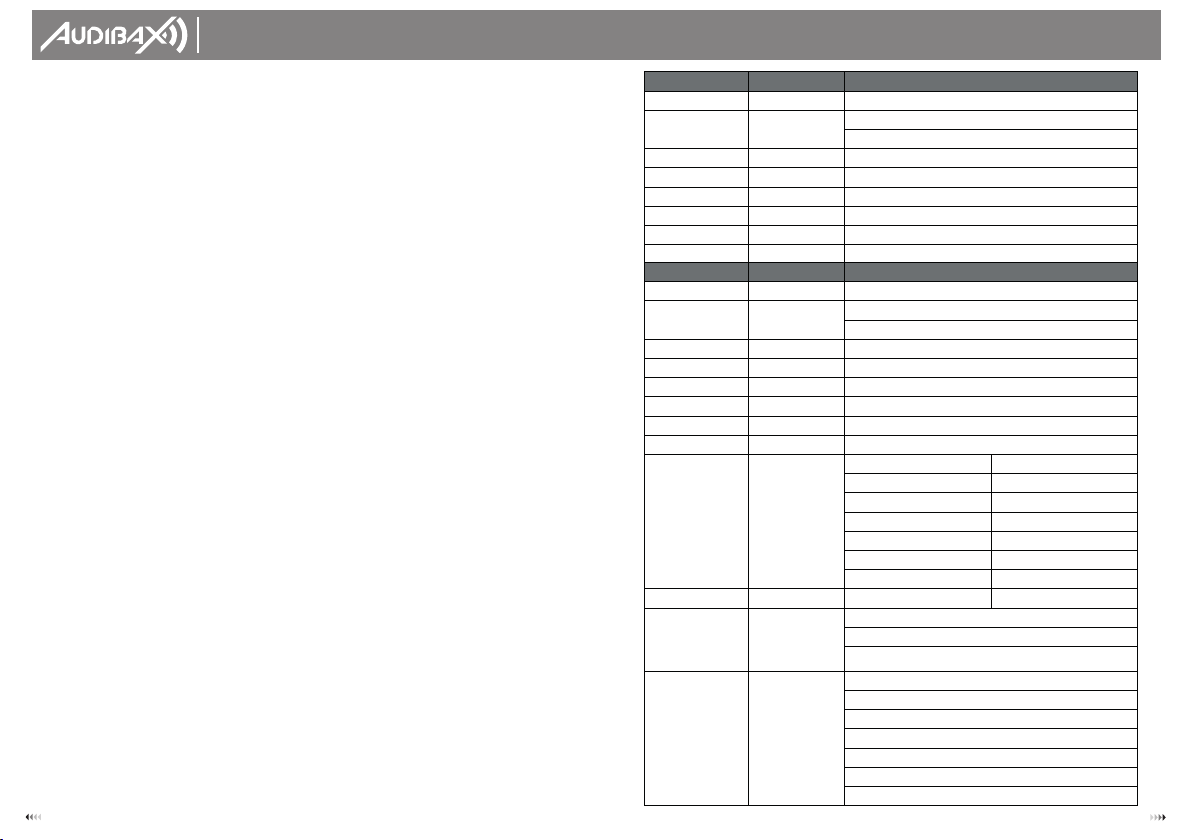
2 Channel Mode Function Function Control
CH1 Dimmer
0
00-255: 0-100% dimmer
CH2
Color temperature
0
00-005: No function
1
31-151: 4500K
0
06-025: 2700K
1
52-172: 5600K
0
26-046: 3000K
1
73-193: 6000K
0
47-067: 3200K
1
94-214: 6500K
0
68-088: 3500K
2
15-235: 7200K
0
89-109: 4000K
2
36-255: 8000K
1
10-130: 4200K
USER´S
MANUAL
Waco Prolife 350RGBALC
3 8
Rotary Knob function
The knob in the rear panel of the Waco Profile 350RGBALC act as multi function. Including
rotary control of dimmer, rotary control of dimmer, up/down/enter function.
Dimmer & strobe function:
1. Press the MENU button to enter the main menu.
2. Press the UP or DOWN button to select Mode menu and press ENTER.
3. Press DOWN menu and select Manual sub menu.
4. Press ENTER and select Brightness or Strobe in third menu.
5. Rotate the rotary knob to control the dimmer (right stop = maximum output, left stop =
zero output), or strobe(right stop = maximum strobe, left stop = no strobe).
Note: Rotary dimmer or strobe function works in information Menu and Mode-Manual menu.
Zoom function:
1. Press the MENU button to enter the main menu.
2. Press the UP or DOWN button to select Mode menu and press ENTER.
3. Press DOWN menu and select Manual sub menu.
4. Press ENTER and select Zoom in third menu.
5. Rotate the rotary knob to control the dimmer(right stop = minimum zoom scale, left stop =
maximum zoom scale)
Note: Zoom function works in information Menu and Mode-Manual menu.
Quick switch between brightness and zoom in Main menu(information Menu):
In information menu (main menu) interface, you can easily switch between brightness
adjustment function and zoom function.
1. Make sure the display in main menu, picture below.
2. Press the ENTER button or the Rotary knob (which also perform Enter function) to switch
between the two functions.
Up, Down, Enter function:
The knob can also act as up, down and enter function.
1. Press the MENU button to enter the main menu interface.
2. Right rotation = Down, left rotation = Up, press = Enter function
useful when the device is installed in a remote area.
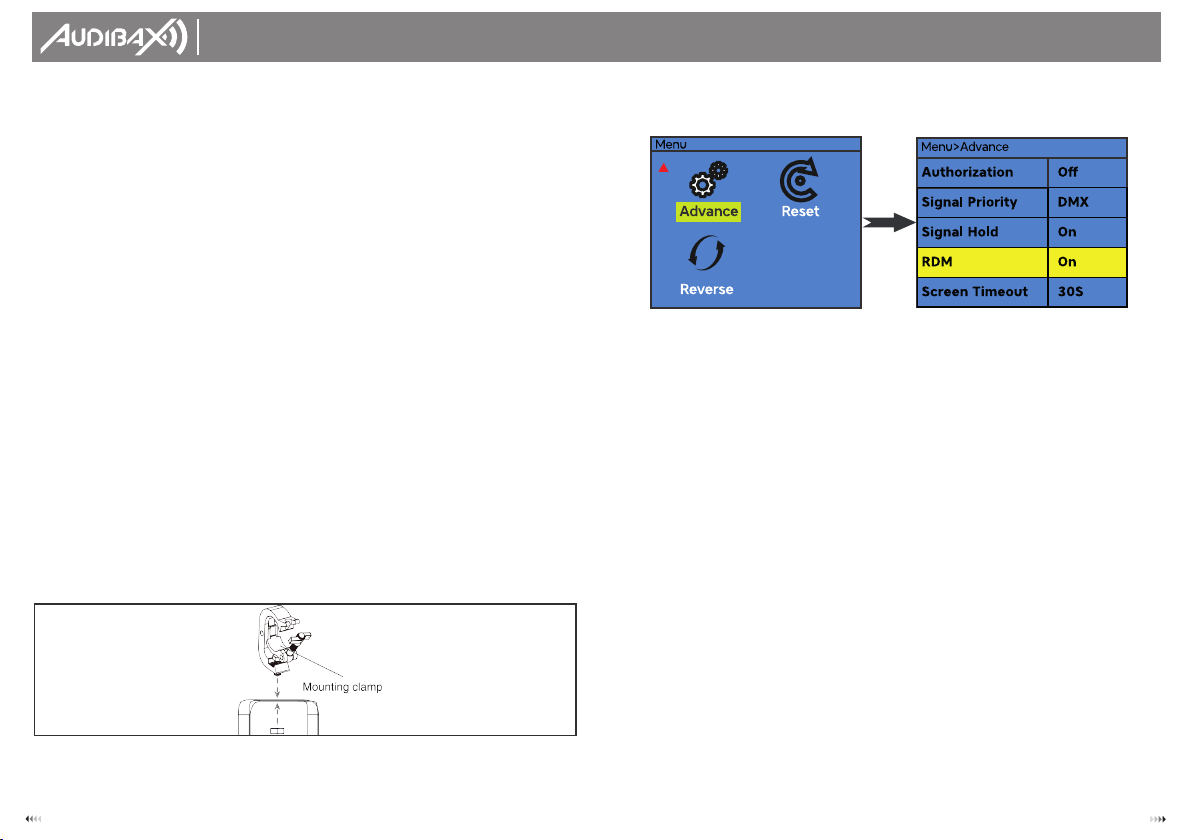
Each Waco Profile 350RGBALC has a factory set RDM UID (unique identification number).
Note: Before operation, enable RDM function in Advanced settings
Installation
Read ‘Safety information’ before installing the fixture.
The fixture is designed for indoor use only and must be used in a dry location with adequate
ventilation. Ensure that none of the fixture’s ventilation slots are blocked.
Fasten the fixture to a secure structure or surface. Do not stand it on a surface or leave it
where it can be moved or fall over. If you install the fixture in a location where it may cause
injury or damage if it falls, secure it as directed in this user manual using a securely anchored
safety cable that will hold the fixture if the primary fastening method fails.
Fastening the fixture to a flat surface
The fixture can be fastened to a hard, fixed, flat surface that is oriented at any angle. Ensure
that the surface and all fasteners used can support at least 10 times the weight of all fixtures
and equipment to be installed on it.
Fasten the fixture securely. Do not stand it on a surface or leave it where it can be moved or
fall over. If you install the fixture in a location where it may cause injury or damage if it falls,
secure it as directed below with a securely anchored safety cable that will hold the fixture if
the primary fastening method fails.
Mounting the fixture on a truss
The fixture can be clamped to a truss or similar rigging structure in any orientation. When
installing the fixture hanging vertically down, you can use an open-type clamp such as a
G-clamp. When installing in any other orientation, you must use a half-coupler clamp that
completely encircles the truss chord.
To clamp the fixture to a truss:
1. Check that the rigging structure can support at least 10 times the weight of all fixtures and
equipment to be installed on it.
2. Block access under the work area.
3. Fold the legs of the mounting bracket together and bolt a rigging clamp securely to the
mounting bracket. The bolt used must be M10, grade 8.8 steel minimum. It must pass through
both mounting bracket legs and be fastened with a self-locking nut.
4. Working from a stable platform, hang the fixture with its clamp on the truss and fasten the
clamp securely.
5. Secure the fixture with a safety cable as directed below.

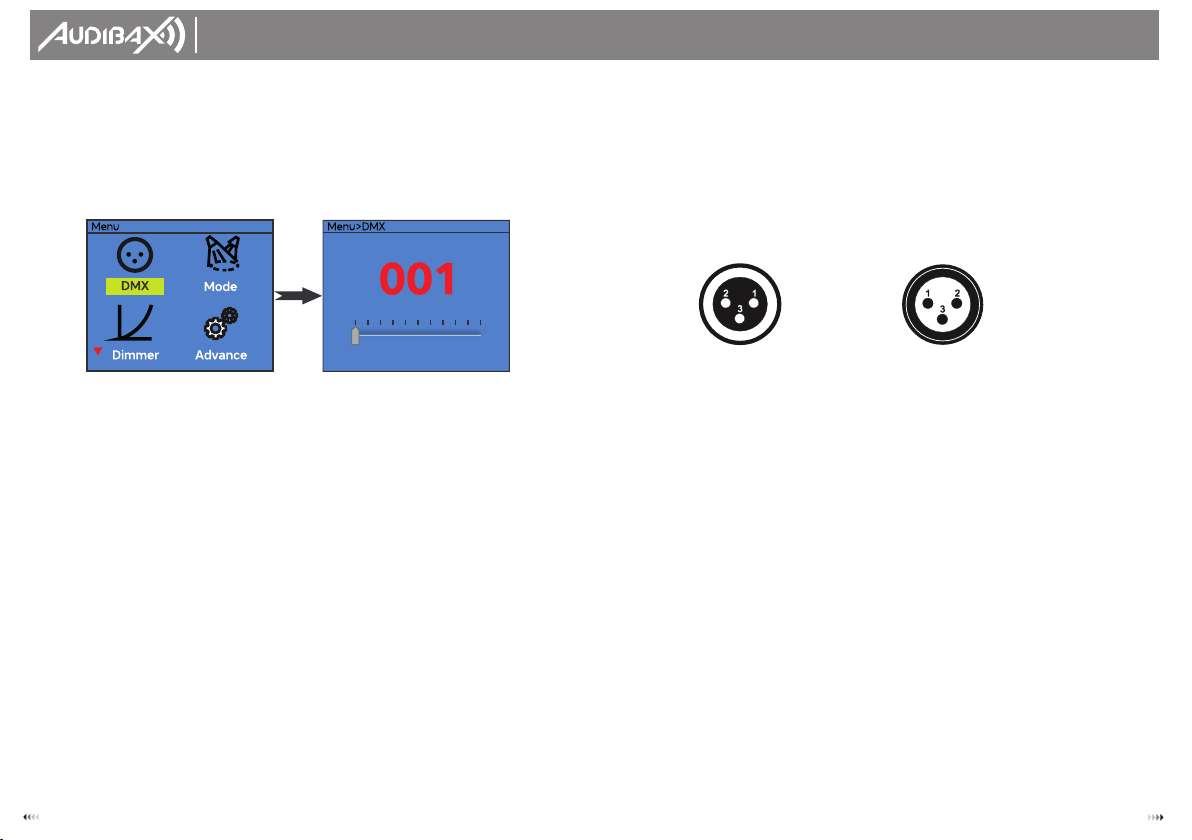
out from the DMX controller. The allocation of this starting address is achieved by setting the
correct number on the display located on the base of the device.
You can set the same starting address for all fixtures or a group of fixtures, or make different
address for each fixture individually.
If you set the same address, all the units will start to listen to the same control signal from the
same channel number. In other words, changing the settings of one channel will affect all
the fixtures simultaneously.
If you set a different address, each unit will start to listen to the channel number you have
set, based on the quantity of control channels of the unit. That means changing the settings
of one channel will affect only the selected fixture.
In the case of the Waco Profile 350RGBALC, which is 2/8/12 channels fixture. If you set, for
example, the address in the 2 channel mode to channel 3, the device will use the channel
3-4 for control.
Note: After switching on, the device will automatically detect whether DMX 512 data is
received or not. If there is data received at the DMX input, you will see the DMX indicator
light in green.
Universal DMX Control
This function allows you to use a universal DMX-512 controller to control the dimmer and
strobe. A DMX controller allows you to create unique programs tailored to your individual
needs.
RDM control
The Waco Profile 350RGBALC can communicate using RDM (Remote Device Management)
in accordance with ESTA’s American National Standard E1.20-2006: Entertainment
Technology RDM Remote Device Man- agement Over DMX512 Networks.
RDM is a bi-directional communications protocol for use in DMX512 control systems, it is the
open stan- dard for DMX512 device configuration and status monitoring.
The RDM protocol allows data packets to be inserted into a DMX512 data stream without
affecting existing non-RDM equipment. It allows a console or dedicated RDM controller to
send commands to and receive messages from specific fixtures.
With RDM function, you can set the DMX address of your fixtures remotely. This is especially
USER´S
MANUAL
Waco Prolife 350RGBALC
7 4
Securing with a safety cable
Secure the fixture with a safety cable (or other secondary attachment) that is approved for
the weight of the fixture so that the safety cable will hold the fixture if a primary attachment
fails.
Loop the safety cable through the eyebolt in the back of the fixture and around a secure
anchoring point. Do not loop the safety cable around the fixture’s mounting bracket only, as
this will leave the fixture unsecured if it separates from the bracket.
DMX-512 connection/connection between fixtures
Occupation of the XLR-connection:
If you are using controllers with this occupation, you can connect the DMX-output of the
controller directly with the DMX-input of the first fixture in the DMX-chain. If you wish to
connect DMX-controllers with other XLR-outputs, you need to use adapter-cables.
Building a serial DMX-chain:
Connect the DMX-output of the first fixture in the DMX-chain with the DMX-input of the next
fixture. Always connect one output with the input of the next fixture until all fixtures are
connected.
DMX-512 connection with DMX terminator:
For installations where the DMX cable has to run a long distance or is in an electrically noisy
environment, such as in a discotheque, it is recommended to use a DMX terminator. This
helps in preventing corruption of the digital control signal by electrical noise. The DMX
terminator is simply an XLR plug with a 120 resistor connected between pins 2 and 3, which is
then plugged into the output XLR socket of the last fixture in the chain.
Caution: At the last fixture, the DMX-cable has to be terminated with a terminator. Solder a
120 Ω resistor between Signal (–) and Signal (+) into a 3-pin XLR-plug and plug it in the
DMX-output of the last fixture.
Power connection
Power Requirements
The Waco Profile 350RGBALC luminaire operates on 100 to 240 volts AC (+/- 10%,
auto-ranging). The luminaire contains an auto-ranging power supply.
Power linking between fixtures:
The fixture with powercon in and out socket. Connect the power out to the power in socket
in the next fixture till all are connected.
Caution: maximum power linking - 6 units.
DMX OUT
1- Ground
2- Signal (-)
3- Signal (+)
DMX IN
1- Ground
2- Signal (-)
3- Signal (+)

Connection with the mains:
Connect the device to the mains with the enclosed power supply cable.
The occupation of the connection cables as below:
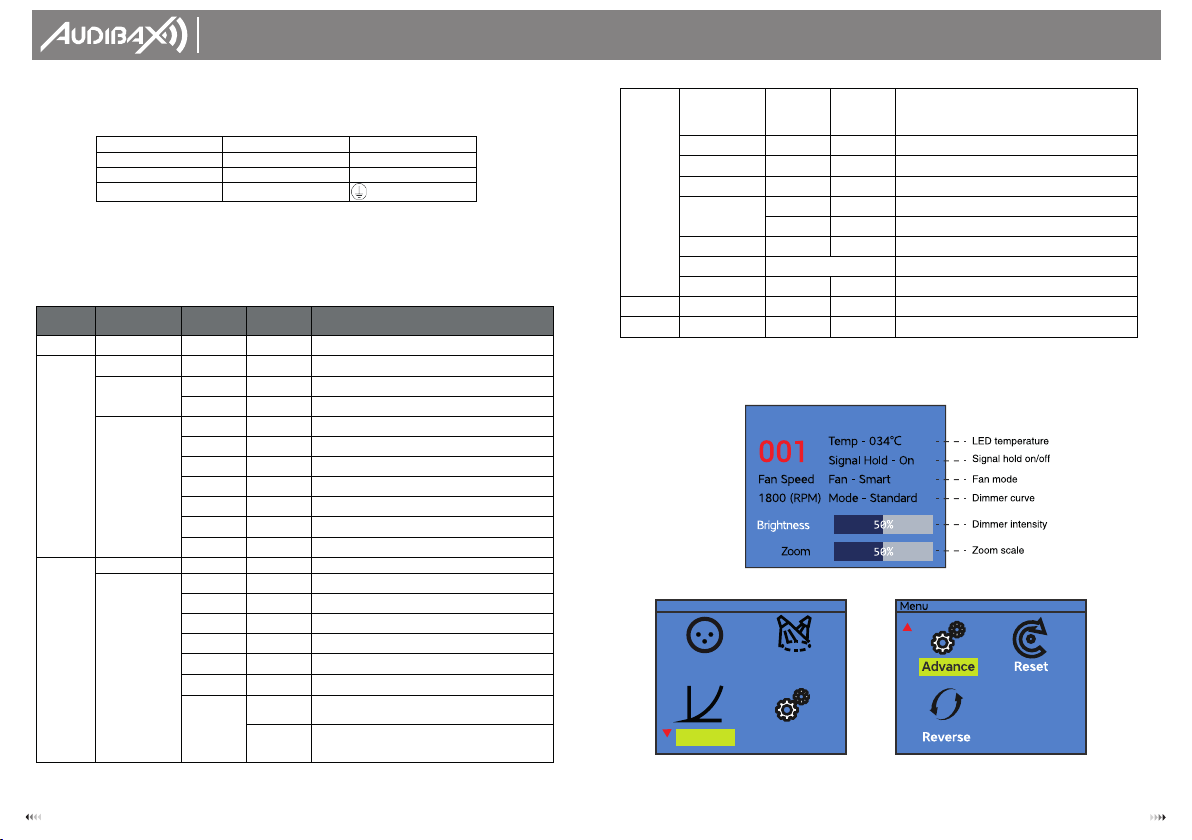
Control menu
The information menu will appear after the fixture is switched on. In this menu, the following
status is displayed:
Main Menu
Press the MENU button to enter the Main Menu interface
Addressing
All fixtures should be given a DMX starting address when using a DMX signal, so that the
correct fixture responds to the correct control signals. This digital starting address is the
channel number from which the fixture starts to listen to the digital control information sent
Operation
The Waco Profile 350RGBALC can operate in three different modes. In each mode you can
run the fixture as a standalone fixture or in a master/slave configuration. This next section will
detail the differences in the operating modes.
Control Menu Map
USER´S
MANUAL
Waco Prolife 350RGBALC
5 6
Cable color
Connection
International
Brown
Live
L
Blue
Neutral
N
Yellow/green
Earth(Ground)
Menu
DMX
Advance
Mode
Dimme r
MAIN MENU LEVEL 1 LEVEL 3 LEVEL 3 FUNCTION INSTRUCTION
DMX 001-512
DMX address setting
Mode
DMX 2/8/12CH
DMX channel mode
Auto Program 001-007 Preset programs
Speed 001-009 Programs speed
Manual Red 000-255
Red dimmer 0-100%
Green 000-255
Green dimmer 0-100%
Blue 000-255
Blue dimmer 0-100%
Amber 000-255
Amber dimmer 0-100%
Lime 000-255
Lime dimmer 0-100%
Cyan 000-255
Cyan dimmer 0-100%
Strobe 000-255 Strobe with speed increasing
Dimmer
Curve 0.3-3.0
Dimmer curves adjustment
Mode
Standard
Dimmer mode, Standard
Stage
Dimmer mode, Stage
TV
Dimmer mode, TV
Architecture
Dimmer mode, Architecture
Theatre
Dimmer mode, Theatre
Studio
Studio power mode, silent (200W)
Custom
Fade in
(150 ms~2230 ms) Custom dimmer curve
Fade out
(150 ms~2230 ms)
A
dvance
Authorization
O
n/Off
Advanced settings/calibration (Only
qualified technicians should
perform this function. Inquire your
local dealer for password.)
Signal Priority
D
MX
Signal priority setting
Signal Hold
O
n/Off
Run if signal cut
RDM
O
n/Off
RDM function on/off
Screen Timeout
3
0S
Display shut off time
N
ever
Screen Brightness
3
0-100%
Display brightness
Dimming Freq
1
.20 - 24.0KHz
Dimmer frequency setting
Software Version
V
1.47
Software version
R
eset Yes/No
System reset
R
everse Yes/No
Display reverse 180 degree

Waco Prolife 350RGBALC
Por favor, lea el manual antes de usar el producto
MANUAL
DE USUARIO
11
Waco Prolife
350RGBALC
Tenga en cuenta: toda la información está sujeta a cambios sin previo aviso.24.08.2022
Limpieza de accesorios
Debido a los residuos de niebla, humo y polvo, la limpieza de las lentes ópticas internas y
externas y del espejo debe realizarse periódicamente para optimizar la salida de luz. La
frecuencia de limpieza depende del entorno en el que funciona el accesorio (es decir,
humo, residuos de niebla, polvo, rocío). En caso de uso intensivo del palo, recomendamos
limpiarlo mensualmente. La limpieza periódica asegurará la longevidad y una salida nítida.
Para limpiar el accesorio:
1. Desconecte la lámpara de la corriente y deje que se enfríe durante al menos 10 minutos.
2. Aspire o sople suavemente el polvo y las partículas sueltas del exterior del aparato con
aire comprimido a baja presión.
3. Limpie las superficies frotando suavemente con un paño suave, limpio y sin pelusa
humedecido con una solución de detergente suave. No frote las superficies de vidrio con
fuerza: levante las partículas con una presión suave y repetida. Seque con un paño suave,
limpio y sin pelusa o con aire comprimido a baja presión. Retire las partículas adheridas con
un pañuelo de papel sin perfume o un bastoncillo de algodón humedecido con
limpiacristales o agua destilada.
4. Verifique que el accesorio esté seco antes de volver a aplicar energía.
Reemplazo de fusibles
Este fusible se encuentra en un portafusibles junto a la toma MAINS OUT en el panel de
conexiones. Para reemplazar un fusible:
1. Desconecte la lámpara de la corriente y deje que se enfríe durante al menos 10 minutos.
2. Desenrosque la tapa del portafusibles y retire el fusible. Reemplácelo con un fusible del
mismo tamaño y clasificación solamente.
3. Vuelva a instalar la tapa del portafusibles antes de volver a aplicar energía.
Solución de problemas
A continuación se enumeran algunos problemas comunes que puede encontrar, con
soluciones.
La lámpara no funciona, no hay luz.
• Compruebe la conexión de alimentación y el fusible principal. Asegúrese de que el fusible
externo no se haya quemado.
• Mida la tensión de red en el conector principal.
Especificaciones técnicas
Modelo
Waco Profile 350RGBALC
Fuente de alimentación:
CA100 - 240 V, 50/60 Hz
Fuente de luz:
LED de 350W
Color de LED:
RGBALC (rojo, verde, azul, ámbar, lima, cian)
Temperatura del color:
2700K - 8000K
Reproducción de color:
CRI 95 (canal CT), 85 (totalmente activado)
Lente:
19°, 26°, 36°, 50° opcional
Conexión eléctrica:
Entrada y salida PowerCON
Fusible:
F5A, 250V
Enlace de potencia máxima:
6 unidades
Conexión de señal:
Entrada y salida XLR de 3 pines
Canales DMX:
2/8/12
Protocolo de control:
DMX512
Alojamiento:
Color negro, aluminio
Tamaño:
700 x 270 x 263mm
N.W.:
9.2 kg
G.W.:
11 kg
Ambiente:
IP20
MANUAL
DE USUARIO
Waco Prolife 350RGBALC
1 10
Tabla de contenido
¡Precaución!.................................................................................................................2
Introducción.................................................................................................................2
Instrucciones de seguridad........................................................................................2
Instalación....................................................................................................................3
Lea la 'Información de seguridad' antes de instalar el accesorio...........................3
Fijación de la luminaria a una superficie plana.........................................................3
Montaje de la luminaria en un truss.............................................................................3
Asegurar con un cable de seguridad.........................................................................4
Conexión DMX-512/conexión entre aparatos...........................................................4
Conexión de alimentación..........................................................................................4
Operación....................................................................................................................5
Mapa del Menú de Control.........................................................................................5
Menú del Control..........................................................................................................6
Menú Principal...............................................................................................................6
Direccionamiento.........................................................................................................6
Control DMX universal...................................................................................................7
Control RDM...................................................................................................................7
Función de botón giratorio..........................................................................................8
Establecer curvas de atenuación..............................................................................9
Protocolo DMX..............................................................................................................9
Limpieza de accesorios.............................................................................................11
Reemplazo de fusibles...............................................................................................11
Solución de problemas..............................................................................................11
El aparato no funciona, no hay luz............................................................................11
Especificaciones técnicas........................................................................................11
Modo de 8 canales Función Control de funciones
CH1 Atenuador
000-255: 0-100%
Atenuador
CH2
Estroboscópico
000-004: Sin función
005-255: Luz estroboscópica con aumento de velocidad
CH3
Rojo
000-255: Atenuador rojo 0-100%
CH4
Verde
000-255: Atenuador verde 0-100%
CH5
Azul
000-255: Atenuador azul 0-100%
CH6
Ámbar
000-255: Atenuador ámbar 0-100%
CH7
Lima
000-255: Atenuador de cal 0-100%
CH8
Cian
000-255: Atenuador cian 0-100%
Modo de 12 canales Función Control de funciones
CH1 Atenuador
000-255: 0-100% Atenuador
CH2
Estroboscópico
000-004: Sin función
005-255: luz estroboscópica con aumento de velocidad
CH3
Rojo
000-255: Atenuador rojo 0-100%
CH4
Verde
000-255: Atenuador verde 0-100%
CH5
Azul
000-255: Atenuador azul 0-100%
CH6
Ámbar
000-255: Atenuador ámbar 0-100%
CH7
Lima
000-255: atenuador de cal 0-100%
CH8
Cian
000-255: Atenuador cian 0-100%
CH9
Temperatura del
color
000-005: Sin función
131-151: 4500K
006-025: 2700K
152-172: 5600K
026-046: 3000K
173-193: 6000K
047-067: 3200K
194-214: 6500K
068-088: 3500K
215-235: 7200K
089-109: 4000K
236-255: 8000K
110-130: 4200K
CH10
Decoloración
000-004: Sin función
005-255: decoloración
CH11
Marco de color
000-004: Sin función
005-130: salto de color, aumento de velocidad
131-255: Desvanecimiento del color, aumento de la
velocidad
CH12
Modo de
atenuación
005-005: Sin función
006-047: modo atenuador, estándar
048-089: modo atenuador, escenario
090-131: modo atenuador, TV
132-173: modo Dimmer, Arquitectura
174-215: Modo atenuador, Teatro
216-255: Curva de atenuación personalizada
MANUAL
DE USUARIO
Waco Prolife 350RGBALC
9 2
Establecer curvas de atenuación
Esta función le permite seleccionar curvas de atenuación preestablecidas, así como curvas
Para establecer curvas de dimmer preestablecidas:
1. Presione el botón MENÚ para ingresar al menú principal.
2. Presione el botón ARRIBA o ABAJO para seleccionar el menú Dimmer y presione ENTER.
3. Presione el menú ABAJO y seleccione el submenú Mode.
4. Seleccione el modo de atenuación deseado.
Curvas de atenuación personalizadas:
1. Presione el botón MENÚ para ingresar al menú principal.
2. Presione el botón ARRIBA o ABAJO para seleccionar el menú Dimmer y presione ENTER.
3. Presione el menú ABAJO y seleccione el submenú Mode.
4. Presione el botón ARRIBA o ABAJO para seleccionar Custon Menu y presione ENTER.
5. Ajuste el tiempo de aparición y desaparición gradual para personalizar las curvas de
atenuación. El tiempo varía de 150 ms a 2230 ms.
Protocolo DMX
Menu>Dimme r
Curv e
1. 0
Mode
St andard
St age
TV
Architectur e
Theatre
Menu
DMX
Advance
Mode
Dimme r
¡Precaución!
Toda persona involucrada en la instalación, operación y mantenimiento de este dispositivo
debe
- Estar calificado
- Siga las instrucciones de este manual
- Considere este manual como parte del producto total
- Conserve este manual durante toda la vida útil del producto.
- Entregue este manual a todos los demás propietarios o usuarios del producto.
- Descarga la última versión del manual de usuario de Internet
Introducción
Gracias por haber elegido Waco Profile 350RGBALC. Verás que has adquirido un dispositivo
potente y versátil.
Desembale su artículo. Antes de su puesta en marcha inicial, asegúrese de que no haya
daños causados por el transporte. Si los hubiera, consulte a su distribuidor y no utilice el
dispositivo.
Instrucciones de seguridad
Este dispositivo ha salido de nuestras instalaciones en absolutamente perfecto estado. Para
mantener esta condición y garantizar una operación segura, es absolutamente necesario
que el usuario siga las instrucciones de seguridad y las notas de advertencia escritas en este
manual del usuario. Desconecte siempre de la red eléctrica, cuando el dispositivo no esté
en uso o antes de limpiarlo. ¡Mantenga alejados a los niños y aficionados del dispositivo! No
hay piezas reparables dentro del dispositivo. Las operaciones de mantenimiento y servicio
solo deben ser realizadas por distribuidores autorizados.
Tenga cuidado con sus operaciones. ¡Con un voltaje peligroso puede sufrir una
peligrosa descarga eléctrica al tocar los cables!
¡Evite mirar directamente a la fuente de luz!
Use anteojos protectores y otro PPE (equipo de protección personal) cuando trabaje
en o cerca del accesorio.
Asegúrese siempre de conectar este producto al voltaje adecuado de acuerdo con
las especificaciones de este manual o de la etiqueta de especificaciones del
producto. ¡Asegúrese de que esté conectado a tierra cuando lo use!
Desconecte el cable de alimentación antes de abrir la carcasa.
Asegúrese de que el cable de alimentación nunca esté doblado o dañado por bordes
afilados. Compruebe la lámpara y el cable de alimentación de vez en cuando.
Asegúrese de reemplazar el fusible con otro del mismo tipo y clasificación.
Por su propia seguridad, lea detenidamente este manual de usuario antes de la puesta
en marcha inicial. Siga las precauciones de seguridad operativas y preste atención a
los métodos y equipos de advertencia en el manual del usuario.
¡Advertencia! Este símbolo indica una superficie caliente. Ciertas partes de la carcasa
pueden calentarse durante el funcionamiento. Después del uso, espere un período de
enfriamiento de al menos 10 minutos antes de manipular o transportar el dispositivo.
¡Solamente para uso en interiores! Para evitar el riesgo de incendio o descarga
eléctrica, no exponga este producto a la lluvia ni a la humedad. Clasificación IP20.
La temperatura ambiente debe estar siempre entre -5° C y +45° C.
Modo de 2 canales
Función
Control de funciones
CH1 Atenuador
0
00-255: 0-100%
Atenuador
CH2
Temperatura del
color
000-005: Sin función
131-151: 4500K
0
06-025: 2700K
1
52-172: 5600K
0
26-046: 3000K
1
73-193: 6000K
047-067: 3200K
194-214: 6500K
0
68-088: 3500K
2
15-235: 7200K
0
89-109: 4000K
2
36-255: 8000K
110-130: 4200K

MANUAL
DE USUARIO
Waco Prolife 350RGBALC
3 8
Función de botón giratorio
La perilla en el panel trasero del Waco Profile 350RGBALC actúa como multifunción. Incluye
control giratorio de atenuador, control giratorio de atenuador, función arriba/abajo/entrar.
Función de atenuación y luz estroboscópica:
1. Presione el botón MENÚ para ingresar al menú principal.
2. Presione el botón ARRIBA o ABAJO para seleccionar el menú Modo y presione ENTER.
3. Presione el menú ABAJO y seleccione el submenú Manual.
4. Presione ENTER y seleccione Brightness or Strobe en el tercer menú.
5. Gire la perilla giratoria para controlar el atenuador (tope derecho = salida máxima, tope
izquierdo = salida cero) o luz estroboscópica (tope derecho = luz estroboscópica máxima,
tope izquierdo = sin luz estroboscópica).
Nota: La función de atenuador giratorio o luz estroboscópica funciona en el menú de
información y en el menú Mode-Manual.
Función zoom:
1. Presione el botón MENÚ para ingresar al menú principal.
2. Presione el botón ARRIBA o ABAJO para seleccionar el menú Mode y presione ENTER.
3. Presione el menú ABAJO y seleccione el submenú Manual.
4. Presione ENTER y seleccione Zoom en el tercer menú.
5. Gire el botón giratorio para controlar el atenuador (tope derecho = escala de zoom
mínima, tope izquierdo = escala de zoom máxima)
Nota: La función Zoom funciona en el Menú de información y en el menú Mode-Manual.
Cambio rápido entre brillo y zoom en el menú principal (menú de información):
En la interfaz del menú de información (menú principal), puede cambiar fácilmente entre la
función de ajuste de brillo y la función de zoom
1. Asegúrese de que la pantalla en el menú principal, imagen de abajo.
2. Pulse el botón ENTER o el mando giratorio (que también realizan la función Enter) para
cambiar entre las dos funciones.
Función Arriba, Abajo, Entrar:
La perilla también puede actuar como función de subir, bajar y entrar.
1. Pulse el botón MENÚ para acceder a la interfaz del menú principal.
2. Rotación derecha = Abajo, rotación izquierda = Arriba, presione = Enter function.
Con la función RDM, puede configurar la dirección DMX de sus dispositivos de forma
remota. Esto es especialmente útil cuando el dispositivo está instalado en un área remota.
Cada Waco Profile 350RGBALC tiene un RDM UID (número de identificación único)
configurado de fábrica.
Instalación
Lea la "Información de seguridad" antes de instalar el accesorio.
El accesorio está diseñado para uso en interiores únicamente y debe usarse en un lugar
seco con ventilación adecuada. Asegúrese de que ninguna de las ranuras de ventilación
del accesorio esté bloqueada.
Fije el accesorio a una estructura o superficie segura. No lo coloque sobre una superficie ni
lo deje donde pueda moverse o caerse. Si instala el dispositivo en un lugar donde puede
causar lesiones o daños si se cae, asegúrelo como se indica en este manual del usuario
utilizando un cable de seguridad firmemente anclado que sostendrá el dispositivo si falla el
método de sujeción principal.
Fijación de la luminaria a una superficie plana
El accesorio se puede sujetar a una superficie plana, dura y fija que esté orientada en
cualquier ángulo. Asegúrese de que la superficie y todos los sujetadores utilizados puedan
soportar al menos 10 veces el peso de todos los accesorios y equipos que se instalarán en
ella.
Sujete el accesorio de forma segura. No lo coloque sobre una superficie ni lo deje donde
pueda moverse o caerse. Si instala el dispositivo en un lugar donde puede causar lesiones o
daños si se cae, asegúrelo como se indica a continuación con un cable de seguridad
firmemente anclado que sostendrá el dispositivo si falla el método de sujeción principal.
Montaje de la luminaria en un truss
El accesorio se puede sujetar a un truss o estructura de aparejo similar en cualquier
orientación. Cuando instale la luminaria colgando verticalmente hacia abajo, puede usar
una abrazadera de tipo abierto, como una abrazadera G. Al instalar en cualquier otra
orientación, debe usar una abrazadera de medio acoplador que rodee completamente el
cordón de la armadura.
Para sujetar la luminaria a un truss:
1. Verifique que la estructura de aparejo pueda soportar al menos 10 veces el peso de
todos los accesorios y equipos que se instalarán en ella.
2. Bloquee el acceso debajo del área de trabajo.
3. Doble las patas del soporte de montaje y atornille firmemente una abrazadera de
montaje al soporte de montaje. El perno utilizado debe ser de acero M10, grado 8.8 como
mínimo. Debe pasar a través de ambas patas del soporte de montaje y sujetarse con una
tuerca autoblocante.
4. Trabajando desde una plataforma estable, cuelgue la luminaria con su abrazadera en el
truss y sujete la abrazadera de forma segura.
5. Asegure la luminaria con un cable de seguridad como se indica a continuación.
escuchar la información de control digital enviada desde el controlador DMX. La
asignación de esta dirección inicial se logra configurando el número correcto en la pantalla
ubicada en la base del dispositivo.
Puede establecer la misma dirección de inicio para todos los aparatos o un grupo de
aparatos, o hacer una dirección diferente para cada aparato individualmente.
Si configura la misma dirección, todas las unidades comenzarán a escuchar la misma señal
de control desde el mismo número de canal. En otras palabras, cambiar la configuración
de un canal afectará a todos los dispositivos simultáneamente.
Si establece una dirección diferente, cada unidad comenzará a escuchar el número de
canal que ha establecido, en función de la cantidad de canales de control de la unidad.
Eso significa que cambiar la configuración de un canal afectará solo al dispositivo
seleccionado.
En el caso del Waco Profile 350RGBALC, que es un aparato de 2/8/12 canales. Si establece,
por ejemplo, la dirección en el modo de 2 canal en el canal 3, el dispositivo utilizará el
canal 3-4 para el control.
Nota: Después de encender, el dispositivo detectará automáticamente si se reciben o no
datos DMX 512. Si hay datos recibidos en la entrada DMX, verá que el indicador DMX se
ilumina en verde.
Control DMX universal
Esta función le permite usar un controlador DMX-512 universal para controlar el atenuador y
la luz estroboscópica. Un controlador DMX le permite crear programas únicos adaptados a
sus necesidades individuales.
Control RDM
El Waco Profile 350RGBALC puede comunicarse mediante RDM (Administración de
dispositivos remotos) de acuerdo con el estándar nacional estadounidense E1.20-2006 de
ESTA: Tecnología de entretenimiento RDM Administración de dispositivos remotos a través
de redes DMX512.
RDM es un protocolo de comunicaciones bidireccional para uso en sistemas de control
DMX512, es el estándar abierto para la configuración de dispositivos DMX512 y monitoreo
de estado.
El protocolo RDM permite insertar paquetes de datos en un flujo de datos DMX512 sin
afectar el equipo existente que no es RDM. Permite que una consola o un controlador RDM
dedicado envíe comandos y reciba mensajes de dispositivos específicos.
MANUAL
DE USUARIO
Waco Prolife 350RGBALC
7 4
Asegurar con un cable de seguridad
Asegure la lámpara con un cable de seguridad (u otro accesorio secundario) que esté
aprobado para el peso de la lámpara, de modo que el cable de seguridad sostenga la
lámpara si falla una conexión principal.
Pase el cable de seguridad a través del cáncamo en la parte posterior de la lámpara y
alrededor de un punto de anclaje seguro. No enrolle el cable de seguridad solo alrededor
del soporte de montaje de la luminaria, ya que esto dejará la luminaria sin asegurar si se
separa del soporte.
Conexión DMX-512/conexión entre luminarias
Ocupación de la conexión XLR:
Si está utilizando controladores con esta ocupación, puede conectar la salida DMX del
controlador directamente con la entrada DMX del primer dispositivo en la cadena DMX. Si
desea conectar controladores DMX con otras salidas XLR, necesita usar cables
adaptadores.
Construcción de una cadena DMX en serie:
Conecte la salida DMX del primer dispositivo de la cadena DMX con la entrada DMX del
siguiente dispositivo. Siempre conecte una salida con la entrada del siguiente dispositivo
hasta que todos los dispositivos estén conectados.
Conexión DMX-512 con terminador DMX:
Para instalaciones en las que el cable DMX tiene que recorrer una gran distancia o se
encuentra en un entorno eléctricamente ruidoso, como en una discoteca, se recomienda
utilizar un terminador DMX. Esto ayuda a prevenir la corrupción de la señal de control digital
por ruido eléctrico. El terminador DMX es simplemente un conector XLR con una resistencia
de 120 conectada entre los pines 2 y 3, que luego se conecta al conector XLR de salida del
último dispositivo de la cadena.
Precaución: en el último dispositivo, el cable DMX debe terminarse con un terminador.
Suelde una resistencia de 120 Ω entre Signal (–) y Signal (+) en un conector XLR de 3 pines y
conéctelo a la salida DMX del último dispositivo.
Conexión eléctrica
Requerimientos de energía
La luminaria Waco Profile 350RGBALC funciona con 100 a 240 voltios CA (+/- 10 %, rango
automático). La luminaria contiene una fuente de alimentación de rango automático.
Enlace de potencia entre luminarias:
El accesorio con enchufe de entrada y salida powercon. Conecte la salida de
alimentación a la toma de entrada de alimentación en el siguiente dispositivo hasta que
todos estén conectados.
Precaución: enlace de potencia máxima - 6 unidades.
SALIDA DMX
1- Tierra
2- Señal (-)
3- Señal (+)
ENTRADA DMX
Menú de control
El menú de información aparecerá después de encender el aparato. En este menú, se
muestra lo siguiente:
Menú principal
Pulse el botón MENÚ para acceder a la interfaz del menú principal.
Direccionamiento
Todos los dispositivos deben recibir una dirección de inicio DMX cuando se utiliza una señal
DMX, de modo que el dispositivo correcto responde a las señales de control correctas. Esta
dirección de inicio digital es el número de canal desde el cual el dispositivo comienza a
MANUAL
DE USUARIO
Waco Prolife 350RGBALC
5 6
Menu
DMX
Advance
Mode
Dimme r
Operation
El Waco Profile 350RGBALC puede funcionar en tres modos diferentes. En cada modo,
puede ejecutar el dispositivo como dispositivo independiente o en una configuración
maestro/esclavo. La siguiente sección detallará las diferencias en los modos de operación.
Mapa del menú de control
Conexión con la red:
Conecte el dispositivo a la red eléctrica con el cable de alimentación adjunto.
La ocupación de los cables de conexión de la siguiente manera:
Color de los cables
Conexión
Internacional
Marrón
Vivir
L
Azul
Neutral
N
Amarillo / verde
Tierra
MAIN
MENU
LEVEL 1 LEVEL 2 LEVEL 3 INSTRUCCIONES DE FUNCIÓN
DMX 001-512
Configuración de dirección DMX
Mode
DMX
2
/8/12CH
Modo de canal DMX
Auto
P
rogram 001-007
Programas preestablecidos
S
peed 001-009
Velocidad de los programas
Manual
R
ed 000-255
Atenuador rojo 0-100%
G
reen 000-255
Atenuador verde 0-100%
B
lue 000-255
Atenuador azul 0-100%
A
mber 000-255
Atenuador ámbar 0-100%
L
ime 000-255
Atenuador lima 0-100%
C
yan 000-255
Atenuador cian 0-100%
S
trobe 000-255
Luz estroboscópica con aumento de velocidad
Dimmer
Curve
0.3-3.0
Ajuste de curvas de atenuación
Mode
S
tandard
Modo atenuador, Estándar
S
tage
Modo atenuador, escenario
T
V
Modo de atenuación, TV
A
rchitecture
Modo atenuador, Arquitectura
T
heatre
Modo atenuador, Teatro
S
tudio
Modo de potencia de estudio, silencioso (200W)
C
ustom
Fade in (150
ms~2230 ms
)
Curva de atenuación personalizada
Fade out
(150
ms~2230 ms)
Advance
Authorization
O
n/Off
Configuración avanzada/calibración (Solo
t
écnicos calificados deben realizar esta función.
S
olicite la contraseña a su distribuidor local).
Signal Priority
D
MX
Configuración de prioridad de señal
Signal Hold
O
n/Off
Ejecutar si se corta la señal
RDM
O
n/Off
Función RDM activada/desactivada
Screen Timeout
3
0S
Hora de apagado de la pantalla
N
ever
Screen Brightnes
s
3
0-100%
Brillo de la pantalla
Dimming Freq
1
.20 - 24.0KHz
Ajuste de frecuencia de atenuación
Software Version
V
1.47
Versión del software
Reset Yes/No
Reinicio de sistema
Reverse Yes/No
Pantalla inversa 180 grados
Table of contents
Languages:


