Audio Physic Luna User manual

Owner´s Manual
High End Series
Luna Subwoofer

English
High End Series
Contents
Included in the Delivery page 3
Welcome page 4
General Tips page 5
Safety Instrucons page 6
Unpacking and Assembly page 6
Setup page 7-9
Connecng Your Subwoofer page 10-11
Seng Up Your Subwoofer page 12
• Acvang the Subwoofer page 12
• Using the Controls page 12
• Seng up the Phase page 13
• Seng Up the Crossover Frequency and Volume page 13-14
Recommended Soware for the Adjustment Process page 15
Troubleshoong Soluons for Funconal Problems page 15
Technical Specicaons page 16
2

High End Series
English
Included in the Delivery is
This box contains one subwoofer and an accessory pack , as well as your „Welcome to the Audio
Physic Family“ package containing this Owner‘s Manual and the Final Inspecon Cercate.
Box • “Welcome to the Audio Physic Family“ package and a spirit level to opmise
setup
• Accessory pack: 1x power supply cord
1x RCA cable for the ground connecon (6 metres) -
for more informaon please refer to the chapters on
Troubleshoong and Connecng Your Subwoofer
4x spikes
4x nuts
Lieferumfang
Der Karton enthält neben dem Subwoofer eine Zubehörpackung und Ihr „Willkommen in der
Familie“-Paket mit dieser Anleitung und der Endkontroll-Urkunde.
Verpackung • „Welcome to the Family-Pack“ mit Dosenlibelle zur Aufstellungsopmierung
•Zubehör: 1x Netzkabel
1x Kabel (Cinch) als Masseverbinder (6 Meter) –
nähere Hinweise in den Kapiteln Funkonsstörungen
und Anschluss
4x Spikes
4x Kontermuern
3

English High End Series
Welcome
Dear music lover,
We would like to thank you for pung your trust in our products and welcome you to the
family of audiophile friends of AUDIO PHYSIC.
You have chosen a top-class product that has been developed in Germany. We would like to
congratulate you on this choice and wish you a lot of fun and enjoyment with your product.
In order to earn your trust, we only use the latest technical experse and top-quality components
when manufacturing our loudspeakers and we produce them in accordance with strict quality
criteria. These criteria enable us to supply our loudspeakers with a 10 year warranty (2 years for the
subwoofer electronics and 10 years for the drivers), which is far longer than the legally prescribed
warranty periods. In order to secure this addional service, please ll out the warranty card
enclosed with the loudspeaker and return it to us.
Only aer several electronic and acousc test runs, which our quality assurance sta conrm by
signing the enclosed cercate, are our loudspeakers allowed to leave the factory in secure
packaging. These measures help to ensure that you can enjoy the full experience of the high-quality
materials, producon and sound of AUDIO PHYSIC loudspeakers in the comfort of your own home.
As a rule, your competent AUDIO PHYSIC dealer will deliver and install your loudspeakers. If you
would rather install your product yourself, the following pages provide you with detailed ps and
steps to follow in order to safely set up your loudspeakers. Have fun with your Luna!
No loss of ne detail: If you want a close-
up rst-hand experience of exactly what
your new AUDIO PHYSIC loudspeakers
can do, we recommend that you try out our
Anniversary Sampler CD. These 16 pieces
of classical music with awless quality are
bound to put a smile on your face.
4

High End Series English
General Tips
Depending on the size and weight of your subwoofer, it is a good idea for two people to unpack it.
First take out the accessory pack, which is located in a smaller box inside the main box. This pack
contains the feet that are important for the operaon of your subwoofers and the required parts.
Your subwoofer should reach a temperature that is approximately equivalent to room temperature
before you connect it to the HiFi system and/or put it into operaon. If you do not let your
subwoofer reach this temperature, this may result in condensaon that may damage the electronics.
This parcular instrucon predominately refers to the winter months in case the loudspeakers were
previously stored in a cold room.
Maintenance
Our loudspeakers and subwoofers are coated in high-quality veneers or high-gloss lacquers. You
should avoid using chemical cleaning agents because these may aack the loudspeaker surfaces and
make them go ma. As a rule, a ne, so and damp cloth is all that you need to clean the surfaces.
Please ensure that you unplug your subwoofer before cleaning it. If a cleaning agent is required,
use this to dampen the cloth and do not directly apply it to the surface. It is best if you test the
suitability of the cleaning agent on a less visible part of the cabinet. Please make sure that no liquid
spills into the interior of your subwoofer. The driver does not normally need to be cleaned. Do not
expose the loudspeaker to direct sunlight. The surfaces are sensive to ultraviolet light and may
fade. The device normally does not need to be serviced. If you think that it does need to be serviced,
please contact your authorised AUDIO PHYSIC dealer.
Burning In Your Subwoofer
The LUNA driver is technically tested and burnt in prior to assembly. Your subwoofer will therefore
reach its full sound potenal aer a burn-in period of as lile as approx. 15 hours of operaon. We
recommend that you readjust the basic sengs of your subwoofer aer this burn-in period, in
parcular due to the fact that you will become more aware of your subwoofer aer a certain period
of playing me and it is therefore worth adjusng the subwoofer volume where necessary.
Stray Magnec Fields
The magnec eld created by the main magnet of the woofer may to some extent have an eect
outside of the loudspeaker. This stray magnec eld may interfere with other devices, parcularly
televisions and monitors with cathode ray tubes (not LCD or plasma televisions), for example
by causing changes in colour in the picture. We recommend that you place your subwoofer
approximately half a metre away from such devices (and also from magnet tapes, video cassees,
credit cards with magnec stripes, etc.).
Where possible, please retain the loudspeaker packaging. You can then securely transport your
subwoofer if you move house.
5

English High End Series
Safety Instrucons
1. Only use your subwoofer in dry rooms. If any liquids get into your subwoofer, immediately unplug
it and switch o any devices connected to it, for example ampliers, receivers or mul-channel
decoders.
For your safety, take your subwoofer to a specialist, at best an authorised AUDIO PHYSIC dealer,
to be checked.
2. Only use your subwoofer on a stable and level surface.
3. If your subwoofer has been exposed to a cold environment over a long period of me, please
wait unl it has reached room temperature in order to avoid condensaon, which may develop
in the case of sudden and large dierences in temperature and damage the electronics.
4. If you go away or do not plan to use your subwoofer over a long period of me, disconnect it by
unplugging it.
5. Do not leave your subwoofer unaended when in use.
6. Keep your subwoofer, especially the connecon terminals, out of reach of small children.
7. If you want to clean the surfaces of your subwoofer, please switch it o before doing so. Before
switching it back on, please ensure that there is no moisture on the connecon terminals and
that the terminals are securely connected.
8. Your subwoofer should only be opened and, where necessary, repaired by an authorised
AUDIO PHYSIC dealer. Any repairs to or work on your subwoofer that are not carried out by
an authorised AUDIO PHYSIC dealer shall result in a voided warranty. In the case of funconal
problems that cannot be solved or suspected damage to your subwoofer, unplug the device
and take it to your AUDIO PHYSIC dealer to be checked.
Unpacking and Assembly
1. Carefully open the packaging where it has been taped up.
2. Remove the accessory pack from the box.
3. Carefully remove the loudspeaker, together with its protecve foam pads, from the box. It is
ideal if two people carry out this step. Make sure that you do not break o the connecon
terminals or controls when removing and handling the loudspeaker.
4. Now remove the top foam cover and carefully slide down the protecve foil.
5. Stand the subwoofer upside down, preferably on a so surface (carpet or a thick towel) so that
the surface of the cabinet does not get scratched.
6. Screw the spikes supplied with your subwoofer into the threaded inserts in the base and use the
lock nuts to x them in place.
7. Stand your subwoofer the right way up again. Now follow the recommendaons for seng up
your subwoofer in the following chapter.
If you want to further increase the precision and sonic depth of your subwoofer’s
bass response, try out our high-quality VC feet (for example the VCF II M8 feet in
the image on the right). The “Vibraon Control“ feet are not only an alternave
to spikes for high-quality ooring, but also reduce the transmission of vibraons
between the loudspeaker and the oor. The result is an audible improvement to
the device’s realisc sound reproducon. For more informaon and advice,
please contact your dealer.
6

High End Series English
Seng Up Your Subwoofer
The fact that a subwoofer only reproduces the lowest frequency band means that a number of dierent
setups are possible in your room. It can, for example be placed by a wall, in a corner or in a free-standing
posion. The acousc rules that apply to other loudspeakers also apply to subwoofers, meaning that the
closer your subwoofer is to a wall or corner, the larger or smaller the increase in lower tones will be. You
can, however, use the electronics of the LUNA to compensate for these inuences in order to achieve
opmal results in all posions. You can nd out more about this issue in the chapter “Adjusng Your
Subwoofer”. There are, however, some posions that are parcularly suited to your subwoofer and
make the setup process easier for you.
1. Your subwoofer should generally be placed on a stable and level surface. Unscrew the spikes
that you previously aached to your subwoofer unl the device is level and all spikes are rmly
set on the ground. The spirit level enclosed with your subwoofer will help you to ensure that it is
exactly level. Once you have posioned your subwoofer, use the lock nuts to again ghten the
spikes. It is important that your subwoofer is level because depending on the bass depth and
volume, large forces act on the device when it is in operaon. If your subwoofer is not in a level
posion and on a solid surface, it may move out of posion due to an unbalanced distribuon of
force and strong vibraons.
2. The loudspeakers and subwoofer should not be placed directly next to each other. This may lead to
unwanted interacons between the devices, for example the loudspeakers causing each other to
resonate. A distance of around 50 cenmetres between the devices largely prevents these eects.
7
A handy helper: The enclosed spirit
level will help you to ensure that
your subwoofer is in a level posion.
50 cm

Placing your subwoofer in the corner of the
room results in a natural bass reinforcement of
around 9 dB
3. If it is possible to posion your subwoofer between the main loudspeakers, it should not be
placed exactly in the middle between the side walls. An ideal posion for your subwoofer is
on an imaginary straight line between the loudspeakers. This will simplify the setup process of
the subwoofer’s phase (please refer to the chapter “Setup”).
4. Depending on how close your subwoofer is to the walls, placing it in the corner of the room
will result in a broad bass reinforcement of up to 9 decibels. You can use the LUNA’s control
electronics to compensate for this reinforcement.
5. a. If you posion your subwoofer by a side wall or the back wall, be sure to choose a crossover
frequency that is as low as possible. This is parcularly relevant in the case of large rooms.
5. b. If you only want to use your subwoofer via the LFE channel of a surround system, you can place
your subwoofer by the wall or in a corner opposite the main loudspeakers without any problems
if you choose a crossover frequency on the receiver that is as low as possible.
If you choose to use this setup opon, the
crossover frequency should not exceed 80 Hertz.
This is parcularly relevant in the case of large
rooms.
English High End Series
8
Where possible, a rao of 1/3 to 2/3 to the side
walls is ideal - see point 7.
Your subwoofer should not be posioned exactly
in the middle.

6. Posioning your subwoofer by a side wall in a one-third to two-thirds rao is highly recommended
in terms of acouscs if, where applicable, your subwoofer cannot be placed between or next to
the front loudspeakers for opcal or spaal reasons.
7. In rooms in which the lengths of the side walls and the distance between the oor and the ceiling
are almost idencal, your subwoofer should not be placed in a corner because this may result in
parcularly strong room modes that disturb the sound reproducon.
8. If you decide to use two subwoofers, we recommend that you place them in symmetrical posions
to an imaginary axis extending from the listening posion to the central point between the two
main loudspeakers. This will result in a parcularly homogenous involvement of the room.
9. The sound of a system consisng of passive loudspeakers and an acve subwoofer can achieve
beer contours and more aenon to detail when your subwoofer is placed around 30 cenmetres
above the oor. When deciding whether or not to use such a setup, you should weigh up this
improved musicality against the opcal consequences of such posioning. This setup up is,
however, only successful when your subwoofer can be placed in a fully secure posion in which it
will not wobble at all.
You can nd more ps and tricks about seng up your speakers and background informaon on
the topic of listening in the technical area of our website at: www.audiophysic.de
You are now only a few steps away from impressive sound performance thanks to a high-quality
subwoofer that is perfectly adjusted to your room and sound system.
The distance
between the
subwoofers
and the
imaginary
centre line
should be
idencal.
=
An idencal
distance
High End Series English
9
2/3
1/3
1/3
2/3
English High End Series
Connecng Your Subwoofer
Please switch o all equipment in your HiFi system before you connect your subwoofer. Depending on
how you want to use your subwoofer, for example in a stereo or surround sound system, there are a
number of dierent possibilies when it comes to connecng your subwoofer to your system.
Operang Your Subwoofer in a Stereo Conguraon
You can integrate your subwoofer into your stereo music system in a variety of ways. If you have a com-
binaon consisng of a preamplier and a power amplier with a free „pre-out“ on the preamplier,
you can use this to connect your subwoofer. This also applies to integrated ampliers or receivers that
have an unused pre-out connector. Use an RCA cable of a suitable length to connect the “pre-out” jacks
to the LUNA’s “low level input”. “Record-out jacks” are not suitable for this purpose.
AUDIO PHYSIC recommends that you use the “high level input” to connect your subwoofer.
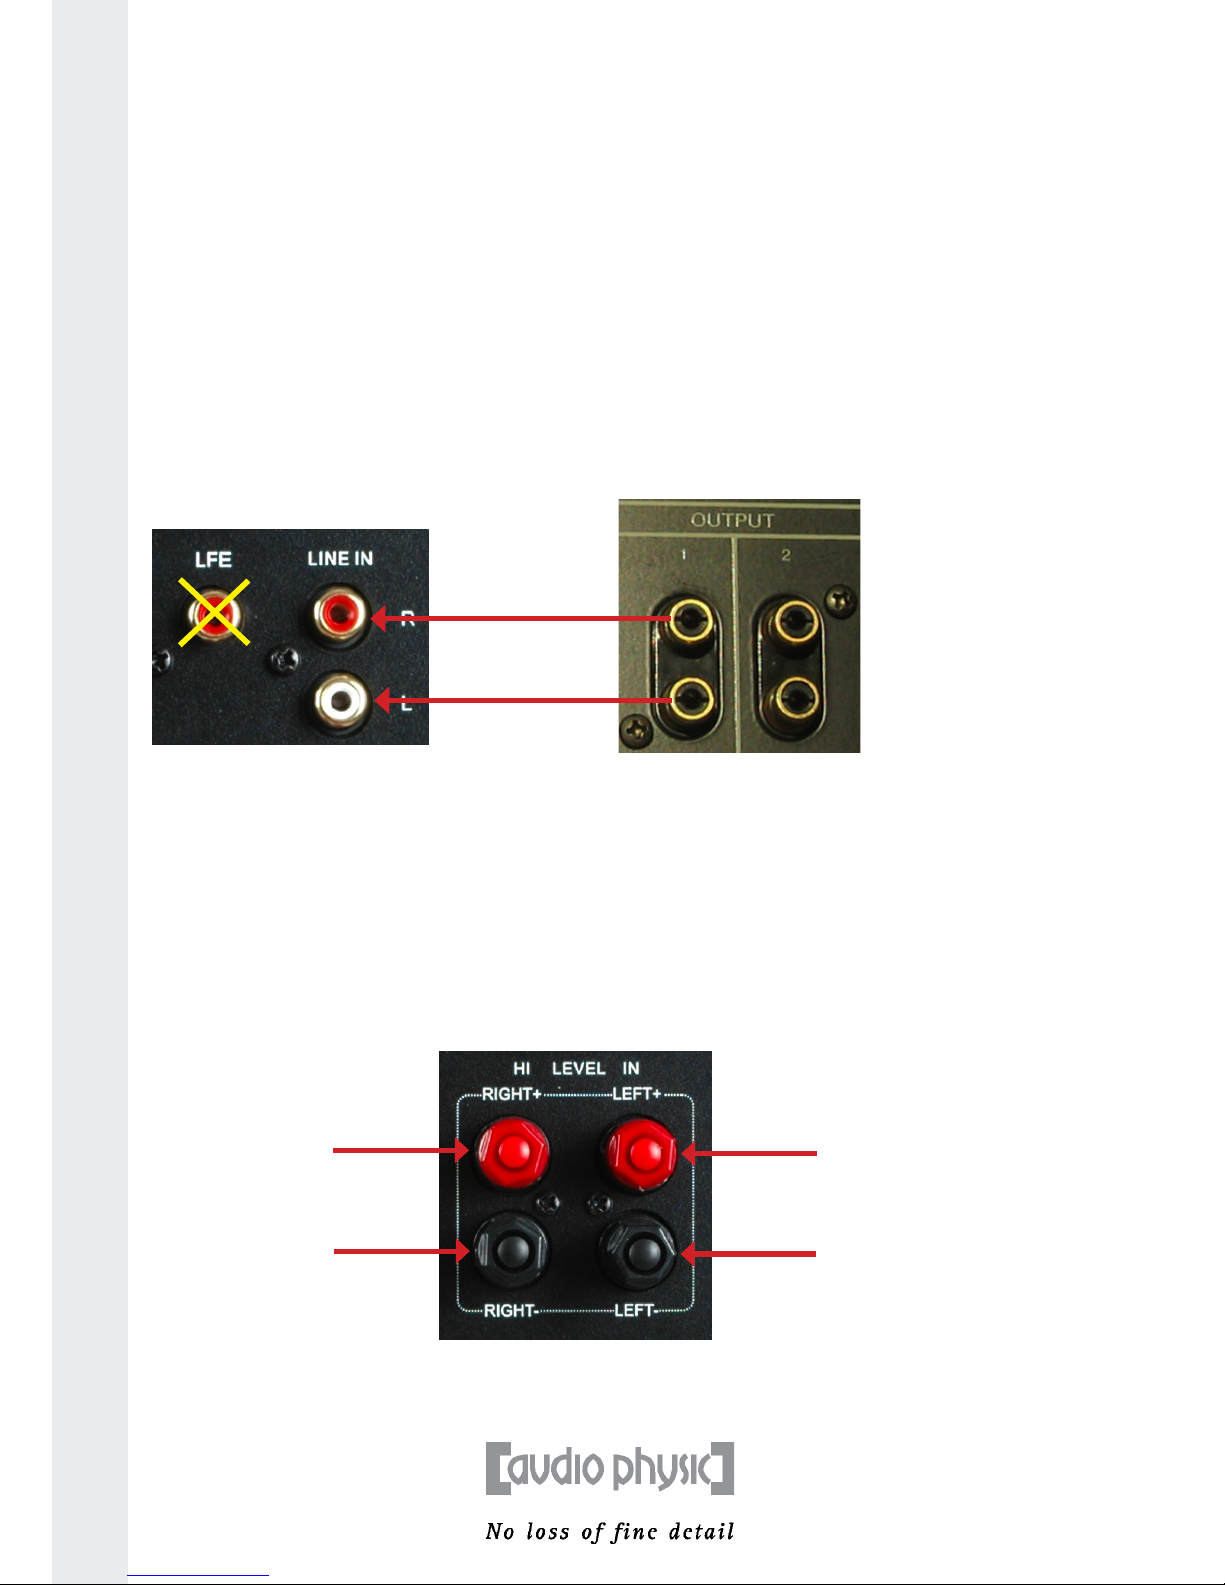
1) Connecng your subwoofer with an RCA cable:
2) Connecng your subwoofer with a loudspeaker cable:
You can also control your LUNA by using a second loudspeaker output on your amplier. To do so, you
need to connect the loudspeaker outputs, normally marked as “B”, of your integrated or power amplier
with the loudspeaker terminals on your subwoofer. Depending on the setup of your system, you can also
connect your subwoofer with cables from the loudspeakers in order to save cable. Loudspeakers mostly
accept cables with spades and banana plugs, meaning that this connecon method can be used without
any problems. Connect the cable from the le loudspeaker with the le “high level input“ of your LUNA
and connect the right channel with the right input accordingly.
If you hear a clear humming noise once you have acvated your subwoofer aer connecng it using this
method, it is very likely that this is due to a dierence in the ground potenals. You can nd out how to
simply recfy this problem on the following page.
10
RCA (low frequency)
connecon: Connect
the free pre-out outputs
of your amplier to the
LUNA’s “low level input”.
Record-out outputs on
your amplier are not
suitable for this purpose!
Connect the right and
le channels with your
subwoofer.
Connecon with a
loudspeaker cable:
Use the high level
input to connect your
subwoofer to the right
and le loudspeaker
outputs of your
amplier or
loudspeakers.
right channel
le channel
LUNA connecon terminal amplier with pre-out

High End Series English
Surround Sound Operaon
There are also two potenal connecon methods that can be used to connect your subwoofer with the
receiver in a surround sound system. Under no circumstances should you use both methods at the same
me to connect your subwoofer.
1) Connecng your subwoofer with an RCA cable:
To use this method, connect a suitably long RCA cable to the LFE RCA output of your surround sound
receiver and then connect this to the LFE input on your subwoofer. You only need to use one connecon
cable (mono) because LFE is an individual and autonomous sound channel. You can, however, also
addionally transmit sound informaon from the stereo channels from your subwoofer. For more
informaon about this possibility, please consult the operaon manual of your receiver.
2) Connecng your subwoofer with a loudspeaker cable:
If you have a surround sound receiver with a loudspeaker connecon terminal for the LFE channel, you
can also use a loudspeaker cable to connect your subwoofer. To do so, connect the LFE loudspeaker output
of your receiver to the right or le loudspeaker input of the LUNA.
A Humming Noise when in Operaon Using the High Level Input
Some conguraons may cause you to hear a deep low-frequency humming noise aer you turn on your
subwoofer. This noise normally does not indicate a technical problem with your subwoofer. You can recfy
this humming noise by using the RCA cable supplied with your AUDIO PHYSIC subwoofer. This cable only
establishes a connecon using the ground wire. Connect this cable to one of the free RCA jacks on your
subwoofer and to any free RCA jack on your amplier or receiver in order to remove the humming noise.
11

English High End Series
Seng Up Your Subwoofer
1. Acvang Your Subwoofer
Use the supplied power cable to connect your subwoofer to a
mains socket. Turn on the power switch on the back of your
subwoofer (marked with an arrow in the image on the right).
The indicator light next to the operang switch will then light up.
Move the operang switch to the “ON” posion. You should use
music that you know well for the next setup steps. Pieces of music
involving a singing voice accompanied by only a few natural
instruments are parcularly suitable.
2. Using the Controls to Adjust Your Subwoofer
You can nd the controls that you can use to opmally integrate your subwoofer into your HiFi or
surround sound system on the connecon terminal on the back of the LUNA.
3. Operang Your Subwoofer in a Surround sound System Using LFE
If you choose to use the LFE output of your receiver or surround sound processor to control your LUNA,
please set up the crossover frequency on your receiver (using the setup menu).
12
Volume: The LUNA has its
own volume control that
can be used to adjust the
volume of the subwoofer
in the system.
Phase switch: You can use this switch to choose
between the 0° and 180° sengs in order to
adapt the LUNA to suit your front loudspeakers.
Indicator light: This light shines green when the
subwoofer is in operaon and red when it is in
standby.
Crossover frequency: You can use this control knob
to select the maximum frequency that the subwoofer
should deliver between a 50 and 150 Hertz.
Operang switch: You can use this switch to acvate the LUNA and to disconnect it from the power supply
if you do not plan to use it for a long me. When the switch is set to the middle posion marked “AUTO”,
the subwoofer will enter into standby mode aer around 20 minutes when there is no signal

High End Series English
4. Seng Up the Phase (Stereo/Surround Sound)
If you choose to use the LFE output of your receiver or surround sound processor to control your LUNA,
the phase can normally be adjusted via your receiver (using the setup menu). If you want to adjust the
phase on your LUNA, you can use the same process as that used for stereo operaon.
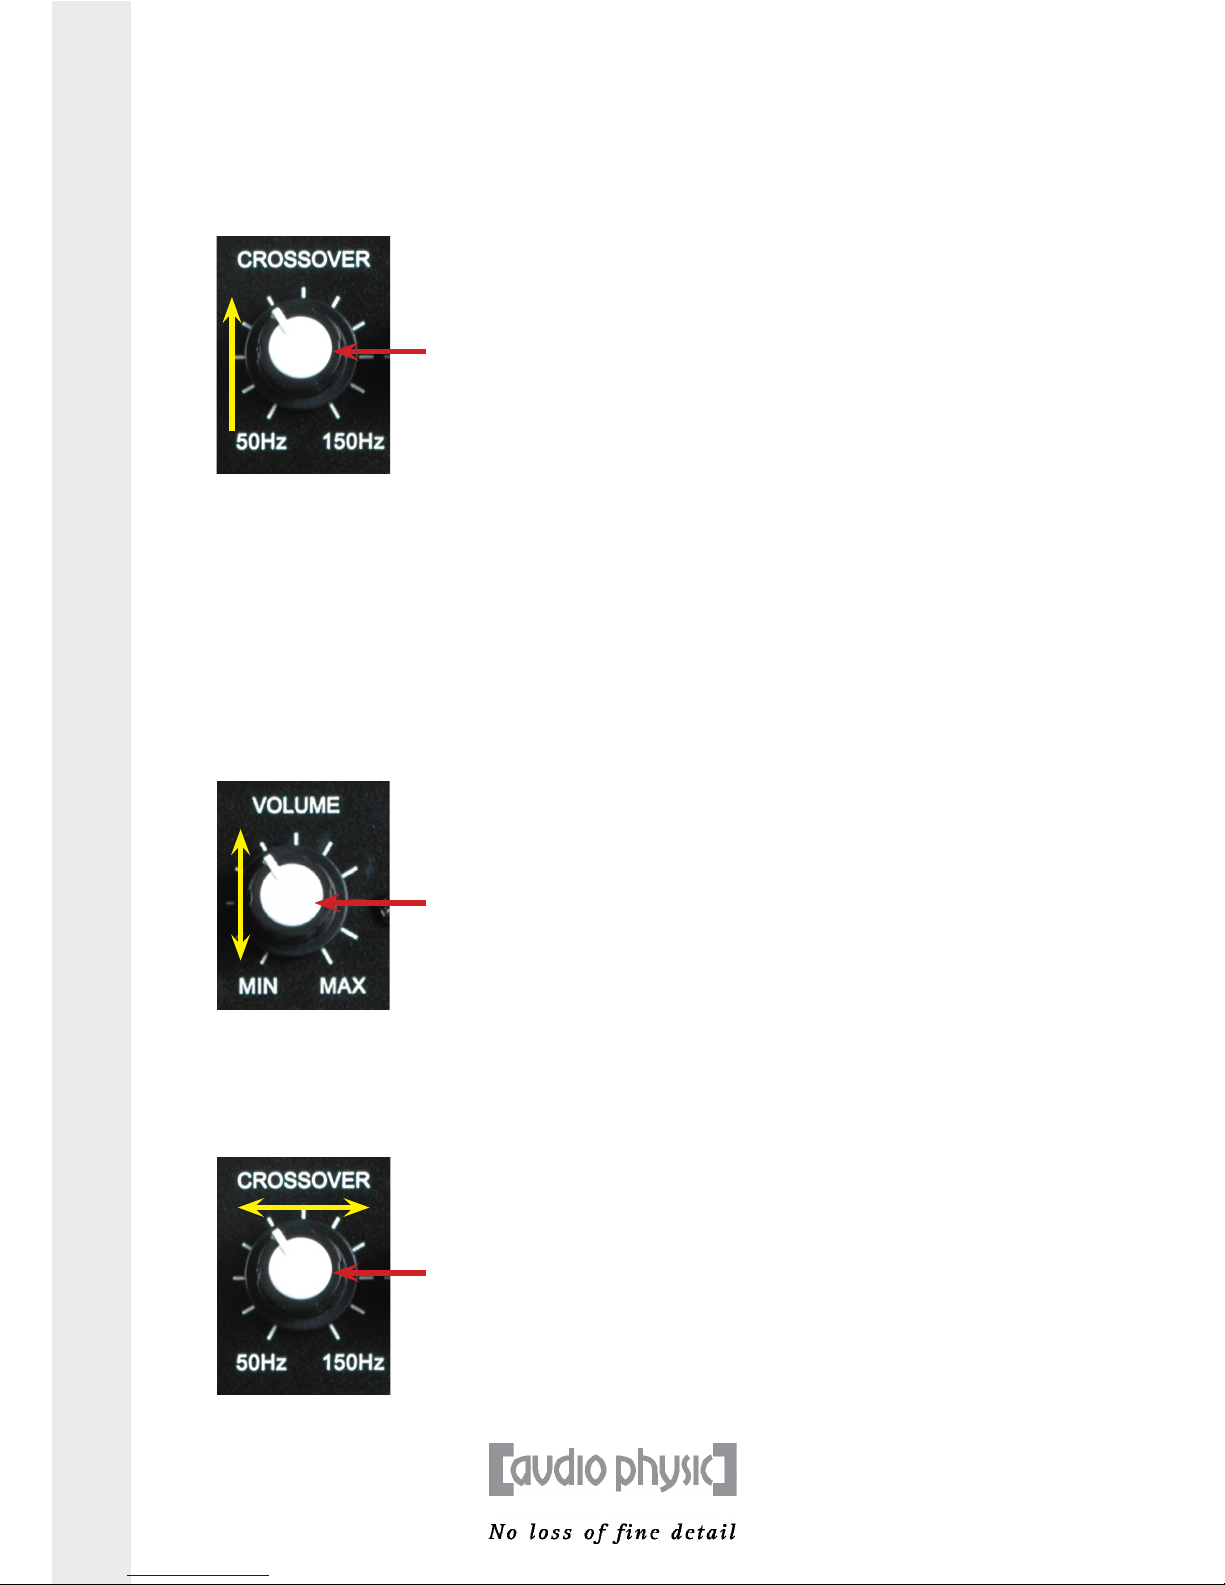
To correctly set up the phase, rst turn the control dial for the crossover frequency to the maximum
value (150 Hertz). Select a medium volume for the LUNA; we recommend that you turn the control knob
to the central line.
Step 1: Seng the crossover frequency control knob to maximum and volume control knob to a central posion
Step 2: Now start to play your music. Pieces of music with a large number of low frequency tones are
parcularly suitable for establishing the phase. While your music is playing, use the phase switch
to change the phase seng from 0° to 180° and back several mes. The seng at which deep
tones can be heard louder in the listening posion is correct.
You have now idened the correct seng and can adjust the crossover frequency. This step does not
apply if you have chosen to operate your subwoofer using the LFE input.
5. Seng Up the Crossover Frequency and Volume
To idenfy the correct crossover frequency between your subwoofer and front loudspeakers, you
need to adjust the LUNA’S reproducon volume to suit your other loudspeakers. If you found the
bass reproducon in the previous step 2 too loud, use the volume knob on the LUNA control panel
to turn down the volume of your subwoofer.
Step 1: Seng the control knob for the crossover posion to minimum
13
Turn the
volume knob
to a medium
volume,
ideally between
the 11 and
12 o’clock
posion.
Set the
crossover
frequency to
the maximum
value.
0 °
180°
You can use the phase
switch to invert the
phase by 180°. Select
the posion at which the
bass tones sound louder
in the listening posion
Turn the knob
to the le as
far as it will
go so that it
is in the 50 Hz
posion.
English High End Series
Now start to play the music again. For this step, it is best to use a piece of music involving acousc
instruments, ideally a double bass and a male voice (bass or baritone). The song “Fever“ by Elvis Presley,
for example, is parcularly suitable for this setup process and can be found in many music collecons. The
track can also be accessed on one of a number of dierent websites if you have the opportunity to do so.
Step 2: Slowly turn the crossover frequency control knob and increase the crossover frequency
Please concentrate on the voice reproducon. Voices will most probably sound thin or cool with the
current seng at the lowest crossover frequency. Now increase the crossover frequency in small
increments unl the voices sound natural and full bodied. If you can clearly hear that the voices are
coming from the direcon of the subwoofer, this is a sign that the crossover frequency seng is too
high. When carrying out this procedure, please also pay aenon to the bass reproducon. If the bass
tones start to sound inated and sluggish at a certain point, reduce the crossover frequency somewhat
unl the sound reproducon is balanced. In this case, you may have to slightly turn the volume of the
LUNA back up.
Step 3: Finely adjusting the volume
If you can clearly hear the subwoofer, turn down the volume at this point until the sound reproduction of
the subwoofer no longer clearly stands out from that of the right and left loudspeakers.
Step 4: Finely adjusting the crossover frequency
14
Increase the
frequency in small
increments unl
the voices sound
natural and full
bodied. Each of the
lines surrounding
the crossover
frequency knob
indicates an increase
of approx. 10 Hertz.
Change the
crossover
frequency in
very small
increments
unl the
voices sound
contoured
and natural.
Finely adjust the
volume unl the
sound reproduc-
on of voices and
instruments from
your subwoofer and
front loudspeakers
is homogenous.

High End Series English
For opmal adjustment, AUDIO PHYSIC recommends that you carry out steps 3 and 4 with a variety of
dierent pieces of music and then repeat the adjustment a few days later in order to ensure that you
have idened the suitable crossover frequency and correctly completed all adjustments.
6. Recommended Soware for the Adjustment Process
These albums and pieces of music will help you to idenfy the sengs for the basic
adjustment parcularly quickly:
Elvis Presley “Elvis Is Back” Sony Music Track 2
Tom Jones “Praise & Blame” Universal Tracks 2,8
W.A. Mozart / Gardiner “The Magic Flute” Universal Disc 2, Tracks 7-8
Troubleshoong Soluons for Funconal Problems
Below you can nd some ps on how to deal with certain disturbances that may occur when using your LUNA.
• You cannot switch on the LUNA. / The indicator lamp does not light up.
Possible causes: • The LUNA is not connected to the power supply.
• The mains fuse is damaged.
Soluon: • Check the power cable and the plug. Try using another plug socket where
necessary.
• Replace the mains fuse. Please ensure that you unplug the power cable
before doing so!
• There is no sound despite the fact that the subwoofer is acvated.
Possible causes: • The polarity of a channel has been inverted if the high level input is being
used.
• The input cables are not connected or are damaged.
• The electronics have entered into standby mode for safety reasons due to
overheang.
Soluon: • Ensure that the cable is connected with the correct polarity.
• Please check the cable.
• Switch o your LUNA and wait unl it has cooled down.
• You can hear a humming noise aer you turn on your subwoofer (in the case of cables connected using
the high level input).
Possible cause: • There are dierent ground potenals between the components.
Soluon: • Use the RCA cable (that only has a ground contact) supplied with your
subwoofer to connect one of the RCA jacks (low level input/LFE) of your
subwoofer with any free RCA jack on your amplier or receiver.
In the case of other problems for which you cannot clearly idenfy the cause, please contact your
authorised AUDIO PHYSIC dealer.
15

English High End Series
16
7. Technical Specicaons
LUNA
Height 40.0cm
Width 36.0cm
Depth 36.0cm
Width x depth 38.0 x 38.0cm
Weight approx. 19kg
“High level input” input impedance: >600 ohms
“Low level input” input impedance: 30 kOhm
Frequency response 30Hz - 150Hz
Loudspeaker Systems
Woofer 260mm
Distributed in North America by:
VANA, Ltd.
2845 Middle Country Road
Lake Grove, NY 11755
(631) 246-4412.
www.vanaltd.com
AUDIO PHYSIC GmbH
Almerfeldweg 38
59929 Brilon / Deutschland
Germany
Tel. +49(0)2961/9617-0; Fax
+49(0)2961/51640 [email protected]
www.audiophysic.de
Table of contents
Other Audio Physic Subwoofer manuals


