Audiodesign PRO PMU 221 Series User manual

Audiodesign Srl
Via dell’industria, 28 - 42025 CAVRIAGO (RE)
+39 0522 941444
www.audiodesign-pro.com - [email protected]
Web Canale youtube
Facebook
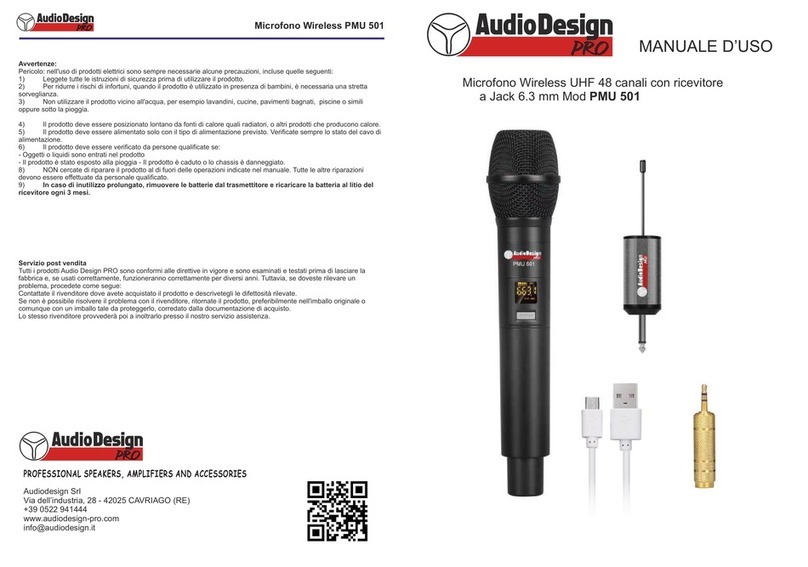
PMU 2211
Set 1 microfono Wireless UHF a gelato
Set of 1 UHF Handheld Wireless Microphone.
PMU 2211BP
Set 1 microfono Wireless UHF ad archetto con body pack
Set of 1 UHF Wireless Headset Microphone with body pack
PMU 2212
Set 2 microfoni Wireless UHF a gelato
Set of 2 UHF Handheld Wireless
Microphones.
PMU 2212HBP
Set 1 microfoni Wireless a gelato e 1 ad
archetto con body pack
Set of 1 hand held Wireless microphone and
1 Headset Microphones with body pack
Features:
Frequencies from 480,000 to 529,750 MHz
Quartz oscillator
Frequency Stability: 10 PPM
Frequency response: 40 Hz-18 Khz (+/- 3 dB)
Harmonic interference ratio:> 90 dB
Frequency stability: +/- 0.005%
Receiver Sensitivity: - 100 dBm
SNR ratio: > -90dB
Output power of the transmitters: 10 mW
Total Harmonic Distortion: <0.5%
Range in open space: 100 meters
N.B .: Distance depends on the absorptions and
reflections of radio waves and local interference due to
other sources of radio waves such as radio bridges, TV
repeaters, mobile repeaters, and so on
Battery charge indicator on microphone and on
receiver.
Working Temperature: -20 / + 50 ° C: the battery type
reduce this range
Battery life: up to 6 hours with alkaline batteries
Output signal connectors 1 Ch: 1 XLR balanced and 1
female jack jack 6.3 mm mono Unbalanced.
Output signal connectors 2 Ch: 1 XLR balanced for
each channel and 1 female jack jack 6.3 mm mono
Unbalanced with mixed signal
Caratteristiche:
Frequenze da 480,000 a 529,750 MHz
Oscillatore al quarzo
Stabilità della frequeze: 10 PPM
Risposta in frequenza: 40 Hz - 18 Khz (+/- 3 dB)
Rapporto di interferenza armonica:> 90 dB
Stabilità della frequenza: +/- 0.005%
Sensibilità del ricevitore: - 100 dBm
Rapporto segnale/rumore: > -90dB
Potenza di uscita del trasmettitore: 10 mW
Distorsione armonica totale: <0.5%
Area di copertura in campo libero: 100 meters
N.B .: La distanza dipende dall’assorbimento e dalla
riflessione delle onde radio e dalle interferenze locali di
altre fonti di onde radio, quali ripetitore radio, TV o
telefonici.
Indicatore di carica delle batterie sul trasmettitore e sul
ricevitore.
Temperatura di funzionamento: -20 / + 50 ° C: in funzione
del tipo di batteria.
Durata delle batterie: fino a 6 ore con batterie alkaline.
Segnale in uscita modelli a 1 canale: 1 XLR Bilanciato e 1
jack 6.3 mm mono non bilanciato
Segnale in uscita modelli a 2 canali: 1 XLR Bilanciato per
ogni canale e 1 jack 6.3 mm mono non bilanciato con il
segnale sommato.
Indicazioni per migliorare le prestazioni di un sistema senza fili.
In presenza di interferenze o perdite di segnale, provate a seguire le seguenti indicazioni:
Riposizionate il ricevitore in modo che non vi siano ostacoli (pubblico incluso) sulla linea ottica tra microfono e
ricevitore.
Non collocate né il radiomicrofono trasmettitore né il ricevitore in prossimità di oggetti metallici.
Spostate il ricevitore nella parte superiore del rack.
Rimuovete le sorgenti vicine di interferenza come, dispositivi radio, telefoni cellulari, walkie-talkie, computer, riproduttori
digitali, dispositivi Wi-Fi e processori di segnale digitali.
Sostituite le pile del radiomicrofono.
Se comunque, per motivi ambientali, ci dovessero essere delle zone problematiche, segnalatele e chiedete ai cantanti
di evitarle.
PMU 2212BP
Set 2 microfoni Wireless UHF ad archetto
con body pack
Set of 2 UHF Wireless Headset Microphones
with body pack
PMU 221 Series
Radiomicrofono multifrequenza a 1 o 2 canali UHF
Variable frequency UHF 1 or 2 Ch Wireless microphone
PMU 221 Series
Radiomicrofono multifrequenza a 1 o 2 canali UHF
Variable frequency UHF 1 or 2 Ch Wireless microphone
MANUALE D’USO OWNER MANUAL

PAGE 7PAGE 2
Servizio post vendita
Tutti i prodotti Audio Design PRO sono esaminati e testati prima di lasciare la fabbrica e, se usati
correttamente, funzioneranno correttamente per diversi anni. Tuttavia, se doveste rilevare un
problema, procedete come segue:
Contattate il rivenditore dove avete acquistato il prodotto e descrivetegli le difettosità rilevate.
Se non è possibile risolvere il problema con il rivenditore, ritornate il prodotto, preferibilmente
nell'imballo originale o comunque con un imballo tale da proteggerlo, corredato dalla
documentazione di acquisto. Lo stesso rivenditore provvederà poi a inoltrarlo presso il nostro
servizio assistenza.
Conformità:
I prodotti Audiodesign Pro, sono conformi alle direttive in vigore
BODY PACK
Handheld Microphone
PMU 221 Series
Radiomicrofono multifrequenza a 1 o 2 canali UHF
Variable frequency UHF 1 or 2 Ch Wireless microphone
Avvertenze:
Pericolo: nell'uso di prodotti elettrici sono sempre necessarie alcune precauzioni, incluse quelle
seguenti:
1) Leggete tutte le istruzioni di sicurezza prima di utilizzare il prodotto.
2) Per ridurre i rischi di infortuni, quando il prodotto è utilizzato in presenza di bambini, è
necessaria una stretta sorveglianza.
3) Non utilizzare il prodotto vicino all'acqua, per esempio lavandini, cucine, pavimenti bagnati,
piscine o simili o sotto la pioggia.
4) Il prodotto deve essere posizionato lontano da fonti di calore quali radiatori, o altri prodotti
che producono calore.
5) Il prodotto deve essere alimentato solo con il tipo di alimentazione previsto. Verificate
sempre lo stato del cavo di alimentazione.
6) In caso di inutilizzo prolungato, staccare la spina per evitare rischi. Per togliere la spina,
non tirare il cavo, ma afferrare la spina.
7) Assicurarsi che l'interruttore di accensione sia sempre facilmente raggiungibile.
8) Il prodotto deve essere verificato da persone qualificate se:
A- Il cavo di alimentazione o la spina siano danneggiati
B- Oggetti o liquidi sono entrati nel prodotto
C- Il prodotto è stato esposto alla pioggia
D- Il prodotto non funziona correttamente o c'è un rilevante cambiamento di caratteristiche.
E- Il prodotto è caduto o lo chassis è danneggiato.
9) NON cercate di riparare il prodotto al di fuori delle operazioni indicate nel manuale. Tutte le
altre riparazioni devono essere effettuate da personale qualificato.
Attenzione. Non posizionate oggetti sul cavo di alimentazione e verificate che il percorso del
cavo di alimentazione non crei ostacoli o che possa essere schiacciato. Una installazione
scorretta può procurare un rischio di incendio o di infortunio.
1
2
3
1- Display della frequenza
2 - indicatore dello stato delle batterie - mute
3 - Interruttore a pulsante: pressione lunga per accendere e
spegnere il microfono, pressione breve per la messa in
pausa
4 - Interruttore a pressione per accendere e spegnere il
body pack
1 - Frequency display
2 - Batteries status - mute
3 - Push Switch: long press to switch ON - OFF - Short
press for pause
4 - Push Switch to switch On - Off the body pack
RADIOMICROFONO
Il Display del ricevitore indica:
AF/RF - L’intensità del segnale ricevuto
Lo stato di carica delle batterie del trasmettitore
I canali e le frequenze in uso
La trasmissione IR dalla centralina al trasmettitore
Receiver Display show:
AF/RF signal level
Transmitter battery status
Transmission Frequencies
IER transmissione from receiver to transmitter
2 Ch
1 Ch
4
1
2
Pulsanti di controllo sul ricevitore:
Permettono di cambiare manualmente la frequenza di lavoro (in su o in giù)
Premuto a fondo inizia la funzione AUTO SCAN. La ricerca terminerà con la
frequenza risultata più esente da disturbi.
Premuto brevemente attiva la connessione IR (infrarossi). Posizionare il
trasmettitore di fronte al LED indicato con la scritta IR per sincronizzare la
frequenza indicata sul ricevitore con il trasmettitore
Receiver Control push buttons:
To modify manually the frequency (up or down)
Long press to activate the AUTO SCAN function. The unit will stop to the
frequency with best tunig possibilities)
Short press start the IR connection to the transmitter. Remind to position the
transmitter closed to IR LED.
PMU 221 Series
Radiomicrofono multifrequenza a 1 o 2 canali UHF
Variable frequency UHF 1 or 2 Ch Wireless microphone

PAGE 3PAGE 6
Precautions:
Caution: When using any electric product , precautions should always be taken, including the
following:
1) Read carefully all instructions before using the product.
2) To reduce the risk, a strict supervision is necessary when the product is used near
children.
3) Don't use the product near to water sources like sinks, kitchens, wet floors, pools,
or similar or when raining.
4) This product should be site away from heat sources such as radiators or any other
product that generate heat.
5) This product should be connected to a power supply line only of the type described
on the operating instructions. Check always the status of the power cable.
6) Unplug power supply when left unused for a long period of time. Don't draw the cable
but pull out the plug.
7) Make sure that power switch can always be easily reached.
8) Please refer to authorized or qualified personnel in case of malfunction
9) DON'T operate on the product, except operation explained on the user's manual .
Please refer to authorized and qualified personnel for any other operation.
10) Caution: Don't place objects on the product's power cable or place it in a position
where it could be damaged or cause interferences. Improper installation could cause fire risk
and/or personal injury.
Warnings:
Batteries can explode if positioned with polarity inverted.
Don't expose batteries to high temperatures
Always refer to batteries manufacturer instructions
Dispose of the batteries appropriately
Compliance:
All Audiodesign products coply with European standards
Service
All Audio Design PRO products have been inspected and tested before leaving the factory and
, if properly used, they will work for many years. However, in case of any problem, please
proceed in the following way:
Contact your dealer and inform about the defect you found
In case it won't be possible to solve the problem with the dealer, the product needs to be
returned, preferably in its original packaging or in a proper packing to protect it during the
transport. Purchase documents must be produced too.
Your dealer will arrange the shipment to our after sales service.
1
2
56
1
2
34
56
Connessioni e controlli:
1) Interruttore di accensione
2) Controllo del volume
3) Indicatore RF e AF
4) Pulsanti di gestione (vedi pag 7)
5) Antenna
6) Uscita XLR Bilanciata canale singolo
7) Uscita jack 6.3 mm sbilanciata
canali mixati.
8) Connessione alimentatore
Connection and controls :
1) Power switch
2) Volume control
3) RF and AF information
4) Setting Push buttons (see page 7)
5) Antenna
6) Single Ch XLR balanced output.
7) MixedJack 6,3 output
8) Power supply connection
PMU 2211 - PMU 2211BP
Receivers front and rear panels
PMU 2211
Set 1 microfono Wireless UHF a gelato
Set of 1 UHF Handheld Wireless Microphone.
PMU 2211BP
Set 1 microfono Wireless UHF ad archetto
con body pack
Set of 1 UHF Wireless Headset Microphone
with body pack
PMU 2212
Set 2 microfoni Wireless UHF a gelato
Set of 2 UHF Handheld Wireless
Microphones.
PMU 2212BP
Set 2 microfoni Wireless UHF ad
archetto con body pack
Set of 2 UHF Wireless Headset
Microphones with body pack
2 Ch UHF Wireless System
78
34
3
4
2
5 6 7 8
PMU 2212 - 2212HBP - 2212BP
PMU 2212HBP
Set 1 microfono Wireless a gelato e 1
microfono ad archetto con body pack
Set of 1 hand held Wireless microphone
and 1 Headset Microphones with body
pack
PMU 221 Series
Radiomicrofono multifrequenza a 1 o 2 canali UHF
Variable frequency UHF 1 or 2 Ch Wireless microphone
PMU 221 Series
Radiomicrofono multifrequenza a 1 o 2 canali UHF
Variable frequency UHF 1 or 2 Ch Wireless microphone

PAGE 5PAGE 4
Inserting batteries into the radio microphone:
Unscrew the bottom of the microphone anticlockwise
Insert two 1,5 Volts NEW (AA size) stylus batteries according to the indicated
polarity
Fit the bottom of the microphone
Inserting batteries into the radio microphone:
Lift the battery cover pushing on the sides.
Insert two 1,5 Volts NEW (AA size) stylus batteries according to the indicated
polarity
Close the battery cover.
Connection and power on the receiver:
Insert the power plug into the power socket in the back panel.
Connect the signal output through the XLR or jack socket output to a mixer or
powered enclosure.
Insert the power plug into a 220 volt outlet
Turn on the receiver by pressing the "POWER" button
Instructions and features:
The system is equipped with the AUTO SCAN function which allows you to select
the best frequency from the 100 (or 100 + 100) frequencies. The function is
activated by long pressing the round button.
The choice of frequency of use is also possible manually with the up or down arrow
buttons.
The frequency chosen (either manually or with the AUTO SCAN function) must be
transmitted to the microphone or body pack via infrared IR rays.
To synchronize, bring the microphone or body pack close to the transmitter and
briefly press the round button to activate it.
The wireless microphone is turned on by long pressing the power button.
The same button, if pressed briefly, activates and deactivates the MUTE function.
The body pack is turned on by long pressing the button at the top. The same
button, if pressed briefly, activates and deactivates the MUTE function.
When the frequency of the transmitter is the same as the receiver, the microphone
connects and the display changes color from ocher to green (only the 1-channel
version) and the volume potentiometer changes from red to blue to indicate
successful connection.
Speak or sing while holding the wireless hand held microphone about 2cm from
your mouth or on the cheek if head set microphone and adjust the volume controls
on the receiver and the mixer gain to check that the signal is at an adequate level.
Make sure that the mixer PEAK or CLIP LED does not light up.
Inserimento batterie nel radiomicrofono a gelato.
Svitare in senso orario la parte inferiore del radiomicrofono.
Inserire due batterie a stilo, NUOVE, da 1,5 V (formato AA) rispettando la polarità
indicata.
Riavvitare la parte inferiore del radiomicrofono
Inserimento batterie nel body pack.
Sollevare il coperchio nella parte bassa del trasmettitore.
Inserire due batterie a stilo, NUOVE, da 1,5 V (formato AA) rispettando la polarità
indicata.
Richiudere il coperchio.
Collegamento e accensione del ricevitore.
Inserire lo spinotto dell'alimentatore nella presa posteriore.
Collegare l'uscita con un cavo XLR bilanciato o Jack 6,3 sbilanciato ad un mixer o
un diffusore attivo.
Inserire la spina dell'alimentatore in una presa.
Accendere il ricevitore.
Caratteristiche funzionali - Istruzioni:
Il sistema è dotato della funzione AUTO SCAN che permette di selezionare tra le
100 (o 100+100) frequenze, quella che risulta migliore. La funzione si attiva
premendo a lungo il pulsante rotondo.
La scelta della frequenza d’uso è possibile anche manualmente con i pulsanti a
freccia in su o giù.
La frequenza scelta (manualmente o con la funzione AUTO SCAN) deve essere
trasmessa al microfono o al body pack via raggi infrarossi IR.
Per effettuare la sincronizzazione, avvicinare il microfono o il body pack al
trasmettitore e premere brevemente il pulsante rotondo per attivarla.
Il radiomicrofono a gelato si accende premendo a lungo il pulsante di accensione.
Lo stesso pulsante, se premuto brevemente attiva e disattiva la funzione MUTE.
Il body pack si accende premendo a lungo il pulsante nella parte superiore. Lo
stesso pulsante, se premuto brevemente attiva e disattiva la funzione MUTE.
Quando la frequenza del trasmettitore è la stessa del ricevitore, il microfono si
connette e il display cambia colore da ocra a verde (solo la versione a 1 canale) e il
potenziometro del volume cambia da rosso a blu per indicare l’avvenuta
connessione.
Parlare o cantare tenendo il radiomicrofono a gelato a circa 2 cm dalla bocca o il
microfono ad archetto sulla guancia e regolare i controlli del volume sul ricevitore e il
gain del mixer per controllare che il segnale sia di un livello adeguato. Evitare
assolutamente che il LED del PEAK o CLIP del mixer si accenda.
PMU 221 Series
Radiomicrofono multifrequenza a 1 o 2 canali UHF
Variable frequency UHF 1 or 2 Ch Wireless microphone
PMU 221 Series
Radiomicrofono multifrequenza a 1 o 2 canali UHF
Variable frequency UHF 1 or 2 Ch Wireless microphone
Other Audiodesign Microphone manuals
