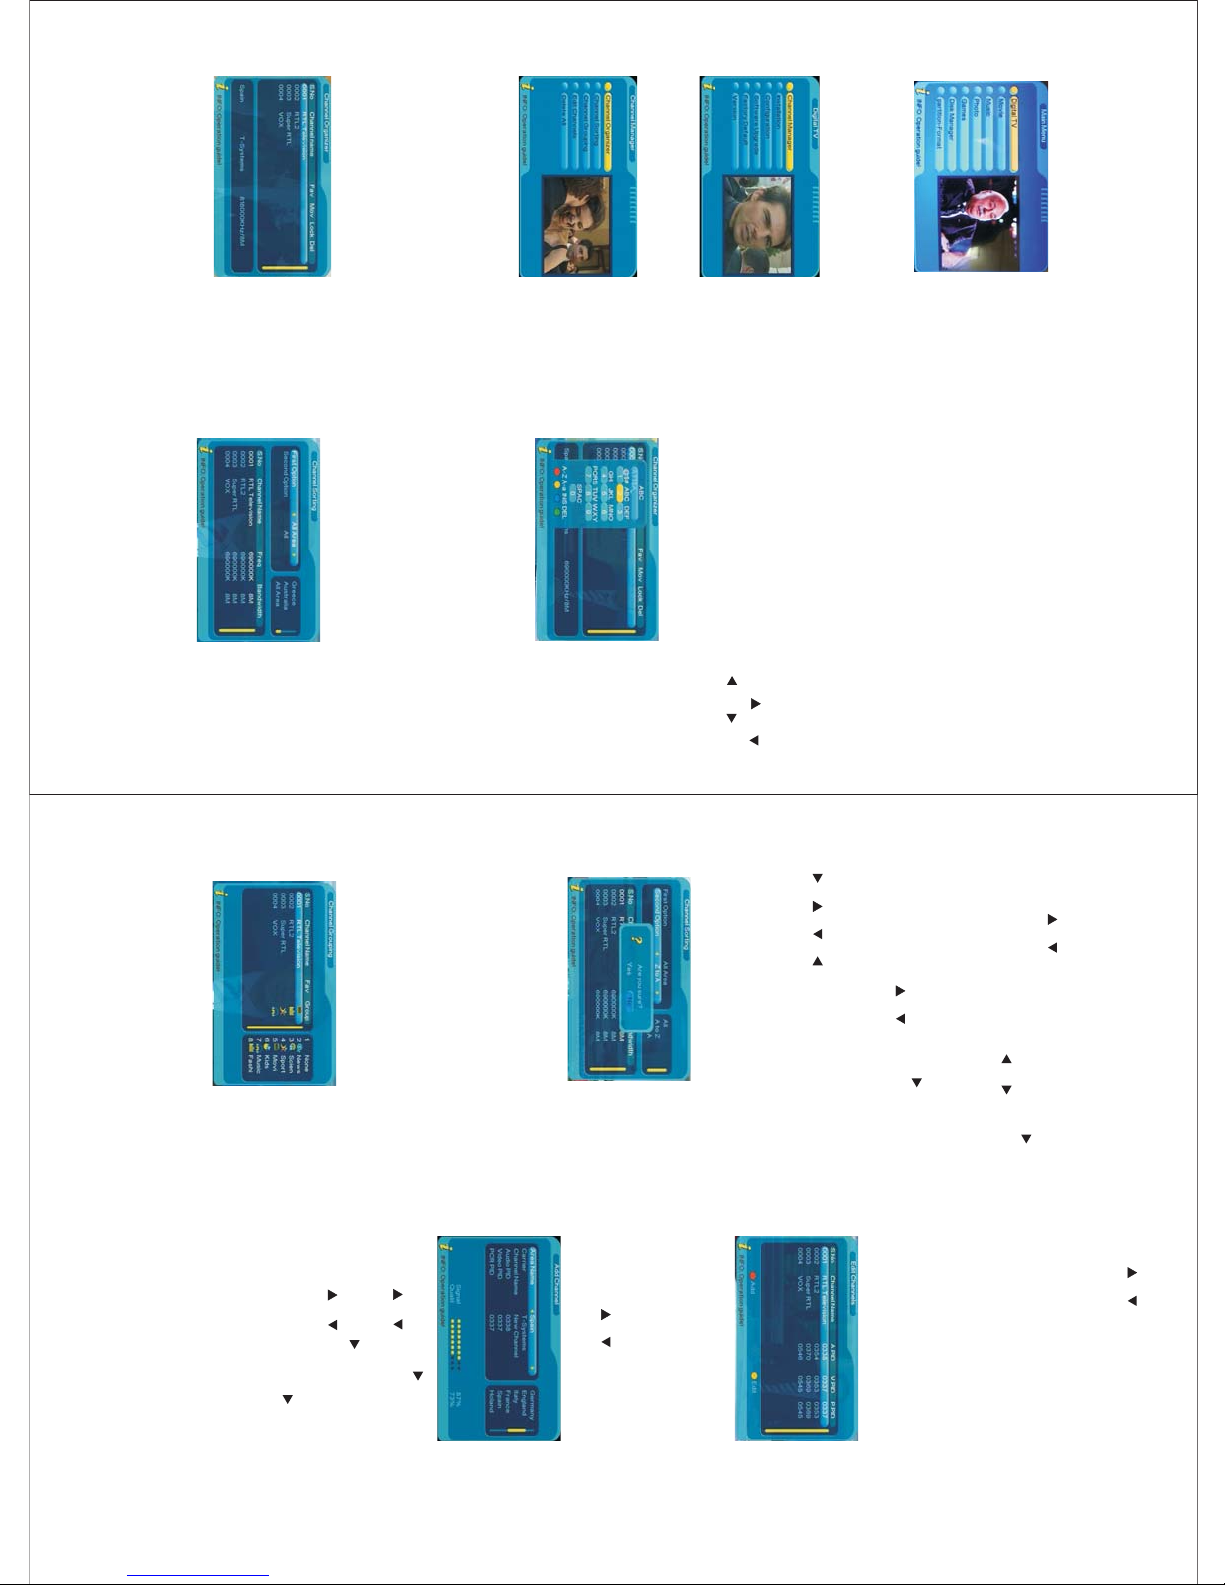
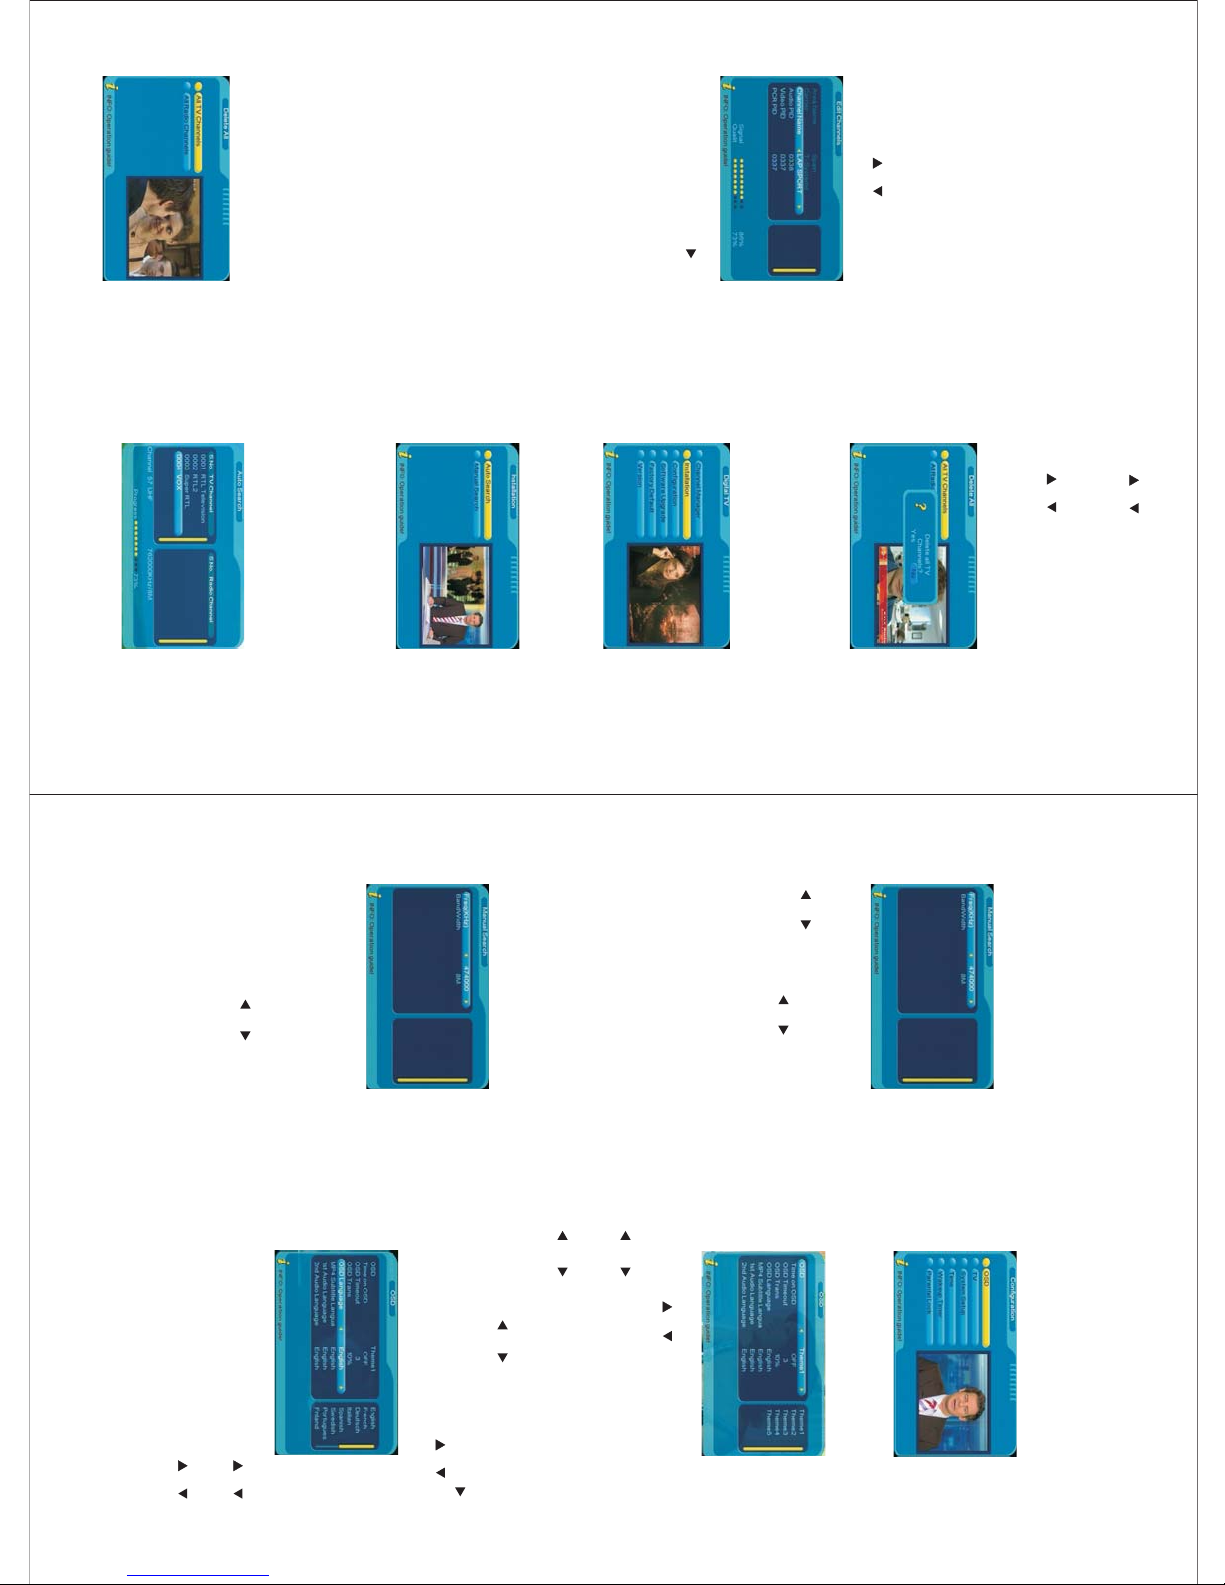
manuals.online logo
Brands
  1. Home
  2. •
  3. Brands
  4. •
  5. August
  6. •
  7. Digital Photo Frame
  8. •
  9. August DPT800 User manual

August DPT800 User manual

Other manuals for DPT800

1

Other August Digital Photo Frame manuals

August 1.5 User manual

August

August 1.5 User manual

August DPT800 User manual

August

August DPT800 User manual

August Digital Photo Frame User manual

August

August Digital Photo Frame User manual

Popular Digital Photo Frame manuals by other brands

Alpina FlipUp FF-RP instructions

Alpina

Alpina FlipUp FF-RP instructions

Audiovox DPF701 owner's manual

Audiovox

Audiovox DPF701 owner's manual

LENCO DF-830 user manual

LENCO

LENCO DF-830 user manual

texet DPF-830 Instructions for use & care

texet

texet DPF-830 Instructions for use & care

Philips SPF2017 Specifications

Philips

Philips SPF2017 Specifications

Philips SPF1327 Specifications

Philips

Philips SPF1327 Specifications

Philips SPF7010/10 quick guide

Philips

Philips SPF7010/10 quick guide

Digital Spectrum MemoryVue MV-1500 user manual

Digital Spectrum

Digital Spectrum MemoryVue MV-1500 user manual

ViewSonic VFM1042-52 Specifications

ViewSonic

ViewSonic VFM1042-52 Specifications

YURAKU YUR.PHOTO 7B4C brochure

YURAKU

YURAKU YUR.PHOTO 7B4C brochure

Denver PFF-710WHITE MK2 user manual

Denver

Denver PFF-710WHITE MK2 user manual

Pandigital PAN8000DWPCF1 user guide

Pandigital

Pandigital PAN8000DWPCF1 user guide

Nokia SU-4 user guide

Nokia

Nokia SU-4 user guide

Philips 10FF3CDW null

Philips

Philips 10FF3CDW null

Rekam Deja View HD-850 user manual

Rekam

Rekam Deja View HD-850 user manual

Majestic DF 918HD MP3 user manual

Majestic

Majestic DF 918HD MP3 user manual

Digital Foci Image Moments IMT-063 user guide

Digital Foci

Digital Foci Image Moments IMT-063 user guide

Kodak W1020 - GUIA COMPLETO DO USUÁRIO FOR FIRMWARE VERSIONS EARLIER THAN... manual

Kodak

Kodak W1020 - GUIA COMPLETO DO USUÁRIO FOR FIRMWARE VERSIONS EARLIER THAN... manual

manuals.online logo
manuals.online logoBrands
  • About & Mission
  • Contact us
  • Privacy Policy
  • Terms and Conditions

Copyright 2025 Manuals.Online. All Rights Reserved.

August International Ltd
United Kingdom
Telephone:+44 (0) 845 250 0586
www.augustint.com
8 Inch Digital TV Photo Frame
DPT800
TV Numerique 8 Pouces et Cadre Photo
8 Zoll Digitaler TV und Bilderrahmen
Thank you for buying our August TV. You may already be familiar with using
a similar product but please take time to read these instructions carefully. It is
designed to familiarise you with the product’s many features and to ensure
that you get the very best from your purchase.
To ensure your safety and the safety of others, please ensure you read the
Safety Instructions before you use this product.
Please ensure the product and its accessories are disposed in compliance with
WEEE (Waste Electrical and Electronic Equipment) Directive and other
regulations. Please check with your local authority for disposal regulations.
If you need help, please contact our Customer Service:
Telephone: +44 (0) 845 250 0586
Email: [email protected]
Safety
Disposal
Customer Service:
User Manual
Quick Start Guide
DPT800
It is suggested that you use a roof top aerial when scanning for TV channels
for the first time, if any signal is detected, the channel information will be
saved on the TV, you may then switch back to the portable antenna supplied
and change your location to find the best place to receive the signal.
To turn on the device, connect it to the mains power, switch the power
button on the side of the device to ON.
When turning on the device for the first time, “Initial Install” will show,
follow the instructions to select OSD Language and Area, then press
ENTER, it will ask whether to install, select YES, the auto search will then
start. Once the search has finished, press or EPG to select channels.
Press TV/RADIO to switch between Freeview TV and Radio channels.
If you have already done an initial installation, and would like to scan for
additional Freeview channels, or if you have moved to a different region
and need to rescan for channels, press MENU, select “Digital TV” by
pressing ENTER, select “Installation”, then select “Area Search”, press
ENTER to start the search. Once the search has finished, press or
EPG to select channels. Press TV/RADIO to switch between Freeview TV
and Radio channels.
To play video, music, or photos on an SD card or memory stick, insert the
SD card or memory stick into the card slot or USB port, press MENU to
select “Movie”, “Music”, or “Photo”, press ENTER to start playing, press
MENU to stop and exit to the main menu. During photo playback, press
for the previous photo, press for the next one, press to rotate clockwise,
press to rotate anticlockwise, press ENTER for photo slideshow, the
selected folders photos will play through continuously.
,
,
1.
2.
3.
4.
5.
Please note the included portable antenna may only be used in areas where
signal is very strong. There are difficulties in receiving signal with the
portable antenna in some regions at present, this is due to the fact that
Freeview (www.freeview.co.uk) is yet to operate in full power in the UK.
The government aims to achieve a full switchover by 2012, which will
occur in stages, region by region between 2008 and 2012, at present the
quality of Freeview reception varies in different regions across the UK.
As mentioned on the Freeview website, only some households might be
able to use a set top aerial at present. This only applies if you live in an
area with coverage close to a transmitter, but reception would still be
unreliable and they strongly recommend that you use a roof top aerial for
good reception.
The reception will improve along with the progress of the Digital
Switchover Program. Reception may also be affected by various factors
such as how close you are to transmitters, tall buildings, thick walls,
ceilings and weather etc.
For any further queries, please telephone August International Ltd helpline
+44 (0) 845 250 0586 or email [email protected]
6.
7.
1. Safety Instructions
2. Accessories
3. Part Names and Functions
4. Connection
5. Basic Operation
6. Digital Freeview TV (DVB-T)
7. Digital TV Recording
8. Card Reader & USB Functions
9. Games
10.
11.
12.
13. Troubleshooting
14. Warranty
Disk Manager
Partition Format
Specifications
1
3
4
9
10
11
17
18
20
21
23
24
25
26
-1-
1. Safety Instructions
Maintenance
Please unplug all connected wires before starting to clean this machine.
Storage and Use
Never expose
the TV set to
moisture,dust
oil or smoke.
Never put this
machine in
containers that
are unstable as
this may cause
damage.
Never strike or
scratch this
machine with
sharp objects.
Keep this device
away from extreme
temperatures.
The storage
temperature of
this machine is
-20~ 60 , the
application
temperature of
this machine is
5~ 35 .
℃
℃
Keep the TV
set away from
water or damp
environments.
Avoid
dropping or
exposing to
impacts.
Please wipe the
display screen
and buttons with
a soft cloth. Only
clean the screen
with professional
LCD TV screen
cleanser.
Never wipe this
machine with an
abrasive cloth,
detergent
powder, alcohol
and benzene etc.
various
propellants or
chemical
cleaning products.
Alcohol
-2-
1. Please do not set your headphones/earphones to high volumes, as it may lead
to ear damage.
2. When using earphones with an open design, to avoid annoying those close by,
please set to a low volume.
3. If you start to develop tinnitus, please stop using the headphones to listen to
this machine.
4. It is recommended by aurists that the earphones should not be used
continuously for a prolonged period.
For the sake of safety for yourself and others, please do not watch the TV
while driving.
1.Use only the supplied power adaptor with this device. Failure to do so can
cause damage to the device and risk personal injury.
2.For the sake of safety, when you do not intend to use the display, please
switch off the AC adaptor.
A few highlights or dark spots may appear on the LCD screen. It is a very
common phenomenon of active matrix display technology, and does
-3-
Stand
User manual
Digital TV antenna
AC/DC adaptor Remote control
2 Accessories.
8 Inch Digital TV Photo Frame
DPT800
TV NUMÉRIQUE 8 POUNCES ET CADRE PHOTO
8 ZOLL DIGITALER TV UND BILDERRAHMEN
-4-
1. LCD display
3. Part Names and Functions
3.1 Front
3.2 Back
12
7
8
12 3456
8
800110001
DPT800
2. IR receiver window
1. Left
2. Right
3. Set
4. Menu
5. Up
6. Down
7. Stand
8. Speakers
-5-
3.4 Right
1.Antenna input jack
1. SD/MMC card slot
3.3 Left
2. USB jack
2
1
1
2
3
4
3.12V DC IN jack
2.Earphone jack 4 Power On/Off switch.
-6-
3.5 Remote Control
3.5.1 Remote Button Functions
2
22 23
3
1
9
12
13
16
17
20
6
4
8
10
11
14
15
18
19
21
7
5
REC.
SET
EXIT
-7- -8-
3.5.2 Use of the Remote Control
Please remove the PVC packaging before using the remote control for the first time.
1.Do not expose the remote control to direct sunlight or very strong/bright light.
2.Do not drop or step on the remote control or subject it to shocks.
3.Keep the remote control away from extreme hot or humid environment.
4.Keep the remote control away from water.
Operating range
1.The IR sensor on the remote control
should be aimed directly at the front
of the device.
2.Use the remote control no further
than 5 meters away from the sensor.
3.The IR sensor has a receiving angle
of 30º.
Replacing the battery
If the remote control does not function or if the operating range becomes
reduced, replace the old battery with a new one.
Remove the old battery, then insert the new battery into the battery holder
with the + side facing upwards.
a
b
Push back the holder.
+
Lithium battery(CR2025)
30 30
<5m
1. Power on/off the device
2.
3.
4.
6. Numbers
7. Favourite channels list
8.
9.
10. Press repeatedly to change the display settings of Brightness,
Contrast, and Colour.
11. Switch off / on the sound
12. Enter/ Play/ Pause
13. Left
14.
15. Volume down
16.
17. Enter or exit main menu
18. Return to upper menu
19. Volume up
20-23. RED/YELLOW/BLUE/GREEN: Used for editing channels
Teletext (not available in the UK)
Freeview channel information
Electronic program guide
Press and / to view today’s program information.
5. Freeview TV and Radio switch
Up / Channel up / Previous
Right
Down/ Channel down/ Next
Start recording or stop recording
-9-
4.Connection
4.1 Connecting the power supply
1.Connect the DC output of the AC/DC adaptor to the DC IN 12V jack on
the device.
2.Plug the power adaptor into the AC power socket.
4.2 Connecting the earphones
Connect the earphone plug to the earphone jack on the device.
*Note:
If earphones are used, sound is only transmitted through the earphones, and
no sound is available from the stereo speakers of the device.
*Note:
1.Please ensure proper disposal of used batteries.
2.To prevent leakage of fluid from the lithium battery, remove the battery when
not using the remote control for a long period of time. If the battery leaks fluid,
carefully wipe it out of the battery case, then change to a new lithium battery.
Earphones
1
2
5. First Time Installation
5.1 Turning on/off the device
5.1.1 Turn power on
5.1.2 Turn power off
5.2 Initial installation
Connect the device to the mains power, switch the power button on the side of the
device to ON.
If the device is on standby, press POWER on the remote to switch it on.
Switch the power button on the side of the device to OFF, or press POWER on the
remote to switch to standby.
When turning on the device for the first time, “Initial Install” will show, follow
the instructions to select OSD Language and Area, then press ENTER, it will ask
whether to install, select YES, the auto search will then start. Once the search has
finished, press , or EPG to select channels. Press TV/RADIO to switch
between Freeview TV and Radio channels.
-10-
6. Digital Freeview TV (DVB-T)
6.1 Channel Manager
In Digital TV mode, select Channel
Manager, press ENTER for the submenus.
Press MENU, select Digital TV, it has the
following options:
Channel Manager allows the user to sort,
edit, delete, and classify the channels.
6.1.1 Channel Organizer
Channel organizer is used to set favourite
channels, change channel positions, lock
and delete channels, and edit channel's name.
1. Channel Organizer can be accessed by
selecting MENU -> Digital TV ->
Channel Manager -> Channel Organizer.
2. If there is no channel saved on the TV,
Channel Organizer can not be accessed,
and it will show “Channel not available”.
3. Use UP/DOWN to select the channel
you want to edit.
- Press YELLOW to delete or undelete a
channel, it will ask you to enter the
password, the system default password
is 0000.
- Press RED to select or cancel a favourite.
- Press BLUE to set or cancel a channel's
position change.
- Press GREEN to lock or unlock a channel,
it will ask you to enter the password, the
system default password is 0000.
4. To change the channel name, use /
to select the channel line, press / to
enter the page to change the name, press
RED/GREEN/YELLOW/BLUE to editthe
name.
5. Press MENU to exit Channel Organizer.
-11-
6.1.2 Channel Sorting
It allows the user to sort the channels by
area, alphabetically or by number sequence.
1. Channel Sorting can be accessed by
selecting MENU-> Digital TV->
Channel Manager->Channel Sorting.
6.1.3 Channel Grouping
It allows the user to sort channels into 8
different categories: News, Science, Sports,
Movie, Kids, Music, Fashion and None.
1. Channel Sorting can be accessed by
selecting MENU-> Digital TV->
Channel Manager->Channel Grouping.
2. If there is no channel saved on the TV,
Channel Grouping can not be accessed,
and it will show “Channel not available”.
3. Use / to select the channel,
and then select the category by pressing
the numbers (1-8).
4. After setting, press MENU it will show
“Successfully updated”.
It allows the user to add and edit channels.
1. Edit Channels can be accessed by
selecting MENU-> Digital TV->
Channel Manager-> Edit Channels.
6.1.4 Edit Channels
-12-
2. If there is no channel saved on the TV,
Edit Channels can not be accessed, and it
will show “Channel not available”.
3. To add a new channel, press RED, and
then press / to select between
the 6 parameters as shown:
2. If there is no channel saved on the TV,
Channel Sorting can not be accessed,
and it will show “Channel not available”.
3. Press / to select:
First Option: Sorting by area, press
to enter the area list, use / to select,
press ENTER to confirm.
Second Option: Sorting alphabetically or
number sequence, press to enter the
option list, use / to select, press
ENTER to confirm.
4. Sorting rules can be selected by pressing
///.
5. After sorting rules is selected, press
ENTER to confirm, it will ask “Are you
sure?”, select “Yes” to confirm and to
proceed the sorting, or select “No” to cancel.
①
②
by
6. Press MENU to exit Channel Sorting.
①
②
③
④
Area Name: press to enter the
list, use / to select, press
confirm.
Carrier: press to enter the
list, use / to select,
press ENTER to confirm.
Channel Name: press to enter
the edit page, use RED/GREEN
/YELLOW/BLUE to edit, press ENTER
to confirm.
Audio PID: can be changed by pressing
the numbers.
area
ENTER
to
carrier
-13-
6.1.5 Delete All
To delete all the TV and Radio channels,
select MENU-> Digital TV->
Channel Manager-> Delete All.
1. Use / to select TV channels,
it will ask “ Delete all TV channels?”,
select “Yes” to confirm and proceed
the delete, select “No” to cancel.
2. Use / to select Radio channels, it will
ask “ Delete all Radio channels?”, select
“Yes” to confirm and proceed the delete,
select “No” to cancel.
Press ENTER, it gives three search
options: Area Search, Manual Search
and Auto Search.
⑤
⑥
⑦
⑧
Video PID: can be changed by pressing
the numbers.
PCR PID: can be changed by pressing
the numbers.
Once finish the settings, press ENTER
to confirm, it will show “Successfully
updated” and return to Edit Channels.
During setup, press MENU at any time
to cancel and exit to Edit Channels.
4. To edit a channel, press YELLOW, and
then press / to select between
the 4 parameters as shown:
6.2.1 Area Search
Select Area Search, press ENTER, it will
start the search. If you are in a different
country, make sure you have selected the
correct country setting before the scan.
①Channel Name: press to enter
the edit page, use RED/GREEN/
YELLOW/BLUE to edit, press ENTER
to confirm.
Audio PID: can be changed by pressing
the numbers.
Video PID: can be changed by pressing
the numbers.
PCR PID: can be changed by pressing
the numbers.
Once finish the settings, press ENTER
to confirm, it will show “Successfully
updated” and return to Edit Channels.
During setup, press MENU at any time
to cancel and exit to Edit Channels.
②
③
④
⑤
⑥
6.2 Installation
Installation is for searching TV and Radio
channels, it can be accessed by selecting
MENU-> Digital TV-> Installation
-14-
6.2.2 Manual Search
If you know a channel's broadcasting
frequency and bandwidth, using manual
search to find the channel can be quicker.
Select Manual Search, press ENTER, it will
ask you to provide two parameters:
①
②
Freq (KHz): scanning frequency, the
default is 474000 KHz, use numbers
or / to change.
Band Width: use / to select.
After setting, press ENTER to start the search.
After searching, the system will automatically
exit the searching page, save program
information and return to Installation menu,
press MENU to exit.
6.3 Configuration
Configuration menu has the following
options: On Screen Display, TV, System
Setup, Time and Parental Lock. It can be
accessed by selecting MENU->Digital
TV->Configuration.
6.3.1 OSD (On Screen Display)
Through OSD, you can set the interface
pattern.
Left of the menu lists all the options under
OSD. Press / to select an option.
1. OSD: supports 5 menu patterns, press
/ to select between Theme1-5.
2. OSD Timeout: sets the display time of an
information dialog window, press
/ to select between 1-6
seconds, the system default is 3seconds.
3. OSD Trans: sets the diaphaneity of the
menu, press / to adjust from 0%-60%.
4. OSD Language: the system supports
multi-language user interface, press
to enter the language list, use /
to select, press ENTER to confirm.
6.2.3 Auto Search
This allows to search channels between a
frequency range.
Select Auto Search, press ENTER, it will ask
you to provide three parameters:
1) Start Freq (KHz): input the start of the
frequency range.
2) End Freq (KHz): input the end of the
frequency range.
3) Band Width: use / to select.
After setting, press ENTER to start the search.
After searching, the system will automatically
exit the searching page, save program
information and return to Installation menu,
press MENU to exit.
5. 1st Audio Language: press RIGHT to
enter Audio Language list, use /
to select, press ENTER to confirm.
6. 2nd Audio Language: press RIGHT to
enter Audio Language list, use /
to select, press ENTER to confirm.
7. After setting, press ENTER to confirm,
press MENU to exit the setup, it will show
“Successfully updated”.