auna multimedia VC-3.2 User manual

VC-3.2 Aktives Lautsprecher Boxen System
10000728

Sehr geehrter Kunde,
zunächst möchten wir Ihnen zum Erwerb Ihres Gerätes gratulieren.
Bitte lesen Sie die folgenden Anschluss- und Anwendungshinweise sorgfältig durch und befolgen Sie
diese um möglichen technischen Schäden vorzubeugen.
Installation des Gerätes
Beachten Sie bitte:
Die volle Klangqualität wird nur erreicht, wenn die Schallwellen durch die Raumwände (Seitenwände)
Ihres Rames nicht behindert werden.
D.h. sind die Wände mit Möbeln Regalen oder andere Gegenständen verstellt, ist keine optimale
Klangwiedergabe möglich.
Batterien einlegen
Durch die einzelnen Funktionen auf der Fernbedienung können die Klangeinstellungen individuell
angepasst werden, diese Einstellungen sind subjektiv und jeder Anwender bevorzugt eigene Klang-
varianten.
Durch das Ausprobieren der einzelnen Funktionen den besten Klang zu nden, ist daher besser als
jede Anleitung.
Sollte Sie Probleme mit der Programmierung haben, können Sie gern unseren kostenlosen Telefon-
Erste-Hilfe-Service in Anspruch nehmen.
Melden Sie sich einfach bei unserem Support und man wird Ihnen weiterhelfen.
Viel Spaß mit unserem Produkt.
Entnehmen Sie das Boxen System und das Zubehör der Verpackung.
Prüfen Sie ob äußerliche Beschädigungen vorhanden sind.
Kommt das Gerät aus dem Kalten ins Warme lassen Sie bitte die Kondensfeuchtigkeit einige Stunden
austrocknen bevor Sie das Gerät anschließen bzw. einschalten.
Verbinden Sie das Netzkabel bitte mit einer 230V Steckdose.
Legen Sie die Batterien in die Fernbedienung, achten Sie bitte auf die richtige Polarität. Verbinden Sie
die Signalquellen mit dem Gerät.
Das Boxen System ist nun betriebsbereit.
2

Anschlüsse an der Rückseite des Gerätes
01 CD Player Cincheingang rechter Kanal
02 CD Player Cincheingang linker Kanal
03 AUX (z.B. Radiogerät/Tuner) Cincheingang linker
Kanal
04 AUX (z.B. Radiogerät/Tuner) Cincheingang rechter
Kanal
05 TV (Fernseher) Cincheingang linker Kanal
06 TV (Fernseher) Cincheingang rechter Kanal
Tastenfunktionen der Fernbedienung
01 RESET - Alle Einstellungen werden zurückgesetzt
(Werkseinstellungen)
02 INPUT - Eingangswahl vorwärts CD, AUX, TV
03 2.2CH - 2.2 Kanal Modus Wahltaste
04 FRONT- - Frontlautsprecher Lautstärke Einstellung
(leiser)
05 VOL+ - Gesamtlautstärke Einstellung (lauter)
06 MUTE - Stummschaltung der gesamtem Anlage
07 SW- - Subwoofer Lautstärke Einstellung (leiser)
08 VOL- - Gesamtlautstärke Einstellung (leiser)
09 FRONT - Frontlautsprecher Lautstärke Einstellung
(lauter)
10 SRS 3D - 3D Raumklang Einstellung
11 SBS - Bass Sound Einstellung
12 CCY2 - Modus 2
13 P2Bass - Bass Equalizer
14 STANDBY - Abschalten ohne Netztrennung,
Bereitschaftsschaltung
15 INPUT - Eingangswahl rückwärts CD, AUX, TV
16 3.2CH - 3.2 Kanal Modus Wahltaste
17 CEN+ - Center Lautsprecher Einstellung (lauter)
18 SW+ - Subwoofer Lautstärke Einstellung (lauter)
19 CEN- - Center Lautsprecher Einstellung (leiser)
20 CCY1 - Modus 1
21 BYPASS - Bypass Funktionsauswahl
3

Erste Schritte nach Neuaufstellung
E/A Netzhauptschalter
01 STANDBY - Abschalten in Bereitschaftsmodus
02 INPUT - Wechsel der Eingangssignalquellen
03 Display mit Modusanzeige
04 IR - Empfängersensor für Fernbedienung 05 - VOLUME - Lautstärke +/- (laut/leiser)
Schalten Sie das Gerät mit dem Ein-/Ausschalter E/A ein.
Das Display sollte nun aueuchten.
Wählen Sie mit der Fernbedienung oder am Gerät die Signalquelle aus die Sie wiedergeben möchten.
Regeln Sie mit den verschiedenen Einstellmöglichkeiten der Fernbedienung Ihren Wunschklang ein.
Erste Hilfe und Problemlösungen
Erste Hilfe und Problemlösungen:
Gerät funktioniert überhaupt nicht?
Leuchtet nach dem Einschalten ein grünes Minuszeichen im Display? Wenn nicht, prüfen Sie bitte die
Stromversorgung.
Fernbedienung ist ohne Funktion?
Bitte prüfen Sie die Batterien der Fernbedienung.
Kein Ton nach aktvieren der Anlage?
Prüfen Sie bitte, ob die Signalkabel oder Signalquellen richtig angeschlossen sind. Aus der Praxis ist
bekannt das Cinchkabel gerne Unterbrechungen haben. Tauschen Sie diese defekten Kabel gegen
neue aus.
Schlechtes Klangbild ohne räumlichen Charakter?
Prüfen Sie die Aufstellung der Anlage.
Verändern Sie gegebenenfalls die Abstrahlrichtung oder beseitigen Sie Hindernisse.
4

Sie scheitern beim Aufstellen und der Erstinstallation total?
Wenden Sie sich unsere Service, wir helfen Ihnen gerne oder bitten Sie einen Fernsehfachmann aus
Ihrer Nähe um Hilfe.
Warnhinweise
Reparaturen am Gerät sollten nur von einer autorisierten Fachwerkstatt durchgeführt werden. Önen
Sie in keinem Fall das Gerät.
Falscher Zusammenbau führt möglicherweis zu Fehlfunktionen oder dem Totalausfall.
Das Gerät sollte vor jeglicher Feuchtigkeit und direkter Sonneneinstrahlung geschützt werden. Das
Gerät bitte nicht mit Reinigungsmitteln reinigen.
Verwenden Sie zur Reinigung nur in trockenes (Mikrofaser) Tuch.
Schließen Sie das Gerät nur an die dafür vorgesehene Netz- oder PKW-Bordspannung an. Schließen
Sie das Gerät in keinem Fall an andere Spannungen als vorgesehen an.
Die Gewährleistung verfällt bei Fremdeingrien in das Gerät.
CHAL-TEC Vertriebs- + Handels GmbH; Wallstraße 16; 10179 Berlin, Germany
5

CONTENTS
Contents ............................................................................................................................... 1
Safety Instructions .............................................................................................................. 2-4
Front and Rear Panels Buttons and Functions ............................................................................. 5
Remote Control Handset Buttons and Functions....................................................................... 6-7
Using the Remote Control Handset............................................................................................ 8
lnstalling the Home Cinema System .......................................................................................... 9
Connecting the Home Cinema System ......................................................................................10
Operation ........................................................................................................................ 11-13
Specications........................................................................................................................14
SAFETY INSTRUCTIONS
Batterien einlegenA lightníng symbol inside an equilateral triangle warns the
user ofthe presence inside the product of uninsulated
hazardous electric Voltages powerful enough to represent
an electrocution risk.
An exclamation mark symbol inside an equilateral triangle
Warns the user that important operating and servicing
instructions are contained in the documentation
accompanying the product.
CAUTION:
TO REDUCE THE RISK OF FIRE OR ELECTROCUTION, NEVER EXPOSE THIS PRODUCT TO RAIN
OR MOISTURE.
To ensure safe use ofthis product, please follow the recommendations below:
Positioning
• Do not use the product in extremely hot, cold, dusty or damp conditions.
• Place the product on a smooth, at surface.
• Do not obstruct the ow ofair through the product. Place it in a well-ventilated position; do not
cover with fabric or stand on a rug or carpet.
Power supply
• Before using the product, check that its rated voltage matches your AC power supply voltage.
6

Safety Instructions
• Never pull on the power cord When plugging in or unplugging the product: always use the plug.
Pulling the cord could damage it and create a risk ofelectric shock.
• Unplug the product from the mains socket ifyou do not intend to use it for an extended period.
• Do not place sources ofopen ames, such as burning candles, on the product.
• This product is designed for use in temperate climates.
• Ensure that the product‘s ventilation is not impaired by newspapers, tablecloths, curtains or any
other objects obstructing the Ventilation slits.
• The AC power plug serves as the means for isolating the product from the power supply; you
should therefore remove the power corcl plug from the AC socket, Which should be located near
the product and easily accessible.
• Never poke metal objects into the product.
Condensation
• Water droplets or condensation may form inside the product when it is moved into a very warm,
humid atmosphere,
• Condensation can cause the product to malfunction.
• Leave the set in a Warm rooın for l to 2 hours to allow the condensation to evaporate.
Ventilation precautions
Never obstruct the product‘s Ventilation holes. To ensure adequate Ventilation, leave a clear area of
at least 15 cm all around the product.
Warning concerning liquids
Do not allow liquids to splash or spill onto the product, and never stand a liquid-lled container (Vase,
jar, etc.) on top ot.
Care and cleaning:
Clean the product with a soft, dry cloth, To remove stubborn dirt, dip the cloth in a weak detergent
solution, wring out thoroughly and then wipe the product. Do not use volatile Chemicals such as
benzene ot paint thinners, Which could damage the product‘s nish.
INSTALLING THE HOME CINEMA SYSTEM
Tastenfunktionen der Fernbedienung
7

FRONT AND REAR PANELS BUTTONS AND FUCTIONS
SAFETY INSTRUCTIONS
1. STANDBY: Standby button 8. Right CD input
2. INPUT: Source selection button 9. Right AUX input
3. LED screen 10. Right TV input
4. Remote control signal sensor 11. Power cord
5. VOLUME - button: Decreases the volume level 12. Left CD input
6. VOLUME + button: Increases the volume level 13. Left AUX input
7. Power On/O swıtch 14. Left TV input
8

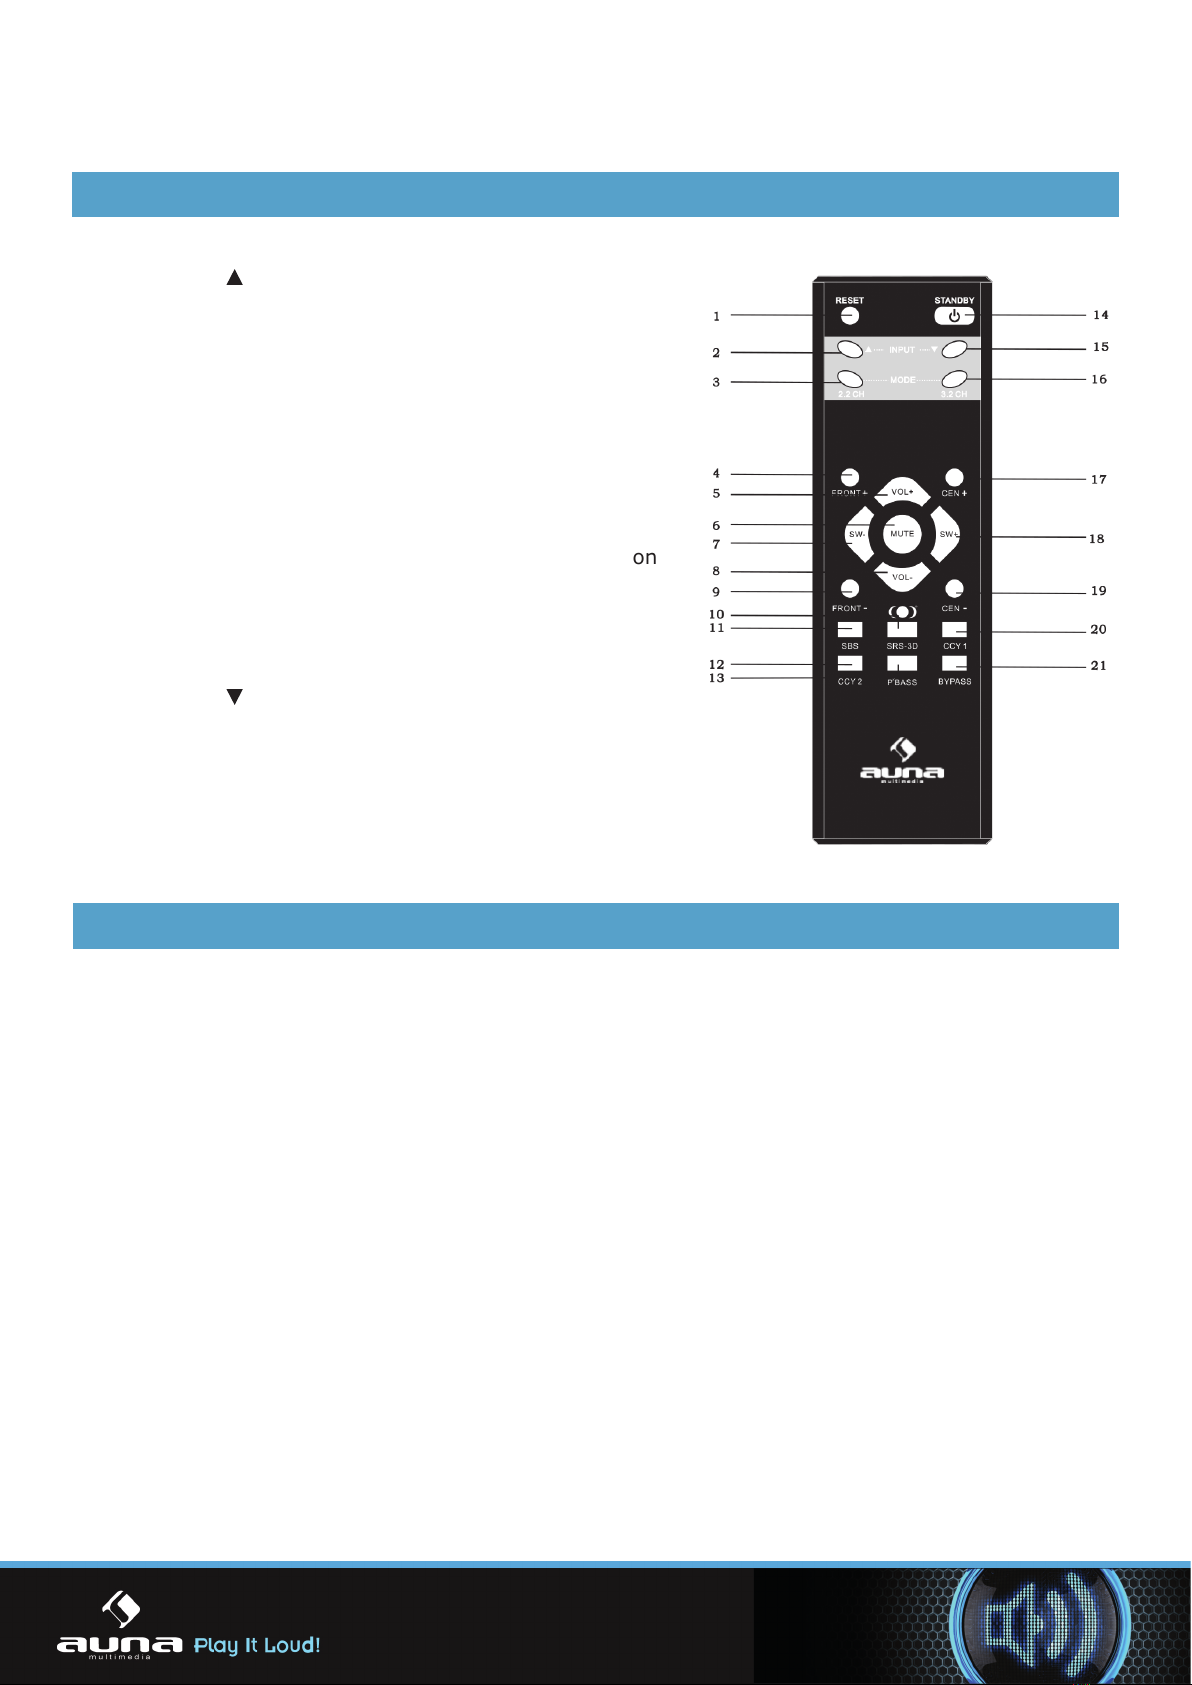
REMOTE CONTROL HANDSET BUTTONS AND FUCTIONS
1. RESET: Reset button
2. INPUT : Ascending source selection button
3. 2.2Cl-l: 2,2 channel mode selector button
4. FRONT+: Increases the front channel level
5. VOL+: Increases the volume level
6. MUTE: Mute (silent) mode
7. SW- button: Decreases the subwoofer channel
level
8. VOL-: Decreases the volume level
9. FRONT-: Decreases the front channel level
10. SRS-3D: SRS-3D Stereo mode selector button.
11. SBS: „Shadow Bass Sound“ mode selector button
12. CCY 2: CCY 2 selection button
13. P2 BASS: Selector button for the new ultrabass
equalizer
14. STANDBY: Enables Standby mode
15. INPUT : Descending source selection button
16. 3.2Cl-l: 3.2 channel mode selector button
17. CEN+: Increases the centre channel level
18. SW+: Increases the subwoofer channel level
19. CEN-: Decreases the centre channel level
20. CCY l: CCY l mode selector button
21. BYPASS: Bypass function selector button
USING THE REMOTE CONTROL HANDSET
1.Fitting the batteries
Insert two LR03/AAA l.5 V batteries (not included) in the battery compartment in the remote control
handset. Observe the battery polarity marked inside the battery compartment.
PRECAUTIONS RELATIVE TO BATTERY USE
• Batteries must be inserted according to the polarity markings. Ensure that the (+) and (›)
terminals are placed in the right direction.
• Never use batteries that display signs ofelectrolyte leakage or cracking.
• To avoid the risk ofelectrolyte leakage or explosion, do not mix batteries ofdierent types, brands,
age or charge level.
• Do not dispose ofused batteries in re.
• Keep batteries out ofthe reach ofchildren.
• Batteries must not be recharged,
• Never short-circuit the battery terminals.
• Remove used batteries from the battery compartment promptly.
• Only batteries ofthe type recommended or similar should be used.
• Do not mix old batteries with new batteries.
• Do not mix alkaline with standard (carbon zinc) batteries.
• The batteries should be removed before discarding the appliance at the end ots service life,
9

BRACKET ASSEMBLE INSTRUCTION
Remark:
This bracket have to be installed on the solid Wall, to be avoided the unit falling down and damage
the households and the unit.
1. Use the paperA to conrm the right place on the Wall, then use the screws to install the
bracket a and b on the wall.
SAFETY INSTRUCTIONS
2. Install the unit on the wall.
3. Check if the installed unit rm or not and the screw is in the right place
10

CONNECTING THE HOME CINEMA SYSTEM
Note:
If you are using a DVD player as an audio source, ensure that it is congured in stereo output mode
so that it can emulate 5.1 channel sound output (SRS-3D mode).
11

OPERATION
A.Switching the product on and o
• Set the POWER switch located on the side panel to „ON“.
• “-” is displayed onscreen, indicating that the home cinema system is in Standby mode.
• Press the “STANDBY“ button on the front panel or on the remote control handset to activate the
system. „Cd 20“ symbol is displayed on the screen.
• To switch othe system, set the POWER button on the side panel to „OFF“.
Note:
Unplug the power cord ifyou do not intend to use the product for an extended period.
B. Adjusting the volume
• To increase the volume, press the „VOL+“ button on the front panel or on the remote control
handset.
• To decrease the voluıne, press the „VOL-“ button on the front panel or on the remote control
handset.
• The level is displayed on the screen while you adjust the volume. Example: „VOL 23“. The
adjustment range extends from „00 dB“ to „63 dB“.
C. Activating Mute mode
• To disable the audio output, press the „MUTE“ button on the remote control unit.
• Pressing this button again restores the sound.
D. Selectíng the source
Press the „INPUT“ button on the front panel to
selectthedesired source mode. Thevariousinputs
are selected in turn in the following order:
a) The „CD“ symbol is shown on the screen when the CD input is selected.
b) Adjust the volume by pressing the „VOL+“ or „VOL-“.button. The adjustment range extends
from „00 dB“ to „63 dB“.
c) lfyou want to change the signal source, press the „INPUT“ button until the desired input is
selected.
d) Alternatively, you can use the remote control handset to select the source, by pressing the
“INPUT ” or “INPUT ” button.
E. Selecting the operating mode
• Pressing the „2.2 CH“ button on the remote control handset selects the 2,2 channel output mode.
This mode enables the subwoofer and the front loudspeakers.
• Pressing the „3.2 CH“ button on the remote control handset selects the 3,2 channel mode, This
mode enables the subwoofer and the front and centre loudspeakers.
F. Setting the loudspeaker levels
You can adjust all the channels individually, within a maximum range of8 dB.
• To adjust the centre loudspeaker level, press the „CEN+“ or „CEN-“ button on the remote control
handset.
• To adjust the level ofthe front loudspeakers, press the “FRONT+“ or „FRONT-“ button on the
remote control handset.
• To adjust the subwoofer level, press the „SW+“ or „SW-“ button on the remote control handset.
12

G. Selecting SBS mode
Pressing the „SBS“ button on the remote control handset converts any bass frequencies outside the
reproduction range ofthe loudspeakers so that they are included in their frequency response range.
This enables small loudspeakers with limited frequency specications to produce fuller bass sounds.
H. Selecting SRS-3D mode
Pressing the “SRS-3D“ button on the remote control handset creates three-dimensional spatial sound
from a two-channel stereo source. This enables you to create sweeping soundscapes.
I. Selecting CCYI mode
Pressing the „CCYl“ button on the remote control handset creates an audio output that recreates the
original sound as faithfully as possible by interpreting the amplier and loudspeakers as an integra-
ted acoustic system, accurately reproducing the „rising part“ ofthe sound - on which audio quality
depends - by processing the signals appropriately before they enter the amplier. The inclusion ofthe
CCY1 audio processor makes for crystal-clear sound.
J. Selecting CCY2 mode
Press the „CCY2“ button on the remote control handset for a full three-dimensional audio output via
two loudspeakers using separate encoded spatial stereo signals.
K. Selecting the P* BASS mode
Press the “P2 BASS“ button on the remote control handset for a natural sound very similar to the
original, even via ultra-at televisions with limited loudspeakers.
L. BYPASS
Press the „BYPASS“ button on the remote control handset to select the 2.2CH output mode,
irrespective ofthe input.
M. Reset
Press the „RESET“ button on the remote control handset to restore the following factory settings:
• Main volume level: „20dB“.
• FRONT/SUBWOOFER/CENTRE channel levels: „OdB“.
TECHNICAL SPECIFICATIONS
Power supply 230V/50Hz
Electric power requirement 130W
Input sensitivity (Subwoofer) 150mV ±50mV
Input sensitivity (Satellites) 550mV ± 50mV
Loudspeaker impedance 8 Ohms
S/N ratio (A-weighted) 85dB
Maximum Total Power 800W
Subwoofer output power 30W+30W (RMS)
Front loudspeaker output power 15W (RMS) x2w
Centre loudspeaker output power 15W (RMS)
Total harmonic distortion(l kHz, l W) <0,7%
Input sensitivity (Subwoofer) 38Hz~l80Hz ± 5dB
Frequency response (Satellites) 18OHz~2OkHz-Iz±5dB
L/R separation (1kHz) >50dB
I./R balance error (Stereo) 2dB
Net weight 12000g
13

Note:
Specıcations are subject to change without notice. SRS and the(.)‘ symbol are trademarks of SRS
Labs, Inc. SRS technology is incorporated under licence from SRS Labs, Inc.
Recycling
This symbol bears the selective Sorting symbol for Waste
electrical and electronic equipment (WEEE) This means that
thıs product must be handled pursuant to European Directive
2002/96/EC in order to be recycled or dismantled to minimize
its impact on the environment For further information please
contact your local or regional authorities.
Electronic products not included in the selective sorting process are potentially danerous
for the environment and human heath due to the presence of hazardous substances.
CHAL-TEC Vertriebs- + Handels GmbH; Wallstraße 16; 10179 Berlin, Germany
14
This manual suits for next models
1
Table of contents
Languages: