Aura 450 Maintenance and service guide
Page 1
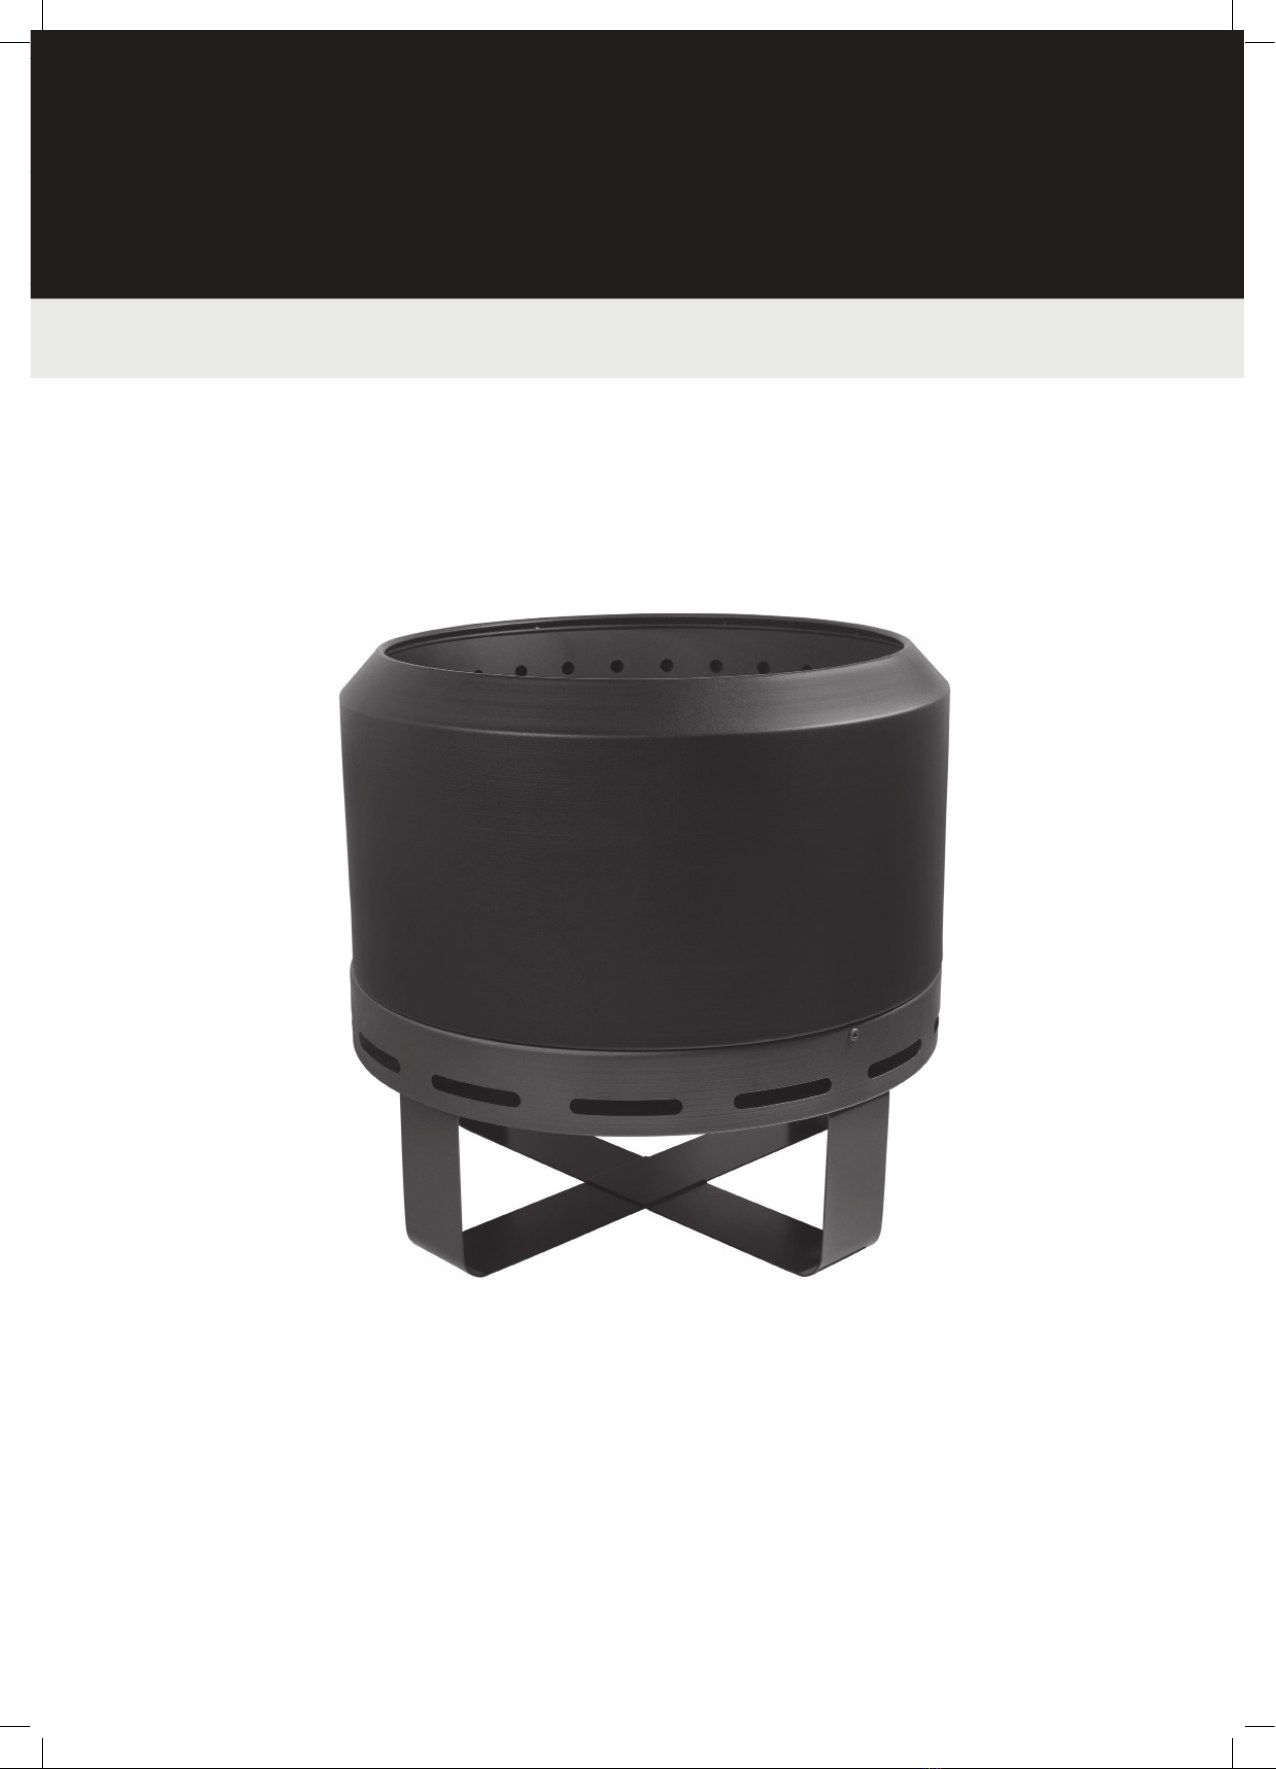
AURA 450 AND 600
LOW SMOKE FIRE PIT
Assembly, Safety & Operating Instructions
READ INSTRUCTIONS CAREFULLY BEFORE ASSEMBLY OR USE
KEEP INSTRUCTIONS IN A SAFE PLACE FOR FUTURE REFERENCE
FOR OUTDOOR USE ONLY

Page 2
IMPORTANT
Before you assemble, install, place or use this product for the rst time, read and follow the supplied
instructions and safety warnings. This is to prevent the potential of re, personal injury or death
or property damage as a result of improper usage. Improper installation, placement, adjustment,
alteration, service or maintenance may cause property damage, injury or death.
IMPORTANT
• During rst use, you may notice a smell and excess smoke caused by paint burn off.
• Your re pit is warranted for 1 year for manufacturing defects and construction.
• Due to the nature of the re pit, the paint will burn off over time, and the body may result in surface rust.
The body can be restored and repainted as required. Refer to care and maintenance section of this manual.
GENERAL SAFETY TIPS
• Always wear re proof gloves when handling the re pit and fuel.
• Place your re pit on a non combustible surface. To prevent accidental combustion or damage, do not place on
unprotected decks, tiles, pavers, concrete, grass, synthetic grass, wood chips or leaves.
• For surfaces such as decks, tiles, pavers, and concrete, it is recommended to use a re resistant mat which
may be purchased from your nearest retailer.
• Ensure the re pit is placed on an even, level surface, not on a sloping surface.
• Position your re pit away from any building structures (house, pergola, garage, shed, trees, furniture).
• Check the weather forecast before using the re pit. Do not use your re pit during high winds.
• Never leave the re pit unattended while in use. Monitor any children or pet activities around the re pit at
all times.
• Do not move the re pit while it is operating or hot.
• Never use petrol or other liquid fuels to start a re, re-start a re or, enhance a re. Never, ever pour any liquid
fuel onto a re that is already alight.
• Make sure that the re is completely extinguished before you leave the re pit unattended.
• Do not disassemble or modify the re pit in any manner other than as described within these instructions.
Improper installation, adjustment, alteration, service or maintenance may cause injury, death or property
damage. This appliance must be operated in accordance with the instructions provided. Failure to observe these
instructions may lead to a re resulting in personal injury or death or property damage.
• Installation clearance requirements must be adhered to. Please read the section on installation clearances
before installing or placing this re pit.
• Keep any combustible materials (such as unprotected decks, furniture), at least 1.5 metres away from the re pit.
• To prevent accidental re and / or smoke damage, remove all packaging before operating.
• Avoid installing or operating the re pit, where a direct draft may affect or fan the ames.
• Do not cover or surround the re pit with insulating materials.
OPERATING SAFETY
• Do not operate this re pit during a total re ban. Always observe any local or state codes or warning issued
by the local re department.
• While the re pit is operating or hot, do not touch the main heating surface (re bowl) or immediate
surroundings as these areas may cause burns.
• Do not use the re pit for any purpose other than its intended use.
• This re pit is designed for use with re wood and kindling only. Do not use any other fuel.
• This re pit must not be used in conjunction with a gas log set or other fuel system - under no circumstances
is this re pit to be modied or retrotted to burn any fuel other than what is described in these instructions.
• Do not leave the re pit unattended while in use.
• Do not heat any unopened plastic, glass or metal containers on the re pit. Pressure may build up and cause
the container to burst, possibly resulting in serious personal injury or damage to the re pit.
• Never move the re pit when it is operating or hot.
• Do not use the re pit as an incinerator - do not burn waste materials such as paper, plastics or garbage
in this re pit.
• Do not use this re pit while under the inuence of alcohol, prescription or non-prescription drugs
or, any substance that may impair sound judgment.
• Do not extinguish the re with cold water - this may damage the re pit. Always use sand or, allow
the re to burn itself out naturally.
3 MTRS
1.5 MTRS
10 MTRS
Page 3
• Use re proof gloves and tools to load and manage the re - never use your bare hands.
• Do not overll the re bowl - always observe any maximum fuel load recommendations.
• Do not allow wood to spill over onto the body or other decorative elements of the re pit. All fuel must be burnt
within the connes of the re bowl.
• Avoid loose clothing while operating the re pit.
FUEL HANDLING SAFETY
• Store wood fuel in a cool dry place - away from the possibility of sparks or embers.
• Keep fuels and re-starters away from children and animals.
• Do not place any ammable liquid or gas fuels or fuel containers within 10 metres around the re pit and always
ensure that any fuel containers or cylinders nearby are sealed to prevent escaping vapour.
CHILD AND PET SAFETY
• Never let children operate the re pit without close supervision.
• Fire pits and chimineas contain hot working surfaces that, if touched, may cause skin burns or scalding.
• Never leave children or pets unattended in the area where the re pit is being used.
• Fireplace surfaces are hot during use. Close supervision of children is necessary when this appliance is
operating. Do not store items of interest to children on, around or below the re pit. Children climbing on the
re pit, to reach items, could damage the re pit or be burned or seriously injured.
• Never allow children to sit or stand on any part of the re pit.
• Always allow hot re tools and accessories to cool in a safe place, out of reach of children.
• We recommend the use of a re screen or guard to prevent children or pets from coming into direct contact
with the surfaces of the re pit while it is in use or hot.
MAINTENANCE AND REPAIR SAFETY
• Always check the re pit and bowl prior to each use - do not use the re pit or bowl if there is a fault.
• Unless specically recommended in this manual, do not repair or replace any part of the appliance.
• Only use genuine replacement parts.
• Any repairs to this product must be carried out by a qualied service person.
• Do not attempt to repair this product yourself.
• Do not operate the product if it has been dropped or damaged in any manner. Call our customer service number
for information on examination or mechanical repair or adjustment of this product.
IN CASE OF ACCIDENTAL FIRE
• In the event of an accidental re, immediately turn the re pit off by smothering the ames with sand
or a re extinguisher.
• For emergency purposes, we recommend the installation of an approved re extinguisher in the vicinity
of where the re pit is installed.
Minimum Clearances To Combustibles
Around the re pit:
Minimum of 1.5 Metres
to combustible materials.
Above the re pit:
Minimum of 3 Metres to
combustible materials. Do not
use the re pit under an awning
or pergola if there is a risk of the
structure or materials igniting.
Liquid or Gas Fuels
Minimum of 10 Metres - Do not store
any liquid or gas fuels, cylinders or
containers in the vicinity of the re pit.
Ensure all fuel containers are sealed
tight to prevent escaping vapours.
Page 4
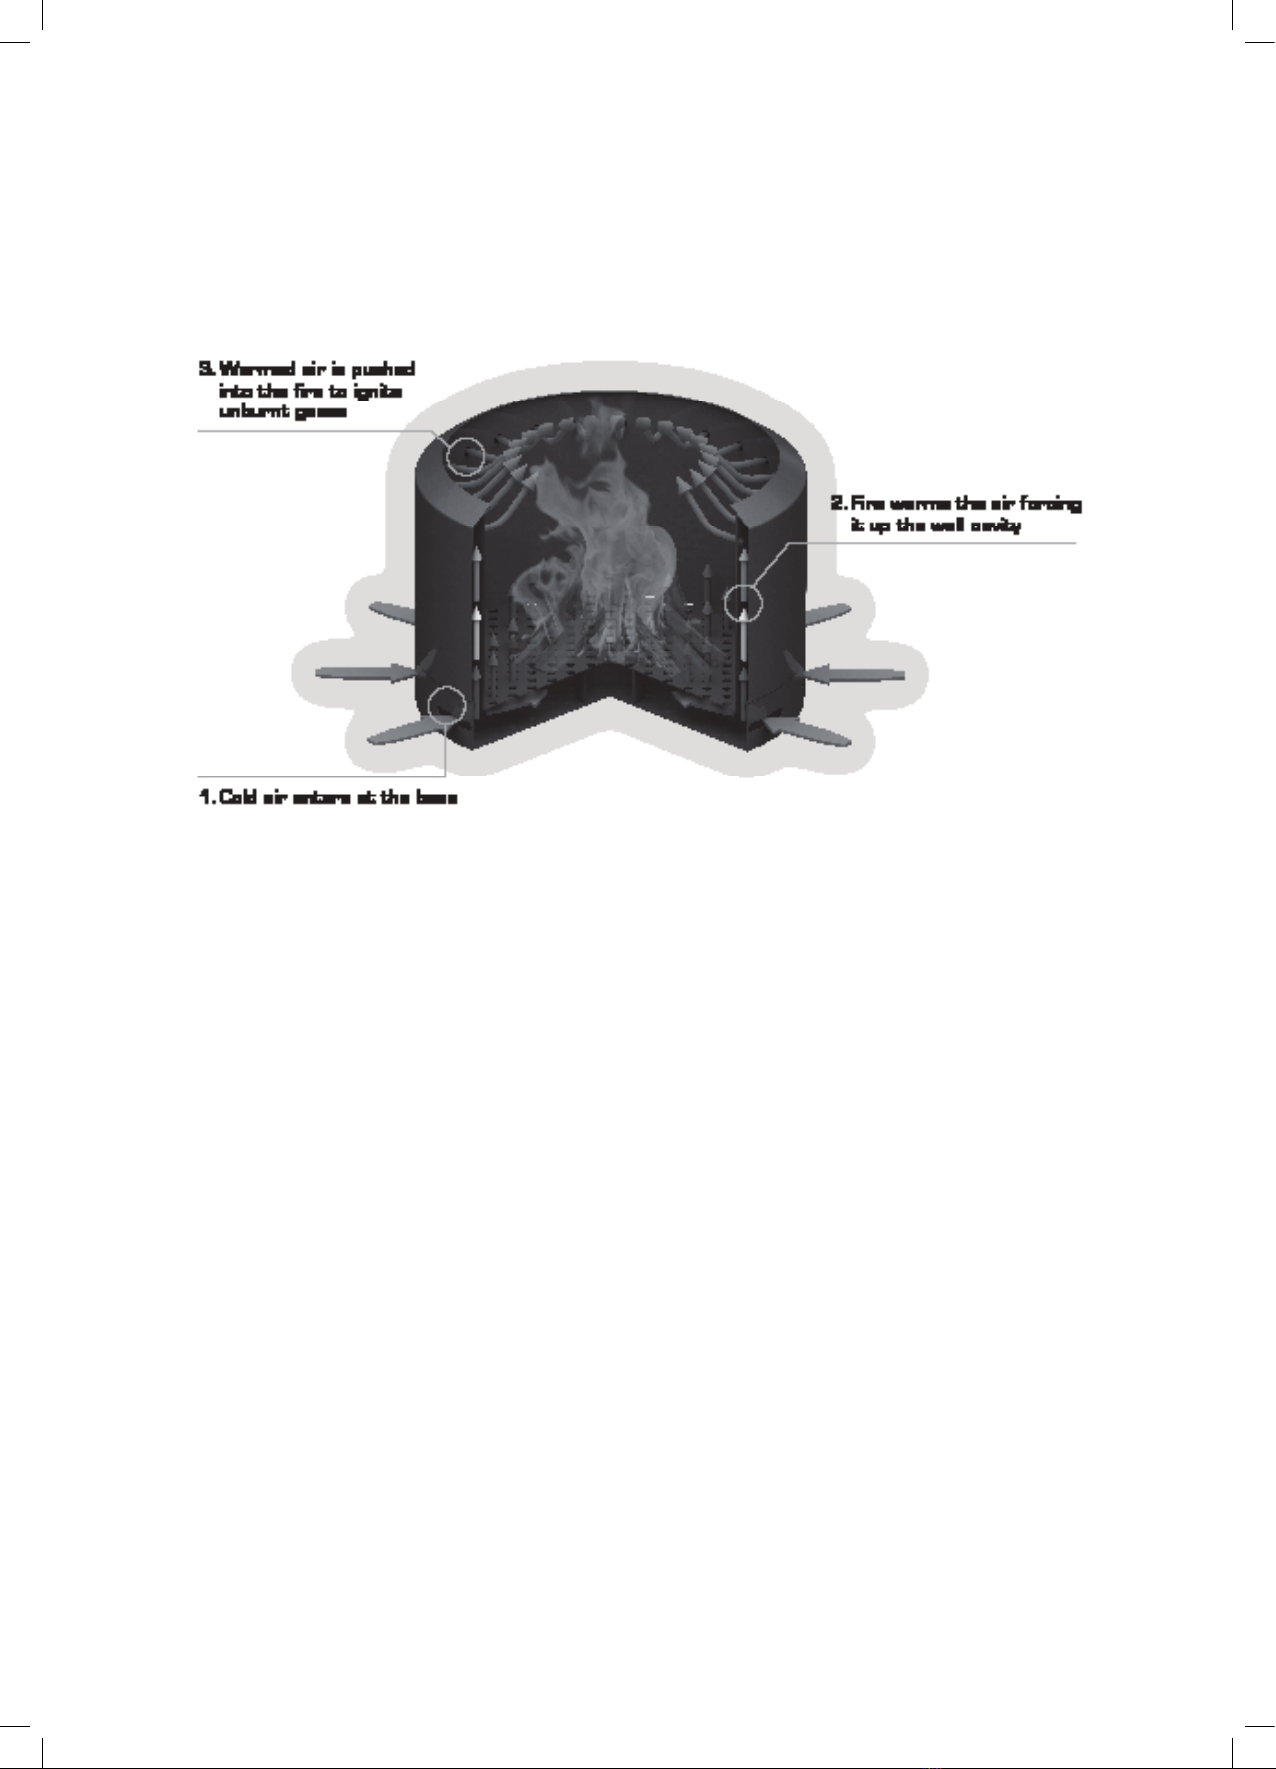
HOW YOUR LOW SMOKE FIRE PIT IS DESIGNED TO WORK
• The Aura 450 and 600 Fire Pit has been designed with a dual wall, which creates a secondary burn reducing
the amount of smoke that is emitted by up to 50%*.
• As depicted in the diagram below, the Low Smoke Fire Pit works by air supply entering the re pit through the
slotted holes in the base. The secondary air ows up through the wall cavity, is heated and exits through the top
holes. Top holes allow for the hot oxygen to enter the pit, mix with the rising smoke and create a
secondary burn.
• The dual wall airow will take about 10-20 minutes to achieve a secondary burn.
• During the rst burn, you may notice a smell and excess amounts of smoke as the excess paint and residue
from production burns off.
NOTE
• The Aura 450 and 600 Fire Pit is designed to produce 50% less smoke* compared to a re pit of a
similar size.
• The Aura 450 and 600 Fire Pit will produce a cleaner burn than a standard re pit, however due to
the nature of the product, smoke will still be emitted from the re pit.
• The secondary burn function will be more effective when burning larger res.
* Produces up to 50% less smoke than a standard re pit of a similar size

Page 5
UNPACKING YOUR FIRE PIT
• Ensure carton is in the upright position before attempting to remove the re pit and components.
• Due to the weight - it is recommended that two people lift the re pit components from the carton.
• Lay carton on a level surface, place a sheet or blanket on the ground to protect the surfaces of the re pit when
handling and unpacking.
• Carefully remove re pit components from carton - ensure all components are located before disposing
of packaging.
• Remove all packaging materials from the product prior to rst use.
PARTS LIST – ALL MODELS
ASSEMBLY – ALL MODELS
STEP 1. Place Leg 2 diagonally on top of Leg 1 on a rm
and level surface, making sure they are centred and crossed
(See safety instructions regarding placement of re pits).
STEP 2. Place Tray on assembled stand, making sure the
holes on the bottom of the Tray and Legs align correctly.
Use the Bolt Sets to secure with the Allen Key Size 2.
At this stage, do not overtighten the bolts.
STEP 3. Place Metal Bowl on assembled base, making sure
the holes on the side of the Tray and Metal Bowl are aligned
correctly. Proceed to lightly secure all 3 bolts into position
before securing with Allen Key Size 1. When securing, tighten
each bolt a small amount at a time whilst moving around the
product to keep all the bolts aligned. At this stage, do not
overtighten the bolts.
1. Metal Bowl 2. Tray 3. Leg 1 4. Leg 2
5. Bolt Sets 6. Bolts for Metal Bowl 7. Allen Key Size 1 8. Allen Key Size 2

Page 6
USING YOUR FIRE PIT
IMPORTANT: BEFORE ASSEMBLING OR USING YOUR FIRE PIT FOR THE FIRST TIME
• Always position your re pit on a rm and level surface.
• Follow all operating and safety instructions in this manual prior to using your re pit for the rst time and
subsequent uses.
IMPORTANT - FUEL TYPE AND LOADING
• This re pit is designed to burn wood only.
• Do not burn coal or coal briquettes.
• The re bowl is designed to burn small logs - approx 100mm /4in in diameter
or less (as a guide) and a total fuel load not exceeding 5 KGS at any one time.
Exceeding this recommendation may damage the re bowl or re pit body.
WARNING:
• Never overload the re bowl as this will lead to a hazardous situation that
may damage the re pit components.
FIRST FIRING
When using the re pit for the rst time - always start with a small re and
allow this to run until the initial fuel load is burnt through. This will assist the
re pit materials to cure and settle.
STARTING THE FIRE
• Use a small amount of kindling and some re starters - or wadded
newspaper to get the re started.
• Once the kindling is alight, you can slowly start to add some more rewood.
• Add rewood as required - but never overload the re bowl.
EXTINGUISHING THE FIRE
Avoid using cold water to extinguish the ames as this may damage re pit.
Generally, the re should always be allowed to die out naturally. However, if
immediate shutdown of the re is required, use sand to smother the ames.
As a safety precaution, always remember that coals can remain hot and
glowing for up to a few days.
When emptying the re bowl for cleaning or maintenance, always use
a steel bucket to retain left over coals and sand.

Page 7
CARE AND MAINTENANCE
Maintaining and caring for your re pit is easy, with just a few simple steps to follow.
IMPORTANT TIPS:
• Never clean the re pit or re bowl when it is hot or still contains hot coals.
• Always allow the re pit to cool completely before cleaning or maintenance.
• Avoid using harsh chemical cleaners, sprays or highly abrasive cleaning tools.
• Do not use high pressure water blasting devices to clean the surfaces of the re pit body as this may damage
or remove the surface coating.
• Always check any cleaning product on a small area of the underside of the product to conrm it is safe to use.
AFTER EACH USE
• Burnt wood and ash will collect in the tray. To maintain uninterrupted air ow for the product to work effectively
and to avoid res igniting underneath the re bowl, the tray must be cleaned out after each use.
• When the re pit has cooled down, unsecure the re bowl from the tray by loosening the 3 bolts on the side of
the re bowl. Carefully lift off the re bowl and thoroughly clean out all the ash and burnt wood from the tray.
• Empty any debris from re bowl into a metal container or bucket.
• Gently scrub the re bowl with a sponge (or old scouring pad) with a mild detergent and warm water.
• Rinse the bowl with clean water and dry.
• Once you have cleaned the re bowl and tray, secure the bowl back onto the tray using the 3 bolts on the side.
• To maintain the look of the re bowl and protect the steel, it should be re-painted as needed, using a high
temperature paint. (Available from your retailer).
PERIODIC MAINTENANCE
• Depending on the amount of use - at least once or twice a year - the re pit and re bowl should be cleaned
according to the care and maintenance instructions supplied in these instructions.
• The re bowl should be inspected to ensure it is not cracked or split. In the event the re bowl is cracked or
split, discontinue use immediately. Contact Mayo Hardware in the event your re bowl has split or cracked.
• If your Fire Pit needs to be re-painted, it is important this can be done as soon as possible. Exposed metal
without paint will lead to the surface rusting.
STORAGE
When not in use, the re pit should be protected from long term exposure to the elements: e.g. Sun, Wind, Rain.
Move the re pit to a covered outdoor space or store the unit in a dry environment, for example, a garage or
suitable storage space.
The re pit should be covered to prevent exposure to moisture or dust and to prevent rusting.

Page 8
© Copyright 2022 Mayo Hardware Pty Ltd.All rights reserved.
All material within this document is protected under copyright.
No part of this document shall be reproduced for any purpose
without the express written consent of Mayo Hardware.
WARRANTY
Our goods come with guarantees that cannot be excluded under the Australian Consumer Law. You are entitled
to a replacement or refund for a major failure and for compensation for any other reasonably foreseeable loss or
damage. You are also entitled to have the goods repaired or replaced if the goods fail to be of acceptable quality
and the failure does not amount to a major failure. The benets to the consumer given by this warranty are in
addition to other rights and remedies of the consumer under the law in relation to the goods and services to which
the warranty relates.
Term
Mayo Hardware Pty Ltd warrants this Aura Fire Pit to be free from manufacturing defects for a period of
12 months commencing from the date of purchase.
Conditions
• This warranty covers manufacturer’s faults and defects only.
Items not covered by this warranty:
• Working surfaces or components (re bowl) unless it is a clear defect or manufacturing fault.
• Surface rust.
• Corrosion of the metal re bowl as a result of exposure to rain or elements.
• Paint wearing or peeling.
• Damage caused by adverse weather conditions, fair wear and tear, accidents, misuse, negligence, re, ood,
hail, earthquakes or other natural disasters.
• Alternations or repairs undertaken by an unauthorised service person.
• Damage to third party property.
• This warranty does not extend to commercial use of the product.
If a defect occurs during the warranty period and you wish to obtain a replacement, please forward to Mayo
Hardware Pty Ltd a written description and photographs of the claimed defect, and a copy of the original receipt
or proof of purchase. Full documentation must be provided within 28 days of the occurrence that leads to a claim.
Any expenses incurred by the consumer in making the warranty claim are at the cost of the consumer.
Mayo Hardware Pty Ltd reserves the right to determine manufacturing faults at their discretion. In the interests
of ongoing product development and improvement the manufacturer reserves the right to discontinue or change
specications or designs at any time without notice and without incurring obligations.
For warranty or technical support, please call Mayo Hardware Pty Ltd.
REGISTER YOUR FIRE PIT
Register your re pit for warranty
We recommend you register your Aura Fire Pit to make it easier for you in
the event you ever have any warranty claims.
To register your warranty please scan the QR code to be taken to our online
registration page.
We recommend you register your Aura Fire Pit for potential warranty claims.
Made in China exclusively for Mayo Hardware PTY LTD
4 Secombe Place, Moorebank NSW 2170 Australia
AU Customer Service: 1300 360 211
NZ Customer Service: 09 415 6240
heating@mayohardware.com.au
This manual suits for next models
1
Table of contents
Popular Outdoor Fireplace manuals by other brands


Blumfeldt
Blumfeldt Catania 10032140 owner's manual

Hotpod
Hotpod Unlimited instruction manual

Astonica
Astonica 40104202 instruction manual

Hearth and Home Technologies
Hearth and Home Technologies TWILIGHT-II-B owner's manual

Firegear
Firegear LOF-4214HMT-N Installation and operating instructions

A.R.T. Furniture
A.R.T. Furniture 933460-4224TP Assembly instructions