manuals.online logo
Brands
  1. Home
  2. •
  3. Brands
  4. •
  5. AUS
  6. •
  7. Drill
  8. •
  9. AUS AUS-125-GHD User manual

AUS AUS-125-GHD User manual

Popular Drill manuals by other brands

Makita BDF456 instruction manual

Makita

Makita BDF456 instruction manual

Black & Decker LDX220 instruction manual

Black & Decker

Black & Decker LDX220 instruction manual

Hitachi DH 40MA Handling instructions

Hitachi

Hitachi DH 40MA Handling instructions

Challenge JO Instructions and parts manual

Challenge

Challenge JO Instructions and parts manual

Makita LXFD01 instruction manual

Makita

Makita LXFD01 instruction manual

Festool T18+3 instructions

Festool

Festool T18+3 instructions

Milwaukee M12 FPDX-202X Original instructions

Milwaukee

Milwaukee M12 FPDX-202X Original instructions

EINHELL TE-RH 32 E operating instructions

EINHELL

EINHELL TE-RH 32 E operating instructions

Makita DHP484 instruction manual

Makita

Makita DHP484 instruction manual

Makita FD05 instruction manual

Makita

Makita FD05 instruction manual

Bosch PSB 530 RA operating instructions

Bosch

Bosch PSB 530 RA operating instructions

Maximum 054-1359-4 instruction manual

Maximum

Maximum 054-1359-4 instruction manual

Makita HP332D instruction manual

Makita

Makita HP332D instruction manual

Raider RDP-HD31H user manual

Raider

Raider RDP-HD31H user manual

Bort BPM-1400x2 manual

Bort

Bort BPM-1400x2 manual

Black & Decker 7266 owner's manual

Black & Decker

Black & Decker 7266 owner's manual

Bosch GSB 19-2 RE Original instructions

Bosch

Bosch GSB 19-2 RE Original instructions

Bosch GSB 21-2 Original instructions

Bosch

Bosch GSB 21-2 Original instructions

manuals.online logo
manuals.online logoBrands
  • About & Mission
  • Contact us
  • Privacy Policy
  • Terms and Conditions

Copyright 2025 Manuals.Online. All Rights Reserved.

GAS HAMMER DRILL
MOD: AUS-125-GHD
Handling Instructions
CAUTION:
Read through carefully and understand these instructions before use.
Technical Specifications:
Product Elements:
Drive Motor
Displacement (ml)
Engine Max Power/Speed
(kw/r/min)
Fuel Type Petrol/oil
Percussion Rate (1/min)
Rotary Hammer Speed (r/min)
Tank Capacity (L)
Max Drill Dia. (mm)
Lubricant Requirement
Net Weight
2-Stroke Petrol Engine (1E34F-F)
25.6
0.7 / 7500
30:1
4400
800
0.6
11/8
JASO FC / API1TC/ISO-LEGC2T1.LUBRICANT OIL
13 lbs.
The numbering of the machine elements refers to the illustration of the machine on the
graphic page.
1
2
3
4
5
6
7
8
9
10
11
12
13
14
15
16
17
18
19
20
21
13mm quick - change key-less chuck (PRH30QCC use only)
SDS - plus chuck (PRH30QCC use only)
Tool Holder
Protective Cap
Protection Sleeve
Locking Ring
Winged Screw
Depth Guage
Spark Plug
Anti-Heated Shield
Shift Lever
Starter Handle
Cleaner Outer Cover
Red Button
Slector Knob
Auxiliary Handle
Choke Lever
Carburetor
Priming Bulb
Handle
Push Botton Switch
2
Labels
1. Thermal Risk Warning Label
2. Eye Protection Label
3. Instruction Manual Label
4. Earplug Label
5. Model Label with Trademark and Manufacturer's address
6. Fireproof Label
7. Information Label (see technical specification)
8. Gasoline with Mixture of Lubricant Oil
3
Noise / Vibration:
Description of Components:
Safety Instructions:
Applications:
DECLARED SINGLE NUMBER NOISE EMISSION VALUES in accordance with ISO4871
A-Weighted sound power level,L in decibels 106.1 dB(A)
A-Weighted emmission sound pressure level L at the operator's position, in decibels. 96.1 dB(A)
Values determined according to noise test code given in ISO 15744, using the basic standard ISO 3744
DECLARED Vibration EMISSION VALUES in accordance with EN 12096
Measured vibration emission value a: 20.0m/s
Uncertainly K: 0.95m/s
Value determined according to EN 28662-3
For breaking concrete and asphalt as well as rubble-laden ground, for demolishing
concrete, masonry and similar building materials (undisturbed and frozen ground)
etc., for ripping up roads and concrete, asphalt, tar as well as wood-block and
stone paving, for cutting off clay, loam, turf and salts, for breaking compacted or
tamped ground, for ramming in posts and earth rods.
The engine, which is flanged to the crankcase and is held in place by 3 screws,
drives the percussion system over a gear transmission and a connecting rod. The
engine torque is transmitted by means of a centrifugal clutch.
The centrifugal clutch interrupts the flow of the percussion system at low engine
speeds, thus allowing for a perfect idling of the engine.
The engine can be switched off with the stop button or the fuel tap.
The drive engine works according to the 2-stroke principle, and is started
mechanically by means of a recoil starter. The engine is air cooled and the air
is necessary for combustion is directed through the air filter.
For Your Safety
Working safely with this machine is possible only when the operating
and safety information are read completely and the instruction contained
therein are strictly followed.
Before using for the first time, ask for a practical demonstration.
Wear ear protection to prevent damage to your hearing.
Wear safety glasses and sturdy shoes. For long hair, wear hair protection.
Work only with close-fitting clothes.
4
1. General
1.1 Drilling and breaking hammers may only be operated by persons
who:
Are at least 18 years of age,
Are physically and mentally fit for this job,
Have been instructed in operating drilling and breaking hammers
and proven their ability for the job to the employer, May be
expected to carry out the job they are charged with carefully.
1.2 Drilling and breaking hammers are to be applied for their proper use.
Both the manufacturer's operating instructions and these safety instructions
have to be observed.
1.3 The persons charged with the operation of these hammers have to be
made familiar with the necessary safety measures relating to the machine.
In case of extraordinary uses, the employer shall give the necessary
additional instructions.
2. Operation
2.1 The function of operation levers or elements is not to be influenced or
rendered ineffective.
2.2 Before going on breaks, the operator has to switch off the engine and
has to place the drilling and breaking hammers in such a manner that it
cannot turn over.
2.3 Wear safety goggles in order to avoid injuries to the eyes.
2.4 Wear ear protection to prevent damage to your hearing.
2.5 We recommend wearing suitable working gloves.
2.6 Wear safety shoes while working with drilling and breaking hammers.
2.7 Drilling and breaking hammer should not be used in the potentially
explosive at mosphere (mine)
2.8 It should not be used under water.
2.9 The ear protector is recommended for the operator during an operation
2.10 Drilling and breaking hammer are not generally insulated for coming
into contact with electric power source.
2.11 Before starting hammer make sure that it does not involve a risk of
coming into contact with electric live cables, gas mains and water pipes.
2.12 Drilling and breaking hammer shall not be used in explosive
atmosphere unless specially designed for that purpose.
2.13 The inserted tool on heavy types of drilling and breaking hammer,
e.g. rock drills, is exposed to heavy strains and can after a long period of
use break due to fatigue.
5
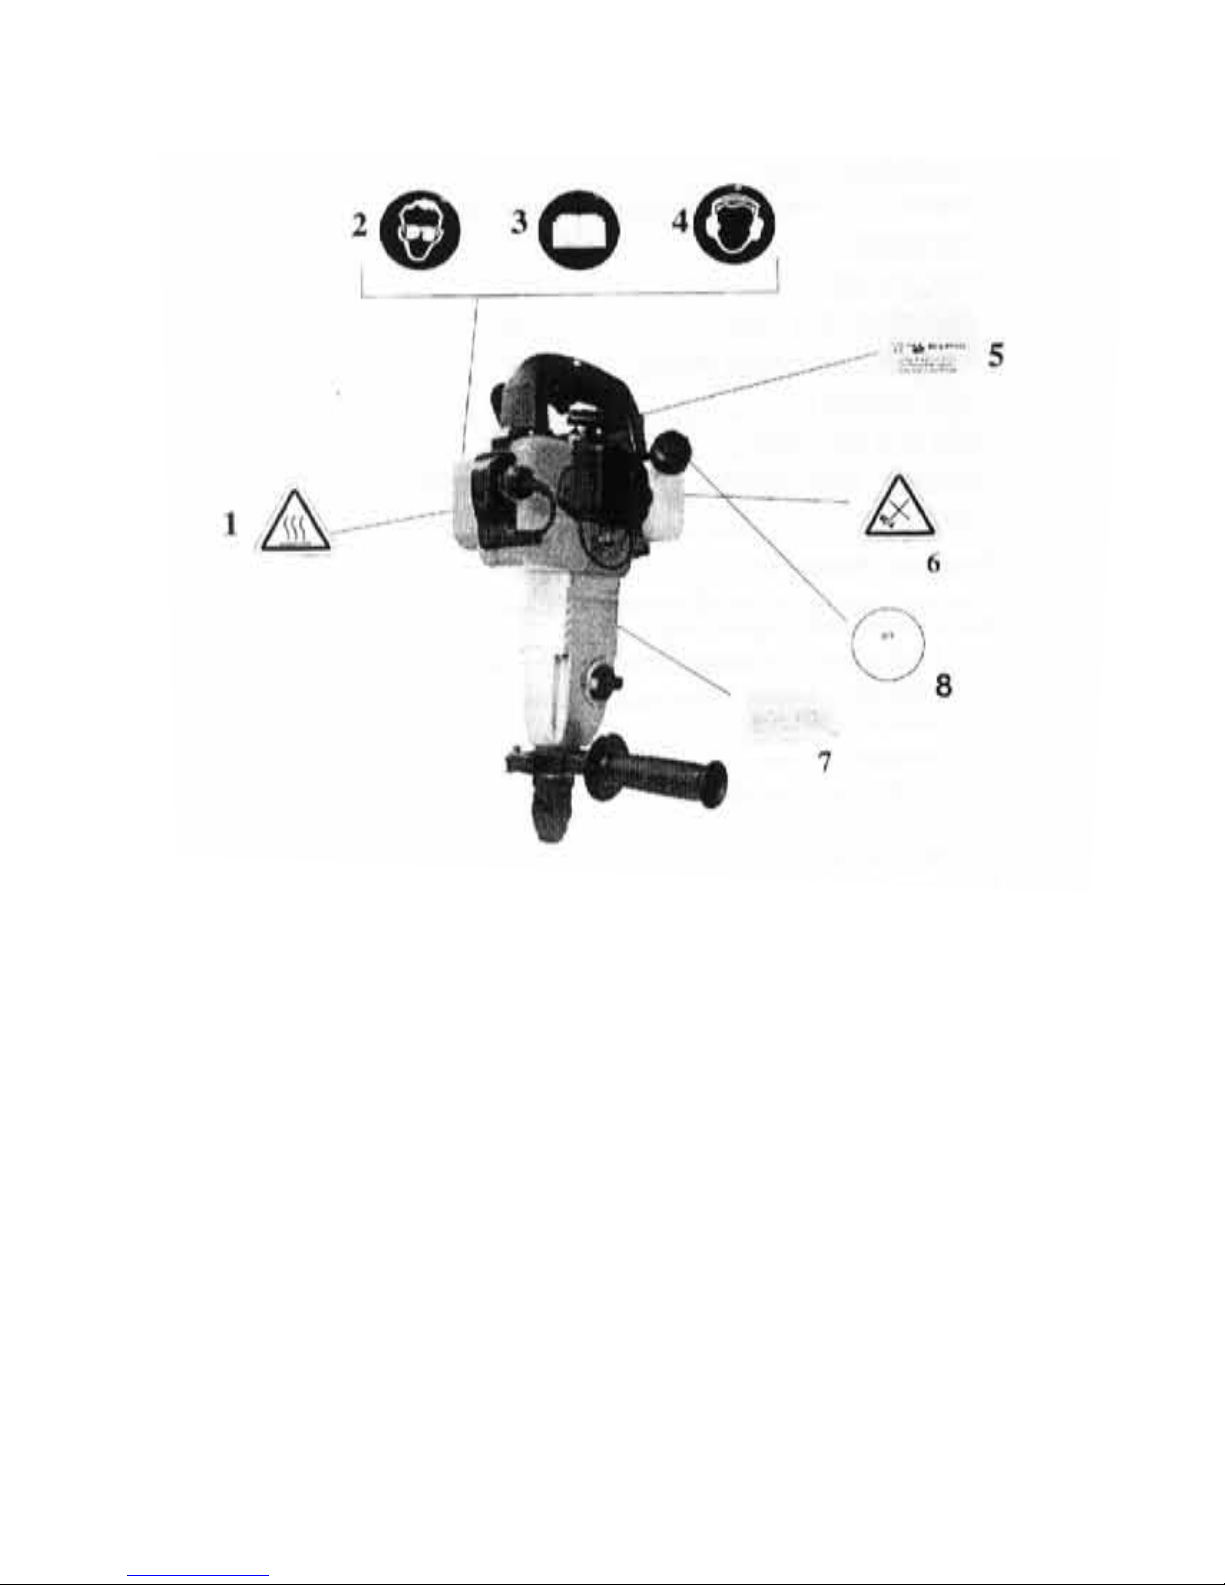
2.14 Unexpected tool movement or breakage of inserted tool may cause injuries.
2.15 Unsuitable postures may not allow counteracting of normal or unexpected
movement of the drilling and breaking hammer. A working position shall be
adopted which remains stable in the event of a break of the inserted tool.
2.16 It is recommended to use dust collection devices or water flushing where
ever appropriate.
2.17 Drilling and breaking shall be isolated from the energy source before
changing an inserted tool.
2.18 Reaction torque may occur.
2.19 If the application for which the hammer is being used may result in the
reaction torque upon the operator, a second handle shall be used. The risk of
drawing in or trapping due to the rotating inserted tool should be taken care.
2.20 The risk of fire when spillage of fuel occurs should be prevented.
2.21 No smoking when filling with fuel.
2.22 Avoiding contact of fuel and oil with the skin.
2.23 Do not use in an unventilated environment, in closed pits, where the
surrounding hinders or prevents air circulation. The use of an exhaust hose can
in many cases be recommended. Care should be taken to minimize the risk of
fuel leakage during transport.
2.24 Specification of the fuel quality (90 gasoline; Lubricant Oil FC/2T)
2.25 Empty liquid petrol gas container shall be taken care of and sent back to
the retailer.
2.26 Drilling and breaking hammers are always to be operated with both hands
and on handles provided for this purpose.
2.27 When working with drilling and breaking hammers, especially when
carrying out drilling jobs, the operator has to have a firm stand, particularly
when working on scaffolding and ladders.
2.28 Drilling and breaking hammers are to be guided such that hand injuries
caused by solid objects are avoided. When carrying out demolition jobs at
elevated places, special care is required to prevent the machine or the operator
from falling.
2.29 When breaking connecting passages, make sure that there are no electric
wires or gas pipes. No one may stay in the room to which the passage is broken
through, as there is danger of injuries because of falling stones or tools.
2.30 During operation the tool holder must be closed. Tools and tool holder
must be checked for wear in order to guarantee proper functioning of holder.
2.31 The operation of this machine may cause broken-off pieces to be flung
away. Therefore, during operation, no one except the operator is to come near
this machine.
2.32 Switch off the engine of drilling and breaking hammers before changing
tools.
6
2.33 The tools always have to be in perfect conditions.
2.34 Do not smoke or handle open fire near this machine.
2.35 The tank lid must fit tightly. Shut fuel cock if available when stopping the
engine. For long distance transports of machines operated by fuel or fuel-
mixtures, the fuel tank has to be drained completely.
2.36 Stop engine before filling fuel tank. When refilling fuel tank, do not allow
fuel to come into contact with the hot parts of the engine or spill onto the
ground.
2.37 Make sure that sufficient fresh air is available when operating drilling and
breaking hammers with combustion engines in enclosed areas, tunnels, adits,
and deep trenches. For this particular use we offer drilling and breaking
hammers with elect rive drive.
2.38 Do not operate this machine in areas where explosions may occur.
2.39 Changing the tool (SDS-plus)
note: It is a characteristic of the system that the SDS-plus tool moves freely.
This produces a radial eccentricity when the machine is running at no-load
speed. This does not affect the accuracy of the drilled hole as the bit is
automatically centered during drilling. The tool holder is maintenance-free. The
dust cap prevents drilling dust from entering the machine during operation.
Make sure that the dust cap is not damaged when inserting the tool.
2.39-1 Inserting tools:
Clean and lightly grease tool shank before inserting. Twist the tool into the tool
holder and push it in until it engages. The tool shank locks in position
automatically. Pull the tool to check if it is locked correctly.
2.39-2 Removing the tool:
Push back the locking sleeve of the tool holder and remove the tool.
7
2.40 Mode Selector Knob:
The mode selector knob may be set only when the machine is switched off.
Press the release button on the mode selector knob and move the knob to the
desired position.
2.41 Removing the Replacement Drill Chuck:
(Fig.1) A
Danger of injury! Before removing the replacement drill chuck, always remove
the tool or bit.
Grasp the locking ring 6 of the SDS- plus replacement drill chuck and pull
forcefully in the direction of the arrow. The replacement drill chuck comes off.
Attaching the Replacement Drill Chuck
For drilling in steel or wood, for driving screws and cutting threads.
For hammer drilling in concrete and stone.
For adjusting the chiseling position(Vario-Lock)
For Chiseling
8
(Fig.2)B
Grasp the quick clamping replacement drill chuck with the whole hand. Place it
with a twisting motion on the chuck holder until it can clearly be heard to latch.
The replacement drill chuck locks itself. check locking by pulling on the
replacement drill chuck. Make replacement in a corresponding manner.
3 Safety Checks:
3.1 Drilling and breaking hammers may only be operated with all safety devices
installed.
3.2 Before starting operation, the operator has to check that all control and
safety devices function properly.
3.3 Before starting operation, the overload clutch of drilling hammers has to be
checked for proper functioning.
3.4 In case of defects of the safety devices or other defects reducing the
operational safety of the drilling and breaking hammers, the supervisor has to be
informed immediately.
4 Maintenance:
4.1 Only use original spare parts. Modifications to this machine, including the
adjustment of the maximum engine speed set by the manufacturer, are subject to
the express approval of HUASHENG. In case of nonobservance all liabilities
shall be refused.
4.2 Stop engine and pull off spark plug cap (if available) before carrying out
maintenance jobs, to avoid unintentional starting of the machine. Deviations
from this are only allowed if the maintenance job requires a running engine.
Warning: Take care when checking the ignition system. The electronic
ignition system produces a very high voltage.
5 Transport:
When being transported on vehicles, precautions have to be taken that these
hammers do not slip or turn over.
Please also observe the corresponding rules and regulations valid in your
country.
Preparation before start:
1. Read safety instructions at the beginning of this manual.
2. For new or long storage machines, oil sealed in the cylinder must be removed
first. The removing method: Take off the spark plug, use the lift thumb to stop
the spark plug hole and pull the starter with strength to spray the oil out.
9
10
3. Check the sparks of the spark plug. Normally the sparks should be blue.
4. Check if the air cleaner is clean. Dirty air cleaner will influence the volume of
incoming air that can cause the bad performance of the engine.
Start:
1. Adding fuel This gasoline engine is the type of single-cylinder and two-
stroke. The fuel is the mixture of NO. 90 gasoline and two-stroke automobile oil
that cannot be replaced by any other kind. The ratio between gasoline and oil is
25-30 :1. One fuel adding bottle is supplied.
It has scales for the conveyance.
2. Regulate the choke to close
position in winter and at the first
time to full open position when
the engine is hot. (Fig. 3)
Pull the starter lightly for 3-5
times to make the fuel into the
cylinder. Then pull it fast to start
the engine. Note: After start, the
start rope should be contracted
back slowly with hand's help. If
the rope contracts back fast, it may cause damage of the starter. After start, put
the choker slowly to full open position. Regulate the fuel handle to a proper
position to run at low speed for 3.5 minutes, and then make the machine
working. New machine should not work at full open position within the first 4
hours, thus enabling the engine to have a good match and do reliable job.
Stop of Engine:
Move the throttle lever to the slow speed position, and operate the engine for its
cooling at time 2 or 3 minutes.
Keep pressing the stop button until the engine stops completely.
The sudden stoppage of the engine during high-speed operation may cause the
engine trouble; therefore, avoid it except for the emergency case.